SmartLock YL-73 User manual

YL-73 Smart Lock Cylinder User's Manual
English / Deutsche
Thank you for choosing YL-73 smart lock cylinder
Please read the manual carefully before using it
Please keep user's manual properly for future reference

1. Included in the box...............................................................................2
2. Product features ..................................................................................2
3. Technical specification .........................................................................4
4. Installation instructions.....................................................................4
5. Restoring factory settings.....................................................................6
6. User settings .......................................................................................6
7. Troubleshooting ...................................................................................9
8. Daily maintenance............................................................................13
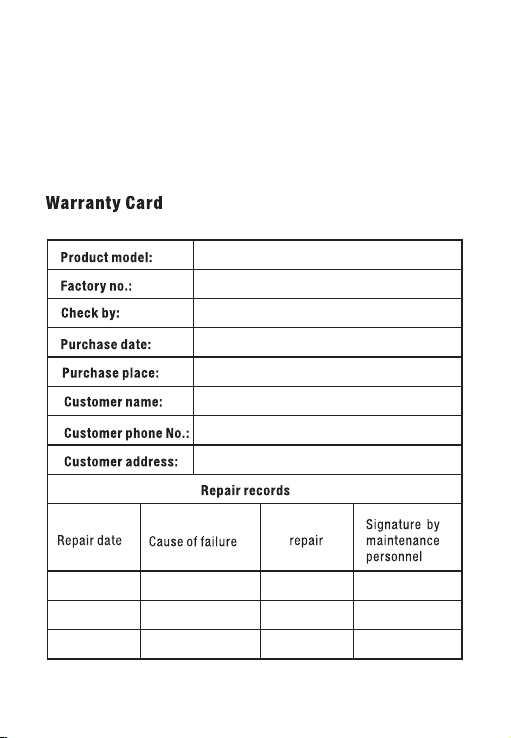
9. Warranty Card ...................................................................................13
CATALOGUE
1

1. Included in the box
NO
Smart lock cylinder YL-73 (Fingerprint +Phone App+
keypad password)
1
2
3
4
Magnetic key
Hexagon screwdriver
User manual
1
2
1
1
2. Product features
Description Quantity
2

3
Open With: Support Fingerprint, Phone App, Keypad Password, Mechanical key.
App: eSmartLock , support Android and iOS phone.
Wrong Password Locked: Entering the wrong Password 5 times in 1 min, the
system will automatically lock for 3 mins to prevent random Password.
Fingerprint Algorithm: Aadopting fingerprint algorithm to eliminate false fingerprints
and residual fingerprints.
360 Degrees Automatic Recognition: Pressing the correctly registered fingerprint
at any angle on the module, the lock can effectively identify.
Self-learning: During fingerprint identification process, the lock will automatically
update the fingerprint database.
Wakeup mode: Wakeup by fingerprint sensor or keyboard.
Backlight flicker: Enter the corresponding number and flash the relative backlight
LED.
Voice Guide: Provide clear voice prompts for user operations.
Fake Password Mode: You can add any numbers (up to Max 32 keys) before and
after the effective Password when you are concerned about your Password being
accidentally exposed.
Vacation Mode: Set the Vacation mode to keep the door closed and the normal user
accounts are unable to unlock.
Low-power Consumption Design: The use of imported low-power energy-saving
master control and major electronic components, high consumption and durability,
strong anti-interference.
Low Voltage Alarm: When the operation is successful, the voice prompts the voltage
to be low and accompanies the status light prompt.
Emergency Power Supply: If the battery is not replaced in time, plug in 5V micro
USB power supplyat the top interface can be used to open the lock.
Antistatic Strong: Contact discharge ±8kv, air discharge ±15kv.
Product Features:

4.1 Confirmation before installation
1) Door material: Security door, gate, wooden door, glass door.
2) Door thickness: 60mm/70mm/80mm (The door thickness less than 60mm/70mm/
80mm can also be installed, but some parts of the lock core will be exposed, not
beautiful, if it exceeds 60mm, it can't be installed).
Note: 60mm/70mm/80mm is the total thickness of the door and the original lock's
front and rear panels.
If the key hole is too close to the door frame, it cannot be installed.
NO
1
2
3
4
5
6
7
8
9
10
11
12
13
14
15
16
17
18
Model
Basic function
Type of finger print sensor
Fingerprint capacity
App user
False recognition rate
Rejection rate
Contrast speed
Code button
Code capacity
Key press resistance
Voice hint
Power supply
Urgent power supply
Low pressure alarm
Working currency
Quiescent currency
Working temperature
YL-73
Fingerprints, Phone App, Keypad Password, Mechanical Keys
Semiconductor module
100 fingerprints
1 Administrators and 500+ authorized users
<0.001%
<1%
1:N<7s/fingerprint
12 keys, Capacitive Touch button, LED Backlight
32 Sets of 6-digit Passwords
100000 times
English
3pcs AAA Alkaline battery (Please use authentic alkaline batteries)
5V Micro USB port
3.6V±0.2
125mA (Max)
22uA
-20----45℃
3.Technical Specification
Item specification
4.Installation instructions
4

4.2 Product installation drawing
1. Install 3 pcs AAA alkaline batteries with the correct positive and negative electrodes
(Figure①).
2. Insert the smart cylinder from outside and adjust the position properly (Figure②).
3. Install the screw through the fixed core screw hole on the side of the cylinder
(Figure ③).
4. Install the rear handle from inside, adjusting the position and tighten the screw
(Figure④,⑤).
4.3 Check after the installation
1.Check whether the rear and front handle is smooth, and whether the key can open
the lock latch, otherwise loosen the screws, fine-tune the handle, and tighten the
screws until the latch move freely.
2.Power on check if the lock cylinder work normal.
3. Please follow the voice prompts to register your administrator account.
①
5

6
5.1 Factory default
The factory default is set to user experience mode,
Password (123456) and any fingerprint can unlocked.
Notes:
1.First time use, please bind the app first.
2. When the first user account is registered successfully, the user experience mode
is cancelled.
3. When binding the app for the first time, you need to enter the lock's default
password 123456. If you choose to enter a new password, please remember it, which
is the administrator's keypad password.
5.2 Factory reset
1. Log in to esmartlock app with the administrator account, unbind/delete the lock,
factory reset success.
2. If the administrator's keypad password or fingerprint is registered in factory mode,
please read (6.2.6)
5.3 Administrator and general users
1. For new users, please set the App binding lock first. When connecting, you need to
enter the lock's default password 123456. If you choose to enter a new password,
please remember this password, which is the administrator's keypad password.
2. Administrator fingerprint setting, enter the keyboard setting menu (read 6.1.1
Registering the administrator user) via the password set by the previous step.
3. Genneral user setting, general users' fingerprints and keyboard passwords can be
set through the App, or you can enter the keypad menu to set according to the voice
prompts.
6 User settings
6.1 App setting
NOTE: First time use, please bind the app first.
Before using this lock for the first time, please log in to the App “eSmartLock” to
register the account and bind it, and then register the administrator's administrator's
keypad password through the App. If the administrator's keypad password or
administrator fingerprint is registered in factory mode, the App will not be able to use.
* To restore App function, it needs to restore the factory mode and re-bind.
5.Restoring factory settings
correct correct correct correct
wrong wrong wrong wrong wrong
Fingerprint pattern

7
6.1.1 App Installation
Search “eSmartLock” From Google Play (Android)/App Store (iOS) and install it to
smart phone.
6.1.2 Register & Log in
Log in eSmartLock by registered account. (Fig. 1-2)
Fig. 2Fig. 1
6.1.3 App Permission Settings
1.It's connected via BT, so BT of smart phone should be turned on (Fig. 3)
2.In order to use BT properly it needs to obtain location permission for Android phone
6.1.4 Add Smart Lock
1. When to add smart lock to the App. It should keep smart lock in working status.
Touch the fingerprint/touch sensor of smart lock and blue light flashes
2. When the blue light starts to flash, click "+" in the upper right corner of APP and
enter “Add device", the scanned smart lock will be displayed in the list. Click the smart
lock to be added in the list, to complete the device addition. (Fig. 4 - 6)

Fig. 3 Fig. 4 Fig. 6Fig. 5
6.1.5 Connect Smart Lock
1. When to connect smart lock to the App. It should keep smart lock in working status.
Touch the touch sensor of smart lock and blue light flashes
2. BT connection: When blue light is flashing, click "Connect" on the main interface of
APP. After the connection is successful, the blue light stays on. Please note that smart
lock will go to sleep mode and BT is disconnected automatically when there is no
operation for 1 minute.
6.1.6 Authorization management
1. You can add sub-accounts through "Account Sharing" or "Scan QR Code to Share".
Scan account is that other accounts scan to add smart lock by connecting to BT, and
be added to the unauthorized list automatically. (Fig. 7)
2. Authorize the unlocking period of the sub-account/scan account (Fig. 8) . Click the
time to set the schedule (Fig. 9).
3. Delete authorized user, click the "X" to the right to delete the user.
8
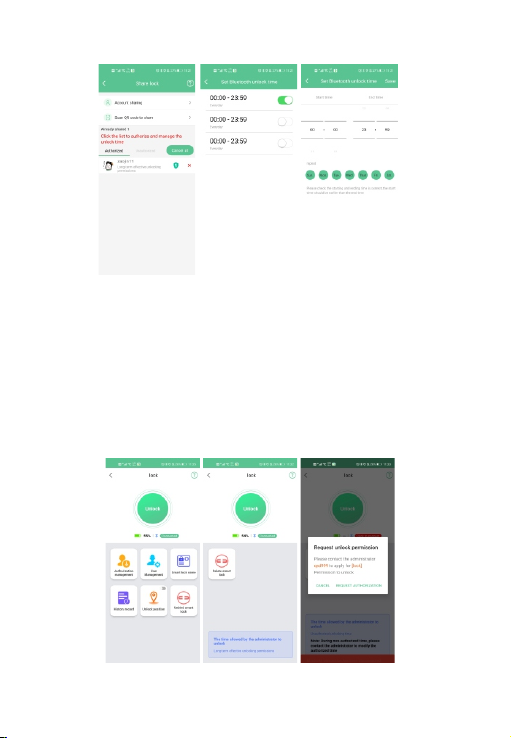
Fig. 10 Fig. 11 Fig. 12
6.1.7 Unlock Method
1. APP connect with smart lock: Please read "E. Connect smart lock” instruction.
2. Unlock by Admin account: Click the "Unlock" button to unlock the smart lock directly
(Fig. 10).
3. Unlock by authorized accountt:
<a> Click “Unlock" in permission period (Fig. 11).
<b> If it is not within the unlocking period, you need to request the administrator
account to authorize the time to unlock (Fig. 12).
4. Unlock by fingerprint: Press fingerprint sensor by the registered fingerprint.
( Please read "I. Fingerprint Management” instruction.)
Fig. 7 Fig. 8 Fig. 9
9

6.1.8 Unlock Record
1. APP connect with smart lock: Please read "E. Connect smart lock” instruction
2. Check unlock record:
<a> Click "BT unlock record" to check record of user, unlock time, unlock method, etc.
(Fig. 13)
<b> Click “Fingerprint unlock Record”. It can check record of the unlock user (Fig. 14)
Fig. 13 Fig. 14
6.1.9 Fingerprint Management
A. Factory experience mode:
Press fingerprint sensor once by any fingerprint, the blue indicator light is on and
smart lock is unlocked
6.1.10 Register fingerprint
1. APP connect with smart lock: Please read "E. Connect smart lock” instruction.
2. Enter user management: After waking up the smart lock, click "user management"
to enter the fingerprint adding interface.
3. Add fingerprint: Click the "+" icon in the upper right corner of the user management
interface (Fig. 15) to enter the add fingerprint interface (Fig. 16-17).
The first 2 fingerprints added for the first time are administrator fingerprints
( ), and the subsequent fingerprints are normal user fingerprint ( ),
after successfully added (Fig. 18)
10
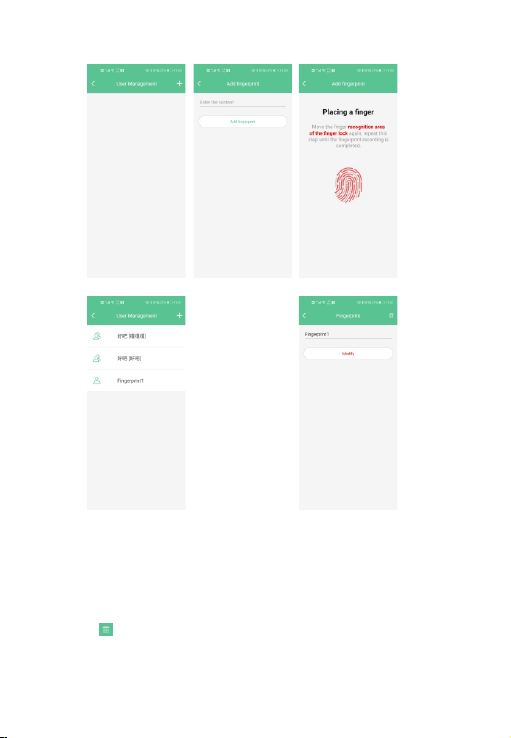
Fig. 16 Fig. 17
Fig. 18 Fig. 19
Fig. 15
6.1.11 Modify fingerprint
Enter to modify the fingerprint name (Fig. 19), after inputting the fingerprint name,
click "Modify", the modification is successful.
6.1.12 Delete fingerprint
1.The icon “ ” in the upper right corner deletes the fingerprint.
2. Delete user: Press and hold for 3 seconds /swipe left to delete the user.
11

6.2 Keypad menu management settings
6.2.1 Registering the administrator user
1. Press the number key to wake up the system and press " ", then press " ", enter
the administrator's password set on the App (read 6.1 App setting), and press " "
key to confirm.
2. According to the voice prompt, press "1" and then press " ". Register a new
administrator Password.
3. Enter the 6-digit Password for the first time and press " " to confirm.
4. Enter the Password the second time and press " " to confirm. Remember it, it's
the new administrator's keypad password .
5. Register your fingerprint according to the voice prompts.
6. Press the fingerprint for the first time.
7. Press the fingerprint a second time.
8. Press the fingerprint for the third time and the fingerprint registration is successful.
9. The administrator has successfully registered, press " " to exit system.
6.2.2 Register the general user password
1. Press the number key to wake up the system and press " ", then press " ", enter
the new administrator's keypad password (read 6.2.1) and press " " key to confirm.
2. According to the voice prompt, press “2” and then press " " according to the voice
prompt. Register a new general user Password.
3. Enter the 6-digit Password for the first time and press " " to confirm.
4. Enter the Password the second time and press " " to confirm.
5. The general user password is successfully registered, press " "to exit the system.
6.2.3 Register the general user fingerprint
1. Press the number key to wake up the system and press " ", then press " ", enter
the administrator's keypad password and press " " key to confirm.
2. According to the voice prompt, press "2" and then press " ". Register a new
general user fingerprint.
3. Press the fingerprint for the first time.
4. Press the fingerprint a second time.
5. Press the fingerprint for the third time and the fingerprint registration is successful.
6.The genneral user fingerprint is successfully registered, press " " to exit the system.
6.2.4 Delete the all general users
1. Press the number key to wake up the system and press " ", then press " ", enter
the administrator's keypad password and press " " key to confirm.
12

13
2. Press "3" and then press " ". Delete all normal users' fingerprint and Password.
3.Press " "to exit the system.
6.2.5 Vacation mode
1. Press the number key to wake up the system and press " ", then press " ",
enter the administrator's keypad password and press " " key to confirm.
2. Press " 4 ", the vacation mode activated successfully.
6.2.6 Factory reset
1. Press the number key to wake up the system and press " ", then press " ",
enter the administrator's keypad password and press " " key to confirm.
2. According to the voice prompt, press "5" and then press " " to restore the factory
settings successfully.
3. Press " " to exit the system.
7 Troubleshooting
1.The fingerprint can not be logged:
A.If the fingerprint is damaged or unclear, you can change another finger with clear
fingerprint.
B.Fingerprint verification failed:
A.If the user's fingerprint is not registered, it can not be verified.
B.Please confirm that the fingerprints are properly placed in the sensing area.
3.The smartlock is not work:
A.Check if the battery is exhausted.
4.The lock cylinder was successfully unlocked, but the door did not open.
A.This product is a lock cylinder, after unlocking, you need to turn the handle to open
the door.
5. Can it be used outdoors?
A. Not waterproof, water will seep in, causing a short circuit on the circuit board,
please use it indoors.
8 Daily maintenance
1.Please use the high quality 7th AAA alkaline battery, and replace the new battery
when the voice prompts low voltage or the indicator is red.
2.Please do not touch the corrosive material on the surface of the panel and the lock
body. It will destroy the electroplating layer, affect the surface gloss.
3.The door handle is the important part of the lock. Please do not hang anything on
the door handle.
4.If the fingerprint sensing area has dirt or dust, it may affect the normal use, clean it
with a soft cloth.
5.When entering a fingerprint, pleas press appropriately with your fingers, do not
press too hard.
6.Please do not hit or scratch the shell with hard objects to protect the surface coating.
7.Please do not use the liquid containing alcohol, gasoline, thinner to clean the lock.
14

1. In der Box enthalten...........................................................................16
2. Produktmerkmale ..............................................................................16
3. Technische Spezifikation....................................................................18
4. Installationsanweisungen...................................................................18
5. Werkseinstellungen wiederherstellen.................................................20
6. Benutzereinstellungen........................................................................20
7. Fehlerbehebung.................................................................................28
8. Tägliche Wartung...............................................................................29
9. Garantiekarte....................................................................................30
KATALOG
15

1. In der Box enthalten
Nummer
Quantität
Schließzylinder YL-73 (Fingerabdruck + Phone App +
Tastaturpasswort)
1
2
3
4
Magnetschlüssel
sechseck schraubenzieher
Benutzerhandbuch
1
2
1
1
2. Produktmerkmale
Hinterer Griff
Das Schloss wählt
Zifferntastatur
Front griff aus Edelstahl
Festes Schraubenloch
Fixiertes Kern schraubenloch
Festes Schraubenloch
Beschreibung
16

Produktmerkmale:
Falsches Passwort gesperrt: Wenn Sie das falsche Passwort 5 Mal in 1 Minute
eingeben, wird das System automatisch für 3 Minuten gesperrt, um ein zufälliges
Passwort zu verhindern.
Fingerabdruckalgorithmus: Ein Fingerabdruckalgorithmus wird verwendet, um
falsche Fingerabdrücke und verbleibende Fingerabdrücke zu eliminieren.
Weckmodus: Wecken per Fingerabdrucksensor oder Tastatur.
Fake-Passwort-Modus: Sie können beliebige Zahlen (bis zu maximal 32 Tasten) vor
und nach dem effektiven Passwort hinzufügen, wenn Sie befürchten, dass Ihr
Passwort versehentlich offengelegt wird.
Urlaubsmodus: Stellen Sie den Urlaubsmodus so ein, dass die Tür geschlossen
bleibt und die normalen Benutzerkonten nicht entsperren können.
Niederspannungsalarm: Wenn der Vorgang erfolgreich ist, weist die Stimme darauf
hin, dass die Spannung niedrig ist, und begleitet die Statuslicht-Aufforderung.
Notstromversorgung: Wenn die Batterie nicht rechtzeitig ausgetauscht wird, kann
das 5-V-Micro-USB-Netzteil an der oberen Schnittstelle angeschlossen werden, um
das Schloss zu öffnen.
17

3. Technische Spezifikation
4.1 Bestätigung vor der Installation
1) Türmaterial: Sicherheitstür, Tor, Holztür, Glastür.
2) Türstärke: 60 mm/70 mm/80 mm (Die Türstärke von weniger als 60 mm/70 mm/80
mm kann ebenfalls installiert werden, aber einige Teile des Schlosskerns werden
freigelegt, nicht schön, wenn sie 60 mm überschreitet, kann es nicht sein Eingerichtet).
Hinweis: 60 mm/70 mm/80 mm ist die Gesamtdicke der Tür und der Vorder- und
Rückwand des Originalschlosses.
Wenn das Schlüsselloch zu nahe am Türrahmen liegt, kann es nicht installiert werden.
4. Installationsanweisungen
1
2
3
4
5
6
7
8
9
10
11
12
13
14
15
16
17
Artikel
Modell
Entsperrmodus
Art des Fingerabdrucksensors
Fingerabdruckkapazität
Falsche Erkennungsrate
Ablehnungsrate
Kontrastgeschwindigkeit
Taste
Passwortkapazität
Tastaturtest
Stimme
Netzteil
Dringende Stromversorgung
Alarm bei niedrigem Druck
Arbeitswährung
Ruhestrom
Arbeitstemperatur
YL-73
Fingerabdrücke, Telefon-App, Tastaturpasswort, mechanische Schlüssel
Halbleiter modul
100 fingerabdrücke
<0.001%
<1%
1:N<7s Fingerabdrück
12 Taste, kapazitive Touch-Taste, LED-Hintergrundbeleuchtung
32 Sätze von 6-stelligen Passwörtern
100000 mal
Englisch
3 Stück AAA-Alkalibatterie (Bitte verwenden Sie authentische Alkalibatterien)
5V Micro USB
3.6V±0.2
125mA (Max)
22uA
-20----45℃
Nummer
spezifikation
18

4.2 Zeichnung zur Produktinstallation
1. Legen Sie 3 AAA-Alkalibatterien mit den korrekten positiven und negativen
Elektroden ein (Abb ①).
2. Setzen Sie den Zylinder von außen ein und passen Sie die Position ordnungsgemäß
an (Abb ②).
3. Installieren Sie die Schraube durch das feststehende Kernloch auf der Zylinderseite
(Abb ③).
4. Den hinteren Griff von innen montieren, die Position anpassen und die Schraube
festziehen (Abb ④,⑤).
4.3 Überprüfen Sie nach der Installation
1. Prüfen Sie, ob der hintere und der vordere Griff glatt sind, und ob der Schlüssel
die Schlossleiste öffnen kann, andernfalls lösen Sie die Schrauben, den Griff
feinabstimmung, und ziehen Sie die Schrauben an, bis sich die Latche frei bewegen
kann.
2. Einschalten und prüfen, ob der Schließzylinder normal funktioniert.
3. Folgen Sie den Sprachanweisungen, um Ihr Administratorkonto zu registrieren.
①
drinnen
draußen
19
Table of contents
Languages:
Other SmartLock Lock manuals

SmartLock
SmartLock PREMIER User manual

SmartLock
SmartLock S31 User manual

SmartLock
SmartLock PREMIER - 10 USERS User manual

SmartLock
SmartLock UNRD Series User manual

SmartLock
SmartLock VISION User manual

SmartLock
SmartLock LOCK-ONE User manual

SmartLock
SmartLock Q20 User manual

SmartLock
SmartLock 301 User manual

SmartLock
SmartLock PREMIER - 2 USERS User manual

SmartLock
SmartLock DEADBLOT Service manual


