SmartLock H50-TYW User manual

Special Attention:
1. Mechanical keys please keep outdoor, just in case keys lock in doors.
2. Please replace for the battery when low wattage alarm.
3. Reading this manual carefully before installation, and keep it for future reference.
User Manual
Smart Lock
H50-TYW
User Manual
1
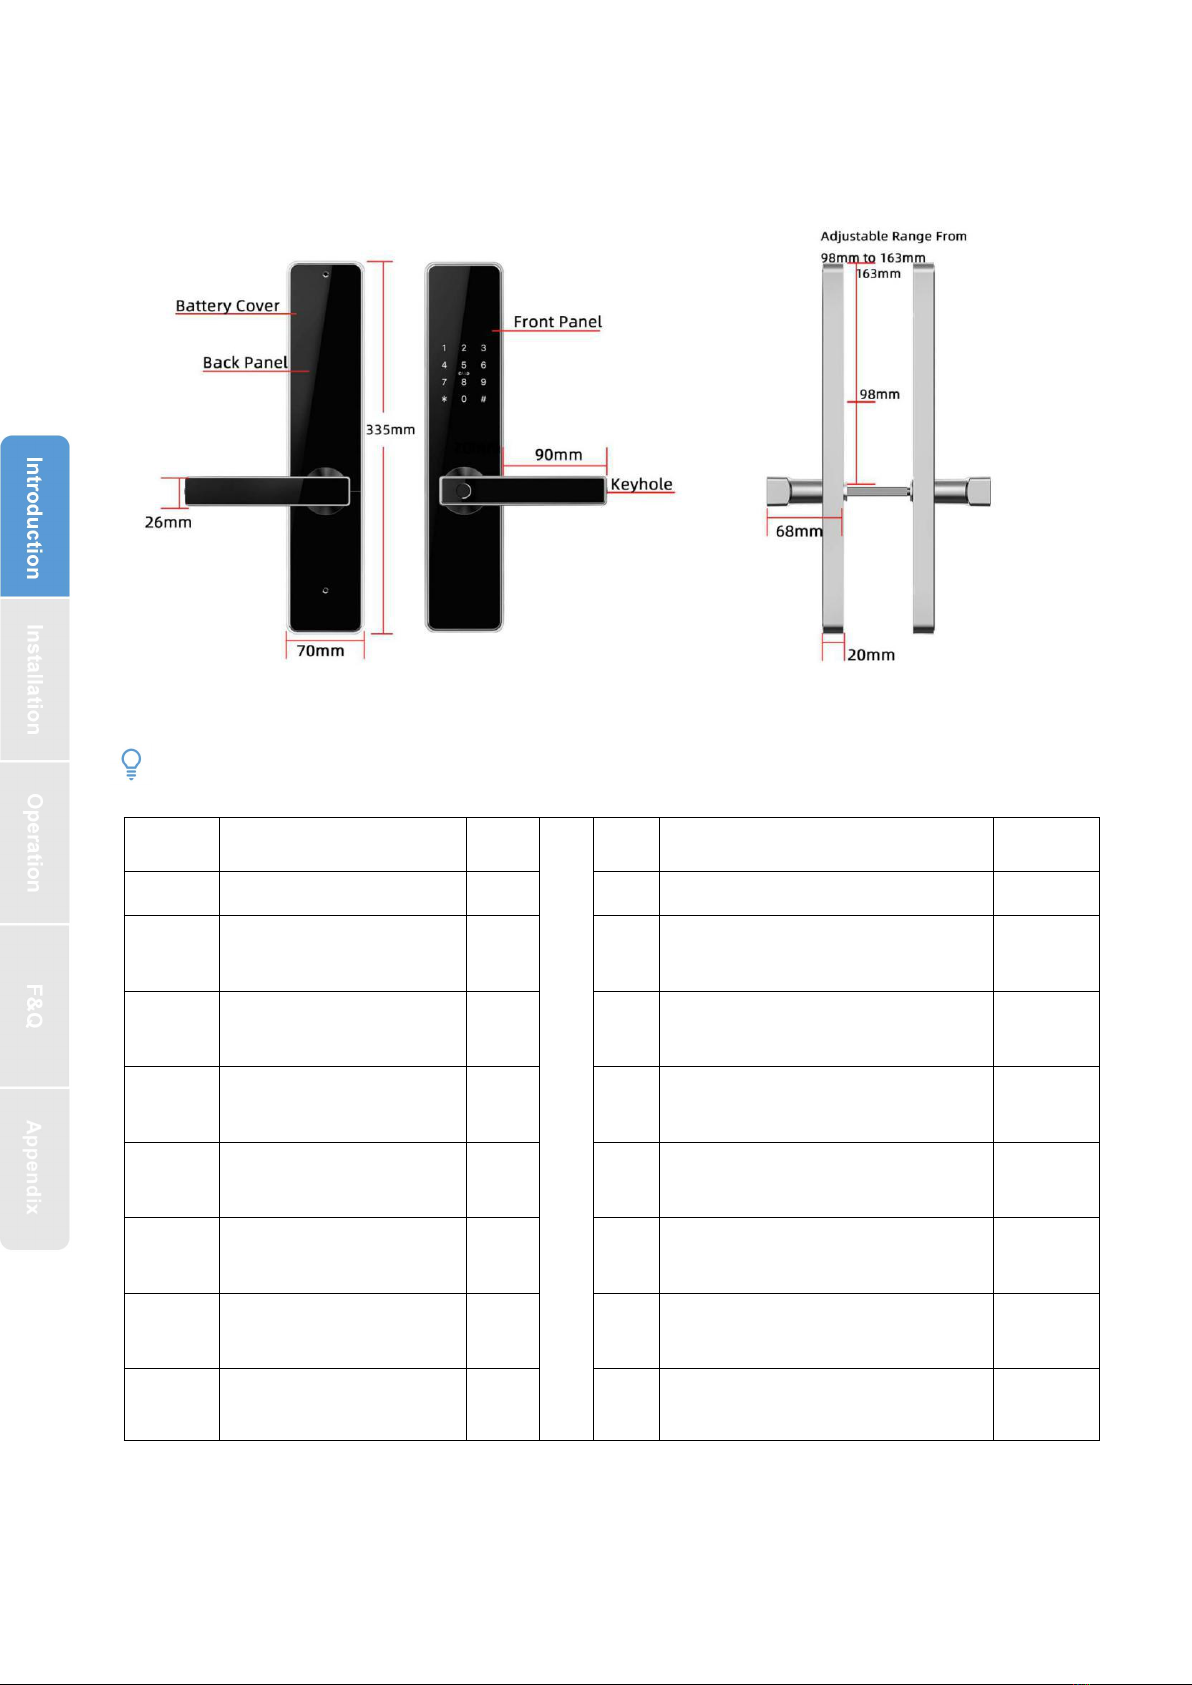
1. Introduction
1.1.Lock structure
1.2.Packing List
Check the following drawing to check whether the package contains all the parts
NO
Name
Qty
NO
Name
Qty
1
Front Pane
1
9
Sliding Screws:16*5mm
2
2
Back Panel
1
10
Mortise Screws:10*5
(For Aluminum Door)
4
3
Mortise:55*72
1
11
Mortise Screws:25*4mm
(For Wooden Door)
4
4
Card
3
12
M5*20mm Screw for
Door Thickness 35-50mm
1
5
Mechanical Key
2
13
M5*30mm Screw for
Door Thickness 30-65mm
1
6
Waterproof Rubber
Plate
2
14
M5*50mm Screw for
Door Thickness 50-65mm
1
7
Screw
Stubs:M5*30mm
2
15
User Manual
1
8
Strike&Strike Box
1+1
16
Chuck
1
2
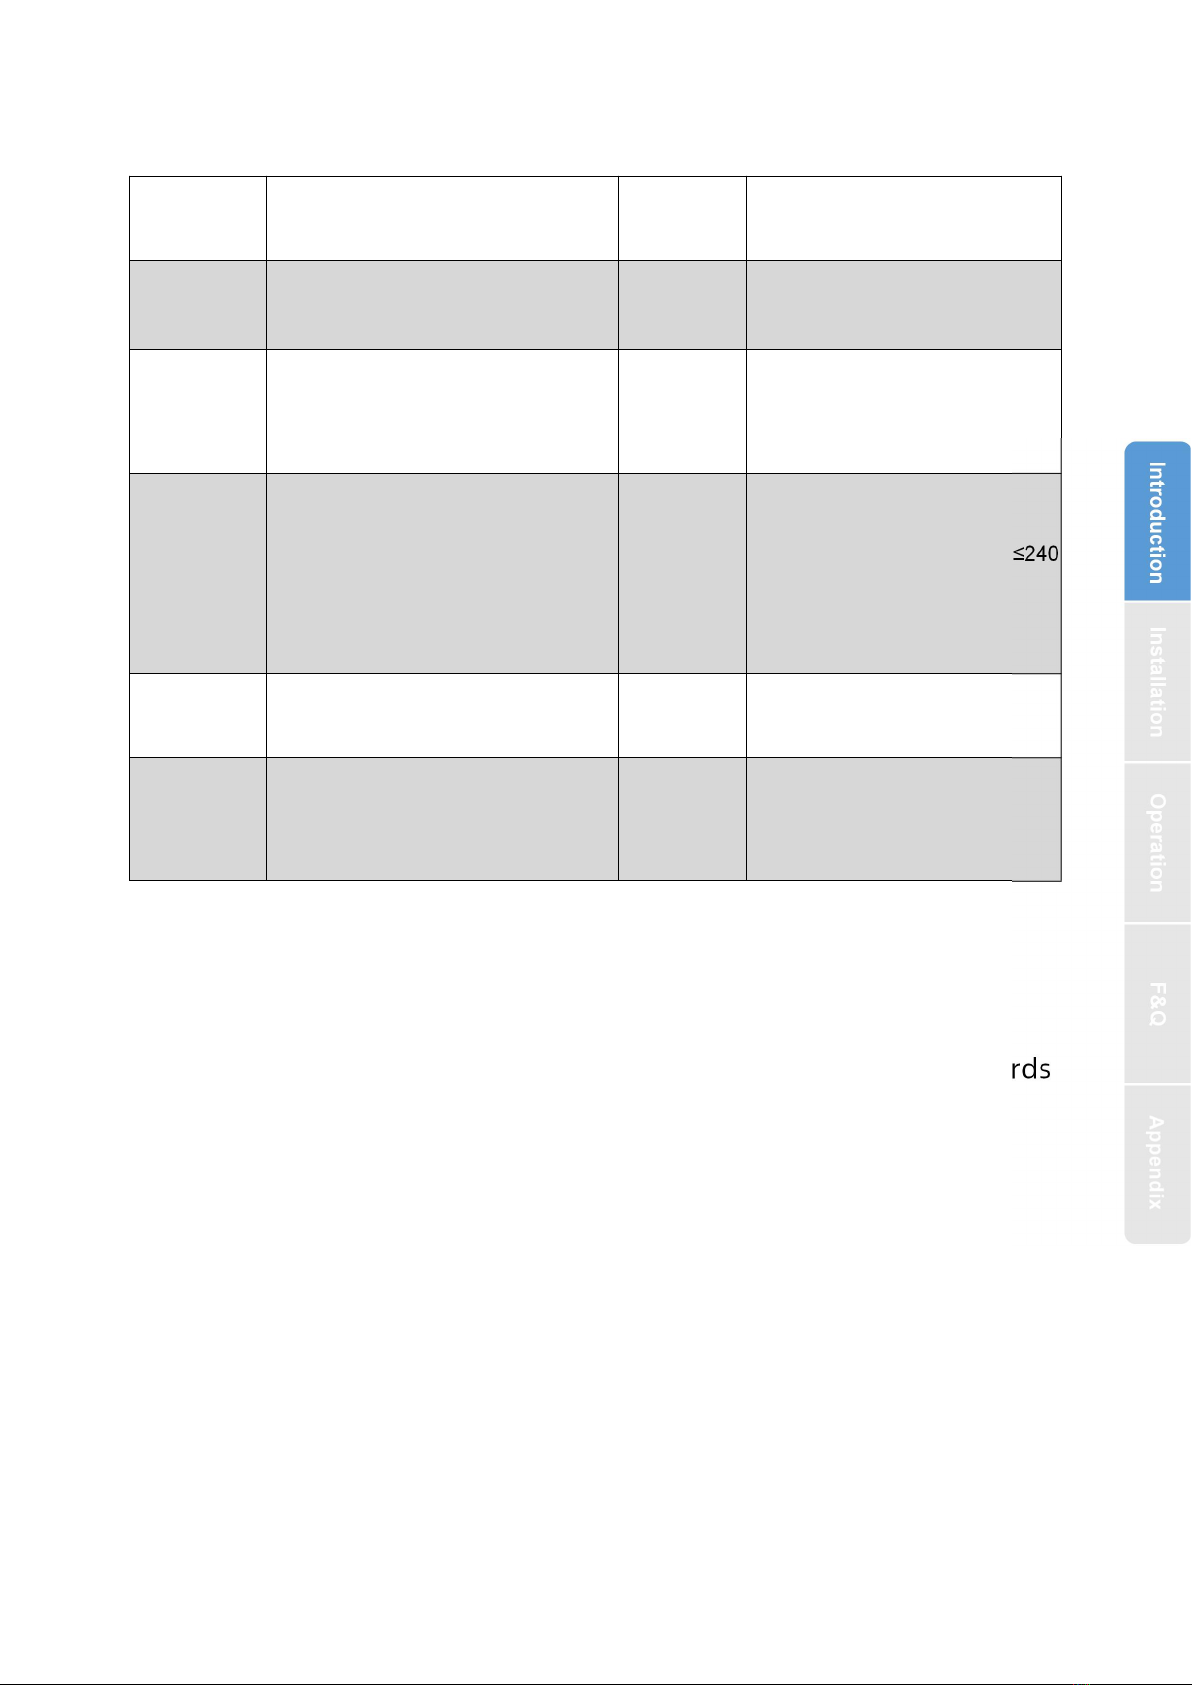
1.3.Specifications
Features:
Semiconductor fingerprint sensor(508dpi)
Passage mode function
LCD screen display Date & Time, User ID access & User unlock records
Stainless steel handle
Voice guided operation
Auto secure & break-in alarm
Voice setting function
Auto locking time setting function
Privacy locking
Anti-theft Password
Emergency power supply through USB
Suitable for
Models
H50-TYW
Doors
Applicable
Aluminum door
Wooden door
Materials
Handle:Zinc Alloy
Panel:SS304
Working
Voltage
6V/4x AA Batteries
Lock Weight
4KG
Door
Thickness to
Fit
35-65mm
Unlocking
Way
WIFI
Fingerprint(option)
Password
Card
Mechanical key
Data
Capacity
Fingerprint+Password+Card≤240
(Fingerprint≤100)
Color
Silver
Black
Working
Temperature
-10℃-55℃
Low Wattage
Alarm
Less than 4.8V
Working
Humidity
0-95%
3
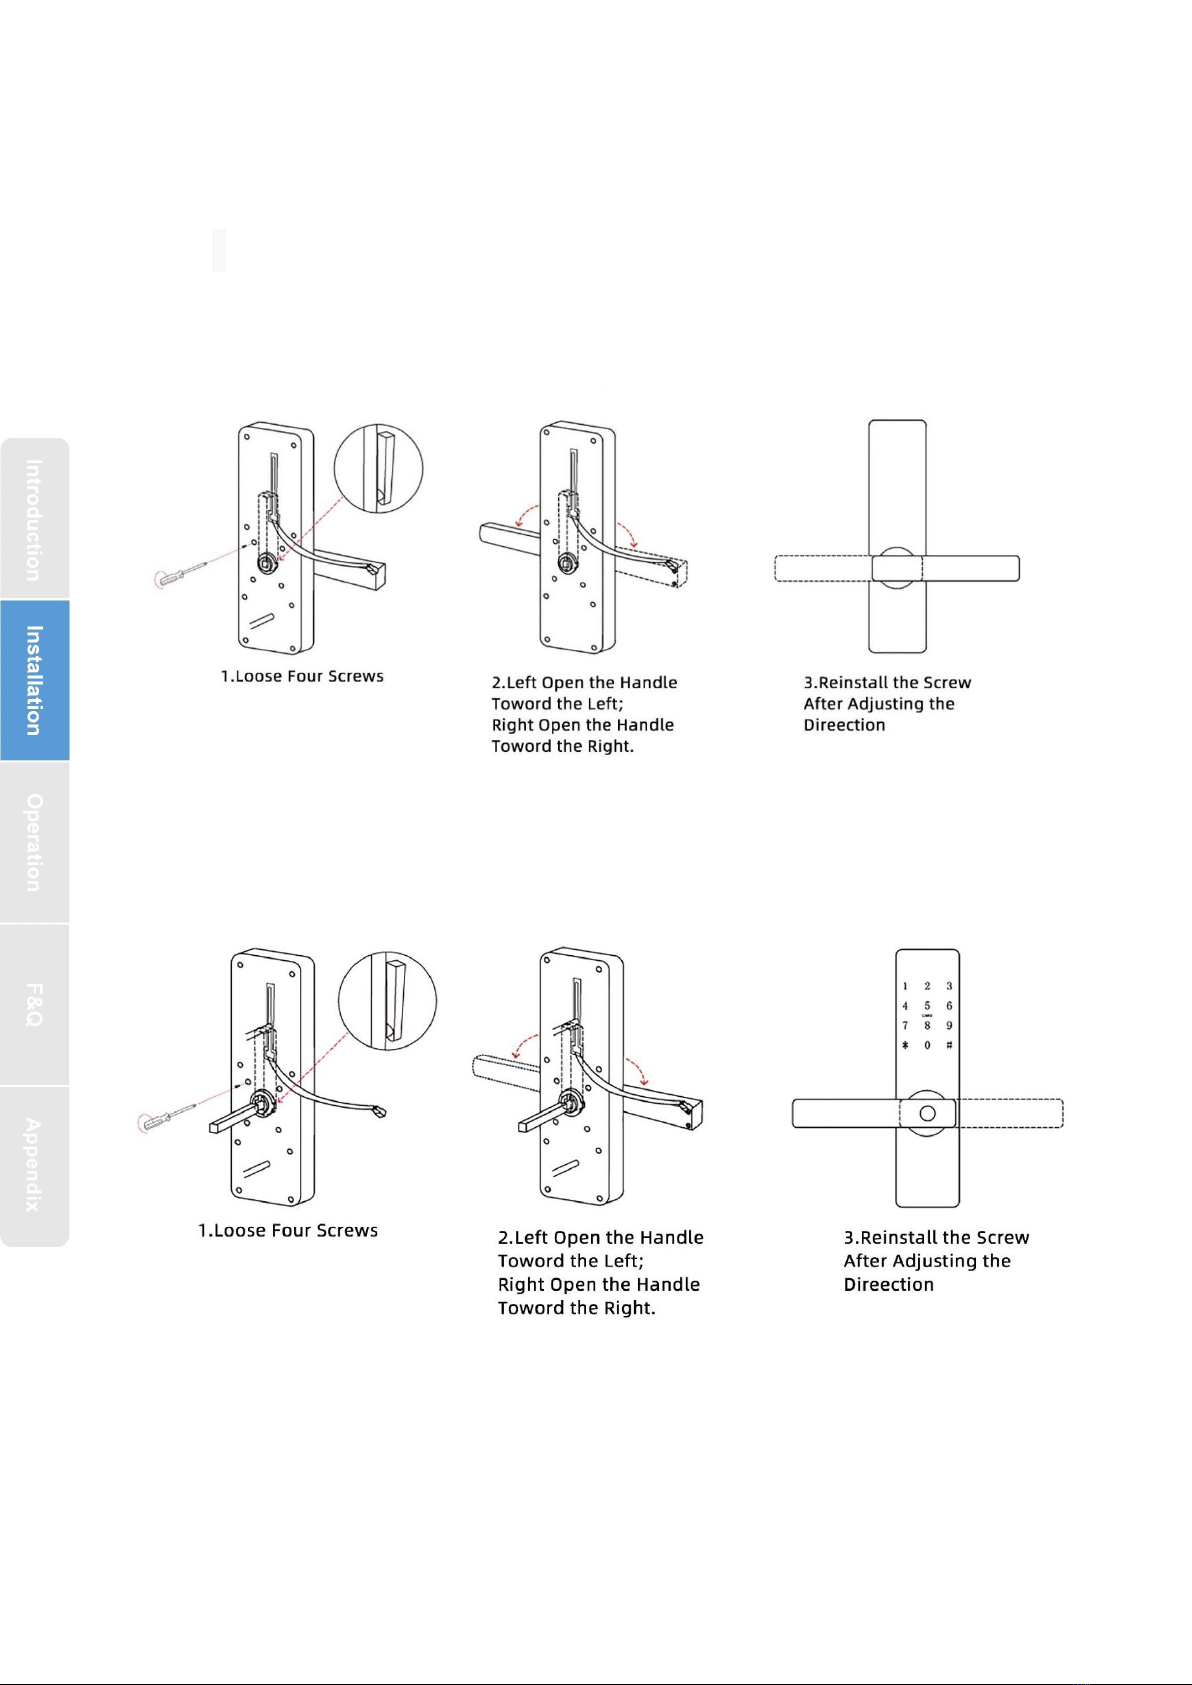
2.Installation
2.1Turn the handle
Notice: Adjust the handle according to the direction you open the
door.
For Front Panel:
For Back Panel:
4
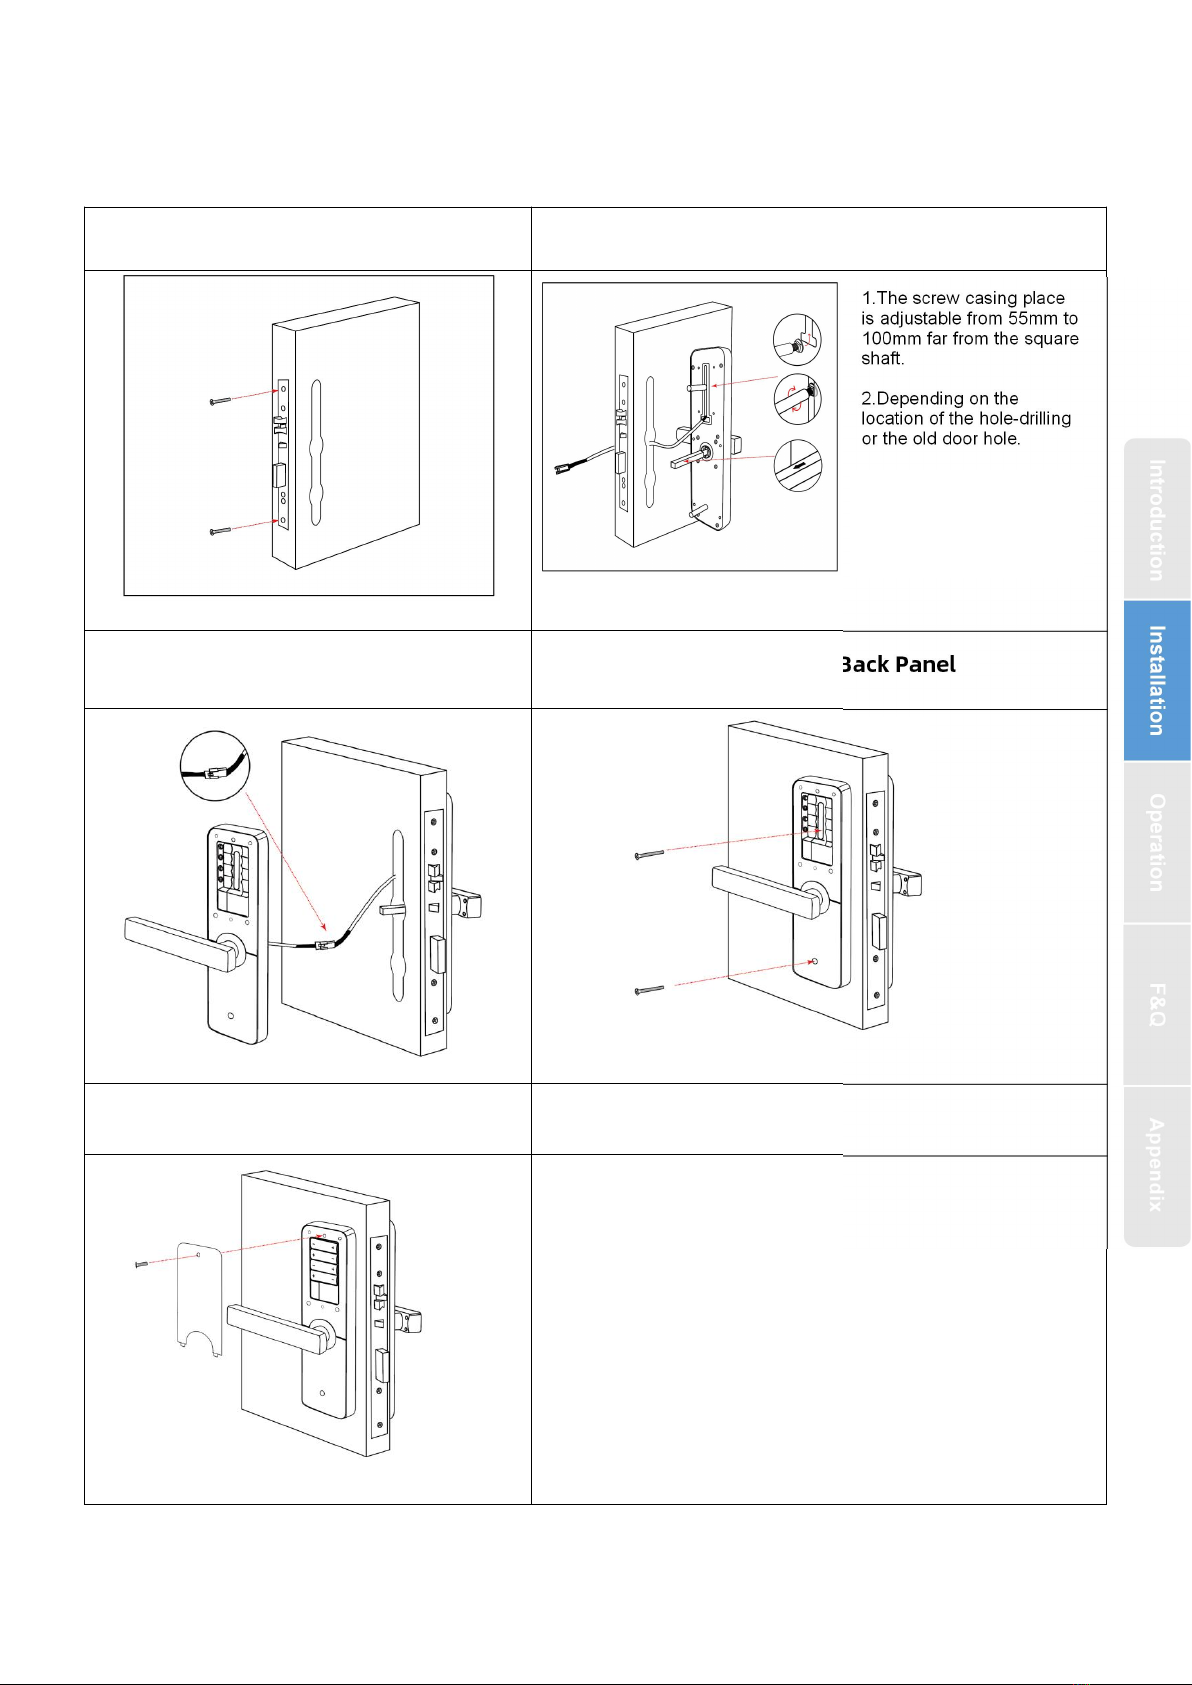
2.2. Installation Diagram(For 5572)
Step 1 Install Mortise
Step 2 Install Sliding Screw Casing
Step 3 Connect Front and Back
Panels
Step4 Install Back Panel
Step5 Install the Battery
Keep arrow
direction(shows in
image) always upward.

5
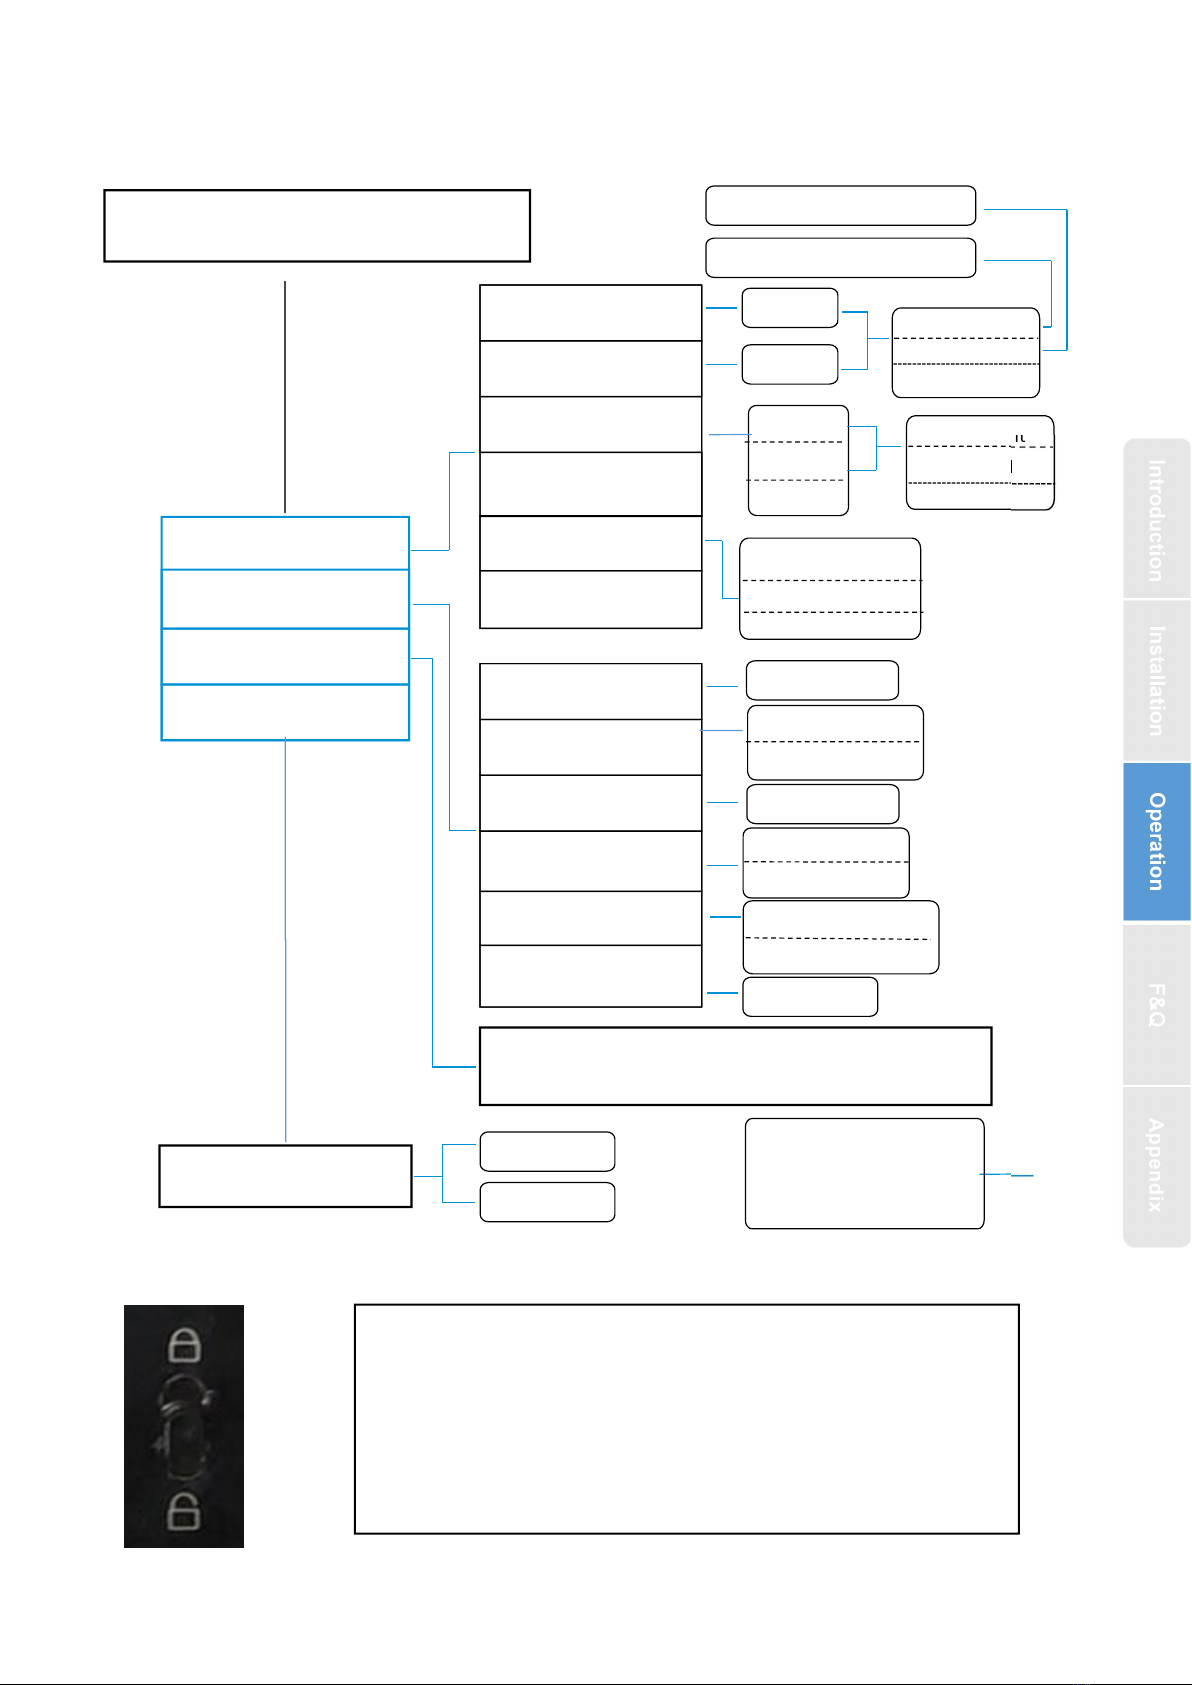
3.Operation
3.1.Number Pad
1#:set
2#: configure the network.1.Net config
2.Net Remov
4#:Request remote lock picking
5#:Get a temporary password
6#:Time Updating
8#:updated
Passage mode:After verifying unlocking, press and hold "#" for 3 seconds and then prompt
"the door is passage mode"
3.2.Operation and Management
3.2.1.Fingerprint Registration
Place the unregistered fingerprint on the fingerprint detector according to voice prompt;
Keep your finger stable;
After successfully recording a fingerprint, then release your finger and place it again. After
that, when placing the finger each time, move the position of the finger slightly up, down, left
and right respectively and press it again until the voice prompt hints successfully recorded.
3.2.2.Setting Procedure
Initialization Mode
Reset button
3.2.3.Adding Administrative Users
Open the battery cover,
press and hold the“Reset”
button, install the battery.
5 seconds
(system prompts
5 key tones)
Within 5 seconds(release
wiyhin system prompts 5
key tons)
release the button
between 6 and 8 seconds
release the button
over 8 seconds
Initialization Failed
Initialization Successful
Initialization Failed
After initialization, the Master
Password is restored to
“123456”, and any fingerprint
can be unlocked for customers
to experience the lock function
Touch the
keyboard to
wake up the
system
1#
123456
System Setting
User Management
Adding Admin
code
Fingerprint
Password
F+P 5 Users in total)
“ 2 ” : UP(↑)
“ 8 ” : DOWN(↓)
“ * ” : Cancel, Return,
Exit and Delete
“ # ” : Confirm and End
6
1. User Management
0-5 level
1-10s
Admin
Normal
Users
English
Portuguese
Single User
Dual User
Pry Enable
Pry Disable
Normal
Users(Administrators
are not restricted by
dual users)
(F+P 235 Users remain)
+P 4 Users remain)
Code
Fingerprint
Password
Card
Fingerprint
Password
Card
Fingerprint
Password
Card
* Cancel
# Confirm
Initializate or not?
Enter a time, the system will locate the time point and list
all user operation records
6. Open Time
5. Pry Setting
4. Combination
3. Volume
2. Language
4. Initialization
1. Time And Date
3. Query Records
2. System Setting
6. Time Limit
5. Delete By Type
4. Delete By Code
3. Statistics
2. Adding Users
1. Adding Admin
Touch the keyboard to wake up the system —1#
— New Adminis- trator Password or Fingerprint.
Code
Current Time
3.2.4.Setting Guide
3.3.Electronic Locking Button
Press the electronic lock button, it prompts "lock" and
the door lock has been locked. At this time, you can
only pass the administrator's verification to unlock or
press it again, and it prompts that the "unlock"
electronic anti-lock function is closed.
7
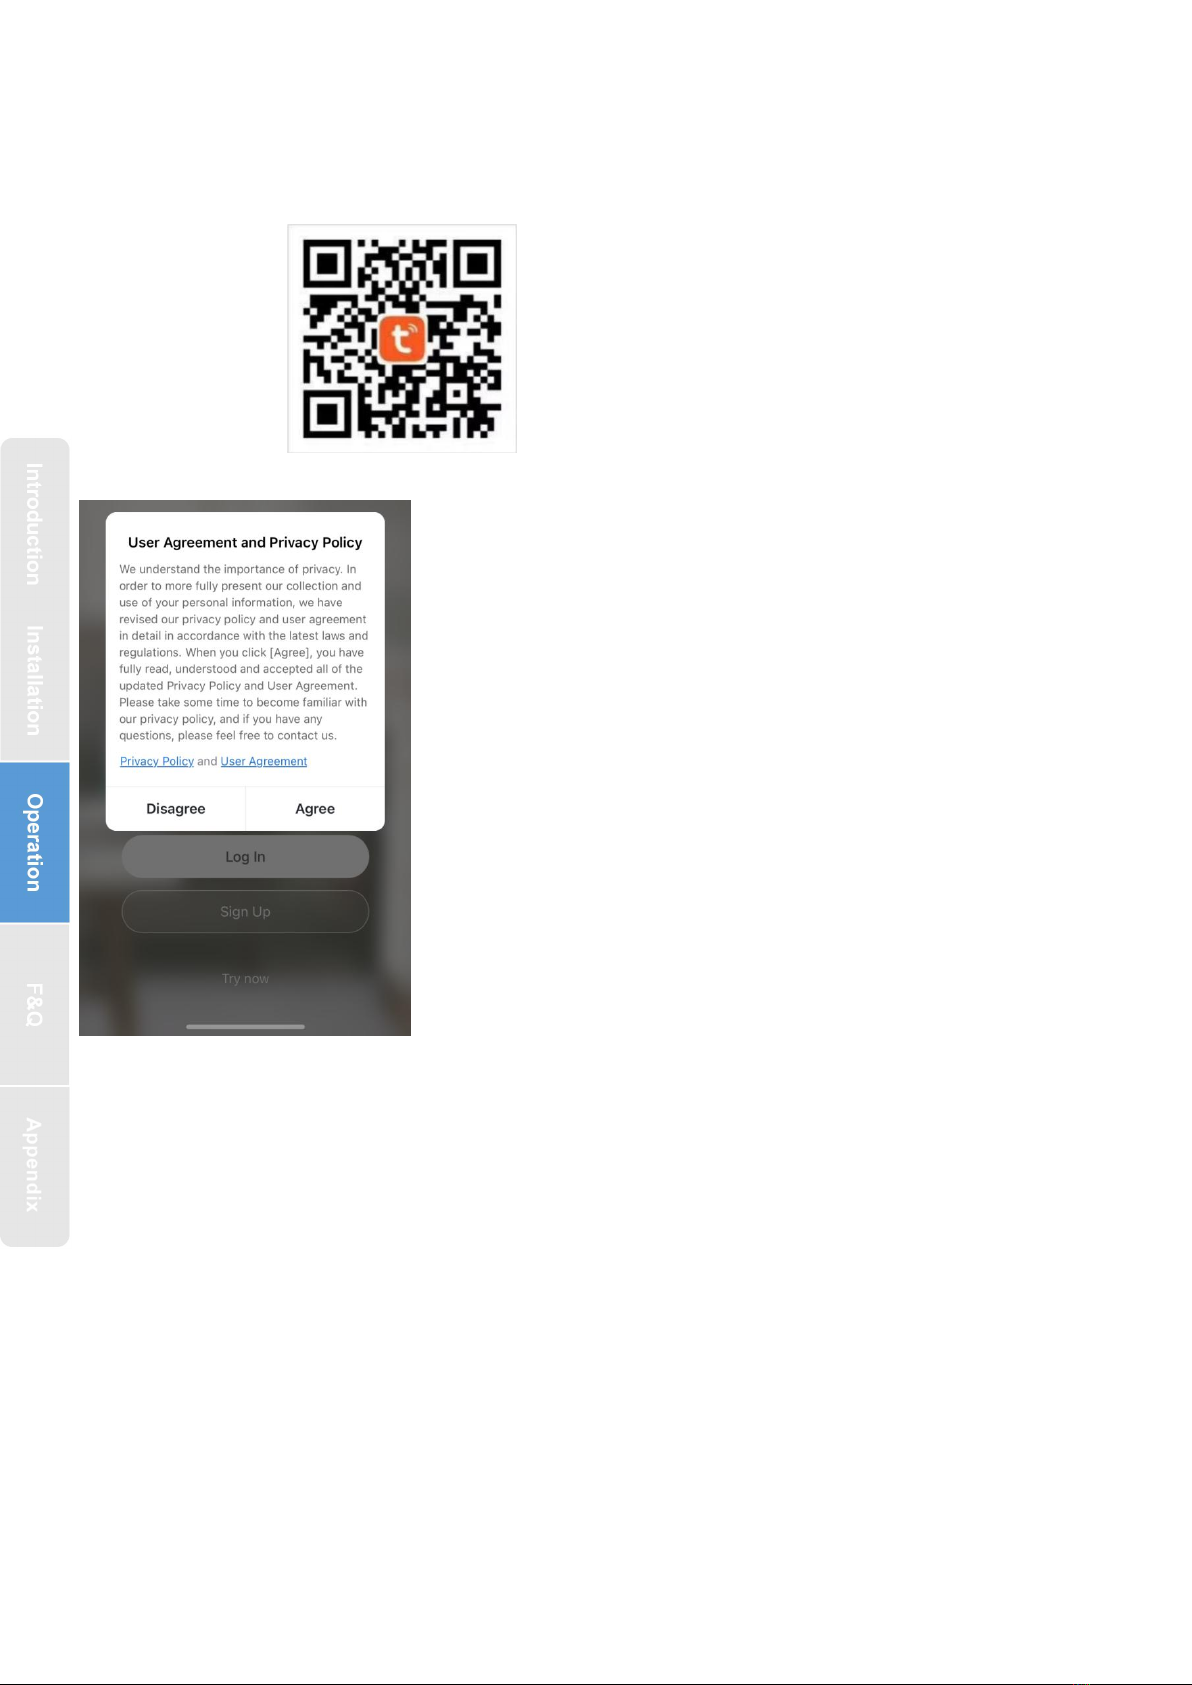
4. Add tuya smart app(optional)
4.1.Download
4.2.Register
1.Click “Sign Up”and read the Privacy Policy
after it pops up. Click “Agree” and enter the
registeration page.
2.You can use email or mobile number as your
account to register. The country/region of the APP will
be the same as the phone's. You can also change it by
yourself when registering.(You cannot change the
country/region after the registeration). Enter mobile
number/email and click”Get Verification Code”;
3.Enter the verification code and turn to the
password setting page. Set your password as required
and click “Done”.
4.3.Log in
If you already have an account,choose “Register with Existing Account”and
enter the log in page.
1).The system will automatically locate the current country/region you are in.
Or you can choose the country/region by yourself.
2).Enter mobile number/ email and password.
-Thirdy-party Social Account Log in
If you have downloaded Wechat or QQ on your phone, you can click the
Wechat/QQ icon in the log in page. You can log in using your wechat/QQ account
after authorizing it.If you are using iPhone,you can also log in with Apple ID.
You can search for
[ TuyaSmart ] in various app stores or
scan the QR code above to download

8
4.4.Using the APP
4.4.1. Add Lock
1. Tap Add Device on the Home page or + in the upper right corner of the page
to go to the Add Device page. Currently, you can manually add devices or search
for devices to add to the app.
Attention:You should be add admin first!!!
Method:
○
1 After pressing “2” + “#” to verify the administrator, press “1” to enter
the Network config , The “5”starts flashing,The screen is displayed in the network.
○
2As shown in the figure, the mobile app connects the lock. Select the wifi
door lock, enter the wifi password and connect the door lock
○
3 Adding success: the voice prompt “successful”
○
4Adding Failure: The keyboard light No. 1234 on the keyboard is not lit, and
the timeout voice prompt “failed”
4.4.2. Remote unlock and temporary passwor
a) Temporary Password
1.Click on the APP homepage
to enter the corresponding door
lock page
2.Generate a temporary
password on your app
3.Press “5”+“#”on the door
lock,You can open the door
with the temporary password
after success

9
b) Remote unlock
4.4.3.Alarm
4.4.4.User Management
1.Click on the APP homepage
to enter the corresponding
door lock page
2.Door lock keyboard press
“ 4 ” + “ # ” Request remote lock
picking
3.The mobile APP will receive
the application information,
and click "Ok" to open the lock
Automatically report after an
alarm occurs. The report types
include: doorbell call,
tamper-proof alarm, low-voltage
alarm, normally open alarm, and
freeze when the number of
verification errors exceeds

10
1.Click on the added user, you can edit the corresponding user opening
information of a user
2.The lock and the app are synchronized through cloud information: enter the
number of the door opening method on the lock. For example, Peter sets a
password number 001 on the lock, then enter 1 in the app as shown in Figure 4,
and use this number 001 later Password to open the door, the door opening record
in the app will show that the door opened by Peter,But if the user information is
deleted on the APP, the user can still open the door, and it must be deleted on the
lock to be effective
Note : 1.Need to reset the time after replacing the battery
2.The lock can be opened using default code 123456 followed by # in trial
mode
3. When the voltage is lower than 4.6V, the lock will automatically alarm
every time. After the alarm, the lock can be unlocked for 200 times. After the
number of times, the delay time of each lock opening will be 2 seconds.
4.Keep the lock as close as possible to the wifi router
11
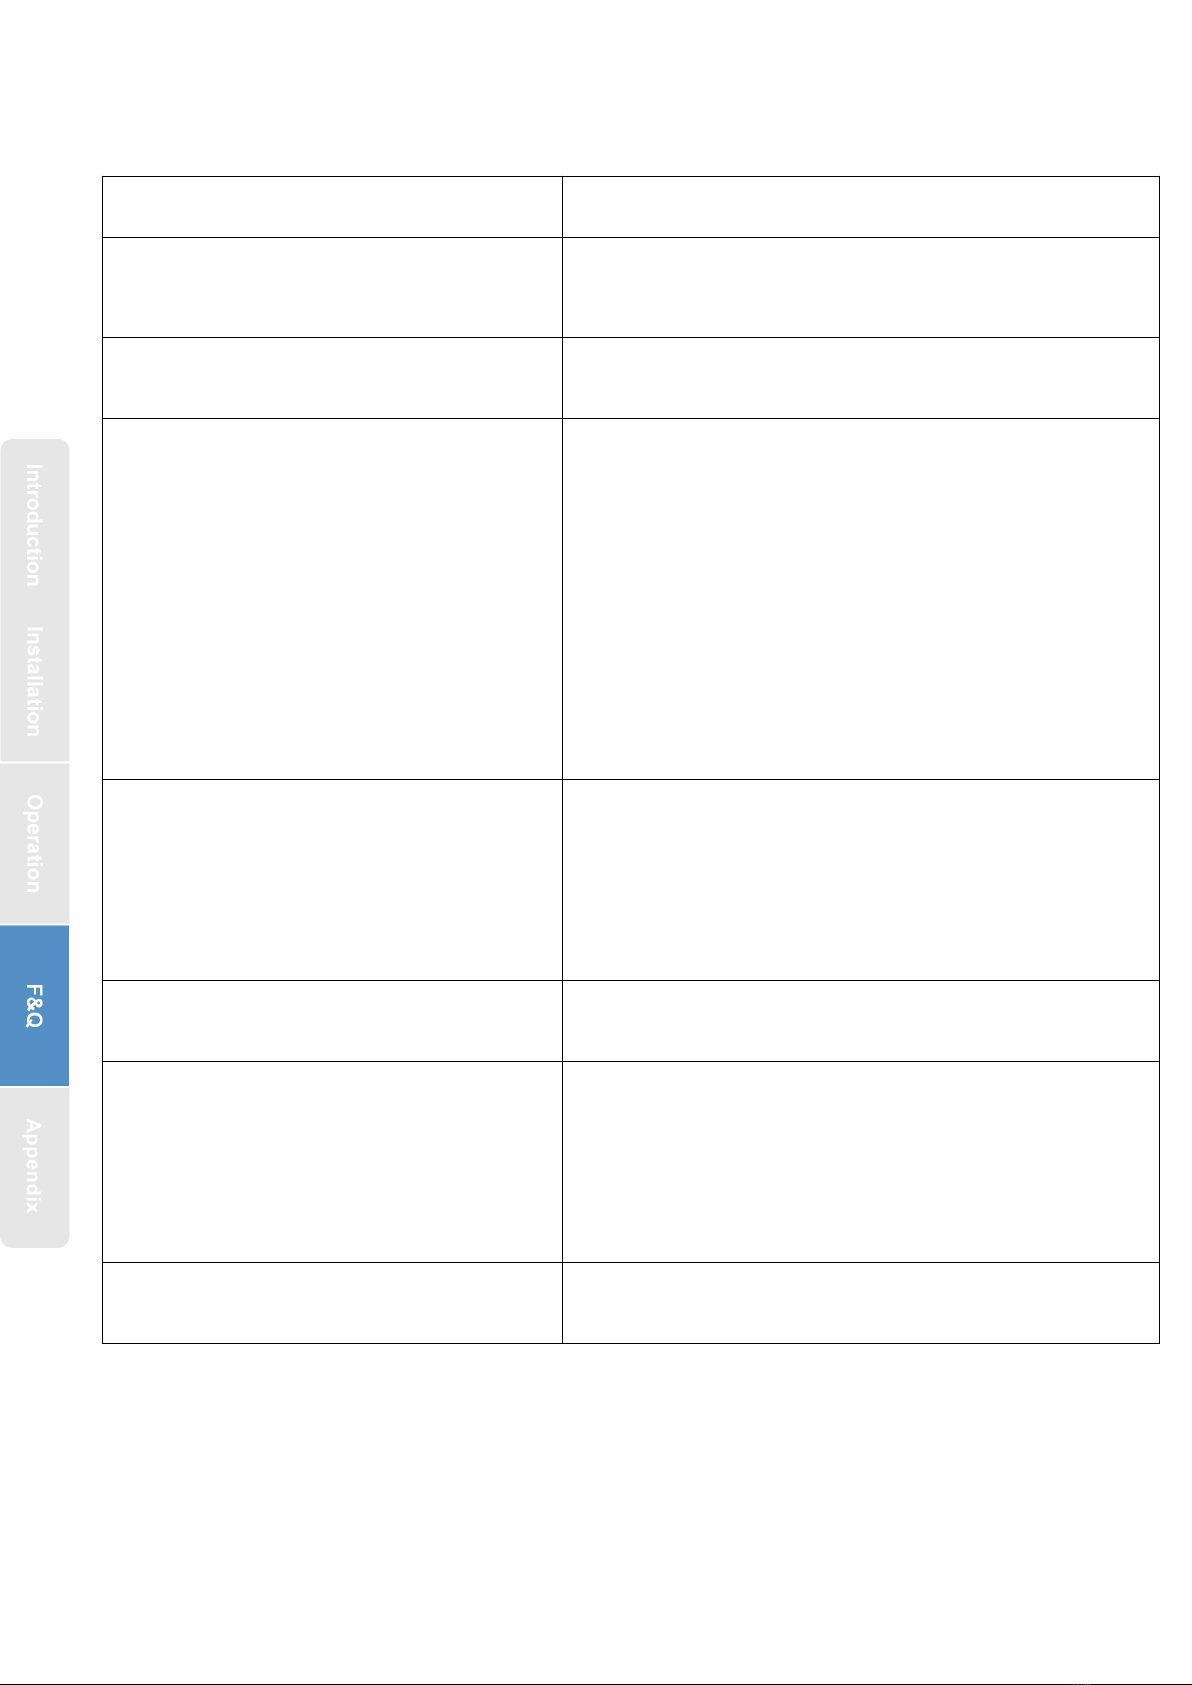
5. FAQ
1) How to read operation records?
In the Records of the main interface. .
2) Why can’t I unlock it after open the
passage mode
You need to perform an unlock verification in any
method, than the passage mode will take effect.
3) What is the purpose of Auto Lock
You can set how long to lock after unlocking
4)After installation, touch sensing
keyboard, screen no respond
a) In this case, first check that the positive and
negative electrodes of the battery have been
installed upside down, whether the battery has
enough power
b) Remove the back panel and see if it's
connected.
c) To eliminate the above situation, you need to
remove the lock ,check whether the wires of
the lock body are squeezed, and the re-wire.
5)Unable to register fingerprint
Check the fingers for dirt or wear, check the
fingerprint head on the lock for dirt and oil stains,
etc.
Check to see if the fingerprint is working
properly(Press to see if there is any responds.
6)What is the reason why the smart
lock consumes fast power?
a) Large standby power consumption
b) Short circuit
7)
There is no response to pressing the
handle on outside the door, and there
is unlock normally on inside the door,
but the verification is normal, and the
motor is normal.
It may be the triangle direction on the clutch was
error, please check correction.
8)How many times will the passcode
be locked? How long is it locked?
Enter the wrong password more than 5 times in a
row, the keyboard is locked for 90 secods

12
Guarantee
Customer Name:
Customer Calls :
Purchase Date :
Product Name :
Product Model :
Note:
1) Please keep this card so that you can use it when you need warranty service.
2) We provide you with a one-year warranty from the date of purchase.
3) This warranty service is valid for customers in any country in the world.
Table of contents
Other SmartLock Lock manuals

SmartLock
SmartLock Q20 User manual

SmartLock
SmartLock PREMIER - 10 USERS User manual

SmartLock
SmartLock DEADBLOT Service manual

SmartLock
SmartLock S31 User manual

SmartLock
SmartLock PREMIER User manual

SmartLock
SmartLock LOCKONE User manual

SmartLock
SmartLock YL-73 User manual

SmartLock
SmartLock VISION User manual

SmartLock
SmartLock W-0309 User manual

SmartLock
SmartLock Y797 User manual


