smartmi P1 User manual

9
12
10
13
11
14
www.smartmiglobal.com
Intelligent Control with Apple HomeKit
Open the Home app on your iPhone/iPad.
Tap "Add Accessory" and then scan the HomeKit setup code on the product sticker
(two stickers on the device unit, see illustration), or enter the eight-digit setup code
above the HomeKit Setup Code. The device will then be linked to the Apple Home
app.
The device can be linked to Smartmi
Link after linking to HomeKit. Go to
the Personal Info page on Smartmi
Link. Tap "HomeKit Info" and then link
the HomeKit device as prompted.
Devices linked to Smartmi Link can
also be added to HomeKit. Go to the
Device Control page on Smartmi Link.
Tap "Add to HomeKit" in "Settings"
and then link the device to HomeKit
as prompted.
Note:
Please ensure that your Wi-Fi network is both
available and has Internet access. Place your
phone as close to this product as possible. (This
product does not support 5G networks).
To control this accessory which is compatible
with HomeKit, it is recommended to use iOS
13.0 or a later version.
Please keep the HomeKit setup code, as you
will need to scan the code to link the device to
HomeKit after a factory reset.
iPad and iPhone are trademarks of Apple Inc.,
registered in the U.S. and other countries.
Controlling this HomeKit-enabled accessory
automatically and away from home requires a
HomePod, Apple TV, or iPad set up as a home
hub. It is recommended that you update to the
latest software and operating system.
1
2
HomeKit Setup Code
When your phone connects to the purifier for the first time or if
your phone fails to connect, hold down the buttons " " and " "
simultaneously for 5 seconds. The Wi-Fi icon on the screen will
flash. When you hear a sound, the Wi-Fi module has been reset
successfully.
Resetting Wi-Fi Resetting Purifier
Hold down the buttons " " and " " simultaneously for 10
seconds. After you hear a sound, the purifier has been reset
successfully.
Filter Status Reminder Replacing and Resetting the Filter
1Turn over the purifier and remove the
filter by rotating it counterclockwise. 2Replace the filter by following the
instructions contained in the user
manual.
Resetting the Filter
After replacing the filter and turning on
the purifier, hold down " " for 5 seconds.
When you hear a sound, it indicates the
purifier has restarted the filter replacement
count.
Note: Power off purifier and disconnect it
from the power supply before performing
the following operations.
Note: Timely replacement of the filter once the
recommended filter life is over is advised. Once
the Pet Allergy Filter replaced, which contains
activated carbon, the filter will retain the odor of the
harmful gases it has absorbed, when saturated,
put the used filter in a place with sunshine and
ventilation to recover partial performance.
Filter Replacement Reminder
2
Filters should be replaced every 6–12
months. The app will send a reminder
when the filter's lifespan reaches 10% or
less.
Once filter life drops below 10%, the power
button will blink every time you turn on the
machine. Please replace the filter as soon
as possible to ensure normal operation and
optimal air purification.
How to Buy the Filter
Scan the QR Code or
Visit smartmi's online store
https://www.smartmiglobal.com
for more information.
Click on the product page on the app and
check the filter level, which will be displayed
as a percentage.
Checking Filter Lifespan
1
3
3
4
2
2
1
1
Maintenance and Care
Power off purifier and disconnect it from the power supply before performing the following operations.
Cleaning the Filter Housing
Turn over the purifier and remove the
filter by rotating it counterclockwise.
Use a vacuum cleaner to remove dust
from the ventilation hole and cabin
walls, or wipe them using a soft cloth.
Re-install the filter after it has been
cleaned.
Note: Do not spray liquid onto the purifier's
casing, or wipe it using a wet cloth. This
could lead to drops of water leaking into the
base of the device.
Cleaning Laser Particulate
Matter Sensor
Turn over the purifier and remove the
filter by rotating it counterclockwise.
Use a screwdriver to loosen the
screws on the sensor cover.
Remove the cover and clean it with a
hair dryer or pneumatic air gun.
Once cleaning is finished, fix the cover
back onto the sensor and tighten the
screws.
Note: Do NOT clean with hot air.
Linking the Device
to Smartmi Link
This product has been linked to the
Smartmi Link and can be controlled using
the app.
Scan the QR code or search for "Smartmi
Link" on the app store to download and
install the app. Go to the app's homepage,
click "+" in the middle of the page, then add
the device as prompted.
Note:
Please ensure that your Wi-Fi network is both
available and has Internet access. Place your
phone as close to this product as possible. (This
product does not support 5G networks)
This product will be listed as "Smartmi Air
Purifier P1" in the app's device listing.
Specifications
Smartmi Air Purifier P1 User Manual
Pollen
*Standards: Q/BJZMK0001-2018
**ANSI/AHAM AC-1-2019
Name Smartmi Air Purifier P1 Rated Voltage 24V
Model ZMKQJHQP11 / ZMKQJHQP12 Rated Power 30W
Item Dimensions Φ220 × 360.5 mm Power Supply Unit Input 100-240V~ 50/60Hz 1.0A
Net Weight Approx. 3 kg Clean Air Delivery Rate
(CADR Particles) 250 m³/h
Recommended Surface 17.5–30 m2* Pollen CADR 150cfm **
Dust CADR 130cfm ** Smoke CADR 120cfm **
Wireless Connectivity Wi-Fi IEEE 802.11 b/g/n 2.4GHz
Contains FCC ID : 2ANDL-TYWE3SE
This device complies with part 15 of the FCC Rules.
Operation is subject to the following two conditions:
(1)This device may not cause harmful interference, and
(2)This device must accept any interference received, including interference that may cause undesired operation.
Caution: Changes or modifications to this unit not expressly approved by the party responsible for compliance could void the
user's authority to operate the equipment.
NOTE: This equipment has been tested and found to comply with the limits for a Class B digital device, pursuant to part 15 of the
FCC Rules. These limits are designed to provide reasonable protection against harmful interference in a residential installation.
This equipment generates, uses and can radiate radio frequency energy and, if not installed and used in accordance with the
instructions, may cause harmful interference to radio communications. However, there is no guarantee that interference will not
occur in a particular installation. If this equipment does cause harmful interference to radio or television reception, which can be
determined by turning the equipment off and on, the user is encouraged to try to correct the interference by one or more of the
following measures:
—Reorient or relocate the receiving antenna.
—Increase the separation between the equipment and receiver.
—Connect the equipment into an outlet on a circuit different from that to which the receiver is connected.
—Consult the dealer or an experienced radio/TV technician for help.
Limited by local law regulations, version for North America does not have region selection option.
To satisfy FCC RF exposure requirements, a separation distance of 20 cm or more should be maintained between the antenna of
this device and persons during device operation.
To ensure compliance, operations at closer than this distance is not recommended.
210429-Y
Manufactured by: Beijing Smartmi Electronic Technology Co., Ltd.
Address:Room 201-203, Unit 6, Building A, No. 66,Zhufang Road, Qinghe, Haidian District, Beijing
For detailed e-manual, please go to https://www.smartmiglobal.com/pages/manual
For more information, please visit: https://www.smartmiglobal.com/

purifier.
In unstable locations where the purifier can
easily fall over.
In environments that are extremely hot, humid,
or damp, such as bathrooms.
1
5
2
6
3
7
4
8
Always unplug the purifier before carrying out
maintenance to or moving the air purifier.
Immediately stop using the purifier when it
makes unusual sounds, gives off bad odors,
overheats, or its fan rotates irregularly.
Do not stick your fingers or foreign objects into
the protective parts, movable parts, air inlets, or
air outlets.
Keep objects such as hairs or fabrics away from
the purifier to avoid blocking the air inlets or air
outlets.
Do not sit on, lean on or tilt the purifier.
When using in conjunction with gas-fueled
appliances (such as gas stoves, gas heaters),
please ventilate sufficiently to avoid carbon
monoxide poisoning.
Do not pour liquids, nor throw powders or other
small substances into the purifier's air outlet.
Do not use the purifier in the following
circumstances, as they may result in electric
shocks, fire, or other damage:
Near open flames, such as candles, incense
burners, stoves, fireplaces, cigarettes,
firecrackers, lighters, multipurpose torches,
candle lighters, or fire pans.
Near appliances that generate high
temperatures, such as electric heaters, fan
heaters, electric foot warmers,electric stoves,
electric irons.
Make sure no inflammable objects get into the
Turn off and unplug the purifier before moving it.
The purifier cannot turn on when the fan grille
and the filter compartment cover are not
installed properly.
Maintain a distance of at least 20 cm between
the air inlets and walls or other objects.
Prior to cleaning or other maintenance, the
appliance must be disconnected from the supply
mains.
Frequently remove dust, hair, and other particles
from the outer mesh screen of the filter, so as to
reduce the chance of bacteria growth.
Remove dust, hair, and particles from the
purifier's air inlets to prevent a reduction of air
intake.
Cover the air outlet to prevent dust, hair, and
other particles from falling in when the purifier is
left unused for a long time.
To avoid fire, electric shocks, or other damage,
use the power adapter and electrical outlet as
instructed below:
Do not excessively pull, twist or bend the power
adapter, as this may expose or break the cord's
core.
The power adapter must be plugged into a
suitable electrical outlet.
Use the power adapter that is provided with
the purifier, do not use any third party power
adapters.
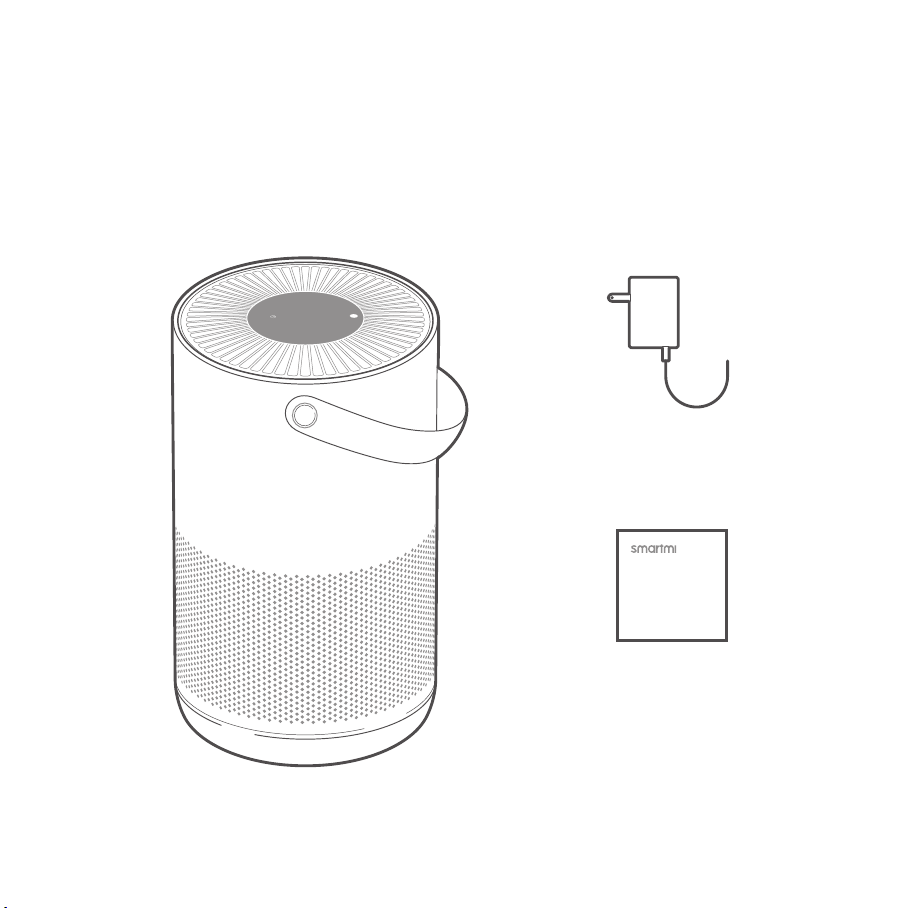
CAUTION Package Contents
Note: In this manual, the illustrations of the product
and its accessories and the user interface are
schematic diagrams for reference only.
The actual product may vary from that shown in
the schematic diagrams due to product updates
and upgrades. Please refer to the actual product.
Read this manual carefully before use, and retain it for future reference.
Air Purifier
Power Adapter
User Manual
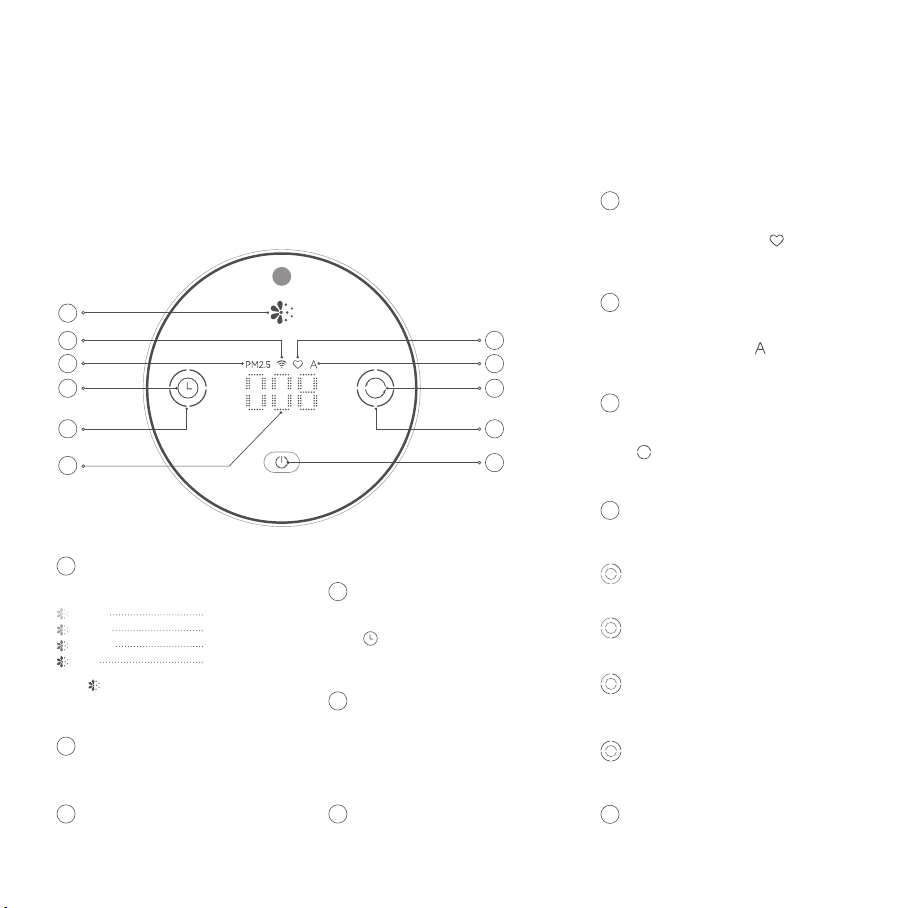
Screen Display
PM2.5 Level
Wi-Fi Status Indicator
PM2.5 Indicator Power Button
Timer Display
The timer display changes according to which
time setting has been selected.
Mode Display
Purifier operates in ultra-low noise mode for
a favorable sleeping environment.
Sleep
Purifier operates at its optimal mode and
noise level. Applicable for daily use.
Normal
Purification rate can be customized by
adjusting the applicable range within the
app.
Custom
Purification rate setting automatically
adjusts depending on IAQ.
Auto
Mode Selection Button
Press " " button to switch between purification
modes.
Timer
Press " " button to cycle through time settings
and to activate the timer
Pollen Alert Indicator
Custom Indicator
After "Custom" mode is selected, " " will
illuminate on the screen.
Auto Indicator
After "Auto" mode is selected, " " will illuminate
on the screen.
A
B
C
D
E
J
I
H
G
K
A
B
C
D
E J
I
H
G
K
F
F
Installation
Place the purifier on a flat and stable surface with the touch
screen facing upwards.
Connect power adapter to the power port at the bottom of
the main unit. Then connect the power adapter to a power
socket.
To allow the purifier to operate as effectively as possible, maintain
a suitable distance between its air inlet and obstructions such as
walls (see figure above).
Note: For optimal air purification, keep doors and windows closed during use.
1 2
Placing the Purifier at an Appropriate Place
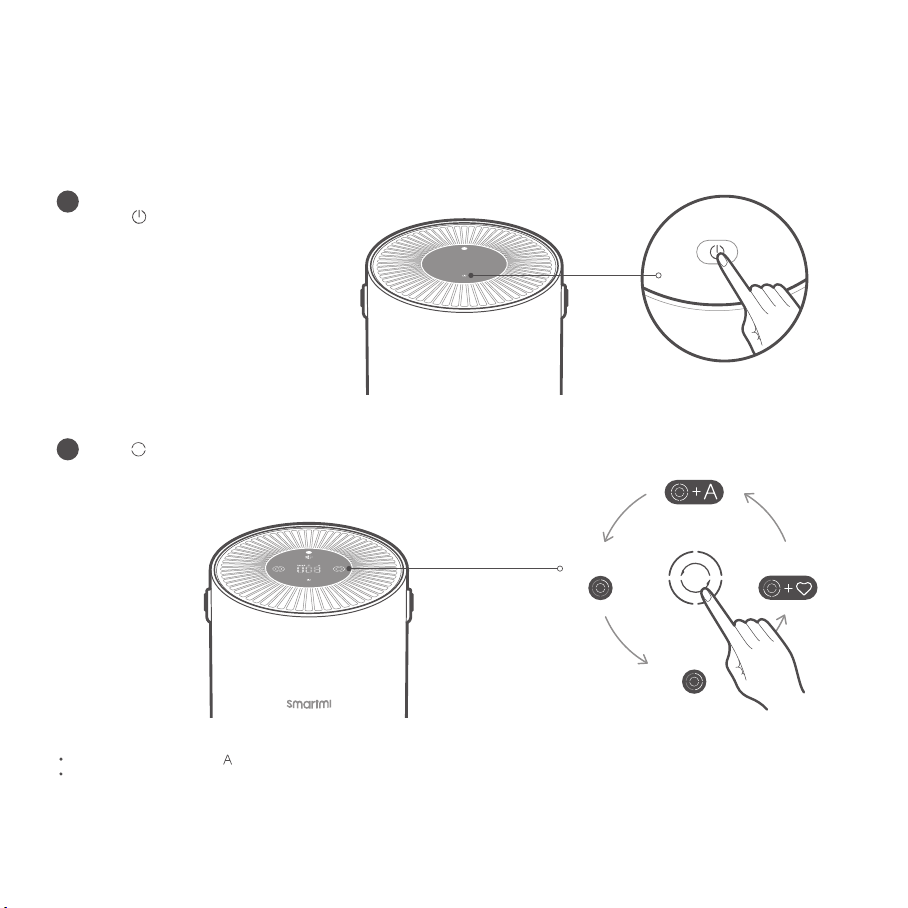
Use
After connecting to a power supply,
press " " button to power on. Upon
initial startup, the purifier will operate
in "Auto" mode. For subsequent
startups, it will operate in such mode
that it is shut down previously.
1
Note:
When "Auto" mode is selected, " " will be illuminated on the screen, and the purifier will adjust the purification level automatically based on the IAQ.
In "Custom" mode, settings may be adjusted after connecting to the Smartmi Link app and adding a device. By default, the purifier can operate at full capacity in
this mode, resulting in slightly noisier operation but superior results.
Press " " button to set a mode for
the purifier.
2
Press " " button to set shutdown time in advance.
Note:
After the timer is activated, the indicator will illuminate. Available time intervals are displayed as follows,
"0h, 1h, 2h, 4h, and 8h". If 0h is selected, the timer will be canceled.
To cancel the timer, press " " button until the timing indicator is off and "0h" is displayed on the screen.
Once the timer runs out, the purifier will shut down automatically.
Upon startup, the purifier will not have a time setting for shutdown.
The timer will start again only if it has been reset.
Press " " button to turn the purifier
off.
34
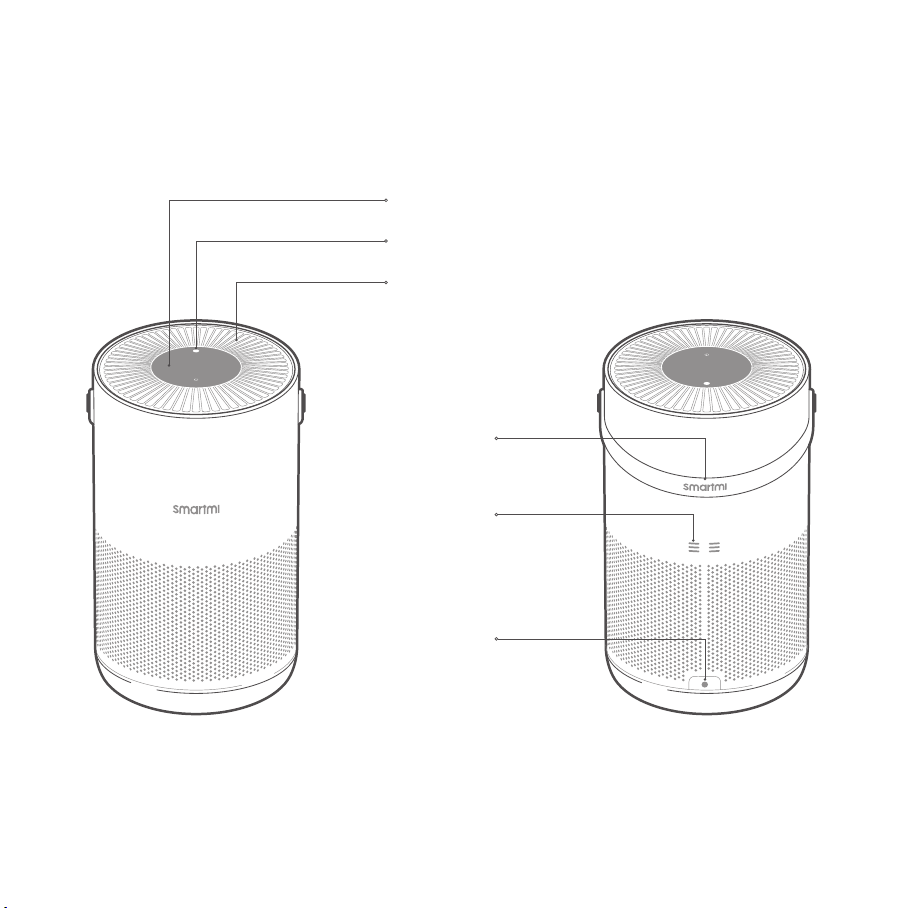
Product Overview
Touch Display Screen
Fan Grille
Light Sensor
Front View Rear View
Laser Particulate
Matter Sensor
Handle
Power Port
WARNING
When the power adapter is damaged, it must be replaced with a genuine power
adapter purchased from the manufacturer or after-sales service department.
This appliance can be used by children aged from 8 years and above and
persons with reduced physical, sensory or mental capabilities or lack of
experience and knowledge if they have been given supervision or instruction
concerning use of the appliance in a safe way and understand the hazards
involved.
Children shall not play with the appliance. Cleaning and user maintenance shall
not be made by children without supervision.
To reduce the risk of fire or electric shock, do not use this appliance with any
solid-state speed control device.
READ AND SAVE THESE INSTRUCTIONS
Green
Yellow
Orange
Red
Very good
Good
Moderate
Unhealthy
Note: indicates the level of PM 2.5-10
(covering common pollen sizes)
20cm or more
20cm or more
Sleep
Normal
Custom
Auto
CL
1h
4h 2h
8h

purifier.
In unstable locations where the purifier can
easily fall over.
In environments that are extremely hot, humid,
or damp, such as bathrooms.
1
5
2
6
3
7
4
8
Always unplug the purifier before carrying out
maintenance to or moving the air purifier.
Immediately stop using the purifier when it
makes unusual sounds, gives off bad odors,
overheats, or its fan rotates irregularly.
Do not stick your fingers or foreign objects into
the protective parts, movable parts, air inlets, or
air outlets.
Keep objects such as hairs or fabrics away from
the purifier to avoid blocking the air inlets or air
outlets.
Do not sit on, lean on or tilt the purifier.
When using in conjunction with gas-fueled
appliances (such as gas stoves, gas heaters),
please ventilate sufficiently to avoid carbon
monoxide poisoning.
Do not pour liquids, nor throw powders or other
small substances into the purifier's air outlet.
Do not use the purifier in the following
circumstances, as they may result in electric
shocks, fire, or other damage:
Near open flames, such as candles, incense
burners, stoves, fireplaces, cigarettes,
firecrackers, lighters, multipurpose torches,
candle lighters, or fire pans.
Near appliances that generate high
temperatures, such as electric heaters, fan
heaters, electric foot warmers,electric stoves,
electric irons.
Make sure no inflammable objects get into the
Turn off and unplug the purifier before moving it.
The purifier cannot turn on when the fan grille
and the filter compartment cover are not
installed properly.
Maintain a distance of at least 20 cm between
the air inlets and walls or other objects.
Prior to cleaning or other maintenance, the
appliance must be disconnected from the supply
mains.
Frequently remove dust, hair, and other particles
from the outer mesh screen of the filter, so as to
reduce the chance of bacteria growth.
Remove dust, hair, and particles from the
purifier's air inlets to prevent a reduction of air
intake.
Cover the air outlet to prevent dust, hair, and
other particles from falling in when the purifier is
left unused for a long time.
To avoid fire, electric shocks, or other damage,
use the power adapter and electrical outlet as
instructed below:
Do not excessively pull, twist or bend the power
adapter, as this may expose or break the cord's
core.
The power adapter must be plugged into a
suitable electrical outlet.
Use the power adapter that is provided with
the purifier, do not use any third party power
adapters.
CAUTION Package Contents
Note: In this manual, the illustrations of the product
and its accessories and the user interface are
schematic diagrams for reference only.
The actual product may vary from that shown in
the schematic diagrams due to product updates
and upgrades. Please refer to the actual product.
Read this manual carefully before use, and retain it for future reference.
Air Purifier
Power Adapter
User Manual
Screen Display
PM2.5 Level
Wi-Fi Status Indicator
PM2.5 Indicator Power Button
Timer Display
The timer display changes according to which
time setting has been selected.
Mode Display
Purifier operates in ultra-low noise mode for
a favorable sleeping environment.
Sleep
Purifier operates at its optimal mode and
noise level. Applicable for daily use.
Normal
Purification rate can be customized by
adjusting the applicable range within the
app.
Custom
Purification rate setting automatically
adjusts depending on IAQ.
Auto
Mode Selection Button
Press " " button to switch between purification
modes.
Timer
Press " " button to cycle through time settings
and to activate the timer
Pollen Alert Indicator
Custom Indicator
After "Custom" mode is selected, " " will
illuminate on the screen.
Auto Indicator
After "Auto" mode is selected, " " will illuminate
on the screen.
A
B
C
D
E
J
I
H
G
K
A
B
C
D
E J
I
H
G
K
F
F
Installation
Place the purifier on a flat and stable surface with the touch
screen facing upwards.
Connect power adapter to the power port at the bottom of
the main unit. Then connect the power adapter to a power
socket.
To allow the purifier to operate as effectively as possible, maintain
a suitable distance between its air inlet and obstructions such as
walls (see figure above).
Note: For optimal air purification, keep doors and windows closed during use.
1 2
Placing the Purifier at an Appropriate Place
Use
After connecting to a power supply,
press " " button to power on. Upon
initial startup, the purifier will operate
in "Auto" mode. For subsequent
startups, it will operate in such mode
that it is shut down previously.
1
Note:
When "Auto" mode is selected, " " will be illuminated on the screen, and the purifier will adjust the purification level automatically based on the IAQ.
In "Custom" mode, settings may be adjusted after connecting to the Smartmi Link app and adding a device. By default, the purifier can operate at full capacity in
this mode, resulting in slightly noisier operation but superior results.
Press " " button to set a mode for
the purifier.
2
Press " " button to set shutdown time in advance.
Note:
After the timer is activated, the indicator will illuminate. Available time intervals are displayed as follows,
"0h, 1h, 2h, 4h, and 8h". If 0h is selected, the timer will be canceled.
To cancel the timer, press " " button until the timing indicator is off and "0h" is displayed on the screen.
Once the timer runs out, the purifier will shut down automatically.
Upon startup, the purifier will not have a time setting for shutdown.
The timer will start again only if it has been reset.
Press " " button to turn the purifier
off.
34
Product Overview
Touch Display Screen
Fan Grille
Light Sensor
Front View Rear View
Laser Particulate
Matter Sensor
Handle
Power Port
WARNING
When the power adapter is damaged, it must be replaced with a genuine power
adapter purchased from the manufacturer or after-sales service department.
This appliance can be used by children aged from 8 years and above and
persons with reduced physical, sensory or mental capabilities or lack of
experience and knowledge if they have been given supervision or instruction
concerning use of the appliance in a safe way and understand the hazards
involved.
Children shall not play with the appliance. Cleaning and user maintenance shall
not be made by children without supervision.
To reduce the risk of fire or electric shock, do not use this appliance with any
solid-state speed control device.
READ AND SAVE THESE INSTRUCTIONS
Green
Yellow
Orange
Red
Very good
Good
Moderate
Unhealthy
Note: indicates the level of PM 2.5-10
(covering common pollen sizes)
20cm or more
20cm or more
Sleep
Normal
Custom
Auto
CL
1h
4h 2h
8h

9
12
10
13
11
14
www.smartmiglobal.com
Intelligent Control with Apple HomeKit
Open the Home app on your iPhone/iPad.
Tap "Add Accessory" and then scan the HomeKit setup code on the product sticker
(two stickers on the device unit, see illustration), or enter the eight-digit setup code
above the HomeKit Setup Code. The device will then be linked to the Apple Home
app.
The device can be linked to Smartmi
Link after linking to HomeKit. Go to
the Personal Info page on Smartmi
Link. Tap "HomeKit Info" and then link
the HomeKit device as prompted.
Devices linked to Smartmi Link can
also be added to HomeKit. Go to the
Device Control page on Smartmi Link.
Tap "Add to HomeKit" in "Settings"
and then link the device to HomeKit
as prompted.
Note:
Please ensure that your Wi-Fi network is both
available and has Internet access. Place your
phone as close to this product as possible. (This
product does not support 5G networks).
To control this accessory which is compatible
with HomeKit, it is recommended to use iOS
13.0 or a later version.
Please keep the HomeKit setup code, as you
will need to scan the code to link the device to
HomeKit after a factory reset.
iPad and iPhone are trademarks of Apple Inc.,
registered in the U.S. and other countries.
Controlling this HomeKit-enabled accessory
automatically and away from home requires a
HomePod, Apple TV, or iPad set up as a home
hub. It is recommended that you update to the
latest software and operating system.
1
2
HomeKit Setup Code
When your phone connects to the purifier for the first time or if
your phone fails to connect, hold down the buttons " " and " "
simultaneously for 5 seconds. The Wi-Fi icon on the screen will
flash. When you hear a sound, the Wi-Fi module has been reset
successfully.
Resetting Wi-Fi Resetting Purifier
Hold down the buttons " " and " " simultaneously for 10
seconds. After you hear a sound, the purifier has been reset
successfully.
Filter Status Reminder Replacing and Resetting the Filter
1Turn over the purifier and remove the
filter by rotating it counterclockwise. 2Replace the filter by following the
instructions contained in the user
manual.
Resetting the Filter
After replacing the filter and turning on
the purifier, hold down " " for 5 seconds.
When you hear a sound, it indicates the
purifier has restarted the filter replacement
count.
Note: Power off purifier and disconnect it
from the power supply before performing
the following operations.
Note: Timely replacement of the filter once the
recommended filter life is over is advised. Once
the Pet Allergy Filter replaced, which contains
activated carbon, the filter will retain the odor of the
harmful gases it has absorbed, when saturated,
put the used filter in a place with sunshine and
ventilation to recover partial performance.
Filter Replacement Reminder
2
Filters should be replaced every 6–12
months. The app will send a reminder
when the filter's lifespan reaches 10% or
less.
Once filter life drops below 10%, the power
button will blink every time you turn on the
machine. Please replace the filter as soon
as possible to ensure normal operation and
optimal air purification.
How to Buy the Filter
Scan the QR Code or
Visit smartmi's online store
https://www.smartmiglobal.com
for more information.
Click on the product page on the app and
check the filter level, which will be displayed
as a percentage.
Checking Filter Lifespan
1
3
3
4
2
2
1
1
Maintenance and Care
Power off purifier and disconnect it from the power supply before performing the following operations.
Cleaning the Filter Housing
Turn over the purifier and remove the
filter by rotating it counterclockwise.
Use a vacuum cleaner to remove dust
from the ventilation hole and cabin
walls, or wipe them using a soft cloth.
Re-install the filter after it has been
cleaned.
Note: Do not spray liquid onto the purifier's
casing, or wipe it using a wet cloth. This
could lead to drops of water leaking into the
base of the device.
Cleaning Laser Particulate
Matter Sensor
Turn over the purifier and remove the
filter by rotating it counterclockwise.
Use a screwdriver to loosen the
screws on the sensor cover.
Remove the cover and clean it with a
hair dryer or pneumatic air gun.
Once cleaning is finished, fix the cover
back onto the sensor and tighten the
screws.
Note: Do NOT clean with hot air.
Linking the Device
to Smartmi Link
This product has been linked to the
Smartmi Link and can be controlled using
the app.
Scan the QR code or search for "Smartmi
Link" on the app store to download and
install the app. Go to the app's homepage,
click "+" in the middle of the page, then add
the device as prompted.
Note:
Please ensure that your Wi-Fi network is both
available and has Internet access. Place your
phone as close to this product as possible. (This
product does not support 5G networks)
This product will be listed as "Smartmi Air
Purifier P1" in the app's device listing.
Specifications
Smartmi Air Purifier P1 User Manual
Pollen
*Standards: Q/BJZMK0001-2018
**ANSI/AHAM AC-1-2019
Name Smartmi Air Purifier P1 Rated Voltage 24V
Model ZMKQJHQP11 / ZMKQJHQP12 Rated Power 30W
Item Dimensions Φ220 × 360.5 mm Power Supply Unit Input 100-240V~ 50/60Hz 1.0A
Net Weight Approx. 3 kg Clean Air Delivery Rate
(CADR Particles) 250 m³/h
Recommended Surface 17.5–30 m2* Pollen CADR 150cfm **
Dust CADR 130cfm ** Smoke CADR 120cfm **
Wireless Connectivity Wi-Fi IEEE 802.11 b/g/n 2.4GHz
Contains FCC ID : 2ANDL-TYWE3SE
This device complies with part 15 of the FCC Rules.
Operation is subject to the following two conditions:
(1)This device may not cause harmful interference, and
(2)This device must accept any interference received, including interference that may cause undesired operation.
Caution: Changes or modifications to this unit not expressly approved by the party responsible for compliance could void the
user's authority to operate the equipment.
NOTE: This equipment has been tested and found to comply with the limits for a Class B digital device, pursuant to part 15 of the
FCC Rules. These limits are designed to provide reasonable protection against harmful interference in a residential installation.
This equipment generates, uses and can radiate radio frequency energy and, if not installed and used in accordance with the
instructions, may cause harmful interference to radio communications. However, there is no guarantee that interference will not
occur in a particular installation. If this equipment does cause harmful interference to radio or television reception, which can be
determined by turning the equipment off and on, the user is encouraged to try to correct the interference by one or more of the
following measures:
—Reorient or relocate the receiving antenna.
—Increase the separation between the equipment and receiver.
—Connect the equipment into an outlet on a circuit different from that to which the receiver is connected.
—Consult the dealer or an experienced radio/TV technician for help.
Limited by local law regulations, version for North America does not have region selection option.
To satisfy FCC RF exposure requirements, a separation distance of 20 cm or more should be maintained between the antenna of
this device and persons during device operation.
To ensure compliance, operations at closer than this distance is not recommended.
210429-Y
Manufactured by: Beijing Smartmi Electronic Technology Co., Ltd.
Address:Room 201-203, Unit 6, Building A, No. 66,Zhufang Road, Qinghe, Haidian District, Beijing
For detailed e-manual, please go to https://www.smartmiglobal.com/pages/manual
For more information, please visit: https://www.smartmiglobal.com/
Need support? Please contact smartmi customer service: onlinesupport@smartmiglobal.com
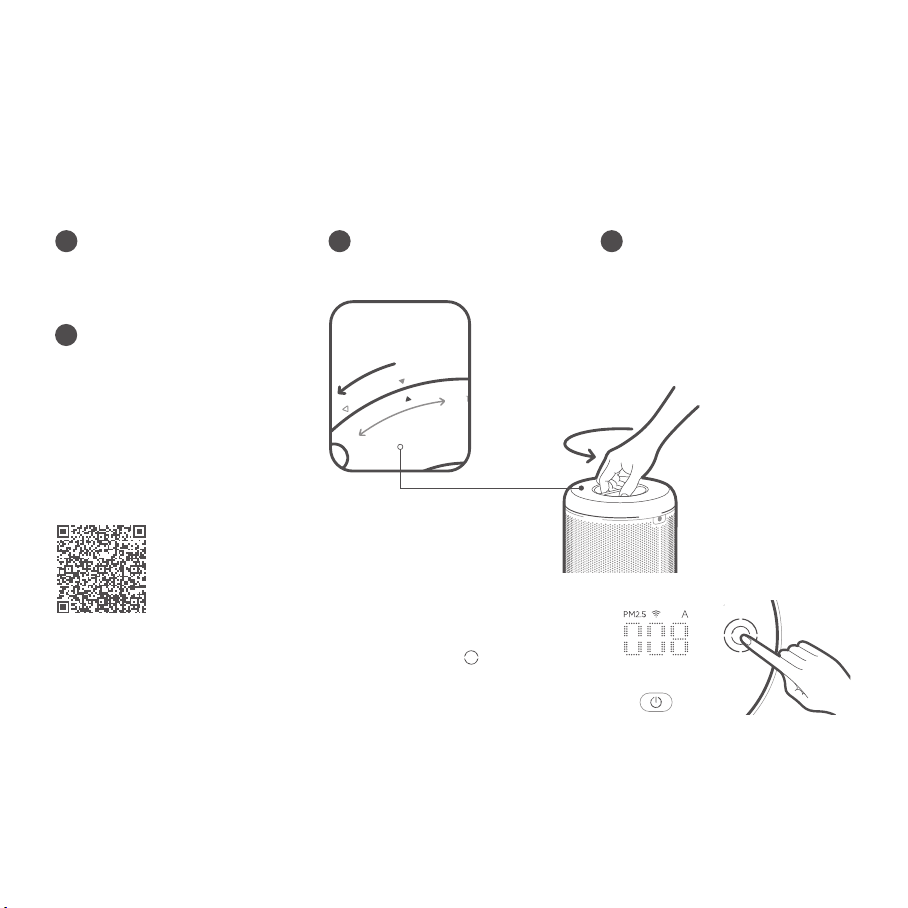
9
12
10
13
11
14
www.smartmiglobal.com
Intelligent Control with Apple HomeKit
Open the Home app on your iPhone/iPad.
Tap "Add Accessory" and then scan the HomeKit setup code on the product sticker
(two stickers on the device unit, see illustration), or enter the eight-digit setup code
above the HomeKit Setup Code. The device will then be linked to the Apple Home
app.
The device can be linked to Smartmi
Link after linking to HomeKit. Go to
the Personal Info page on Smartmi
Link. Tap "HomeKit Info" and then link
the HomeKit device as prompted.
Devices linked to Smartmi Link can
also be added to HomeKit. Go to the
Device Control page on Smartmi Link.
Tap "Add to HomeKit" in "Settings"
and then link the device to HomeKit
as prompted.
Note:
Please ensure that your Wi-Fi network is both
available and has Internet access. Place your
phone as close to this product as possible. (This
product does not support 5G networks).
To control this accessory which is compatible
with HomeKit, it is recommended to use iOS
13.0 or a later version.
Please keep the HomeKit setup code, as you
will need to scan the code to link the device to
HomeKit after a factory reset.
iPad and iPhone are trademarks of Apple Inc.,
registered in the U.S. and other countries.
Controlling this HomeKit-enabled accessory
automatically and away from home requires a
HomePod, Apple TV, or iPad set up as a home
hub. It is recommended that you update to the
latest software and operating system.
1
2
HomeKit Setup Code
When your phone connects to the purifier for the first time or if
your phone fails to connect, hold down the buttons " " and " "
simultaneously for 5 seconds. The Wi-Fi icon on the screen will
flash. When you hear a sound, the Wi-Fi module has been reset
successfully.
Resetting Wi-Fi Resetting Purifier
Hold down the buttons " " and " " simultaneously for 10
seconds. After you hear a sound, the purifier has been reset
successfully.
Filter Status Reminder Replacing and Resetting the Filter
1Turn over the purifier and remove the
filter by rotating it counterclockwise. 2Replace the filter by following the
instructions contained in the user
manual.
Resetting the Filter
After replacing the filter and turning on
the purifier, hold down " " for 5 seconds.
When you hear a sound, it indicates the
purifier has restarted the filter replacement
count.
Note: Power off purifier and disconnect it
from the power supply before performing
the following operations.
Note: Timely replacement of the filter once the
recommended filter life is over is advised. Once
the Pet Allergy Filter replaced, which contains
activated carbon, the filter will retain the odor of the
harmful gases it has absorbed, when saturated,
put the used filter in a place with sunshine and
ventilation to recover partial performance.
Filter Replacement Reminder
2
Filters should be replaced every 6–12
months. The app will send a reminder
when the filter's lifespan reaches 10% or
less.
Once filter life drops below 10%, the power
button will blink every time you turn on the
machine. Please replace the filter as soon
as possible to ensure normal operation and
optimal air purification.
How to Buy the Filter
Scan the QR Code or
Visit smartmi's online store
https://www.smartmiglobal.com
for more information.
Click on the product page on the app and
check the filter level, which will be displayed
as a percentage.
Checking Filter Lifespan
1
3
3
4
2
2
1
1
Maintenance and Care
Power off purifier and disconnect it from the power supply before performing the following operations.
Cleaning the Filter Housing
Turn over the purifier and remove the
filter by rotating it counterclockwise.
Use a vacuum cleaner to remove dust
from the ventilation hole and cabin
walls, or wipe them using a soft cloth.
Re-install the filter after it has been
cleaned.
Note: Do not spray liquid onto the purifier's
casing, or wipe it using a wet cloth. This
could lead to drops of water leaking into the
base of the device.
Cleaning Laser Particulate
Matter Sensor
Turn over the purifier and remove the
filter by rotating it counterclockwise.
Use a screwdriver to loosen the
screws on the sensor cover.
Remove the cover and clean it with a
hair dryer or pneumatic air gun.
Once cleaning is finished, fix the cover
back onto the sensor and tighten the
screws.
Note: Do NOT clean with hot air.
Linking the Device
to Smartmi Link
This product has been linked to the
Smartmi Link and can be controlled using
the app.
Scan the QR code or search for "Smartmi
Link" on the app store to download and
install the app. Go to the app's homepage,
click "+" in the middle of the page, then add
the device as prompted.
Note:
Please ensure that your Wi-Fi network is both
available and has Internet access. Place your
phone as close to this product as possible. (This
product does not support 5G networks)
This product will be listed as "Smartmi Air
Purifier P1" in the app's device listing.
Specifications
Smartmi Air Purifier P1 User Manual
Pollen
*Standards: Q/BJZMK0001-2018
**ANSI/AHAM AC-1-2019
Name Smartmi Air Purifier P1 Rated Voltage 24V
Model ZMKQJHQP11 / ZMKQJHQP12 Rated Power 30W
Item Dimensions Φ220 × 360.5 mm Power Supply Unit Input 100-240V~ 50/60Hz 1.0A
Net Weight Approx. 3 kg Clean Air Delivery Rate
(CADR Particles) 250 m³/h
Recommended Surface 17.5–30 m2* Pollen CADR 150cfm **
Dust CADR 130cfm ** Smoke CADR 120cfm **
Wireless Connectivity Wi-Fi IEEE 802.11 b/g/n 2.4GHz
Contains FCC ID : 2ANDL-TYWE3SE
This device complies with part 15 of the FCC Rules.
Operation is subject to the following two conditions:
(1)This device may not cause harmful interference, and
(2)This device must accept any interference received, including interference that may cause undesired operation.
Caution: Changes or modifications to this unit not expressly approved by the party responsible for compliance could void the
user's authority to operate the equipment.
NOTE: This equipment has been tested and found to comply with the limits for a Class B digital device, pursuant to part 15 of the
FCC Rules. These limits are designed to provide reasonable protection against harmful interference in a residential installation.
This equipment generates, uses and can radiate radio frequency energy and, if not installed and used in accordance with the
instructions, may cause harmful interference to radio communications. However, there is no guarantee that interference will not
occur in a particular installation. If this equipment does cause harmful interference to radio or television reception, which can be
determined by turning the equipment off and on, the user is encouraged to try to correct the interference by one or more of the
following measures:
—Reorient or relocate the receiving antenna.
—Increase the separation between the equipment and receiver.
—Connect the equipment into an outlet on a circuit different from that to which the receiver is connected.
—Consult the dealer or an experienced radio/TV technician for help.
Limited by local law regulations, version for North America does not have region selection option.
To satisfy FCC RF exposure requirements, a separation distance of 20 cm or more should be maintained between the antenna of
this device and persons during device operation.
To ensure compliance, operations at closer than this distance is not recommended.
210429-Y
Manufactured by: Beijing Smartmi Electronic Technology Co., Ltd.
Address:Room 201-203, Unit 6, Building A, No. 66,Zhufang Road, Qinghe, Haidian District, Beijing
For detailed e-manual, please go to https://www.smartmiglobal.com/pages/manual
For more information, please visit: https://www.smartmiglobal.com/
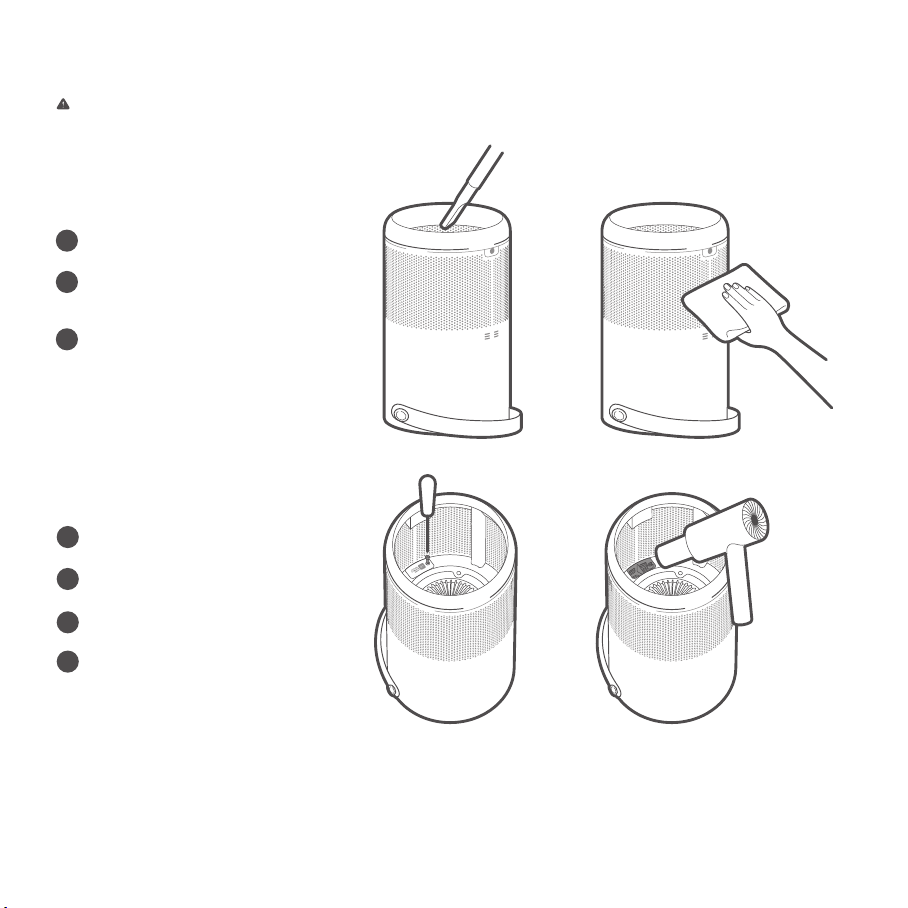
Need support? Please contact smartmi customer service: onlinesupport@smartmiglobal.com
9
12
10
13
11
14
www.smartmiglobal.com
Intelligent Control with Apple HomeKit
Open the Home app on your iPhone/iPad.
Tap "Add Accessory" and then scan the HomeKit setup code on the product sticker
(two stickers on the device unit, see illustration), or enter the eight-digit setup code
above the HomeKit Setup Code. The device will then be linked to the Apple Home
app.
The device can be linked to Smartmi
Link after linking to HomeKit. Go to
the Personal Info page on Smartmi
Link. Tap "HomeKit Info" and then link
the HomeKit device as prompted.
Devices linked to Smartmi Link can
also be added to HomeKit. Go to the
Device Control page on Smartmi Link.
Tap "Add to HomeKit" in "Settings"
and then link the device to HomeKit
as prompted.
Note:
Please ensure that your Wi-Fi network is both
available and has Internet access. Place your
phone as close to this product as possible. (This
product does not support 5G networks).
To control this accessory which is compatible
with HomeKit, it is recommended to use iOS
13.0 or a later version.
Please keep the HomeKit setup code, as you
will need to scan the code to link the device to
HomeKit after a factory reset.
iPad and iPhone are trademarks of Apple Inc.,
registered in the U.S. and other countries.
Controlling this HomeKit-enabled accessory
automatically and away from home requires a
HomePod, Apple TV, or iPad set up as a home
hub. It is recommended that you update to the
latest software and operating system.
1
2
HomeKit Setup Code
When your phone connects to the purifier for the first time or if
your phone fails to connect, hold down the buttons " " and " "
simultaneously for 5 seconds. The Wi-Fi icon on the screen will
flash. When you hear a sound, the Wi-Fi module has been reset
successfully.
Resetting Wi-Fi Resetting Purifier
Hold down the buttons " " and " " simultaneously for 10
seconds. After you hear a sound, the purifier has been reset
successfully.
Filter Status Reminder Replacing and Resetting the Filter
1Turn over the purifier and remove the
filter by rotating it counterclockwise. 2Replace the filter by following the
instructions contained in the user
manual.
Resetting the Filter
After replacing the filter and turning on
the purifier, hold down " " for 5 seconds.
When you hear a sound, it indicates the
purifier has restarted the filter replacement
count.
Note: Power off purifier and disconnect it
from the power supply before performing
the following operations.
Note: Timely replacement of the filter once the
recommended filter life is over is advised. Once
the Pet Allergy Filter replaced, which contains
activated carbon, the filter will retain the odor of the
harmful gases it has absorbed, when saturated,
put the used filter in a place with sunshine and
ventilation to recover partial performance.
Filter Replacement Reminder
2
Filters should be replaced every 6–12
months. The app will send a reminder
when the filter's lifespan reaches 10% or
less.
Once filter life drops below 10%, the power
button will blink every time you turn on the
machine. Please replace the filter as soon
as possible to ensure normal operation and
optimal air purification.
How to Buy the Filter
Scan the QR Code or
Visit smartmi's online store
https://www.smartmiglobal.com
for more information.
Click on the product page on the app and
check the filter level, which will be displayed
as a percentage.
Checking Filter Lifespan
1
3
3
4
2
2
1
1
Maintenance and Care
Power off purifier and disconnect it from the power supply before performing the following operations.
Cleaning the Filter Housing
Turn over the purifier and remove the
filter by rotating it counterclockwise.
Use a vacuum cleaner to remove dust
from the ventilation hole and cabin
walls, or wipe them using a soft cloth.
Re-install the filter after it has been
cleaned.
Note: Do not spray liquid onto the purifier's
casing, or wipe it using a wet cloth. This
could lead to drops of water leaking into the
base of the device.
Cleaning Laser Particulate
Matter Sensor
Turn over the purifier and remove the
filter by rotating it counterclockwise.
Use a screwdriver to loosen the
screws on the sensor cover.
Remove the cover and clean it with a
hair dryer or pneumatic air gun.
Once cleaning is finished, fix the cover
back onto the sensor and tighten the
screws.
Note: Do NOT clean with hot air.
Linking the Device
to Smartmi Link
This product has been linked to the
Smartmi Link and can be controlled using
the app.
Scan the QR code or search for "Smartmi
Link" on the app store to download and
install the app. Go to the app's homepage,
click "+" in the middle of the page, then add
the device as prompted.
Note:
Please ensure that your Wi-Fi network is both
available and has Internet access. Place your
phone as close to this product as possible. (This
product does not support 5G networks)
This product will be listed as "Smartmi Air
Purifier P1" in the app's device listing.
Specifications
Smartmi Air Purifier P1 User Manual
Pollen
*Standards: Q/BJZMK0001-2018
**ANSI/AHAM AC-1-2019
Name Smartmi Air Purifier P1 Rated Voltage 24V
Model ZMKQJHQP11 / ZMKQJHQP12 Rated Power 30W
Item Dimensions Φ220 × 360.5 mm Power Supply Unit Input 100-240V~ 50/60Hz 1.0A
Net Weight Approx. 3 kg Clean Air Delivery Rate
(CADR Particles) 250 m³/h
Recommended Surface 17.5–30 m2* Pollen CADR 150cfm **
Dust CADR 130cfm ** Smoke CADR 120cfm **
Wireless Connectivity Wi-Fi IEEE 802.11 b/g/n 2.4GHz
Contains FCC ID : 2ANDL-TYWE3SE
This device complies with part 15 of the FCC Rules.
Operation is subject to the following two conditions:
(1)This device may not cause harmful interference, and
(2)This device must accept any interference received, including interference that may cause undesired operation.
Caution: Changes or modifications to this unit not expressly approved by the party responsible for compliance could void the
user's authority to operate the equipment.
NOTE: This equipment has been tested and found to comply with the limits for a Class B digital device, pursuant to part 15 of the
FCC Rules. These limits are designed to provide reasonable protection against harmful interference in a residential installation.
This equipment generates, uses and can radiate radio frequency energy and, if not installed and used in accordance with the
instructions, may cause harmful interference to radio communications. However, there is no guarantee that interference will not
occur in a particular installation. If this equipment does cause harmful interference to radio or television reception, which can be
determined by turning the equipment off and on, the user is encouraged to try to correct the interference by one or more of the
following measures:
—Reorient or relocate the receiving antenna.
—Increase the separation between the equipment and receiver.
—Connect the equipment into an outlet on a circuit different from that to which the receiver is connected.
—Consult the dealer or an experienced radio/TV technician for help.
Limited by local law regulations, version for North America does not have region selection option.
To satisfy FCC RF exposure requirements, a separation distance of 20 cm or more should be maintained between the antenna of
this device and persons during device operation.
To ensure compliance, operations at closer than this distance is not recommended.
210429-Y
Manufactured by: Beijing Smartmi Electronic Technology Co., Ltd.
Address:Room 201-203, Unit 6, Building A, No. 66,Zhufang Road, Qinghe, Haidian District, Beijing
For detailed e-manual, please go to https://www.smartmiglobal.com/pages/manual
For more information, please visit: https://www.smartmiglobal.com/
Other manuals for P1
3
Table of contents
Other smartmi Air Cleaner manuals


