Smeg TSF03 User manual

Description
9
EN
2 Description
2.1 Product description
Model TSF03 - 4-slice Toaster
1 Large slots with automatic centering of the
slice
2 Toaster lever
3 Double control panel
4 Crumb trays
2
3
4
1

Description
10
2.2 Control panel
The toaster is equipped with two
independent control panels. Each panel
controls 2 slots to allow a different setting of
the available functions.
1. Defrost function button
This function is useful when using frozen
bread. During toasting the defrost button
will light up to indicate that the cycle is
activated.
2. Browning control knob
This control is used to select one of the 6
different browning levels or the Reheat
function. During toasting the central LED
lights up to indicate that the toasting cycle is
activated.
3. Browning indicator
The Browning indicator shows the selected
browning level or the selected Reheat
function.
4. Stop function button
The Stop button can be used to cancel or
stop the toasting cycle at any time.
5. Bagel function button
This feature will toast one side of a bagel or
any other kind of bread, without toasting the
other side. During toasting the Bagel button
will light up to indicate that the function has
been activated.
6. Reheat function
This function is used to reheat cold toast or
to continue a toasting cycle if the result is not
satisfactory. During toasting the central LED
lights up to indicate that the cycle is
activated.
5
5
6
3
2
4
1
5
6
3
2
4
1

Use
11
EN
3 Use
Volts: 120 Volts AC only.
Hertz: 60 Hz
• Do not use an extension cord. If the
power supply cord is too short, have a
qualified electrician or serviceman install
an outlet near the appliance.
• A short power supply cord (or
detachable power supply cord) should
be used to reduce the risk resulting from
becoming entangled in or tripping over a
longer cord.
• Longer detachable power supply cords
or extension cords are available and
may be used if care is exercised in their
use.
If a longer detachable power supply cord
or extension cord is used:
• The marked electrical rating of the cord
set or extension cord should be at least
as great as the electrical rating of the
appliance.
• The cord should be arranged so that it
will not drape over the countertop or
tabletop where it can be pulled on by
children or tripped over unintentionally.
• If the appliance is of the grounded type,
the extension cord should be a
grounding-type 3-wire cord.
3.1 Before first use
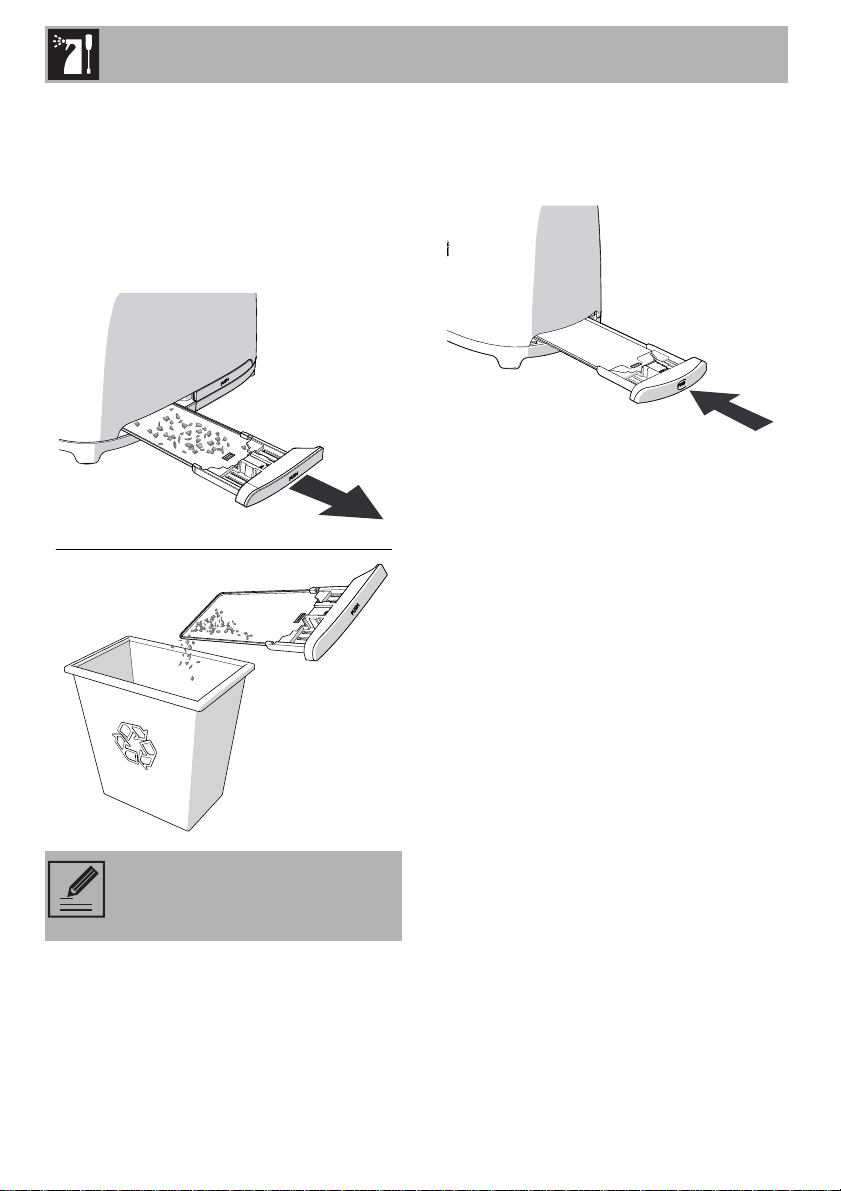
1. Remove all stickers and any packing or
printed material that might have fallen
inside during shipping or handling. Do
not probe inside the toaster with a metal
object.
2. Clean the outside of the toaster with a
damp cloth.
3. Use the toaster for the first time without
any bread in it.
4. Turn the two browning control knobs to
the maximum position and lower the two
toaster levers. This will eliminate any
residual dust that has fallen into the
toaster during manufacturing or transport.
Electrical Shock Hazard
• Plug into a grounded 3 prong outlet.
• Do not remove earth prong.
• Do not use an adapter.
• Do not use an extension cord.
• Failure to follow these instructions can
result in death, fire or electrical shock.
Your toaster has a 3-prong
grounded plug. To reduce the risk
of electrical shock, this plug will fit
in an outlet only one way. If the
plug does not fit in the outlet,
contact a qualified electrician. Do
not modify the plug in any way.
During first use there may be some
smoke and odors.

Use
12
3.2 Operation
1. If necessary, shorten the cord by
wrapping it under the base.
2. Plug in the toaster.
3. Insert the bread in the slot.
4. Choose the desired browning level
(Browning levels 1 to 6, from light to
dark) or the “Reheat function” .
User hints & tips
• The first batch of toast you make
enables the heating elements to reach
the correct toasting temperature. Please
note that further batches of toast could
take less time.
• Remember that the type of bread you
use will impact the toasting times. The
fresher the bread you use, the longer it
will take to toast. Different kinds of
bread have different moisture content
and will require different browning
levels. For example, fruit breads
generally toast much quicker, and
freshly baked breads will take longer as
they have a greater moisture content.
For best results:
• Toast only one type of bread at a time.
• Toast bread slices of the same thickness.
• Use bread slices no thicker than one
inch.
• If you are using handcut bread, try to cut
slices as evenly as possible. Uneven
slices will toast unevenly.
• Be aware that if you use very thin or
broken slices of bread, they will burn.
If the bread is not square, you may
need to turn the bread on its side
to get a better fit and optimize the
toasting surface.

Use
13
EN
5. Push the lever down until it clicks to
activate the toasting cycle.
6. If needed, select the additional functions
Defrost or Bagel or the two
combined.
The heating element is now activated. The
bread will be centered in the slot
automatically for toasting.
7. The toasted bread will pop up
automatically when the toast is ready.
3.3 Special functions
Canceling/stopping the toasting cycle
At any time, it is possible to cancel or stop
the toasting cycle by pushing the
button.
Defrost
This function gently defrosts frozen bread
and toasts it to the selected browning level.
To activate it, insert the bread into the slot,
select the desired browning level, press the
lever down until it clicks, then push the
defrost button, which will light up. Toasting
time will be automatically increased to
allow the bread to defrost and brown
correctly. When the toast pops up
automatically, the light of the defrost button
will switch off.
Bagel
This special function is ideal for toasting one
side only, for bagels, flat bread, English
muffins, baguettes, etc. To use the function,
simply insert the bread into the slot with the
side that you want toasted facing the
outside. Select the desired browning level,
press the lever down until it clicks, then push
the Bagel function button, which will light
up. When the bread is toasted, it will pop
up automatically and the Bagel function
light will switch off.
If the toast is not browned enough
and needs more time, press the
Reheat button to extend the
toasting time.
Warning
• If the appliance is not plugged in, the
lever will not lock.

Use
14
Reheat
This function is used to reheat cold toast or
to continue a toasting cycle if the result is not
satisfactory. To activate it, insert the bread
into the slot, select the Reheat function on
the browning control knob and press the
lever down until it clicks. The central light of
the browning control knob will light up.
When the toast is ready, it will pop up
automatically and the light of the control
knob will switch off.
3.4 Using optional accessories
Sandwich racks
TSSR01 Model suitable for TSF03 Toaster
The sandwich racks are ideal for toasting
filled sandwiches, or for easier handling of
smaller items such as bagels.
Defrost or Reheat can be
selected at the same time as the
Bagel function.
Accessories may differ according
to the model.
Hot appliance
• The bun warmer and sandwich rack will
be hot during the toasting cycle. When
removing it from the toaster, take care
not to burn yourself by touching the
metal parts.

Use
15
EN
How to use:
1. Open the rack with the handles.
2. Place the sandwich inside the rack.
3. Close the sandwich rack handles
together to grip the sandwich in the
middle of the racks.
4. Insert the sandwich rack into the slot and
select a browning level. If a little more
browning is required, you can use the
reheat button to extend the toasting
time.
5. Push the lever down until it clicks to
activate the toasting cycle.
6. When the toasting cycle has ended
remove the sandwich rack from the
toaster.
User hints & tips
• Lightly butter the outside of the bread,
this prevents burning and helps with the
warming of the filling. Do not butter the
inside of the sandwich.
• For best results use thinly sliced
ingredients and finely grated cheese.
• For best results use cold meat (ham,
turkey, etc.) at room temperature, not
straight from the refrigerator.
• Do not overfill the sandwich.
• If using a low browning setting, the filling
might not heat through correctly. In this
case, at the end of the toasting cycle,
leave the toast inside the toasting slot for
longer, or extend the time by using the
reheat button.
Warning
• If the appliance is not plugged in, the
toaster lever will not lock.

Use
16
Bun Warmer
TSBW01 Model suitable for TSF03 Toaster
The bun warmer is used to warm small
bread rolls, flat bread or pastries.
How to use:
1. Place the bun warmer on top of the
toaster, making sure the wire feet on the
bottom of the warmer fit into the toaster
slots.
2. Place small bread rolls, flat bread or
pastries on top of the warmer and set the
browning level to ‘1’ (no higher).
3. Lower the lever until it clicks to activate
the toasting cycle.
Warning
• To prevent overheating of the
appliance, please use only one bun
warmer at a time.

Cleaning and care
17
EN
4 Cleaning and care
4.1 Instructions
4.2 Maintenance
Any other servicing should be performed by
an authorized service representative.
4.3 Cleaning the surfaces
To keep the surfaces in good condition,
clean regularly after use. Let them cool first.
4.4 Ordinary daily cleaning
Never use products that contain abrasives
or chlorine-based acids.
Pour the product onto a damp cloth and
wipe the surface, then wipe over thoroughly
and dry with a soft cloth or a microfiber
cloth.
4.5 Food stains or residues
Do not use metallic sponges or sharp
scrapers as they will damage the surfaces.
Use ordinary non-abrasive products with
the aid of wooden or plastic utensils if
necessary. Wipe over thoroughly and dry
with a soft cloth or a microfiber cloth.
Improper use
Electrical shock hazard
• Unplug the cord before cleaning the
toaster, crumb trays or optional
accessories.
Hot appliance
Burns Hazard
• Always let the appliance and optional
accessories cool down before cleaning.
Improper use
Risk of damage to surfaces
• Do not use steam jets for cleaning the
appliance.
• Do not use cleaning products containing
chlorine, ammonia or bleach on steel
parts or parts with metallic finishes (e.g.
anodizing, nickel- or chromium-plating).
• Do not use abrasive or corrosive
detergents (e.g. powder products, stain
removers or metallic sponges).
• Do not use rough or abrasive materials
or sharp metal scrapers.
If grease or oil splatters on the
toaster, wipe it off immediately
using a clean, damp cotton cloth.

Cleaning and care
18
4.6 Cleaning the crumb trays
The toaster is provided with two crumb
trays, one for each pair of slots.
To clean the crumb trays, do the following:
1. Push the Crumb Tray to unlock it, then pull
to slide it out and empty it. The Crumb
Tray should be emptied after each use.
2. Put the crumb trays back in the toaster.
Press the trays in until they click into
position. Do not use the toaster without
the crumb trays in the proper position.
3. Do not use any toaster cover.
4.7 Cleaning the optional sandwich
rack and bun warmer
Wash the sandwich rack and bun warmer
by hand in warm soapy water. After
washing, rinse them and dry them
thoroughly with a soft cloth.
The crumb trays can be washed by
hand. Dry the trays carefully before
putting them back in the toaster.

Cleaning and care
19
EN
4.8 Troubleshooting
If your toaster should fail to operate,
check the following:
• Check that the toaster is plugged into a
grounded 3-prong electrical outlet. If it is,
unplug the toaster.
• Plug in the toaster.
• If the toaster still does not work, check
the household fuse or circuit breaker.
If the problem cannot be solved:
• See the Smeg Warranty and Service
sections.
Warning
Electrical Shock Hazard
• Plug into a grounded 3 prong outlet.
• Do not remove ground prong.
• Do not use an adapter.
• Do not use an extension cord.
• Failure to follow these instructions can
result in death, fire or electrical shock.
Other manuals for TSF03
1
Table of contents
Other Smeg Toaster manuals

Smeg
Smeg PAE TSF01GREU User manual

Smeg
Smeg DOLCE&GABBANA TSF01DGBUS User manual

Smeg
Smeg TSF03 User manual

Smeg
Smeg DOLCE&GABBANA TSF01DGBEU User manual

Smeg
Smeg TSF01 User manual

Smeg
Smeg TSF01WHEU User manual

Smeg
Smeg TSF03SSEU User manual

Smeg
Smeg TSF01-02 User manual

Smeg
Smeg TSF01 User manual

Smeg
Smeg TSF03DGEU User manual