Smeg KFV92E User manual

Libretto istruzioni
Instructions Manual
Manuel d’Instructions
Bedienungsanleitung
Gebruiksaanwijzing
Manual de instrucciones
Manual de Instruções
Brugsvejledning
Bruksanvisning
Руководство по эксплуатации
Instrukcja Obsługi
Bruksanvisning
Käyttöohje
KFV92E

2
2
INDICE
CONSIGLI E SUGGERIMENTI.............................................................................................................................................. 5
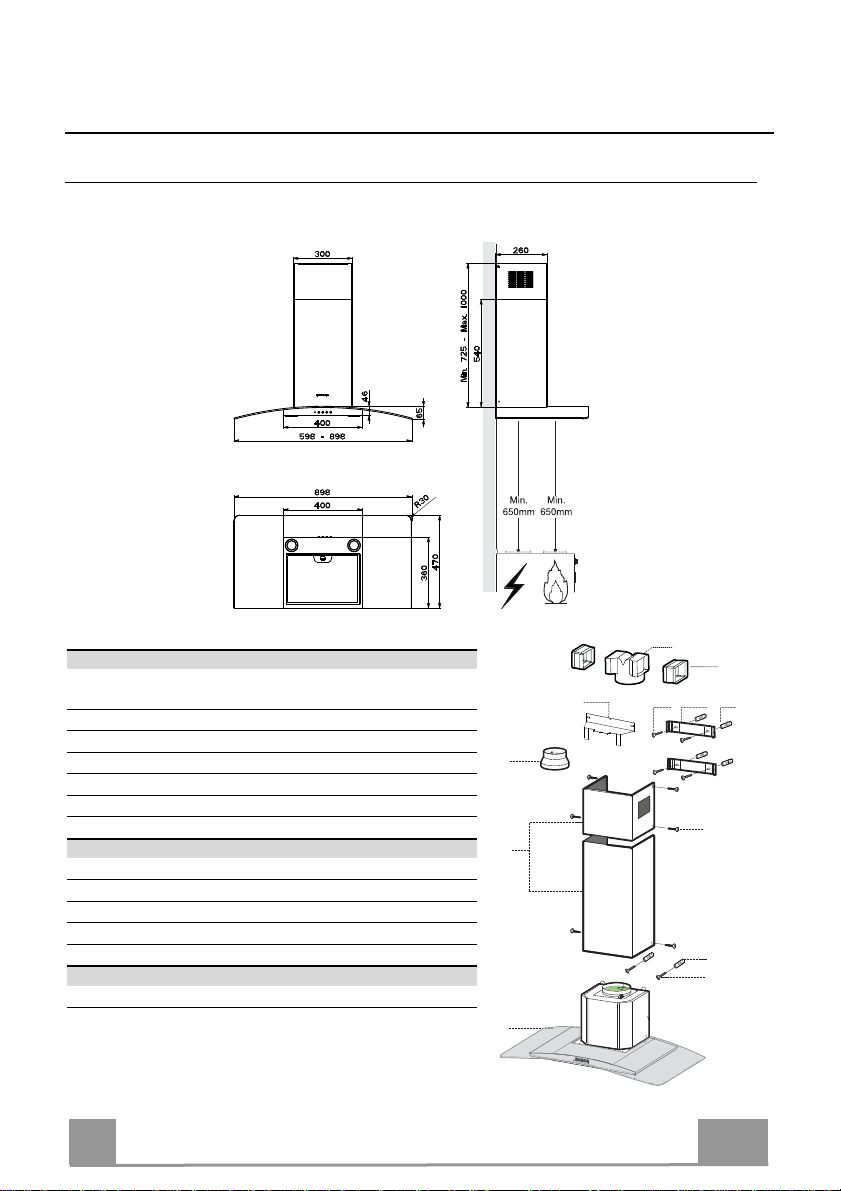
CARATTERISTICHE.............................................................................................................................................................. 8
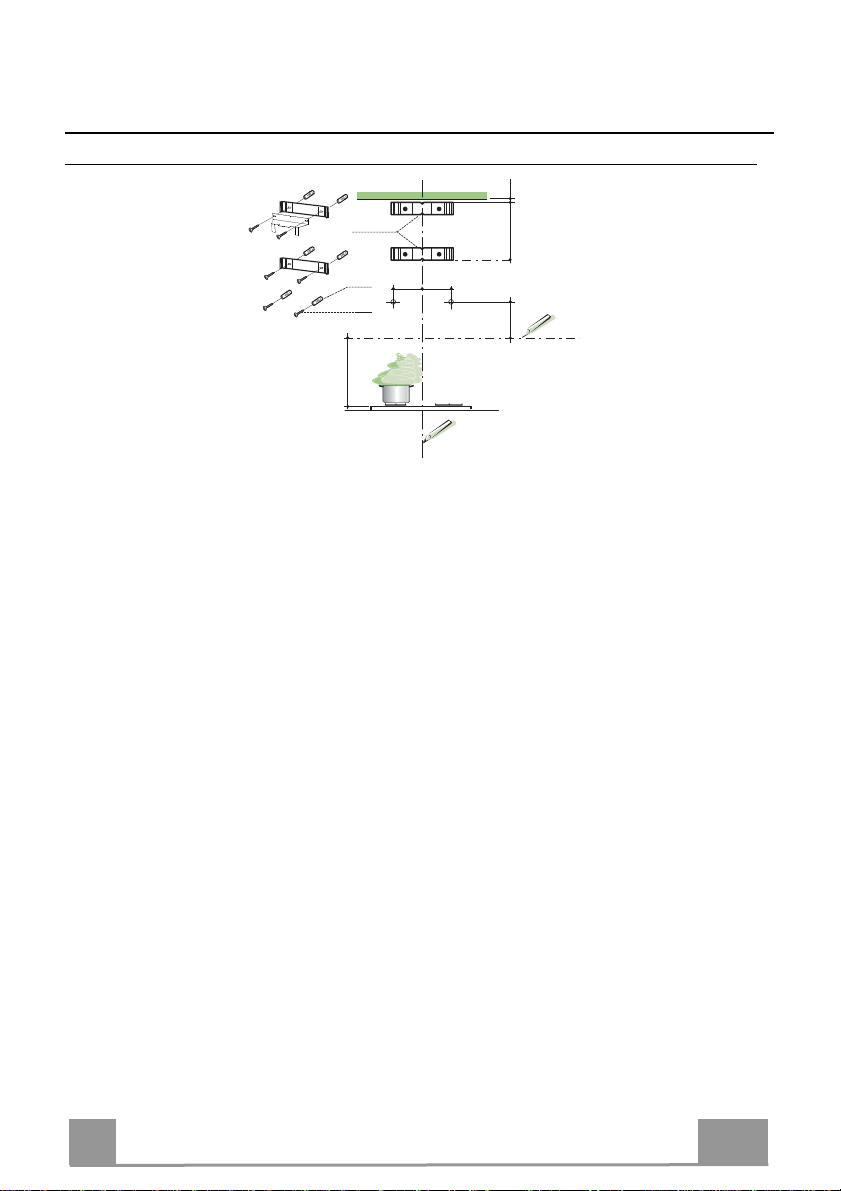
INSTALLAZIONE ................................................................................................................................................................... 9
USO...................................................................................................................................................................................... 12
MANUTENZIONE ................................................................................................................................................................ 13
INDEX
RECOMMENDATIONS AND SUGGESTIONS ................................................................................................................... 14
CHARACTERISTICS ........................................................................................................................................................... 17
INSTALLATION.................................................................................................................................................................... 18
USE...................................................................................................................................................................................... 21
MAINTENANCE................................................................................................................................................................... 22
SOMMAIRE
CONSEILS ET SUGGESTIONS.......................................................................................................................................... 23
CARACTERISTIQUES......................................................................................................................................................... 26
INSTALLATION.................................................................................................................................................................... 27
UTILISATION ....................................................................................................................................................................... 30
ENTRETIEN......................................................................................................................................................................... 31
INHALTSVERZEICHNIS
EMPFEHLUNGEN UND HINWEISE ................................................................................................................................... 32
CHARAKTERISTIKEN......................................................................................................................................................... 35
MONTAGE ........................................................................................................................................................................... 36
BEDIENUNG........................................................................................................................................................................ 39
WARTUNG........................................................................................................................................................................... 40
INHOUDSOPGAVE
ADVIEZEN EN SUGGESTIES............................................................................................................................................. 41
EIGENSCHAPPEN .............................................................................................................................................................. 44
INSTALLATIE....................................................................................................................................................................... 45
GEBRUIK ............................................................................................................................................................................. 48
ONDERHOUD...................................................................................................................................................................... 49
ÍNDICE
CONSEJOS Y SUGERENCIAS........................................................................................................................................... 50
CARACTERÍSTICAS ........................................................................................................................................................... 53
INSTALACIÓN ..................................................................................................................................................................... 54
USO...................................................................................................................................................................................... 57
MANTENIMIENTO............................................................................................................................................................... 58
IT
EN
FR
DE
NL
ES

3
3
ÍNDICE
CONSELHOS E SUGESTÕES............................................................................................................................................ 59
CARACTERÍSTICAS ........................................................................................................................................................... 62
INSTALAÇÃO....................................................................................................................................................................... 63
UTILIZAÇÃO ........................................................................................................................................................................ 66
MANUTENÇÃO.................................................................................................................................................................... 67
УКАЗАТЕЛЬ
СОВЕТЫ ИРЕКОМЕНДАЦИИ .......................................................................................................................................... 68
ХАРАКТЕРИСТИКИ............................................................................................................................................................ 71
УСТАНОВКА........................................................................................................................................................................ 72
ЭКСПЛУАТАЦИЯ................................................................................................................................................................ 75
УХОД.................................................................................................................................................................................... 76
INNEHÅLL
REKOMMENDATIONER OCH TIPS................................................................................................................................... 77
EGENSKAPER..................................................................................................................................................................... 80
INSTALLATION.................................................................................................................................................................... 81
ANVÄNDING........................................................................................................................................................................ 84
UNDERHÅLL........................................................................................................................................................................ 85
INDHOLD
RÅD OG ANVISNINGER ..................................................................................................................................................... 86
APPARATBESKRIVELSE ................................................................................................................................................... 89
INSTALLATION.................................................................................................................................................................... 90
BRUG................................................................................................................................................................................... 93
VEDLIGEHOLDELSE .......................................................................................................................................................... 94
SPIS TREŚCI
UWAGI I SUGESTIE............................................................................................................................................................ 95
WŁAŚCIWOŚCI TECHNICZNE........................................................................................................................................... 98
INSTALACJA........................................................................................................................................................................ 99
UŻYTKOWANIE................................................................................................................................................................. 102
KONSERWACJA ............................................................................................................................................................... 103
INNHOLD
ANBEFALINGER OG FORSLAG ...................................................................................................................................... 104
EGENSKAPER................................................................................................................................................................... 107
INSTALLASJON................................................................................................................................................................. 108
BRUK ................................................................................................................................................................................. 111
VEDLIKEHOLD.................................................................................................................................................................. 112
PT
RU
SE
DK
PL
NO

4
4
SISÄLTÖ
OHJEET JA SUOSITUKSET ............................................................................................................................................. 113
MITAT JA OSAT ................................................................................................................................................................ 116
ASENNUS.......................................................................................................................................................................... 117
KÄYTTÖ............................................................................................................................................................................. 120
HUOLTO ............................................................................................................................................................................ 121
سﺮﻬﻔﻟا
تﺎﺣاﺮﺘﻗا وتادﺎﺷرا............................................................................................................................................122
ﺺﺋﺎﺼﺨﻟا.........................................................................................................................................................125
ﺐﻴآﺮﺘﻟا...........................................................................................................................................................126
ماﺪﺨﺘﺳﻻا...........................................................................................................................................................129
ﺔﻧﺎﻴﺼﻟا ﺔﻴﻠﻤﻋ..................................................................................................................................................130
FI
SA

EN 1
14
RECOMMENDATIONS AND SUGGESTIONS
The Instructions for Use apply to several versions of this appliance.
Accordingly, you may find descriptions of individual features that do not
apply to your specific appliance.
INSTALLATION
• The manufacturer will not be held liable for any damages resulting from
incorrect or improper installation.
• The minimum safety distance between the cooker top and the extractor hood
is 650 mm (some models can be installed at a lower height, please refer to
the paragraphs on working dimensions and installation).
• Check that the mains voltage corresponds to that indicated on the rating
plate fixed to the inside of the hood.
• For Class I appliances, check that the domestic power supply guarantees
adequate earthing.
Connect the extractor to the exhaust flue through a pipe of minimum
diameter 120 mm. The route of the flue must be as short as possible.
• Do not connect the extractor hood to exhaust ducts
carrying combustion fumes (boilers, fireplaces, etc.).
• If the extractor is used in conjunction with non-electrical
appliances (e.g. gas burning appliances), a sufficient
degree of aeration must be guaranteed in the room in
order to prevent the backflow of exhaust gas. The
kitchen must have an opening communicating directly
with the open air in order to guarantee the entry of clean air. When the
cooker hood is used in conjunction with appliances supplied with energy
other than electric, the negative pressure in the room must not exceed 0,04
mbar to prevent fumes being drawn back into the room by the cooker hood.
• The air must not be discharged into a flue that is used for
exhausting fumes from appliances burning gas or other
fuels (not applicable to appliances that only discharge the
air back into the room).
• In the event of damage to the power cable, it must be
replaced by the manufacturer or by the technical service
department, in order to prevent any risks.
2°

EN 1
15
• If the instructions for installation for the gas hob specify a greater distance
specified above, this has to be taken into account. Regulations concerning
the discharge of air have to be fulfilled.
• Use only screws and small parts in support of the hood.
Warning: Failure to install the screws or fixing device in accordance with
these instructions may result in electrical hazards.
• Connect the hood to the mains through a two-pole switch having a contact
gap of at least 3 mm.
USE
• The extractor hood has been designed exclusively for domestic use to
eliminate kitchen smells.
• Never use the hood for purposes other than for which it has been designed.
• Never leave high naked flames under the hood when it is in operation.
• Adjust the flame intensity to direct it onto the bottom of the pan only, making
sure that it does not engulf the sides.
• Deep fat fryers must be continuously monitored
during use: overheated oil can burst into flames.
• Do not flambè under the range hood; risk of fire.
• This appliance can be used by children aged from
8 years and above and persons with reduced
physical, sensory or mental capabilities or lack of
experience and knowledge if they have been given supervision or instruction
concerning use of the appliance in a safe way and understand the hazards
involved. Children shall not play with the appliance. Cleaning and user
maintenance shall not be made by children without supervision.
• This appliance is not intended for use by persons (including children) with
reduced physical, sensory or mental capabilities, or lack of experience and
knowledge, unless they have been given supervision or instruction
concerning use of the appliance by a person responsible for their safety.

EN 1
16
• “CAUTION: Accessible parts may become hot when used with cooking
appliances.”
MAINTENANCE
•Switch off or unplug the appliance from the mains supply before carrying out
any maintenance work.
• Clean and/or replace the Filters after the specified time period (Fire hazard).
• The Grease filters must be cleaned every 2 months of operation, or more
frequently for particularly heavy usage, and can be washed in a dishwasher.
• The Activated charcoal filter is not washable and cannot be regenerated,
and must be replaced approximately every 4 months of operation, or more
frequently for particularly heavy usage.
• "Failure to carry out cleaning as indicated will result in a fire hazard".
• Clean the hood using a damp cloth and a neutral liquid detergent.
The symbol on the product or on its packaging indicates that this product
may not be treated as household waste. Instead it shall be handed over to the
applicable collection point for the recycling of electrical and electronic
equipment. By ensuring this product is disposed of correctly, you will help
prevent potential negative consequences for the environment and human
health, which could otherwise be caused by inappropriate waste handling of
this product. For more detailed information about recycling of this product,
please contact your local city office, your household waste disposal service or
the shop where you purchased the product.

EN 1
17
CHARACTERISTICS
Dimensions
Components
Ref. Q.ty Product Components
11 Hood Body, complete with: Controls, Light, Blower,
Filters
21 Telescopic Chimney comprising:
2.1 1 Upper Section
2.2 1 Lower Section
91 Reducer Flange ø 150-120 mm
14.1 2 Air Outlet Connection Extension
15 1 Air Outlet Connection
Ref. Q.ty Installation Components
7.2.1 2 Upper Chimney Section Fixing Brackets
7.3 1 Air Outlet Connection Support
11 6 Wall Plugs
12a 6 Screws 4,2 x 44,4
12c 6 Screws 2,9 x 9,5
Q.ty Documentation
1 Instruction Manual
2.1
2.2
2
12c
12a 7.2.1 11
11
12a
9
7.3
14.1
15
1
1

EN 1
18
INSTALLATION
Wall drilling and bracket fixing
Wall marking:
• Draw a vertical line on the supporting wall up to the ceiling, or as high as practical, at the
centre of the area in which the hood will be installed.
• Draw a horizontal line at 650 mm above the hob.
• Place bracket 7.2.1 on the wall as shown about 1-2 mm from the ceiling or upper limit align-
ing the centre (notch) with the vertical reference line.
• Mark the wall at the centres of the holes in the bracket.
• Place bracket 7.2.1 on the wall as shown at X mm below the first bracket (X = height of the
upper chimney section supplied), aligning the centre (notch) with the vertical line.
• Mark the wall at the centres of the holes in the bracket.
• Mark a reference point as indicated at 116 mm from the vertical reference line and 310 mm
above the horizontal reference line.
• Repeat this operation on the other side.
• Drill ø 8 mm holes at all the centre points marked.
• Insert the wall plugs 11 in the holes.
• Fix the lower bracket 7.2.1 using the 12a screws (4,2 x 44,4) supplied.
• Fix the upper bracket 7.2.1 and the air outlet connection support 7.3 together using the 2
screws 12a (4,2 x 44,4) supplied.
• Insert the two screws 12a (4,2 x 44,4) supplied in the hood body fixing holes, leaving a gap
of 5-6 mm between the wall and the head of the screw.
11
12a
310 X
116
1÷2
116
650 min.
7.2.1

EN 1
19
Mounting the hood body
• Before attaching the hood body, tighten the two screws Vr lo-
cated on the hood body mounting points.
• Hook the hood body onto the screws 12a.
• Fully tighten the support screws 12a.
• Adjust the screws Vr to level the hood body.
12a
Vr
Connections
DUCTED VERSION AIR EXHAUST SYSTEM
When installing the ducted version, connect the hood to the
chimney using either a flexible or rigid pipe ø 150 or 120 mm,
the choice of which is left to the installer.
• To install a ø 120 mm air exhaust connection, insert the re-
ducer flange 9on the hood body outlet.
• Fix the pipe in position using sufficient pipe clamps (not sup-
plied).
• Remove possible charcoal filters.
9
ø 120ø 150
RECIRCULATION VERSION AIR OUTLET
• Insert the connection extension pieces laterally 14.1 in connec-
tion 15.
• Insert the Connector 15 into the Support bracket 7.3 and fix it
with a screw.
• Make sure that the outlet of the extension pieces 14.1 is hori-
zontally and vertically aligned with the chimney outlets.
• Connect the air outlet connection 15 to the hood body outlet
using either a flexible or rigid pipe ø 150 mm, the choice of
which is left to the installer.
• Ensure that the activated charcoal filters have been inserted.
ø 150
15
14.1
7.3

EN 2
20
ELECTRICAL CONNECTION
• Connect the hood to the mains through a two-pole switch hav-
ing a contact gap of at least 3 mm.
• Remove the grease filters (see paragraph Maintenance) being
sure that the connector of the feeding cable is correctly inserted
in the socket placed on the side of the fan.
Flue assembly
Upper exhaust flue
• Slightly widen the two sides of the upper flue and hook them
behind the brackets 7.2.1, making sure that they are well
seated.
• Secure the sides to the brackets by using the 4 screws 12c (2,9
x 9,5) supplied.
• Make sure that the outlet of the extensions pieces is aligned
with the chimney outlets.
Lower exhaust flue
• Slightly widen the two sides of the flue and hook them be-
tween the upper flue and the wall, making sure that they are
well seated.
• Fix the lower part laterally to the hood body by using the 2
screws 12c (2,9 x 9,5) supplied.
12c
12c
12c
2.1
2.2
2
7.2.1

EN 2
21
USE
L
V1 V2 V3
S
LLight Switches the lighting system on and off.
SLed Motor running led.
V1 Motor Switches the extractor motor on and off at low speed. Used to provide a
continuous and silent air change in the presence of light cooking vapours.
V2 Speed Medium speed, suitable for most operating conditions given the optimum
treated air flow/noise level ratio.
V3 Speed Maximum speed, used for eliminating the highest cooking vapour emission,
including long periods.

EN 2
22
MAINTENANCE
Grease filters
CLEANING METAL SELF- SUPPORTING GREASE FILTERS
• The filters must be cleaned every 2 months of operation, or
more frequently for particularly heavy usage, and can be
washed in a dishwasher.
• Remove the filters one at a time by pushing them towards the
back of the group and pulling down at the same time.
• Wash the filters, taking care not to bend them. Allow them to
dry before refitting.
• When refitting the filters, make sure that the handle is visible
on the outside.
Activated charcoal filter (Recirculation version)
REPLACING THE ACTIVATED CHARCOAL FILTER
• The filter is not washable and cannot be regenerated, and must
be replaced approximately every 4 months of operation, or
more frequently for particularly heavy usage.
• Remove the metal grease filters.
• Remove the saturated activated carbon filter by releasing the
fixing hooks.
• Fit the new filter by hooking it into its seating.
• Refit the metal grease filters.
Lighting unit
• For replacement contact technical support ("To purchase
contact technical support").
Table of contents
Other Smeg Ventilation Hood manuals

Smeg
Smeg KEIV90 Technical manual

Smeg
Smeg SHT600X User manual

Smeg
Smeg KCM900POE User manual

Smeg
Smeg Victoria Aesthetic KT90PE User manual

Smeg
Smeg KIL52-1 User manual

Smeg
Smeg KIR37XE User manual

Smeg
Smeg SAH461SS User manual

Smeg
Smeg KD9X6-1 User manual

Smeg
Smeg SHW935X User manual

Smeg
Smeg PASC5801FPX User manual

Smeg
Smeg KAT900XHE Technical manual

Smeg
Smeg KS98XSE Assembly instructions

Smeg
Smeg Victoria Aesthetic KT90PE User manual

Smeg
Smeg KR37XE User manual

Smeg
Smeg SPUM60X Operator's manual

Smeg
Smeg KCH62X Technical manual

Smeg
Smeg PASC7801FPX User manual

Smeg
Smeg Portofino KPF9AN User manual

Smeg
Smeg KASC505 User manual

Smeg
Smeg CK2000LED User manual