manuals.online logo
Brands
  1. Home
  2. •
  3. Brands
  4. •
  5. Smiths Medical
  6. •
  7. Water Pump
  8. •
  9. Smiths Medical CADD Administration Sets with Flow Stop Reference guide

Smiths Medical CADD Administration Sets with Flow Stop Reference guide

CADD®Administration Sets
with Flow Stop
Quick Reference Card
Flow stop free-flow protection is an integral
set-based free-flow protection device that
has been added to CADD®administration sets.
Smiths Medical is part of the global technology business Smiths Group plc. MPAUCA-1002
Product(s) described may not be licensed or available for sale in all countries. Please
see the Instructions for Use/Operator’s Manual for a complete listing of the indications,
contraindications, warnings and precautions. CADD and the Smiths Medical and CADD
design marks are trademarks of Smiths Medical. The symbol ® indicates the trademark is
registered in the U.S. Patent and Trademark Office and certain other countries.
©2013 Smiths Medical. All rights reserved. IN193106EN-032013
Smiths Medical ASD, Inc.
St. Paul, MN 55112, USA
Phone: 1-214-618-0218
Toll-Free USA: 1-800-258-5361
EC Authorized Representative
Smiths Medical International Ltd.
TN25 4BF, UK
Phone: +44 (0) 1233 722100
www.smiths-medical.com
Find your local contact information at www.smiths-medical.com/customer-support
Australian Representative
Smiths Medical Australasia Pty. Ltd.
Brisbane, QLD 4113, Australia
Phone: +61 (0) 7 3340 1300
Priming
The sets are designed to be
easily primed with the blue
flow stop clip in place.
Closing the fluid path
Remove the blue clip to
close the fluid path.
Opening the fluid path
Press the green button to
open the fluid path.
1. Close all tubing clamps.
2. Disconnect the tubing
from the patient’s
access site.
3. Open all tubing clamps.
4. Press and hold the
green button to allow
gravity flow.
CADD®-Solis Pumps
IN193106EN-032013.indd 1 5/6/13 11:51 AM
If using a syringe:
1. Remove all air from the syringe.
2. Close all tubing clamps.
3. Remove the protector cap from the luer.
4. Using aseptic technique, connect the luer on the short
piece of tubing to the syringe.
If using an IV bag:
1. Remove all air from the IV bag.
2. Close all tubing clamps.
3. Remove protective cap from the bag spike.
4. Using aseptic technique, insert the spike into the IV bag port.
Step 1- Connect the Tubing
3. Place the pump upright on a firm, flat surface, and press
down on the latch side of the pump so the cassette fits
tightly against the pump.
4. Lift the cassette latch into the closed position. If you
experience resistance when lifting the cassette latch
handle, do not force the latch. If the pump doesn’t latch
easily, unlatch the cassette and repeat the process.
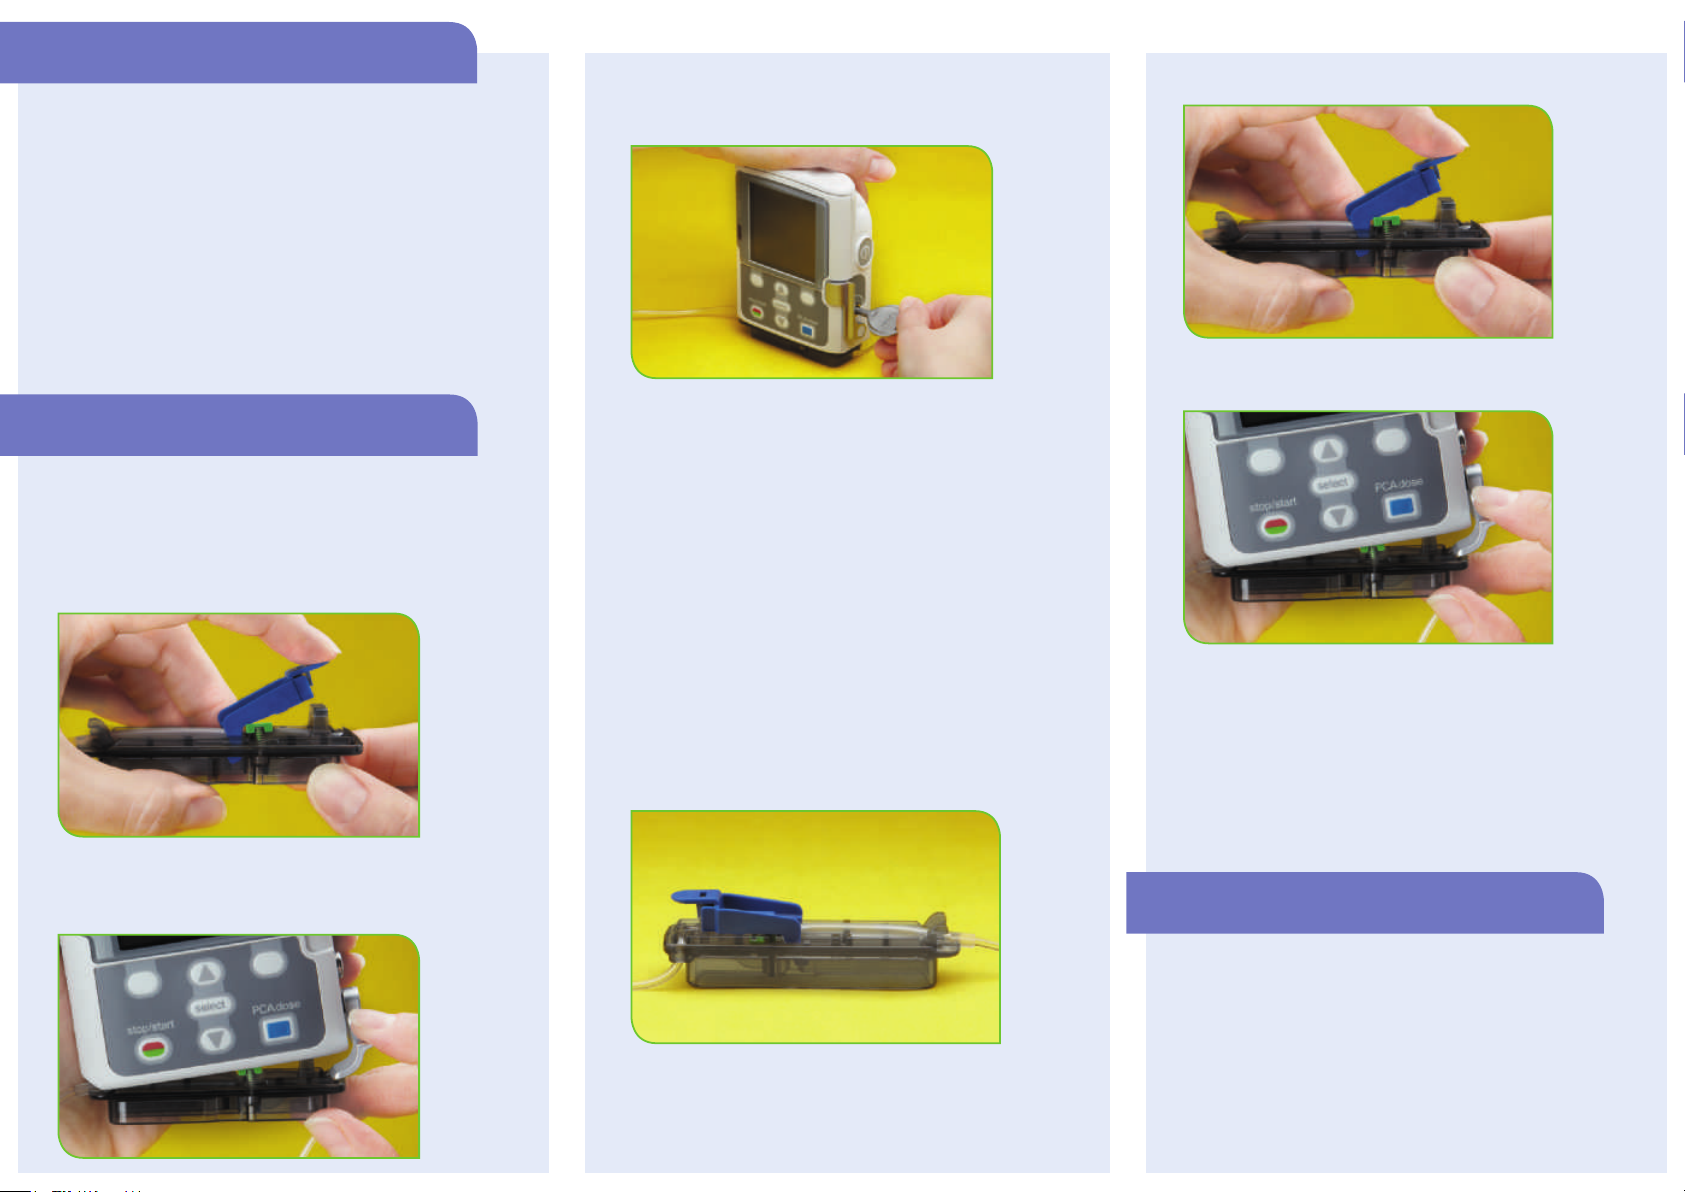
5. To lock the cassette, insert the pump key into the lock and
turn it clockwise into the locked position
6. Open all clamps.
7. Prime the tubing using the pump’s priming feature.
Ensure that the entire fluid path is free of all air. Maintain
asepsis of the distal tubing end.
8. Close all tubing clamps.
For gravity priming:
1. Open all tubing clamps. Leave the blue clip in place.
2. If using a syringe, press the syringe plunger to remove air.
If using an IV bag, allow gravity to fill the fluid path with
fluid. Remove all air from the fluid path. Maintain asepsis
of the distal tubing end.
3. Close all tubing clamps.
WARNING: Do not attempt to prime the set by attaching a
syringe to the distal end of the set and withdrawing the air,
as this will damage the filter.
For pump priming:
1. Remove the blue clip from the cassette.
2. Make sure the cassette latch is unlocked, open the cassette
latch, and insert the cassette hooks into the hinge pins, on
the bottom of the pump.
WARNING: Leave the blue clip on the cassette in place until
ready to attach the cassette to the pump. Storing the cassette
with the blue clip removed may affect delivery accuracy.
Step 2- Prime the Tubing
4. Remove the blue clip from the cassette.
5. Insert the cassette hooks into the hinge pins, on the
bottom of the pump.
6. Place the pump upright on a firm, flat surface, and press
down on the latch side of the pump so the cassette fits
tightly against the pump.
7. Lift the cassette latch into the closed position. If you
experience resistance when lifting the cassette latch
handle, do not force the latch. If the pump doesn’t latch
easily, unlatch the cassette and repeat the process.
8. To lock the cassette, insert the pump key into the lock and
turn it clockwise into the locked position
Step 3- Start the Infusion
1. Using aseptic technique, connect the tubing to the
patient’s access site.
2. Open all tubing clamps and begin the infusion.
WARNING: Ensure fluid path below filter is free of air
before connection to patient. Please refer to the detailed
Instructions for Use supplied with the administration sets
for additional information, cautions, and warnings. For
pump priming, refer to the Operator’s Manual supplied
with the pump.
IN193106EN-032013.indd 2 5/6/13 11:52 AM

Other Smiths Medical Water Pump manuals

Smiths Medical CADD-Prizm PCS II User manual

Smiths Medical

Smiths Medical CADD-Prizm PCS II User manual

Smiths Medical Graseby 500 User manual

Smiths Medical

Smiths Medical Graseby 500 User manual

Smiths Medical CADD-Solis User manual

Smiths Medical

Smiths Medical CADD-Solis User manual

Smiths Medical CADD Solis VIP 2120 User manual

Smiths Medical

Smiths Medical CADD Solis VIP 2120 User manual

Smiths Medical Graseby C9 User manual

Smiths Medical

Smiths Medical Graseby C9 User manual

Smiths Medical CADD Prizm VIP 6100 User manual

Smiths Medical

Smiths Medical CADD Prizm VIP 6100 User manual

Smiths Medical CADD 2120 User manual

Smiths Medical

Smiths Medical CADD 2120 User manual

Smiths Medical CADD-Prizm VIP 6100 Reference guide

Smiths Medical

Smiths Medical CADD-Prizm VIP 6100 Reference guide

Smiths Medical CADD Solis 2100 User manual

Smiths Medical

Smiths Medical CADD Solis 2100 User manual

Popular Water Pump manuals by other brands

KSB Evamatic-Box N 200 l Installation & operating manual

KSB

KSB Evamatic-Box N 200 l Installation & operating manual

Agilent Technologies IDP 10 user manual

Agilent Technologies

Agilent Technologies IDP 10 user manual

STERWINS 900 JET AUTO-3 manual

STERWINS

STERWINS 900 JET AUTO-3 manual

Angelo Decor TP-180 manual

Angelo Decor

Angelo Decor TP-180 manual

Tsurumi Pump HS2.4S Residue Kit installation guide

Tsurumi Pump

Tsurumi Pump HS2.4S Residue Kit installation guide

Dutypoint ScubaTANK WX1-3040-1050-AB.A Operation & maintenance manual

Dutypoint

Dutypoint ScubaTANK WX1-3040-1050-AB.A Operation & maintenance manual

KABI 40177 Instructions and precautions

KABI

KABI 40177 Instructions and precautions

ARO TWO-BALL NM2202B-X Operator's manual

ARO

ARO TWO-BALL NM2202B-X Operator's manual

SPORTSTECH TM400 manual

SPORTSTECH

SPORTSTECH TM400 manual

Wilden Original Series operation & maintenance

Wilden

Wilden Original Series operation & maintenance

hp-TECHNIK UHE-WH4 Series Installation, maintenance and operation instructions

hp-TECHNIK

hp-TECHNIK UHE-WH4 Series Installation, maintenance and operation instructions

BUSCH R 5 instruction manual

BUSCH

BUSCH R 5 instruction manual

Franklin Electric FAOT Series owner's manual

Franklin Electric

Franklin Electric FAOT Series owner's manual

Lincoln 85353 Service & operating manual

Lincoln

Lincoln 85353 Service & operating manual

Pentair Flotec AUTOJET 1000 Use and maintenance manual

Pentair Flotec

Pentair Flotec AUTOJET 1000 Use and maintenance manual

Kärcher BPE 4200/50 instructions

Kärcher

Kärcher BPE 4200/50 instructions

Dover WILDEN TURBOFLO T8 Engineering, operation & maintenance

Dover

Dover WILDEN TURBOFLO T8 Engineering, operation & maintenance

SR Aquaristik DC Series user manual

SR Aquaristik

SR Aquaristik DC Series user manual

manuals.online logo
manuals.online logoBrands
  • About & Mission
  • Contact us
  • Privacy Policy
  • Terms and Conditions

Copyright 2025 Manuals.Online. All Rights Reserved.