Snapfon ezFlip 4G User manual

ezFlip 4G
User Manual V2.0 EN

ii
Tabel of Contents
Welcome to
Thank you for your purchase of the Snapfōn® ezFlip™ 4G
and welcome you to Snapfōn®,
a leader in innovative easy-to-use cellular devices.
The Snapfōn® ezFlip™ incorporates the latest 4G LTE,
VoLTE, WiFi, GPS, Touch-Screen technology, and is
specifically designed for individuals with accessibility
needs and all those wanting a simpler cellular phone at
a great value. The Snapfōn® ezFlip™ User Manual is here
to help and familiarize you with your new ezFlip™ 4G.
For additional assistance or questions follow our
Support section in this guide to connect with one of
our helpful U.S. based customer service representatives.
© 2020 Excellus Communications, LLC dba Snapfōn®
Table of Contents
ezFlip 4G� � � � � � � � � � � � � � � � � � � � � � � � � � � � � � � � � � � � � � � � � � � � � � � � � � � � � � � � � � � � � � i
Getting Started � � � � � � � � � � � � � � � � � � � � � � � � � � � � � � � � � � � � � � � � � � � � � � � � � � � � � � 1
Activating Your ezFlip . . . . . . . . . . . . . . . . . . . . . . . . . . . . . . . . . . . . . . . . . . . . . . 2
ezFlip Specications and Features . . . . . . . . . . . . . . . . . . . . . . . . . . . . . . . . . . . 3
What’s in the Box . . . . . . . . . . . . . . . . . . . . . . . . . . . . . . . . . . . . . . . . . . . . . . . . . . . 4
External Features . . . . . . . . . . . . . . . . . . . . . . . . . . . . . . . . . . . . . . . . . . . . . . . . . . . 5
External Functions . . . . . . . . . . . . . . . . . . . . . . . . . . . . . . . . . . . . . . . . . . . . . . . . . . 6
Home Screen . . . . . . . . . . . . . . . . . . . . . . . . . . . . . . . . . . . . . . . . . . . . . . . . . . . . . . . 7
Icons . . . . . . . . . . . . . . . . . . . . . . . . . . . . . . . . . . . . . . . . . . . . . . . . . . . . . . . . . . . . . . . 8
Removing Back Cover. . . . . . . . . . . . . . . . . . . . . . . . . . . . . . . . . . . . . . . . . . . . . . . 9
Battery Installation. . . . . . . . . . . . . . . . . . . . . . . . . . . . . . . . . . . . . . . . . . . . . . . . . 10
SIM Card Installation . . . . . . . . . . . . . . . . . . . . . . . . . . . . . . . . . . . . . . . . . . . . . . . 10
Charging Battery . . . . . . . . . . . . . . . . . . . . . . . . . . . . . . . . . . . . . . . . . . . . . . . . . . 11
Optional Charging Cradle . . . . . . . . . . . . . . . . . . . . . . . . . . . . . . . . . . . . . . . . . . 11
Micro SD Card Installation . . . . . . . . . . . . . . . . . . . . . . . . . . . . . . . . . . . . . . . . . 12
Basic Operations � � � � � � � � � � � � � � � � � � � � � � � � � � � � � � � � � � � � � � � � � � � � � � � � � � � � 13
Powering On or O . . . . . . . . . . . . . . . . . . . . . . . . . . . . . . . . . . . . . . . . . . . . . . . . 14
Setting Up Voicemail. . . . . . . . . . . . . . . . . . . . . . . . . . . . . . . . . . . . . . . . . . . . . . . 14
Touch Screen Usage . . . . . . . . . . . . . . . . . . . . . . . . . . . . . . . . . . . . . . . . . . . . . . . 15
Quick Keys . . . . . . . . . . . . . . . . . . . . . . . . . . . . . . . . . . . . . . . . . . . . . . . . . . . . . . . . 15
Keyboard. . . . . . . . . . . . . . . . . . . . . . . . . . . . . . . . . . . . . . . . . . . . . . . . . . . . . . . . . . 15
Calling . . . . . . . . . . . . . . . . . . . . . . . . . . . . . . . . . . . . . . . . . . . . . . . . . . . . . . . . . . . . 16

iv
Tabel of Contents
iii
Tabel of Contents
Settings . . . . . . . . . . . . . . . . . . . . . . . . . . . . . . . . . . . . . . . . . . . . . . . . . . . . . . . . . . . . . 37
Network & Internet . . . . . . . . . . . . . . . . . . . . . . . . . . . . . . . . . . . . . . . . . . . . . . . . . . . .37
Connected Devices. . . . . . . . . . . . . . . . . . . . . . . . . . . . . . . . . . . . . . . . . . . . . . . . . . . .38
Apps & Notications. . . . . . . . . . . . . . . . . . . . . . . . . . . . . . . . . . . . . . . . . . . . . . . . . . .39
Battery. . . . . . . . . . . . . . . . . . . . . . . . . . . . . . . . . . . . . . . . . . . . . . . . . . . . . . . . . . . . . . . .39
Display. . . . . . . . . . . . . . . . . . . . . . . . . . . . . . . . . . . . . . . . . . . . . . . . . . . . . . . . . . . . . . . .40
Sound . . . . . . . . . . . . . . . . . . . . . . . . . . . . . . . . . . . . . . . . . . . . . . . . . . . . . . . . . . . . . . . .41
Storage . . . . . . . . . . . . . . . . . . . . . . . . . . . . . . . . . . . . . . . . . . . . . . . . . . . . . . . . . . . . . . .42
Security & Location. . . . . . . . . . . . . . . . . . . . . . . . . . . . . . . . . . . . . . . . . . . . . . . . . . . .42
User & Accounts. . . . . . . . . . . . . . . . . . . . . . . . . . . . . . . . . . . . . . . . . . . . . . . . . . . . . . .43
System. . . . . . . . . . . . . . . . . . . . . . . . . . . . . . . . . . . . . . . . . . . . . . . . . . . . . . . . . . . . . . . .43
SOS Features� � � � � � � � � � � � � � � � � � � � � � � � � � � � � � � � � � � � � � � � � � � � � � � � � � � � � � � � � �47
SOS Emergency Button . . . . . . . . . . . . . . . . . . . . . . . . . . . . . . . . . . . . . . . . . . . . . . 48
SOS Siren. . . . . . . . . . . . . . . . . . . . . . . . . . . . . . . . . . . . . . . . . . . . . . . . . . . . . . . . . . . . 48
SOS Application . . . . . . . . . . . . . . . . . . . . . . . . . . . . . . . . . . . . . . . . . . . . . . . . . . . . . 48
SOS Settings. . . . . . . . . . . . . . . . . . . . . . . . . . . . . . . . . . . . . . . . . . . . . . . . . . . . . . . . . 49
SOS Contacts . . . . . . . . . . . . . . . . . . . . . . . . . . . . . . . . . . . . . . . . . . . . . . . . . . . . . . . . 49
SOS Message . . . . . . . . . . . . . . . . . . . . . . . . . . . . . . . . . . . . . . . . . . . . . . . . . . . . . . . . 49
SOS Help and Switch on ring . . . . . . . . . . . . . . . . . . . . . . . . . . . . . . . . . . . . . . . . . 50
Fall Detection. . . . . . . . . . . . . . . . . . . . . . . . . . . . . . . . . . . . . . . . . . . . . . . . . . . . . . . . 50
sosPlus Mobile Monitoring Service® . . . . . . . . . . . . . . . . . . . . . . . . . . . . . . . . . . 51
sosPlus® Account Information . . . . . . . . . . . . . . . . . . . . . . . . . . . . . . . . . . . . . . . . 51
Contacts . . . . . . . . . . . . . . . . . . . . . . . . . . . . . . . . . . . . . . . . . . . . . . . . . . . . . . . . . . 17
Messaging. . . . . . . . . . . . . . . . . . . . . . . . . . . . . . . . . . . . . . . . . . . . . . . . . . . . . . . . . 17
Volume Control. . . . . . . . . . . . . . . . . . . . . . . . . . . . . . . . . . . . . . . . . . . . . . . . . . . . 18
Main Menu Style. . . . . . . . . . . . . . . . . . . . . . . . . . . . . . . . . . . . . . . . . . . . . . . . . . . 18
Applications and Features � � � � � � � � � � � � � � � � � � � � � � � � � � � � � � � � � � � � � � � � � � � 19
Menu Icons. . . . . . . . . . . . . . . . . . . . . . . . . . . . . . . . . . . . . . . . . . . . . . . . . . . . . . . . 20
Call History . . . . . . . . . . . . . . . . . . . . . . . . . . . . . . . . . . . . . . . . . . . . . . . . . . . . . . . . 21
Messaging. . . . . . . . . . . . . . . . . . . . . . . . . . . . . . . . . . . . . . . . . . . . . . . . . . . . . . . . . 23
Camera. . . . . . . . . . . . . . . . . . . . . . . . . . . . . . . . . . . . . . . . . . . . . . . . . . . . . . . . . . . . 27
Multimedia . . . . . . . . . . . . . . . . . . . . . . . . . . . . . . . . . . . . . . . . . . . . . . . . . . . . . . . . 29
Browser . . . . . . . . . . . . . . . . . . . . . . . . . . . . . . . . . . . . . . . . . . . . . . . . . . . . . . . . . . . 29
Tools . . . . . . . . . . . . . . . . . . . . . . . . . . . . . . . . . . . . . . . . . . . . . . . . . . . . . . . . . . . . . . 33
Calculator. . . . . . . . . . . . . . . . . . . . . . . . . . . . . . . . . . . . . . . . . . . . . . . . . . . . . . . . . . .33
Alarm . . . . . . . . . . . . . . . . . . . . . . . . . . . . . . . . . . . . . . . . . . . . . . . . . . . . . . . . . . . . . . .33
Calendar . . . . . . . . . . . . . . . . . . . . . . . . . . . . . . . . . . . . . . . . . . . . . . . . . . . . . . . . . . . .33
Timer . . . . . . . . . . . . . . . . . . . . . . . . . . . . . . . . . . . . . . . . . . . . . . . . . . . . . . . . . . . . . . .35
Stopwatch . . . . . . . . . . . . . . . . . . . . . . . . . . . . . . . . . . . . . . . . . . . . . . . . . . . . . . . . . .35
Wold Clock. . . . . . . . . . . . . . . . . . . . . . . . . . . . . . . . . . . . . . . . . . . . . . . . . . . . . . . . . .35
Applications. . . . . . . . . . . . . . . . . . . . . . . . . . . . . . . . . . . . . . . . . . . . . . . . . . . . . . . 35
Email . . . . . . . . . . . . . . . . . . . . . . . . . . . . . . . . . . . . . . . . . . . . . . . . . . . . . . . . . . . . . . .35
Facebook . . . . . . . . . . . . . . . . . . . . . . . . . . . . . . . . . . . . . . . . . . . . . . . . . . . . . . . . . . .36
File Manager . . . . . . . . . . . . . . . . . . . . . . . . . . . . . . . . . . . . . . . . . . . . . . . . . . . . . . . .36
FM Radio. . . . . . . . . . . . . . . . . . . . . . . . . . . . . . . . . . . . . . . . . . . . . . . . . . . . . . . . . . . .36
SOS. . . . . . . . . . . . . . . . . . . . . . . . . . . . . . . . . . . . . . . . . . . . . . . . . . . . . . . . . . . . . . . . .36
Weather . . . . . . . . . . . . . . . . . . . . . . . . . . . . . . . . . . . . . . . . . . . . . . . . . . . . . . . . . . . .36

viv
Tabel of Contents
Snapfōn Policies� � � � � � � � � � � � � � � � � � � � � � � � � � � � � � � � � � � � � � � � � � � � � � � � � � � � � 53
Important Safety Information . . . . . . . . . . . . . . . . . . . . . . . . . . . . . . . . . . . . . . 54
Manufacturer's Warranty . . . . . . . . . . . . . . . . . . . . . . . . . . . . . . . . . . . . . . . . . . . 55
30-Day No-Risk Device Guarantee . . . . . . . . . . . . . . . . . . . . . . . . . . . . . . . . . . 56
Service Plan Requirements. . . . . . . . . . . . . . . . . . . . . . . . . . . . . . . . . . . . . . . . . 56
Optional Services . . . . . . . . . . . . . . . . . . . . . . . . . . . . . . . . . . . . . . . . . . . . . . . . . . 56
Support� � � � � � � � � � � � � � � � � � � � � � � � � � � � � � � � � � � � � � � � � � � � � � � � � � � � � � � � � � � � � 58

2
Getting Started
1Getting Started
Activating Your ezFlip
If you've purchased your ezFlip from Snapfōn® directly your phone service may
already be activated. If you purchased your ezFlip from another retailer you may
still need to activate your device and an activation guide will be included in the
box. Follow that activation guide to get started.
If you need any assistance contact our U.S. Based Customer Service department.
Call: 800-937-1532
or
Email: [email protected]
Mobile
4
Getting Started
3
Getting Started
Quick-Start Guide
ezFlip
™
4G
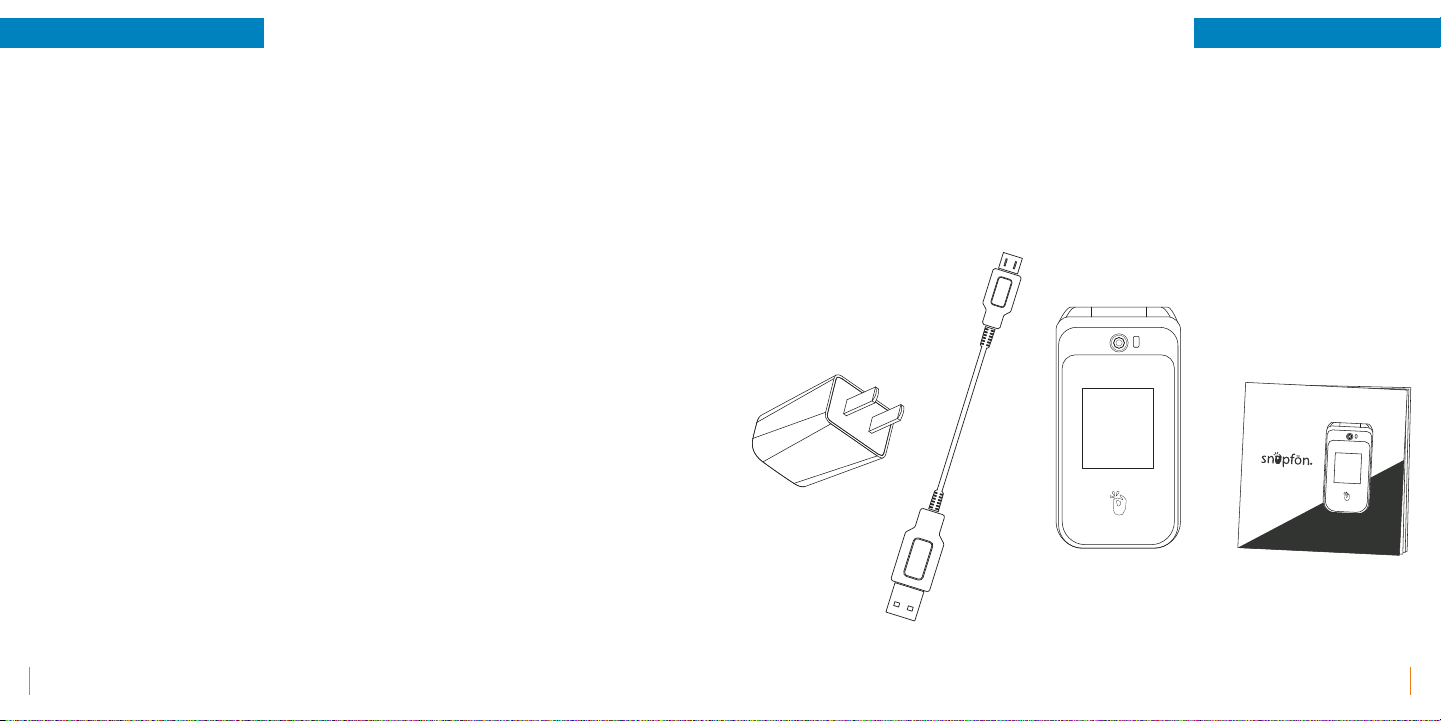
What’s in the Box
ezFlip 4G
Micro-USB Cord
Quick-Start Guide
USB Wall Plug
ezFlip Specications and Features
Technical Features:
• Bluetooth® 4.2
• 4G LTE
• VoLTE (Voice Over LTE)
• GPS
• Touch Screen Interface
• WiFi, WiFi Calling, & WiFi Hotspot
• Hearing Aid Compatible (HAC T3/M3)
• 4GB Built-in Storage
• Micro-SD Slot for additional storage
App Features:
• Weather APP
• SOS Emergency APP
• Facebook
• FM Radio
• Touch Screen Interface
• Lanyard Anchor
• Speaking Keypad - English & Spanish
• Large, Easy-to-Use Buttons
• Web Browser
• Email
SOS Emergency Features:
• Accessible SOS Button
• Calls and texts emergency message
• Customizable Emergency Message
• Low Battery Warning System
• Fall Detection Capable
• Speakerphone Connects to Emergency Contacts
• Optional Siren When Activated
• Can be activated or deactivated
Specications:
• Talk Time: 5.5 Hours Approx.
• Stand by time: 4-5 days approx.
• Headphone Jack: Standard 3.5mm
• Cameras: 5mp Main, 2mp Sele
• Screen Size: Main Screen 2.8in + Sub Screen 1.77in
• Lithium-ion battery: 1500 mAh CE
• Dimensions: 110mm x 56.8mm x 21mm
• Weight: 135 Grams
• Charger Outputs: 5V 1.0A
• Power: Micro-USB and Charging Dock Capable
(Charging Dock sold separately)

6
Getting Started
5
Getting Started
External Features
Page 4
• SOS Button
Press for 5 seconds to activate SOS
Alarm and SOS features. Learn more in
SOS Features, page 46.
• Main Camera Lens
5mp Camera
• Selfie Camera Lens
2mp Selfie Camera
• Touch Screen
Use your fingers to perform operations
directly on icons, buttons, and the
optional on-screen keypad.
• Menu
Press to display menu options.
• Navigation Pad
Up, Down, Left, Right, and Enter for
navigating on screen activity.
• Call
Answer an incoming call or press once
to open call application, twice to dial
last outgoing call.
• Calculator
Press to launch Calculator Application.
Selfie Camera
Lens Main Camera
Lens
Headphone
Jack
SOS Button
Silent/Volume On
Volume
(+/-)
Touch Screen
Micro-USB
Charging Port
Flashlight
Camera
End/Power
Back
Menu
Navigation
Pad
Call
Voicemail
Calculator
Flash
• Voicemail
Hold down to launch Voicemail.
• Silent/Volume On
Hold down to mute or turn on volume.
• Flashlight
Press to turn Flashlight on or off.
• Camera
Press to open Camera application.
• End/Power
End call or application and power off.
• Back
Return to previous screen or delete text.
• Micro-USB Charging Port
For charging the ezFlip.
• Headphone Jack
For use with any 3.5mm standard
headphone.
• Volume (+/-)
Adjust the ringer, in-call, speaker, media,
and alarm volume. Ringer volume may
be adjusted any time but in-call volume
must be adjusted during a call.
External Functions
8
Getting Started
7
Getting Started
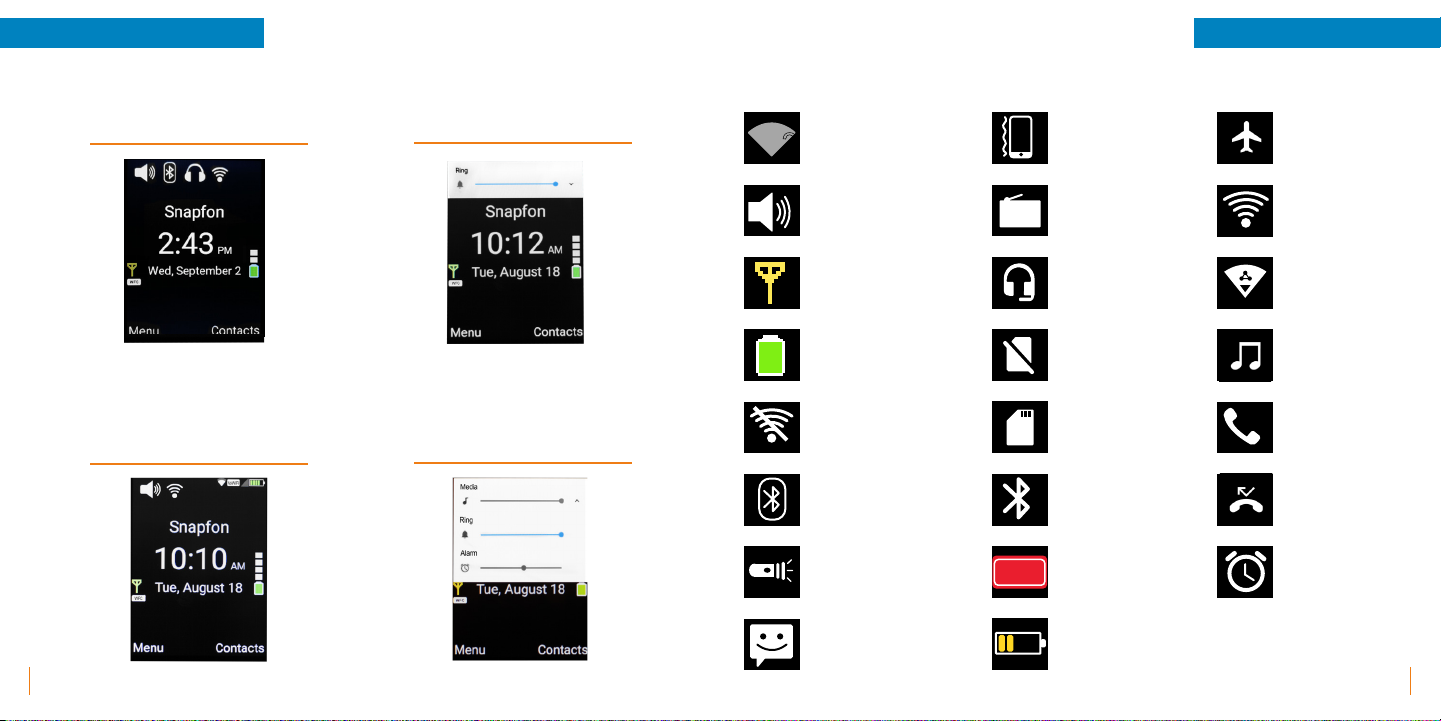
Home Screen Icons
Standard Home Screen
Swiping down on
Standard Home Screen
When you press (+/-) the
side Volume button
When you press the side
Volume button,
then select the ^ icon
SOS
?
Nearby WiFi Available
Ring only
Network Signal
Battery Level
WiFi Not Connected
Bluetooth®
Flashlight
Message
Vibrate Only
FM Radio
Headphone Mode
No SIM Card
Micro SD Inserted
Bluetooth®
SOS Activated
Battery Level
Airplane Mode
WiFi Connected
Shown on Home Screen
WiFi Connected
Shown on Status Bar
Music
Missed Call
Shown on Home Screen
Missed Call
Shown on Status Bar
Alarm
10
Getting Started
9
Getting Started
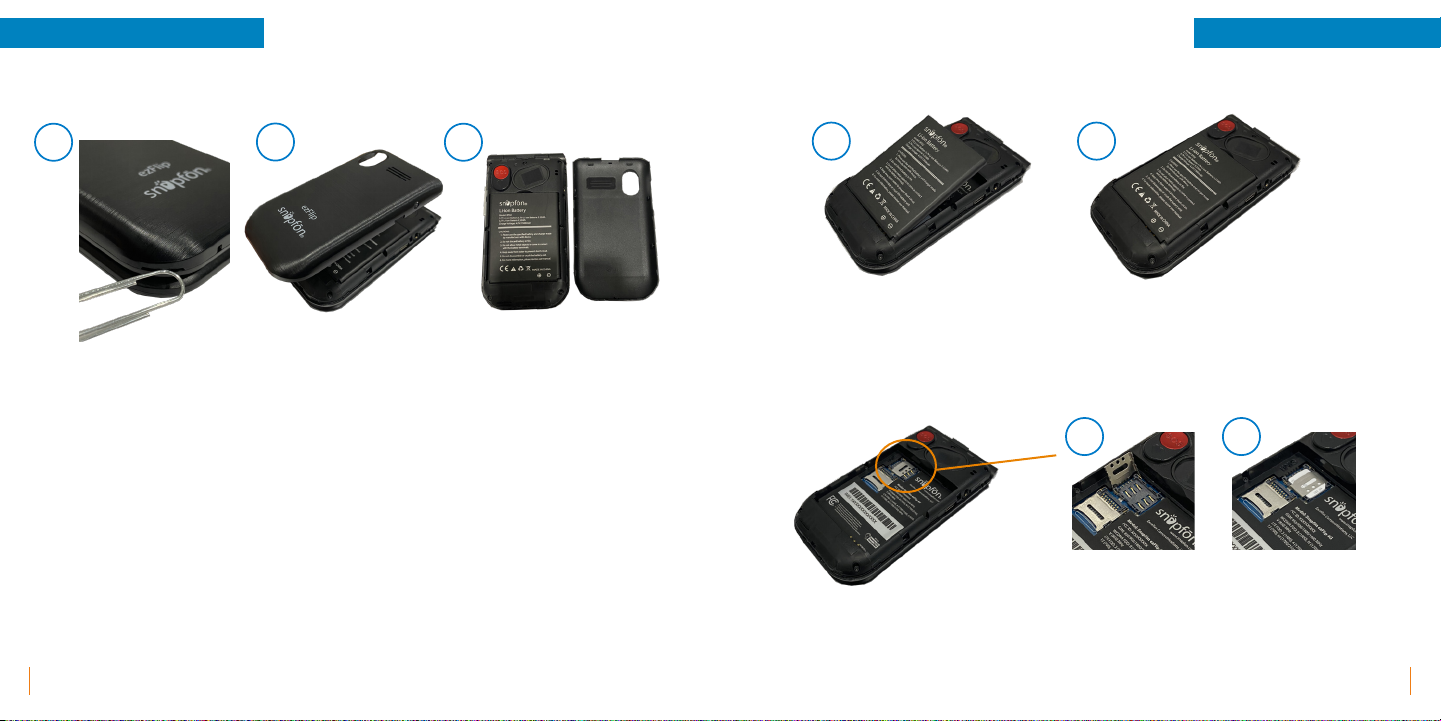
Removing Back Cover
SIM Card Installation
Battery Installation
1. Removing the back of the ezFlip can be done by locating the slit on the left side of your device.
You can use your nger or a tool, such as a paper clip, by inserting into the slit and turning clockwise.
2. The back will then pop up. You'll then need to work your ngers around the device to fully remove
the back cover.
3. Once the back is removed you'll be able to access the Battery, SIM Slot, and MICRO SD slot.
A. B.
1. Insert battery with Logo side up and gold contacts facing down into the compartment at an angle.
2. Press top of battery down until at into the compartment.
1. Slide SIM Tray to the OPEN position following the arrows then lift.
2. Insert SIM Card LOGO side up then slide SIM Tray back to the locked position.
A. B.
A. B. C.
12
Getting Started
11
Getting Started
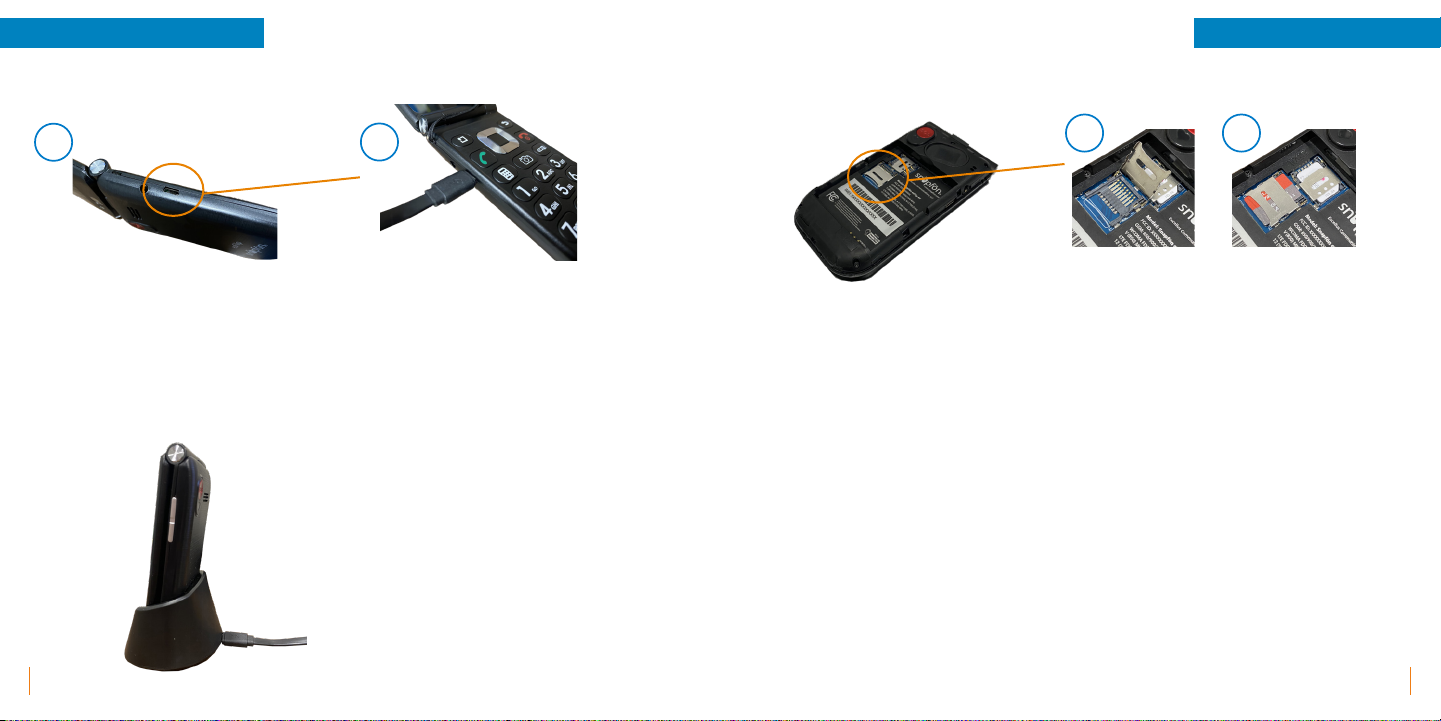
Charging Battery Micro SD Card Installation
1. The Micro-USB charging port can be found on the left side of the ezFlip near the lanyard anchor and
headphone jack.
2. Use the Snapfōn® Micro-USB charger by aligning and inserting it into the charging port. The charger can
be used with a Snapfōn® USB wall charging plug, computer or vehicle USB port, or compatible USB port.
A. B.
1. Slide SD Tray to the OPEN position following the arrows then lift.
2. Insert SD Card LOGO side up then slide SD Tray back to the locked position.
Note: Micro SD Card can be used to expand storage.
A. B.
Optional Charging Cradle
1. The ezFlip can also be charged using the ezFlip
Charging Cradle. The Micro-USB charger plugs in to
the Micro-USB port located on the back side of the
Charging Cradle then the ezFlip simply sits in the
Charging Cradle while charging.

14
Basic Operations
13 Basic Operations
Powering On or Off
Powering On: Press and hold the red PWR button for 3-5 seconds. Release
the button when the screen animation begins and phone plays its start-up
chime.
Powering Off: Press and hold the red PWR button for 3-5 seconds. Power
off option screen will appear asking "Do you want to shut down?" select OK
shut-down chime will sound and the screen animation will begin.
Note: If you have enabled Lock in the Settings menu, you will need to unlock
when power-on before you can use the phone. There are three types of Lock
setting options view these on page 41.
Setting Up Voicemail
After the phone has powered on and has connected with the carrier, press
and hold the 1 button on the phone’s keypad until it begins to call your
Voicemail Box. When the call connects, simply follow the spoken instructions.
You may choose to have (or not to have) a password.
Note: If you do not set up voicemail, you may not be able to receive
incoming calls.

16
Basic Operations
15
Basic Operations
Calling
Making a Call: With the phone powered on, while on the Home Screen,
enter the phone number you wish to call and press the green Phone button.
Tap the Phone icon to open the application. The Dial-up page is displayed.
Enter a phone number and press the green Phone button to make the call.
You are also able to initiate a call by selecting a phone number from your
Contacts, Call History, or the Message applications.
Answering an Incoming Call: When the phone rings and/or vibrates open
phone, then you can press the green Send/Answer Phone button, swipe up
on touch screen, or press Answer on the touch screen to answer the call. You
can enable or disable the phone’s ability to answer upon opening in the Call
History Settings section. Learn more in Phone Setting section on Page 21.
Ending a Call or Ignoring a Call: Press the red PWR button to end a call at
any time. You can enable or disable the phone’s ability to end a call upon
closing in the Call History Section on Page 21.
Note: Holding down the PWR button will turn the phone completely off.
Call Waiting: While a call is engaged, press the Answer or Ignore option
buttons when the second incoming call is displayed. To swap between lines
when call waiting is in use, select Swap from the Options menu, or press the
green OK/Send button one time.
Touch Screen Usage
Use your fingers to perform operations directly on icons, buttons, and the
optional on-screen keypad.
Tap/Touch/Click: Tap the icon of an Application to start it.
Touch & Hold: Touch and hold an item to display a pop-up menu of options.
For example, go to Call History, touch and hold a missed call listed on the
page, and a menu of available options opens.
Slide/Sweep: Sweeping your finger vertically or horizontally across the
screen allows you to view apps, pictures, and web pages continently.
Scroll: Similar to sweeping, but faster.
Quick Keys
The Calculator, Camera, and Flashlight buttons are quick access icons that
take you directly to those specific applications. Use the Navigation Pad while
on the home screen: Up opens Messaging, Down opens Notifications, Left
opens Multimedia, Right opens Applications.
Keyboard
You have two keyboard options the Android Keyboard and the NineKeyIme
Keyboard. The Android Keyboard will appear on the screen like a computer
keyboard with touch screen usage. The NineKeyIme keyboard is used by the
keypad with 5 typing options. More information and directions to change
keyboard setting preferences can be found on Page 43.

18
Basic Operations
17
Basic Operations
Contacts
Select the Contacts app through the menu or on the home screen. The
Contacts app allows you to view the list of phone contacts, related details
within your contact, make a call, send an SMS text message to a certain
contact, and share a contact.
Contact Import: On the Contacts page, tap the Option button then Settings,
and choose Import/Export then select a mode for importing or exporting.
Add a Contact: On the Contacts page, tap the Option button then Create
new contact. Enter the name and number, when finished select Option then
Save.
Contact List: On the Contacts page, tap any of the contact info. Details about
the contact is displayed. This allows you to quickly make a call or send an
SMS text message to the contact.
Messaging
Within the Menu you'll find the Messaging application used to create and
send an SMS or MMS.
New Message: Tap the Options button then New message. The message
creating page is displayed. Enter the name or phone number of the target
contact into the Recipient bar. The phone will automatically search among
the list of contacts for one that best matches the entered info. You can also
select the contact from the list of contacts or groups.
Input Method: Tap the text editing zone to invoke your keypad.
Send: After an SMS is complete, tap Option Send for sending the SMS text
message.
Note: View all messaging settings on Page 23.
Volume Control
The side volume control can be used to increase or decrease Ringer volume
and open the volume control center. Selecting the drop down of the Volume
control center lets you also increase or decrease Media volume, and Alarm
volume. Holding down the low volume control button while on the home
screen will switch your phone into Do Not Disturb Mode simply increase the
volume to turn this mode off, view all sound settings on Page 41.
Main Menu Style
You can change how you view your main menu to either Scroll each menu
option one-by-one for a larger and easier to see view or to view menu by
Grid style to view all menu options on one page. View all Display settings on
Page 40.

20
Applications and Features
19 Applications and Features
Menu Icons
Contacts Call History Messaging
Camera
Tools
Multimedia Browser
Applications Settings

22
Applications and Features
21
Applications and Features
Call History
Within the Menu you'll find Call History. You can view ALL Call History
or MISSED Call History by going left or right on the Navigation Pad then
scrolling up or down to view older listings. When you find a listing you want
to interact with scroll to that listing until it is highlighted, then select Option.
Under option the functions call, send a message, block number, call details,
and delete will all engage with the listing you have highlighted.
Clear Call History: This will delete all calls from your history.
To do so select Clear call history under Options then select OK.
Settings: You can find this under Options. There are four different Settings
that can be adjusted for Call History:
• General
ºPhone Ringtone: There are five ringtone options available, or a
music track can be used from your device.
ºAlso Vibrate for Calls: Enable or disable. Vibrates with ring for
incoming call.
ºVibrate when Connected: Enable or disable. Vibrates when a call
has been connected between both lines.
ºDial Pad Tones: Enable or disable. Tones play when pressing keys.
ºOpen Answer: Enable or disable. Phone answers call upon open.
ºClose Hangup: Enable or disable. Phone hangs up call upon close.
ºDial Number Voice: Enable or disable. The key pad numbers are
spoken in English or Spanish, determined by language setting.
ºIncoming Call: Enable or disable. Incoming call numbers are
spoken prior to ringtone.
• Calls
ºFixed Dialing Numbers: This can be used to restrict or disable who
can and can not be called from you device. You can enable FDN, set
a PIN for access, and manage the FDN phone number list here. By
adding numbers here you are restricting the device to only be able
to call these numbers.
Note: Incoming and emergency calls are not affected by this
option, so 911 is always reachable.
ºWiFi Calling: WiFi calling can be enabled or disabled here. If
enabled you can set calling preference to either WiFi preferred
or Mobile preferred. WiFi preferred simply means if WiFi calling is
available your device will use that over Mobile Data if Mobile Data
is all that's available that is what will be used.
ºCall Forwarding: Used to forward calls to another number. Enable
or disable Always forward, When busy, or When unanswered.
Note: This setting depends on your service provider and may need
to be enabled by them.
ºCall Barring: Enable or disable calls from connecting for, All
outgoing calls, International outgoing calls, International
outgoing calls except to home PLMN, All incoming calls, or
Incoming calls while roaming. Also choose to Cancel all, or
Change barring password.
ºAdditional Settings: Set Caller ID to Network default or Hide
number to display your number in outgoing calls. Enable or disable
Call waiting notification of an incoming call during a call.

24
Applications and Features
23
Applications and Features
• Call Blocking: You won't receive calls or texts from blocked numbers.
Add or remove phone numbers to your Call Blocking list here.
• Voicemail:
ºNotifications: Enable or disable notifications regarding voicemail.
Set Importance of voicemail notifications to: Urgent - make sound
and pop on screen, High - Make sound, Medium - no sound,
Low - No sound or visual interruption. Sound changes the default
notification sound that is played. Enable or disable Vibrate for
notifications. Override Do Not Disturb lets these notifications
continue to interrupt when Do Not Disturb is set to Priority Only.
ºAdvanced: Here you will find Service which shows your voicemail
is provided by Your carrier. Setup shows your Voicemail number,
this number should only be edited with direct instruction by your
carrier in the event you're switching carriers or modifying the
phone in some way.
Note: You may lose access to your voicemail if you edit this number.
Messaging
Within the Menu you'll find Messaging. Here you'll be able to see all of your
SMS (Text) or MMS (Multimedia) Conversations. Using the Navigation Pad
you can scroll up or down to select a message thread. Within a message
thread you will see your individual Conversation history.
Call History (Continued) Selecting Option gives you the choices of:
New Message: Create a new message thread with a new contact or cellular
number.
Search: To search through your messages.
Cell Broadcasts: This shows emergency alert history in your area. You can
change Alert settings using the Settings menu option.
WAP PUSH Messages: Shows any WAP PUSH messages you've received.
Voice Messages: Show any Voice messages you have received.
Settings: There are five different Settings that can be adjusted for Call
History:
• SMS Enabled: Here you can change your default SMS app.
• Text Message (SMS): Enable or disable Request delivery report
for each message you send. Manage SIM card messages stored
on your SIM Card. Edit quick text allows you to customize all the
preprogrammed quick text statements or add your own additional
ones. SMS Service Center is responsible for handling SMS operations
of a wireless network. The SMSC address is pre-set in the SIM card and
you will not need to edit this number unless working with your service
provider and they instruct you to do so. Note: You may lose access to
SMS messaging if you edit this number. SMS storage location lets you
change between storing SMS messages on your Phone or SIM Card.

26
Applications and Features
25
Applications and Features
Messaging (Continued)
• Multimedia Message (MMS): Enable or disable Group messaging
which allows you to use MMS to send a single message when there are
multiple recipients. Enable or disable Request delivery report which
allows you to request a delivery report for each message you send.
Enable or disable Request read report which allows a read report
for each message you send. Enable or disable Send read report if
requested by the MMS sender. Enable or disable Auto-retrieve which
allows for automatic retrieval of messages. Enable or disable Roaming
auto-retrieve which allows for automatic retrieval of messages while in
roaming. Size Limit lets you switch between 100K, 200k, or 300K.
• Notifications: Enable or disable Message notifications� Mute
notifications off or for 1 hour, 4 hours, or 8 hours. Sound lets you
change the sound tone played when receiving a text message or set
to None to disable. Enable or disable Vibrate when a notification is
received. Enable or disable Popup notification which shows popup for
push notifications.
• General: Message font size allows you to change between Follow
system font size, Small, Medium, Large, and Extra large. Enable or
disable Delete old messages as size limits are reached, if enabled
you can set Text message limit of number of messages to save and
Multimedia message limit of number of messages to save. View Cell
broadcast settings which is used to receive emergency alerts and
notifications that go out to multiple phone users in a defined area.
You can add a channel or view channel list.
Note: Changing any of the Cell broadcast settings may result in loss of
this functionality.
When selected on an individual Conversation or when you create a New
message under Options you can type text messages or select Option which
allows for more customization such as:
• Add Contacts: This prompts you to be able to add the message
recipient to your contacts.
• Send: This will send out your text message.
• Insert Quick Text options of: "Where are you?", "What are you doing?",
"Call back! Please!", "Sorry, I have a meeting�", "Call you soon�", "Don't
worry! I'm fine�", "On my way home�", "Arrive soon�", and "Be there or
be square!."
• Insert Contact: This will share a selected contact from your phone into
the message thread.
• Add a Subject: This allows for a subject to your text to be available to
edit.
• Attach: Which allows for an attachment to be added.
• Discard: This will discard the message or new message thread you have
created.

28
Applications and Features
27
Applications and Features
Camera
You can access the Camera application with the camera icon on the keypad
or within the Menu. You can capture an image by selecting the OK button
or touching Capture on the touch screen. By toggling left or right from the
Navigation Pad you can control your Zoom level. By toggling up or down
from the navigation pad you can control the Exposure. You can view your
most recent photo in the circle in the lower left hand corner. You can also
touch the circle photo to go directly to your Gallery.
Selecting Option gives you the choices of:
• Camera switcher: Switch between Front camera (selfie camera) or Back
camera (exterior forward camera).
• Camera mode switcher: Camera mode switcher switches you from
Video or Camera and takes you directly back to your camera to use the
mode you've chosen.
• Previews: This takes you your photo Gallery to view your pictures.
• Scene mode: Gives you options of scene scenarios to better predict the
exposure, color, and ISO for your environment. Options are Off, Night,
Sunset, Party, Portrait, Landscape, Night portrait, Theatre, Beach,
Snow, Steady photo, Fireworks, Sports, and Candle light.
Note: When you set a Scene mode you can not customize the ISO if you
turn off Scene mode you can customize ISO.
• Self timer: Set your self timer to Off, 2 seconds, or 10 seconds�
• Picture size: Change your picture pixel/file size from
2M(4:3)1600x1200, 1M(4:3)1024x768, or VGA640x480.
• ZSD: Enable or disable Zero Shutter Delay which synchronizes the
shutter with capture in order for shutter to fire as soon as Capture
button is selected.
• White balance: Gives you options to set your White balance to better
predict different lighting settings for your environment. Options are
Auto, Incandescent, Daylight, Fluorescent, Cloudy, Twilight, Shade,
and Warm fluorescent.
• ISO: Change your ISO level. ISO is the sensitivity to light of your camera
lens. A low numbered ISO will be less sensitive and a higher level will be
more sensitive. Options are Auto, 100, 200, 400, 800, or 1600. Note: If
you have a Scene mode activate you will not see ISO options available
to edit.
• FLASH: Turn Flash off, flash on, or flash auto.Note: FLASH options are
only available when you are using the Back camera.
• Anti flicker: This setting can be set to: Auto,Off,50Hz,or 60Hz.Anti
Flicker helps to prevent flickering in the photograph when shooting in
florescent lighting or taking pictures of a screen.

30
Applications and Features
29
Applications and Features
Multimedia
Within the Menu you'll find Multimedia. The Multimedia application holds all
the different media files on your device.
Pictures: These are pictures from your device sorted into different Albums.
You can select Option to Delete full albums, navigate through albums using
Navigation Pad, select images, Delete, Rotate, and Set wallpaper.
Videos: These are Videos from your device sorted into different Albums. You
can select Option to Delete full albums or within albums, view video clips,
play videos, Share videos, Loop videos, or change video to Landscape view.
Music: This is where you can view Songs and music files on your device,
playback, and shuffle playback.
FM Radio: This allows you to connect to different FM Radio Stations. You can
choose to Record Stations and save the file to listen to later, you can access
these files under option Saved recordings. Selecting Options then Radio
Stations gives you a list of available radio stations to choose from. You can
select Option then Refresh to search again.
Browser
Within the Menu you'll find Browser. The Browser application connects you
to the Internet. The application by default runs Google, this can be changed
in Browser Settings. You can login to your Google account to synchronize
bookmarks and search history across your devices.
Selecting Option gives you the choices of:
• Refresh: Will reload the page you are currently on.
• Stop: Will stop loading in the middle of current cycle.
• Home: Will take you back to the home page. By default this is set to
Google.com.
• Save to Bookmarks: This allows you so save pages in book mark folders
to access later.
• Close: Allows you to either close the application completely or
minimize to keep your browser page open in the background.
• Save for Offline Reading: This option lets you save a web page to be
viewed when you have no WiFi or Data available. This will download
the web page and add it to your Saved Pages section available under
Bookmarks/History.
• Share Page: Lets you share the website URL to a Message, Facebook, or
by Bluetooth®.
• Find on Page: Lets you search for specific words, letters, or phrases
through the web page.
• Request Desktop Site: This can be enabled or disabled and it switches
your URLs from the Mobile version to the Desktop version.
• Bookmarks/History: Here you can find your search history, website
history, bookmarks, and Saved Offline Pages.

32
Applications and Features
31
Applications and Features
Browser (Continued)
When selecting Option and then Settings you are able to customize, edit,
and utilize six different settings options:
• General: Set homepage default to current page, blank page, default
page, most visited sites, or other. Other allows you to type in a specific
URL.
• Privacy & Security: Allows you to Clear cache which is locally cached
content and databases. Clear history which is the browser navigation
history. Enabled or disabled Show security warnings if theres a
problem with a site's security. Enable or disable Accept cookies which
allow sites to save and read cookie data. Clear all cookie data which
clears all browser cookies. Enable location on or off which allows sites
to request access to your location. Clear location access for all websites.
Remember passwords enabled or disabled with saves usernames and
passwords for websites.
• Accessibility: Here you can adjust the Text size by Text scaling. You can
adjust how much to set the Zoom on double-tap. You can also adjust
the Minimum font size.
• Advanced: Set search engine lets you change your default browser.
You can choose between Start, Yahoo!, Google, or Bing. Enable or
Disable Open in background which opens new tabs behind current
tabs, JavaScript, Allow Multiple tabs per app, and Website settings.
There are also Page content settings that can be enabled or disabled
they are Open pages in overview, Auto-fit pages to the screen, and
Block Pop-ups. Also, Reset to default if you'd like to restore the default
settings.
• Bandwidth Management: Enable or disable Web page preloading
which allows browser to preload linked web pages in the background,
and Load images which displays images on web pages.
• Laboratories: Enable or disable Quick controls which allows you to
slide your thumb from the left or right edge to open quick controls and
hide app and URL bars, and Fullscreen, which is uses to hide the status
bar.
Other manuals for ezFlip 4G
2
Table of contents
Other Snapfon Cell Phone manuals

Snapfon
Snapfon ez4G User manual

Snapfon
Snapfon ezTWO-A User manual

Snapfon
Snapfon ezFlip User manual

Snapfon
Snapfon ez4G User manual

Snapfon
Snapfon ezTWO User manual

Snapfon
Snapfon ezTWO User manual

Snapfon
Snapfon ezFlip 4G User manual

Snapfon
Snapfon ez-ONE C User manual

Snapfon
Snapfon ez ONE User manual

Snapfon
Snapfon ezFlip 4G User manual


