manuals.online logo
Brands
  1. Home
  2. •
  3. Brands
  4. •
  5. Snow Peak
  6. •
  7. Tent
  8. •
  9. Snow Peak TP-870 User manual

Snow Peak TP-870 User manual

ランドネストタープセット
TP-870
ランドネストS/M
テントタープセット(タープ)
SET-259 / SET-260
取扱説明書:Ver 1.01
1
この度は、スノーピーク製品をお買い上げいただき、誠にありがとうございます。本製品は、キャンプ用のタープです。安
全にご使用いただくためにも下記の取扱説明書をよく読んでからご使用ください。また、読み終わった後も大切に保管
してください。説明内容で理解出来ない点及び製品に不具合が確認された際には直ちに使用を中止しご購入いただ
きました販売店様もしくは弊社ユーザーサービスまでお問い合わせください。
安全上の注意事項 ご使用の前によく読んで予測される事故を回避し安全にご使用ください。
明らかに生命にかかわる重大な事故が予測される行為を示します。
危険
●このタープの素材は難燃性ではありません。テント内では燃焼式のランタンやコンロ、ヒーターなどの
熱源や、マッチ、ローソク、ライター、タバコなどの裸火や炎は絶対に使用しないでください。限られた
空間での火気の使用は火災の恐れがあり大変危険です。
●タープ下に燃料を保管したり、燃料を補給するなど、引火性のあるものを持ち込まないでください。
●ご使用の前に、本製品を点検し各部に異常がないことを確認してください。異常が発見された場合は、直ち
に使用を中止しお買い求めいただいた販売店様、または弊社ユーザーサービス係に点検または修理を依頼
してください 。
●気象状況には常に細心の注意を払い、風の強いときや悪天候が予想されるときは速やかにキャン
プを中止して安全な場所へ避難してください。
●高温に加熱されたものや発熱性のあるものを持ち込まないでください。天候によりタープ下は高温になり、
熱中症などの危険があります。お子様の昼寝の際など、細心の注意を払ってください。
●風の吹き抜けるような場所や、雪崩、がけ崩れ、急な出水などの恐れのない地盤のしっかりとした、水はけの
良い平坦な場所を選んで設営してください。
●タープは表面積が大きく体感風量よりはるかに大きな力を受けます。ご使用中はペグや張り綱がしっかりと
繋がれているかどうかを定期的に点検してください。強風下ではタープの使用を中止してください。
取扱いを誤った場合、使用者が死亡または重傷を負う可能性があることを示します。
警告
●本製品は常設用ではありません。
●日差しにより本体表面は低温やけどに発展するほどの高温になります。十分ご注意ください。
●焚火や花火などのそばで組み立てたり、使用しないでください。火の粉を被り、生地に穴をあけてしまう場合
が あります 。
●タープの素材は長時間日光にさらされた場合、退色や生地劣化などの強度不足を起こしますので、常設用
とし て 使 用 し な い でくだ さ い 。
●樹液が付着してしまうときれいに除去することはできません。樹液が垂れそうな木の下を避けて設営してくだ
さい。溶剤などにより無理に除去すると生地やコーティングを傷めます。
●タープの設営・撤収の際は、風に飛ばされないようフレームをしっかりと支えて作業してください。フレーム先端
のハネ返りなどで思わぬ事故に繋がる恐れがありますので必ず周囲の安全を確認してください。
● ペ グとロ ープ でしっかりと 固 定し て 使 用し てください 。
●薄い生地を使用してますので、生地を引っ張りすぎると破損する恐れがあります。ご注意ください。
●足もとの常設用ロープやペグにはご注意ください。足を引っかけて転倒し、思わぬ事故の原因となります。
ケガや本体破損、物品破損として拡大損害の原因となる行為を示します。
注意
フィールドでは予測不可能な事態が突発的に発生し、時にはプロダクツの性能を超えるような状況に直面する場
合もあります。以下の説明がすべての危険な状況を説明している訳ではありません。プロダクツの性能をよく理解し
たうえ で 安 全 な キャン プ を お 楽し みください 。
注意事項
■セット内容※本品はハンマーは含まれておりません。
タープ 本 体
×1
キャリー バッグ
×1
ぺグケース
×1
ポールケ−ス
×1
自在 付ロープ
二又10m×2
3m×4
スチールポール
240cm×2
スチールペグ
30cm×8
品質には万全を期しておりますが、お使いになる前に必ず試し張りを行い、付属品や設営手順を確認し
てください。万一不具合があった場合は、お買い求めになった販売店様または弊社ユーザーサービスまで
お問い合わせください。
初めてお使いになる前に
部分名称・ロープの取り付け位置
自在 付ロープ
・メインロープ二又10m×2
・サブロープ  3m×4
■タープヘの張り綱取り付け
二又10m 二又10m
3m3m
3m3m
45°
45°
ポール
240cm ポール
240cm
サブロープ
サブロープ
2
ポール
ポール
サブロープ
タープ の 中 心
メインコ ー ナ ー
メインロープ
メインロープ
コーナー
グ ロ メ ット 付 テ ー プ
稜線
延長線上
サブロープ
延長線上
グ ロ メ ット
二又
ロープ
ポール タープ
3
設営の手順
グ ロ メ ット
ポール
自在
図A
タープ
二 又ロープ
ロープ 返し
部分
■設営・撤収・収納は以下の説明に従い繰り返し練習し、実際のキャンプに備えてください。
 無理な設営・撤収は、本体やポールの破損、事故の原因になります。
0)設営は必ず2人以上で行ってください。
1)タープ本体を平らな場所に広げます。
2)ポール先端をメインコーナーの三角金具に差し込
み、その上からメイン用二又ロープを掛けます。
(二ヵ所)この時、ロ−プの返し部分は自在の位
置 を 調 節 し 、す べ て 同 じ 長 さ に し て く だ さ い 。
 〔 図 A 〕
3)2本のポールを立ち上げ、それぞれを結ぶタープの稜線に対
して外側に二又ロープを引き、ポールを中心に左右それぞれ
約 4 5 °に 開 い た 位 置 に ペ グ ダ ウ ン し ま す 。〔 図B〕
※それぞれのロープ間の角度が90°以上広い位置でペグダウン
するとポールにテンションが 伝わらず、正しく設 営 する事がで
きなくなりま す の で 注 意 し てくださ い 。〔図B〕 ロープ の 角 度が
ポールに対し45度以上となるのが理想的なペグダウンの位
置です。〔 図C〕
  ま た 、 ペ グ を 打 ち 込 む 角 度 は ロ ー プ に 対 し て 9 0 °に な る よ う に
ペグ ダ ウンします 。〔図D〕
図B
ポール ポール
二 又ロープ 二 又ロープ
45°
45°
45°
45°
稜線
稜線
図C
45°
以上
図D
4
5)タープの中心から両翼のコーナーを結ぶ延長線上(各コー
ナーのグロメット付テープの取り付け方向の延長線上)にサ
ブロープを引きペグダウンします。(4ヵ所)〔 図F〕
 ※ロープの方向が狂うと、シワの原因になり、正しく設営する
事 が で きなくなりま す の で 注 意 し てくださ い 。
6)サブロープから番号順にテンションを掛けます。両翼のサブ
ロープは対角線のローテーションで8割程度の力で均等に
引き、稜線部の緩みが奇麗に取れた後に、メインロープのテ
ンションを掛けます。最後にすべてのロープをもう一度、番号
順 に あ と 2 割 の 力 で 引 き 、仕 上 げ ま す 。〔図G〕
※ロープ の 引き過ぎ にご 注 意ください 。強く引きすぎている 場 合
は、その 方 向に大きなしわが 発 生します。しわの出ているコー
ナーのサブロープを緩めて、全体のテンションバランスを調
整し てください 。〔 図H〕
※タープが緩んだ状態やしわの入った状態で使用すると、風を
大 き く 受 け て 倒 れ た り 、雨 が 流 れ ず 溜 ま っ て し ま う な ど 、大 変
危 険です 。
7)仕 上げたときのポール の角 度はポール 先 端がメインロープの
テンションに引かれ、外側に若干傾斜するようになります。そ
の時、ロープの角度がポールに対し45度以上となるのが理
想的なペグダウンの位置です。〔 図C〕
図F
タープ の 中 心
延長線上
図G
①
③
⑥
②
④
⑦
⑧
⑤
図H
4)ロープの自在の位置を調節し稜線部分がしっかりとテンショ
ン の か か った 状 態 にしま す 。〔図E〕
図E
稜線
5
メンテナンス方法
●長期間ご使用しなかった製品を再度お使いになる際は、本製品を点検し各部に異常がないことを確認してください。
異常が発見された場合は、直ちに使用を中止しお買い求めいただいた販売店様、または弊社ユーザーサービス係
に点検または修理を依頼してください。
●本製品にはポリエステル生地を組み合わせて使用しています。生地の特性を考慮し、できる限り色移りし難い加
エと配色パターンを採用していますが、保管状態などにより、若干の色移りが発生する場合があります。ご了承く
ださい 。また 、濡 れたままの 保 管 は 避 け てください 。
●濡れたまま保管すると、カビや異臭、生地の色うつり、生地の劣化などのトラブルの原因となりますので、使用後は
風通しの良い日陰で十分に乾燥し、柔らかいプランなどで汚れを落としてから保管してください。
●ポールは表面の汚れを落とし、十分に乾燥させてから保管してください。濡れたまま保管すると腐食、強度が低下し
ます。またポール内部のショックコードは不必要に引っ張らないでください。
●高温多湿を避け、直射日光の当たらない風通しのよい場所に保管してください。
●ご使用により広囲にわたり素材が劣化し、耐久度合を超えたものは修理できない場合があります。
●次回の使用に備え、ペグなどの付属品も含め、十分に保守、点検をしてください
ケースへの収納
最 初にポールをゆっくり倒し、先 端 の金 具とメインロープを外します。ペグを抜いて、それぞれのロープを
束 ね た 後 、キ ャ リ ー バ ッ グ の 長 さ に 合 わ せ て タ ー プ 本 体 を 折 り た た み 、キ ャ リ ー バ ッ グ の 中 に 入 れ ま す 。
□ポールやペグはそれぞれ付属の専用ケースに先端部が上になるように入れ、キャリ一バッグに収納
してください。むき出しの状態で収納すると本体生地を損傷することがあります。
結露について
空気中に含まれている水分が急激に冷やされて霧状になったものが結露として現れます。特に狭い空間では、通常
の室内よりも水蒸気の濃度が高くなり、結露の発生する確率が高くなります。原因としては、人体構成要素の約60%
を占める水分が、呼吸や汗などにより放出され、水蒸気となり結露が発生します。特に防水性能が高い部分に結露が
発生しやすくなります。結露は優れた透湿防水素材でも使用状況により完全に防ぐことは不可能です。
撥水・防水性能について
●本製品はいずれの生地にも高性能の撥水加工を施していますが、生地の特性上、撥水性能(撥水の仕方や
耐久性)に若干の差が見られる場合があります。また、ご使用を重ねますと撥水性能が低下する場合があります。
性能が低下した場合は市販の撥水スプレー等を、それらの説明書をよくお読みの上ご使用ください。
●
防水性の高い生地を使用しておりますが、地面の水溜りなどへ長時間接触していると雨水が浸み込む場合があります。
●農薬などでPUコーティングが破壊され耐水圧が異常低下してしまう場合があります。この症状と判断された場合、
製品の保証が出来なくなりますのでご注意ください。
●撥水剤の影響によりロゴマークが剥離する場合があります。
紫外線の影響について
●本製品の生地にUVカット加工を施しています。UVカット加工は、人体にとって有害な紫外線の透過を抑えると
共に、生地の強度劣化を緩和します。
※UVカット加工は、紫外線による人体への影響や、素材劣化を防止するものではありません。
440cm
370cm
810cm
920cm
6
●
本格的な修理が必要な場合は、お買い求めになった販売店または弊社ユーザーサービス係までお問い合わせください。
●修理を依頼される場合は、必ず十分に乾燥させ、汚れをきれいに落としてください。
●修理品には修理箇所がはっきりと解るように、必ずメモまたは荷札を付けてください。また破損時の状況をできる
だけ 詳しく書 い たメモを 添 えてください 。
●修理品の運賃並びに修理費については以下のように規定させていただきます。
 1.保証対象の場合:往復運賃並びに修理費は弊社にて負担いたします。
 2.保証対象以外の場合:往復運賃並びに修理費は、お客様のご負担とさせていただきます。
修理について
お買い求めいただきました製品は万全を期していますが、万一不備な点がございましたら、お買い求めいただいた販
売店様もしくは弊社または各製品に記載された連絡先にご相談ください。製造上の欠陥が原因の場合は無償で修
理または交換させていただきます。その他の場合は適切な価格で修理させていただきます。修理、交換の判断は弊社
の裁量によるものとさせていただきます。また、以下の場合は修理できない場合もありますので予めご了承ください。
品質保証について
 1.素材の経年劣化による損害など商品の寿命。
 2.改造および粗雑な取扱いによる故障。
 3.取扱説明書で禁止されている取扱いによる故障。
 4.不測の事故による商品の故障。
 5.その他製造上の欠陥以外による製品の故障。
 6.ゴミやさびによる故障。
 7.分解したことによる不具合の発生または破損。
 8.落下やその他の衝撃による部品の変形や破損による不具合。
 9.摩擦によるパーツの変化及びそれによる故障。
 10.他社製品との組合せによる故障。
●材質:210Dポリエステルオックス・PUコーティング耐
水圧1,800mmミニマム・撥水加工・UVカット加工
●セット内 容:タープ本体 、スチールポール
(240cm×2)、スチールペグ(30cm×8)、自在付
ロープ(二又用10m×2、3m×4)、キャリーバッグ、
ポールケース、ペグケース
●キャリーバッグサイズ:75×15×18(h)cm
●重量:7.2kg
対応人数
4名
240cm
ポール 240cm
ポール
MADEINVIETNAM
スノーピークユーザーサービス
(9:00〜17:00)
0120-010-660
Email:[email protected]
不明な点やお気 付きの点がございましたら、
販売店様または弊社ユーザーサービスまで
お問い合わせください。
株式会社スノーピーク
〒955-0147新潟県三条市中野原456
Tel.0256-46-5858/Fax.0256-46-5860
www.snowpeak.co.jp
7
TP-870
Product Manual : Ver 1.01
Land Nest Tarp Set
SET-259 / SET-260
Land Nest Small / Medium
Tent & Tarp Set (Tarp)
8
9
Thank you for purchasing a Snow Peak product. This product is a tarp for camping. For safety, read the
following instruction manual before use. Please keep it safe for future reference. Finally, if you find
anything that you do not understand in the description or any problems with the product, please stop use
immediately and contact the retailer or Snow Peak Customer Service.
Safety Precautions : Before use, please read thoroughly to ensure safety and avoid
accidents.
Misuse could easily result in a serious accident or death.DANGER
●The material of this tarp is not flame-proof. Do not use combustion-based heat sources such as
lanterns,stoves, or heaters, or open flames such as matches, candles, lighters, or cigarettes, inside the
shelter. The use of fire in a confined space is very dangerous due to the risk of fire.
●Do not bring flammable materials, or items for storing or refilling fuel, under the tarp.
●Before using the product, check each part for abnormalities. If there are abnormalities, take the product
to the dealer or Snow Peak Customer Service for inspection or repair.
●Pay close attention to the weather. If extreme weather is in the forecast, pack up camp and evacuate toa
safe place.
●Do not bring heated items at high temperatures under the tarp. The temperature under the tarp will be
elevated in warm weather, and excess heat could cause heatstroke. Pay close attention to the tempera-
ture, particularly when children are asleep.
●Choose a flat, well-drained area with firm ground to pitch the tarp. Choose a place with no chance of
avalanches, landslides, wind gusts, or sudden flooding.
●Before using the product, check each part for abnormalities. If there are abnormalities, take the product
to the dealer or Snow Peak Customer Service for inspection or repair.
●This product is not intended to be in permanent use.
●Sunlight can cause the surface of the tarp to heat up, potentially causing low-temperature burns.
●Do not assemble or use the tarp close to a bonfire, fireworks, etc. Flying sparks can create holes in the
fabric.
●Please do not leave the tarp set up permanently, as weather conditions and sunlight may cause a loss
of strength, fading or fabric deterioration.
●Resin and sap is difficult to remove. Please avoid setting the tarp up under trees where the sap might
drip. Using a solvent to remove resin will damage the fabric and coating.
●Firmly hold the tarp when assembling and disassembling. Unexpected accidents may occur due to the
pole ends recoiling, etc., so ensure that the surroundings are safe, with no other people in the vicinity.
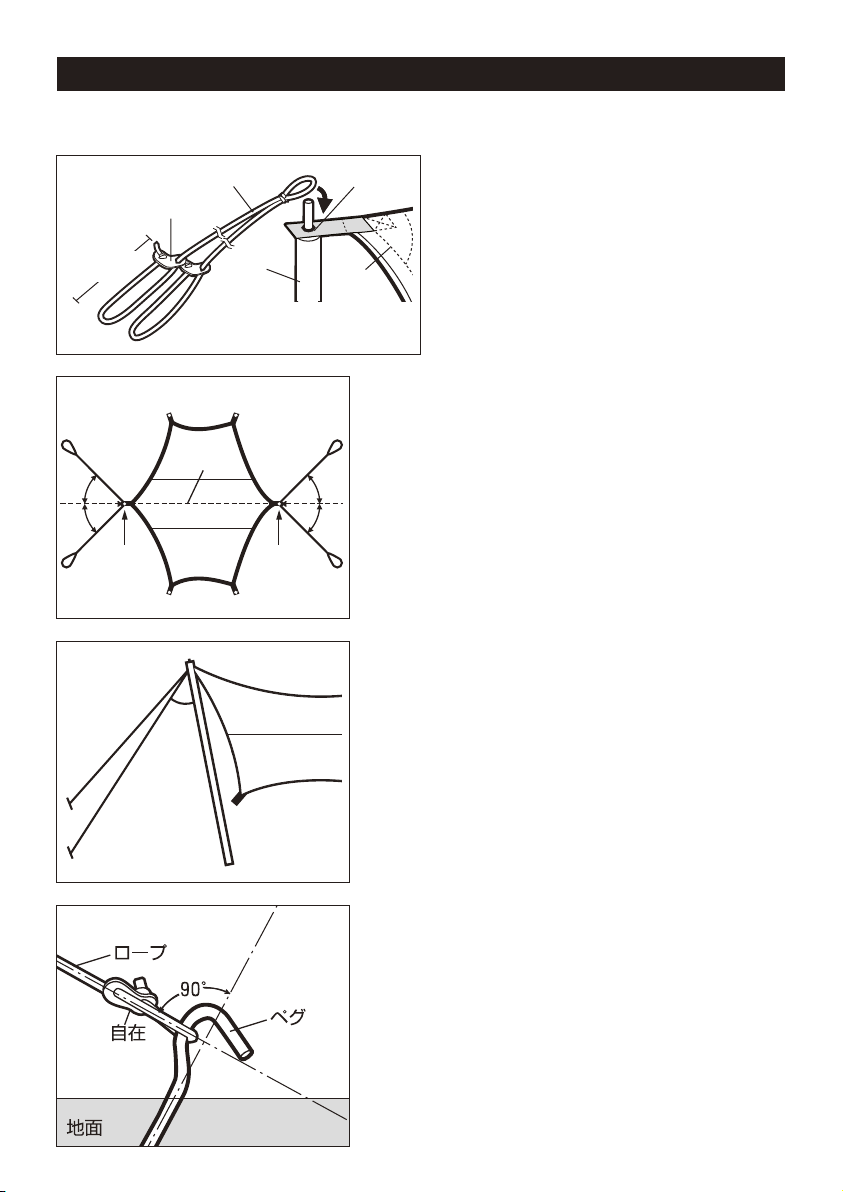
●Firmly secure the pegs, ropes, etc.
●Since this product uses a thin fabric, it may break if you pull the fabric too much.
●Please pay attention to the rope and pegs at your feet. You may catch your foot and fall, leading to an
unexpected accident or injury.
Misuse could result in serious injury or death.WARNING
Misuse could result in injury to the user and/or damage to property.CAUTION
Tarp
×1
Carry bag
×1
Peg case
×1
Pole case
×1
Forked rope with
rope tensioner
10m(32.8’)×2,
3m(9.8’)×4
Steel pole
240cm(7.9')
×2
Steel peg
30cm(12”)
×8
Although we take every precaution to ensure the quality of our products, please be sure to test the
product and check the accessories and setup procedure before using while camping. If any problems
occur, please contact the dealer where you purchased the product or Snow Peak user service.
Before using for the first time
Name of the Parts・Location of rope
Rope with rope tensioner
・Main rope Forked 10m(32.8’) x 2
・Sub-rope 3m(9.8’) x 4
■Location of rope
Forked10m Forked10m
3m3m
3m3m
45°
45°
Pole
240cm
Pole
240cm
Sub-rope
Sub-rope
Set Contents
10
Grommet
Forked
rope
Pole Tarp
Pole
Pole
Tape with grommet
on the corner
Center of tarp Main rope
Main rope
Main corner
Sub-rope
Sub-rope
Ridge line
Extension
Extension
11
Grommet
Rope Tensioner
Figure A
Rope return
part
■Follow the instructions below to set up/ disassemble the product. Always practice first before camping.
Excessive assembly and disassembly may damage the tarp or poles, potentially resulting in an accident.
0)Make sure that two or more people take part in
the setup.
1)Spread the tarp on a flat surface.
2)Insert the tip of the pole into the triangle
bracket of the main corner and hang the
center loop of the main forked rope (2 places)
from above. At this time, position the rope
tensioner of the rope and make the ropes all
the same length.
3)Stand up the two poles, pull the forked rope outward
against the ridge line of the tarp connecting each, and
peg down at 45 degrees to each side of the pole [Figure
B].
*If you peg down at a position where the angle between
each rope is wider than 90 degrees, the tension will not
be transmitted to the poles, and you will not be able to
complete the setup [Figure B]. The ideal peg-down
position is 45 degrees from the poles. [Figure C].
Angle the peg 90 degrees to the rope. [Figure D].
Figure B
Pole Pole
Forked 10mForked 10m
45°
45°
45°
45°
稜線
Forked rope
Figure C
More than
45°
Figure D
Ground
Peg
Rope
Pole Tarp
Forkedrope
Setup Procedure
Rope Tensioner
12
5)Pull the sub ropes and peg down on the extension line
connecting the center of the tarp to the corners of both
wings. The extension line is the direction of the tape
with grommets at each corner (4 places). [Figure F]

*Be aware that if the rope is pulled in the wrong direction,
 
it may cause wrinkles and prevent proper setup.
6)Apply tension on the subrope following the numerical
order shown. Pull the sub ropes on both wings evenly
with about 80% force in a diagonal rotation, and then
tension the main tape after the looseness of the ridge
has been removed. Finally, all ropes are pulled again in
numbered order with the remaining 20% force. [Figure
G]
*Please be careful not to pull the rope too tight. If it is
pulled too hard, large wrinkles will occur in that direction.
Loosen the sub ropes at the corners where wrinkles
appear and adjust the overall tension balance. [Fig. H]
*Using a tarp in a loose or wrinkled condition is very
dangerous, as it can collapse the the wind or collect
excessive amounts of water.
7)When finished, the pole should be angled so that the tip
is pulled by the tension of the main ropes and slopes
slightly outward. The ideal peg-down position for the
rope is 45 degrees or more in relation to the pole.
[Figure C]
Figure F
Center of tarp
Extension
Figure G
①
③
⑥
②
④
⑦
⑧
⑤
Figure H
4)Adjust the position of the rope tensioner of the rope so
that the ridge portion is firmly tensioned [Figure E].
Figure E Center of tarp
13
●A polyester fabric blend is used for this product. Considering the material characteristics, we adopted-
processing and color patterns that will result in less color migration. However, depending on
storageconditions, slight color migration may occur. Do not store the product while it is wet.
●Before storage, the product should be cleaned and dried sufficiently. If the product is stored when wet,
thebuild-up of mold, bad odors, color migration, and material deterioration will occur. Dry the product
sufficiently in a ventilated and shaded area and clean the surface with a soft brush before storing.
●Poles should be cleaned of dirt and thoroughly dried before storage. Storing poles while wet will result
in corrosion and loss of strength. Do not pull on the shock cord inside the pole.
●Please store this product in a well-ventilated area away from direct sunlight, high temperatures, and
humidity.
●Depending on the conditions during use, the tent material may deteriorate over a wide area, losing its
durability and becoming irreparable.
●In order to prepare this product for its next use, please regularly check and maintain the product
(including all accessories such as the pegs).
Precautions for Disassembling/Storage
●Please dry the tarp sufficiently before storing.
●Remove all pegs, clean off any dirt, and store in the peg case facing down. Please be careful not to
lose or forget to remove any of the pegs.
Regarding Water-Repellent and Water-Proof Functions
●The fabric of the tarp is treated with a high-quality, water-repellent finish. However, the level of
water-repellentcapacity and durability may vary slightly due to the characteristics of each material. In
addition, the water repellency will deteriorate over long periods of time. 
●The tarp is made of highly waterproof fabric, but if high water pressure is intensively applied from rain
for a long period of time, water may seep in. Please be careful.
Regarding The Effect of Ultraviolet Rays
●UV protection is applied on the tarp fabric. The UV protection treatment will lessen the permeation of
ultravioletrays, which are harmful to humans, and slowdown the deterioration of the material.

*TheUVprotectiontreatmentdoesnotcompletelypreventtheinfluenceofultravioletraysonhumans
orstopthedeteriorationofthestrengthofthematerial.
●Whenthetarpmaterialisexposedtosunlightforlongperiodsoftime,colordegradationordeterio-
rationofthefabricmayoccur.Donotleavetheproductassembledpermanently.
●Ifthematerialdeterioratesduetotheinfluenceofultravioletraysandisdamaged,itmaybecome
irreparable.
Maintenance
440cm (14.4’)
370cm (12.1’)
810cm (26.6’)
920cm (30.2’)
14
●If professional repairs are required, please contact the retailer where you purchased the product or
Snow Peak Customer Service.
●When you request repairs, please make sure that the product is dry and clean.
●Please attach a memo or a tag indicating the necessary repair and please write details of how and
when the damage occurred.
●Transportation and repair costs are determined as follows.
 1. Within warranty: The transportation cost (both ways) and repair cost will be covered by Snow
Peak.
 2. Outside warranty: The transportation cost (both ways) and repair cost will be covered by the
customer.
Snow Peak has taken all possible measures to ensure every product is durable and functions correctly.
If you find any product defects, please contact the retailer where you purchased the product or Snow
Peak Customer Service. If there are apparent defects in the product's manufacturing, the defective
product will be repaired or exchanged free of charge. In other cases, Snow Peak will repair the product
for an appropriate fee. The decision to repair or replace the product will be at our discretion. Snow Peak
will not repair the product for any damage that occurred due to the following:
1. Material deterioration caused by age
2. Damage caused by modifications or rough handling
3. Damage caused by inappropriate use not mentioned in the instruction manual
4. Damage caused by unexpected accidents
5. Any damage other than defects in the manufacturing process
6. Damage caused by dust or rust
7. Damage and defects caused by dismantling the product
8. Damage and defects caused by dropping, jolting or other shocks
9. Deterioration or failure of parts due to friction
10. Damage caused by the use of the product in combination with another manufacturer's
●Material(s): 210D Polyester Oxford, PU coating
Waterproof rating: 1,800mm minimum, Water-re-
pellent finish, UV protection treatment
●Set contents:Tarp, Steel pole 240cm (7.9’) x 2,
Steel peg 30cm (12”) x 8, Forked rope with
rope tensioner 10m(32.8’) x 2, 3m (9.8’) x 4、
Carry bag, Pole case, Peg case
●Carry Bag Size: 75×15×18(h)cm (29.5”x 5.9”x
7.1”)
●Weight: 7.2kg (15.9lbs)
●Capacity: 4 people
Repair
Warranty
240cm
(7.9’)
240cm
Pole
MADEINVIETNAM
Snow Peak, Inc.
456, Nakanohara, Sanjo-Shi, Niigata 955-0147 Japan
Tel. +81 256-46-5858 / Fax. +81 256-46-5860
www.snowpeak.co.jp
Snow Peak USA, Inc.
404 NW 23rd Avenue, Portland, Oregon 97210, USA
Tel. +1 (503) 461-0781 / Instagram. @snowpeakusa
Email. [email protected] / www.snowpeak.com

This manual suits for next models

2

Other Snow Peak Tent manuals

Snow Peak Amenity Dome S User manual

Snow Peak

Snow Peak Amenity Dome S User manual

Snow Peak Land Breeze Pro Air Duo User manual

Snow Peak

Snow Peak Land Breeze Pro Air Duo User manual

Snow Peak Alpha Breeze User manual

Snow Peak

Snow Peak Alpha Breeze User manual

Snow Peak Takibi Tarp Hexa Set M User manual

Snow Peak

Snow Peak Takibi Tarp Hexa Set M User manual

Snow Peak LV-071-1-IV User manual

Snow Peak

Snow Peak LV-071-1-IV User manual

Snow Peak Penta Pro.air 1 User manual

Snow Peak

Snow Peak Penta Pro.air 1 User manual

Snow Peak FES-195 User manual

Snow Peak

Snow Peak FES-195 User manual

Snow Peak Amenity Dome Small in Ivory User manual

Snow Peak

Snow Peak Amenity Dome Small in Ivory User manual

Snow Peak Land Nest Dome User manual

Snow Peak

Snow Peak Land Nest Dome User manual

Snow Peak TM-259 User manual

Snow Peak

Snow Peak TM-259 User manual

Snow Peak Amenity Dome M User manual

Snow Peak

Snow Peak Amenity Dome M User manual

Snow Peak Entry Pack TT User manual

Snow Peak

Snow Peak Entry Pack TT User manual

Snow Peak Living Lodge M User manual

Snow Peak

Snow Peak Living Lodge M User manual

Snow Peak SDE-260IR User manual

Snow Peak

Snow Peak SDE-260IR User manual

Snow Peak FES-091 User manual

Snow Peak

Snow Peak FES-091 User manual

Snow Peak Amenity Dome L User manual

Snow Peak

Snow Peak Amenity Dome L User manual

Snow Peak SSD-630-1 User manual

Snow Peak

Snow Peak SSD-630-1 User manual

Snow Peak Land Nest Dome Small User manual

Snow Peak

Snow Peak Land Nest Dome Small User manual

Snow Peak Toya 2 User manual

Snow Peak

Snow Peak Toya 2 User manual

Snow Peak SD-651 User manual

Snow Peak

Snow Peak SD-651 User manual

Snow Peak Vault User manual

Snow Peak

Snow Peak Vault User manual

Snow Peak Lago 1 Ivory User manual

Snow Peak

Snow Peak Lago 1 Ivory User manual

Popular Tent manuals by other brands

ShadeTree Vinyl Basic Pergola Assembly instructions

ShadeTree

ShadeTree Vinyl Basic Pergola Assembly instructions

Coleman Fossil Creek 9'x7' installation instructions

Coleman

Coleman Fossil Creek 9'x7' installation instructions

Adventure Kings Roof Top Tent manual

Adventure Kings

Adventure Kings Roof Top Tent manual

Nordisk ALFHEIM 19.6 Product book

Nordisk

Nordisk ALFHEIM 19.6 Product book

Coleman BIG CYPRESS 17'x12' installation manual

Coleman

Coleman BIG CYPRESS 17'x12' installation manual

Napier SPORTZ 84000 installation instructions

Napier

Napier SPORTZ 84000 installation instructions

toolport ECONOMY Assembly instructions

toolport

toolport ECONOMY Assembly instructions

PartySpace FLEXXUM manual

PartySpace

PartySpace FLEXXUM manual

PACIFIC PLAY TENTS DOME TENT instructions

PACIFIC PLAY TENTS

PACIFIC PLAY TENTS DOME TENT instructions

MSR ELIXIR 3 Assembly instructions

MSR

MSR ELIXIR 3 Assembly instructions

Coleman Montana Big Sky 9278B247 instructions

Coleman

Coleman Montana Big Sky 9278B247 instructions

Anchor 57 Aurora installation instructions

Anchor

Anchor 57 Aurora installation instructions

Boutique Camping ADVENTURE STAR EMPEROR BELL TENT instruction manual

Boutique Camping

Boutique Camping ADVENTURE STAR EMPEROR BELL TENT instruction manual

Vango PULSAR PRO Pitching instructions

Vango

Vango PULSAR PRO Pitching instructions

Texsport 02836 Assembly instructions

Texsport

Texsport 02836 Assembly instructions

Boutique Camping Bell Tent instruction manual

Boutique Camping

Boutique Camping Bell Tent instruction manual

myToys 4239141 Assembly instructions

myToys

myToys 4239141 Assembly instructions

Vango BLADE Pitching instructions

Vango

Vango BLADE Pitching instructions

manuals.online logo
manuals.online logoBrands
  • About & Mission
  • Contact us
  • Privacy Policy
  • Terms and Conditions

Copyright 2025 Manuals.Online. All Rights Reserved.