manuals.online logo
Brands
  1. Home
  2. •
  3. Brands
  4. •
  5. Snow Peak
  6. •
  7. Tent
  8. •
  9. Snow Peak Vault User manual

Snow Peak Vault User manual

Vault
SDE-080H
Instruction Manual Ver 1.00
1
■Contents
Inner Tent x 1,
Fly x 1
Pole (long) x 1
Pole (short) x 2
Carry Bag x 1
Peg Case x 1 Pole Case x 1
Instruction Manual x 1 Repair Pipe x 1 Duralumin Peg x 24
Rope with Rope Tensioner
3m (9'8") x 4,
2.5m (8' 2.5") x 8
Thank you very much for purchasing a Snow Peak product. This product is a tent designed for camping.
To use this product safely and correctly, please read these instructions carefully. After reading these
instructions, keep this manual in a safe place for future reference. Although this product is expected to
be complete and safe, please check that all accessory items are included before attempting to assemble
the product. Practice assembling and handling the product in a safe location before using it while
camping.
If you find anything in the instruction manual that is difficult to understand, or if you find a defect with the
product, stop using it immediately and contact the dealers where you purchased the product or Snow
Peak Customer Service.
●
This product is not intended to be in permanent use.
●
Sunlight can cause the surface of the Fly to heat up, potentially causing low-temperature burns.
●
Do not assemble or use the tent close to a bonfire, fireworks, etc. Flying sparks can create holes in
the tent fabric.
●
Firmly hold the tent/tarp pole when assembling and disassembling the tent/tarp. Unexpected
accidents may occur due to the Pole ends recoiling, etc, so ensure that the surroundings are safe,
with no other people in the vicinity.
●
Firmly secure the Pegs, Guy Lines, etc.
●
If the tent is left in the sun for long periods, the materials may fade in color or the fabric may
deteriorate and lose strength. Do not leave the tent set up permanently.
Misuse could result in injury to the user and/or damage to property.
CAUTION
Safety Precautions
Before use: please read thoroughly to ensure safety and to avoid accidents.
Misuse could easily result in a serious accident or death.
DANGER
●
The tent material is not flame-proof. Do not use combustion-based heat sources such as
lanterns, stoves or heaters, or open flames such as matches, candles, lighters or cigarettes,
inside the tent. The use of such heat or light sources inside a small enclosed space is very
dangerous and may result in fire, oxygen deficiency or carbon monoxide poisoning.
●
Do not keep fuel, or flammable items for replenishing the fuel, inside the tent.
●
Pay close attention to the weather. If extreme weather is in the forecast, pack up camp and
evacuate to a safe place.
●
Do not bring heated items into the tent when they are at high temperatures. Inside the tent,
very high temperatures may cause heatstroke. Pay close attention to the temperature, particularly
when children are asleep inside the tent.
●
Choose a flat, well-drained area with firm ground to pitch the tent. Choose an area where there is
no chance of avalanches, landslides, wind gusts or sudden flooding.
Misuse could result in serious injury to the user.
WARNING
2
3m 3m
2.5m 2.5m
2.5m
2.5m
フライシートへの自在付ロープの取付けとペグダウン方向
3m 3m
2.5m 2.5m
2.5m
2.5m
Hammer the peg down vertically to secure the tent.
Hammer the peg
down diagonally.
Hammer the peg
down diagonally.
Hammer the peg
down diagonally.
Hammer the peg
down diagonally.
Reinforcing Cloth
Reinforcing Cloth
RingRing
Ring
Ring
Ring
Hammer the peg down vertically to secure the tent.
Rope Tensioner
Ring
■How to attach the rope
*Follow the instructions on the next page (P. 3).
Reinforced Cloth
Rope Tensioner
View from Top
How to attach the rope with the tensioner to the fly; and how to secure the pegs
in the proper direction.
A C
GJ
F
B D
HI
E
3 4
Pole Short (yellow end)
Pole Long (red end)
Reinforcing Cloth
Sleeve
Sleeve
Sleeve
Ventilation
Plastic
Hook
Side Door Panel
Corner Loop
Corner Loop
Corner Loop
Plastic Hook
Match the yellow Pole with
the yellow Sleeve and the red
Pole with the red Sleeve.
Match the yellow Pole with
the yellow Corner Tape, and
the red Pole with the red
Corner Tape, and insert.
The side with logo at the
bottom should face the
vestibule.
Connect the wall section to
the plastic ring.
Hook the bottom section
to the corner ring.
1
2
Check the position marked with ★and insert
the Pole into the Sleeve. Make sure to match
the end colors of the Sleeve and the Pole .
Make sure there is no
slack when pegging C
and D down.
Peg down these
parts if necessary.
Drive the peg into the groundat 45°.
3
Check the position marked with ▲and insert
the pin into the end of the Pole, at the corner
of the Fly. Match the colors of the Pole end
and corner tape.
4
Attach the rope according to the P5 and also peg down the rope.
8
6
Insert the pin on the opposite side.
*Slowly insert the pin into the end of pole
while adjusting the sleeve so it is positioned
in the center. If the pin is inserted with too
much force from one side, the other side
may curve widely and damage the Pole. Be
sure to communicate with your set-up
partner during this procedure.
5
Wrap [I] tape around the pole .
Hook [II] to the pole .
7
Secure to each corner loop, following the order shown below.
9
Hang the inner tent inside the fly sheet.
Wrap the tape
around the pole,
thread between
the tapes next to
the seam, and pull.
Ⅰ
Ⅰ
Ⅰ
Ⅰ
Ⅱ
Ⅱ
Ⅱ
Vestibule
Rear Room
45°
Sewn seam
Pole
Spread the Fly (beige color) on a flat area.
*Typically, the Vestibule should face downwind. If the Vestibule faces windward, not only will wind
and rain blow into the main entrance, but sudden and strong gusts may causedamagetothe
tentwhenopeningthedoor.
Extend Pole (long) x 1 and Pole (short) x 2
and connect them firmly.
*Make sure to connect them without leaving
gaps at the joints.
Connect them without
leaving gaps at the joints.
Set-up Procedure Make sure that two or more people take part in the set-up.
5
Docking
Purchase two tents for easy docking.
*Please note: complete docking is not possible. The docking function does not prevent rainwater
from entering. Release the docking connection if rain is anticipated.
Connect the tents at the vestibules, the backrooms or the vestibule and the backroom (any
combination works). Secure the connection with the Velcro strap at two points on each
side, four points total.
1
A
A
B
B
C
C
D
D
Enter the room and stack the two front and side panels, then roll them up.
2
Cross the ropes with a ropetensioner, thensecure with apegandtighten tensioner.
3
Cross the ropes
Stack the two
panels and roll up.
D-ring
Pole Pass the tape through the first D-ring.
Wrap around the two Poles.
Pass the tape through the other D-ring.
Secure with Velcro.
Velcro
●
A combination of Polyester fabric is used in this product. Both materials are treated with a high-quality,
water-repellent finish. However, the level of water-repellent capacity and durability may vary slightly due to
the characteristics of each material.
●
The water-repellent finish will lose effectiveness after repeated use. When the water repellence decreases,
please use a water-repellent spray purchased from your local outdoor gear retailer. When using such
sprays, please follow the product’s instructions.
●
Materials with high waterproof capacity are used in this product. However, if the materials are in contact
with pools of water on the ground for long periods, the water may be absorbed into the material, potentially
resulting in discoloration.
Water-Repellent and Waterproof Functions
●
A UV protection treatment has been applied to the fly material. The UV protection treatment will lessen the
permeation of ultraviolet rays, which are harmful to humans, and slow the deterioration of the Fly.
*The UV protection treatment does not completely shield humans from ultraviolet rays or stop the
deterioration of the material’s strength.
●
When the tent material is exposed to sunlight for long periods, color degradation or strength deterioration
may occur. Do not leave the product assembled permanently.
●
If the material deteriorates due to ultraviolet rays and is badly damaged, it may become irreparable.
Regarding the Effect of Ultraviolet Rays
●
A combination of Polyester fabric is used for this product. Taking the material characteristics into
consideration, we adopted processing and color patterns that will result in less color migration. However,
depending on storage conditions, slight color migration may occur. Do not store the product while it is wet.
●
Before storing, the product should be cleaned and dried sufficiently. If the product is stored when wet, the
build-up of mold, bad odors, color migration and material deterioration will occur. Dry the product
sufficiently in a breezy and shaded area and clean the surface with a soft brush before storing.
*Do not flip the tent over with poles still in the sleeves, as the poles may break, and cloth damage may occur.
●
Clean and dry the surface of the poles before storing. If stored when wet, corrosion may occur, resulting in
strength deterioration. Keep the joints clean and apply a small amount of silicone lubricant; applying an
excessive amount of lubricant will stain the cloth. Ensure that the cords inside the poles are not pulled
unnecessarily.
●
Store the product in a well-ventilated area, away from heat and moisture.
●
Using the zipper when it is covered with mud, sand or dust may cause wear or damage.
 Clean the zipper with a brush before use. Apply small amounts of silicone lubricant to the zipper regularly to
ensure smooth movement. Do not apply excessive amounts of lubricant as it will leave stains on the cloth.
●
Minor damage to the cloth can be mended with repair tape that can be purchased from your local outdoor
gear retailer. Refer to the product instructions for the correct use of such repair tape.
●
Depending on the conditions during use, the tent material may deteriorate over a wide area, losing its
durability and becoming irreparable.
●
To maximize the longevity of this product, regularly check and maintain the product (including all
accessories such as the pegs).
Maintenance & Storage
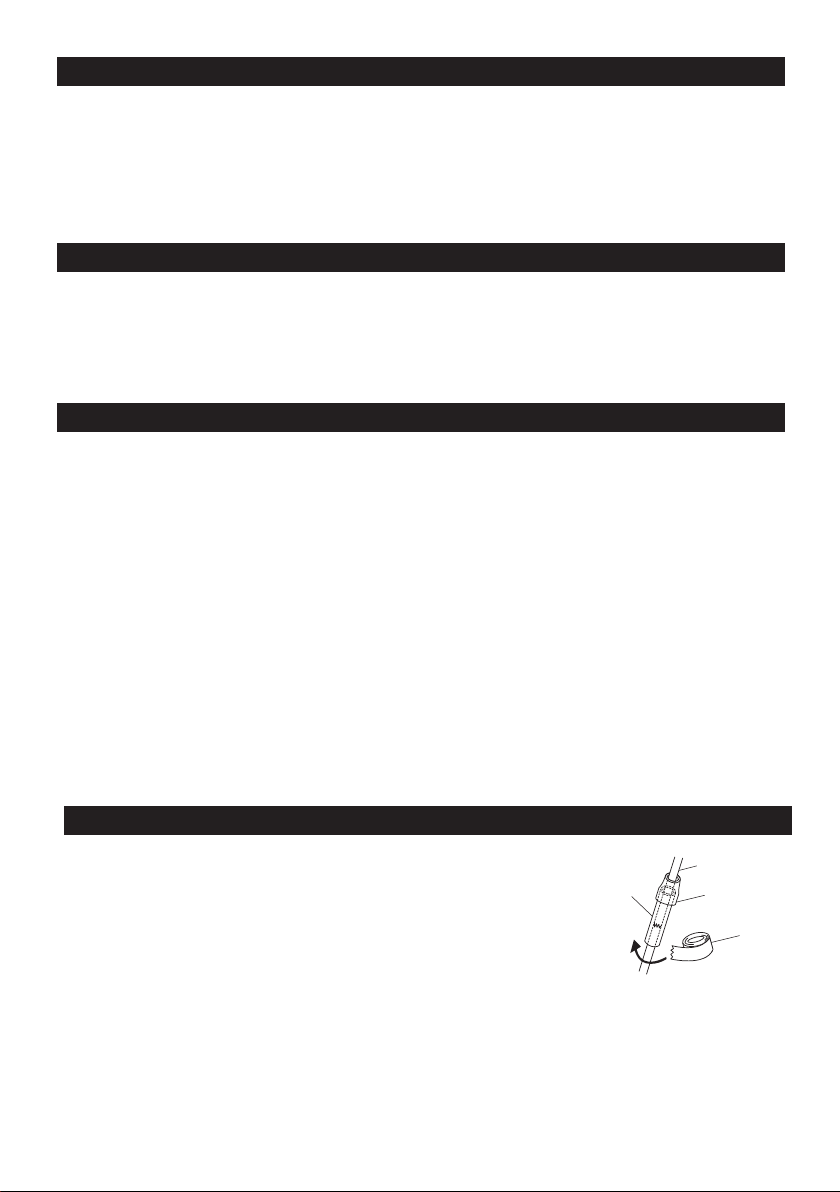
Broken pole
Tape
Tape
Repair
pipe
Q: What can be done if a pole is broken while the tent is in use?
A: For an emergency treatment, use a repair pipe or splint, and secure
with vinyl tape. Or fully disassemble the tent for repair.
Q: What can be done if the tent/tarp cloth is damaged or rips while the
tent is in use?
A: Seal the area with packing tape on both sides or use a tent repair kit
that can be purchased from your local outdoor gear retailer. When
using a repair kit, read the instructions carefully.
Q: What can be done when the water-repellent finish degrades?
A: The water-repellent finish will lose its effectiveness with repeated use. When the material’s water repellence
decreases, please use a water-repellent spray that can be purchased from your local outdoor gear retailer.
When using such sprays, please follow the product’s instructions.
Q: What can be done if mold develops on the tent material?
A: Wipe the affected area with a dry cloth and sterilize with alcohol. When the material has a color change due
to mold, this color change cannot be removed. Removing mold with excessive force may result in further
deterioration of the material and the coating finish.
FAQ
6
300cm
(9.8')
285cm
(9.4')
150cm
(4.9')
530cm (17.4')
220cm
(7.2')
(Indoor Height)
●
If a professional repair is necessary, please contact the dealer where the product was sold or Snow Peak
Customer Service.
●
Please dry and clean the product before sending it for repair.
●
Please stick a memo onto the damaged area of the product. In the memo, include details explaining the
circumstances that led to the damage.
●
The cost of repair will be determined as follows:
1.If the damage is subject to warranty, transportation cost (both ways) and repair cost will be
coveredbySnowPeak.
2.Ifthedamageisnotsubjecttowarranty,transportationcost(bothways)andrepaircostwillbe
coveredbythecustomer.
Regarding Repair
The specifications of Snow Peak products are determined based on field testing and quality control, ensuring
proper function and longevity of every product. If apparent defects in the manufacturing of the product are
found, the defective product will be repaired or exchanged free of charge. Damages, as follows, are not
covered under warranty.
Regarding Warranty
1. Damage caused by improper use.
2. Material deterioration caused by age or the influence of ultraviolet rays.
3. Damage caused by modifications or rough handling.
4. Damage caused by unforeseen accidents.
5. Damage not caused by defects in the manufacturing process.
6. Damage caused by dust or rust.
7. Damage or defects caused when dismantling the product.
8. Damage and defects caused by dropping or other shocks to the product.
9. Defects, breakage or deterioration of replaceable parts.
10. Damage caused by use of the product in combination with other maker’s products.
MADE IN VIETNAM
For question or concerns
contact the Snow Peak
Customer Service Department.
Snow Peak USA Inc.
+1 503-697-3330(9:00~17:00)
Email: [email protected]
404 NW 23rd Ave., Portland Oregon, 97210, USA
@snowpeakusa
Snow Peak USA Inc.
Specifications
〇Capacity:4 persons〇Material: Fly/75D Polyester Taffeta, PU coating, Waterproof
rating: 1,800mm minimum, water-repellent finish, UV
protection treatment,Inner Tent/68D Polyester Taffeta,
Bottom/210D Polyester Oxford, PU coating, Waterproof
rating: 1,800mm minimum; Pole /A6061 (Ф13mm(0.51"))
〇Set Contents/Tent, Pole Long (x1), Pole Short (x2),
Duralumin Peg (x24), Rope with Rope Tensioner (3m (9'8") x
4, 2.5m (8' 2.5') x 8), Repair Pipe (x1), Carry Bag, Pole Case,
Peg Case
〇
Carry Bag Size 66x25x25(h)cm
(26”x9.8”x9.8”)
〇Weight:7.9 ㎏(17.4 l bs)

This manual suits for next models

1

Other Snow Peak Tent manuals

Snow Peak FES-195 User manual

Snow Peak

Snow Peak FES-195 User manual

Snow Peak Amenity Dome L User manual

Snow Peak

Snow Peak Amenity Dome L User manual

Snow Peak Toya 2 User manual

Snow Peak

Snow Peak Toya 2 User manual

Snow Peak Amenity Dome Small in Ivory User manual

Snow Peak

Snow Peak Amenity Dome Small in Ivory User manual

Snow Peak FES-091 User manual

Snow Peak

Snow Peak FES-091 User manual

Snow Peak SDE-260IR User manual

Snow Peak

Snow Peak SDE-260IR User manual

Snow Peak Penta Pro.air 1 User manual

Snow Peak

Snow Peak Penta Pro.air 1 User manual

Snow Peak Alpha Breeze User manual

Snow Peak

Snow Peak Alpha Breeze User manual

Snow Peak Takibi Tarp Hexa Set M User manual

Snow Peak

Snow Peak Takibi Tarp Hexa Set M User manual

Snow Peak SSD-630-1 User manual

Snow Peak

Snow Peak SSD-630-1 User manual

Snow Peak TP-870 User manual

Snow Peak

Snow Peak TP-870 User manual

Snow Peak Amenity Dome S User manual

Snow Peak

Snow Peak Amenity Dome S User manual

Snow Peak Land Nest Dome Small User manual

Snow Peak

Snow Peak Land Nest Dome Small User manual

Snow Peak SD-651 User manual

Snow Peak

Snow Peak SD-651 User manual

Snow Peak TM-259 User manual

Snow Peak

Snow Peak TM-259 User manual

Snow Peak Lago 1 Ivory User manual

Snow Peak

Snow Peak Lago 1 Ivory User manual

Snow Peak Amenity Dome M User manual

Snow Peak

Snow Peak Amenity Dome M User manual

Snow Peak Land Breeze Pro Air Duo User manual

Snow Peak

Snow Peak Land Breeze Pro Air Duo User manual

Snow Peak Living Lodge M User manual

Snow Peak

Snow Peak Living Lodge M User manual

Snow Peak Land Nest Dome User manual

Snow Peak

Snow Peak Land Nest Dome User manual

Snow Peak Entry Pack TT User manual

Snow Peak

Snow Peak Entry Pack TT User manual

Snow Peak LV-071-1-IV User manual

Snow Peak

Snow Peak LV-071-1-IV User manual

Popular Tent manuals by other brands

Palram Juniper 3x3 manual

Palram

Palram Juniper 3x3 manual

Dometic FTC operating manual

Dometic

Dometic FTC operating manual

Game Day Gear BL 93095 quick start guide

Game Day Gear

Game Day Gear BL 93095 quick start guide

ShelterLogic SUPERMAX 25770 Assembly instructions

ShelterLogic

ShelterLogic SUPERMAX 25770 Assembly instructions

Palram Feria Patio Cover 5400 Assembly instructions

Palram

Palram Feria Patio Cover 5400 Assembly instructions

Zempire Canvaslite Pitching instructions

Zempire

Zempire Canvaslite Pitching instructions

Skandika Folldal 4 Air-Rise quick start guide

Skandika

Skandika Folldal 4 Air-Rise quick start guide

GigaTent POP UP PRIVACY POD owner's manual

GigaTent

GigaTent POP UP PRIVACY POD owner's manual

Hilleberg ALLAK manual

Hilleberg

Hilleberg ALLAK manual

Eureka High Camp Assembly instructions

Eureka

Eureka High Camp Assembly instructions

Gill 881018 Assembly instructions

Gill

Gill 881018 Assembly instructions

Kathmandu Boreas v2 instruction manual

Kathmandu

Kathmandu Boreas v2 instruction manual

Palram Joya 3x5.46 instructions

Palram

Palram Joya 3x5.46 instructions

GYBE Event Assembly instructions

GYBE

GYBE Event Assembly instructions

Vaude CAMPO CASA XT 5P user manual

Vaude

Vaude CAMPO CASA XT 5P user manual

A1 OTC 20X30 quick start guide

A1

A1 OTC 20X30 quick start guide

Coleman 2000004410 Setup instructions

Coleman

Coleman 2000004410 Setup instructions

Gutta BS Plus 160 Assembly instructions

Gutta

Gutta BS Plus 160 Assembly instructions

manuals.online logo
manuals.online logoBrands
  • About & Mission
  • Contact us
  • Privacy Policy
  • Terms and Conditions

Copyright 2025 Manuals.Online. All Rights Reserved.