SOMFY Sonesse 30 RS485 Quick setup guide
1061 South 800 East · Orem, Utah 84097 · Telephone 801 229 2800 · Fax 801 224 0355 Document Updated June 17, 2016
©Vantage Equinox
Somfy: Sonesse 30 RS485
page 1 of 7
VANTAGECONTROLS.COM
EQUINOX INTEGRATION GUIDE
Manufacturer:
Somfy
Widget:
Shade
Model Number/s:
Sonesse 30 RS485 ( Equinox )
Aliases:
ILT2 (Equinox)
Driver Version:
v. 12 or higher
Widget Category:
Shades/Blinds
DC Version:
v. 3.3 or higher
Connection Type:
Serial (RS-485)*
I. Overview
As part of its Premier Partner Program, Vantage Equinox products support the Somfy Sonnese 30 RS485 for control of the shades in
your InFusion Project. After setting up the Somfy in Design Center, the Equinox Shade Widget user interface for control of the Somfy
Shades automatically appears in the EQ41 and EQ73 in-wall touch screens and on mobile devices installed with the Equinox App
(available for iPhones, iPads, iPods, and Android products).
*see Notes section for information about Vantage RS-485 stations.
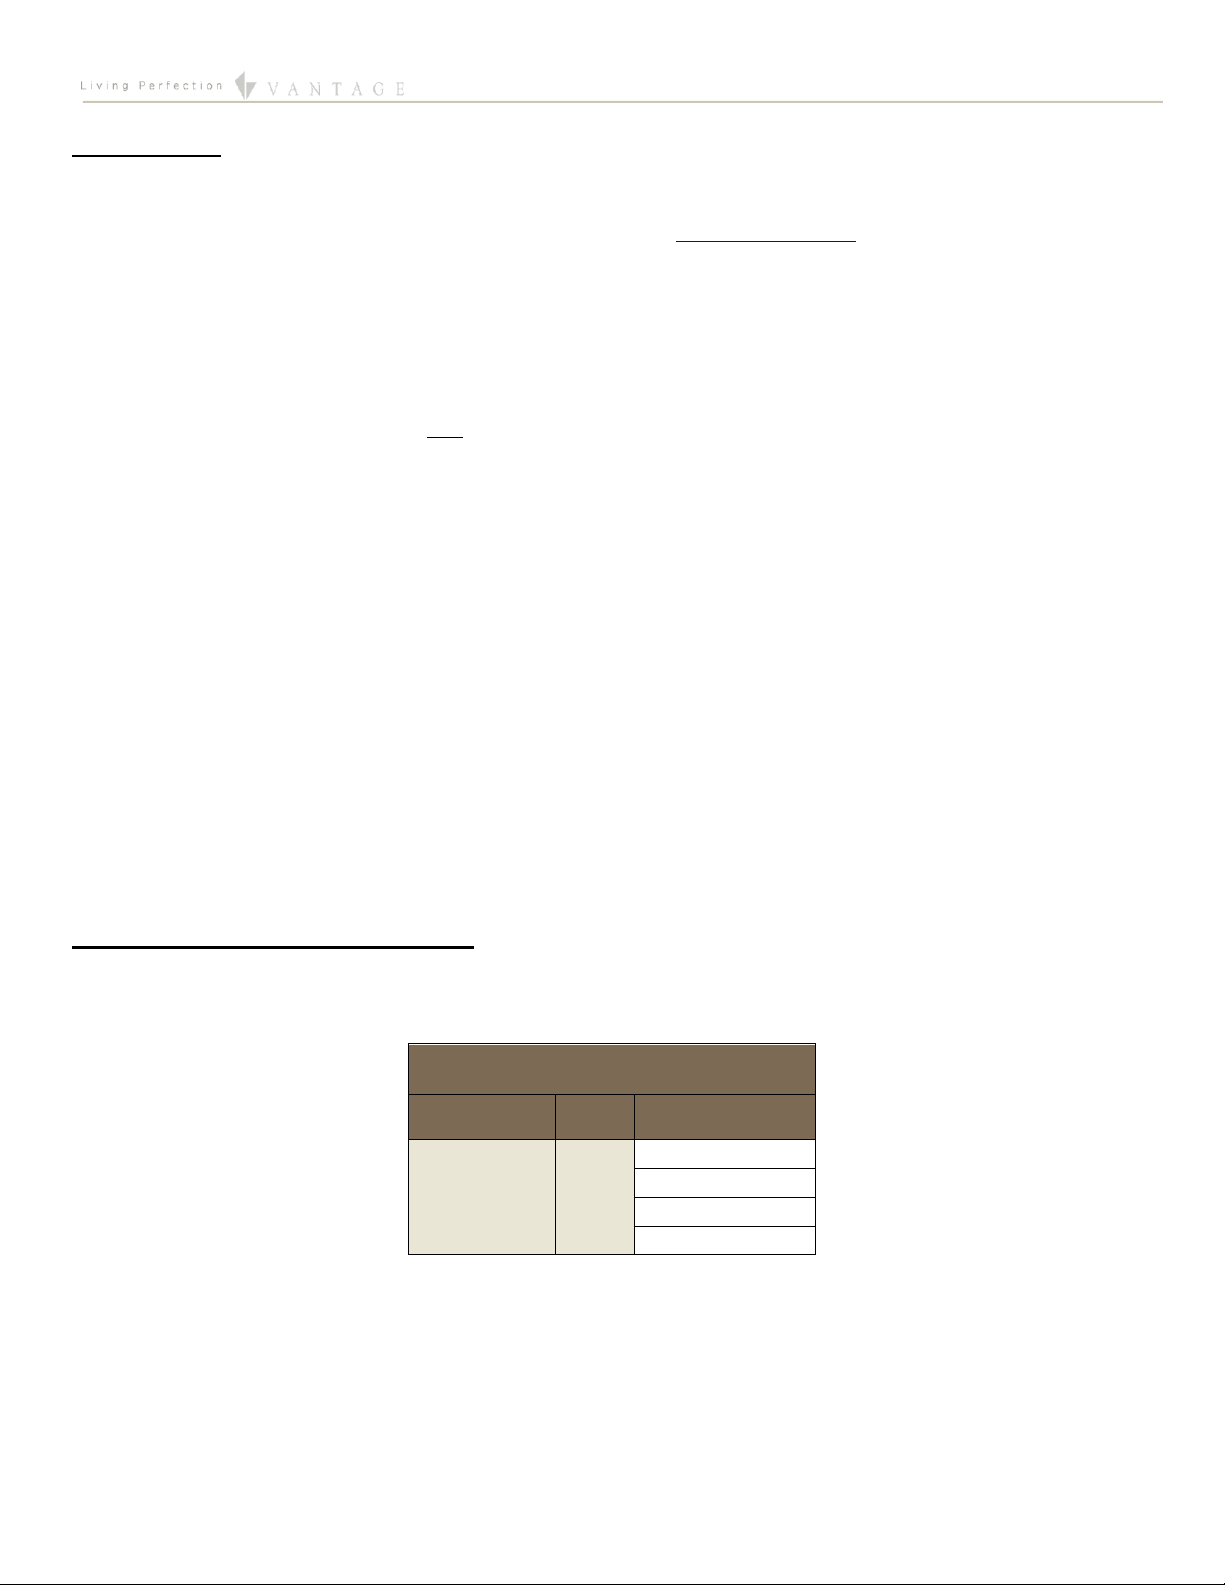
II. Features Supported / Not Supported
Feature
EQ40
EQ41, EQ73 &
EQApp
Open/ Close / Stop
Full control over open, close, and stop for all shades
Position Control
Set the shades to specific positions
Visual Feedback
Graphic presents the position of every shade
Group Control
Configure and control a shade group or individual shades
Configure Presets
Set up to four user-defined presets for each group.
Supported
Task Only Support
Not Supported
Feature Notes:
EQ40 support for open, close, and stop is supported only through Design Center Tasks.
III. Notes
Unless integrating ILT 2 shades, we recommend NOT using this driver, but instead using the Somfy RS-485 SDN 2.0 driver and
integration guide for Somfy shades. For more information, see XII. Tech Notes at the end of this document.
Somfy products ARE NOT compatible with the RS-485 station. If a similar setup is desired it is best to use an RS-232 station with an
RS-485 to RS-232 converter. For more information, see the Installation Steps section.
Somfy shades contain a calibration property within Design Center. If checked, this will cause the shade to execute a full open and
close. While this occurs, the system will measure the travel time from bottom to top and top to bottom. These values will be used to
produce an accurate widget animation. If the widget animation seems too fast or too slow, the travel time can be reset. This is done

EQUINOX INTEGRATION GUIDE
©Vantage Equinox
Somfy: Sonesse 30 RS485
page 2 of 7
by un-checking the “Calibrate”checkbox and performing an update, then rechecking the box and updating again. This will cause the
shade to perform a full open and close to re-measure the travel time. Once the travel time is set, it will not change until recalibrated
through Design Center or some property of the shade is changed in Design Center.
IV. Links
Product Specifications: https://www.somfypro.com/documents/531668/7162585/Sonesse-30-RS485-Spec-Sheet.pdf
Databook: https://www.somfypro.com/documents/531668/9493868/Sonesse-30-Databook.pdf
Installation Instructions: https://www.somfypro.com/documents/531668/7162585/Sonesse30_RS485_Installation_Instructions.pdf
Demo Tool Installation Guide: http://files.domoticaforum.eu/Somfy/RS485%20demo%20tool%20IG.pdf
Somfy Downloads Page: https://www.somfypro.com/downloads
V. Installation Steps
Use the above guides to install the Somfy shade systems. The limits of each shade must be set up outside of
Design Center using the limit setting tool such as the one pictured to the right. In order to automate the shade,
you need determine the motor address for each shade. This is not anywhere on the device itself (NodeID
written on shade and motor is to identify shade in config tool) and must be determined using the SDN Motor
Configuration Software (below) found in the “Downloads”page above, or calculated manually as described in
XII. Tech Notes. In order to use this software, you will need to
connect the Somfy system to your computer’s com port. This is
typically done with an adapter such as the one pictured below
from U-Linx. The software will allow you to determine the motor
address of each shade using the “Get Mtr Addr” button. You can
also assign group addresses to each shade on the system. Make
note of each shade’s motor address and group addresses. These
will be used in Design Center Setup. Connect a wire from the Somfy System bus
to the InFusion Project. Red is T/R+, Black is T/R-, and Green is Ground. You
should be ready for Design Center configuration.
Somfy products ARE NOT compatible with the Vantage RS-485 station. If a station is wanted or needed, you will need to use an RS-
232 station with an RS-485 adapter, both are pictured below. We recommend the B&B converter with a null modem attached for
two way communication.
RS-232 Station: http://dealer.vantagecontrols.com/products/category.php?category=a0M800000049qPYEAY
Converter: http://www.bb-elec.com/Products/Serial-Connectivity/Serial-Converters/Port-Powered-RS-232-to-RS-422-485-
Converters/485SD9TB.aspx
EQUINOX INTEGRATION GUIDE
©Vantage Equinox
Somfy: Sonesse 30 RS485
page 3 of 7
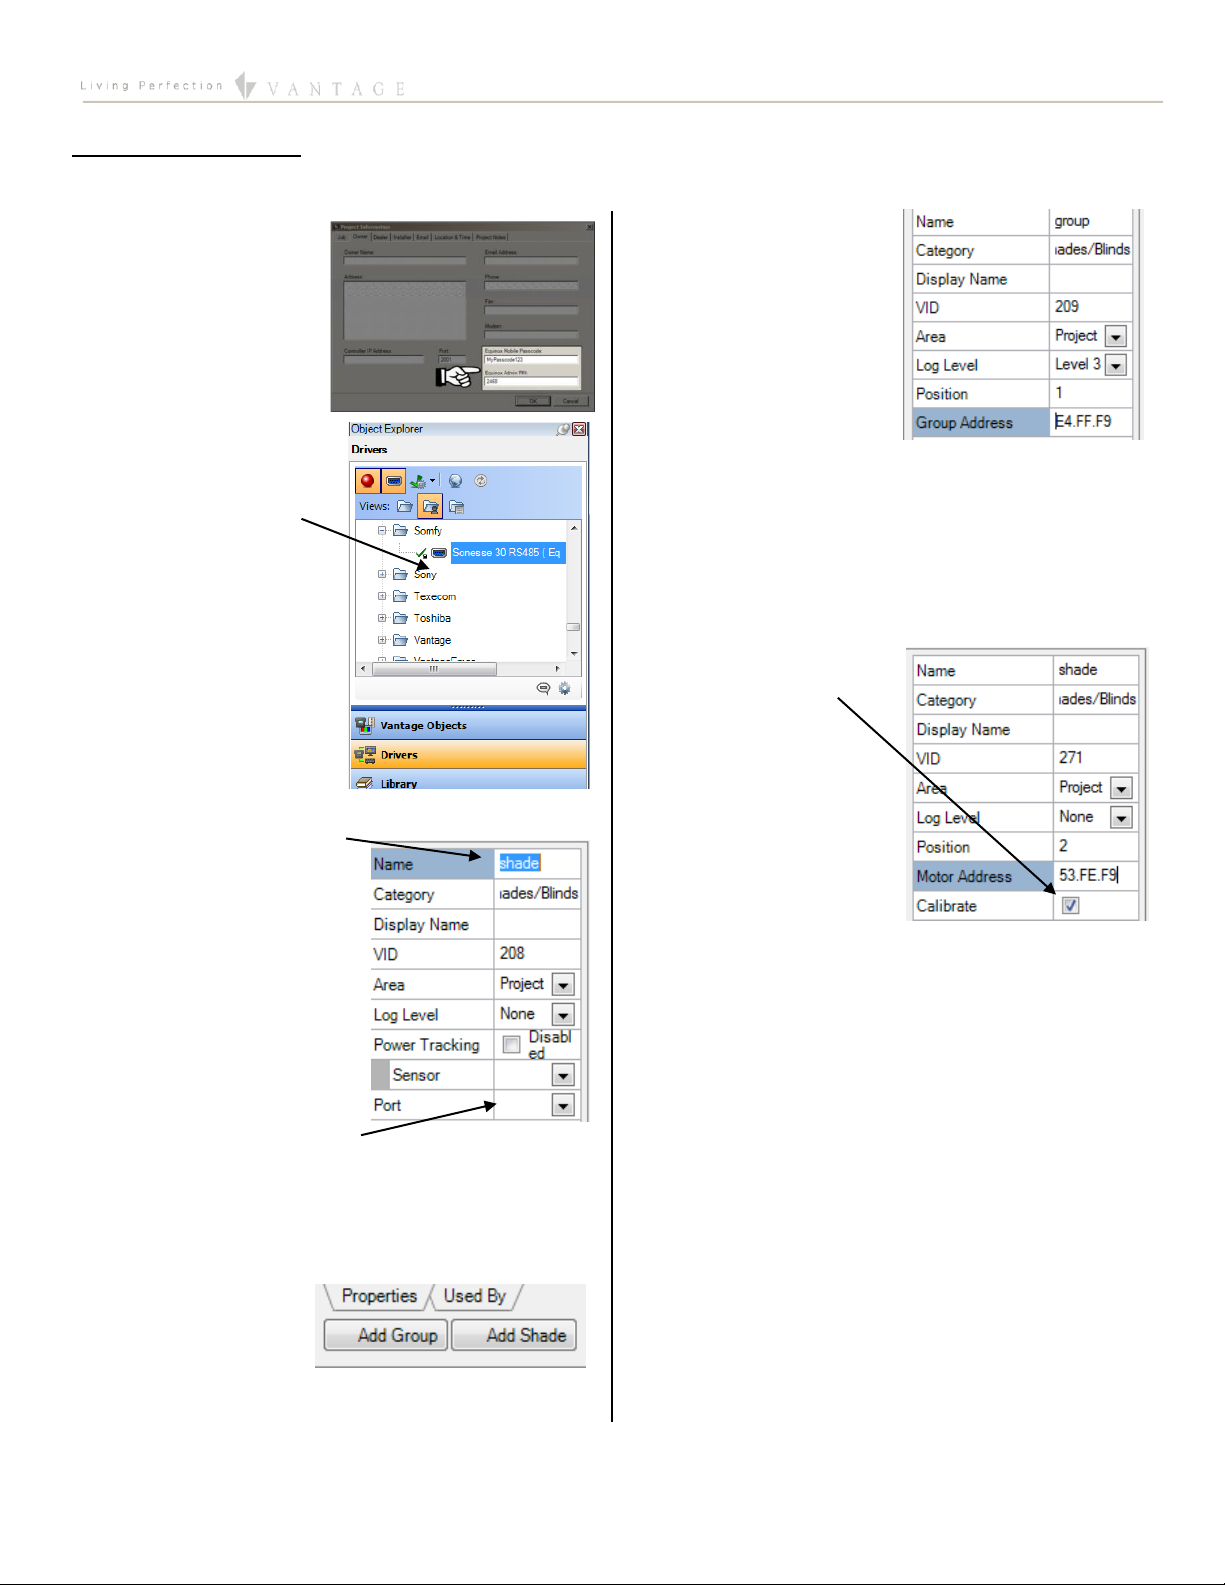
VI.Design Center Setup
Follow these instructions to add the Somfy to your Design Center project and configure its settings appropriately.
1. Project Settings –Click
on Settings | Project
Information| Owner
(tab). Fill out the
Equinox Mobile
Passcode:
(alpha/numeric), and
the Equinox Admin PIN:
(numeric).
2. Add Somfy Sonnese 30 –
In the Object Explorer,
select Drivers and drag or
double click the driver to
add it to the project.
TIP: The Somfy is added to
the room currently
selected when double
clicking.
3. Name the Somfy –In the Object Editor, name the Somfy
and give it a user-friendly
display name also.
4. Set the Area –Set the area
for each shade. Also, set the
area for the system.
5. Add a port –Add a new RS-
485 port. This will correspond
to the port that you
connected the Somfy to the InFusion Project with.
6. Add Groups –Add the number of groups you
programmed during installation.
7. Add Shades –Add the
number of shades you
have in each group.
8. Set Group Addresses –
Enter the group address
you programmed during
installation.
9. Set Shade Motor Addresses –Enter the motor address
for each shade on the system. (This is NOT the Node ID.
See V. Installation Steps or XII. Tech Notes for how to get
the motor address.)
10. Calibrate –When the
system is ready, check
the “Calibrate”
checkbox within each
shade and perform an
InFusion update. See
notes above for more
details.
EQUINOX INTEGRATION GUIDE
©Vantage Equinox
Somfy: Sonesse 30 RS485
page 4 of 7
VII.Equinox 40 Setup
The Equinox 40 has no native shade widget support for use with the MechoShade IQ2. However, EQ40 (and keypad button) control
may be accomplished through Design Center tasks. See Design Center Procedure Table in section XIII.
VIII. Add Additional Equinox Devices and Program Controller
To use the Somfy with the Equinox Shade widget, simply add and name any EQ 73 or EQ 41 (from Vantage Objects | Touchscreens in
the Object Explorer pane) in their respective areas in your Design Center project. (For the Equinox mobile app, no object needs to be
added.) No additional Design Center setup is required.
Connect to the InFusion Controller. Configure the devices. After the devices are configured, do an Update or Full Program. The
devices should now be operational.
Do not touch or send commands (open, close, stop etc) to a Somfy Shade while it is calibrating. These may cause errors which will
require recalibration. If Equinox animation appears inaccurate, recalibrate the effected shade.
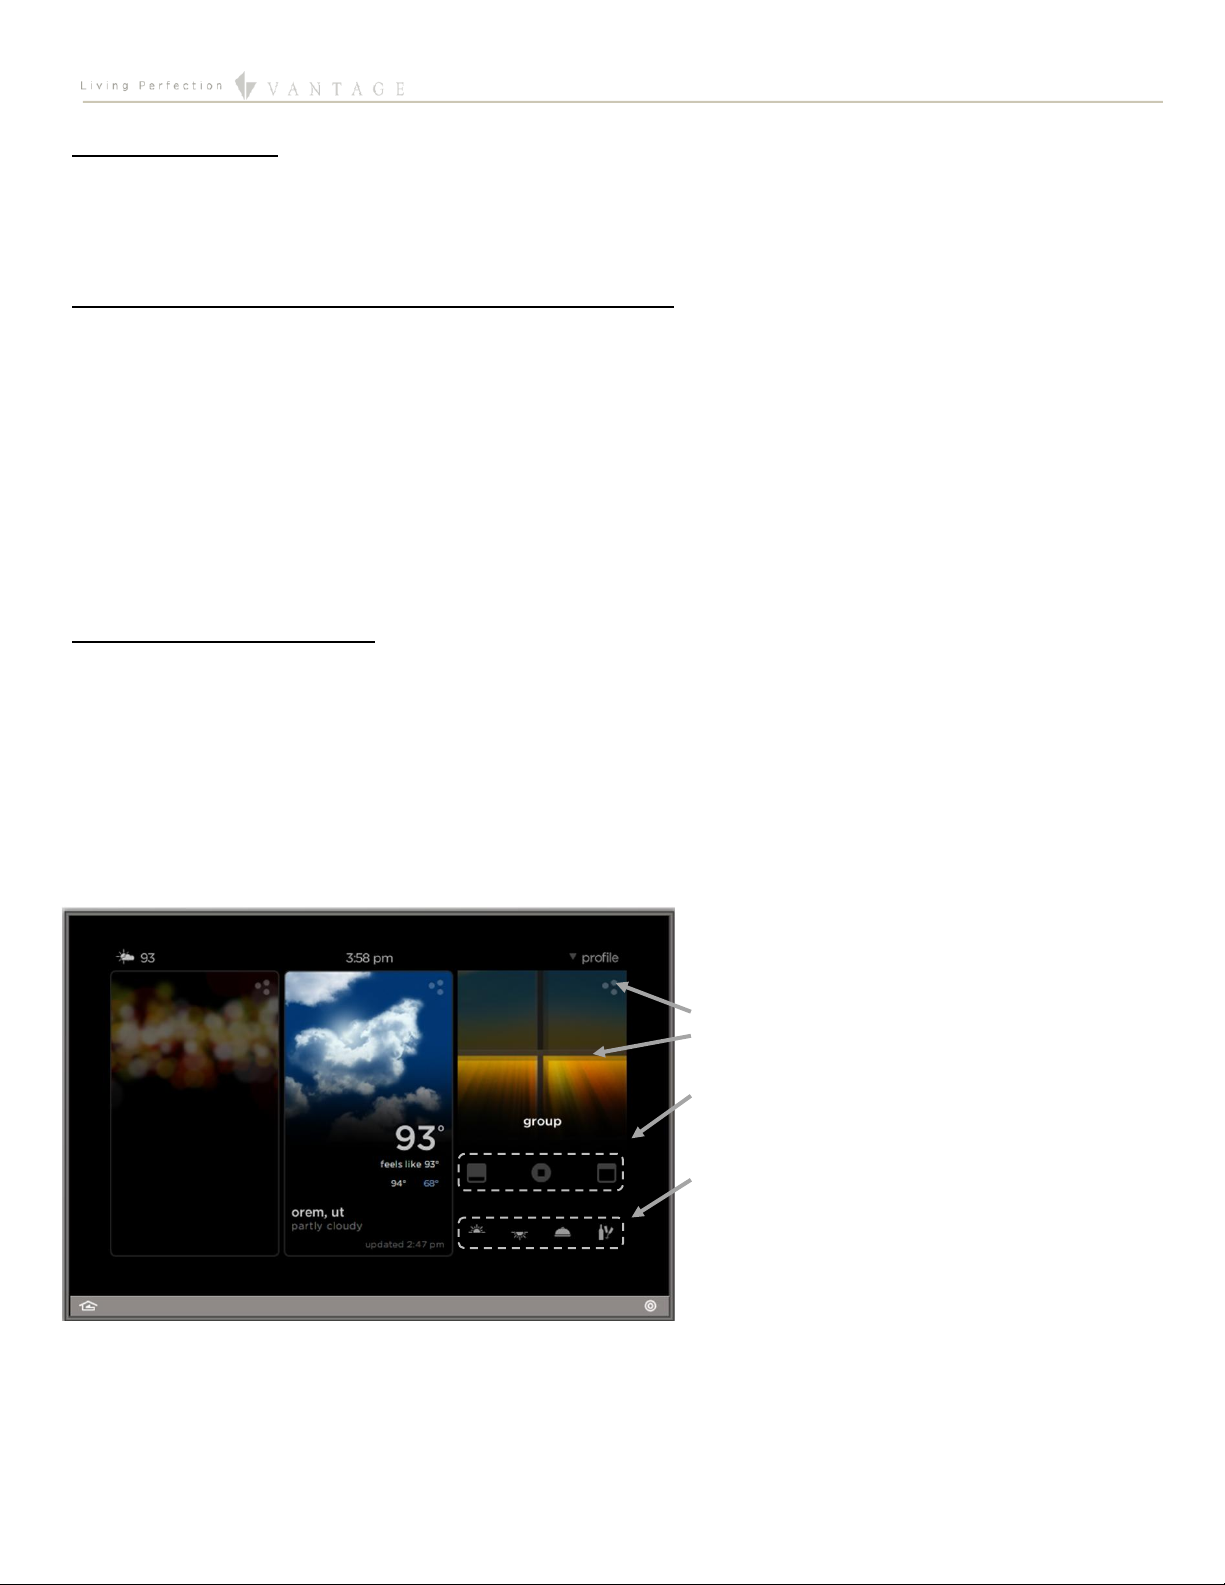
IX. Equinox Widget Navigation
Once a Somfy Shade is added to the project, the Shade widget will normally appear on the EQ73, EQ41, and Equinox Apps. If the
widget is not visible, go to Profile Settings and select the widget to make it visible. Note that if the Shade widget is already on the
Equinox device, but the Somfy Shade is not visible; go to the widget’s Edit Mode (see below) to toggle the shade to make it visible.
The following screen shots, taken from a typical EQ73 device, show the basic navigation for full Equinox widgets on the EQ41, EQ73,
and Equinox App, among the three widget views: Dashboard, Full Screen, and Edit Mode. Refer to the “Equinox Apps Widget Install”
document on Vantage’s website for more detailed information.
Dashboard View of the Somfy in the Shade Widget
Press to enter Full Screen Widget
See current group or zone position
Shade controls
User assigned presets
EQUINOX INTEGRATION GUIDE
©Vantage Equinox
Somfy: Sonesse 30 RS485
page 5 of 7
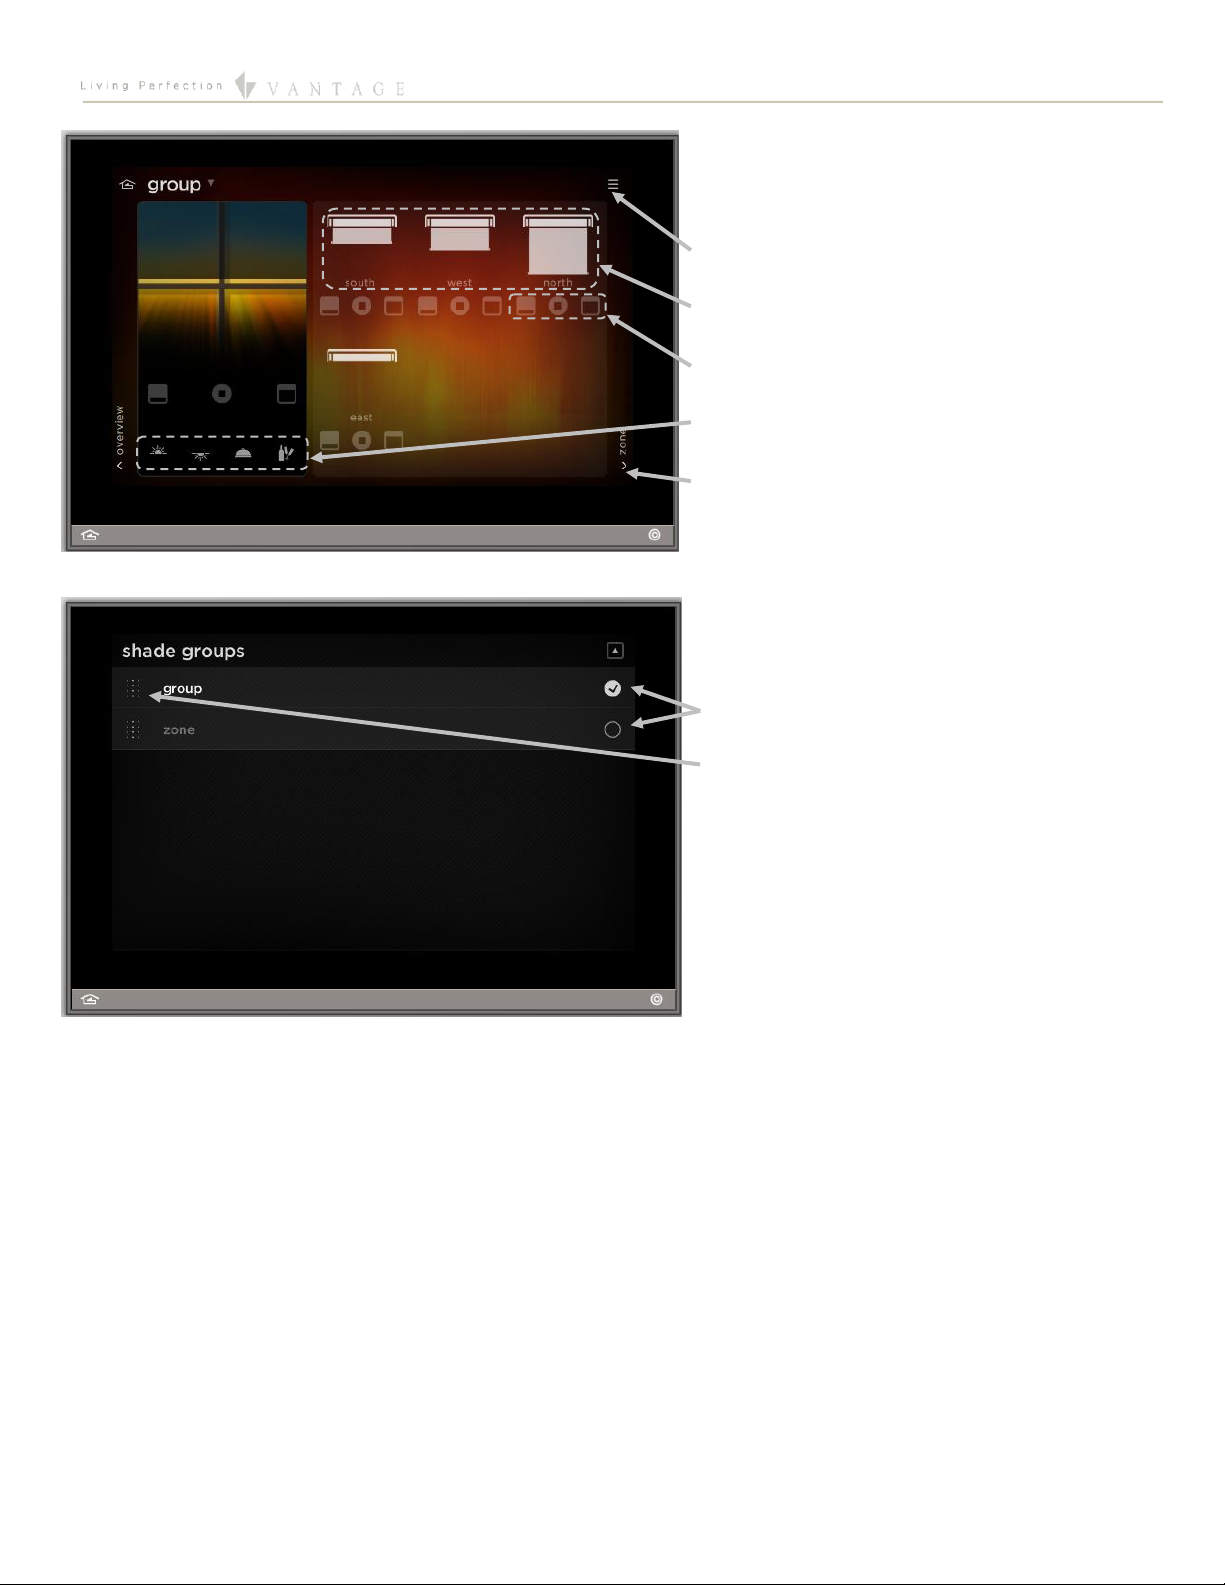
Full Screen View of the Somfy in the Shade Widget
Enter edit mode
See individual shade positions
Control individual shades
Press and hold to set presets
Swipe or press to switch between groups
Edit Mode View for Shade Widget
Toggle Inclusion/exclusion in widget
Hold and drag up/down to change the order
Equinox App Licensing Note
Install the Equinox App (search for Vantage Equinox) on your iOS or Android devices. A valid license is needed for each Equinox
device connected to a Vantage System. Licenses are available via Controller SD cards for up to 5 (EQ-APP-5), 10 (EQ-APP-10), or
unlimited (EQ-APP-X) quantities of Equinox devices. Also, each EQ73 station adds one more license (EQ73TB-T1). Ensure Step 1 of
the Design Center Setup was completed, as the Equinox App will not run without the Equinox Mobile Passcode. Launch the App, and
follow the on-screen prompts in the Setup Wizard.

EQUINOX INTEGRATION GUIDE
©Vantage Equinox
Somfy: Sonesse 30 RS485
page 6 of 7
X. Connection Diagram Example
XI. Bill of Materials Example
#
Device
Manufacturer
Part Number
Protocol
Connector Type
Notes
1
EQ41
Vantage
EQ41TB-TI
Ethernet w/PoE
Cat 5 (RJ45)
2
EQ73
Vantage
EQ73TB-TI
Ethernet w/PoE
Cat 5 (RJ45)
3
EQ Mobile Apps
Vantage
EQ-APP-5/10/X
WiFi
N/A
4
Infusion Controller
Vantage
IC-36-1
Ethernet
Station bus / Cat 5
5
Wireless Router
Luxul
XWR-1750
Ethernet / WiFi
Cat 5 (RJ45)
6
Gigabit Switch w/PoE
Luxul
XGS-1008P
Ethernet w/PoE
Cat 5 (RJ45)
7
Shade/Blind
Controller Interface
Somfy
Sonesse 30 RS485
RS-485
Cat 5 (RJ45)
EQUINOX INTEGRATION GUIDE
©Vantage Equinox
Somfy: Sonesse 30 RS485
page 7 of 7
XII. Tech Notes
Things to Know / Gotchas
Most Somfy shades (except for ILT 2 manufactured before 2016) are compatible with both this driver and the Somfy RS-485
SDN 2.0 driver. Except for ILT 2 shades, we recommend using the Somfy RS-485 SDN 2.0 driver instead of this, the Sonesse
30 RS485 ( Equinox ), driver. That driver uses Node ID directly (not motor address), which is already printed on the shades.
As noted above, Somfy products ARE NOT compatible with the RS-485 station. If a similar setup is desired it is best to use
an RS-232 station with an RS-485 to RS-232 converter, as explained in the Installation Steps section.
If a shade is experiencing difficulty calibrating, change the shade to a different position and attempt recalibration.
If a shade appears stuck during calibration, press the open or close button to reanimate it.
You must use the limit setting tool before the shade can be used in calibration.
The Node ID listed on the motor is NOT the motor address. You will need to determine the motor address using the
configuration software tool. For an alternative method, see below
If you are familiar with hex notation, you may be able to manually calculate the motor address from the Node ID using the
following steps:
1. Subtract the Node ID from FFFFFF (in hex). For instance, in Windows:
Open the Windows built-in Calculator program
Change the View to Programmer
Select “Hex” in the number format area (as opposed to Dec, Oct, or Bin)
Type in FFFFFF
Press subtract (-)
Type in the Node ID for a given shade (usually written on the shade’s label)
Press equal (=)
2. Swap the first byte and the last byte of the result (each byte is two hex characters):
For instance, F9FE53 becomes 53FEF9. (F9, FE, and 53 are the three bytes. Do not swap the two hex
characters within a byte.)
3. As a full example, Node ID 0601AC would become motor address 53FEF9.
XIII. Design Center Task Procedure Table
The following table shows the most common procedures that are available for programming Design Center tasks with Somfy Shades.
Tasks can be assigned to keypad buttons and Equinox scenes.
Available Task Procedures
Category
Folder
Procedure
Shades/Motors
Shades
Close Blind
Open Blind
Set Blind Position
Stop Blind
Other manuals for Sonesse 30 RS485
4
Table of contents
Other SOMFY Power Supply manuals

SOMFY
SOMFY Power 1.0 DC Flush User manual

SOMFY
SOMFY KNX IP LineMaster Specification sheet

SOMFY
SOMFY 9018245 User manual

SOMFY
SOMFY 9018244 User manual

SOMFY
SOMFY TaHoma Assembly instructions

SOMFY
SOMFY animeo 1860093 User manual

SOMFY
SOMFY Power 2.5 DC User manual

SOMFY
SOMFY animeo User manual

SOMFY
SOMFY animeo 1860093 User manual
Popular Power Supply manuals by other brands


Elenco Electronics
Elenco Electronics XP-15 Instruction & assembly manual

HENRY
HENRY A1584 Installation, operation and maintenance manual

Tecnoware
Tecnoware EVO DSP PLUS TT 10 KVA user manual

Antec
Antec TruePower 2.0 Benutzerhandbuch

Westermo
Westermo PS-240-P4G installation manual

OSAKA VACUUM
OSAKA VACUUM TC163H instruction manual