Somogyi Elektronic MVN 900 User manual

instruction manual
MVN 900
használati utasítás
návod na použitie
manual de utilizare
uputstvo za upotrebu
navodilo za uporabo
návod k použití

峰
0
-30
-20
-10菜
メ量
量
音指示灯
65A 5B4A 4B3A 3B 7
1B
1A 2A 2B
EN - 1. Stepping UP • 2. SET button • 3. Stepping DOWN • 4. LCD display • 5. AF audio level indicator • 6. INFRA signal transmitter • 7. ON/OFF switch
H - 1. FEL léptetés • 2. SET gomb • 3. LE léptetés • 4. LCD kijelző • 5. AF audio szintjelző • 6. INFRA jeladó • 7. BE/KI kapcsoló
SK - 1. krokovanie HORE • 2. tlačidlo SET • 3. krokovanie DOLE • 4. LCD displej • 5. kontrolky AF audio signálu • 6. INFRA vysielač signálu • 7. ZA- /
VYPÍNAČ
RO - 1. pas SUS • 2. buton SET • 3. pas JOS • 4. ecran LCD • 5. semnal nivel audio AF • 6. emiţător INFRA • 7. Comutator PORNIRE / OPRIRE
SRB, MNE - 1. Gore • 2. Set • 3. Dole • 4. LCD displej • 5. AF audio signala • 6. INFRA predajnik • 7. Uklj./Isklj.
SLO - 1. GOR • 2. SET • 3. DOL • 4. LCD zaslon • 5. AF audio signal • 6. INFRA oddajnik • 7. Vklop/izklop
CZ - 1. FEL léptetés • 2. SET gomb • 3. LE léptetés • 4. LCD kijelző • 5. AF audio szintjelző • 6. INFRA jeladó • 7. BE/KI kapcsoló
xxxx / BEÁLLÍTÁS, PÁROSÍTÁS, FUNKCIÓK / NASTAVENIE, PÁROVANIE, FUNKCIE / SETĂRI, ÎMPERECHERE, FUNCŢII / PODEŠAVANJE, PÁRO-
SÍTÁS, FUNKCIJE / NASTAVITEV , PÁROSÍTÁS, FUNKCIJE / xxxx
EN - 1. 220 - 240 V ~ socket • 2. 12 V socket • 3. BNC antenna connector • 4. XLR audio output • 5. LINE OUT output • 6. VOL1 volume • 7. VOL2
volume
H - 1. 220-240V~ csatlakozó • 2. 12 V csatlakozó • 3. BNC antenna csatlakozó • 4. XLR audio kimenet • 5. LINE OUT kimenet • 6. VOL1 hangerő • 7.
VOL2 hangerő
SK - 1. 220-240V~ prípojka • 2. 12V prípojka • 3. BNC prípojka antény • 4. XLR audio výstup • 5. LINE OUT výstup • 6. VOL1 intenzita zvuku • 7. VOL2
intenzita zvuku
RO - 1. racord 220-240V~ • 2. racord 12V • 3. racord antenă BNC • 4. ieşire audio XLR • 5. ieşire LINE OUT • 6. potenţiometru VOL1 • 7. potenţiometru VOL2
SRB, MNE - 1. Utičnica 220-240V~ • 2. Utičnica 12V • 3. BNC antenska utičnica • 4. XLR audio izlaz • 5. LINE OUT izlaz • 6. VOL 1 jačina zvuka • 7.
VOL2 jačina zvuka
SLO - 1. Vtičnica 220-240V~ • 2. Vtičnica 12V • 3. BNC antenska vtičnica • 4. XLR audio izhod • 5. LINE OUT izhod • 6. VOL 1 jakost zvoka • 7. VOL
2 jakost zvoka
CZ - 1. 220-240V~ csatlakozó • 2. 12V=! csatlakozó • 3. BNC antenna csatlakozó • 4. XLR audio kimenet • 5. LINE OUT kimenet • 6. VOL1 hangerő • 7.
VOL2 hangerő
123A4A4B53B67
1
2
3
4
5
6
EN - 1. microphone head • 2. infra receiver • 3. LCD display
• 4. ON/OFF switch • 5. transmitter output switch • 6. battery
holder compartment
H - 1. mikrofon fej • 2. infra vevő • 3. LCD kijelző • 4. BE/KI
kapcsoló • 5. adóteljesítmény kapcsoló • 6. elemtartó
SK - 1. hlava mikrofónu • 2. infra prijímač • 3. LCD displej • 4. ZA-
/ VYPÍNAČ • 5. spínač výkonu vysielania • 6. puzdro na batérie
RO - 1. capul microfonului • 2. receptor infra • 3. ecran LCD
• 4. buton PORNIRE/OPRIRE • 5. comutator putere emiţător
• 6. suport baterii
SRB, MNE - 1. Glava mikrofona • 2. Infra prijemnik • 3. LCD
displej • 4. Uklj./Isklj. • 5. Prekidač za snagu • 6. Držač baterija
SLO - 1. Glava mikrofona • 2. INFRA sprejemnik • 3. LCD zaslon •
4. VKLOP/IZKLOP • 5. Stikalo za moč • 6. Nosilec baterij
CZ - 1. mikrofon fej • 2. infra vevő • 3. LCD kijelző • 4. BE/KI
kapcsoló • 5. adóteljesítmény kapcsoló • 6. elemtartó

0
-30
-20
-10菜
メ
指示灯
-
15 cm
2x SET
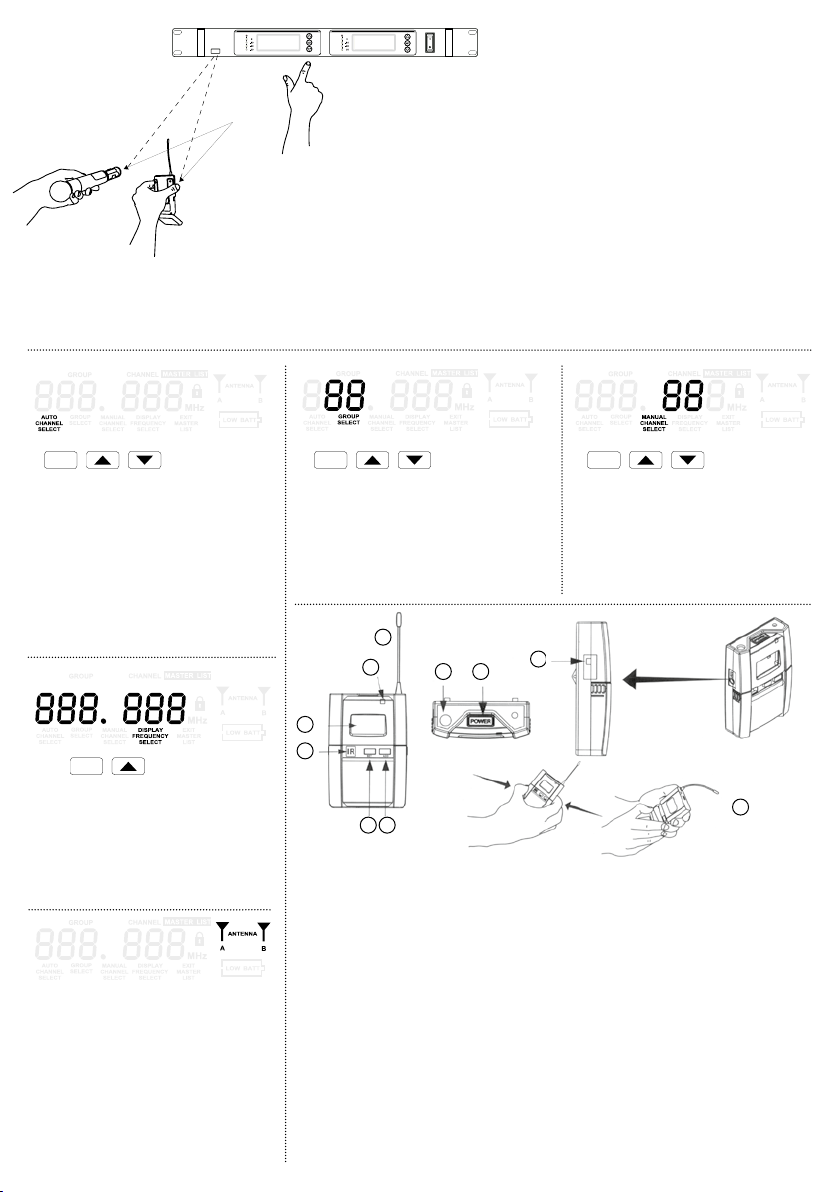
EN - Receiver unit is seeking for a free frequency
and will store it. • H - A vevőkészülék keres
egy szabad frekvenciát és azt tárolja. • SK -
Prijímač vyhľadá prázdnu frekvenciu a uloží ju.
• RO – Receptorul caută o frecvenţă liberă şi-l
memorează. • SRB, MNE - Prijemnik pronalazi
jednu slobodnu frekvenciju i memoriše je. • SLO
- Sprejemnik najdne eno prosto frekvenco in jo
shrani v spomin • CZ - A vevőkészülék keres egy
szabad frekvenciát és azt tárolja.
3x SET
EN - Manual selection of frequency group.
H - Frekvencia csoport manuális kiválasztása.
SK - Manuálny výber skupiny frekvencie.
RO – Alegerea manuală a grupului de frecvenţe.
SRB, MNE - Manualni odabir grupe frekvencije.
SLO - Ročna nastavitev skupine frekvencij.
CZ - Frekvencia csoport manuális kiválasztása.
4x SET
EN - Manual selection of channels.
H - Csatorna manuális kiválasztása.
SK - Manuálny výber kanála.
RO - Alegerea manuală a canalului.
SRB, MNE - Manualni odabir kanala.
SLO - Ročna nastavitev kanala.
CZ - Csatorna manuális kiválasztása.
5x SET SET
EN - Frequency display.
H - Frekvencia kijelzése.
SK - Zobrazenie frekvencie.
RO - Aşarea frecvenţei.
SRB, MNE - Ispis frekvencije.
SLO - Izpis frekvence.
CZ - Frekvencia kijelzése.
EN - ANTENNA STATUS - Only one antenna is
active at one time. • H - ANTENNA STÁTUSZ -
Egyidejűleg csak egy antenna aktív. • SK - STA-
TUS ANTÉNY – Súčasne je aktívna len jedna
anténa. • RO - STATUS ANTENĂ - Deodată doar
o antenă este activă. • SRB, MNE - ANTENNA
STÁTUSZ - Egyidejűleg csak egy antenna aktív.
• SLO - ANTENNA STÁTUSZ - Egyidejűleg csak
egy antenna aktív. • CZ - ANTENNA STÁTUSZ -
Egyidejűleg csak egy antenna aktív.
EN - 1. Antenna • 2. LED/green: transmission/red: mute/ashing red: depleated battery • 3. LCD display • 4.
infra receiver • 5. SET button • 6. control button • 7. 3,5 mm microphone socket • 8. ON/OFF switch, mute • 9.
microphone/guitar selector • 10. opening of battery holder • H - 1. antenna • 2. LED / zöld: adás / piros: némítás /
villogó piros: lemerült elem • 3. LCD kijelző • 4. infra vevő • 5. SET gomb • 6. beállító gomb • 7. 3,5 mm mikrofon
aljzat • 8. BE/KI kapcsoló, némítás • 9. mikrofon/gitár váltó • 10. elemtartó nyitása • SK - 1. anténa • 2. LED /zelená:
vysielanie / červená: stíšenie / blikajúca červená: vybitá batéria • 3. LCD displej • 4. infra prijímač • 5. tlačidlo SET • 6.
tlačidlo nastavenia • 7. 3,5 mm mikrofónová zásuvka • 8. ZA- / VYPÍNAČ, stíšenie • 9. menič mikrofón / gitara • 10.
otvorenie puzdra na batérie • RO - 1. antenă • 2. LED / verde: emisie / roşu: blocare sunet / roşu intermitent: baterie
descărcată • 3. ecran LCD • 4. receptor infra • 5. buton SET • 6. buton setări • 7. mufă de 3,5 mm pentru microfon • 8.
buton PORNIRE/OPRIRE, blocare sunet • 9. comutator microfon/chitară • 10. deschiderea suportului pentru baterii
• SRB, MNE - 1. Antena • 2. LED / zeleno: predaja / crveno: prigušivanje / trepćuće crveno: prazna baterija • 3. LCD
displej • 4. Infra prijemnik • 5. Taster SET • 6. Taster za podešavanje •7. Utičnica za mikrofon 3,5 mm • 8. Uklj./Isklj.,
prigušivanje • 9. Odabir mikrofon/gitara • 10. Otvor za baterije • SLO - 1. Antena • 2. LED / zeleno:oddaja / rdeče:
zadušitev / utripajoče rdeče : prazna baterija • 3. LCD zaslon • 4. Infra sprejemnik • 5. Stikalo SET • 6. STIKALO ZA
NASTAVITEV • 7. Vtičnica za mikrofon 3,5 mm • 8. Vklop/izklop, dušenje • 9. Izbira mikrofon / gitara • 10. Odprtina
za baterije • CZ - 1. antenna • 2. LED / zöld: adás / piros: némítás / villogó piros: lemerült elem • 3. LCD kijelző • 4.
infra vevő • 5. SET gomb • 6. beállító gomb • 7. 3,5 mm mikrofon aljzat • 8. BE/KI kapcsoló, némítás • 9. mikrofon/
gitár váltó • 10. elemtartó nyitása
2
1
3
4
56
9
7 8
10
EN - SWITHCH ON + 1 x SET • Synchronisation of frequency, set on the receiver unit with one
microphone at the same time, within 15 cm distance.
H - BEKAPCSOLÁS + 1x SET • A vevőkészüléken beállított frekvencia szinkronizálása egyi-
dejűleg egy mikrofonnal, 15 cm távolságon belül.
SK - ZAPNUTIE + 1 x SET • Synchronizácia frekvencie nastavenej na prijímači súčasne s
jedným mikrofónom, vo vzdialenosti do 15 cm.
RO - PORNIRE + 1x SET • Sincronizarea frecvenţei alese pe receptor deodată cu un
microfon, pe o rază de 15 cm
SRB, MNE - UKLJUČIVANJE + 1x SET • Istovremena sinhronizacija sa jednim mikrofonom
na frekvenciju koja je nameštena na prijemniku, razdaljina 15 cm.
SLO - VKLOP + 1X SET • Istočasna sinhronizacija z enim mikrofonom na frekvenco katerea
je nastavljena na sprejemniku, razdalja 15 cm.
CZ - BEKAPCSOLÁS + 1x SET • A vevőkészüléken beállított frekvencia szinkronizálása
egyidejűleg egy mikrofonnal, 15 cm távolságon belül.

MVN 900
wireless microphone set
EN
Before using the product for the rst time, please read the instructions for use below and retain them for later reference. The
original instructions were written in the Hungarian language. After unpacking the unit, conrm that it has not been damaged during
transit. Keep the packaging away from children if it contains plastic bags or other potentially hazardous components.
This appliance may only be used by persons with impaired physical, sensory or mental capabilities, or lacking in experience or knowledge,
as well as children from the age of 8, if they are under supervision or have been given instruction concerning use of the appliance by a person
responsible for their safety and they have understood the hazards associated with use. Children should not be allowed to play with the unit. Children
may only clean or perform user maintenance on the appliance under supervision.
• operation range in open eld: max. 100 m • 2 professional metal hand microphones in the set • DIVERSITY PRO: continuos analysis of
reception-quality • adjustable transmitter-output • digital noise ltering circuit • 110 frequencies; 10 channels selectable in 11 groups • automatic
free frequency search • automatic channel selection • automatic synchronization among the units • automatic microphone searching and pairing
with infra function • manual group- and frequency selection • high-quality, 2 channel digital DPLL operation • multifunctional LCD displays with
backlight in the grip and on the receiver unit • frequency/channel/channel-group/receiving signal level/dominant antenna/display of battery
status and other functions • coloured LED-line audio modulation meter rst class, sensitive, full sound quality • rst class, sensitive, full sound
quality • 2x XLR & LINE OUT dual output • high sensitivity 260 mm/50 Ohm BNC antennas • operation frequency band: 863-865 MHz • with gift
aluminium storage case • accessory: ∅6,3mm-6,3mm audio connection cable, 1,0 m • 2in1 AC/DC power supply option • microphones: ∅55/40
x 250 mm, 2xAA (1,5 V) battery, not included • receiver: 480/420 x 45 x 210 mm, 1,5 m connection cable
INSTALLATION
Handheld microphone
Carefully unscrew the end of microphone grip, and place in two pcs AA (1,5V) alkaline batteries, according to the marked polarity. Put back the cover of the
battery compartment. Turning on and off happens with ON-OFF switch.
Replace the batteries, if the operation range would decrease or the transmission is noisy! • The battery should be replaced by adults only! • Do not use
different kinds of batteries and/or used and new batteries together! • If the batteries are depleted, or you are not planning to use device for longer period,
immediately remove the batteries! • If there is some liquid own out, then take a protective glove and clean the battery holder with a dry cloth! • Do not
open, burn and short circuit the batteries! • It is forbidden to charge the batteries which are not rechargeable! Risk of explosion! • Do not use accumulators
instead of batteries, because their voltage and efciency is signicantly lower! • In cold circumstances, the power of the batteries weakens, frequent battery
replacement may needed!
Receiver
Connect the unit to the input of an audio amplier or mixer or an active sound box, using the MIX OUT (LINE IN line level input) or BALANCED A +
BALANCED B (XLR symmetric microphone input) outputs. Use only one mode at one time! Connect the power cable rst to the appliance, then to the
power network. (Secondary option is to operate the device from 12 V car accumulator or with network adaptor, where the 220 - 240 V power supply is not
available. The accumulator and the adaptor is not included.) Mount the antennas (ANT A, ANT B) to their place, by using the BNC connectors. Switch on
the unit with I/0 switch. When the handheld microphones are switched on as well, then you can set – with the help of a suitable screwdriver - the desired
voice output level with the VOL1 and VOL2 control knobs. Ideal setting depends on the location of the microphones and settings of the amplier as well.
Antenna symbol which is visible on the front panel will give information about the stable RF radio connection and the currently used antenna, the AF LED
modulation meter will inform about the audio activity. Rotate the antennas by handling them close to the rear of the unit to get them in almost vertical position,
and search the best position for receiving signals with them.
Transmitter wearable on body + backband microphone (headset option)
This accessory is not included in the set, only available separately, type number is MVN 901T. It has the advantage that the performer can move free and
comfortably, the hands remain free and the microphone stays always in the same distance from the mouth. Due to this, the sound quality and volume is
always constant, stable and noise free.
POWER: ON/OFF switch, briey pressing is mute (MUTE).
LED: green: transmission is active, red: transmission is muted, MUTE is on the display, ashing red: depleting battery
IR: infra receiver for pairing, and for the frequency synchronisation with the receiver unit.
SET: selection of GROUP or CHANNEL setting
ADD: stepping GROUP or CHANNEL, frequency display
RF: radiofrequency signal value
AF: audio frequency signal value
Body Transmitter: in case of connection of microphone for speaking
Guitar: in case of connection instrument voice pick-up, guitar microphone

AUTO LOCK: during use, against undesired key presses the device locks buttons, indicated by a padlock symbol in the display. To resolve it, press:
ADD+SET
ADVICES
• The antennas of handheld microphones are usually situated at the bottom. Therefore do not touch the bottom of the microphones, since it may shield the
transmission.
• Do not move the microphones in your hand, because it can change the receiving conditions.
• Do not have switched-on mobile phone, Bluetooth speaker, TV, computer, Wi-Fi router or any other radio frequency operated device in the near, because
it can disturb the receiving.
• Receiver unit has to be 1 meter high above the ground. Do not mount on wall or put on a wall shelf, because it is signicantly interfering the receiving
conditions.
• Don’t place bigger size of metal objects or other electric appliance near the receiver unit.
• Operating time of alkaline batteries is usually 8 hours, but it may change depending on the conditions of use.
TROUBLESHOOTING
If there is no sound or it is noisy, check if
- connection is according to the prescriptions
- there is proper power supply and the batteries are correct
- there is any damaged wire
- the amplier has set properly
- distance is beyond the recommended
- there is other disturbing electric appliance nearby
CLEANING
Switch off and power off the unit by unplugging it from the electric outlet before cleaning! Use a dry, soft cloth! Do not use any aggressive cleaners or
liquids!
WARNINGS
1. Please read the instructions carefully before use, and keep it to have it available in the future! • 2. Do not lead the power cable under carpets,
doormats, etc., and prevent it from being pulled out accidentally or tripped over. The appliance should be located so as to allow easy access and
removal of the power plug! By powering off the unit, don’t pull the cable but handle the plug and pull it out from the electric outlet! • 3. Warming of the unit
during operation is natural. Do not cover the appliance, because covering the unit can cause overheating, re, electric shock or default! • 4. Efciency
range and sound quality may decrease if there are appliances operated nearby with radio frequency (mobile phone, Wi-Fi router, computer, TV …), or
there are big metal objects presented among the appliances (metal shelves, Ferro-concrete wall, cooling- and heating appliances) • 5. Pursue not to
have foreign object between the microphones and the receiver. • 6. Do not place the microphones near speakers, since it can cause noise feedback! •
7. Do not use appliances together in one operation range (c.a. 100 m) with same operation frequency! • 8. Use in dry, indoor circumstances only! • 9. If
the power cable is damaged or any other irregular operation detected, immediately unplug the device and contact a specialist! • 10. After usage or not
planning to use it for longer period, unplug it from the power network! • 11. Keep the cables connecting the units away from other power cables! • 12. Do
not operate the appliance near strong magnetic eld! • 13. Protect it from dust, humidity, liquids, dampness, frost, shock and direct thermal radiation or
sunshine! • 14. Do not expose the unit to splashing water and do not place objects lled with liquid, for example glass on it! • 15. Open source of ame,
ex. lit candle can not be placed on the unit! • 16. Do not attempt to disassemble or modify the unit or its accessories, because it can cause re, accident
or electric shock! • 17. Due to presence of mains voltage, please follow the usual life protection rules! • 18. Do not touch the unit or the power cable with
wet hands! • 19. Somogyi Elektronic Ltd. certies, that MVN 700 type radio-equipment conforms to 2014/53/EU directive. Full text of EU Certication of
Conformity is available at the following link: www.somogyi.hu • 20. Due to continuous improvements the design and specications may change without
any prior notice. • 21. We don’t take the responsibility for printing errors and we apologize for them if there’s any.
Waste equipment must not be collected separately or disposed of with household waste because it may contain components hazardous
to the environment or health. Used or waste equipment may be dropped off free of charge at the point of sale, or at any distributor
which sells equipment of identical nature and function. Dispose of product at a facility specializing in the collection of electronic
waste. By doing so, you will protect the environment as well as the health of others and yourself. If you have any questions,
contact the local waste management organization. We shall undertake the tasks pertinent to the manufacturer as pre-
scribed in the relevant regulations and shall bear any associated costs arising.
DISPOSING OF ALKALINE AND RECHARGEABLE BATTERIES
Batteries, whether alkaline or rechargeable, must not be handled together with regular household waste. It is the
legal obligation of the product’s user to dispose of batteries at a nearby collection center or at a retail shop.
This ensures that the batteries are ultimately neutralized in an environment-friendly way.
Caution: Risk of electric shock! Do not attempt to disassemble of modify the unit or its accessories. In case any part is damaged, immediately
power off the unit and seek the assistance of a specialist.
Table of contents
Languages:
Other Somogyi Elektronic Microphone System manuals