Sony Xperia SM12 User manual

User guide
Xperia SM12
Hxxx/Hxxx/Hxxx/Hxxx/Hxxx

Contents
Getting started.............................................................................. 6
About this User guide.......................................................................6
Overview........................................................................................... 7
Assembly – Single SIM......................................................................8
Assembly – Dual SIM.........................................................................9
Screen protection............................................................................ 10
Starting your device for the first time.............................................10
Why do I need a Google account?.................................................. 11
Device security.............................................................................12
Making sure your device is protected.............................................12
Screen lock.......................................................................................12
Unlocking your device automatically..............................................13
Fingerprint Manager........................................................................13
SIM card protection......................................................................... 14
Using multiple SIM cards.................................................................14
Finding the IMEI number(s) of your device.....................................15
Finding, locking or erasing a lost device ....................................... 16
Using location services....................................................................16
Learning the basics......................................................................18
Using the touchscreen.................................................................... 18
Turning the screen on or o........................................................... 20
Smart backlight control.................................................................. 20
Home screen...................................................................................20
Application screen.......................................................................... 23
Shortcuts for easy actions.............................................................. 24
Navigating applications.................................................................. 24
Widgets........................................................................................... 26
Shortcuts and folders......................................................................27
Background and themes................................................................ 28
Taking a screenshot........................................................................ 28
Notifications.................................................................................... 28
Icons in the status bar..................................................................... 31
Applications overview.....................................................................33
Battery and maintenance............................................................35
Charging your device...................................................................... 35
Battery and power management...................................................36
Updating your device......................................................................38
Maintenance using a computer..................................................... 39
Storage and memory......................................................................40
2

Backing up and restoring content..................................................42
Downloading applications..........................................................45
Downloading applications from Google Play................................ 45
Downloading applications from other sources..............................45
Internet and networks................................................................ 46
Browsing the web...........................................................................46
Internet and MMS settings ............................................................ 46
Wi-Fi.................................................................................................47
Sharing your mobile data connection............................................49
Controlling data usage.................................................................... 51
Selecting a SIM card for data trac................................................ 51
Selecting mobile networks............................................................. 52
Synchronising data on your device.............................................53
Synchronising with online accounts...............................................53
Synchronising with Microsoft Exchange ActiveSync......................53
Basic settings.............................................................................. 55
Accessing settings.......................................................................... 55
Volume settings.............................................................................. 55
Do not disturb mode...................................................................... 56
Screen settings................................................................................ 57
Screen pinning................................................................................ 57
Application settings........................................................................58
Resetting your applications............................................................59
Language settings..........................................................................60
Date and time................................................................................. 60
Enhancing the sound output......................................................... 60
Multiple user accounts.................................................................... 61
Typing text...................................................................................63
On-screen keyboards......................................................................63
Editing text......................................................................................64
Calling..........................................................................................65
Making calls.................................................................................... 65
Receiving calls.................................................................................66
Forwarding calls.............................................................................. 67
Blocking a number..........................................................................68
Contacts.......................................................................................69
Adding and editing contacts.......................................................... 69
Grouping contacts.......................................................................... 70
Transferring contacts...................................................................... 70
Backing up contacts........................................................................ 71
3

Messaging and chat.................................................................... 73
Reading and sending messages.................................................... 73
Messaging settings......................................................................... 74
Video chat....................................................................................... 75
Setting up email.............................................................................. 75
Music............................................................................................76
Transferring music to your device.................................................. 76
Listening to music...........................................................................76
Listening to the radio......................................................................78
Camera........................................................................................ 80
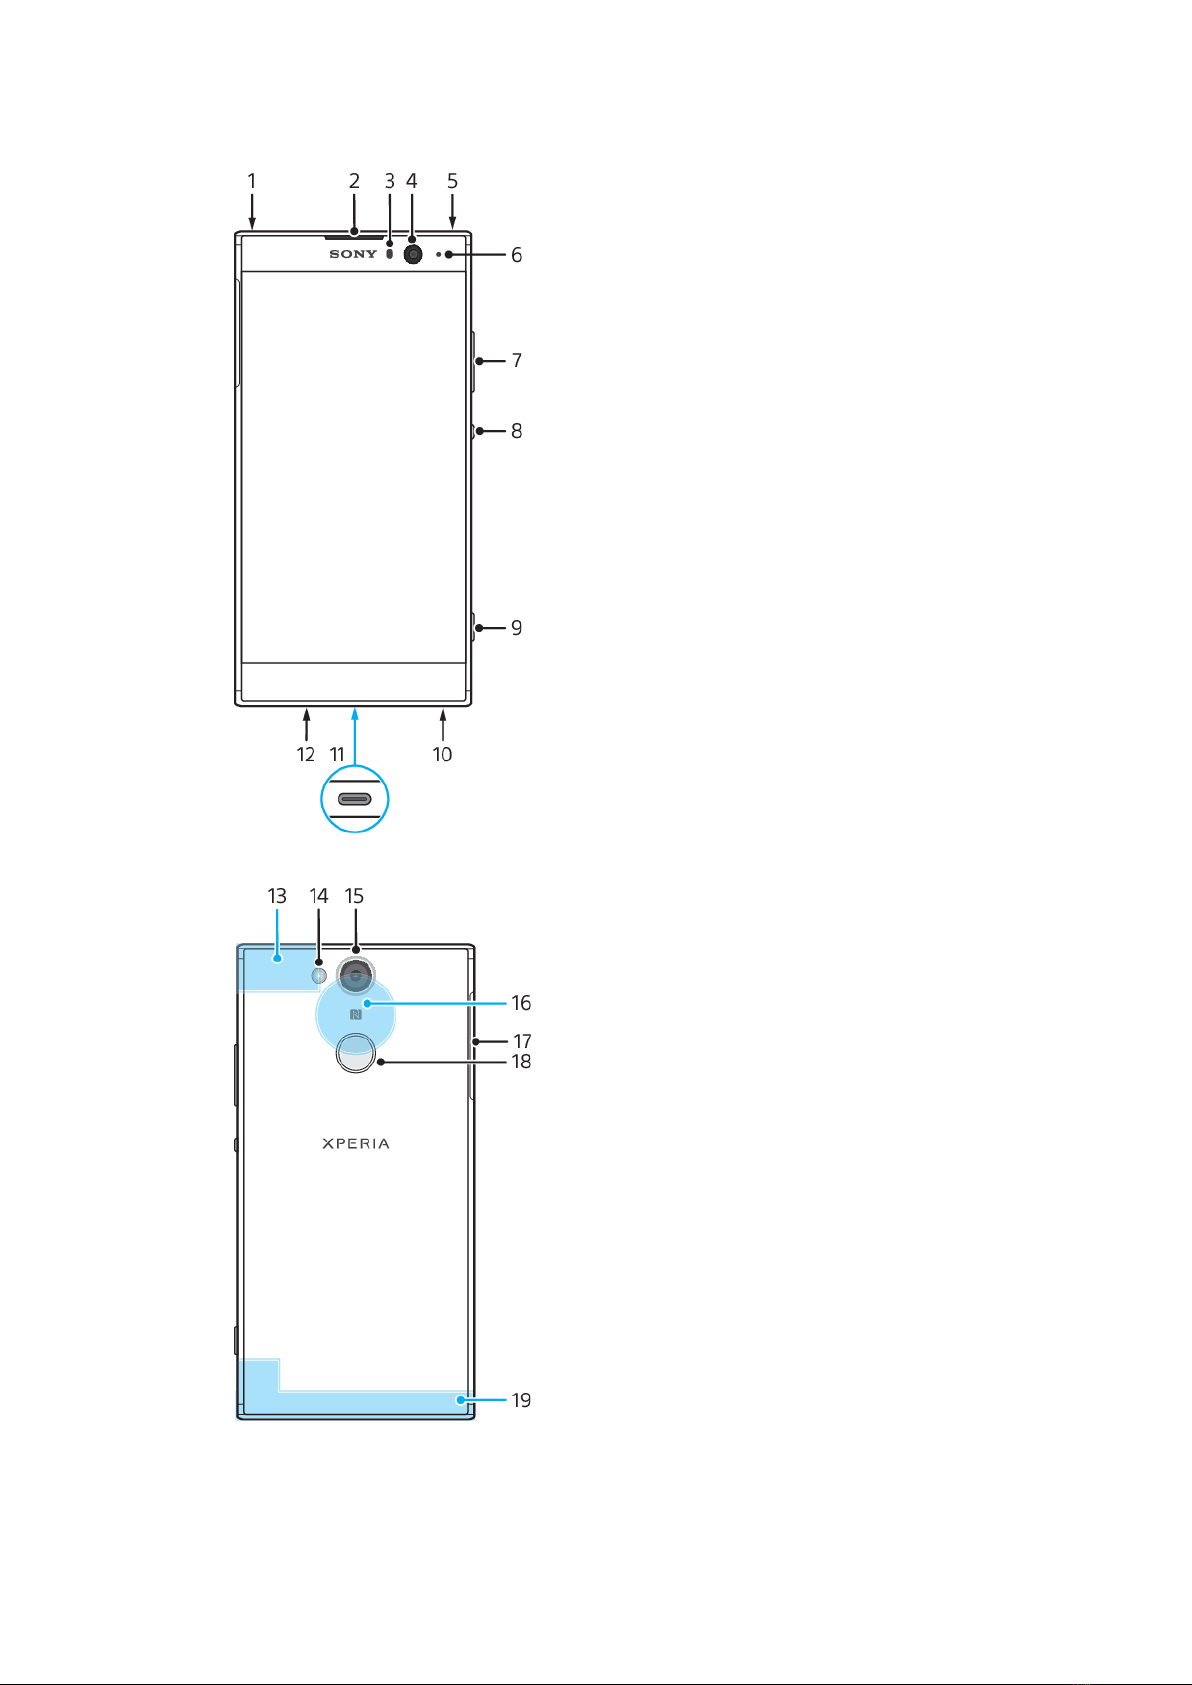
Getting to know your camera........................................................ 80
Exposure, colour and light conditions............................................83
Setting the right focus.................................................................... 86
People, selfies and smiling faces....................................................87
Moving objects............................................................................... 88
Using camera apps......................................................................... 89
Resolution and memory.................................................................90
Diagnosing your camera.................................................................92
Additional camera settings.............................................................92
Photos and videos in Album.......................................................94
Viewing photos and videos............................................................94
Album home screen menu.............................................................95
Sharing and managing photos and videos....................................96
Hiding photos and videos...............................................................97
Connectivity.................................................................................98
Mirroring the screen of your device wirelessly on a TV.................98
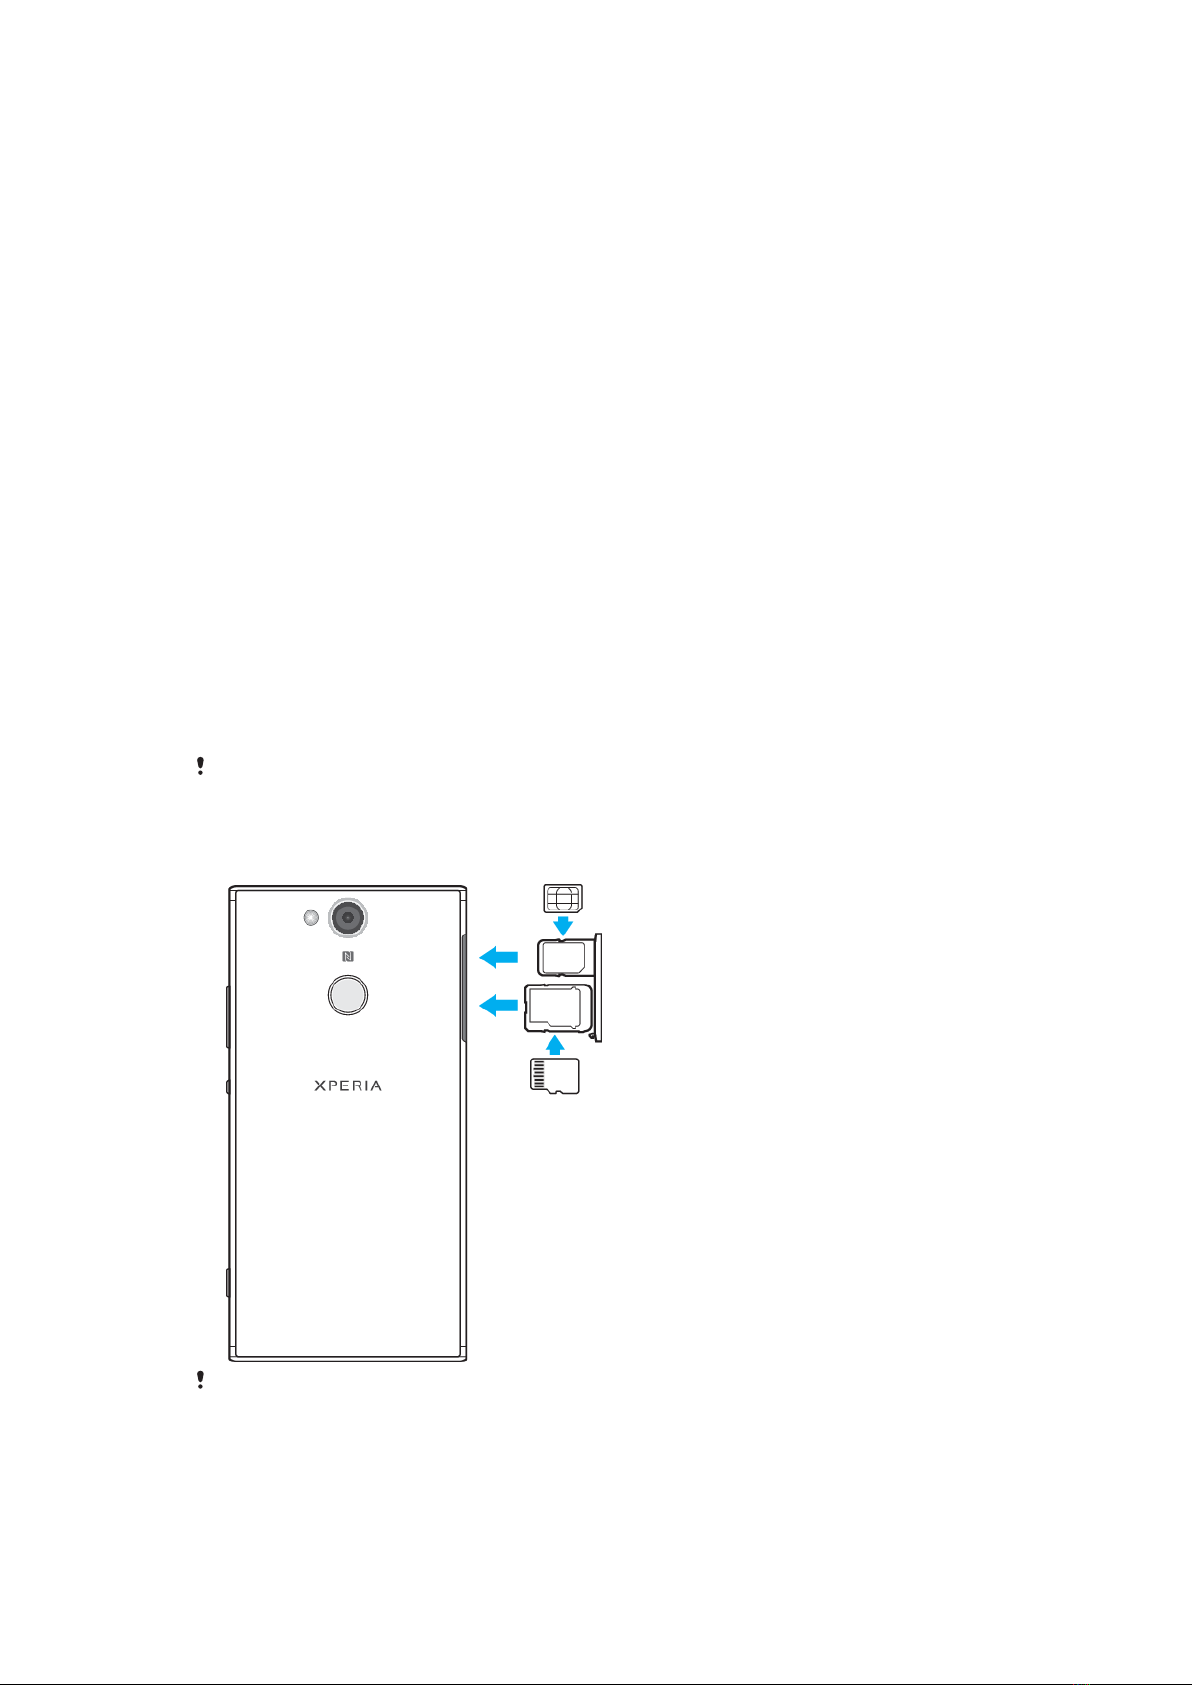
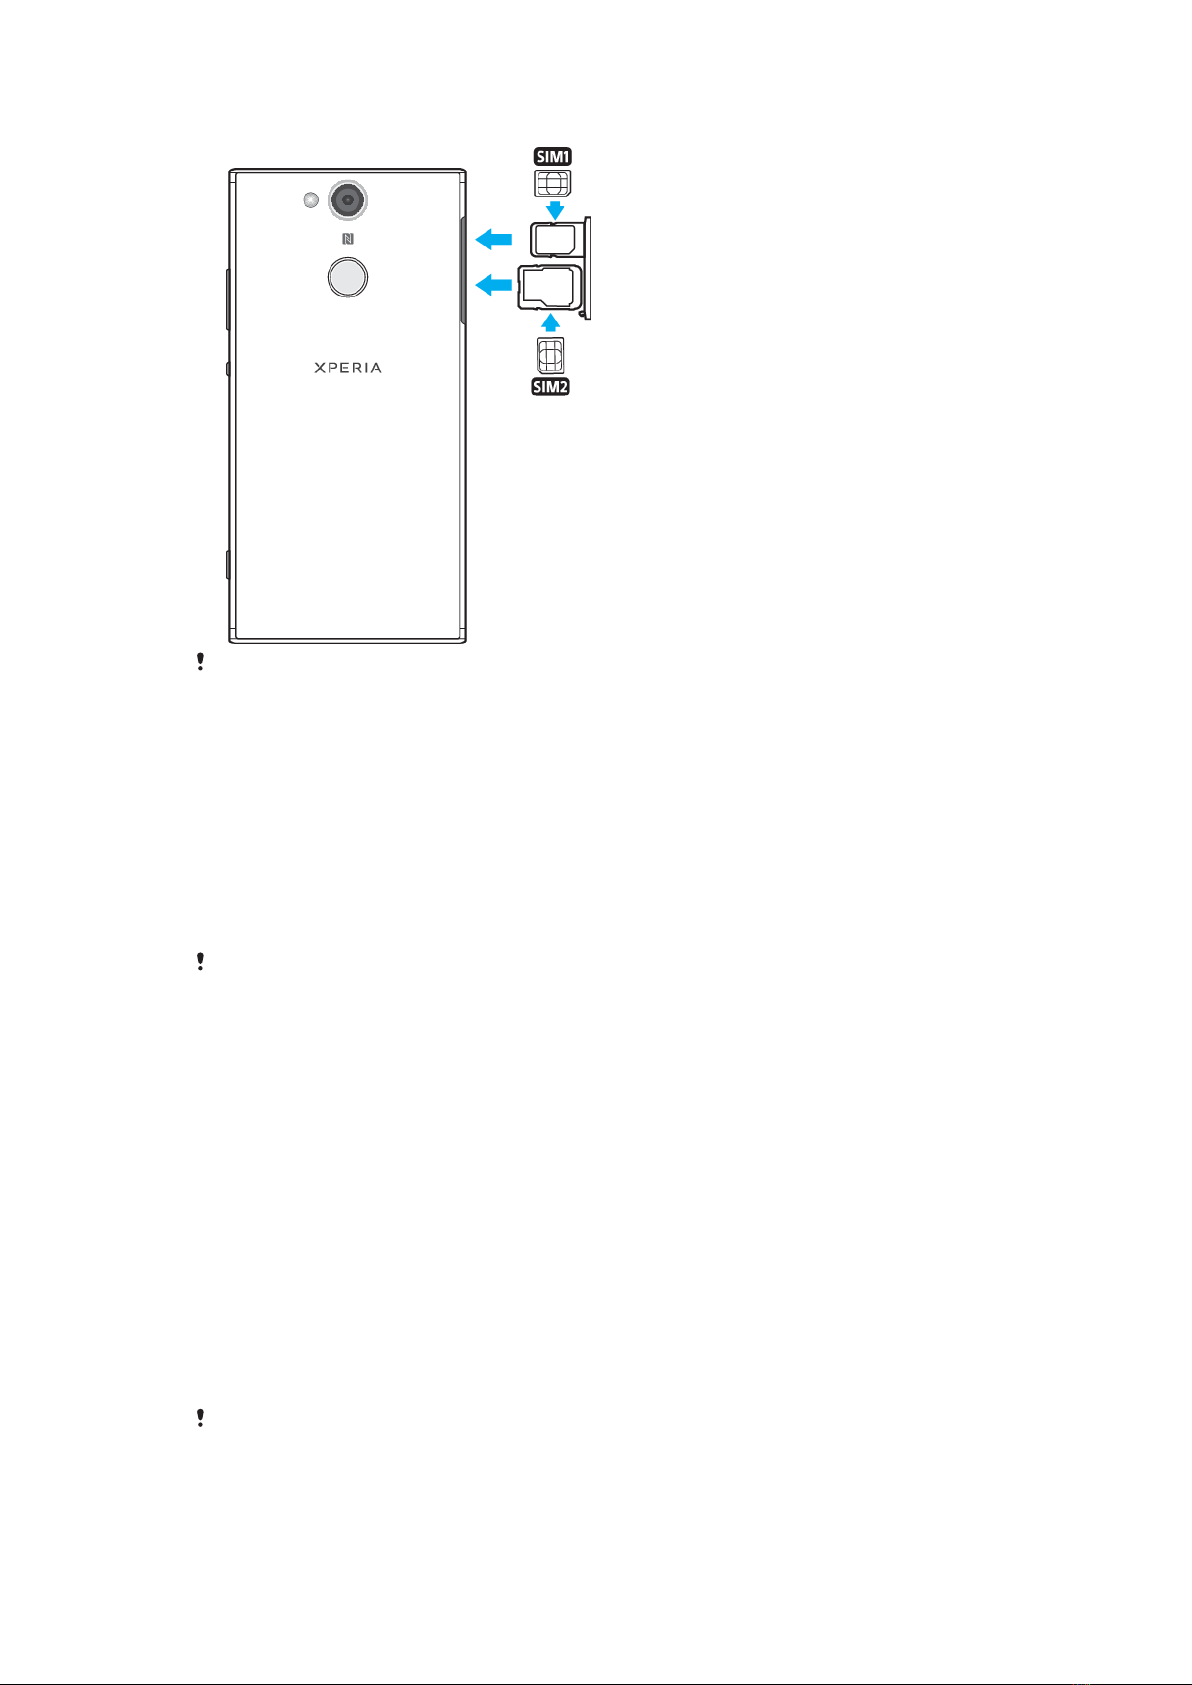
Connecting your device to USB accessories.................................. 98
Near Field Communication (NFC)................................................... 98
Bluetooth wireless technology..................................................... 100
Smart apps and features that save you time............................103
Google Feed.................................................................................. 103
Using your device as a wallet........................................................103
Xperia™ Actions............................................................................ 103
Clock and Calendar....................................................................105
Calendar........................................................................................ 105
Clock.............................................................................................. 105
Accessibility............................................................................... 108
Magnification................................................................................ 108
Font size........................................................................................ 108
Display size....................................................................................108
Colour correction...........................................................................108
TalkBack.........................................................................................108
4

Mono audio................................................................................... 109
Switch Access................................................................................ 109
Support and legal.......................................................................110
Support application....................................................................... 110
Restarting, resetting and repairing............................................... 110
Warranty, SAR and usage guidelines.............................................111
Legal information........................................................................... 111
5

Getting started
About this User guide
This is the Xperia SM12 User guide for the Android™ 8.0 software version. If you're
not sure which software version your device is running, you can check it in the
Settings menu.
System and application updates can present the features in your device in another way than
described in this User guide. The Android version might not be aected in an update. For
more information about software updates, see
Updating your device
on page 38.
To check the current software version of your device
•Find and tap Settings > System > About phone.
The current software version is displayed under Build number.
To find the model number of your device
•Find and tap Settings > System > About phone.
The device model number is displayed under Model.
Limitations to services and features
Some of the services and features described in this User guide may not be
supported in all countries or regions, or by all networks or service providers. The
GSM International Emergency Number can always be used in all countries, regions,
networks and by all service providers, provided that the device is connected to the
mobile network. Please contact your network operator or service provider to
determine the availability of any specific service or feature and whether additional
access or usage fees apply.
The use of certain features and applications described in this guide may require
access to the internet. You may incur data connection charges when you connect
to the internet with your device. Contact your wireless service provider for more
information.
6
This is an internet version of this publication. © Print only for private use.

Overview
7
This is an internet version of this publication. © Print only for private use.

1. Secondary microphone
2. Ear speaker
3. Proximity/Light sensor
4. Front camera
5. Headset jack
6. Charging/Notification light
7. Volume/Zoom key
8. Power key
9. Camera key
10. Speaker
11. Charger/ USB Type-C™cable port
12. Primary microphone
13. Wi-Fi /Bluetooth®/ GPS antenna
14. Flash LED
15. Main camera
16. NFC™ detection area
17. Nano SIM/Memory card slot cover
18. Fingerprint sensor
19. Main antenna
Assembly – Single SIM
Your device only supports nano SIM cards. Single SIM devices allow you to use one
SIM card and a memory card.
The nano SIM card and the memory card have separate slots. Make sure you don’t
confuse the two.
For information on how to check if your device is Single SIM or Dual SIM, see
Finding the IMEI number(s) of your device
on page 15.
To prevent data loss, make sure you turn o your device or unmount the memory card
before you drag out the holder to remove the nano SIM card or memory card from the
device.
To insert a nano SIM card and a memory card
Do not cut your SIM card, as this may damage your device.
8
This is an internet version of this publication. © Print only for private use.

1Drag out the nano SIM and memory card trays.
2Place the memory card securely in the memory card tray, in the correct
orientation as shown in the illustration.
3Place the SIM card securely in the SIM card tray, as shown in the illustration.
4Gently push first the memory card tray, then the SIM card tray back into their
slots until they fit into place.
Assembly – Dual SIM
Your device only supports nano SIM cards. Dual SIM devices support the use of
either two nano SIM cards or a nano SIM card and a memory card.
Dual SIM devices are not available in all markets or from all operators.
For information on how to check if your device is Single SIM or Dual SIM, see
Finding the IMEI number(s) of your device
on page 15.
To prevent data loss, make sure you turn o your device or unmount the memory card
before you drag out the holder to remove the nano SIM card (or cards) or memory card from
the device.
To insert a nano SIM card and a memory card
Do not cut your SIM card, as this may damage your device.
1Drag out the nano SIM and memory card trays.
2Place the memory card securely in the memory card tray, in the correct
orientation as shown in the illustration.
3Place the SIM card securely in the SIM card tray, as shown in the illustration.
4Gently push first the memory card tray, then the SIM card tray back into their
slots until they fit into place.
9
This is an internet version of this publication. © Print only for private use.

To insert one or two nano SIM cards
Do not cut your SIM cards, as this may damage your device. Only Dual SIM devices support
the simultaneous use of two SIM cards.
1Drag out the SIM and memory card trays.
2Place the main SIM card (SIM1) securely in the SIM card tray, as shown in the
illustration.
3Place the second SIM card (SIM2) in the correct orientation in the memory
card tray, as shown in the illustration.
4Gently push first the memory card tray, then the SIM card tray back into their
slots until they fit into place.
Screen protection
Before using your device, remove the protection film by pulling up on the protruding tab.
Screen covers and protectors may help you protect your device against damage.
We recommend you use only those screen covers intended for your Xperia™
device. The use of third party screen protection accessories may prevent your
device from working correctly by covering sensors, lenses, speakers, or
microphones and can invalidate the warranty.
Starting your device for the first time
It is recommended that you charge the battery for at least 30 minutes before
starting up your device for the first time. You can still use your device while it is
charging. For more information on charging, see
Charging your device
on
page 35.
The first time you start your device, a setup guide helps you to configure basic
settings, personalise your device and sign in to your accounts, for example a
Google™ account.
To turn on your device
It is important to use the USB Type-C cable provided when charging your device, as other
types of USB cables can damage your device. It is recommended to charge the battery for at
least 30 minutes before you turn on your device for the first time.
10
This is an internet version of this publication. © Print only for private use.

1Press and hold down the power key until your device vibrates.
2Enter your SIM card PIN when requested, then tap .
3Wait a moment for your device to start.
Your SIM card PIN is initially supplied by your network operator, but you can change it later
from the Settings menu. To correct a mistake made while entering your SIM card PIN, tap
.
To turn o the device
1Press and hold down the power key until the options menu opens.
2In the options menu, tap Power o.
It may take a while for the device to shut down.
Why do I need a Google account?
Your Xperia device from Sony runs on the Android platform developed by Google.
A range of Google applications and services is available on your device when you
purchase it, for example, Gmail™, Google Maps™, YouTube™ and the Play Store™.
To get the most out of these services, you need a Google account. For example, a
Google account enables you to do the following:
•Download and install applications from Google Play™.
•Synchronise your email, contacts and calendar using Gmail.
•Chat with friends using the Duo™ application.
•Synchronise your browsing history and bookmarks using the Google Chrome™
web browser.
•Identify yourself as the authorised user after a software repair using Xperia
Companion.
•Remotely find, lock or clear a lost or stolen device using the Find my device
services.
For more information about Android and Google, go to
http://support.google.com
.
It is crucial to remember your Google account user name and password, since in some
situations, you may need it to identify yourself for security reasons. If you fail to give your
Google user name and password in such situations, your device is locked. Also, if you have
more than one Google account, make sure to enter the details for the relevant account.
To set up a Google account on your device
1Find and tap Settings > Users & accounts > Add account > Google.
2Follow the on-screen instructions to create a Google account, or sign in if
you already have an account.
You can also create a Google account using the setup guide when you first start your
device, or go online later and create an account at
http://www.google.com/accounts
.
To remove a Google account
1Find and tap Settings > Users & accounts.
2Select the Google account that you want to remove.
3Tap REMOVE ACCOUNT.
4Tap REMOVE ACCOUNT again to confirm.
If you remove your Google account, any security features that are linked to your Google
account will no longer be available.
11
This is an internet version of this publication. © Print only for private use.

Device security
Making sure your device is protected
Your device includes security options, strongly recommended in case of loss or
theft.
When using a security option to protect your device, it is crucial to remember the details
provided at set up.
Screen lock
Set a secure screen lock on your device using a PIN, password, pattern or
fingerprint to prevent others from using your device without permission. Once the
screen lock is set, it is not possible to unlock the screen or erase the content via a
Factory Data Reset without providing the screen lock information.
If you add your contact information on the screen lock, for example your email, this
information can be used to get your device back if you lose it.
Google account
Add a Google account so that you can use the Find my device service. In some
situations, you may also need to identify yourself for security reasons using your
Google account.
Find my device
Use the Find my device service to remotely locate, lock, unlock or erase the content
on a lost device. After you have signed in to your Google account, Find my device
is turned on by default.
SIM card lock
Lock your SIM cards with a PIN to protect your subscription against misuse. The PIN
is required every time you restart your device.
IMEI number
Keep a copy of the IMEI number. If your device is stolen, some network providers
can use this number to stop the device from accessing the network in your country
or region.
Dual SIM devices have two IMEI numbers.
Backup
Back up the content on your device in case your device is damaged, lost or stolen.
See
Backing up and restoring content
on page 42.
Screen lock
When the screen is locked you have to unlock it with a swipe gesture or with your
personal pattern, PIN, password or fingerprint. Initially, the unprotected screen
swipe is set, but it is recommended to use a more secure screen lock to protect
your device.
The security level of each lock type is listed below in order of weakest to strongest:
•Swipe: no protection, but you have quick access to the Home screen.
•Pattern: draw a simple pattern with your finger to unlock your device.
•PIN: enter a numeric PIN of at least four digits to unlock your device.
•Password: enter an alpha-numeric password to unlock your device.
•Fingerprint: place your registered finger on the sensor to unlock your device.
12
This is an internet version of this publication. © Print only for private use.

Fingerprints need to be registered with Fingerprint Manager before use. To
configure the notifications on the lock screen, see
Notifications
on page 28.
To create or change a screen lock
It is very important that you remember your screen lock when using a pattern, PIN or
password. If you forget this information, it may not be possible to restore important data
such as contacts and messages. See troubleshooting tips for your device at
http://support.sonymobile.com
.
1Find and tap Settings > Lock screen & security > Screen lock.
2If requested, confirm your current screen lock.
3Choose an option and follow the on-screen instructions.
4When a secure screen lock is used, you can set the power button to lock the
screen, set the screen lock activation time and create a lock screen message
by pressing .
If you use a Microsoft Exchange ActiveSync (EAS) account, the EAS security settings may
limit the lock screen type to only a PIN or password. Contact your network administrator to
check the implemented network security policies.
Unlocking your device automatically
The Smart Lock feature lets you set your device to unlock automatically in certain
situations, for example, when connected to a Bluetooth device or carrying it with
you.
The Smart Lock feature is available in most markets, countries or regions.
Go to
http://www.support.google.com/
and search “smart lock” for more
information about the Smart Lock feature.
To enable Smart Lock
1Set a pattern, PIN or password as a screen lock if you have not already done
so.
2Find and tap Settings > Lock screen & security > Trust agents.
3Tap the Smart Lock (Google) slider to enable the function.
4Tap .
5Find and tap Smart Lock.
6Enter your pattern, PIN or password. You need to enter these credentials to
change your Smart Lock settings.
7Select a Smart Lock type.
Fingerprint Manager
Register your fingerprint to use it as an additional security method for unlocking
your device or authenticating purchases. You can register up to 5 fingerprints on
your device.
The pattern, PIN or password screen lock serves as a backup unlock method when
a fingerprint is used as a screen lock. Before registering your fingerprint, make sure
the sensor is clean and without any visible moisture.
To register a fingerprint for the first time
1Find and tap Settings > Lock screen & security > Fingerprint Manager.
2Tap NEXT. If prompted confirm your pattern, PIN or password, or select your
backup screen lock method and follow the on-screen instructions to set it
up.
3Tap NEXT and follow the on-screen instructions to complete fingerprint
registration.
13
This is an internet version of this publication. © Print only for private use.

To register additional fingerprints
1Find and tap Settings > Lock screen & security > Fingerprint Manager.
2Confirm your pattern, PIN or password.
3Tap Add fingerprint, then follow the on-screen instructions.
To delete a registered fingerprint
1Find and tap Settings > Lock screen & security > Fingerprint Manager.
2Confirm your pattern, PIN or password.
3Tap the registered fingerprint, then tap DELETE > DELETE.
To rename a registered fingerprint
1Find and tap Settings > Lock screen & security > Fingerprint Manager.
2Select a registered fingerprint in the list, then enter a name and tap OK.
SIM card protection
You can lock and unlock each SIM card that you use in your device with a PIN.
When a SIM card is locked, the subscription linked to the card is protected against
misuse, meaning that you have to enter a PIN every time you start your device.
If you enter the PIN incorrectly too many times, your SIM card will get blocked. You
then need to enter your PUK (Personal Unblocking Key) and a new PIN. Your PIN
and PUK are supplied by your network operator.
To set up a SIM card lock
1Find and tap Settings > Lock screen & security > SIM card lock.
2Dual SIM users, select a SIM card.
3Tap the slider beside Lock SIM card to enable.
4Enter the SIM card PIN and tap OK. The SIM card lock is now active and you
will be prompted to enter your PIN every time you restart your device.
To change the SIM card PIN
1Find and tap Settings > Lock screen & security > SIM card lock.
2Dual SIM users, select a SIM card.
3Tap Change SIM PIN.
4Enter the old SIM card PIN and tap OK.
5Enter the new SIM card PIN and tap OK.
6Re-type the new SIM card PIN and tap OK.
To unlock a blocked SIM card using the PUK code
1Enter the PUK code and tap .
2Enter a new PIN code and tap .
3Re-enter the new PIN code and tap .
If you enter an incorrect PUK code too many times, you need to contact your network
operator to get a new SIM card.
Using multiple SIM cards
This function only applies for Dual SIM devices.
Dual SIM devices work with either one or two SIM cards inserted. You can get
incoming communication to both SIM cards and select which number to place
outgoing communication from. Before using multiple SIM cards, you need to
enable them and select a SIM card which will handle data trac.
You can forward calls that come in on SIM 1 to SIM 2 when SIM 1 is unreachable,
and vice versa. This function is called Dual SIM reachability. You must enable it
manually. See
Forwarding calls
on page 67.
14
This is an internet version of this publication. © Print only for private use.

To enable or disable the use of two SIM cards
1Find and tap Settings > Network & Internet > Dual SIM.
2Tap the SIM1 and SIM2 sliders to enable or disable the SIM cards.
To rename a SIM card
1Find and tap Settings > Network & Internet > Dual SIM.
2Select a SIM card and enter a new name for it.
3Tap OK.
To select which SIM card handles data trac
1Find and tap Settings > Network & Internet > Dual SIM > Mobile data.
2Select the SIM card you want to use for data trac.
For higher data speeds, select the SIM card that supports the fastest mobile network, for
example, LTE.
Finding the IMEI number(s) of your device
Your device has one or two unique identification numbers that are referred to as
IMEI or Product ID. You should keep a copy of this. You may require it if your device
is stolen or when contacting support.
Dual SIM devices only: Your device has two IMEI numbers, one for each SIM card
slot.
To view your IMEI number(s) using the dialpad
1Find and tap .
2Tap .
3Enter *#06# into the dialpad. The IMEI number(s) are displayed
automatically.
To view your IMEI number(s) on the label strip
1Drag out the SIM/Memory card tray.
2Drag the strip outwards using your fingernail. The strip displays the IMEI
number(s).
15
This is an internet version of this publication. © Print only for private use.

Finding, locking or erasing a lost device
Google oers a location and security web service called Find my device. After you
have signed in to a Google account, Find my device is turned on by default. If you
lose your device, you can use Find my device to:
•Find and show where your device is located on a map.
•Lock your device and present a message on the lock screen.
•Unlock your device and reset it by erasing its content.
•Activate the ringer, even if the sound is turned o.
Your device must be turned on, have an internet connection and have the location
service activated. The Find my device service may not be available in all countries
or regions.
If you erased the content on your device using Find my device, you must enter the
username and password for a Google account in order to use your device again. This can be
any Google account which you have set up on your device as an owner. If you can’t give this
information during the setup, you won’t be able to use your device at all after a reset.
For additional information about Find my device, go to
https://www.support.google.com/
and search for “Find my device”.
To verify that your device can be found
•Go to
https://www.google.com/android/find
and sign in using your Google
account.
Using location services
Location services allow applications such as Maps and the camera to use
information from your mobile or Wi-Fi network as well as Global Positioning
System (GPS) information to determine your approximate location. If you're not
within a clear line of sight to GPS satellites, your device can determine your
location using the Wi-Fi function. And if you're not within range of a network, your
device can determine your location using your mobile network.
In order to use your device to find out where you are, you need to enable location
services.
You may incur data connection charges when you connect to the internet from your device.
To enable or disable location services
•Find and tap Settings > Lock screen & security > Location. Tap the slider to
enable or disable location services.
You can also enable location services from Settings > Google > Location.
To enable or disable Google Location Sharing
1Find and tap Settings > Lock screen & security > Location. Tap Google
Location Sharing.
2Tap , select the time span you want to have the function turned on and
choose an option to select the contact you want to share your location with.
You can also choose the way to share your location by tapping More.
You can also keep track of your location history under Google Location History.
Improving GPS accuracy
The first time you use the GPS function in your device, it can take a few minutes for
your location to be found. To help the search, make sure not to cover the GPS
antenna, as highlighted in the image. GPS signals can pass through clouds and
plastic, but not through most solid objects such as buildings and mountains. If
your location isn't found after a few minutes, move to another location.
16
This is an internet version of this publication. © Print only for private use.

17
This is an internet version of this publication. © Print only for private use.

Learning the basics
Using the touchscreen
Tapping
•Open or select an item.
•Mark or unmark a checkbox or option.
•Enter text using the on-screen keyboard.
Touching and holding
•Move an item.
18
This is an internet version of this publication. © Print only for private use.

•Activate an item-specific menu.
•Activate selection mode, for example, to select several items from a list.
Pinching in and out
•Pinch in and out on web pages, photos and maps, and when you’re taking photos
or shooting videos.
Swiping
•Scroll up or down a list.
•Scroll left or right, for example, between Home screen panes.
•Swipe left or right to reveal more options.
19
This is an internet version of this publication. © Print only for private use.

Flicking
•Scroll quickly, for example, in a list or on a web page. You can stop the scrolling
movement by tapping the screen.
Turning the screen on or o
When your device is on and left idle for a set period of time, the screen dims and
turns o to save battery power. You can change how long your screen stays active
before it turns o.
When your screen is turned o, your device can be locked or unlocked, depending
on your screen lock setting. See
Screen lock
on page 12.
To turn the screen on or o
•Briefly press the power key .
To adjust the idle time before the screen turns o
1Find and tap Settings > Display > Sleep.
2Select an option.
Smart backlight control
The smart backlight control keeps the screen on as long as the device is held in
your hand. Once you put down the device, the screen turns o according to your
sleep setting.
To enable or disable the Smart backlight control function
1Find and tap Settings > Display > Smart backlight control.
2Tap the slider to enable or disable the function.
Home screen
The Home screen is the starting point for using your device. It's similar to the
desktop on a computer screen. The number of Home screen panes is represented
by a series of dots at the lower part of the Home screen. The highlighted dot
shows the pane that is currently displayed.
If Google Assistant is enabled, the Home screen icon appears as in the navigation bar.
20
This is an internet version of this publication. © Print only for private use.
Table of contents
Other Sony Cell Phone manuals

Sony
Sony Xperia M C1904 User manual

Sony
Sony Xperia Z3+ User guide

Sony
Sony G3123 User manual

Sony
Sony SOL21 Installation instructions

Sony
Sony Xperia feat. HATSUNE MIKU SO-04E User manual

Sony
Sony Xperia XZ2 User manual

Sony
Sony Xperia C6906 User guide

Sony
Sony XPERIA Z3v User manual

Sony
Sony Xperia E dual C1605 User manual

Sony
Sony Xperia Z3 Compact User manual

Sony
Sony e2III User manual

Sony
Sony XPeria ST25i Owner's manual

Sony
Sony Xperia 10 User manual

Sony
Sony D2533 User manual

Sony
Sony F3112 User manual

Sony
Sony Walkman NWZ-F804 Reference guide

Sony
Sony D2202 User manual

Sony
Sony Xperia SP M35c Quick reference guide

Sony
Sony Xperia neo L User manual

Sony
Sony Xperia 5 V Reference guide