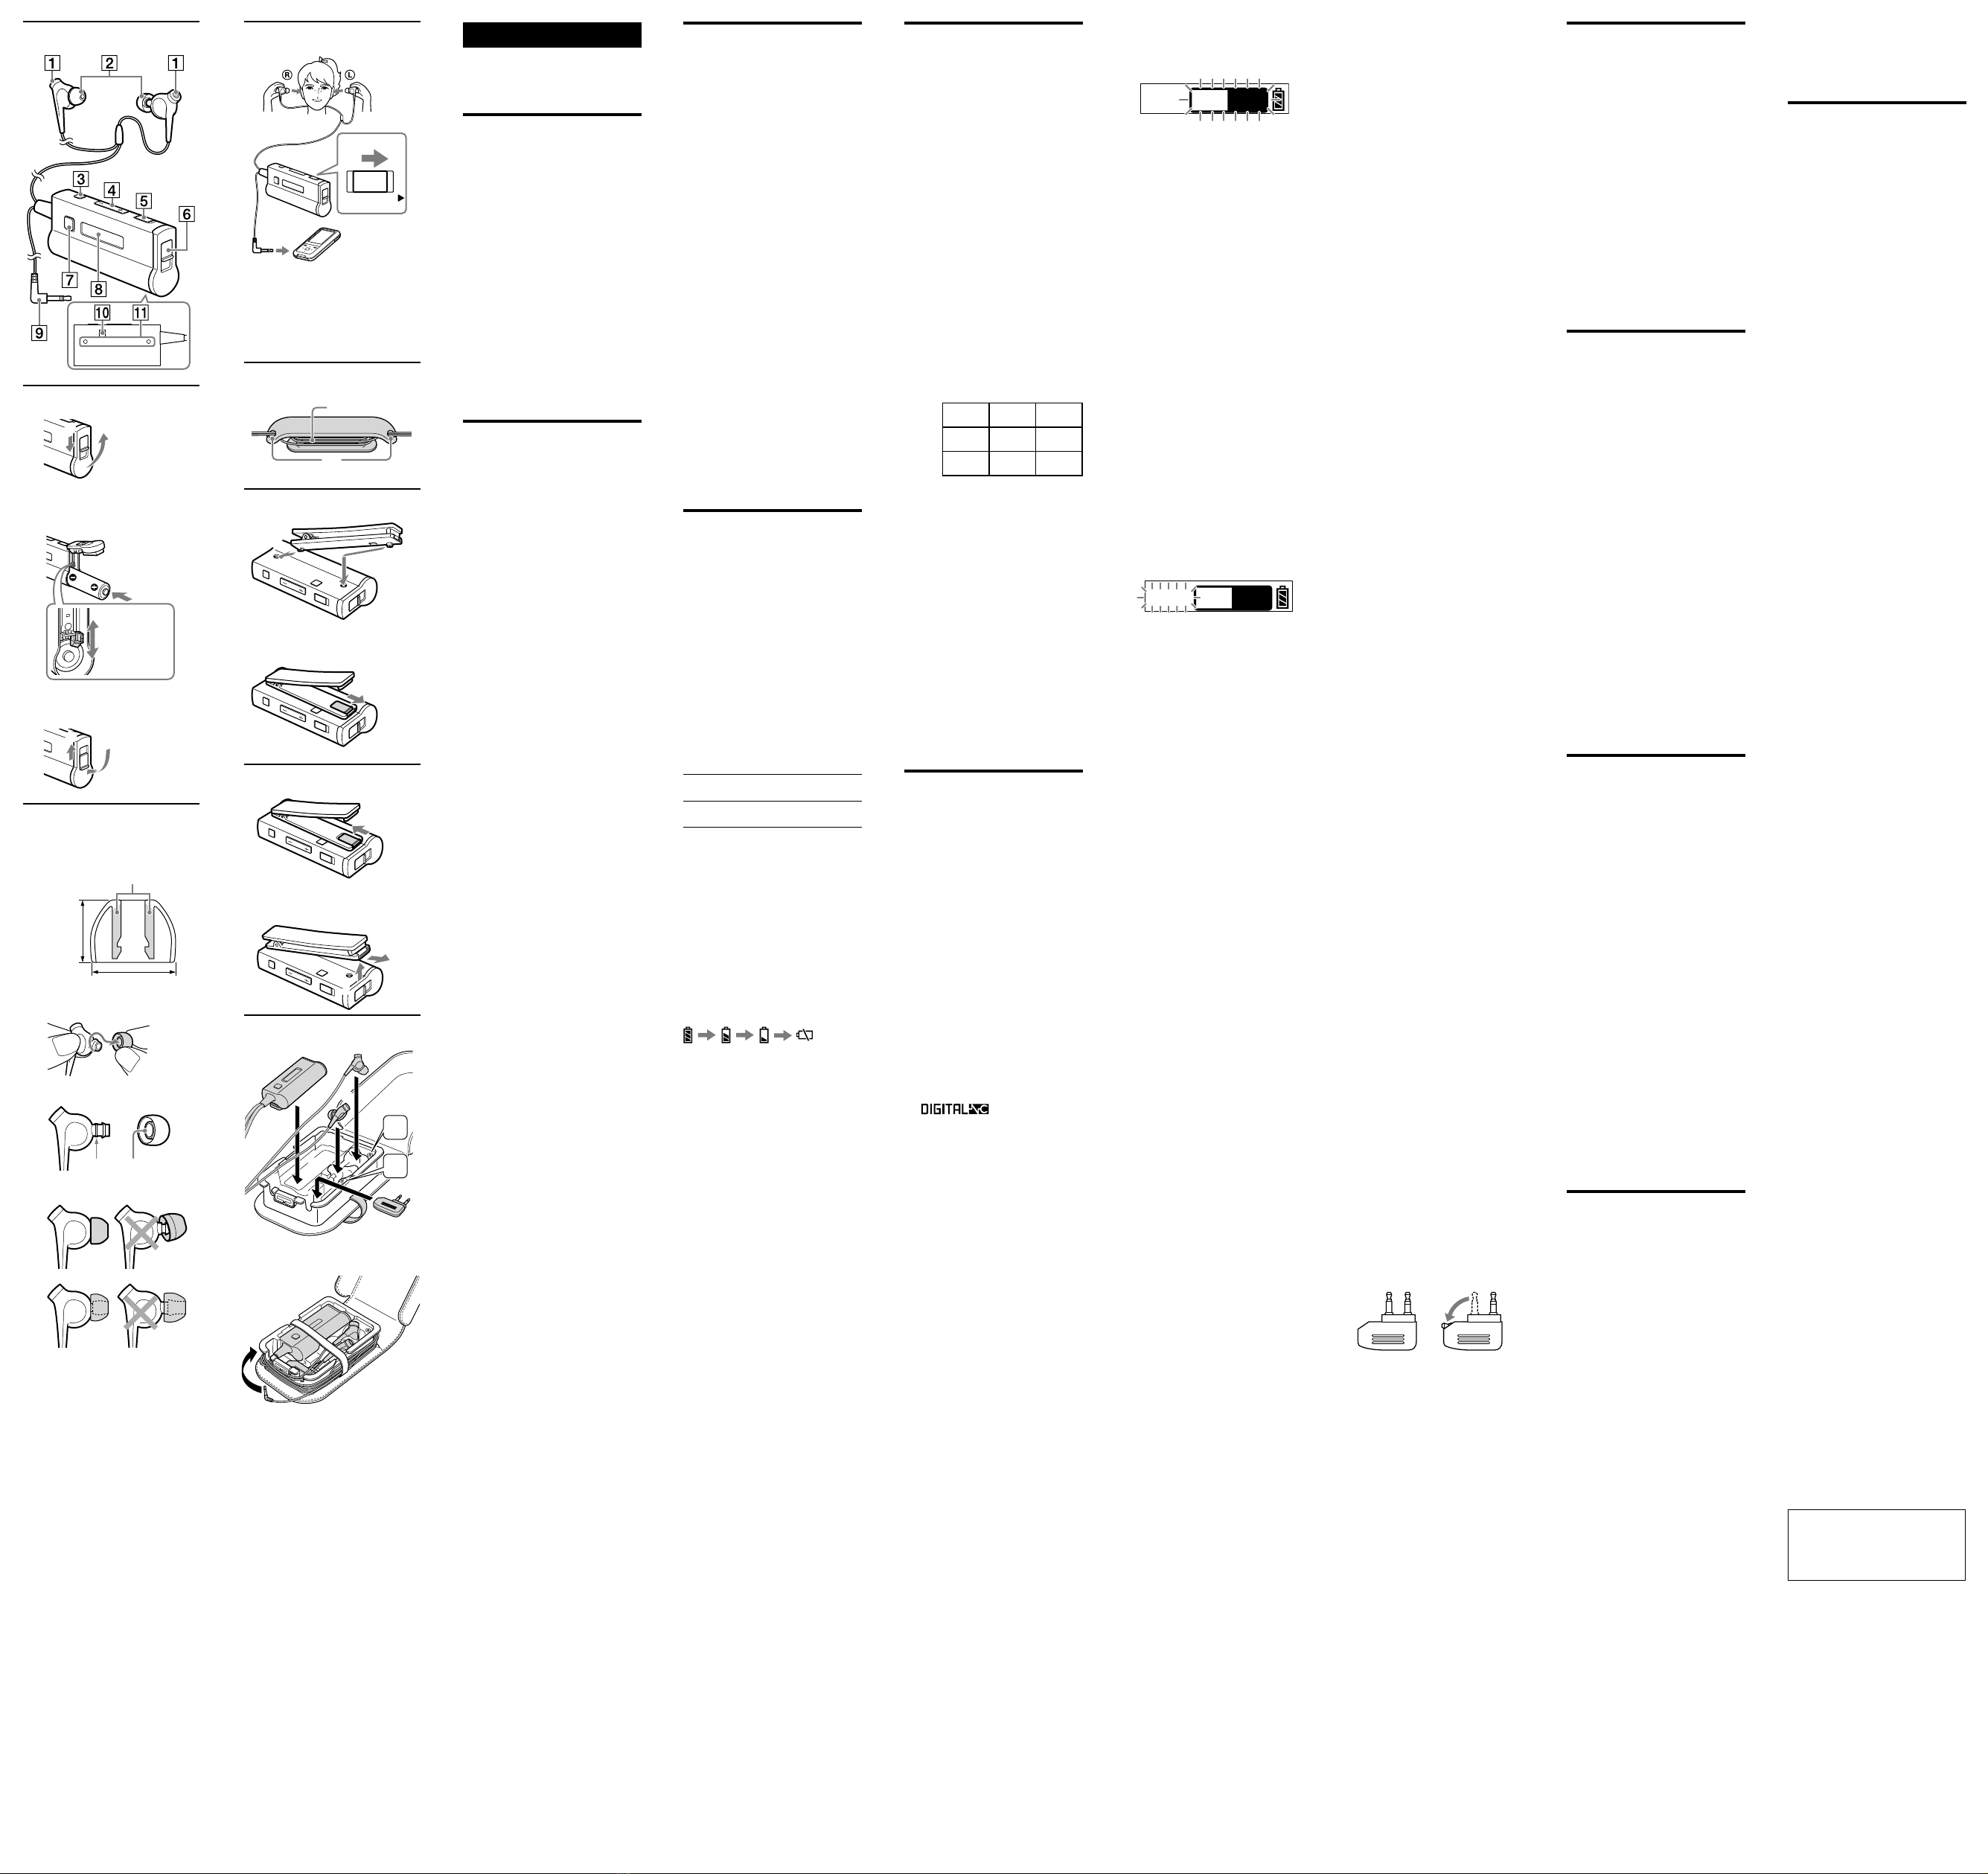
Sony MDR-NC300D User manual

Noise Canceling Headphones
MDR-NC300D
©2009 Sony Corporation Printed in Malaysia
Operating Instructions
Manual de instrucciones
MONITOR
SOUND MODE
VOLUME HOLD POWER
OPEN
LOCK
NC OPTIMIZE
OPEN
LOCK
OPEN
LOCK
OPEN
LOCK
unlock
lock
Sectional View
Diameter
Height
Colored parts
End of earbud’s
colored part
HOLD POWER
2
3
1
When connecting to the stereo mini
jack of the remote control supplied
with a WALKMAN*, etc.
* “WALKMAN” and “WALKMAN”
logo are registered trademarks of Sony
Corporation.
2
1
1
2
3
2
R
L
Features
Digital noise canceling headphones
with Sony's unique DNC Software
Engine.
Creation of a high-precision
canceling signal delivers outstanding
noise canceling performance.
Automatic AI (Artificial
Intelligence) Noise Canceling
function.
Automatic selection of the optimal
noise canceling mode based on
intelligent analysis of environmental
ambient noise.
Digital Sound Enhancer and full
digital S-Master amplifier delivers
ideal frequency response and
high-quality music reproduction.
Large 16 mm dynamic type driver
units deliver a wide frequency range
and broad dynamic range.
Closed type vertical in-the-ear
headphones for secure fit and
wearing comfort.
7 sizes of hybrid silicone earbuds are
included to ensure ideal seal within
the ear for highest quality sound and
also to provide wearing comfort
during extended listening.
Three sound modes (NORMAL/
BASS/MOVIE) available based on
use or application.
Built-in monitor function to hear
surrounding sound without taking
off the headphones.
Easy-to-use volume control on
control box.
Location and
Function of Parts
(see fig. )
Microphones
Earbuds
SOUND MODE button
Changes the sound mode:
NORMAL, BASS and MOVIE.
VOLUME(+/–) button
Adjusts the volume.
The VOLUME + button has a
tactile dot for ease of use.
HOLD/POWER switch
Battery compartment lid
MONITOR button
To hear ambient sound for safety.
LCD display
Indicates the current status or
mode, etc.
Gold-plated L-type stereo
mini-plug
NC OPTIMIZE button
Optimizes the noise canceling
sensitivity level.
Clip holes
To attach the supplied clip.
Installing a battery
(see fig. )
1 Unlock and open the battery
compartment lid.
2 Insert an AA/LR6 dry battery,
end first.
Insert the battery until the internal
stopper holds the battery.
Note
Make sure to insert the battery
end first. If you fail to do so, it may
cause heat buildup or a fault.
3 Close and lock the battery
compartment lid.
Battery life
Battery Approx. hours*1
Sony alkaline AA/LR6
dry battery
20 hours*2
*1At 1 kHz, 0.1 mW + 0.1 mW output
*2Time stated above may vary, depending on
the temperature or conditions of use.
When to replace the
battery
When the battery becomes low, the
battery remains status on the LCD
display will change. The unit will turn
off automatically if there is no battery
remains.
Replace the dry battery by checking the
battery remains status.
Note
Take out the battery from the unit if
you do not intend to use the unit for a
long time.
How to replace the battery
Open the battery compartment lid,
unlock the internal stopper, and then
take out the battery.
How to install the
earbuds correctly
(see fig. )
If the earbuds do not fit your ears
correctly, the noise canceling effect will
not be optimal. To optimize noise
canceling and to enjoy better sound
quality, change the earbuds to another
size, or adjust the earbud position to fit
your ears comfortably and snugly.
If the earbuds do not fit your ears, try
another size. Confirm the size of the
earbuds by checking color inside (see
fig. -).
When you change the earbuds, turn to
install them firmly on the headphones
to prevent the earbud from detaching
and remaining in your ear.
Earbud sizes (inside color)
Diameter
Small Large
High – ML
(Blue)
LL
(Purple)
Height S
(Orange)
M
(Green)
L
(Light blue)
Low
SS
(Red)
MS
(Yellow)
–
To detach an earbud
(see fig. -)
While holding the headphone, twist and
pull the earbud off.
Tip
If the earbud slips and cannot be
detached, wrap it in a soft dry cloth.
To attach an earbud
(see fig. -)
Push the earbud onto the headphone to
where the end of the earbud’s colored
part aligns with .
Listening to music
(see fig. )
1 Connect the headphones to the
listening equipment.
2 Put on the headphones.
Wear the earpiece marked in
your right ear and the one marked
(has a tactile dot for ease of
use.) in your left ear.
Adjust the earbuds position to fit
your ears snugly.
Note
If you wear the headphones
incorrectly, noise canceling will not
function.
Adjust the earbud position to sit on
your ears comfortably and fit your
ears snugly.
3 Slide the HOLD/POWER switch
to POWER side.
appears on the LCD
display, and a short beep sounds
from the headphones.
4 Turn on the power of the
listening equipment.
5 Adjust the volume.
A scale bar appears on the LCD
display when you press VOLUME +
or –.
The scale bar changes according to
your volume setting.
Notes
VOLUME + or – of this headphones does
not change volume setting of a connected
AV equipment.
Even if you adjust the volume to the
minimum, some sound leakage in the
headphones may be heard.
Automatic AI Noise
Canceling
Automatic AI Noise Canceling is a
useful function that automatically
selects one of the noise canceling
modes. This function provides the most
effective automatic noise canceling by
constant analyzing of ambient sound.
Noise canceling modes
LCD display
NC A
The current noise canceling mode is
displayed.
NC mode A (NC A):
This mode is suitable mainly for low
and midrange frequency noise.
This mode is suitable mainly for
noise in an airplane.
NC mode B (NC B):
This mode is suitable mainly for
ultralow frequency noise.
This mode is suitable mainly for
noise in a bus or train.
NC mode C (NC C):
This mode is suitable mainly for
subtle and wideband noise.
This mode is suitable mainly for
noise in an office environment (PC,
copier, air ventilation, etc.).
Tip
Noise characteristics vary over time.
The headphones automatically select the
appropriate noise canceling mode for the
situation.
To select a sound mode
LCD display
NC
MOVIE
A
The current sound mode is displayed.
1 Press the SOUND MODE button.
The sound mode changes in the
order of NORMAL → BASS →
MOVIE.
NORMAL: (nothing displayed)
You can enjoy high-quality music
reproduction.
BASS:
This mode provides high level of
sound reproduction with booming
bass sound.
MOVIE:
This mode is suitable for enjoying
an AV sound source with wide
dynamic range in a noisy place.
Tip
The MOVIE mode is the most
effective when volume level of this
unit is set to around 16.
To optimize the noise
canceling effect
Noise canceling
optimization function
This unit is designed for creating the
most effective noise canceling effects,
but the default setting may not be best
because of differences in ear shape or
usage circumstances.
Optimize the noise canceling effect
using the noise canceling optimization
function if the default effect is not
sufficient.
1 Press the NC OPTIMIZE button.
A scale bar appears on the LCD
display and playback sound is
muted.
2 Press the VOLUME(+/-) button
repeatedly to adjust.
21 levels of sensitivity are available.
Position of the mark where you feel
the noise canceling effect is the
most effective.
3 Press the NC OPTIMIZE button
to finish setting.
Tips
The setting value of the noise
canceling optimizing function will
apply to all 3 noise canceling modes.
The setting value of the noise
canceling optimizing function is
memorized, even when the power is
turned off.
Note
The value of this setting does not reflect
the impact of the noise canceling effect.
To hear environmental
sound for safety
Press the MONITOR button while the
power is on, playback silences, and you
can hear the surrounding environment.
To finish this function, press the
MONITOR button again.
To prevent false operation
Hold function
When you slide the HOLD/POWER
switch to HOLD side, “HOLD” appears
in the display and the controls on the
unit are disabled. This function is useful
to prevent false operation such as
turning on the unit unintended.
To cancel the Hold function, slide the
HOLD/POWER switch to POWER
side.
To reset the headphones
to the factory default
You can reset the setting value of the
headphones to the factory default.
1 While the power is off, turn on
the power of the headphones
with pressing and holding the
NC OPTIMIZE button.
2 Release the NC OPTIMIZE button
when“ALL RESET” appears on
the LCD display.
How to use the supplied
cord adjuster (see fig. )
You can adjust the cord length by
winding the cord on the cord adjuster.
(The cord can be wound to the cord
adjuster up to 40 cm. If you wind more,
the cord comes off from the cord
adjuster easily.)
1 Wind the cord.
2 Push the cord into slot hole to
secure in place.
Note
Do not wind the plug or split section of
the cord, as it will strain the cord and
may cause a wire break.
How to use the clip
You can fasten the unit on your clothes
or bag, by attaching the supplied clip
onto the unit.
To attach the clip (see fig. )
1 Insert the knobs of the clip into
the holes on the rear of the unit,
as shown in the illustration.
Tip
You can attach the clip either way.
2 Slide the clip's inner lever
outward.
The clip is locked in place.
To detach the clip (see fig. )
1 Slide the clip's inner lever
inward.
The clip is released.
2 Lift the end of the clip (lever
side) approx. 2 mm.
3 Pull the clip in the direction of
the arrow.
Notes on using on an
airplane
The supplied plug adaptor can be
connected to the dual or stereo mini
jacks of in-flight music services.
dual jacks stereo mini jacks
Do not use the headphones when use
of electronic equipment is prohibited
or when use of personal headphones
for in-flight music services is
prohibited.
Take the headphones off when not in
use.
After use
Turn off the power of the headphones.
1 Slide the HOLD/POWER switch
to POWER side, and then hold
about 1 seconds or more.
“See You!” appears in the display,
and then unit turns off.
Tip
When power is turned off, the unit
stores the settings, which are applied
again when the unit is turned on.
Note
Settings are not stored if you replace the
battery during the operation.
How to use the
carrying case
(see fig. )
1 Remove the elastic band from
the inner case.
2 Place all items (plug adapter,
unit and headphones) inside the
carrying case.
3 Wind the cord around the side of
the inner case, and then put the
elastic band on the inner case.
4 Close the carrying case.
Notes
Items must be placed in the correct
order to fit in the carrying case.
If the cord is left out of the carrying
case, it may be damaged.
Make sure to remove the elastic band
when removing or placing items;
otherwise, the cord may be damaged.
Troubleshooting
No sound
Turn on the headphones.
Check that the battery is not
depleted.
Check the connection of the
headphones and the AV equipment.
Check that the connected AV
equipment is turned on.
Turn up the volume of the connected
AV equipment.
Muffled sound
Turn down the volume of the
connected AV equipment.
Replace the battery with a new one.
Power does not turn on
Replace the battery with a new one.
The unit does not operate
properly.
Turn off the unit and then take out
the battery. Reinsert the battery and
turn on the unit again.
Specifications
General
Type: Dynamic, closed
Wear method: Vertical in-the-ear
Driver units: 16 mm, dome type (CCAW
adopted)
Power handling capacity:
100 mW
Impedance: 16 Ω (at 1 kHz)
Sensitivity: 103 dB/mW
Frequency response: 6 – 24,000 Hz
Total Noise Suppression Ratio*1:
Approx. 18 dB*2
Cord: 1.2 m (47 1/4in) OFC litz
cord
Plug: Gold-plated stereo
mini-plug
Power source: DC 1.5 V, 1 × AA/LR6 dry
battery
Mass: Headphones section:
Approx. 8 g (0.3 oz)
(without cord)
Control box section:
Approx. 53 g (1.9 oz)
(without cord, including
battery)
Supplied accessories
Extension cord (0.6 m (23 5/8in), gold-plated
stereo mini-plug) (1)
Cord adjuster (1)
Clip (1)
Plug adaptor for in-flight use*3(single/dual) (1)
Carrying case (1)
Carrying pouch (1)
Earbuds (SS × 2, S × 2, MS × 2, M × 2, ML × 2,
L × 2, LL × 2)
Sony alkaline AA/LR6 dry battery (1)
Operating Instructions (1)
Product Information (1)
Card warranty (1)
*1Under the Sony measurement standard.
For details about the Total Noise
Suppression Ratio amount for each mode,
refer to the Product Information booklet.
*2Equivalent to approx. 98.4 % reduction of
energy of sound compared with not
wearing headphones (NC mode A).
*3May not be compatible with some in-flight
music services.
Design and specifications are subject to
change without notice.
Precautions
The headphones contain a noise
canceling circuit.
What is noise canceling?
The noise canceling circuit actually
senses outside noise with built-in
microphones and sends an equal-but-
opposite canceling signal to the
headphones.
The noise canceling effect may not be
pronounced in a very quiet
environment, or some noise may be
heard.
Do not cover the microphones of the
headphones with your hands. The
noise canceling function may not
work properly.
The noise canceling effect may vary
depending on how you wear the
headphones.
The noise canceling function works
for noise in the low frequency band
primarily. Although noise is reduced,
it is not canceled completely.
When you use the headphones in a
train or a car, noise may occur
depending on street conditions.
Mobile phones may cause
interference and noise. Should this
occur, locate the headphones further
away from the mobile phone.
Notes on usage
Clean the headphones with a soft dry
cloth.
Do not leave the jack plug dirty
otherwise the sound may be
distorted.
Be sure to bring the headphones to
the Sony dealer when requiring a
change of earbuds or repair work.
Do not leave the headphones in a
location subject to direct sunlight,
heat or moisture.
Do not subject the headphones to
excessive shock.
To clean the earbuds, first remove
them from the headphones, and then
clean them with water and mild
detergent. After cleaning, dry each
earbud carefully before use.
The earbuds will need to be replaced
from time to time. If they are worn
out by daily use or longtime storage,
replace them with new ones.
If you fell drowsy or sick while using
these headphones, stop use
immediately.
Install the earbuds firmly onto the
headphones. If an earbud accidentally
detaches and is left in your ear, it may
cause injury.
Notes on headphones
Preventing hearing damage
Avoid using headphones at high
volume. Hearing experts advise against
continuous, loud and extended play. If
you experience a ringing in your ears,
reduce the volume or discontinue use.
Do not use headphones while
driving and cycling, etc
As headphones reduce outside sounds,
they may cause a traffic accident. Also,
avoid listening with your headphones in
situations where hearing must not be
impaired, for example, a railroad
crossing, a construction site, etc.
Note on static electricity
In particularly dry air conditions, mild
tingling may be felt on your ears. This is
a result of static electricity accumulated
in the body, and not a malfunction of
the headphones.
The effect can be minimized by wearing
clothes made from natural materials.
If you have any questions or
problems concerning the system that
are not covered in this manual,
please consult your nearest Sony
dealer.
English
Noise Canceling
Headphones
WARNING
To reduce the risk of fire or electric
shock, do not expose this apparatus
to rain or moisture.
To reduce the risk of electrical
shock, do not open the cabinet.
Refer servicing to qualified
personnel only.
This device complies with Part 15 of the
FCC Rules.
Operation is subject to the following
two conditions: (1) This device may not
cause harmful interference, and (2) this
device must accept any interference
received, including interference that
may cause undesired operation.
Caution
You are cautioned that any changes or
modifications not expressly approved in
this manual could void your authority
to operate this equipment.
Note
This equipment has been tested and found to
comply with the limits for a Class B digital
device, pursuant to Part 15 of the FCC Rules.
These limits are designed to provide
reasonable protection against harmful
interference in a residential installation. This
equipment generates, uses and can radiate
radio frequency energy and, if not installed
and used in accordance with the instructions,
may cause harmful interference to radio
communications. However, there is no
guarantee that interference will not occur in a
particular installation. If this equipment does
cause harmful interference to radio or
television reception, which can be determined
by turning the equipment off and on, the user
is encouraged to try to correct the
interference by one or more of the following
measures:
– Reorient or relocate the receiving antenna.
– Increase the separation between the
equipment and receiver.
– Connect the equipment into an outlet on a
circuit different from that to which the
receiver is connected.
– Consult the dealer or an experienced radio/
TV technician for help.
The validity of the CE marking is
restricted to only those countries where
it is legally enforced, mainly in the
countries EEA (European Economic
Area).
Owner’s Record
The model number is located at the
back side of the control box.
The serial number is located in the
battery compartment.
Record these numbers in the spaces
provided below. Refer to them
whenever you call upon your Sony
dealer regarding this product.
Model No. MDR-NC300D __________
Serial No.________________________

MONITOR
SOUND MODE
VOLUME HOLD POWER
OPEN
LOCK
NC OPTIMIZE
OPEN
LOCK
OPEN
LOCK
OPEN
LOCK
destrabar
trabar
Vista por secciones
Diámetro
Altura
Partes con color
Extremo de la
parte coloreada de
la almohadilla
HOLD POWER
2
3
1
Cuando se conecte a la minitoma estéreo
del control remoto incluido con un equipo
WALKMAN*, etc.
* WALKMAN y el logotipo de
WALKMAN son marcas comerciales
registradas de Sony Corporation.
2
1
1
2
3
2
R
L
Ubicación y función
de las piezas
(vea la fig. )
Micrófonos
Almohadillas
Botón SOUND MODE
Cambia el modo de sonido:
NORMAL, BASS y MOVIE
Botón VOLUME(+/–)
Ajusta el volumen.
El botón VOLUME + tiene un
punto táctil para facilitar el uso.
Botón HOLD/POWER
Tapa del compartimiento de
la batería
Botón MONITOR
Para escuchar el sonido de
ambiente por seguridad.
Pantalla LCD
Indica el estado o el modo actual,
etc.
Miniclavija estéreo dorada
con forma de L
Botón NC OPTIMIZE
Optimiza el nivel de sensibilidad
de cancelación de ruido.
Orificios para la presilla.
Para sujetar la presilla incluida.
Colocación de la
batería (vealafig.)
1 Destrabe y abra la tapa del
compartimiento de la batería.
2 Inserte una batería seca AA/LR6,
con el extremo primero.
Inserte la batería hasta que la traba
interna la sostenga en su lugar.
Nota
Asegúrese de insertar la batería con
el extremo primero. Si no lo
hace, puede producir una
acumulación de calor o una falla.
3 Cierre y trabe la tapa del
compartimiento de la batería.
Duración de la batería
Batería Horas aprox.*1
Batería alcalina seca Sony
AA/LR6
20 horas*2
*1A 1 kHz y 0,1 mW + 0,1 mW de salida
*2El tiempo indicado arriba puede variar
según la temperatura o las condiciones de
uso.
Cuándo reemplazar la
batería
Cuando la batería está baja, el estado de
carga restante de la batería cambia en la
pantalla LCD. La unidad se apagará
automáticamente cuando la batería se
quede sin carga.
Para reemplazar la batería, controle el
estado de carga en la pantalla.
Nota
Si no va a utilizar la unidad durante un
período prolongado, extraiga la batería
de la unidad.
Cómo reemplazar la
batería
Abra la tapa del compartimiento de la
batería, suelte la traba interna y luego
extraiga la batería.
Cómo instalar
correctamente las
almohadillas
(vea la fig. )
Si las almohadillas no se adaptan
correctamente a sus oídos, el efecto de
cancelación de ruido no será óptimo.
Para optimizar la cancelación de ruido
y disfrutar de una mejor calidad de
sonido, cambie de tamaño de
almohadillas o ajuste la posición de las
almohadillas para que se ajusten a sus
oídos de manera confortable.
Si las almohadillas no se adaptan a sus
oídos, pruebe con otro tamaño.
Confirme el tamaño de las almohadillas
mirando el color del interior (vea la fig.
-).
Cuando cambie las almohadillas, gírelas
para que queden firmemente colocadas
en los auriculares a fin de evitar que se
desprendan de estos y queden en sus
oídos.
Tamaños de las almohadillas
(color interno)
Diámetro
Pequeño Grande
Alto – ML
(Azul)
LL
(Púrpura)
Altura S
(Naranja)
M
(Verde)
L
(Azul claro)
Bajo
SS
(Rojo)
MS
(Amarillo)
–
Para extraer una
almohadilla
(vea la fig. -)
Sostenga el auricular, gire y tire de la
almohadilla hacia afuera.
Consejo
Si la almohadilla se desliza y no se
puede extraer, envuélvala con una tela
suave y seca.
Para colocar una
almohadilla
(vea la fig. -)
Presione la almohadilla hacia el
auricular en el punto en el que el
extremo con color de la almohadilla se
alinea con .
Escucha de música
(vea la fig. )
1 Conecte los auriculares al
equipo reproductor.
2 Póngase los auriculares.
Coloque el auricular con la marca
en su oído derecho y el auricular
con la marca (tiene un punto
táctil para facilitar el uso) en su
oído izquierdo.
Ajuste la posición de las
almohadillas para que se ajusten
cómodamente a sus oídos.
Nota
Si utiliza los auriculares de manera
incorrecta, la cancelación de ruido
no funcionará.
Ajuste la posición de las
almohadillas para que se asienten
en sus oídos de manera confortable
y para que se ajusten suavemente.
3 Deslice el botón HOLD/POWER
hasta la posición POWER.
aparece en la
pantalla LCD y se escucha un pitido
corto en los auriculares.
4 Encienda el equipo reproductor.
5 Ajuste el volumen.
En la pantalla LCD, se muestra una
barra de escala cuando presiona
VOLUME + o –.
La barra de escala cambia según el
ajuste de volumen que seleccione.
Notas
El botón VOLUME + o – no cambia el
ajuste de volumen de un equipo AV
conectado.
Aun cuando se ajusta el volumen al
mínimo, puede oírse cierto nivel de sonido
en los auriculares.
Cancelación de ruido AI
automática
La cancelación de ruido AI automática
es una práctica función que selecciona
uno de los modos de cancelación de
ruido. Esta función brinda la
cancelación de ruido más eficaz ya que
analiza constantemente el ruido del
ambiente.
Modos de cancelación de
ruido
Pantalla LCD
NC A
Se muestra el modo de cancelación de
ruido actual.
Modo A de NC (NC A):
Este modo es adecuado
principalmente para ruidos de
frecuencias bajas y medias.
Este modo es adecuado
principalmente para los ruidos de
un avión.
Modo B de NC (NC A):
Este modo es adecuado
principalmente para ruidos de
frecuencias ultrabajas.
Este modo es adecuado
principalmente para los ruidos de
un autobús o de un tren.
Modo C de NC (NC A):
Este modo es adecuado
principalmente para los ruidos
suaves y de frecuencia amplia.
Este modo es adecuado
principalmente para los ruidos de
ambiente de oficina (PC, copiadoras,
ventilación de aire, etc.).
Consejo
Las características de los ruidos varían con el
tiempo.
Los auriculares seleccionan automáticamente
el modo de cancelación de ruido según la
situación.
Para seleccionar un modo
de sonido
Pantalla LCD
NC
MOVIE
A
Se muestra el modo de sonido actual.
1 Presione el botón SOUND
MODE.
El modo de sonido cambia en el
siguiente orden NORMAL → BASS
→ MOVIE.
NORMAL: (no se muestra nada)
Puede disfrutar de una
reproducción de música de alta
calidad.
BASS:
Este modo brinda un alto nivel de
reproducción de sonido con bajos
reforzados.
MOVIE:
Este modo es el adecuado para
disfrutar de una fuente de sonido
AV con un rango dinámico amplio
en un lugar ruidoso.
Consejo
El modo MOVIE es más eficaz
cuando se ajusta el nivel de volumen
de esta unidad alrededor de 16.
Para optimizar el efecto de
cancelación de ruido
–Función de cancelación
de la optimización de
ruido–
Esta unidad está diseñada para crear los
efectos de cancelación de ruido más
eficaces, pero es posible que el ajuste
predeterminado no sea el mejor debido
a las diferencias en las formas de los
oídos o a las circunstancias de uso.
Optimice el efecto de cancelación de
ruido utilizando la función de
cancelación de la optimización si el
efecto predeterminado no es suficiente.
1 Presione el botón NC OPTIMIZE.
Aparece una barra de escala en la
pantalla LCD y se silencia el sonido
de la reproducción.
2 Presione varias veces el botón
VOLUME(+/-) para ajustar el
volumen.
Hay 21 niveles de sensibilidad
disponibles. La posición de la marca
en la que usted siente el efecto de
cancelación de sonido es la más
eficaz.
3 Presione el botón NC OPTIMIZE
para finalizar el ajuste.
Consejos
El valor de ajuste de la función de
optimización de la cancelación de
sonido se aplicará a los 3 modos de
cancelación de sonido.
El valor de ajuste de la de la función
de optimización de la cancelación de
sonido se guarda en la memoria, aun
cuando se apaga el equipo.
Nota
El valor de este ajuste no refleja el
impacto del efecto de cancelación de
ruido.
Para escuchar el sonido de
ambiente por seguridad
Presione el botón MONITOR mientras
el equipo esté encendido. La
reproducción se silencia y usted puede
oír los ruidos del ambiente.
Para finalizar esta función, presione el
botón MONITOR.
Para evitar el
funcionamiento en falso
–Función Hold–
Cuando se desliza el botón HOLD/
POWER hasta la posición HOLD,
“HOLD” se muestra en la pantalla y se
deshabilitan los controles de la unidad.
Esta función es útil para evitar el
funcionamiento en falso, como el
encendido de la unidad.
Para cancelar la función Hold, deslice el
botón HOLD/POWER hasta la posición
POWER.
Para restablecer la
configuración
predeterminada de fábrica
de los auriculares
Puede restablecer el valor de ajuste de
los auriculares a la configuración
predeterminada de fábrica.
1 Con la unidad apagada, active la
alimentación de los auriculares
manteniendo presionado el
botón NC OPTIMIZE.
2 Suelte el botón NC OPTIMIZE
cuando se muestre“ALL RESET”
en la pantalla LCD.
Cómo utilizar el regulador
de cable suministrado
(vea la fig. )
Puede ajustar la longitud del cable
enrollándolo en el regulador de cable
(es posible enrollar hasta 40 cm de cable
en el regulador. Si supera este límite, el
cable puede desprenderse del regulador
con facilidad).
1 Enrolle el cable.
2 Presione el cable en el orificio de
la ranura para fijarlo en su lugar.
Nota
No enrolle la clavija ni la sección
dividida, ya que el cable se tensaría y
podrían romperse los hilos.
Cómo utilizar la presilla
Puede sujetar la unidad a sus ropas o a
un bolso colocando la presilla incluida
en la unidad.
Para colocar la presilla
(vea la fig. )
1 Inserte las salientes de la
presilla en los orificios de la
parte trasera de la unidad, como
se muestra en la ilustración.
Consejo
Puede colocar la presilla en
cualquier dirección.
2 Deslice la palanca interior de la
presilla hacia afuera.
La presilla está trabada en su lugar.
Para extraer la presilla
(vea la fig. )
1 Deslice la palanca interior de la
presilla hacia adentro.
La presilla está suelta.
2 Levante el extremo de la presilla
(en el lado de la palanca) aprox.
2 mm.
3 Empuje la presilla en la dirección
de la flecha.
Notas sobre la utilización
en un avión
El adaptador de clavija suministrado
podrá conectarse a minitomas estéreo
o dobles en los servicios musicales
que se ofrecen en trayectos aéreos.
Tomas dobles Minitomas estéreo
No utilice los auriculares cuando esté
prohibido utilizar equipos
electrónicos o auriculares personales
en servicios de música en vuelo.
Quite los auriculares cuando no los
esté utilizando.
Después del uso
Desconecte la energía de los
auriculares.
1 Deslice el botón HOLD/POWER a
la posición POWER y luego
manténgalo presionado durante
1 segundo o más.
Se muestra “See You!” (“nos
vemos”) en la pantalla y luego se
apaga la unidad.
Consejo
Cuando se apaga, la unidad almacena
los ajustes, que se vuelven a aplicar
nuevamente cuando se enciende la
unidad.
Nota
Los ajustes no se almacenan si se
reemplaza la batería durante la
operación.
Utilización del
estuche de
transporte
(vea la fig. )
1 Retire la cinta elástica del
interior del estuche.
2 Coloque todos los elementos
(adaptador de clavija, unidad y
auriculares) en el estuche de
transporte.
3 Enrolle el cable alrededor de la
cara interna del estuche y, a
continuación, coloque la cinta
elástica en el interior del
estuche.
4 Cierre el estuche de transporte.
Notas
Los elementos deben colocarse en el
orden correcto para que quepan en el
estuche de transporte.
Si se deja el cable fuera del estuche de
transporte, podría resultar dañado.
Asegúrese de retirar la cinta elástica
cuando retiras o colocas los demás
elementos; de lo contrario, el cable
podría resultar dañado.
Solución de
problemas
No hay sonido
Encienda los auriculares.
Compruebe que la batería no se haya
agotado.
Compruebe la conexión de los
auriculares y el equipo AV.
Compruebe que el equipo AV
conectado esté encendido.
Suba el volumen del equipo AV
conectado.
El sonido se escucha
apagado
Baje el volumen del equipo AV
conectado.
Cambie la batería por una nueva.
La unidad no se enciende
Cambie la batería por una nueva.
La unidad no funciona
correctamente
Apague la unidad y extraiga la
batería. Vuelva a colocar la batería y
encienda nuevamente la unidad.
Especificaciones
técnicas:
Información general
Tipo: Cerrados, dinámicos
Método de uso: Vertical, en el interior del
oído
Unidades auriculares:
16 mm, tipo cúpula (CCAW
adoptado)
Capacidad de manipulación de potencia:
100 mW
Impedancia: 16 Ω (a 1 kHz)
Sensibilidad: 103 dB/mW
Respuesta de frecuencia:
6 – 24.000 Hz
Relación de supresión de ruido total*1:
Aprox. 18 dB*2
Cable: 1,2 m OFC hilo de litz
Clavija: Miniclavija estéreo dorada
Fuente de alimentación:
CC de 1,5 V, 1 batería AA/
LR6 seca
Masa: Sección de los auriculares:
Aprox. 8 g (sin cable)
Sección de la caja de control:
Aprox. 53 g (sin cable,
incluida la batería)
Accesorios incluidos
Cable de extensión (0.6 m, miniclavija estéreo
dorada) (1)
Ajustador de cable (1)
Presilla (1)
Adaptador de clavija para uso en aviones*3
(simple/doble) (1)
Estuche de transporte (1)
Bolsa de transporte (1)
Almohadillas (SS × 2, S × 2, MS × 2, M × 2, ML ×
2, L × 2, LL × 2)
Batería seca alcalina AA/LR6 de Sony (1)
Manual de instrucciones (1)
Información del producto (1)
Tarjeta de garantía (1)
*1Según los estándares de medición de Sony.
Para obtener más información acerca de la
relación de supresión de ruido total para
cada modo, consulte el folleto de
información del producto.
*2Equivalente a aproximadamente 98,4 % de
reducción de energía de sonido,
comparado con no usar auriculares (Modo
A de NC).
*3Puede no ser compatible con algunos
servicios de música en vuelo.
El diseño y las especificaciones están sujetos a
cambios sin previo aviso.
Precauciones
Los auriculares disponen de un circuito
para la cancelación de ruido.
¿Qué es la cancelación de
ruido?
El circuito de cancelación de ruido
detecta ruidos exteriores a través de los
micrófonos incorporados y envía a los
auriculares una señal de cancelación
igual pero opuesta.
Es posible que el efecto de
cancelación de ruido no se perciba en
un ambiente muy silencioso, o es
posible que se escuche algo de ruido.
No cubra los micrófonos de los
auriculares con las manos. Esto
puede hacer que la función de
cancelación de ruido no funcione
correctamente.
El efecto de cancelación de ruido
puede variar en función de cómo se
colocan los auriculares.
La función de cancelación de ruido
funciona principalmente para los
ruidos de la banda de baja frecuencia.
Aunque el ruido se reduce, no se
suprime por completo.
Si utiliza los auriculares en un tren o
automóvil, pueden producirse ruidos
en función de las condiciones del
exterior.
Los teléfonos móviles pueden causar
interferencias y ruido. Si esto ocurre,
aleje los auriculares del teléfono
móvil.
Notas sobre el uso
Limpie los auriculares con un paño
suave y seco.
Evite que la clavija se ensucie. De lo
contrario, el sonido puede
distorsionarse.
Asegúrese de consultar a un
distribuidor de Sony cuando necesite
cambiar las almohadillas o cuando
los auriculares requieran reparación.
No deje los auriculares estéreo en
lugares sujetos a la luz directa del sol,
el calor o la humedad.
No exponga los auriculares a golpes
excesivos.
Para limpiar las almohadillas,
extráigalas de los auriculares y luego
límpielas con agua y un detergente
suave. Después de la limpieza, seque
cada almohadilla cuidadosamente
antes del uso.
Será necesario reemplazar las
almohadillas de vez en cuando. Si
están desgastadas por el uso diario o
por el almacenamiento a largo plazo,
reemplácelas.
Si se siente adormecido o
descompuesto al utilizar estos
auriculares, interrumpa el uso
inmediatamente.
Coloque las almohadillas firmemente
en los auriculares. Si una almohadilla
se desprende accidentalmente y
queda en uno de sus oídos, puede
producirle lesiones.
Notas sobre los auriculares
Cuidado de sus oídos
Evite utilizar los auriculares a gran
volumen. Los expertos en audición
aconsejan no utilizar auriculares
durante mucho tiempo ni a gran
volumen. Si experimenta un silbido en
los oídos, reduzca el volumen o deje de
utilizar los auriculares.
No utilice los auriculares
mientras maneja o monta en
bicicleta
Como los auriculares reducen el sonido
del exterior, su uso puede causar un
accidente de tránsito. Evite también
utilizarlos cuando no deba perder el
sentido del oído, por ejemplo, en un
paso a nivel, en un lugar de
construcción, etc.
Nota sobre la electricidad
estática
En condiciones de aire muy seco, es
posible que sienta un zumbido en sus
oídos. Esto es producido por la
electricidad estática acumulada en el
cuerpo, y no es producto del mal
funcionamiento de los auriculares.
El efecto se puede minimizar utilizando
vestimenta fabricada con materiales
naturales.
Si tiene preguntas o problemas
relacionados con el sistema que no
estén incluidos en este manual,
póngase en contacto con su
distribuidor de Sony más cercano.
Español
Auriculares con
cancelación de ruido
ADVERTENCIA
Para reducir el riesgo de incendios o
electrocución, no exponga el
aparato a la lluvia ni a la humedad.
Para evitar descargas eléctricas, no
abra la unidad. En caso de avería,
solicite los servicios de personal
cualificado.
PRECAUCIÓN
Se le advierte de que la realización de
cambios o modificaciones no aprobados
explícitamente en este manual pueden
anular su autoridad para utilizar este
equipo.
La validez de la marca CE se limita sólo
a los países en los que se appliqué
legalmente, principalmente en los
países del Espacio Económico Europeo
(EEE).
Funciones
Auriculares con cancelación digital
de ruido, con DNC Software Engine
exclusivo de Sony.
La creación de una señal de
cancelación de alta precisión brinda
un rendimiento de cancelación de
ruido excepcional.
Función automática AI de
cancelación de ruido.
Selección automática del modo
óptimo de cancelación de ruido
basada en un análisis inteligente del
ruido ambiental.
Digital Sound Enhancer y el
amplificador completamente digital
S-Master proporcionan una respuesta
de una frecuencia ideal y una
reproducción de música de alta
calidad.
Las unidades de control grandes, de
16 mm, proporcionan una amplia
gama de frecuencias y un amplio
margen dinámico.
Auriculares internos verticales de
tipo cerrado para un calce seguro y
mayor comodidad de uso.
Se incluyen 7 tamaños de
almohadillas de silicona híbrida para
asegurar una selladura ideal en el
interior del oído, a fin de brindar
sonido de la más alta calidad y
máxima comodidad durante escuchas
prolongadas.
Tres modos de sonido (NORMAL/
BASS/MOVIE) disponibles basados
en el uso o en la aplicación.
Función de control incorporada para
escuchar el sonido envolvente sin
desconectar los auriculares.
Control de volumen fácil de usar
incorporado en la caja de control.
Other manuals for MDR-NC300D
5
Table of contents
Languages:
Other Sony Headphones manuals

Sony
Sony MDR-DS6000 User manual

Sony
Sony MDR KX70LW User manual

Sony
Sony MDR-EX86LP User manual

Sony
Sony MDR-ZX110 User manual

Sony
Sony MDR-XB600iP User manual

Sony
Sony h.ear on MDR-100AAP User manual

Sony
Sony MDR DS3000 User manual

Sony
Sony MDR-PQ6/GRN User manual

Sony
Sony MDR-XB500 User manual

Sony
Sony MDR-1ADAC Guide

Sony
Sony MDR-NC20 User manual

Sony
Sony MDR-EX35LP/GV Owner's manual

Sony
Sony MDR-EX10LP User manual

Sony
Sony MDR-EX10LP/DPK User manual

Sony
Sony MDR-RF845R User manual

Sony
Sony MDR-IF3000 User manual

Sony
Sony MDR-1122 User manual

Sony
Sony MDR NC60 - Headphones - Binaural User manual

Sony
Sony MDR-PQ1 User manual

Sony
Sony Triqii MDR-PQ3/YLW User manual