manuals.online logo
Brands
  1. Home
  2. •
  3. Brands
  4. •
  5. Sony
  6. •
  7. Marine Audio
  8. •
  9. Sony CXS-GT2113 User manual

Sony CXS-GT2113 User manual

2007 Sony Corporation Printed in Thailand
CXS-GT2113
3-198-974-11 (1)
2-way Speaker
Precautions
•Do not continuously use the speaker system
beyond the peak power handling capacity.
•Keep recorded tapes, watches, and personal
credit cards using magnetic coding away from
the speaker system to protect them from
damage caused by the magnets in the
speakers.
If you cannot find an appropriate mounting
location, consult your car dealer or your
nearest Sony dealer before mounting.
Précautions
•Ne faites pas fonctionner en continu le système
de haut-parleurs à une puissance supérieure à
sa puissance de crête.
•Maintenez les bandes enregistrées, les montres
et les cartes de crédit utilisant un code
magnétique à l’écart du système de haut-
parleurs pour éviter tout dommage susceptible
d’être causé par les aimants des haut-parleurs.
Si aucun emplacement approprié ne convient
à l’installation, consultez votre
concessionnaire automobile ou votre
revendeur Sony le plus proche avant de
procéder au montage.
Sicherheitsmaßnahmen
•Verwenden Sie das Lautsprechersystem nicht
kontinuierlich über der maximalen
Belastbarkeit.
•Halten Sie bespielte Tonbänder, Uhren und
Kreditkarten mit Magnetcodierung von den
Lautsprechern fern, um eine Beschädigung
durch die Lautsprechermagnete zu vermeiden.
Wenn Sie keine geeignete Einbaustelle
finden, wenden Sie sich vor der Montage an
Ihren Kfz-Händler oder an den nächsten
Sony-Händler.
Instructions
Mode d’emploi
Montageanleitung
Gebruiksaanwijzing
Istruzioni per I’uso
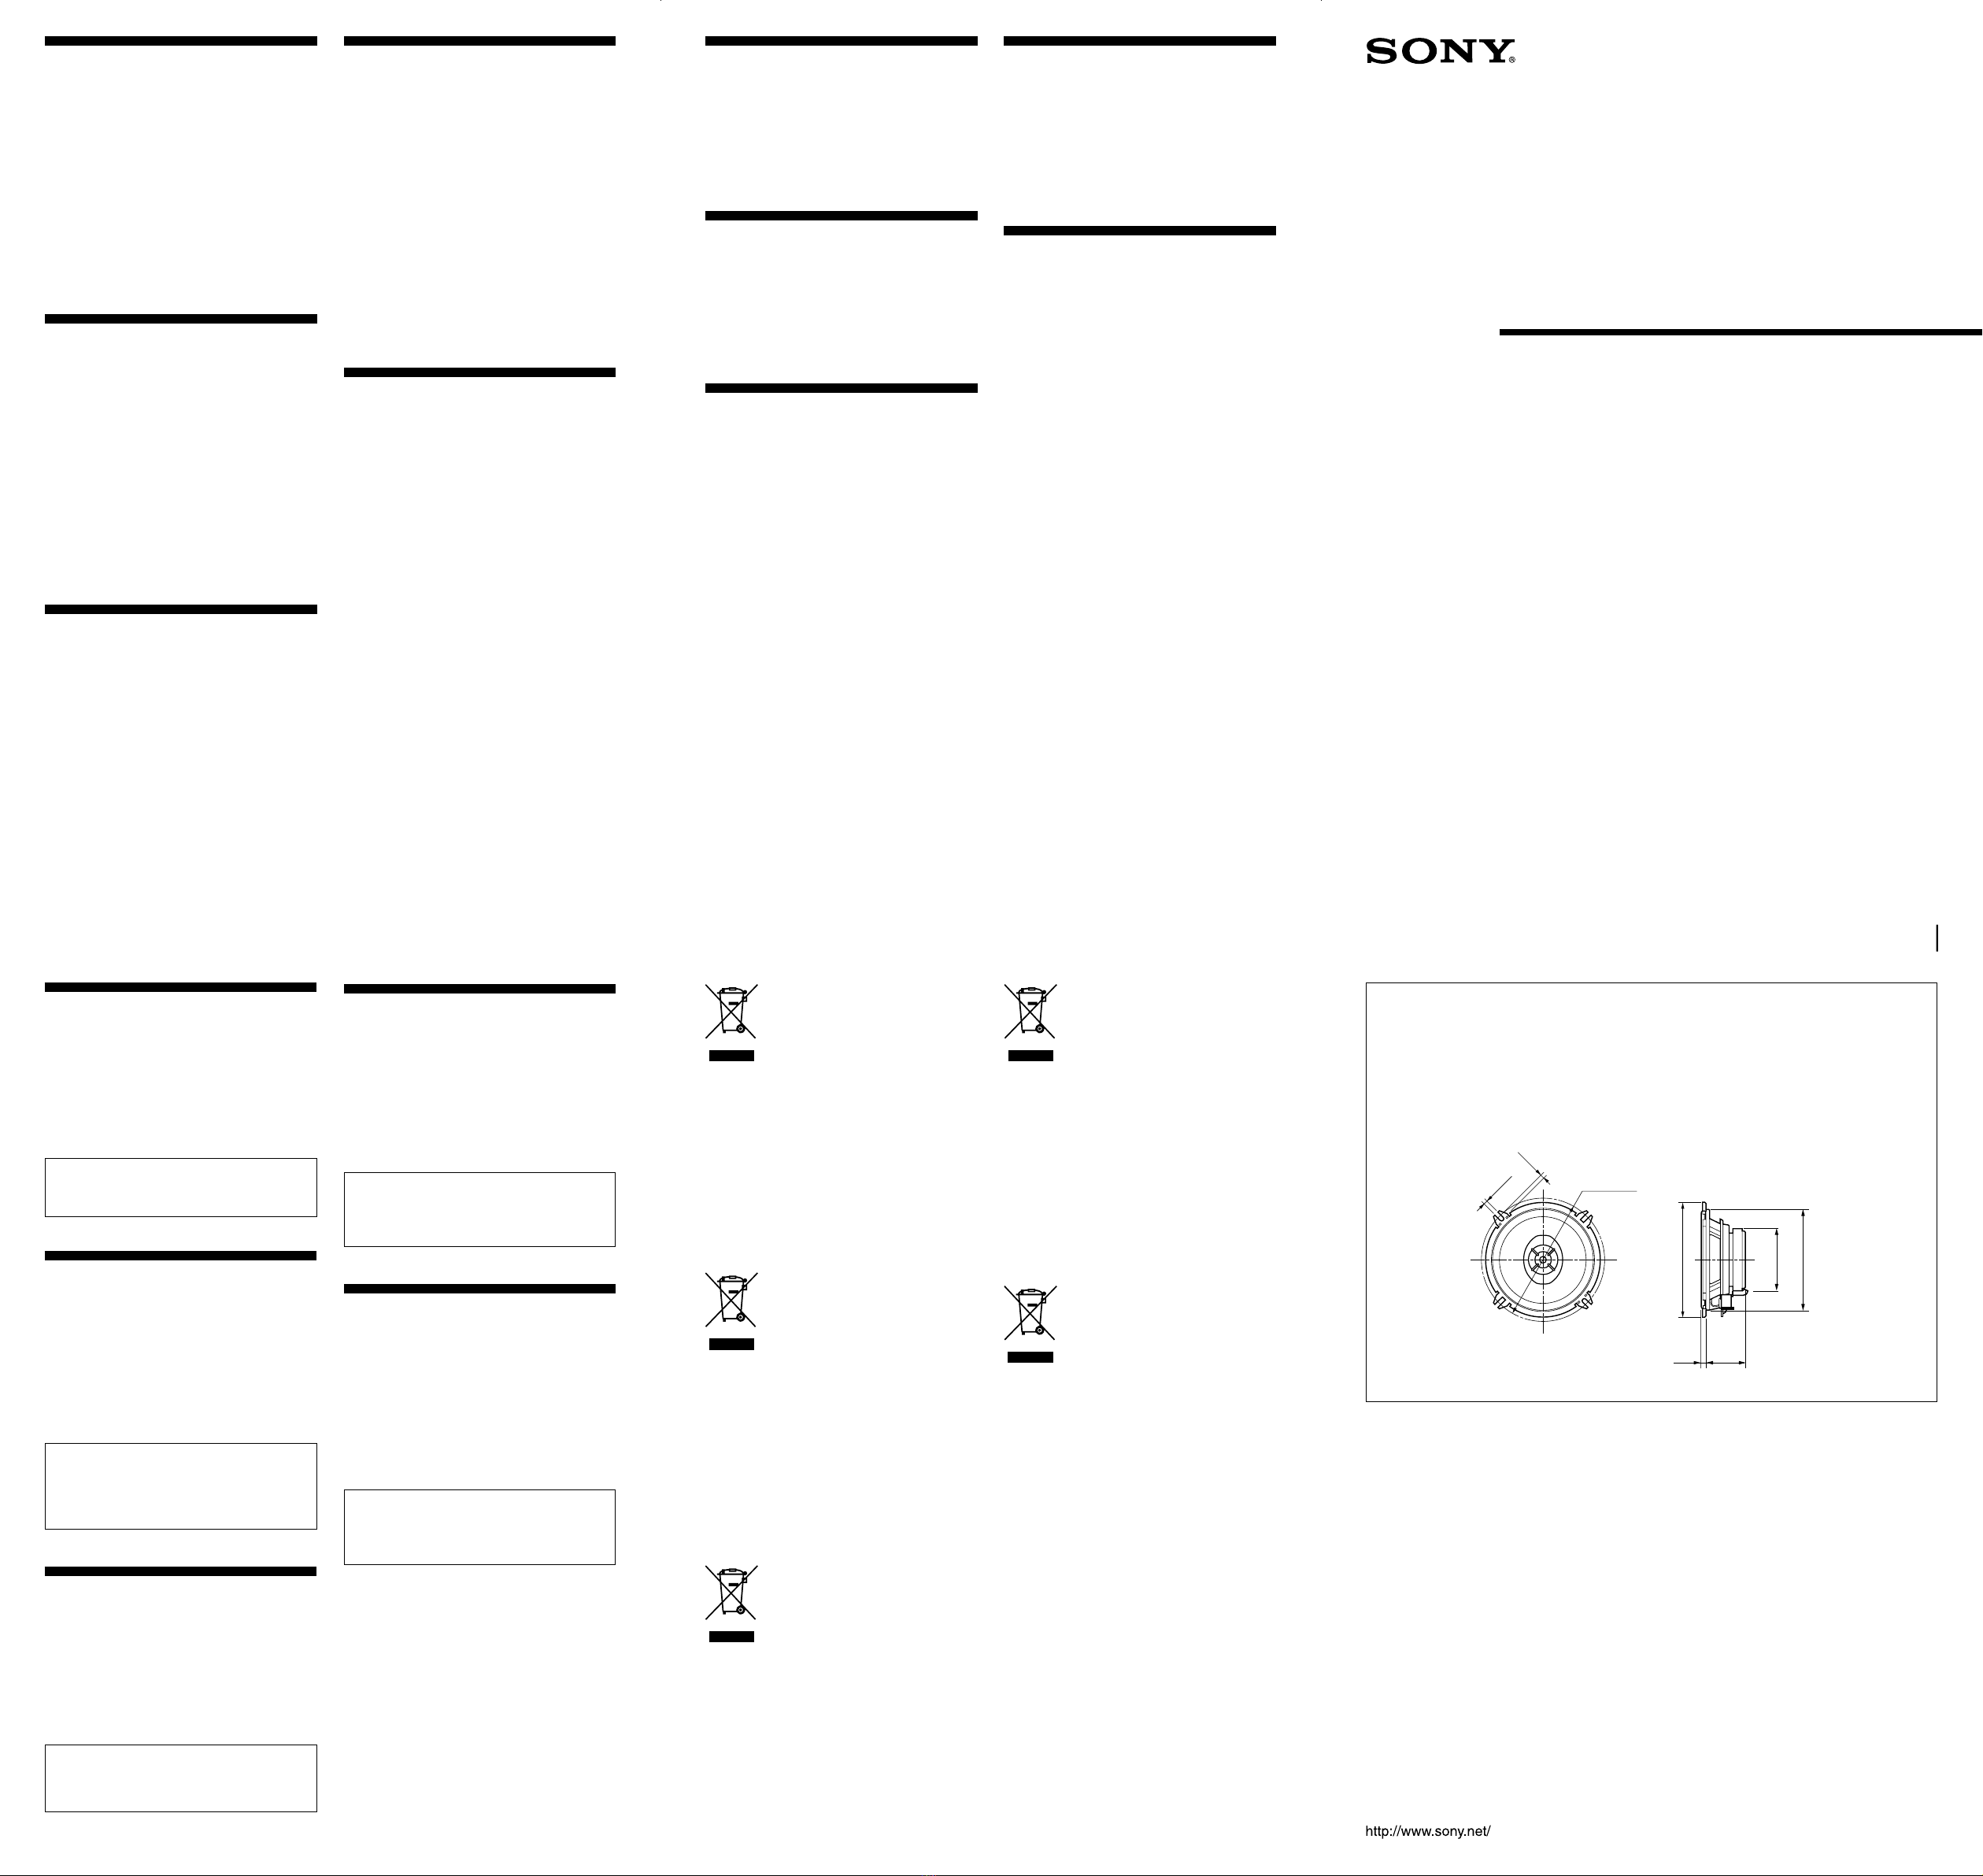
Dimensions
Dimensions
Abmessungen
Afmetingen
Dimensioni
Unit: mm
Unité : mm
Einheit: mm
Eenheid: mm
Unità: mm
Specifications
Speaker Coaxial 2-way:
Woofer 13 cm, HOP, cone
type
Tweeter 4 cm, Al, cone
type
Peak power 150 W
Rated power 35 W
Impedance 4 Ω
Sensitivity 91 dB/W/m
Frequency response 30 – 23,000 Hz
Mass Approx. 525 g per speaker
Supplied accessories Parts for installation
Design and specifications are subject to change
without notice.
Spécifications
Haut-parleur Coaxial à 2 voies :
Woofer de 13 cm,
HOP, de type conique
Tweeter de 4 cm, Al, de
type conique
Puissance de crête 150 W
Puissance nominale 35 W
Impédance 4 Ω
Sensibilité 91 dB/W/m
Réponse en fréquence 30 – 23 000 Hz
Poids Environ 525 g par haut-
parleur
Accessoires fournis Eléments d’installation
La conception et les spécifications sont sujettes à
modification sans préavis.
Technische Daten
Lautsprecher Koaxial, 2 Wege:
Tieftöner: 13 cm, HOP,
Konus
Hochtöner: 4 cm, Al,
Konus
Max. Leistung 150 W
Nennleistung 35 W
Impedanz 4 Ω
Empfindlichkeit 91 dB/W/m
Frequenzgang 30 – 23.000 Hz
Gewicht ca. 525 g pro Lautsprecher
Mitgeliefertes Zubehör Montageteile
Änderungen, die dem technischen Fortschritt
dienen, bleiben vorbehalten.
Welcome !
The CXS-GT2113 package includes the
following:
•Car audio unit CDX-GT210
See the supplied CDX-GT210 manual.
•Speaker XS-F1324R*
*See this manual.
Félicitations !
L’emballage CXS-GT2113 contient les éléments
suivants :
•Autoradio CDX-GT210
Voir le manuel CDX-GT210 fourni.
•Haut-parleur XS-F1324R*
*Voir le présent manuel.
Willkommen!
Das Paket CXS-GT2113 umfasst Folgendes:
•Autoanlage CDX-GT210
Siehe dazu die mitgelieferte CDX-GT210-
Anleitung.
•Lautsprecher XS-F1324R*
*Siehe diese Anleitung.
Technische gegevens
Luidspreker Coaxiale, 2-weg:
Woofer van 13 cm, HOP,
conustype
Tweeter van 4 cm, Al,
conustype
Maximaal ingangsvermogen
150 W
Nominaal ingangsvermogen
35 W
Impedantie 4 Ω
Gevoeligheid 91 dB/W/m
Frequentiebereik 30 – 23.000 Hz
Gewicht Ongeveer 525 g per
luidspreker
Bijgeleverde accessoires Onderdelen voor
installatie
Ontwerp en specificaties kunnen zonder
voorafgaande kennisgeving worden gewijzigd.
Caratteristiche tecniche
Diffusore Coassiale a 2 vie:
Woofer da 13 cm, HOP, di
tipo conico
Tweeter da 4 cm,
alluminio, di tipo conico
Potenza massima 150 W
Potenza nominale 35 W
Impedenza 4 Ω
Sensibilità 91 dB/W/m
Risposta in frequenza 30 – 23.000 Hz
Peso Circa 525 g per diffusore
Accessori in dotazione Elementi per installazione
Il design e le caratteristiche tecniche sono soggetti a
modifiche senza preavviso.
Welkom!
De verpakking van de CXS-GT2113 bevat het
volgende:
•Autoradio CDX-GT210
Raadpleeg de bijgeleverde handleiding voor
de CDX-GT210.
•Luidspreker XS-F1324R*
*Raadpleeg deze handleiding.
Congratulazioni!
La confezione del modello CXS-GT2113 include
i seguenti elementi:
•Autoradio CDX-GT210
Consultare il manuale per CDX-GT210 in
dotazione.
•Diffusore XS-F1324R*
*Consultare il presente manuale.
Voorzorgsmaatregelen
•Belast de luidsprekers niet constant met een
vermogen dat het maximale ingangsvermogen
overschrijdt.
•Houd banden met opnamen, horloges en
creditcards met magnetische codering uit de
buurt van het luidsprekersysteem om
mogelijke beschadiging door de
luidsprekermagneten te voorkomen.
Als u geen geschikte montageplaats vindt,
raadpleeg dan uw autodealer of de
dichtstbijzijnde Sony dealer voordat u de
luidsprekers gaat installeren.
Precauzioni
•Non utilizzare il sistema diffusori con
alimentazione di potenza nominale superiore a
quella massima supportata e in modo
prolungato.
•I nastri registrati, gli orologi e le carte di
credito con codice magnetico devono essere
tenuti lontano dal sistema diffusori, per evitare
che i magneti dei diffusori possano
danneggiarli.
Se non si riesce ad individuare una posizione
adatta per il montaggio, consultare il
concessionario auto o il proprio rivenditore
Sony.
Traitement des appareils
électriques et électroniques en fin
de vie (Applicable dans les pays de
l’Union Européenne et aux autres
pays européens disposant de
systèmes de collecte sélective)
Ce symbole, apposé sur le produit ou sur son
emballage, indique que ce produit ne doit pas être
traité avec les déchets ménagers. Il doit être remis à un
point de collecte approprié pour le recyclage des
équipements électriques et électroniques. En s’assurant
que ce produit est bien mis au rebut de manière
appropriée, vous aiderez à prévenir les conséquences
négatives potentielles pour l’environnement et la santé
humaine. Le recyclage des matériaux aidera à préserver
les ressources naturelles. Pour toute information
supplémentaire au sujet du recyclage de ce produit,
vous pouvez contacter votre municipalité, votre
déchetterie ou le magasin où vous avez acheté le
produit.
Disposal of Old Electrical &
Electronic Equipment (Applicable
in the European Union and other
European countries with separate
collection systems)
This symbol on the product or on its packaging
indicates that this product shall not be treated as
household waste. Instead it shall be handed over to the
applicable collection point for the recycling of electrical
and electronic equipment. By ensuring this product is
disposed of correctly, you will help prevent potential
negative consequences for the environment and human
health, which could otherwise be caused by
inappropriate waste handling of this product. The
recycling of materials will help to conserve natural
resources. For more detailed information about
recycling of this product, please contact your local
Civic Office, your household waste disposal service or
the shop where you purchased the product.
Entsorgung von gebrauchten
elektrischen und elektronischen
Geräten (anzuwenden in den
Ländern der Europäischen Union
und anderen europäischen
Ländern mit einem separaten
Sammelsystem für diese Geräte)
Das Symbol auf dem Produkt oder seiner Verpackung
weist darauf hin, dass dieses Produkt nicht als
normaler Haushaltsabfall zu behandeln ist, sondern an
einer Annahmestelle für das Recycling von elektrischen
und elektronischen Geräten abgegeben werden muss.
Durch Ihren Beitrag zum korrekten Entsorgen dieses
Produkts schützen Sie die Umwelt und die Gesundheit
Ihrer Mitmenschen. Umwelt und Gesundheit werden
durch falsches Entsorgen gefährdet. Materialrecycling
hilft, den Verbrauch von Rohstoffen zu verringern.
Weitere Informationen über das Recycling dieses
Produkts erhalten Sie von Ihrer Gemeinde, den
kommunalen Entsorgungsbetrieben oder dem
Geschäft, in dem Sie das Produkt gekauft haben.
Trattamento del dispositivo
elettrico od elettronico a fine vita
(applicabile in tutti i paesi
dell’Unione Europea e in altri paesi
europei con sistema di raccolta
differenziata)
Questo simbolo sul prodotto o sulla confezione indica
che il prodotto non deve essere considerato come un
normale rifiuto domestico, ma deve invece essere
consegnato ad un punto di raccolta appropriato per il
riciclo di apparecchi elettrici ed elettronici.
Assicurandovi che questo prodotto sia smaltito
correttamente, voi contribuirete a prevenire potenziali
conseguenze negative per l’ambiente e per la salute che
potrebbero altrimenti essere causate dal suo
smaltimento inadeguato. Il riciclaggio dei materiali
aiuta a conservare le risorse naturali. Per informazioni
più dettagliate circa il riciclaggio di questo prodotto,
potete contattare l’ufficio comunale, il servizio locale di
smaltimento rifiuti oppure il negozio dove l’avete
acquistato.
Verwijdering van oude elektrische
en elektronische apparaten
(Toepasbaar in de Europese Unie
en andere Europese landen met
gescheiden ophaalsystemen)
Het symbool op het product of op de verpakking wijst
erop dat dit product niet als huishoudelijk afval mag
worden behandeld. Het moet echter naar een plaats
worden gebracht waar elektrische en elektronische
apparatuur wordt gerecycled. Als u ervoor zorgt dat
dit product op de correcte manier wordt verwijderd,
voorkomt u voor mens en milieu negatieve gevolgen
die zich zouden kunnen voordoen in geval van
verkeerde afvalbehandeling. De recycling van
materialen draagt bij tot het vrijwaren van natuurlijke
bronnen. Voor meer details in verband met het recyclen
van dit product, neemt u contact op met de
gemeentelijke instanties, het bedrijf of de dienst belast
met de verwijdering van huishoudafval of de winkel
waar u het product hebt gekocht.
ø130
ø137.5
5
ø114
ø75
5.0
6.3
43
1
23
Mounting/Montage/Montage/Montage/Montaggio
Mounting from the car interior/Montage depuis l’intérieur de l’habitacle/Montage vomWageninneren aus/
Installeren in de auto/Montaggio all’interno dell’auto
Mark the 4 bolt holes and make them 3.3 mm in diameter.
Marquez les 4 orifices des boulons et percez des trous de 3,3 mm de diamètre.
Markieren Sie die 4 Schraubenlöcher und bohren Sie Löcher mit 3,3 mm Durchmesser.
Markeer de 4 schroefgaten en boor gaten met een diameter van 3,3 mm.
Contrassegnare i 4 fori dei bulloni e praticare fori di 3,3 mm di diametro.
Parts list/Liste des pièces/Teileliste/Onderdelenlijst/
Lista delle parti
Before mounting
Adepthofatleast43mmisrequiredforflush
mounting. Measure the depth of the area where
youaretomountthespeaker,and ensurethat
thespeakerisnotobstructinganyother
componentsofthecar.Keep thefollowingin
mind when choosing a mounting location:
•Makesurethatnothingisobstructingaround
themountinglocationofthedoor(frontor
rear)whereyouaretomount thespeaker.
•Aholefor mountingmayalreadybe cutoutof
theinnerpanelofthedoor(frontorrear).In
thiscase,youneedtomodifytheboardonly.
•Ifyouaretomountthisspeakersysteminthe
door(frontorrear),makesurethatthespeaker
terminals,frameormagnetdonot interfere
withanyinnerparts,suchasthewindow
mechanism in the door (when you open or
closethe window),etc.
Avant le montage
Uneprofondeurd’au moins43 mmestrequise
afin de procéder à un montage encastré du haut-
parleur.Mesurezlaprofondeurde
l’emplacementoùvoussouhaitezinstallerle
haut-parleuretassurez-vousquecedernierne
gênera aucun des autres éléments du véhicule.
Veuilleztoujoursgarderlesremarques
suivantesenmémoirelorsquevouschoisissez
unemplacementpourl’installation:
•Assurez-vousqu’aucunobjetnefaitobstacleà
proximitédel’emplacementsurlaportière
(avantouarrière)oùvous envisagezde
monterlehaut-parleur.
•Ilest possible qu’untrou ait déjàété découpé
danslepanneauintérieurdelaportière(avant
ouarrière).Danscecas,ilvoussuffitde
modifier uniquement le panneau.
•Sivousinstallezcesystèmedehaut-parleurs
danslaportière(avantouarrière),vérifiezque
lesbornes,lebordoul’aimantdeshaut-
parleursnegênentpaslesélémentsinternes
comme le mécanisme de lève-vitres de la
portière(lorsquevousbaissezouremontezla
vitre),etc.
Vor der Montage
FüreineversenkteMontageisteine Einbautiefe
von mindestens 43 mm erforderlich. Messen Sie
dieTiefeanderStelle,anderderLautsprecher
montiertwerdensoll,undvergewissernSiesich,
dassderLautsprecherkeineanderen
Fahrzeugteileblockiert.BeachtenSiebitte
Folgendes,wennSiedieMontagestellefestlegen:
•AchtenSiedarauf,dassnichtsdie
Montageposition in der Tür (vorne oder
hinten),an der Sieden Lautsprecher anbringen
wollen,blockiert.
•In der Innenverkleidung der Tür (vorne oder
hinten)befindetsichmöglicherweisebereits
eine Aussparung für die Montage. In diesem
FallbrauchenSienurdiePlatteanzupassen.
•WennSiediesesLautsprechersystemin der
Tür (vorne oder hinten) montieren, achten Sie
darauf,dassdieLautsprecheranschlüsse,die
Rahmen bzw. die Magneten keine Teile im
Fahrzeuginnerenblockieren,wiezumBeispiel
den Fensterhubmechanismus beim Öffnen und
SchließendesFenstersusw.
Vóór de montage
Voor de montage is een inbouwdiepte van
minimaal 43 mm vereist. Meet de diepte van het
gebiedwaarudeluidsprekerwiltinstallerenen
zorg dat de luidspreker niet wordt geblokkeerd
door andere onderdelen van de auto. Houd
rekening met de volgende punten als u een
montageplaatsuitzoekt:
•Zorgdatergeenobstakelszijnrondhetportier
(voorofachter)waarudeluidsprekerwilt
installeren.
•Inhetbinnenstepaneelvanhetportier(voorof
achter)iswellichtaleenopeningvoorde
installatiegemaakt.Inditgevalhoeftualleen
deplaataantepassen.
•Alsuhetluidsprekersysteemwiltinstalleren
inhet portier (voor of achter), mogende
contactpunten, het frame en de magneet van
de luidspreker niet in contact komen met de
binnensteonderdelen,zoalshet
raammechanismeinhetportieralsuhetraam
opentofsluit.
Prima del montaggio
Perilmontaggioaincassoènecessariauna
profondità di almeno 43 mm. Misurare la
profonditàdell’areaincuiverràmontatoil
diffusoreeassicurarsichequest’ultimonon
ostacolinessunaltrocomponentedell’auto.Per
sceglierelaposizione dimontaggio, tenere
presentequantosegue:
•Assicurarsichenonvisiaalcunostacolonel
puntoincuisidesideramontareidiffusori
nelleportiere(anteriorioposteriori).
•Èpossibilechesiagiàpresenteun foronel
pannellointernodelleportiere(anteriorio
posteriori).Intalcaso,ènecessariomodificare
solamenteilcruscotto.
•Sesidesideramontareilsistemadiffusorinelle
portiere(anteriorioposteriori),assicurarsiche
iterminali,iltelaiooilmagnetedeidiffusori
noninterferiscanoconlepartiinternedelle
portiere,qualiilmeccanismodiaperturae
chiusuradeifinestrinioaltro.
×8
ø 4 ×30
12
3
×2
2 m ×8
2
13 mm
4 mm
ø115 mm
3
1*
1
Flat mounting/Montage à plat/Versenkte Montage/Verzonken montage/Montaggio piatto
Thisspeakercanbemadetofitinalmostanytype
of car by removing the mounting tabs.
Use clippers or pliers, etc. to cut or snap two of
the mounting tabs off so that it is even with the
edge of the speaker frame as illustrated.
Note
After removing the mounting tabs, handle the speaker
frame with care, as the edges may be sharp.
Cehaut-parleurpeutêtreadaptéàpresquetousles
typesdevéhiculesensupprimantlespattesde
montage.
Utilisez des cisailles ou des pinces pour couper
ou enlever les pattes de montage afin qu’il n’y
ait plus de partie saillante sur le bord du haut-
parleur, comme illustré.
Remarque
Lorsque vous avez enlevé les pattes de montage,
manipulez le haut-parleur avec précaution car le bord
peut être coupant.
WennSiedieMontagelaschenentfernen,passt
dieserLautsprecherinfastjedesAutomodell.
Schneiden Sie zwei Montagelaschen mit einer
Schere ab oder zwicken Sie sie mit einer Zange
o. Ä. so ab, dass sie wie in der Abbildung
dargestellt mit der Kante des
Lautsprecherrahmens abschließen.
Hinweis
Fassen Sie den Lautsprecherrahmen nach dem
Entfernen der Montagelaschen vorsichtig an, da die
Kanten unter Umständen scharf sind.
Alsudebevestigingslipjesverwijdert,pastdeze
luidsprekerinbijnaelktypeauto.
Knip of maak de twee bevestigingslipjes los met
een schaar of een tang zodat de rand van de
luidspreker egaal is, zoals wordt weergegeven.
Opmerking
Behandel de luidspreker na het verwijderen van de
lipjes met de nodige omzichtigheid omdat de randen
scherp kunnen zijn.
Door panel
Panneau de porte
Türverkleidung
Deurpaneel
Pannello della portiera
To speaker cord of a car.
Vers le cordon de haut-parleur d’une voiture.
An Lautsprecherkabel eines Autos.
Naar luidsprekersnoer van een auto.
Al cavo diffusori dell’auto.
Striped cord
Cordon rayé
Gestreiftes Kabel
Gestreept snoer
Cavo rigato
ø3.3 mm
Remove the protection cover/Retrait du capuchon de protection/Abnehmen der Schutzabdeckung/
Het beschermingsdeksel verwijderen/Rimuovere il rivestimento di protezione
Protection cover
Capuchon de protection
Schutzabdeckung
Beschermingsdeksel
Rivestimento di protezione
Beforeinstallingthespeaker,removethe
protectioncover.
Note
Keep the protection cover for future use as it is also
necessary to protect the speaker if you remove the
speaker from your car.
Retirezlecapuchondeprotectionavantd’installer
lehaut-parleur.
Remarque
Conservez le capuchon de protection pour toute
utilisation ultérieure car il également nécessaire de
protéger le haut-parleur si vous le retirez de votre
véhicule.
Nehmen Sie vor dem Einbau des Lautsprechers die
Schutzabdeckungab.
Hinweis
Heben Sie die Schutzabdeckung zur späteren
Verwendung auf. Sie dient zum Schutz des
Lautsprechers, wenn Sie diesen aus dem Wagen
ausbauen.
Voordatudeluidsprekerinstalleert,moetuhet
beschermingsdekselverwijderen.
Opmerking
Bewaar het beschermingsdeksel voor later gebruik,
omdat u dit nodig hebt om de luidspreker te
beschermen als u deze uit de auto verwijdert.
Primadiinstallareildiffusore,rimuovereil
rivestimentodiprotezione.
Nota
Conservare il rivestimento di protezione per eventuali
usi futuri, in quanto è inoltre necessario per la
protezione del diffusore quando quest’ultimo viene
rimosso dall’auto.
*White cord — Left speaker
Gray cord — Right speaker
*Cordon blanc — Haut-parleur gauche
Cordon gris — Haut-parleur droit
*Weißes Kabel — Linker Lautsprecher
Graues Kabel — Rechter Lautsprecher
*Wit snoer — Linkerluidspreker
Grijs snoer — Rechterluidspreker
*Cavo bianco — Diffusore sinistro
Cavo grigio — Diffusore destro
Rimuovendo le linguette di montaggio, il presente
diffusorepuòadattarsiquasiadognitipodiauto.
Utilizzare forbici, pinze o simili per tagliare o
spezzare due linguette di montaggio in modo
che il bordo sia allineato con quello del telaio
del diffusore come da illustrazione.
Nota
Dopo la rimozione delle linguette di montaggio,
maneggiare il telaio del diffusore con cura perché i
bordi potrebbero essere aguzzi.

Other Sony Marine Audio manuals

Sony XS-F1021 User manual

Sony

Sony XS-F1021 User manual

Sony XS-GT1328F Installation instructions manual

Sony

Sony XS-GT1328F Installation instructions manual

Sony XS-GS1621 User manual

Sony

Sony XS-GS1621 User manual

Sony XS-GT1028F Installation instructions manual

Sony

Sony XS-GT1028F Installation instructions manual

Sony XS-A1026 Product guide

Sony

Sony XS-A1026 Product guide

Sony XS-HF137 Product guide

Sony

Sony XS-HF137 Product guide

Sony XS-7303 User manual

Sony

Sony XS-7303 User manual

Sony XS-A824 Product guide

Sony

Sony XS-A824 Product guide

Sony XS-6029 User manual

Sony

Sony XS-6029 User manual

Sony CDXM50IP - Marine CD Receiver Slot User manual

Sony

Sony CDXM50IP - Marine CD Receiver Slot User manual

Sony XS-HA1327 Product guide

Sony

Sony XS-HA1327 Product guide

Sony XS-HA1724 Product guide

Sony

Sony XS-HA1724 Product guide

Sony XS-GS6921 User manual

Sony

Sony XS-GS6921 User manual

Sony XS-F1323 User manual

Sony

Sony XS-F1323 User manual

Sony CXS-S2213GF User manual

Sony

Sony CXS-S2213GF User manual

Sony CDX-M20 User manual

Sony

Sony CDX-M20 User manual

Sony DSX-M80 User manual

Sony

Sony DSX-M80 User manual

Sony XS-A825 Product guide

Sony

Sony XS-A825 Product guide

Sony XS-F6920 User manual

Sony

Sony XS-F6920 User manual

Sony MEX-M72BT User manual

Sony

Sony MEX-M72BT User manual

Sony XS-W1321 User manual

Sony

Sony XS-W1321 User manual

Sony CDX-H905IP User manual

Sony

Sony CDX-H905IP User manual

Sony XS-HF137 Product guide

Sony

Sony XS-HF137 Product guide

Sony XS-HF78 Product guide

Sony

Sony XS-HF78 Product guide

Popular Marine Audio manuals by other brands

Fusion MS-SW10 Installation guidelines

Fusion

Fusion MS-SW10 Installation guidelines

Polk Audio PA450UM Operation manual

Polk Audio

Polk Audio PA450UM Operation manual

Jensen JMS2214BT Installation and operation manual

Jensen

Jensen JMS2214BT Installation and operation manual

OWL USB CONNECT user guide

OWL

OWL USB CONNECT user guide

Rockford Fosgate PMX-8DH Installation and operation guide

Rockford Fosgate

Rockford Fosgate PMX-8DH Installation and operation guide

Polk Mono UM1A Installation and operation manual

Polk Mono

Polk Mono UM1A Installation and operation manual

Fusion MS-IP700i manual 

Fusion

Fusion MS-IP700i manual 

TriangleTube ELARA LN05 Owner's manual & warranty

TriangleTube

TriangleTube ELARA LN05 Owner's manual & warranty

Nady Systems PPAS -115+ Features, instructions & technical data

Nady Systems

Nady Systems PPAS -115+ Features, instructions & technical data

Fusion MS-UD/AV755 Series Quick start manual

Fusion

Fusion MS-UD/AV755 Series Quick start manual

Nady Audio PFW12+ Features, instructions & technical data

Nady Audio

Nady Audio PFW12+ Features, instructions & technical data

HQ Power VDS8N user manual

HQ Power

HQ Power VDS8N user manual

Philips CSQ605/00 Installation

Philips

Philips CSQ605/00 Installation

Dual MCP378SXM Installation & owner's manual

Dual

Dual MCP378SXM Installation & owner's manual

Dual AMB500W Installation & owner's manual

Dual

Dual AMB500W Installation & owner's manual

ASA Electronics MSR170 owner's manual

ASA Electronics

ASA Electronics MSR170 owner's manual

manuals.online logo
manuals.online logoBrands
  • About & Mission
  • Contact us
  • Privacy Policy
  • Terms and Conditions

Copyright 2025 Manuals.Online. All Rights Reserved.