Sony HT-500 - Home Theater In A Box Manual

HT-500
B L U E T O O T H S O U N D B A R
Instrucons Guide

Contents
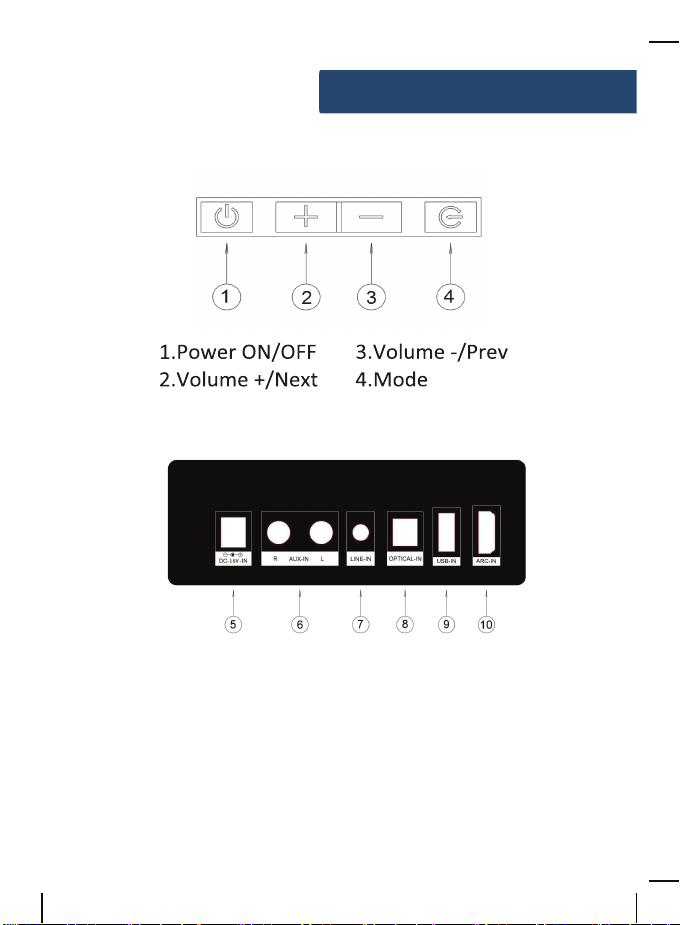
Controls And Funcons -----------------------------------------1
What’s In The Box? ---------------------------------------------- 2
Support ------------------------------------------------------------- 3
User Manual ------------------------------------------------------- 4
Using the AUX IN Cable -------------------------------------- 4
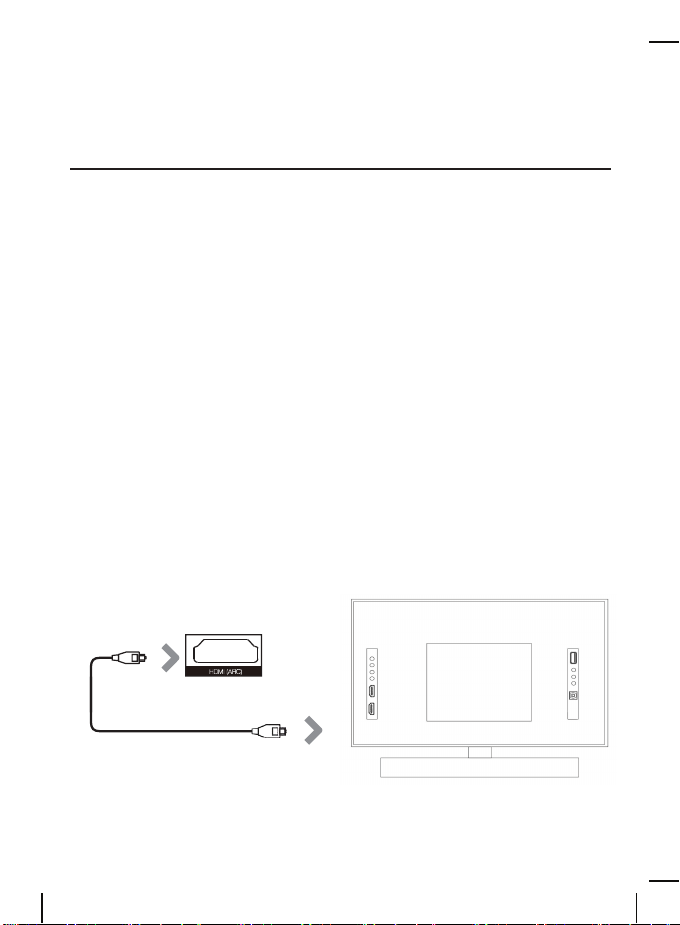
Using the ARC Input ------------------------------------------- 5
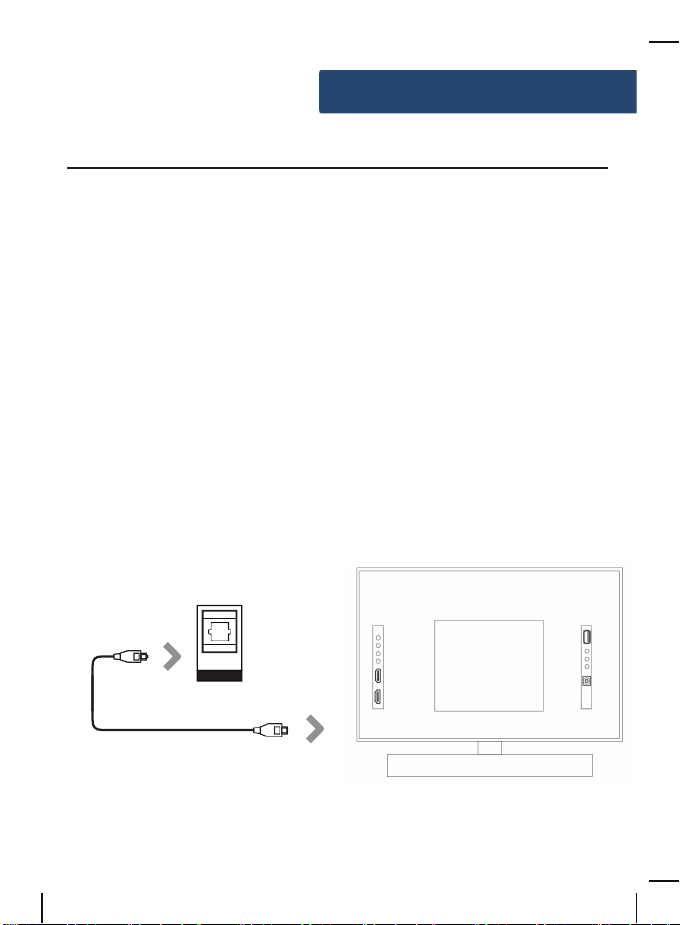
Using the Opcal Input --------------------------------------- 6
Using the MP3 Link Connecon (Line In) ----------------- 7
Connecng to the Mains Supply -------------------------- 8
Using the Bluetooth Operaon --------------- ------------ 9
Using the USB ------------------ ----------------- 10
-------------------------------------------------- 11
------------------------------------------------- ---- 12
Quick System Guide ----------------------------- 13
Safety ----------------------------------------------- 14

Controls And Funcons
Side View/Control Buns
Back View
1
5.DC Power Input
6.AUX-IN Input
7.LINE-IN Input
8.OPTICAL-IN Input
9.USB-IN Input
10.ARC-IN Input

Wha
t’s
In
The
Box
?
Box Contents
HT-500 Soundbar
2.
3.
Power Adapter x 1
AUX IN Cable
4.
Cable
5.
User Manual
6.
3.5mm to 3.5mm Line In Cable
7.
2 x Screws
8.
2 x Expanded Rubber Stopper
1. HT-500 Soundbar
2. Power
Adapter
3. AUX IN 4. 3.5mm to 3.5mm 5. User Manual
Cable Line In Cable
2

Support
Thank you for your purchasing the HT-500 Soundbar.
Please follow the guidance of the user manual to set up your
new purchase and begin enjoying its features.
3

AUX
Instructions Guide
Usinthe AUX IN Cable
Use the AUX Stereo Audio Cable (included) to connect the TV’s
stereo AUX (L/R) audio output socket.
Connect the audio output cable of the soundbar via the ‘AUX’
input sockets of the unit.
Then press MODE on the remote control (
Rem.18
) or press the
Mode button on the unit to scroll to the AUX IN function.
Turn on your television
Troubleshootin:
If you are not receiving a picture or
encountering interference, please ensure that the AUX cable is
being connected to‘output’AUX port on your TV set. This will
ensure that the sound is being exported correctly.
If your TV does not have ‘output’ AUX port, please use an
alternative connection method.
AUX stereo audio cable
Rear view of the unit
4

O
P
T
I
C
A
Usinthe ARC Input
You will need: An audio source with an ARC Audio Output and a
ARC Audio cable (not included).
Connect the ARC Audio cable to the ARC output on the audio
source and to the ARC Input on the soundbar.
Press the POWER button on the soundbar or POWER button
directly on the remote control (Rem.10
)
to switch on the unit.
Press the MODE button on the remote control (
Rem.18
) to
switch to ARC mode or select the Mode button on main unit
repeatedly to select the ARC mode.
Using the native controls on your connected device, make sure
the audio settings are set to ARC or HDMI Audio and are turned
on. Audio from the connected audio source will now be played
through the speakers.
ARC cable
Rear view of the unit
5

O
P
T
I
C
A
L
Instructions Guide
Usinthe Optical Input
Youwill need: An audio source with an Optical Audio Output and a Diital
Optical Audio cable (included).
Connect the Digital Optical Audio cable to the optical output
on the audio source and to the Optical Input on the soundbar.
Press the POWER button on the sound bar or POWER button
directly on the remote control (Ref.10
)
to switch on the unit.
Press the MODE button on the remote control (
Rem.18
)to
switch to Optical mode or select the Mode button on main
unit repeatedly to select the Optical mode.
Using the native controls on your connected device, make sure
the audio settings are set to PCM or Optical Audio and are
turned On. Audio from the connected audio source will now be
played through the speakers.
OPTICAL cable
Rear view of the unit
6
OPTICAL IN

Usinthe MP3 Link Connection (Line In)
Plug one end of a 3.5mm to 3.5mm Line In cable (included)
into the Line In port on the unit. Before use, disconnect any
cables connected to the Stereo RCAInputs.
Plug the other end of the cable into the audio output/
headphone output on an MP3 player or other audio source.
Press the Power button on the soundbar or POWER button
directly on the remote control (
Rem.10
)to switch on the unit.
Press the Mode button repeatedly on the soundbar or press
the MODE button on remote control (Rem.18) repeatedly to
enter LINE in mode.
Audio played through the connected device will now be heard
through the speakers.
3.5mm to 3.5mm
Line In cable
Audio device
7
LIN E-IN

Instrucons Guide
Connecnto the Mains Supply
Ensure that the power supply voltage is in the voltage of
100V~240V.
This unit is designed to use adapter.
Connecng the unit to any other power source may cause
damage to the unit.
Unwind the mains cable to its full length.
Connect the mains plug to a mains socket.
Make sure the mains plug is fully inserted into the mains socket.
Connect the adapter to the unit via the DC input Socket.
(DC-24V-IN)
DC-in Power Cable
Ensure all audio connecns ohe unit are connected beforeconnecng
to the mains power socket.
Unplug the power cord from the outlet when the unisuse for an
extended period oime.
8
DC 18V IN
!

Instrucons Guide
Usinthe Bluetooth Operaon
Pairina Bluetooth Device for the First Time
Press the POWER buon on the unit or the POWER bun on
the remote control (Rem.10
)
to switch on the unit.
Select and press the MODE buon repeatedly on the remote
control unl in Bluetooth mode (
Rem.18
)or press the Mode
buon repeatedly on the sound bar to enter Bluetooth
mode.
Using the controls on your Bluetooth device, select the
“GS-SB106” in your Bluetooth to pair.
Refer to the user manual for your speci device for instrucons
on pairing and connecng Bluetooth devices.
When successfully paired and connected, a beep will issue from
the unit. Aer inial pairing, the unit will stay paired unless
unpaired manually by the user.
If your device should become unpaired or you nd it is unable to
connect, repeat the above steps.
9

PlayinAudio Wirelessly
Follow the instructions for pairing a Bluetooth device.
Use the native controls on the connected Bluetooth Device to
select a track.
To Play/Pause the track or Skip Forwards/Backwards to a
selected track, use the remote control (Rem.12,13,19).
Audio played through the connected Bluetooth device will now
be heard through the speakers.
Usinthe USB Operation
Insert USB to Play Music Automatically.
Select and press the MODE button repeatedly on the remote
control until in USB mode (Rem.18
)
or press the Mode button
repeatedly on the soundbar to enter USB mode.
To Play/Pause the track or Skip Forwards/Backwards to a
selected track, use the remote control (Rem.12,13,19).
Audio played through the connected USB device will now be
heard through the speakers.
10

Troubleshoon
Ihe soundbar does not work properly as desired, please check
the following.
Malfuncon
Possible causes/measures
No power / funcon
Check whether the power is switched on or
oahe wall.
Check whether the power adaptor is
properlyconnected to power outlet or not.
No sound
Check whether cables are properly installed.
Ihey are, please try alternave cable to
connecoyour TV if possible.
Check unis out of standby and in mode.
No sound from bluetooth
connecon
Forgehe soundbar from your device and
reconnect.
Funcon disturbance
Switch oand unplug the unit. Leave ior
2minutes and switch it on again.
If a parcular mode is causing problems,
please try an alternave connecon to
your TV such as Opcal or Bluetooth.
Remote control does not work
[properly]
Check whether the baery run out or not.
Replace with a new one if necessary.
Check whether there is obstacle on the
front of remote sensor.
11

Specicaons
Speciaons
Power Supply
DC 24V
Power Output 20W 4
Speaker Size 2inch 1
Working environment (Temperature)-10~+55C
Relave Humidity 5% ~ 90%
Frequency Response
Bluetooth V5.0
Dimension (LxWxH)
12
7 H
50Hz~18KHz

Quick System Installaon Guide
Place the paper guide on the wall Verify with a level gauge thahe inclinan
whereyou wano hang the soundbar. angle ohe soundbar is zero degrees.
Locate the screw holes on the paper Make the holes with the corresponding
guide and mark a point with a pencil. drill bit according to the type of wall.
Is advisable to leave no more than 5mm For a beer sound experience,
between the head ohe screw and the wall is advisable to place the soundbar
to minimize the inclinan angle ohe soundbar. ahe same height ohe ear.
13

14
1. Read these user manual.
2.
Keep these
user manual
.
3.
Heed all Warnings
4.
Follow all instrucons
5.
Do no clean the apparatus near or with water
6.
Do not block any venaon openings. Install in
accordance withthe manufacturer’sinstrucons
7.
Do nonstall near any heat sources such as
radiators, heat registers, stoves, or other apparatus
(including ampliers) that produce heat.
8.
Protece power from being walked on or
pinched parcularly at plugs, convenience
receptacles, and the point where they exirom the
apparatus.
9.
Only use aachments/accessories specied by the
manufacturer.
10.
Unplug this apparatus during light storms or when
unused for long periods oime.
11.
Refer all servicing to qualied service personnel.
Servicing is required when the apparatus has been
damaged in a way, such as power-supply cord or
plug is damaged, liquid has been spilled or objects
have fallen into the apparatus, the apparatus has
been exposed to the rain or moisture, does not
operate normally or has been dropped.
12.
No naked ame sources, such as lit candles, should
be placed on the apparatus.
13.
Dispose of used electrical products and baeries
safely according to your local authority and
regulaons.
ADDITIONAL WARNINGS
The apparatus shall not be exposed to dripping or
splashing and no objects ed with liquid, such as
vases, shall be places on the apparatus.
Main plug is used to disconnect device and it should
remain readily operable during intended use. In order
to disconnece apparatus from the main mains
completely, the mains plug should be disconnected
from the main socket outlet completely.
Baery shall not be exposed to excessive heat such as
sunshine, re or the like.
RECYCLING ELECTRICAL PRODUCTS
You should now recycle your waste electrical goods and
in doing so help the environment.
This symbol means an electrical product should
not be disposed of with normal household waste.
Please ensure is taken to a suitable facility for
disposal when nished with.
IMPORTANT: Please read all instrucons carefully
before use and keep for future reference.
Risk of electric shock.
Do not open
Read all instrucons carefully before use
and keep for future reference
When servicing, use only idencal
replacement parts
RISK OF ELECTRIC SHOCK DO
NOT OPEN
!
!
IMPORTANT: Please read all instrucons carefully
before use and keep for future reference.
!
CAUTION

cause harmful interference, and (2) this device must accept
any inte rference received, including interference that may cause
responsible for compliance could void the user's authority to
operate the equipment.
NOTE: This equipment has been tested and found to comply
with the limits for a Class B digital device, pursuant to part 15
of the FCC Rules. These limits are designed to provide
radiate radio frequency energy and, if not installed and used in
correct the interference by one ormore of the following
measures:
· Reorient or relocate the receiving antenna.
from that to which the receiver is connected.
· Consult the dealer or an experienced radio/TV technician for
help.
set forth for an uncontrolled environment. This equipment
should be installed and operated with minimum distance 20cm
between the radiator and your body.
15
Table of contents
Other Sony Speakers System manuals

Sony
Sony Walkman RDP-NWD300 User manual

Sony
Sony SSM-F500H User manual

Sony
Sony SRS-GU10iP Marketing User manual

Sony
Sony SS-FCR455H User manual

Sony
Sony AVD-LA2500PKG User manual

Sony
Sony SS-RG60 User manual

Sony
Sony PMC-303L User manual

Sony
Sony HT-A7000 User guide

Sony
Sony PMC-222V User manual

Sony
Sony SS-FCR4000 Installation instructions manual