manuals.online logo
Brands
  1. Home
  2. •
  3. Brands
  4. •
  5. Sony
  6. •
  7. Speakers System
  8. •
  9. Sony SA-VE345 Installation instructions manual

Sony SA-VE345 Installation instructions manual

 2003 Sony Corporation Printed in China
E
e
Ee
English Français
AVERTISSEMENT
Pour éviter tout risque d’incendie ou d’électrocution,
ne pas exposer cet appareil à la pluie ou à l’humidité.
Pour prévenir tout risque d’incendie, ne couvrez pas les
orifices d’aération de l’appareil avec des journaux,
nappes, rideaux, etc., et ne placez pas de bougies
allumées sur l’appareil.
Pour prévenir tout risque d’incendie ou d’électrocution,
ne posez aucun objet rempli de liquide, comme un vase,
sur l’appareil.
Pour prévenir tout risque d’électrocution, n’ouvrez jamais
le coffret. Adressez-vous à un personnel qualifié
uniquement pour toute intervention sur l’appareil.
N’installez pas l’appareil dans un espace confiné
comme dans une bibliothèque ou un meuble encastré.
A propos de ce manuel
Le SA-VE345 est un ensemble d’enceintes 5.1 canaux
composé de deux enceintes avant, deux enceintes arrière,
une enceinte centrale et un caisson de grave.
Il prend en
charge les systèmes Sony Digital Cinema Sound, Dolby*
Pro Logic, et Dolby Digital etc. Il est par conséquent
réservé au visionnage de films.
* « Dolby » et le symbole double D sont des marques de
Dolby Laboratories.
Précautions
Sécurité
• Avant de mettre le système en service, assurez-vous que
sa tension de fonctionnement est identique à celle de
l’alimentation secteur locale.
• Le système n’est pas isolé de la source d’alimentation
secteur tant qu’il reste branché sur la prise murale, même
s’il est éteint.
• Débranchez le système s’il ne doit pas être utilisé
pendant longtemps. Pour débrancher le cordon, tirez sur
la fiche. Ne jamais tirer sur le cordon proprement dit.
• Si un liquide ou un solide pénètre dans le système,
débranchez le cordon d’alimentation du système et faites
vérifier le système par un professionnel avant de l’utiliser
à nouveau.
• Le cordon d’alimentation secteur doit être remplacé
seulement dans un centre de service compétent.
Fonctionnement
• Ne pas faire fonctionner le système acoustique
continuellement à une puissance dépassant sa puissance
d’entrée maximale.
• Si la polarité des liaisons d’enceintes n’est pas correcte,
les graves seront faibles et la position des différents
instruments de musique indistincte.
• Le contact des fils d’enceinte dénudés au niveau des
bornes de l’enceinte peut provoquer un court-circuit.
• Avant de raccorder les enceintes, éteignez l’amplificateur
pour éviter d’endommager le système acoustique.
• Les grilles des enceintes ne peuvent pas être retirées.
N’essayez pas de les enlever car les enceintes pourraient
être endommagées.
•
Le volume sonore ne doit pas être élevé au
point que le son en soit déformé.
Si les couleurs sur l’écran de télévision sont
anormales
Le système acoustique est isolé contre le magnétisme et
peut être installé près d’un téléviseur. Cependant, avec
certains téléviseurs, vous pourrez observer des anomalies
de couleur.
Si les couleurs sont anormales…
cMettez le téléviseur hors tension, puis remettez-le
sous tension 15 à 30 minutes plus tard.
Si les couleurs restent anormales…
cEloignez les enceintes du téléviseur.
Si un sifflement se produit
Repositionnez les enceintes ou réduisez le volume sur
l’amplificateur.
Emplacement
• N’installez pas les enceintes dans une position inclinée.
• N’installez pas les enceintes dans les endroits suivants :
— Extrêmement chauds ou froids
— Poussiéreux ou sales
— Très humides
— Sujets à des vibrations
— Exposés à la lumière directe du soleil
• Prenez les précautions nécessaires lors de l’installation
du haut-parleur sur un plancher traité (ciré, huilé, verni,
etc.) pour éviter l’apparition de taches ou la décoloration
du sol.
Nettoyage
Nettoyez les coffrets d’enceintes avec un chiffon doux
légèrement humidifié avec une solution détergente neutre
de l’eau. Ne pas utiliser de tampons abrasifs, de poudre à
récurer ni de solvants, comme l’alcool ou
l’essence
.
Pour toute question ou difficulté concernant votre système
acoustique, veuillez consulter votre revendeur Sony.
Raccordement du système
acoustique
Raccordez le système acoustique aux bornes d’enceintes
de l’amplificateur (A).
Avant de raccorder les cordons, assurez-vous que tous
les appareils (caisson de grave compris) sont hors
tension.
Remarques (B)
• Assurez-vous que les bornes plus (+) et moins (–) des
enceintes correspondent aux bornes plus (+) et (–) de
l’amplificateur.
• Veillez à bien serrer les vis des bornes d’enceintes, car
des vis desserrées peuvent être une source de parasites.
• Veillez à insérer à fond les fils dans les bornes. Le
contact des fils d’enceinte dénudés au niveau des
bornes de l’enceinte peut provoquer un court-circuit.
• Pour les connexions côté amplificateur, reportez-vous
au manuel fourni avec l’amplificateur.
Conseil
Les fils noirs ou rayés noirs ont une polarité négative (–)
et doivent être reliés aux bornes moins (–) des enceintes.
WARNING
To prevent fire or shock hazard, do not expose the
unit to rain or moisture.
To prevent fire, do not cover the ventilation of the
apparatus with news papers, table-cloths, curtains, etc.
And don’t place lighted candles on the apparatus.
To prevent fire or shock hazard, do not place objects
filled with liquids, such as vases, on the apparatus.
To avoid electrical shock, do not open the cabinet. Refer
servicing to qualified personnel only.
Do not install the appliance in a confined space, such
as a bookcase or built-in cabinet.
Foot pads
Tampons autocollants
Foot pads
Tampons autocollants
CAUTION
You are cautioned that any changes or modification not
expressly approved in this manual could void your
authority to operate this equipment.
About this manual
The SA-VE345 is a 5.1 channel speaker system consisting
of two front speakers, two surround speakers, one center
speaker, and one subwoofer. It supports Sony Digital
Cinema Sound, Dolby* Pro Logic, and Dolby Digital etc.,
and is thus geared towards the enjoyment of movies.
* “Dolby” and the double-D symbol are trademarks of
Dolby Laboratories.
Precautions
On safety
• Before operating the system, be sure that the operating
voltage of the system is identical with that of your local
power supply.
• The unit is not disconnected from the AC power source
(mains) as long as it is connected to the wall outlet,
even if the unit itself has been turned off.
• Unplug the system from the wall outlet if it is not to be
used for an extended period of time. To disconnect the
cord, pull the cord by grasping the plug. Never pull
the cord itself.
• Should any liquid or solid object fall into the system,
unplug the system’s power cord and have the system
checked by qualified personnel before operating it any
further.
• AC power cord must be changed only at the qualified
service shop.
On operation
• Do not drive the speaker system with a continuous
wattage exceeding the maximum input power of the
system.
• If the polarity of the speaker connections are not
correct, the bass tones will be weak and the position of
the various instruments obscure.
• Contact between bare speaker wires at the speaker
terminals may result in a short-circuit.
• Before connecting, turn off the amplifier to avoid
damaging the speaker system.
• The speaker grille cannot be removed. Do not attempt
to remove the grille on the speaker system. If you try
to remove it, you may damage the speaker.
•The volume level should not be turned up to
the point of distortion.
If you encounter color irregularity on a
nearby TV screen
This speaker system is magnetically shielded to allow it
to be installed near a TV set. However, color
irregularities may still be observed on certain types of TV
sets.
If color irregularity is observed...
cTurn off the TV set, then turn it on again after 15 to
30 minutes.
If color irregularity is observed again...
cPlace the speakers further away from the TV set.
If howling occurs
Reposition the speakers or turn down the volume on the
amplifier.
On placement
• Do not set the speakers in an inclined position.
• Do not place the speakers in locations that are:
— Extremely hot or cold
— Dusty or dirty
— Very humid
— Subject to vibrations
— Subject to direct sunlight
• Use caution when placing the speaker on a specially
treated (waxed, oiled, polished, etc.) floor, as staining
or discoloration may result.
On cleaning
Clean the speaker cabinets with a soft cloth lightly
moistened with a mild detergent solution or water. Do
not use any type of abrasive pad, scouring powder or
solvent such as alcohol or benzine.
If you have any questions or problems concerning your
speaker system, please consult your nearest Sony dealer.
Hooking up the system
Connect the speaker system to the speaker output
terminals of an amplifier. (A)
Make sure power to all components (included the
subwoofer) is turned off before starting the hook-up.
Notes (B)
• Make sure the plus (+) and the minus (–) terminals on
the speakers are matched to the corresponding plus (+)
and minus (–) terminals on the amplifier.
• Be sure to tighten the screws of the speaker terminals
securely as loose screws may become a source of noise.
• Make sure all connections are firm. Contact between
bare speaker wires at the speaker terminals may cause
a short-circuit.
• For details regarding the connections on the amplifier
side, refer to the manual that was provided with your
amplifier.
Tip
Black or black striped wires are minus (–) in polarity, and
should be connected to the minus (–) speaker terminals.
Positioning the speakers
Location of each speaker (C)
Each speaker should face the listening position. Better
surround effect will result if all speakers are set at the
same distance from the listening position.
Place the front speakers at a suitable distance to the left
and right of the television.
Place the subwoofer on either side of the television.
Place the center speaker on the top-center of the TV set.
The placement of surround speakers greatly depends on
the configuration of the room. The surround speakers
may be placed on both sides of the listening position A
or behind the listening position B.
Setting the speakers
To prevent speaker vibration or movement while
listening, attach the supplied foot pads to the bottom
four corners of the center speaker, front speakers, and
surround speakers (D).
Setting the center speaker (E)
Set the center speaker firmly on top of the TV set, making
sure it is completely level.
Setting other speakers (F)
For greater flexibility in the positioning of the speakers,
use the optional WS-FV10D or WS-WV10D speaker stand
(available only in certain countries).
Tip
The height of the front speakers should be adjusted to
about the center of the TV screen (G).
Setting the amplifier
When connecting to an amplifier with internal multi
channel decoders (Dolby Digital, DTS**, etc.), you should
use the setup menus for the amplifier to specify the
parameters of your speaker system.
See the table below for the proper settings. For details on
the setting procedure, refer to the manual that was
provided with your amplifier.
Speaker setup
For Set to
Front speakers SMALL
Center speaker SMALL
Surround speakers SMALL
Subwoofer ON (or YES)
If you use the amplifier with adjustable crossover
frequency, it is recommended to select 150 Hz (or close to
this figure) as the crossover frequency for your front,
center, and surround speakers.
** “DTS” and “DTS Digital Surround” are registered
trademarks of Digital Theater Systems, Inc.
Listening to the sound (H)
First, turn down the volume on the amplifier. The
volume should be set to minimum before you begin
playing the program source.
1Turn on the amplifier and select the
program source.
2Press POWER on the subwoofer.
The ON/STANDBY indicator on the
subwoofer lights up green.
3Play the program source.
Power turns on and off automatically — Auto
power on/off function (I)
When the subwoofer is on (i.e, the ON/STANDBY
indicator lights up green) and there is no signal input for
a few minutes, the ON/STANDBY indicator changes to
red and the subwoofer enters power saving mode. While
in this mode a signal is input to the subwoofer, the
subwoofer automatically turns on (auto power on/off
function).
To turn this feature off, slide the POWER SAVE switch
on the rear panel to OFF.
Note
If you turn down the volume level of the amplifier too
low, the auto power on/off function may activate,
causing the subwoofer to enter power saving mode.
Adjusting the subwoofer (H)
1Set MODE according to the program
source as follows:
Source MODE
DVD, LD, video cassette MOVIE
or other video source
MD, CD, cassette tape MUSIC
or other audio source
2Rotate LEVEL to adjust the volume.
Set the volume level to best suit your
preference according to the program
source.
Notes
• Some amplifier functions for enhancing the sound may
cause distortion in the subwoofer. If such distortion
occurs, turn off those functions.
• To enjoy high-quality sound, do not turn the
subwoofer volume too high.
• The bass sound is enhanced in MOVIE mode rather
than in MUSIC mode. Therefore, if you change the
mode to MOVIE while listening to some sources that
do not include the bass sound, you may not be able to
get the effect.
Troubleshooting
Should you encounter a problem with your speaker
system, check the following list and take the indicated
measures. If the problem persists, consult your nearest
Sony dealer.
There is no sound from the speaker system.
•Make sure all the connections have been
correctly made.
•Make sure the volume on the amplifier has
been turned up properly.
•Make sure the program source selector on the
amplifier is set to the proper source.
•Check if headphones are connected. If they
are, disconnect them.
There is distortion in the subwoofer sound
output.
•Check if any sound-enhancing functions have
been activated on the amplifier. If they have,
turn them off.
There is hum or noise in the speaker output.
•Make sure all the connections have been
correctly made.
•Make sure none of the audio components are
positioned too close to the TV set.
The sound has suddenly stopped.
•Make sure all the connections have been
correctly made. Contact between bare
speaker wires at the speaker terminals may
cause a short-circuit.
Specifications
SA-VE345
SS-V345 (front and surround speakers)
Speaker system Full range, magnetically
shielded
Speaker units 5.5 ×11 cm, cone type
Enclosure type Bass reflex
Rated impedance 8 ohms
Power handling capacity
Maximum input power: 110 watts
Sensitivity level 85 dB (1 W, 1 m)
Frequency range 120 Hz - 20,000 Hz
Dimensions (w/h/d) Approx. 85 ×152 ×112 mm,
including front grille
Mass Approx. 850 g each
SS-CN345 (center speaker)
Speaker system Full range
magnetically shielded
Speaker units 5.5 × 11 cm, cone type
Enclosure type Bass reflex
Rated impedance 8 ohms
Power handling capacity
Maximum input power: 110 watts
Sensitivity level 85 dB (1 W, 1 m)
Frequency range 90 Hz - 20,000 Hz
Dimensions (w/h/d)
Approx. 300 ×81 ×122 mm,
including front grille
Mass Approx. 1,100 g
SA-WMS345 (subwoofer)
Speaker system Active subwoofer,
magnetically shielded
Speaker unit Woofer: 20 cm, cone type
Enclosure type Advanced SAW type
Reproduction frequency range
26 Hz - 200 Hz
Amplifier section
Continuous RMS power output
110 W (8 ohms, 20 Hz -
20 kHz, 0.8 % THD)
Inputs
LINE IN (input pin jack)
General
Power requirements 220 - 230 V AC, 50/60 Hz
(European Model)
220 - 240 V AC, 50/60 Hz
(Australian Model)
Power consumptions 90 W
1 W (standby mode)
Dimensions (w/h/d) Approx. 230 ×392 ×447
mm, including front grille
Mass Approx. 13.2 kg
Supplied accessories
Foot pads (20)
Audio connecting cord (1)
Speaker connecting cords, 10 m (2)
Speaker connecting cords, 3.5 m (3)
Design and specifications are subject to change without
notice.
Emplacement des enceintes
Position de chaque enceinte (C)
Chaque enceinte doit être dirigée vers la position d’écoute.
L’effet surround sera bien meilleur si toutes les enceintes
sont à égale distance de la position d’écoute.
Installez les enceintes avant à une distance correcte à
droite et à gauche du téléviseur.
Installez le caisson de grave à droite ou à gauche du
téléviseur.
Installez l’enceinte centrale sur le téléviseur.
L’emplacement des enceintes arrière dépend en grande
partie de la grandeur de la pièce. Les enceintes arrière
peuvent être installées sur les deux côtés de la position
d’écoute Aou derrière la position d’écoute B.
Installation des enceintes
Afin d’éviter toute vibration ou mouvement des
enceintes pendant l’écoute, fixez les tampons
autocollants sous les quatre coins de l’enceinte centrale,
des enceintes avant et des enceintes à effet surround
(D).
Installation de l’enceinte centrale (E)
Installez correctement l’enceinte centrale au-dessus du
téléviseur en vous assurant qu’elle est parfaitement de
niveau.
Installation d’autres enceintes (F)
Pour une plus grande flexibilité d’installation des
enceintes, utilisez des supports pour enceintes en option
WS-FV10D ou WS-WV10D (uniquement disponibles dans
certains pays).
Conseil
Les enceintes doivent être placées environ à la hauteur du
centre du téléviseur (G).
Réglage de l’amplificateur
Lors du raccordement à un amplificateur avec décodeurs
multi-voies internes (Dolby Digital, DTS**, etc.), vous
devez utiliser les menus de configuration de
l’amplificateur pour spécifier les paramètres de votre
système acoustique.
Consultez le tableau suivant pour les réglages appropriés.
Pour les détails sur les réglages proprement dits, reportez-
vous au manuel fourni avec l’amplificateur.
Réglage des enceintes
Pour Réglez sur
Enceintes avant SMALL
Enceinte centrale SMALL
Enceintes à effet surround SMALL
Caisson de grave ON (ou YES)
Si vous utilisez l’amplificateur avec une fréquence de
recouvrement ajustable, il est conseillé de sélectionner
150 Hz (ou une valeur proche) comme fréquence de
recouvrement des
enceintes
avant, centrale et arrière.
** « DTS » et « DTS Digital Surround » sont des marques
commerciales déposées de Digital Theater Systems, Inc.
Ecoute du son (
H
)
Réduisez d’abord le volume sur l’amplificateur. Le
volume doit être réduit au minimum avant l’écoute de la
source.
1
Allumez l’amplificateur et sélectionnez
la source.
2
Appuyez sur la touche POWER du
caisson de grave.
Le témoin ON/STANDBY sur le caisson
de grave s’allume en vert.
3
Reproduisez la source.
Le caisson de grave s’allume et s’éteint
automatiquement
— Marche et arrêt automatiques
(I)
Si le caisson de grave est en service (c’est-à-dire le voyant
ON/STANDBY est allumé en vert) mais qu’aucun signal
n’est fourni pendant quelques minutes, le voyant ON/
STANDBY deviendra rouge et le caisson de grave se
mettra en mode d’économie d’énergie. Lorsqu’un signal
est transmis au caisson de grave dans ce mode, le caisson
s’allume automatiquement (fonction de marche/arrêt
automatique).
Pour mettre cette fonction hors service, réglez le
commutateur POWER SAVE sur le panneau arrière sur
OFF.
Remarque
Si vous réduisez trop le volume de l’amplificateur, la
fonction de marche/arrêt automatique peut entrer en
service et mettre le caisson en mode d’économie d’énergie.
Réglage du caisson de grave (
H
)
1
Réglez MODE en fonction de la source
écoutée :
Source MODE
DVD, LD, vidéocassette ou MOVIE
autre source vidéo
MD, CD, cassette ou autre MUSIC
source audio
2
Tournez la commande LEVEL pour
ajuster le volume.
Réglez le niveau du volume selon vos
préférences en fonction de la source du
programme.
Remarques
• Les fonctions d’amplification du son de certains
amplificateurs peuvent causer des distorsions au niveau
du caisson de grave. Si le cas se présente, désactivez ces
fonctions.
• Vous obtiendrez un son de bien meilleure qualité si vous
n’augmentez pas trop le volume du caisson de grave.
• Les graves sont davantage accentuées en mode MOVIE
qu’en mode MUSIC. Par conséquent, si vous passez au
mode MOVIE pendant que vous écoutez d’autres
sources qui ne comprennent pas de graves, il se peut que
vous n’obteniez pas l’effet escompté.
Guide de dépannage
En cas de problème, veuillez vérifier les points de la liste
suivante et prendre les mesures nécessaires. Si le problème
persiste, consultez votre revendeur Sony.
Le système acoustique ne fournit aucun son.
•Assurez-vous que toutes les connexions ont été
effectuées correctement.
•Assurez-vous que le volume de l’amplificateur
est réglé correctement.
•Assurez-vous que le sélecteur de source de
l’amplificateur est réglé sur la source correcte.
•Vérifiez si un casque n’est pas raccordé et le cas
échéant, débranchez-le.
Distorsion sur la sortie du caisson de grave.
•Vérifiez si une fonction d’amplification du son
n’a pas été activée sur l’amplificateur et, le cas
échéant, désactivez-la.
Bourdonnement ou bruit sur la sortie d’enceintes
•Assurez-vous que toutes les connexions ont été
effectuées correctement.
•Assurez-vous qu’aucun des appareils audio ne
se trouve trop près du téléviseur.
Le son est coupé subitement.
•Assurez-vous que toutes les connexions ont été
effectuées correctement. Le contact des fils
d’enceinte dénudés au niveau des bornes de
l’enceinte peut provoquer un court-circuit.
Spécifications
SA-VE345
SS-V345 (
enceintes centrale et à effet surround
)
Système acoustique Pleine gamme, à blindage
magnétique
Enceintes 5,5 ×11 cm, à cône
Type de caisson Bass-reflex
Impédance nominale 8 ohms
Tenue en puissance
Capacité maximale : 110 watts
Niveau de sensibilité 85 dB (1 W, 1 m)
Plage de fréquences 120 Hz - 20 000 Hz
Dimensions (l/h/p) Environ 85 ×152 ×112 mm,
avec la grille avant
Poids Environ 850 g chacune
SS-CN345 (enceinte centrale)
Système acoustique Pleine gamme à blindage
magnétique
Haut-parleur 5,5 × 11 cm, à cône
Type de caisson Bass-reflex
Impédance nominale 8 ohms
Tenue en puissance
Puissance de sortie maximale : 110 watts
Niveau de sensibilité 85 dB (1 W, 1 m)
Plage de fréquences 90 Hz - 20 000 Hz
Dimensions (l/h/p) Environ 300 ×81 ×122 mm,
avec la grille avant
Poids Environ 1 100 g
SA-WMS345 (caisson de grave)
Système acoustique Caisson de grave amplifié, à
blindage magnétique
Enceinte Grave : 20 cm , à cône
Type de caisson Nouveau type SAW
Plage de fréquences reproduites
26 Hz à 200 Hz
Section amplificateur
Puissance de sortie RMS continue
110 W (8 ohm, 20 Hz -
20kHz, 0,8 % THD)
Entrées
LINE IN (prise d’entrée)
Généralités
Alimentation CA 220 - 230 V, 50/60 Hz
(Modèle européen)
CA 220 - 240 V, 50/60 Hz
(Modèle australien)
Consommation 90 W
1 W (mode veille)
Dimensions (l/h/p) Environ 230 ×392 ×447
mm, avec grille avant
Poids Environ 13,2 kg
Accessoires fournis
Tampons autocollants (20)
Cordon de liaison audio (1)
Cordons d’enceintes, 10 m(2)
Cordons d’enceintes, 3,5 m (3)
La conception et les spécifications sont sujettes à
modifications sans préavis.
C
AA
BB
Front (Right)
Avant (droite)
Center
Centre Subwoofer
Caisson de grave
Surround (Right)
Effet surround (droite)
Front (Left)
Avant
(gauche)
Surround (Left)
Effet surround(gauche)
eE Ee
Ee
Ee Ee
Ee
Ee Ee
LINE IN
WOOFER OUT
FRONT
CENTER SURROUND
R
R
L
L
AFront (Right)
Avant (droite) Center
Centre
Subwoofer
Caisson de grave Front (Left)
Avant (gauche)
Surround
(Right)
Effet surround
(droite)
Surround
(Left)
Effet surround
(gauche)
Amplifier
Amplificateur
3.5m
3,5m 3.5m
3,5m 3.5m
3,5m
10m 10m
E
Micro Satellite Speaker System
SA-VE345
4-244-848-22(1)
E
e
E
e
G
F
POWERON/STANDBY indicator
Voyant ON/STANDBY
LEVEL MODE
MIN MAX
MOVIE MUSIC
POWER
ON
/
STANDBY
H
LEVEL MODE
WS-WV10D
(for surround speakers)
(pour les enceintes à effet surround)
I
AUTO
OFF
POWER
SAVE
B
WS-FV10D
D
Deutsch
WARNUNG
Um Feuergefahr und die Gefahr eines elektrischen Schlages
zu vermeiden, darf das Gerät weder Regen noch
Feuchtigkeit ausgesetzt werden.
Um einen Brand zu verhüten, dürfen die Ventilationsöffnungen
des Gerätes nicht mit einer Zeitung, einer Tischdecke, einem
Vorhang usw. abgedeckt werden. Stellen Sie auch keine
brennenden Kerzen auf das Gerät.
Um Feuergefahr und die Gefahr eines elektrischen Schlags zu
vermeiden, stellen Sie keine Gefäße mit Flüssigkeiten darin wie
z. B. Vasen auf das Gerät.
Um
einen elektrischen
Schlag zu vermeiden, öffnen Sie das
Gehäuse nicht. Überlassen Sie Wartungsarbeiten stets nur
qualifiziertem Fachpersonal.
Stellen Sie das Gerät nicht an einem Ort auf, an dem eine
ausreichende Luftzufuhr nicht gegeben ist, zum Beispiel in
einem engen Regalfach oder in einem Einbauschrank.
Hinweis zu dieser
Bedienungsanleitung
Das SA-VE345 ist ein 5.1-Kanal-Lautsprechersystem, bestehend
aus zwei Frontlautsprechern, zwei Surroundlautsprechern,
einem Mittellautsprecher und einem Subwoofer. Das System
ermöglicht Sony Digital Cinema Sound, Dolby* Pro Logic und
Dolby Digital usw. Damit eignet es sich ideal für die
Wiedergabe von Spielfilmen.
* „Dolby“ und das Doppel-D-Symbol sind Warenzeichen der
Dolby Laboratories.
Zur besonderen Beachtung
Betriebssicherheit
• Vergewissern Sie sich vor der Inbetriebnahme des Systems,
daß die Betriebsspannung mit der Netzspannung vor Ort
übereinstimmt.
• Solange der Netzstecker nicht aus der Steckdose gezogen ist,
bleibt die Komponente mit dem Stromnetz verbunden, und
zwar auch dann, wenn ihre Stromversorgung ausgeschaltet
worden ist.
• Ziehen Sie vor längerem Nichtgebrauch den Netzstecker aus
der Steckdose. Zu diesem Zweck fassen Sie das Netzkabel
stets am Stecker. Ziehen Sie nicht am Kabel selbst.
• Falls Flüssigkeiten oder Gegenstände in das Innere gelangen,
ziehen Sie den Netzstecker aus der Steckdose und lassen das
System vor weiterem Gebrauch von einem qualifizierten
Servicetechniker überprüfen.
• Das Netzkabel darf nur von einem qualifizierten Elektriker
ausgetauscht werden.
Betrieb
• Steuern Sie das Lautsprechersystem keinesfalls über längere
Zeit mit einer Leistung an, die über seiner maximalen
Belastbarkeit liegt.
• Eine falsche Polung der Lautsprecheranschlüsse führt zu
einer schwachen Baßwiedergabe, und die Raumposition der
Instrumente ist nicht mehr auszumachen.
• Wenn sich abisolierte Lautsprecherleitungen an den
Lautsprecheranschlüssen berühren, kann es zu einem
Kurzschluß kommen.
• Schalten Sie vor dem Herstellen der Kabelverbindungen den
Verstärker aus, damit eine Beschädigung des
Lautsprechersystems ausgeschlossen ist.
• Das Lautsprechergitter läßt sich nicht abnehmen. Daher
keinesfalls versuchen, das Lautsprechergitter vom
Lautsprechersystem abzutrennen. Andernfalls droht eine
Beschädigung der Lautsprecher.
•Erhöhen Sie die Lautstärke nicht so weit, daß es zu
Tonverzerrungen kommt.
Wenn es bei einem Fernsehgerät in der Nähe zu
Farbunregelmäßigkeiten kommt
Dank der magnetischen Abschirmung kann der Lautsprecher
normalerweise problemlos direkt neben einem Fernsehgerät
aufgestellt werden. Dennoch kann es bei manchen Modellen zu
Farbverfälschungen des Fernsehbilds kommen.
Bei Farbverfälschungen...
cSchalten Sie das Fernsehgerät einmal aus und nach 15 bis
30 Minuten wieder ein.
Wenn die Farbwiedergabe danach immer noch
beeinträchtigt ist...
cStellen Sie das Lautsprechersystem weiter entfernt vom
Fernsehgerät auf.
Bei Heulgeräuschen
Ändern Sie die Aufstellpositionen der Lautsprecher, oder
drehen Sie die Lautstärke zurück.
Aufstellung
• Stellen Sie die Lautsprecher nicht in geneigter Position auf.
• Meiden Sie Aufstellorte mit den folgenden Bedingungen:
— Extreme Temperaturen
— Staub- oder Schmutzbelastung
— Extreme Luftfeuchtigkeit
— Vibrationsbelastung
— Direkte Sonneneinstrahlung
• Seien Sie vorsichtig, wenn Sie den Lautsprecher auf einen
besonders behandelten Fußboden (gewachst, geölt, poliert
usw.) stellen, da es zu Flecken oder Verfärbungen kommen
kann.
Reinigung
Reinigen Sie die Lautsprechergehäuse mit einem weichen Tuch,
das leicht mit einer milden Reinigungslösung oder Wasser
angefeuchtet ist. Scheuermittel oder Lösungsmittel wie
Farbverdünner, Waschbenzin oder Alkohol sind für diesen
Zweck völlig ungeeignet.
Bei Problemen mit oder Fragen zu Ihrem System wenden Sie
sich bitte an Ihren Sony-Händler.
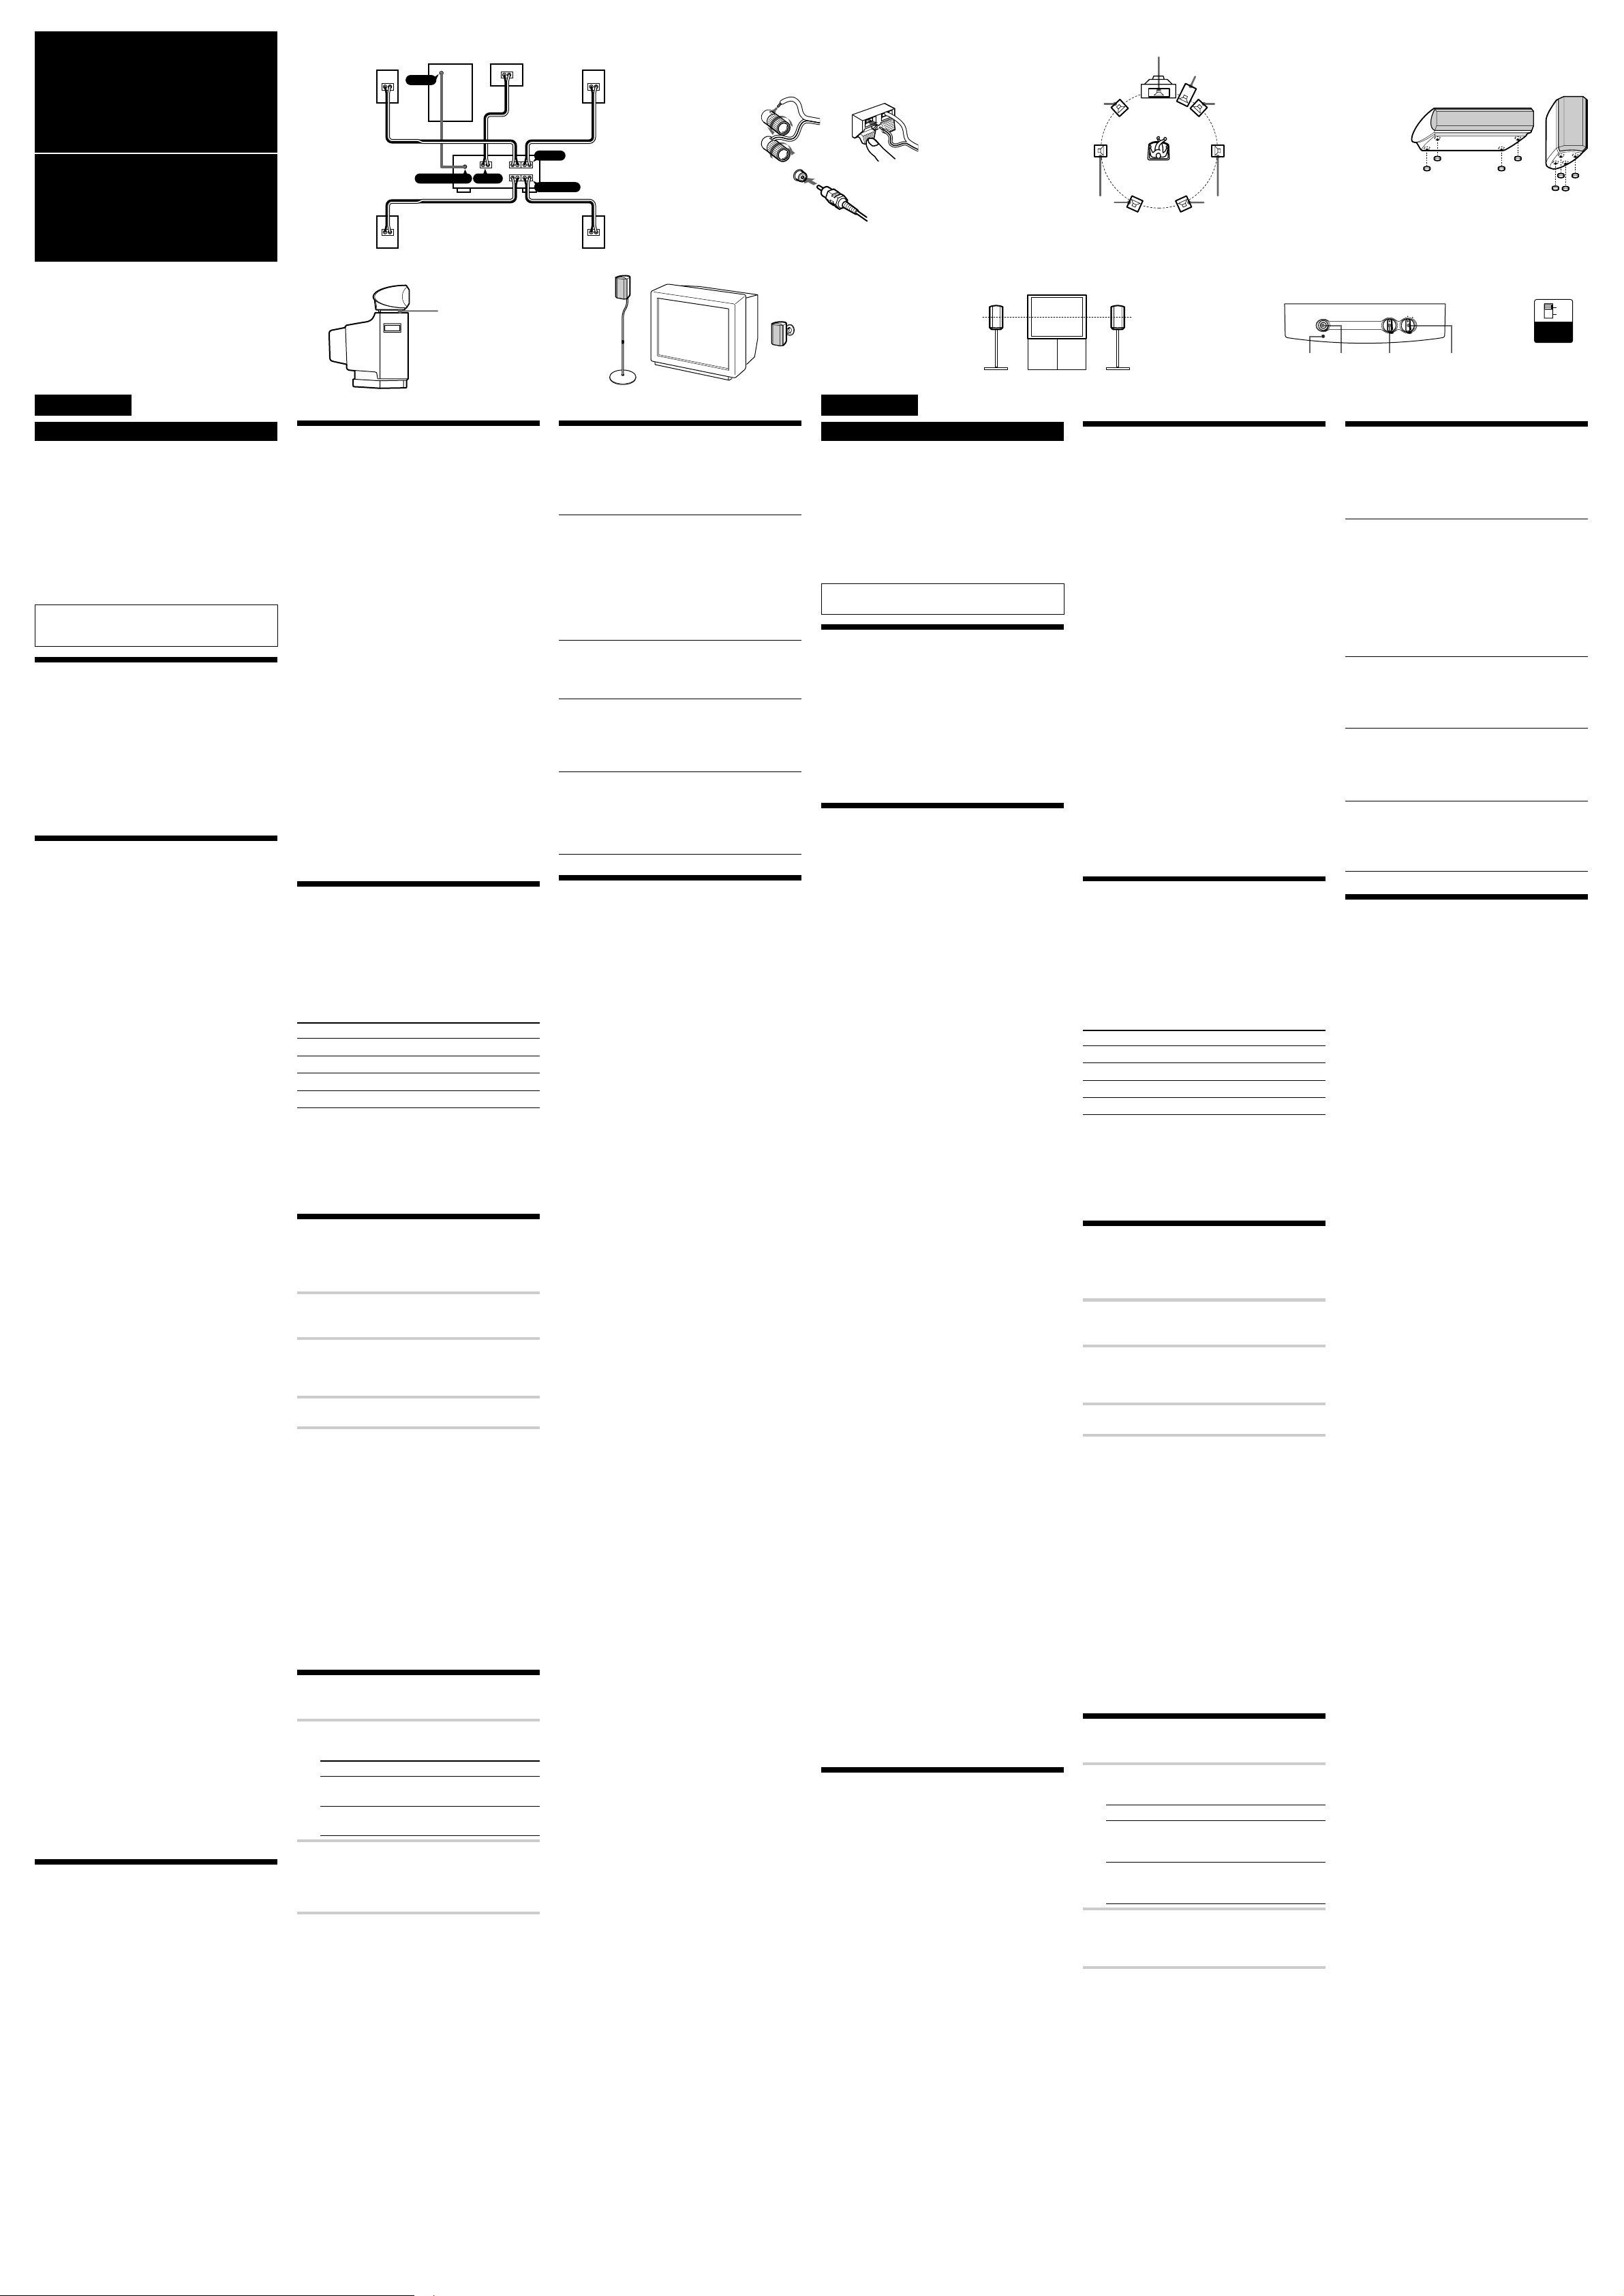
Anschluß des Lautsprechersystems
Verbinden Sie das Lautsprechersystem mit den
Lautsprecherausgängen eines Verstärkers (A).
Sorgen Sie dafür, daß vor dem Herstellen der
Kabelverbindungen alle Komponenten (einschließlich des
Subwoofers) ausgeschaltet sind.
Hinweise (B)
• Die positive (+) und die negative (–) Klemme an den
Lautsprechern müssen mit dem entsprechenden positiven (+)
und negativen (–) Anschluß am Verstärker verbunden
werden.
• Die Schrauben an den Lautsprecherklemmen müssen fest
angezogen werden, da es bei lockeren Schrauben zu
Störgeräuschen kommen kann.
• Alle Verbindungen müssen sicheren Sitz haben. Wenn sich
abisolierte Lautsprecherleitungen an den
Lautsprecheranschlüssen berühren, kann es zu einem
Kurzschluß kommen.
• Näheres zu der Verkabelung des Verstärkers finden Sie in
dessen Bedienungsanleitung.
Tip
Schwarze oder schwarzgestreifte Kabel haben negative (–)
Polarität und müssen an negative (–) Lautsprecheranschlüsse
angeschlossen werden.
Positionierung der Lautsprecher
Auftstellorte der einzelnen
Lautsprecher (C)
Alle Lautsprecher müssen auf die Hörposition ausgerichtet
sein. Man erhält einen besseren Surround-Effekt, wenn alle
Lautsprecher denselben Abstand von der Hörposition haben.
Stellen Sie die Frontlautsprecher in passendem Abstand links
und rechts vom Fernsehgerät auf.
Der Subwoofer kann auf jeder Seite des Fernsehgeräts seinen
Platz finden.
Stellen Sie den Mittellautsprecher oben in der Mitte auf dem
Fernsehgerät auf. Wo Sie die Surroundlautsprecher aufstellen,
hängt im großen und ganzen vom Raum ab. Sie können die
Surroundlautsprecher links und rechts der Hörposition Aoder
hinter der Hörposition Baufstellen.
Vorbereiten der Lautsprecher
Um zu verhindern, daß die Lautsprecher während der
Wiedergabe vibrieren oder verrutschen, bringen Sie an den vier
Ecken der Frontlautsprecher, der Surroundlautsprecher und
des Mittellautsprechers die mitgelieferten Unterlagen an (D).
Vorbereiten des Mittellautsprechers (E)
Stellen Sie den Mittellautsprecher auf das Fernsehgerät. Achten
Sie darauf, daß er sicher und waagrecht steht.
Vorbereiten der anderen Lautsprecher (F)
Wenn Sie die zusätzlich erhältlichen Lautsprecherständer WS-
FV10D oder WS-WV10D (nur in bestimmten Ländern
erhältlich) verwenden, lassen sich die Lautsprecher flexibler
positionieren.
Tip
Die Frontlautsprecher sollten etwa auf der Höhe der
Fernsehschirmmitte installiert werden (G).
Einstellen des Verstärkers
Wenn Sie einen Verstärker mit internen Mehrkanal-Decodern
(Dolby Digital, DTS** usw.) anschließen, stellen Sie die
Parameter für das Lautsprechersystem über die
Konfigurationsmenüs des Verstärkers ein.
Die richtigen Einstellungen sind der nachstehenden Tabelle zu
entnehmen. Näheres zum Einstellverfahren finden Sie in der
Bedienungsanleitung zum Verstärker.
Lautsprechereinstellung
Für Parameter
Frontlautsprecher SMALL
Mittellautsprecher SMALL
Surroundlautsprecher SMALL
Subwoofer ON (oder YES)
Wenn Sie einen Verstärker mit einstellbarer Übergangsfrequenz
verwenden, sollten Sie als Übergangsfrequenz für die Front-,
den Mittel- und die Surroundlautsprecher 150 Hz oder einen
ähnlichen Wert einstellen.
** „DTS“ und „DTS Digital Surround“ sind eingetragene
Warenzeichen der Digital Theater Systems, Inc.
Klangwiedergabe (H)
Drehen Sie zunächst die Lautstärke des Verstärkers zurück. Vor
der Wiedergabe der Signalquelle sollte die Lautstärke ganz
zurückgedreht sein.
1Schalten Sie den Verstärker ein, und wählen
Sie die Signalquelle.
2Drücken Sie POWER am Subwoofer.
Daraufhin leuchtet die Anzeige ON/
STANDBY am Subwoofer grün auf.
3Starten Sie die Wiedergabe der Signalquelle.
Automatisches Ein- und Ausschalten der
Stromversorgung —Ein-/Ausschaltautomatik (I)
Wenn der Subwoofer aktiviert ist (d.h. die Anzeige ON/
STANDBY grün leuchtet) und mehrere Minuten lang kein
Signal eingeht, wechselt die Anzeige ON/STANDBY zu Rot,
und der Subwoofer schaltet auf Energiesparbetrieb. Wenn in
dieser Betriebsart am Subwoofer ein Signal eingespeist wird, so
wird dieser automatisch eingeschaltet (Ein-/
Ausschaltautomatik).
Zur Deaktivierung dieser Funktion müssen Sie den POWER
SAVE-Schalter an der Rückseite auf OFF stellen.
Hinweis
Wird der Lautstärkepegel des
Verstärkers
zu weit
zurückgedreht, so kann die Ein-/Ausschaltautomatik
ansprechen und den Subwoofer auf Energiesparbetrieb
umschalten.
Einstellung des Subwoofers (H)
1Stellen Sie je nach der Signalquelle MODE
wie folgt ein:
Signalquelle MODE
DVD, LD, Videokassette oder MOVIE
anderes Videomedium
MD, CD, Kassette oder MUSIC
anderes Audiomedium
2Stellen Sie mit LEVEL die Lautstärke ein.
Stellen Sie den Lautstärkepegel auf Ihre
Hörgewohnheiten und die jeweilige
Signalquelle ein.
Hinweise
• Einige Verstärkerfunktionen zur Klangverbesserung können
die Klangwiedergabe des Subwoofers verzerren. In solchen
Fällen deaktivieren Sie diese Funktionen.
• Um hochwertigen Klang genießen zu können, darf die
Lautstärke des Subwoofers nicht zu hoch eingestellt werden.
• Im Modus MOVIE werden die Bässe stärker betont als im
Modus MUSIC. Wenn Sie daher zum Modus MOVIE
wechseln, während eine Signalquelle ohne Bässe
wiedergegeben wird, hat der Wechsel keine Wirkung.
Fehlersuche
Bei Problemen mit dem Lautsprechersystem versuchen Sie bitte
zunächst eine Abhilfe anhand der nachstehenden Liste. Sollte
die Störung bestehen bleiben, wenden Sie sich an Ihren Sony-
Händler.
Keine Klangwiedergabe über die Lautsprecher.
• Vergewissern Sie sich, daß alle Verbindungskabel
einwandfrei angeschlossen sind.
• Die Lautstärkeeinstellung am Verstärker muß
ausreichend hoch sein.
• Am Verstärker muß die richtige Signalquelle
eingestellt sein.
• Sehen Sie nach, ob Kopfhörer angeschlossen sind.
Wenn ja, trennen Sie die Kopfhörer vom System.
Verzerrte Klangwiedergabe über den Subwoofer.
• Klangverstärkungsfunktionen am Verstärker
aktiviert. Gegebenenfalls diese Funktionen
deaktivieren.
Brummen oder Rauschen der Lautsprecher.
• Vergewissern Sie sich, daß alle Verbindungskabel
einwandfrei angeschlossen sind.
• Sorgen Sie ggf. für ausreichenden Abstand der
Audiokomponenten vom Fernsehgerät.
Plötzliches Aussetzen der Klangwiedergabe.
• Vergewissern Sie sich, daß alle Verbindungskabel
einwandfrei angeschlossen sind. Wenn sich
abisolierte Lautsprecherleitungen an den
Lautsprecheranschlüssen berühren, kann es zu
einem Kurzschluß kommen.
Technische Daten
SA-VE345
SS-V345 (Front- und Surroundlautsprecher)
Bauart Breitbandlautsprecher,
magnetisch abgeschirmt
Lautsprechertyp 5,5 ×11 cm, Konus
Gehäusetyp Baßreflex
Nennimpedanz 8 Ohm
Belastbarkeit
Max. Belastbarkeit 110 W
Kennschalldruckpegel 85 dB (1 W, 1 m)
Frequenzbereich 120 bis 20.000 Hz
Abmessungen (B/H/T) ca. 85 ×152 ×112 mm,
einschließlich
Lautsprechergitter
Gewicht ca. 850 g je Lautsprecher
SS-CN345 (Mittellautsprecher)
Bauart Breitbandlautsprecher,
magnetisch abgeschirmt
Lautsprechertyp 5,5 ×11 cm, Konus
Gehäusetyp Baßreflex
Nennimpedanz 8 Ohm
Belastbarkeit
Max. Belastbarkeit 110 W
Kennschalldruckpegel 85 dB (1 W, 1 m)
Frequenzbereich 90 bis 20.000 Hz
Abmessungen (B/H/T) ca. 300 ×81 ×122 mm,
einschließlich
Lautsprechergitter
Gewicht ca. 1.100 g
SA-WMS345 (Subwoofer)
Lautsprechersystem Subwoofer-Aktivbox,
magnetisch abgeschirmt
Lautsprechertyp Tieftöner: 20 cm, Konus
Gehäusetyp SAW, verbessert
Wiedergabefrequenzbereich 26 bis 200 Hz
Verstärker
Kontinuierliche RMS-Leistungsabgabe
110 W (8 Ohm, 20 Hz -
20 kHz, 0,8 % gesamte
harmonische Verzerrung)
Eingänge
LINE IN (Stiftbuchse)
Allgemeines
Stromversorgung 220 - 230 V Wechselspannung,
50/60 Hz
(Modell für Europa)
220 - 240 V Wechselspannung,
50/60 Hz
(Modell für Australien)
Leistungsaufnahme 90 W
1 W (Bereitschaftsmodus)
Abmessungen (B/H/T) ca. 230 ×392 ×447 mm,
einschließlich
Lautsprechergitter
Gewicht ca. 13,2 kg
Mitgeliefertes Zubehör
Unterlagen (20)
Audiokabel (1)
Lautsprecherkabel, 10 m (2)
Lautsprecherkabel, 3,5 m (3)
Änderungen, die dem technischen Fortschritt dienen, bleiben
vorbehalten.
Italiano
ATTENZIONE
Per evitare il pericolo di incendi o scosse elettriche,
non esporre l’apparecchio alla pioggia o all’umidità.
Per evitare incendi, non coprire le aperture per la
ventilazione dell’apparecchio con giornali, tovaglie,
tende, ecc. né collocare candele accese sull’apparecchio.
Onde evitare incendi o scosse elettriche, non collocare
oggetti contenenti liquidi, ad esempio vasi,
sull’apparecchio.
Non aprire il rivestimento, onde evitare il rischio di
scosse elettriche. Per le operazioni di assistenza rivolgersi
esclusivamente a personale qualificato.
Non installare l’apparecchio in uno spazio chiuso,
come una libreria o un mobiletto.
Informazioni sul presente
manuale
Il sistema di diffusori a 5.1 canali SA-VE345 è costituito
da due diffusori anteriori, due diffusori posteriori, un
diffusore centrale e un subwoofer. Tale sistema supporta
i formati Sony Digital Cinema Sound, Dolby* Pro Logic,
Dolby Digital e così via, garantendo la qualità ottimale
durante la visione di film.
* “Dolby” ed il simbolo doppia D sono marchi registrati
della Dolby Laboratories.
Precauzioni
Sicurezza
• Prima di usare il sistema, assicurarsi che la tensione
operativa del sistema sia identica a quella della rete
elettrica locale.
• Il sistema non è scollegato dalla fonte di alimentazione
CA (corrente di rete) fintanto che è collegato alla presa
di corrente, anche se il sistema stesso è stato spento.
• Scollegare il sistema dalla presa di corrente se non si
usa per un lungo periodo. Per scollegare il cavo, tirare
afferrandone la spina. Non tirare mai il cavo stesso.
• Se liquidi o oggetti solidi penetrano nel sistema,
scollegare il cavo di alimentazione del sistema e far
controllare il sistema da personale qualificato prima di
usarlo ulteriormente.
• Il cavo di alimentazione CA deve essere sostituito solo
presso un centro assistenza qualificato.
Funzionamento
• Non usare il sistema diffusori a wattaggi continui che
eccedano la potenza in ingresso massima del sistema.
• Se la polarità dei collegamenti diffusori non è corretta, i
toni dei bassi sono deboli e la posizione dei vari
strumenti non è chiara.
• Il contatto tra i fili nudi dei diffusori e i terminali dei
diffusori potrebbe causare cortocircuiti.
• Prima di collegare, spegnere l’amplificatore per evitare
danni al sistema diffusori.
• La griglia del diffusore non può essere rimossa. Non
tentare di rimuovere la griglia del sistema diffusori. Se
si tenta di rimuoverla, si può danneggiare il diffusore.
•Il livello del volume non deve venire
aumentato fino al raggiungimento del punto di
distorsione del suono.
Se si notano irregolarità di colore nello
schermo di un televisore in prossimità del
sistema
Questo sistema diffusori è schermato magneticamente
per permetterne l’installazione vicino ad un televisore.
Tuttavia, irregolarità di colore possono apparire su alcuni
tipi di televisore.
Se si notano irregolarità di colore...
cSpegnere il televisore, quindi riaccenderlo dopo 15-
30 minuti.
Se si notano ancora irregolarità di colore...
cAllontanare maggiormente i diffusori dal
televisore.
Se si verifica feedback
Spostare i diffusori o abbassare il volume
sull’amplificatore.
Collocazione
• Non collocare i diffusori in posizione inclinata.
• Non collocare i diffusori in luoghi:
— estremamente caldi o freddi
— polverosi o sporchi
— molto umidi
— soggetti a vibrazioni
— esposti alla luce solare diretta
• Se il diffusore viene collocato su un pavimento trattato
con prodotti speciali, quali cera, olio o lucidanti,
prestare attenzione onde evitare eventuali macchie o
perdite di colore.
Pulizia
Pulire le casse dei diffusori con un panno morbido
leggermente inumidito con una blanda soluzione
detergente o acqua. Non usare alcun tipo di spugnetta o
polvere abrasiva né solventi come alcool o benzina.
In caso di interrogativi o problemi riguardanti il sistema
diffusori, consultare il proprio rivenditore Sony.
Collegamento del sistema
Collegare il sistema diffusori ai terminali di uscita
diffusori di un amplificatore (A).
Assicurarsi che tutti i componenti (incluso il subwoofer)
siano spenti prima di procedere al collegamento.
Note (B)
• Assicurarsi che i terminali positivo (+) e negativo (–)
dei diffusori corrispondano ai terminali positivo (+) e
negativo (–) dell’amplificatore.
• Assicurarsi di stringere saldamente le viti dei terminali
dei diffusori poiché viti allentate potrebbero generare
disturbi.
• Assicurarsi che tutti i collegamenti siano saldi. Il
contatto tra i fili nudi dei diffusori e i terminali dei
diffusori potrebbe causare cortocircuiti.
• Per ulteriori informazioni sui collegamenti
dell’amplificatore, fare riferimento al manuale allegato
all’amplificatore.
Suggerimento
I fili neri o con strisce nere hanno polarità negativa (–) e
devono essere collegati ai terminali negativi (–) del
diffusore.
Posizionamento dei diffusori
Posizione di ciascun diffusore (C)
Ciascun diffusore deve essere rivolto verso la posizione
di ascolto. Si ottiene un effetto surround migliore se tutti
i diffusori sono alla stessa distanza dalla posizione di
ascolto.
Collocare i diffusori anteriori ad una distanza
appropriata a sinistra e a destra del televisore.
Collocare il subwoofer su un lato del televisore.
Collocare il diffusore centrale sul televisore al centro.
Il posizionamento dei diffusori surround dipende in
grande misura dalla configurazione della stanza. I
diffusori surround possono essere collocati su entrambi i
lati della posizione di ascolto Ao dietro la posizione di
ascolto B.
Preparazione dei diffusori
Per evitare movimenti o vibrazioni dei diffusori durante
l’ascolto, applicare i piedini antiscivolo in dotazione ai
quattro angoli inferiori dei diffusori centrale, anteriori e
surround (D).
Collocazione del diffusore centrale (E)
Posizionare saldamente il diffusore centrale nella parte
superiore del televisore assicurandosi che sia in una
posizione completamente stabile.
Collocazione degli altri diffusori (F)
Per una migliore collocazione dei diffusori, utilizzare il
supporto per diffusori WS-FV10D o WS-WV10D
opzionale (disponibile solo in alcuni paesi).
Suggerimento
L’altezza dei diffusori anteriori dovrebbe essere regolata
con il centro approssimativo dello schermo televisivo (G).
Impostazione dell’amplificatore
Quando si effettua il collegamento ad un amplificatore
dotato di decodificatori multicanale interni (Dolby
Digital, DTS** e così via), è necessario utilizzare i menu
di impostazione dell’amplificatore per specificare i
parametri del sistema di diffusori in uso.
Vedere la tabella sotto per le impostazioni corrette. Per
dettagli sul procedimento di impostazione, fare
riferimento al manuale allegato all’amplificatore.
Impostazione diffusori
Per Impostare su
Diffusori anteriori SMALL
Diffusore centrale SMALL
Diffusori surround SMALL
Subwoofer ON (o YES)
Se l’amplificatore viene utilizzato con frequenza di
transizione regolabile, si consiglia di selezionare 150 Hz o
un valore simile come frequenza di transizione per i
diffusori anteriori, centrale e surround.
** “DTS” e “DTS Digital Surround” sono marchi di
fabbrica registrati di Digital Theater Systems, Inc.
Ascolto del suono (H)
Innanzitutto abbassare il volume sull’amplificatore. Il
volume deve essere regolato sul minimo prima di
iniziare a riprodurre la fonte di programma.
1Accendere l’amplificatore e selezionare
la fonte di programma.
2Premere POWER sul subwoofer.
L’indicatore ON/STANDBY sul
subwoofer si illumina in verde.
3Riprodurre la fonte di programma.
Il subwoofer si accende e si spegne
automaticamente —Funzione di accensione/
spegnimento automatici (I)
Quando il subwoofer è acceso (cioè l’indicatore ON/
STANDBY è illuminato in verde) e non si ha alcun
segnale in ingresso per vari minuti, l’indicatore ON/
STANDBY diventa rosso e il subwoofer passa al modo di
risparmio energetico. Se durante questo modo si ha un
segnale in ingresso al subwoofer, il subwoofer si accende
automaticamente (funzione di accensione/spegnimento
automatici).
Per disattivare questa funzione, spostare su OFF
l’interruttore POWER SAVE sul pannello posteriore.
Nota
Se si abbassa eccessivamente il livello di volume
dell’amplificatore, la funzione di accensione/
spegnimento automatici può attivarsi, causando il
passaggio al modo di risparmio energetio per il
subwoofer.
Regolazione del subwoofer (H)
1Regolare MODE in base alla fonte di
programma come segue:
Fonte MODE
Disco DVD, disco LD, MOVIE
videocassetta o altra
fonte video
Disco MD, disco CD, MUSIC
audiocassetta o altra
fonte audio
2Ruotare LEVEL per regolare il volume.
Impostare il volume al livello desiderato
in base alla fonte di programma.
Note
• Alcune funzioni dell’amplificatore per il
potenziamento del suono possono causare distorsione
nel subwoofer. Se si verifica tale distorsione, disattivare
quelle funzioni.
• Per ottenere un suono di alta qualità, non alzare
eccessivamente il volume del subwoofer.
• Nel modo MOVIE il suono dei bassi è migliore rispetto
a quello ottenuto nel modo MUSIC. Di conseguenza, se
si passa al modo MOVIE durante l’ascolto di alcune
fonti che non comprendono i bassi, potrebbe non essere
possibile ottenere l’effetto.
Soluzione dei problemi
Se si incontrano difficoltà con il sistema diffusori,
controllare la seguente lista e prendere i provvedimenti
indicati. Se il problema persiste, contattare un rivenditore
Sony autorizzato.
Il sistema diffusori non emette alcun suono.
•Assicurarsi che tutti i collegamenti siano stati
eseguiti correttamente.
•Assicurarsi che il volume dell’amplificatore
sia stato alzato in modo appropriato.
•Assicurarsi che il selettore di fonte di
programma dell’amplificatore sia impostato
sulla fonte corretta.
•Controllare se sono collegate delle cuffie. Se lo
fossero, scollegarle.
Si ha distorsione nell’uscita sonora del
subwoofer.
•Controllare se sono attivate funzioni di
potenziamento del suono sull’amplificatore.
Se lo fossero, disattivarle.
Ronzii o rumori nell’uscita dei diffusori.
•Assicurarsi che tutti i collegamenti siano stati
eseguiti correttamente.
•Assicurarsi che nessun componente audio sia
troppo vicino al televisore.
Il suono si interrompe improvvisamente.
•Assicurarsi che tutti i collegamenti siano stati
eseguiti correttamente. Il contatto tra i fili
nudi dei diffusori e i terminali dei diffusori
potrebbe causare cortocircuiti.
Caratteristiche tecniche
SA-VE345
SS-V345 (diffusori anteriori e surround)
Sistema diffusori Gamma completa,
schermato
magneticamente
Unità diffusori 5,5 ×11 cm, tipo a cono
Tipo di cassa Bass reflex
Impedenza nominale 8 ohm
Capacità di potenza
Potenza massima in ingresso: 110 watt
Livello di sensibilità 85 dB (1 W, 1 m)
Campo di frequenza 120 Hz - 20.000 Hz
Dimensioni (l/a/p) Circa 85 ×152 ×112 mm,
inclusa griglia anteriore
Peso Circa 850 g ciascuno
SS-CN345 (diffusore centrale)
Sistema diffusori Gamma completa,
schermato
magneticamente
Unità diffusori 5,5 ×11 cm, tipo a cono
Tipo di cassa Bass reflex
Impedenza nominale 8 ohm
Capacità di potenza
Potenza massima in ingresso: 110 watt
Livello di sensibilità 85 dB (1 W, 1 m)
Campo di frequenza 90 Hz - 20.000 Hz
Dimensioni (l/a/p) Circa 300 ×81 ×122 mm,
inclusa griglia anteriore
Peso Circa 1.100 g
SA-WMS345 (subwoofer)
Sistema diffusori Subwoofer attivo,
schermato
magneticamente
Unità diffusori Woofer: 20 cm, tipo a cono
Tipo di cassa Tipo SAW avanzato
Campo di frequenza riproduzione
26 Hz - 200 Hz
Sezione amplificatore
Uscita di potenza RMS continua
110 W (8 ohm, 20 Hz -
20 kHz, 0,8 % THD)
Ingressi
LINE IN (presa di ingresso a piedini)
Generali
Alimentazione 220 - 230 V CA, 50/60 Hz
(modello per l’Europa)
220 - 240 V CA, 50/60 Hz
(modello per l’Australia)
Consumo 90 W
1W (modo di attesa)
Dimensioni (l/a/p) Circa 230 ×392 ×447 mm,
inclusa griglia anteriore
Peso Circa 13,2 kg
Accessori in dotazione
Piedini antiscivolo (20)
Cavo di collegamento audio (1)
Cavi di collegamento diffusori, 10 m (2)
Cavi di collegamento diffusori, 3,5 m (3)
Il design e le caratteristiche tecniche sono soggetti a
modifiche senza preavviso.
Micro Satellite Speaker System
SA-VE345
Unterlagen
Piedini antiscivolo
B
Unterlagen
Piedini antiscivolo
D
GF
E
POWERAnzeige ON/STANDBY
Indicatore ON/STANDBY
LEVEL MODE
MIN MAX
MOVIE MUSIC
POWER
ON
/
STANDBY
H
LEVEL MODE
WS-WV10D
(für Surroundlautsprecher)
(per i diffusori surround)
C
AA
BB
Mittellautsprecher
Centrale Subwoofer
Subwoofer
Surround (rechts)
Surround (destro)
Frontlautsprecher
(links)
Anteriore
(sinistro)
Surround (links)
Surround (sinistro)
Frontlautsprecher
(rechts)
Anteriore (destro)
I
AUTO
OFF
POWER
SAVE
eE Ee
Ee
Ee Ee
Ee
Ee Ee
LINE IN
WOOFER OUT
FRONT
CENTER SURROUND
R
R
L
L
Frontlautsprecher
(rechts)
Anteriore (destro) Mittellautsprecher
Centrale
Subwoofer
Subwoofer
Frontlautsprecher (links)
Anteriore (sinistro)
Surround (rechts)
Surround (destro) Surround (links)
Surround (sinistro)
Verstärker
Amplificatore
A
3,5m 3,5m 3,5m
10m 10m
E
e
Ee
E
e
E
e
WS-FV10D

Other manuals for SA-VE345

4

Other Sony Speakers System manuals

Sony SRS-BTM8 User manual

Sony

Sony SRS-BTM8 User manual

Sony HT-CT800 User manual

Sony

Sony HT-CT800 User manual

Sony SS-FCR6000 User manual

Sony

Sony SS-FCR6000 User manual

Sony SS-LA500ED User manual

Sony

Sony SS-LA500ED User manual

Sony SS-MB105 Speaker System Instructions  (primary... User manual

Sony

Sony SS-MB105 Speaker System Instructions (primary... User manual

Sony SAV-E535H Installation instructions manual

Sony

Sony SAV-E535H Installation instructions manual

Sony HT-CT100 User manual

Sony

Sony HT-CT100 User manual

Sony SRS-P7 - Portable Speakers User manual

Sony

Sony SRS-P7 - Portable Speakers User manual

Sony SRS-D4100 Operating Instructions  (primary... User manual

Sony

Sony SRS-D4100 Operating Instructions (primary... User manual

Sony SS-X70ED Parts list manual

Sony

Sony SS-X70ED Parts list manual

Sony SS-DP1000DW User manual

Sony

Sony SS-DP1000DW User manual

Sony SS-CN195 User manual

Sony

Sony SS-CN195 User manual

Sony CMT-ED1 - Micro Hi Fi Component System User manual

Sony

Sony CMT-ED1 - Micro Hi Fi Component System User manual

Sony HT-NT3 User manual

Sony

Sony HT-NT3 User manual

Sony SRS-Z750 User manual

Sony

Sony SRS-Z750 User manual

Sony SA-VE367T Marketing User manual

Sony

Sony SA-VE367T Marketing User manual

Sony XDP-PK1000 User manual

Sony

Sony XDP-PK1000 User manual

Sony SRS-U10 User manual

Sony

Sony SRS-U10 User manual

Sony SS-SR120 User manual

Sony

Sony SS-SR120 User manual

Sony HT-X9000F User guide

Sony

Sony HT-X9000F User guide

Sony HT-G700 User guide

Sony

Sony HT-G700 User guide

Sony SRS-GU10iP Marketing User manual

Sony

Sony SRS-GU10iP Marketing User manual

Sony SRS-D21X User manual

Sony

Sony SRS-D21X User manual

Sony SAVA-7 User manual

Sony

Sony SAVA-7 User manual

Popular Speakers System manuals by other brands

Electro-Voice Wide-Range Two-Way Speaker PRO-8A Specification sheet

Electro-Voice

Electro-Voice Wide-Range Two-Way Speaker PRO-8A Specification sheet

McIntosh XCS200 owner's manual

McIntosh

McIntosh XCS200 owner's manual

Sven IMPULSE Operation manual

Sven

Sven IMPULSE Operation manual

LG SKC9 user manual

LG

LG SKC9 user manual

JBL Harman BAR 300 user manual

JBL

JBL Harman BAR 300 user manual

Topp Music Gear T-Array SAT28P user manual

Topp Music Gear

Topp Music Gear T-Array SAT28P user manual

Dynacord VL 262 Specifications

Dynacord

Dynacord VL 262 Specifications

HK Audio LUCAS NANO 305 FX manual

HK Audio

HK Audio LUCAS NANO 305 FX manual

TCL RAY-DANZ 3.1 quick start guide

TCL

TCL RAY-DANZ 3.1 quick start guide

TEMPO ULTRA 502 installation instructions

TEMPO ULTRA

TEMPO ULTRA 502 installation instructions

TCL Alto 8e user manual

TCL

TCL Alto 8e user manual

Behringer Eurolive B1220DSP quick start guide

Behringer

Behringer Eurolive B1220DSP quick start guide

Legacy Expression owner's manual

Legacy

Legacy Expression owner's manual

LG FH6 Simple manual

LG

LG FH6 Simple manual

JVC FS-X 3 instructions

JVC

JVC FS-X 3 instructions

Devine MOH 15A user manual

Devine

Devine MOH 15A user manual

Insignia NS-NBBAR Quick setup guide

Insignia

Insignia NS-NBBAR Quick setup guide

Blueshift Helium & copper speaker systems owner's manual

Blueshift

Blueshift Helium & copper speaker systems owner's manual

manuals.online logo
manuals.online logoBrands
  • About & Mission
  • Contact us
  • Privacy Policy
  • Terms and Conditions

Copyright 2025 Manuals.Online. All Rights Reserved.