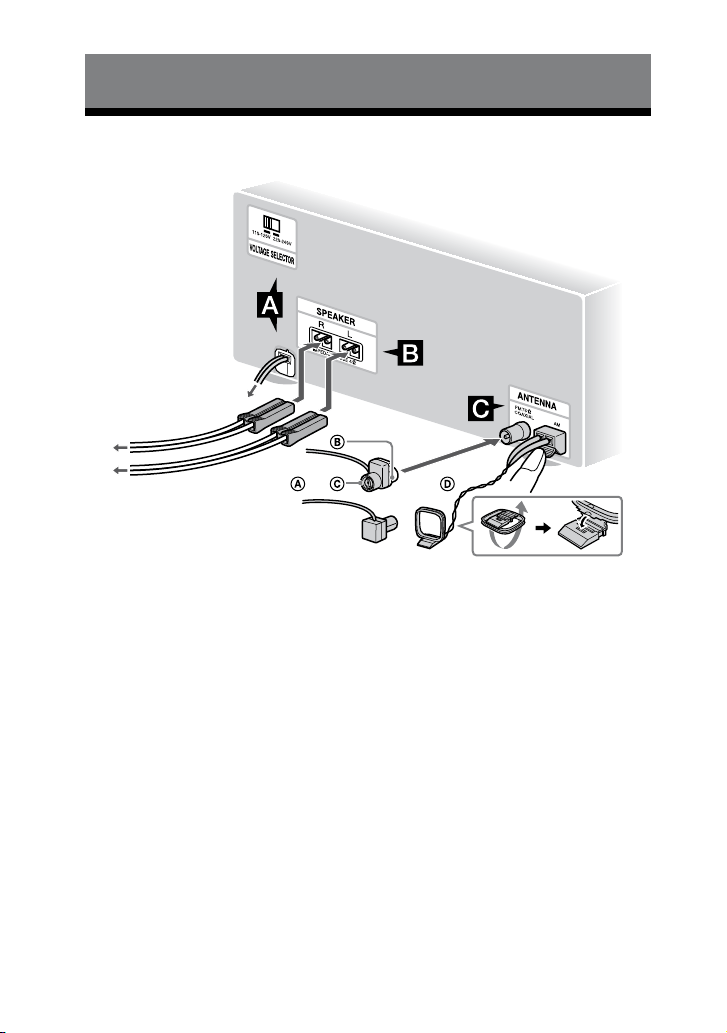
CMT-HX5BT.GB.3-095-518-61(1)
2GB
WARNING
To reduce the risk of re or
electric shock, do not expose
this apparatus to rain or
moisture.
To reduce the risk of re, do not cover
the ventilation of the apparatus with
newspapers, tablecloths, curtains, etc.
And do not place lighted candles on the
apparatus.
To reduce the risk of re or electric shock,
do not place objects lled with liquids,
such as vases, on the apparatus.
Connect the unit to an easily accessible AC
outlet. Should you notice an abnormality
in the unit, disconnect the main plug from
the AC outlet immediately.
Do not install the appliance in a conned
space, such as a bookcase or built-in
cabinet.
Do not expose the battery to excessive heat
such as direct sunlight, re or the like.
Except for customers in the U.S.A.
and Canada
is appliance is classied as a CLASS 1
LASER product. is marking is located
on the rear exterior.
Notice for the customer in the
countries applying EU Directives
According to the EU Directive related
to product safety, EMC and R&TTE, the
manufacturer of this product is Sony
Corporation, 1-7-1 Konan, Minato-ku,
Tokyo, Japan.
e Authorized Representative is Sony
Deutschland GmbH, Hedelnger Strasse
61, 70327 Stuttgart, Germany.
For any service or guarantee matters please
refer to the addresses given in separate
service or guarantee documents.
Hereby, Sony Corp., declares that this
equipment is in compliance with the
essential requirements and other relevant
provisions of Directive 1999/5/EC. For
details, please access the following URL:
http://www.compliance.sony.de/
Use of this radio equipment is not allowed
in the geographical area within radius of
20 km from the centre of Ny-Alesund,
Svalbard in Norway.
Disposal of Old Electrical
& Electronic Equipment
(Applicable in the
European Union and
other European countries
with separate collection
systems)
is symbol on the product or on its
packaging indicates that this product
shall not be treated as household waste.
Instead it shall be handed over to the
applicable collection point for the
recycling of electrical and electronic
equipment. By ensuring this product
is disposed of correctly, you will help
prevent potential negative consequences
for the environment and human health,
which could otherwise be caused by
inappropriate waste handling of this
product. e recycling of materials will
help to conserve natural resources. For
more detailed information about recycling
of this product, please contact your
local Civic Oce, your household waste
disposal service or the shop where you
purchased the product.
Applicable accessories: Remote
commander
Note on DualDiscs
A DualDisc is a two sided disc product
which mates DVD recorded material on
one side with digital audio material on
the other side. However, since the audio
material side does not conform to the
Compact Disc (CD) standard, playback on
this product is not guaranteed.