manuals.online logo
Brands
  1. Home
  2. •
  3. Brands
  4. •
  5. Sony
  6. •
  7. Stereo System
  8. •
  9. Sony LBT-G2000 User manual

Sony LBT-G2000 User manual

SONY.
3-758-592-21(2)
Compact
Hi-Fi
Stereo
System
Operating
Instructions
Wise
LBT-G2000
LBT-D250
©
1994
by
Sony
Corporation
To
prevent
fire
or
shock
hazard,
do
not
expose
the
unit
to
rain
or
moisture.
Oy
NOAEIOIN
AX
/\
00
NOT
OPEN
CAUTION:
TO
REDUCE
THE
RISK
OF
ELECTRIC
SHOCK,
DO
NOT
REMOVE
COVER
(OR
BACK).
NO
USER-SERVICEABLE
PARTS
INSIDE.
REFER
SERVICING
TO
QUALIFIED
SERVICE
PERSONNEL.
This
symbol
is
intended
to
alert
the
user
to
the
presence
of
uninsulated
“dangerous
voltage”
within
the
product's
enclosure
that
may
be
of
sufficient
magnitude
to
constitute
a
risk
of
electric
shock
to
persons.
This
symbol
is
intended
to
alert
the
user
to
the
presence
of
important
operating
and
maintenance
(servicing)
instructions
in
the
literature
accompanying
the
appliance.
*
The
graphical
symbols
are
on
the
rear
enclosure.
Note
to
CATV
system
installer
This
reminder
is
provided
to
call
the
CATV
system
installer's
attention
to
Article
820-40
of
the
NEC
that
provides
guidelines
for
proper
grounding
and,
in
particular,
specifies
that
the
cable
ground
shall
be
connected
to
the
grounding
system
of
the
building,
as
close
to
the
point
of
cable
entry
as
practical.
Owner's
Record
The
model
and
serial
number
is
located
at
the
rear.
Record
this
serial
number
in
the
space
provided
below.
Refer
to
these
numbers
whenever
you
call
upon
your
Sony
dealer
regarding
this
product.
LBT-G2000
/
LBT-D250
__
Serial
No.
INFORMATION
This
equipment
has
been
tested
and
found
to
comply
with
the
limits
for
a
Class
B
digital
device,
pursuant
to
Part
15
of
the
FCC
Rules.
These
limits
are
designed
to
provide
reasonable
protection
against
harmful
interference
in
a
residential
installation.
This
equipment
generates,
uses,
and
can
radiate
radio
frequency
energy
and,
if
not
installed
and
used
in
accordance
with
the
instructions,
may
cause
harmful
interference
to
radio
communications.
However,
there
is
no
guarantee
that
interference
will
not
occur
in
a
particular
installation.
If
this
equipment
does
cause
harmful
interference
to
radio
or
television
reception,
which
can
be
determined
by
turning
the
equipment
off
and
on,
the
user
is
encouraged
to
try
to
correct
the
interference
by
one
or
more
of
the
following
measures:
—
Reorient
or
relocate
the
receiving
antenna.
—
Increase
the
separation
between
the
equipment
and
receiver.
—
Connect
the
equipment
into
an
outlet
on
a
circuit
different
from
that
to
which
the
receiver
is
connected.
—
Consult
the
dealer
or
an
experienced
radio/TV
technician
for
help.
CAUTION
You
are
cautioned
that
any
changes
or
modifications
not
expressly
approved
in
this
manual
could
void
your
authority
to
operate
this
equipment.
CAUTION
The
use
of
optical
instruments
with
this
product
will
increase
eye
hazard.
|
Precautic
This
unit
is
a
compact
disc
deck
receiver
which
consists
of
an
amplifier,
tuner,
stere
cassette
deck
and
5-compact
disc
player.
Before
operating
this
unit,
be
careful
about
the
followings.
On
safety
*
Operate
the
unit
only
on
120
V
AC,
60
Hz.
*
Should
any
solid
object
or
liquid
fall
into
the
unit,
unplug
it
and
have
it
checked
by
qualified
personnel
before
operating
it
any
further.
*
Unplug
the
unit
from
the
wall
outlet
if
it
is
not
to
be
used
for
an
extended
period
of
time.
To
disconnect
the
cord,
pull
it
out
by
grasping
the
plug.
Never
pull
the
cord
itself.
¢
As
the
laser
beam
used
in
this
compact
disc
player
is
harmful
to
the
eyes,
do
not
attempt
to
disassemble
the
cabinet.
Refer
servicing
to
qualified
personnel
only.
On
installation
*
Place
the
unit
on
a
level
surface.
*
Do
not
install
the
urit
in
a
location
near
heat
sources
such
as
radiators
or
air
ducts,
or
in
a
place
subject
to
direct
sunlight,
excessive
clust,
mechanical
vibration
or
shock.
*
Good
air
circulation
is
essential
to
prevent
internal
heat
buildup
in
the
unit.
Place
the
unit
in
a
location
with
adequate
air
circulation.
Do
not
place
the
unit
on
a
soft
surface,
such
as
a
rug
that
would
block
the
ventilation
holes
on
the
bottom.
*
Do
not
place
anything
on
top
of
the
cabinet.
The
top
ventilation
holes
must
be
unobstructed
for
the
proper
operation
of
the
uni!
and
to
prolong
the
life
of
its
components.
On
cleaning
the
cabinet
Clean
the
cabinet,
panel
and
controls
with
a
soft
cloth
lightly
moistened
with mild
detergent
solution.
Do
not
use
any
type
of
abrasive
pad,
scouring
powder
or
solvent
such
as
alcohol
or
benzine.
On
repacking
Do
not
throw
away
the
carton
and
the
packing
material.
It
makes
an
ideal
contair
er
to
transport
the
unit
in.
On
moisture
condensation
If
the
unit
is
brought
directly
from
a
cold
to
a
warm
location,
or
is
placed
in
a
very
damp
room,
moisture
may
condense
on
the
lens
inside
the
unit.
Should
this
occur,
the
player
will
not
operate.
In
this
case,
remove
the
disc
and
leave
the
player
turned
on
for
about
an
hour
until]
the
moisture
evaporates.
If
you
have
any
question
or
problem
concerning
your
unit,
please
consult
your
nearest
Sony
dealer.
For
detailed
precautions,
see
the
leaflet
"IMPORTANT
SAFEGUARDS".
(Mo-del
for
U.S.A.)
Note
This
“Operating
Instructions”
is
common
for
models
LBT-
G2000
and
LBT-D250.
The
illustrations
are
those
of
LBT-
G2000.
Differences
in
the
functions,
etc.
are
specified
respectively.
Notes
on
the
transit
key
The
transit
key
on
the
bottom
of
the
unit
protects
the
optical
system
against
shock
during
transportation.
Before
operating
the
unit,
be
sure
to
remove
the
key
by
following
the
instructions
on
the
label,
and
keep
it
in
a
safe
place.
When
transporting
the
unit,
re-install
the
key
by
following
the
instructions
below.
1
Remove
all
the
discs
from
the
CD
section.
2
Press
the
&
button
to
close
the
disc
tray
and
wait
for
“1)
(or
27,
3)...)”
to
disappear
from
the
display.
3
Turn
off
the
power.
4
Insert
the
key
into
its
original
hole
and
lock
it
in
place.
Tel
nL
tH
A]
oi
He
a
J
bg
Bed
H
0
a
e
0
“oe
:
*
<
oe
sive
ae
3
Table
of
Contents
Preparations
Getting
Started
:
ssa
eles
eam
el
salectclale
tera
PECAULIONS
.0;0ssssecossonsseceososesssbesessonsesosesen
seesses
snonseneaseessasvoveessasseees
3
You
can
control
the
system
(except
the
cassette
deck)
with
the
supplied
remote
commander.
Using
Your
Stereo
Turning
on
the
power
........sssssssssscsecsnsesssensenesensonssenseanserscenscsees
Adjusting
the
SOUNG
.......sssssssscsssscssssssnesscasscsnnesssnsosenvssnsessssseees
Receiving
broadcast
.......ssessssscssssssssecessecesnssonnecssnecsanessonesconssossnvees
Playing
back
tapes
....svscssccsereeccsscesssssecsanessnssanessssosnsonsscenasosseose
Recording
On
tapes
...........0vsssecsssessecesscssvessnecaneconsesnessonssonsssenecee
Dubbing
tapes
..........secscccsscessssesreresenecsesenesenees
Playing
compact
GiSCS
...........ssssesssscseeeesecseneees
Playing
the
beginning
of
each
selection
Playing
in
a
random
Order.....s...ssssecssesssessescessvecersnesoesseseccuseoooes
Playing
repeatedly
..........0+ssssvsesssecseccseerseccsncesnsennscenssonsssnncenoess
Playing
in
a
desired
order
and
time
.........csssssssscrrscsenssorssooerees
Designating
the
total
playing
time
............eseccvesrsesssessesoeseeee
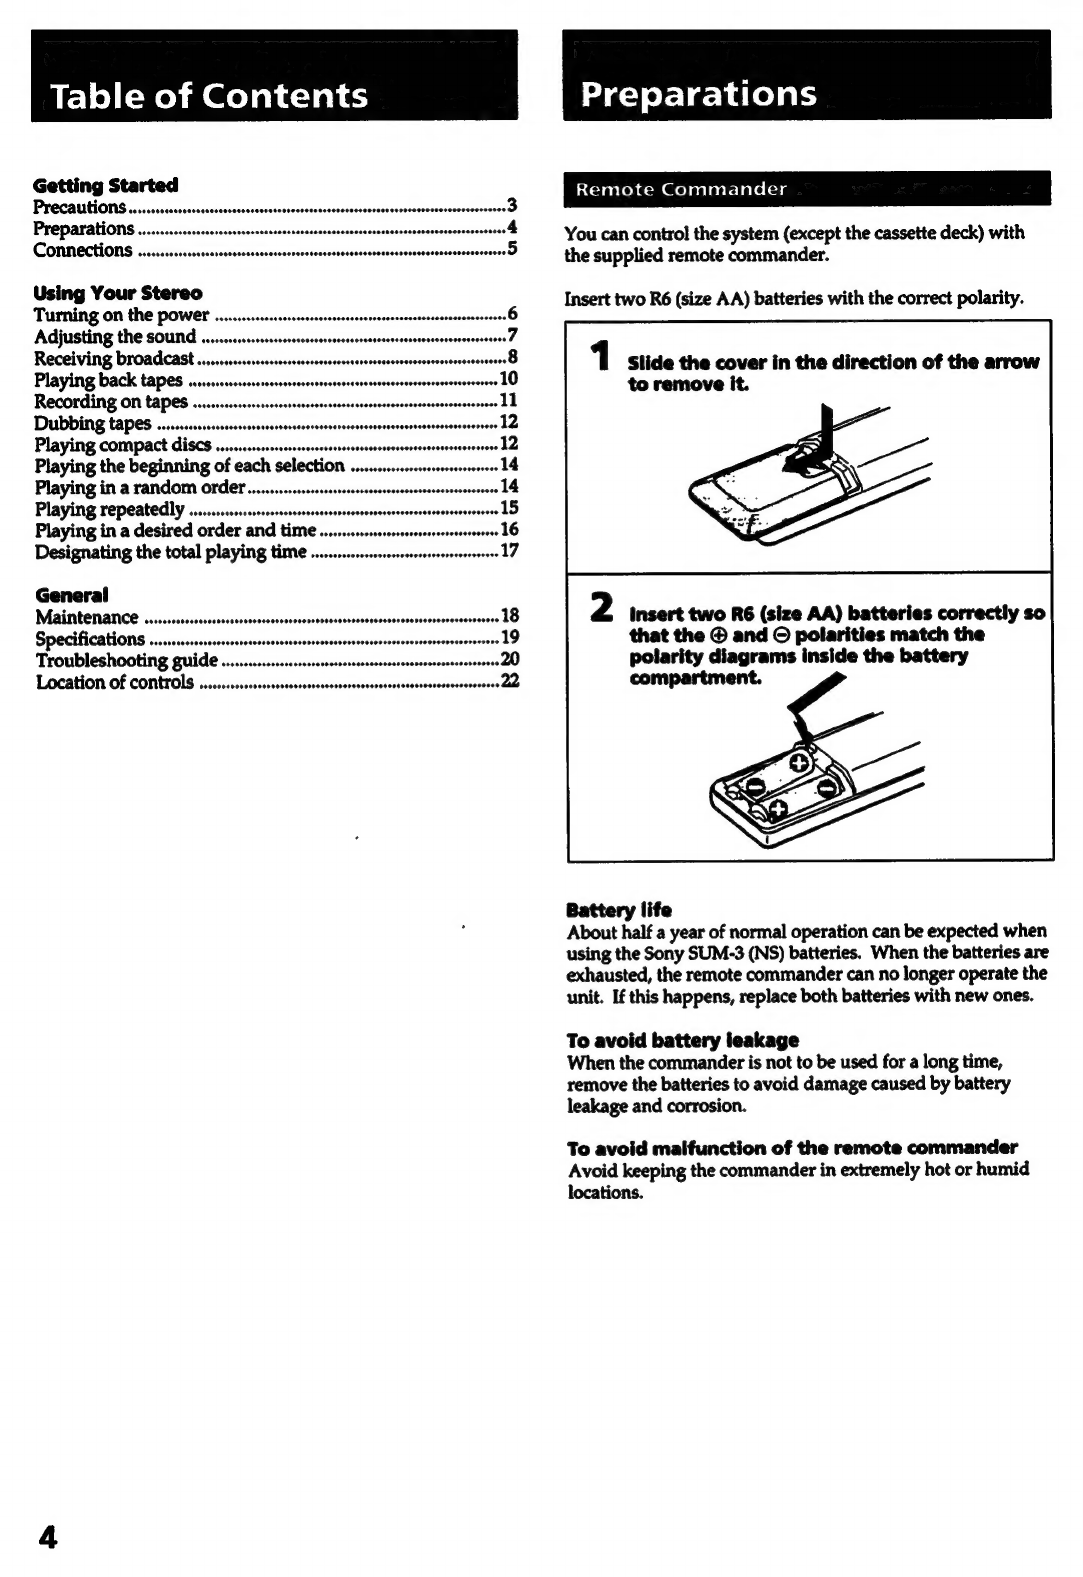
Insert
two
R6
(size
AA)
batteries
with
the
correct
polarity.
1
Slide
the
cover
in
the
direction
of
the
arrow
to
remove
it.
General
Maalitiberiannce
ssiscsesssissscssscssesssscasscsvocsssonssssescaconsonssessedsescsesosseeceioen
Specifications
.........vscssesserssesssssesnssesesecanecssesssonesenscsensosossvsessoeestes
Troubleshooting
guide
Location
of
Controls
...........ssrssssessssssssesscrssesecsssesesessvsesessvosseseess
2
insert
two
R6
(size
AA)
batteries
correctly
so
that
the
@
and
©
polarities
match
the
polarity
diagrams
inside
the
battery
compartment.
Battery
life
About
half
a
year
of
normal
operation
can
be
expected
when
using
the
Sony
SUM-3
(NS)
batteries.
When
the
batteries
are
exhausted,
the
remote
commander
can
no
longer
operate
the
unit.
If
this
happens,
replace
both
batteries
with
new
ones.
To
avoid
battery
leakage
When
the
commander
is
not
to
be
used
for
a
long
time,
remove
the
batteries
to
avoid
damage
caused
by
battery
leakage
and
corrosion.
To
avoid
malfunction
of
the
remote
commander
Avoid
keeping
the
commander
in
extremely
hot
or
humid
locations.
'®elalal-va
Turn
all
the
power
o:f
before
making
any
connections.
The
diagram
below
shows
the
system
connections.
The
letters
in
the
diagram
correspond
to
those
in
the
text.
Toh
act-mrel
em
Qelalal-radtela,
Connect
the
AC
power
cord
last.
Cord
plugs
and
jacks
are
color
coded.
Red
plugs
and
jacks
are
for
the
right
channel
(R)
and
white
ones
are
for
the
left
channel
(L).
Sy
oXer=1
421
an
el
ae
Molalalcia
aleya)
|
«a
Strip
9/16
inch
(15
mm)
of
the
speaker
cord
coating
from
the
end
of
the
cord.
Connect
the
right
speaker
to
the
R
(right)
speaker
terminal,
and
the
left
speaker
to
the
L
(left)
speaker
terminal,
with
the
red
cords
to
+
and
the
black
cords
to
-.
4
Caution
Connect
the
supplied speakers
only.
iar
cVah
dela lat:
Mm
@elalalcradresal
3)
Connect
the
supplied
FM
wire
antenna
to
the
FM
75
Q
terminal
and
extend
horizontally.
2
insert
the
wire.
3
Push
up
the
knob.
Supplied
wire
antenna
For
better
reception
Connect
to
an
outdoor
antenna.
'@olalacadcelac
FeV
Van
csi
el
ere
Gelalersaqcela|
Connect
the
supplied
loop
antenna
to
the
AM
and
+h
terminals.
You
can
attach
the
loop
antenna
on
the
wall
using
commercially
available
screws.
ZE
\
=
Sy
«
at
flat)
(
—
SN
ht
A\
=I
For
better
reception
In
addition
to
the
loop
antenna,
connect
an
insulated
wire
of
20-
to
50-
feet
(6
to
15
meters)
to
the
AM
terminal
(the
lower
terminal).
Be
sure
not
to
disconnect
the
loop
antenna.
Adding
Other
Components
to
the
System
Connecting
a
video
equipment
(for
LBT-G2000)
You
can
connect
a
video
equipment
to
the
VIDEO
IN
jacks
only
for
the
audio
input
signal.
To
select
the
video
equipment,
press
the
VIDEO
button.
Note
When
this
system
is
turned
on,
noise
may
occur
during
radio
reception
or
in
the
picture
and
sound
of
the
video
equipments
(TV,
VTR,
etc.).
In
this
case,
place
this
system
away
from
the
video
equipments
or
turn
off
the
power
of
the
unit.
VIDEO
IN
Connecting
a
turntable
(for
LBT-D250)
You
can
connect
a
turntable
system
(PS-LX56,
etc.)
to
the
PHONO
jacks.
To
listen
to
analog
discs,
press
the
PHONO
button.
AC
Power
Cord
8)
Connect
the
AC
power
cord
to
a
wall
outlet.
Note
Memories
stored
in
the
unit
may
be
lost
when
the
AC
power
cord
is
disconnected
for
a
certain
period
of
time.
Turning
on
the
Power
Press
the
POWER
button
to
turn
on
the
power
after
completing
all
connections.
Changing
the
AM
Tuning
Interval
The
unit
tunes
in
AM
stations
at
10-kHz
intervals.
To
use
the
unit
where
the
tuning
interval
is
9-kHz,
change
the
setting
as
follows:
.
1
Turn
on
the
power.
2
Tune
in
any
AM
station.
3
Turn
off
the
power.
4
While
pressing
the
DUAL
MODE
TUNING
+
button,
turn
on
the
power.
To
reset
the
interval,
repeat
the
same
procedure.
Nea]
exeyacelane
@
Stored
stations
will
be
erased
from
the
memory
when
you
change
the
interval.
@
Stored
stations
will
be
erased
from
the
memory
when
the
AC
power
cord
is
disconnected
for
a
long
time.
The
following
operations
apply
only
to
reproduced
sound.
The
letters
in
the
illustration
below
correspond
to
those
in
the
text.
i)
/
f
‘CO
:
we
To
increase
the
volume,
turn
the
VOLUME
control
clockwise.
To
decrease
it,
turn
the
control
counterclockwise.
*
Turn
down
the
volume
before
switching
on
the
unit
to
prevent
possible
damage
to
the
speakers.
o
VOLUME
PXolUrsalate
Mm
calsmeteljare
MOlUr-Tin
ay
LBT-G2000
8B)
Adjust
the
following
2:
BAND
GRAPHIC
EQUALIZER
controls.
100
Hz:
Boosts
or
cuts
heavy
bass.
TkHz:
Accentuates
or
dims
vocals.
10
kHz:
Boosts
to
a
brighter
sound
or
reduces
stridency.
100Hz
biz
10kHz
PNosl
ery
alate
Mm
darcmevoleialemelerei
ena
LBT-D250
:B:
Adjust
the
TONE
CONTROLs.
BASS:
Boosts
or
cuts
heavy
bass.
TREBLE:Boosts
to
a
brighter
sound
or
reduces
stridency.
TONE
CONTROL
+10
+10
;
0 0
-10
-10
Bass
TREBLE
PNelivtsatale
Mm
ealcmeidaele
lac
M
nace
C
To
obtain
a
stage-like
atmosphere
for
playing
stereo
sources,
adjust
the
SURROUND
control.
SURROUND
For
private
listening
Connect
a
pair
of
headphones
to
the
HEADPHONES
jack.
No
sound
is
heard
from
the
speakers.
Receiving
Broadcast
You
can
listen
to
FM
or
AM
stations.
Display
3
4
STEREO/MONO
2
2
Press
the
TUNING/PRESET
button
to
enter
the
tuning
mode.
“PRESET”
and
the
preset
code
disappear.
Press
the
BAND
button
repeatedly
until
the
desired
band
appears.
(Fm)
GAB
One
Each
time
you
press
the
BAND
button,
the
received
band
changes
as
follows:
FM
<———»
AM
4
Keep
the
DUAL
MODE
TUNING
+
or
-
button
pressed
for
over
2
seconds
so
that
“AUTO”
appears.
The
unit
starts
scanning
frequencies
and
stops
when
it
tunes
into
a
station.
Repeat
this
step
until
the
desired
station
is
tuned
in.
eng
OS
Cae
The
“TUNED”
indicator
appears
When
a
station
of
a
sufficient
signal
strength
is
tuned
in.
|
The
“STEREO”
indicator
appears
When
an
FM
stereo
program
of
a
sufficient
signal
strength
is
tuned
in.
When
you
press
the
TUNER
button
The
CD
player
is
automatically
turned
off
so
that
radio
broadcast
may
not
be
disturbed
by
noise.
For
receiving
FM
stations
in
stereo
If
the
MONO
indicator
is
lit,
press
the
STEREO/
MONO
button
so
that
the
indicator
goes
out.
When
an
FM
stereo
program
is
noisy
or
hard
to
receive
Press
the
STEREO/MONO
button
so
that
“MONO”
appears.
This
eliminates
the
stereo
effect,
but
the
noise
will
be
greatly
reduced.
To
return
to
the
stereo
mode,
press
the
STEREO/MONO
button
again.
The
MONO
indicator
goes
off.
if
you
cannot
tune
in
a
desired
station
A
station
with
a
weak
signal
may
be
skipped.
In
this
case,
tune
in
the
station
manually.
¢
Press
the
DUAL
MODE
TUNING
+
or
—
button
again
to
stop
scanning.
¢
Press
the
DUAL
MODE
TUNING
+
or
-
button
repeatedly
and
tune
in
the
exact
frequency.
Note
The
controls
of
the
tuner
become
inactive
when
you
press
any
of
the
function
buttons
other
than
the
TUNER
button.
You
can
store
station
frequencies
in
the
unit's
memory
for
quick
recall
later
on.
Up
to
30
frequencies
in
any
band
can
be
stored
by
specifying
a
code
for
each
frequency.
The
code
is
a
combination
of
a
letter
—-
A,
B
or
C-
and
a
number
-
0
to
9:
A-1, A-2,
...,
A-9, A-0,
B-1,
cop
CL,
ooey
C-0.
ocoogd
Cm
C—~ET)
oOo
|
1
Press
the
TUNING/PRESET
button
to
enter
the
tuning
mode.
“PRESET”
and
the
preset
code
disappear.
O,.,
8
FG
Ue
|
2
Press
the
BAND
button
and
the
DUAL
MODE
TUNING
+
or
-
button
to
tune
in
the
desired
station.
(See
page
8.)
Press
the
MEMORY
button.
“PRESET”
and
“MEMORY”
appear
on
the
display.
While
a
number
of
the
last
memorized
code
is
blinking,
proceed
to
step
4.
Alien
FL
(Que
4
Press
the
SHIFT
button
to
select
a
letter
(A,
B
or
C).
The
last
memorized
number
with
the
selected
letter
appears.
Ten
Fb
[Que
5
Press
the
DUAL
MODE
TUNING
+
or
-
button
to
select
a
number
(0
-
9).
BODEN
9b
1
Due
Press
the
MEMORY
button.
“PRESET”
and
“MEMORY”
disappear.
A
code
is
specified
and
the
setting
of
the
STEREO/
MONO
button
is
also
stored.
One
second
later,
the
code
disappears
and
the
tuner
enters
the
tuning
mode
again.
FM
Fl
[om
if
you
cannot
store
a
station
successfully
Be
sure
to
press
the
buttons
for
the
code
while
the
“MEMORY”
indicator
lights.
If
the
indicator
has
gone
off,
press
the
MEMORY
button
again.
To
erase
a
stored
station
Storing
a
new
station
on
a
used code
erases
the
previously
stored
one.
To
select
the
preset
channel
directly
using
the
DUAL
MODE
TUNING
buttons
Each
time
you
press
the
DUAL
MODE
TUNING
button
in
step
4,
the
code
(combination
of
a
letter
and
a
number)
can
be
selected
without
pressing
the
SHIFT
button
and
you
can
skip
to
step
6.
The
preset
channel
changes
as
follows:
Al
+»
A2<---->
A9«»
A0
+>
BI
<---->
BO
+
C1
<-*
CO
Tuning
into
a
Stored
Station
1
Press
the
TUNING/PRESET
button
to
enter
the
preset
mode.
(“PRESET”
and
the
preset
code
appear.)
2
Press
the
SHIFT
button
and
the
DUAL
MODE
TUNING
+
or
-
button
to
specify
the
code
for
the
desired
station.
Playing
Back
Tapes
You
can
use
tapes
of
type
I
and
II
for
playback.
Playing
Deck
A
or
B
Sooes
coaC_rijOoo
e
2
Press
the
&
/
4
button.
3
insert
a
recorded
tape.
4
Press
the
TAPE
SELECT
button
to
select
tape
type.
5
Press
the
>
button.
Playback
starts.
10
When
the
tape
is
played
to
the
end,
the
deck
stops.
To
stop
during
playback,
press
the
@
/
&
button.
To
fast
forward
or
rewind,
press
the
P>
or
44
button.
To
pause,
press
the
11
PAUSE
button.
To
resume,
press
the
a
PAUSE
button
again.
To
play
a
tape
recorded
with
the
Dolby
NR*
effect
Set
the
DOLBY
NR
switch
to
ON.
The
setting
is
operated
on
both
decks.
This
unit
is
provided
with
DOLBY
B
NR
system.
When
both
decks
are
set
to
play
mode
Only
the
sound
from
deck
B
will
be
heard.
Note
When
a
deck
is
operated
while
recording
or
playing
back
a
tape
on
the
other
deck,
sound
waver
(uneven
rotation)
may
result.
*
Dolby
noise
reduction
manufactured
under
license
from
Dolby
Laboratories
Licensing
Corporation.
“DOLBY”
and
the
double-D
symbol
00
are
trademarks
of
Dolby
Laboratories
Licensing
Corporation.
Playing
from
Deck
to
Deck—Relay
Play
1
Insert
tapes
into
decks
A
and
B.
2
Press
the
&
button
on
deck
B.
Deck
B
starts
playing.
3
Press
the
if
PAUSE
button
and
the
®
button
on
deck
A.
When
the
tape
in
deck
B
ends,
the
tape
in
deck
A
starts
playing.
g
on
Tapes
You
can
use
tape
type
I
and
II
for
recording.
etoxaelae
lave
mci
2)
pe
age)
cre
diatom
Kolel
a
<:1ael
ceifate
Break
off
the tab
of
the
side
to
be
protected.
For
side
A,
break
off
the
right-hand
tab
facing
the
side
A
up.
This
prevents
further
recording
on
that
side.
Tab
of
side
B
°
Tab
of
side
A
Cm
|
To
record
on
a
protected
tape,
cover
the
opening
with
plastic
:
fees
boo
ee ee
cee
es
tape.
1
Select
a
source
(except
TAPE)
with
the
function
selectors.
You
can
also
select
the
audio
sources
of
equipment
connected
to
‘he
VIDEO
IN
jacks.
insert
a
blank
tape
into
deck
B.
Press
the
TAPE
SELECT
button
to
select
tape
type.
Set
the
DOLBY
NR
switch
to
ON
or
OFF.
The
Dolby
NR
(noise
reduction)
system
reduces
tape
hiss
nois2
in
low-level,
high-frequency
signals
by
boosting
the
signals
during
recording
and
then
lowering
them
during
playback.
Press
the
@
REC
button
and
start
the
selected
source.
Recording
starts.
When
the
tape
is
recorded
to
the
end,
the
deck
stops.
To
stop
during
recording,
press
the
@
/
&
button.
To
start
recording
more
precisely
1
After
steps
1
to
4
above,
press
the
if
PAUSE
button.
2
Press
the
@
REC
-utton.
3
Press
the
§f
PAUSE
button
again
to
start
recording.
aE
Malate
mM
@Celan)
ey-(a
am
Ol
Ea
2
Insert
a
recorded
tape
into
deck
A
and
a
blank
tape
into
deck
B.
Press
the
TAPE
SELECT
button
to
select
tape
type.
Be
sure
to
use
tapes
of
the
same
type
for
dubbing,
as
the
switch
setting
is
effective
on
both
decks.
Select
dubbing
speed
(NORMAL
or
HIGH)
with
the
DUBBING
SPEED
button
(LBT-G2000
only).
Press
the
11
PAUSE
button,
then
the
B>
button
on
deck
A.
Press
the
@
REC
button
on
deck
B.
Dubbing
starts.
To
stop
dubbing,
press
the
&
/
&
button
on
deck
A,
then
press
the
B
/
&
button
on
deck
B.
You
need
not
designate
the
Dolby
NR
system
The
tape
in
deck
B
is
recorded
with
the
same
recording
level
and
Dolby
NR
system
as
the
original
tape
in
deck
A.
You
can
listen
to
other
program
sources
during
dubbing
Select
the
program
source
with
the
function
selectors.
12
You
can
enjoy
various
play
modes
provided
with
the
CD
player.
Playing
the
Entire
Disc
—
Continuous
Play
|
OOO)
LI}
EEE
1
Press
the
CD
button.
2
Press
the
&
OPEN/CLOSE
button.
3
Place
a
disc
with
the
printed
side
up
on
the
tray.
4
Press
the
DISC
SKIP
button
to
place
up
to
four
more
discs
in
the
tray
when
you
want
to
play
more
than
one
disc.
5
Press
the
4
OPEN/CLOSE
button
to
close
the
tray.
6
Press
the
CONTINUE
button
to
choos
whether
to
play
one
disc
(1
DISC)
or
‘all
discs
(ALL
DISCS).
To
stop
during
play,
press
the
I
button.
To
pause,
press
the
ff
button.
To
resume
play,
press
the
B>
or
the
Uf
button
again.
To
stop
play
and
open
the
tray,
press
the
&
OPEN/
CLOSE
button.
To
close
the
tray
and
start
playing,
press
the
®>
or
the
DISC
SELECT
1-5
button.
The
“no
d
ISC“
indication
appears
When
there
is
no
disc
at
all
on
the
tray.
To
play
an
3-inch
(8-cm)
CD
Place
it
on
the
inner
circle
of
the
tray.
If
the
disc
is
provided
with
an
adaptor,
first
remove
it.
Do
not
put
a
5-inch
(12-cm)
CD
upon
an
3-inch
CD.
If
you
press
the
TUNER
button
during
play
The
disc
play
stops
and
all
buttons
on
the
CD
player
other
than
the
&
OPEN/CLOSE
button
cannot
be
operated.
Caution
on
volume
adjustment
Do
not
turn
up
the
vclume
while
listening
to
a
section
with
very
low
level
output
or
no
audio
signals,
since
the
speakers
may
be
damaged
when
the
peak
level
section
is
played.
mami
veces
==!
a
Sooo
©
lel)
lel)
woo
i
sl
Si
PM
ye
kpes
ee
ee
xe!
Wiest
eae
y
To
check
the
remaining
or total
playing
time
Use
the
TIME
button
«on
the
player.
To
check
Remaining
time
TIME
once
during
play
sledion
[|
OD
II
ID
z
~436
Remaining
time
TIME
twice
during
play
ae
BDIIIO
omer
=
Press
once
more
to
resume
the
prior
display.
Total
playing
TIME
in
stop
mode
time
BR
QIIIO
|
lI
appears
for
a
few
seconds
Notes
¢
You
can
check
the
remaining
time
during
continuous,
shuffle
and
program
play.
The
total
playing
time
and
number
of
selections
also
appear
in
the
display
when
you
press
the
&
OPEN/
CLOSE
button
to
close
the
disc
tray.
While
playing
a
selection
number
24
or
above,
“--.--”
is
displayed.
Selecting
a
Desired
Disc
You
can
locate
the
beginning
of
any
disc
by
using
the
DISC
SELECT
1-5
buttons
or
the
DISC
SKIP
button
during
play.
To
select
a
particular
disc,
press
the
corresponding
DISC
SELECT
1-5
button.
To
move
the
disc
tray
next
to
the
current
one,
press
the
DISC
SKIP
button.
Locating
a
Particular
Selection
You
can
locate
the
beginning
of
a
desired
selection
on
the
disc
being
played
during
stop,
play
or
pause
mode.
To
locate
the
beginning
of
the
current
or
preceding
selection
Press
the
k@<4
<4
button
as
many
times
as
required.
To
locate
the
beginning
of
a
succeeding
selection
Press
the
>>
PPI
button
as
many
times
as
required.
Mola-helalem-Mar-ladcavlt-iat
cella)
elem
dale
Clie
To
search
quickly
while
monitoring
the
sound
Keep
the
D>
PPt
or
kd
<d
button
pressed
during
play,
then
release
it
at
the
desired
point.
To
search
quickly
while
observing
the
display
Press
the
ff
button
to
pause,
then
keep
the
>>
PPI
or
the
Ké<q
<<
button
pressed.
The
search
speed
will
increase
but
there
will
be
no
sound.
Watch
the
display
to
find
the
desired
point.
To
resume
play,
press
the
B>
or
§f
button
at
the
desired
point.
The
“
7°
”
indicator
is
displayed
When
you
reach
the
end
of
a
disc
by
continuously
pressing
the
>
PPI
button.
Press
the
k€<f
<4
button
to
return
to
normal
indication.
aE
MYitalemaatem
<9}
laleliale
medi
t:14
a
Bel=)
(14
dela
a
tc\
laren
lak-Batzleleelssh@lce
=e
You
can
check
the
selections
by
scanning
the
beginning
of
each
selection
on
the
disc.
You
can
use
this
function
in
any
play
mode.
While
“
ALL
DISCS”
is
selected
in
continuous
mode,
the
first
selection
of
each
disc
will
be
scanned.
Music
Scan
Play
eonmeam
COCefIl¢)
Cc:
eat
ome
et
ee
eon
1
Place
a
disc
on
the
tray
and
close
it
with
the
&
OPEN/CLOSE
button.
Press
the
MUSIC
SCAN
button.
Each
selection
will
be
played
for
10
seconds
and
then
fade
out
for
2
seconds.
After
all
selections
are
played,
scan
play
will
end.
a
DIID
HD
noood
When
you
press
the
MUSIC
SCAN
button
again
while
playing
the
beginning
of
a
selection,
playing
will
be
extended
for
another
10
seconds
up
to
30
seconds.
To
cancel
the
music
scan
mode
and
continue
playing
Press
the
B>
button.
To
stop
music
scan
Press
the
Dutton.
Note
*
Programed
pauses
in
program
mode
will
be
disregarded
during
music
scan
play.
*
If
you
press
the
kK
<<
/
PP
PPI
button,
music
scan
will
be
cancelled.
14
You
can
have
the
selections
played
in
a
random
order.
The
unit
will
play
all
the
discs,
or
just
one
disc
you
desire.
Shuffle
Play
boson
ee
eoDoo
COLE)
LU
(9)
|
(eee
1
Place
a
disc
on
the
tray
and
close
it
with
the
4
OPEN/CLOSE
button.
Press
the
SHUFFLE
button
to
choose
whether
to
shuffle
between
“ALL
DISCS”
(press
once)
or
“1
DISC”
(press
twice),
depending
on
the
number
of
discs
inserted.
“SHUFFLE*
appears
in
the
display.
(amar
DID
IOD
Press
the
>
button.
Shuffle
play
starts.
To
stop
playing
Press
the
MH
button.
To
cancel
shuffle
play
Press
the
CONTINUE
button
and
the
unit
enters
continuous
play
mode.
“SHUFFLE”
disappears
from
the
display.
What
is
this
indication?
e
cs
This
indication
appears
while
the
player
is
“shuffling”
the
selections.
To
Play
Only
the
Desired
Discs
in
a
Random
Order
—
Select
Shuffle
Play
Select
the
desired
discs
during
stop
mode
(ALL
DISCS
SHUFFLE
mode).
To
select
the
desired
discs
Press
the
DISC
SELECT
1-5
buttons.
A
circle
will
appear
around
the
selected
disc
number.
To
choose
another
disc,
press
the
desired
disc
number
button.
Press
the
B>
button
to
start
select
shuffle
play.
To
delete
a
disc
which
you
have
selected
Press
the
DISC
SELECT
1-5
button
for
that
disc.
A
circle
will
disappear
around
the
selected
disc
number.
To
put
back
all
discs
which
you
have
deleted,
press
the
SHUFFLE
button
twice.
Playing
Repeatedly
You
can
choose
between
two
different
repeat
play
modes.
One
repeats
all
the
selections
in
the
current
play
mode;
the
other
repeats
a
single
selection.
Use
the
REPEAT
button
on
the
unit
to
do
this
operation.
Repeat
play
functions
during
any
playing
modes
except
multi-disc
program.
gp
Be
naan
eee
a
cae
Repeating
all
the
selections
(in
any
play
mode)
Press
the
REPEAT
button
so
that
“REPEAT”
lights
up
in
the
display.
ELIIIOD
uy
Repeating
a
single
selection
(in
continuous
play
mode
only)
Press
the
REPEAT
button
so
that
“REPEAT
1°
lights
up
in
the
display
while
playing
the
desired
track.
EZ
I090
cH
i!
Oil
To
cancel repeat
play
Press
the
REPEAT
button
so
that
“REPEAT”
or
“REPEAT
1”
disappears
from
the
display.
15
a
ENalate
mia
W-m
OL-\tie-1emelac(-lar-lalem
Blaal=
You
can
make
a
program
by
designating
up
to
24
selections
in
the
order
you
want
them
to
be
played.
The
unit
will
play
the
disc
according
to
your
program.
eXeedielatchatele
Mmaalom
atch
alaremelacisla
.
|
ae
iam
aes
=i
oa
L
1—1—1—1—1—)
|)
4
>
tele
is
Place
a
disc
on
the
tray
and
close
it
with
the
&
OPEN/CLOSE
button.
Press
the
PROGRAM
button.
“PROGRAM”
appears
in
the
display.
3-a
To
program
discs
in
the
order
you
want
to
play
Press
the
DISC
SELECT
1
-
5
button
in
the
order
you
want
to
program.
mae:
3406
AL
"AL"
appears
in
the
display.
3-s
To
program
selections
on
a
disc
in
the
order
you
want
to
play
1)
Select
the
desired
disc
with
the
DISC
SELECT
1-5
button.
2)
Press
the
44
or
PPI
button
repeatedly
until
the
desired
selection
is
located.
Selection
tobe
—
Total
program
time
programmed
3)
Press
the
PROGRAM
button.
The
selection
is
stored,
and
the
blinking
number
in
the
display
lights
up.
Repeat
2)
and
3)
to
select
another
selection.
To
program
the
selection(s)
on
another
disc,
repeat
1),
2)
and
3).
Press
the
>
button
to
start
playback.
The
®>
indicator
lights
up.
To
stop
playing
Press
the
&
button.
You
can
play
the
same
program
repeatedly
as
long
as
you
do
not
cancel
program
play
or
erase
the
program.
To
erase
the
entire
program
*
Press
the
&
button
once
during
stop;
twice
during
play.
¢
Press
the
&
button.
¢
Turn
off
the
power.
*
Press
the
CONTINUE
button.
if
you
press
the
PROGRAM
button
during
continuous
or
shuffie
play
The
selection
being
played
will
be
the
first
one
in
the
program.
To
program
a
whole
disc
¢
Using
the
DISC
SELECT
1-5
buttons
After
steps
1
and
2:
1
Press
one
of
the
DISC
SELECT
1-5
buttons
to
select
the
disc.
2
Goon
to
step
5.
¢
Using
the
DISC
SKIP
button
After
steps
1
and
2:
1
Press
the
DISC
SKIP
button
to
select
the
disc,
“AL”
appears
in
the
display.
2
Goon
to
step
5.
The
whole
disc
is
programmed
as
one
step.
To
check
your
program
Press
the
CHECK
button.
The
first
selection
in
the
program
will
be
displayed.
Each
time
you
press
the
CHECK
button,
the
next
selection
in
the
program
will
be
displayed.
After
the
last
selection,
“End”
will
be
indicated
and
the
display
will
soon
return
to
the
initial
status.
Note
The
playing
time
for
selection
numbers
higher
than
20
will
not
be
added
into
the
total
playing
time.
You
can
make
the
follcwing
changes
before
starting
play.
To
erase
the
last
selection,
press
the
CLEAR
button
during
stop
mode.
Each
time
you
press
the
CLEAR
button,
the
last
selection
in
the
program
will
be
erased.
To
delete
a
selection,
press
the
CHECK
button
repeatedly
until
the
ur
desired
selection
is
displayed.
Then
press
the
CLEAR
button.
if
you
want
to
change
the
order,
erase
the
entire
program
by
pressing
the
M
button
in
stop
mode,
and
then
repeat
the
programming
procedure
from
the
beginning.
Ws
Felca
late
Mel
od
cele]
a-
facia
ce)
ae
tel
hal
ale
Mz
2)
oX<.
You
can
insert
a
pause
in
your
program
by
pressing
the
88
button.
Use
this
function
to
make
a
program
for
both
sides
of
the
tape
at
one
time.
1
Program
the
selections
for
side
A.
2
Press
the
fl
button.
“P”
will
appear
in
the
display
and
the
total
playing
time
will
be
reset
to
0.
3
Program
the
selections
for
side
B.
When
you
start
playing,
the
selections
for
side
A
will
be
played
and
then
the
unit
will
pause
with
the
chosen
selections
for
side
B
illuminated
in
the
display.
Set
the
tape
to
the
beginning
of
side
B,
then
press
the
>
or
U5
button.
The
selections
for
side
B
will
be
played.
What
is
the
tape
indicator?
During
program
play,
the
tape
indicator
shows
side
A
or
B
being
played.
Aww
a0}
:
Side
A
is
being
played.
|
ao]
:
Side
A
has
teen
played
and
the
unit
is
in
pause
mode,
or
side
B
is
being
played.
To
check
the
step
of
programmed
selections
Press
the
CHECK
button
during
stop
mode.
The
number
of
programmed
steps
will
be
displayed
for
a
few
seconds
in
the
display.
To
check
the
remaining
time
Press
the
TIME
button
once
to
check
the
remaining
time
of
the
selection
being
played;
twice
to
check
the
total
remaining
time;
once
more
to
return
to
the
initial
display.
If
you
have
inserted
a
pause,
the
display
shows
the
remaining
time
until
the
pause.
(2)
appears
while
checking
the
program
for
side
A
and
(5)
appears
while
checking
the
program
for
side
B.
Note
When
selections
have
been
programmed
for
sides
A
and
B,
the
total
playing
time
displayed
during
stop
mode
will
show
the
selections
programmed
for
side
B
and
the
total
playing
time
for
side
B.
Designating
the
Total
Playing
Time
You
can
designate
a
playing
time
and
the
unit
will
make
two
different
programs
of
selections
each
fitting
within
that
period.
Use
this
function,
by
designating
the
length
of
your
tape,
for
editing
both
sides
of
a
tape.
This
feature,
called
Time
Edit,
sets
the
playing
time
of
each
program
within
the
designated
time
automatically
by
choosing
selections
in
numerical
order.
You
can
also
program
desired
selections
by
priority.
In
this
case,
you
can
designate
desired
selections
beforehand
and
the
remaining
selections
will
be
programmed
to
fit
the
remaining
time.
Display
1
Place
a
disc
on
the
tray
and
close
it
with
the
@
OPEN/CLOSE
button.
Press
the
EDIT
button
and
display
“EDIT”.
te
DOI
OD
a
it
{2|siets|
2508
Each
time
you
press
the
él
<q
/
BP
PPI
button,
the
display
changes
to
give
you
the
following
duration.
[
--.--
-—
§=823.00
—
27.00
al
45.00
<——»
37.00
<>
30.00
Designating
the
Total
EN
Alale
ml
eal=
WW
iFeTiehaclalslaras
4
Press
the
EDIT
button.
The
selections.for
side
A
are
determined
automatically.
Then
the
display
shows
the
last
selection
to
be
recorded
(a)),
total
playing
time
(b)),
and
the
selections
to
be
recorded
(c)).
!
Press
the
EDIT
button
once
more
while
“B”
in
the
tape
indicator
is
blinking.
Another
program
for
the
other
side
is
completed.
ree.
an
ree
Ba
To
play
the
program
Press
the
B>
button.
The
selections
for
side
A
will
be
played
and
then
the
unit
will
pause.
Set
the
tape
to
the
beginning
of
side
B,
then
press
the
®
or
the
88
button.
The
selections
for
side
B
will
be
played.
Note
Playback
can
be
performed
when
“EDIT”
is
displayed.
To
stop
playing
Press
the
I
button.
You
can
play
the
same
program
repeatedly
as
long
as
you
do
not
cancel
the
edit
or
erase
the
program.
To
erase
the
entire
program
*
Press
the
M
button
once
during
stop;
twice
during
play.
*
Press
the
&
button.
¢
Turn
off
the
power.
¢
Press
the
CONTINUE
button.
To
check
the
program
See
page
16.
To
designate
a
different
time
for
each
side
Execute
steps
1
to
4,
then
press
the
88
button.
Then
execute
steps
2
to
4
for
the
other
side.
18
Keep
your
system
in
good
condition
to
obtain
the
best
sound.
OlT=F-Tallevem
alr-lekm-]
ale
Mm
i=)
ol-m
arch
da)
Clean
after
every
10
hours
of
use
and
before
recording,
1
Press
the
B
/
4
button
to
open
the
cassette
holder.
2
Moisten
a
cotton
swab
slightly
with
cleaning
fluid
or
alcohol.
3
Wipe
heads,
pinch
roller
and
capstans.
Cotton
swab
Playback
head
head
Playback/
recording
head
Erasing
Pinch
roller
Do
not
insert
a
cassette
tape
until
cleaned
areas
are
completely
dry.
Demagnetizing
the
Heads
Remove
magnetism
built
up
on
the
heads
after
every
20
to
30
hours
of
use.
Turn
off
the
power
before
demagnetizing
the
heads.
Use
any
commercially
available
demagnetizer.
Cleaning
Discs
When
a
disc
becomes
dirty,
clean
it
with
a
cleaning
cloth.
Wipe
the
disc
from
the
center
outward.
Do
not
use
solvents
such
as
benzine,
thinner,
commercially
available
cleaners
or
anti-static
spray
intended
for
analog
discs.
Cleaning
the
Cabinets
Use
a
soft
cloth
lightly
moistened
with
a
mild
detergent
solution.
[specifications
Compact
disc
deck
receiver
(HCD-G2000/HCD-D250)
AUDIO
POWER
SPECIFICATIONS
POWER
OUTPUT
AND
TOTAL
HARMONIC
DISTORTION:
With
6-ohm
loads,
both
channels
driven,
from
70
-
15,000
Hz;
rated
10
watts
per
channel
minimum
RMS
power,
with
less
than
10%
total
harmonic
distortion
from
250
milliwatts
to
rated
output.
Amplifier
Continuous
RMS
power
output
10
W +
10
W
(6
ohms,
at
1
kHz,
5%
THD)
8
ohms
or
more
Frequency
response
15
Hz
to
50
kHz‘}
aB
Tuner
System
FM
stereo
FM/AM
superheterodyne
tuner
FM
tuner
section
Tuning
range
87.5
to
108
MHz
Antenna
300
ohms
balanced
75
ohms
unbalanced
Intermediate
frequency
10.7
MHz
AM
tuner
section
Tuning
range
530
to
1,710
kHz
Antenna
AM
loop
antenna
External
antenna
terminal
Intermediate
frequency
450
kHz
Cassette
deck
Recording
system
4-track
2-channel
stereo
Frequency
response
DOLBY
NR
OFF
With
Type
Il
cassette
(Sony
UX-S)
40
Hz
to
14
kHz
(#3
dB)
With
Type
I
cassette
(Sony
HF-S)
40 Hz
to
13
kHz
(«3
dB)
Wow
and
flutter
+0.1%
(WRMS)
Compact
disc
player
Laser
Semiconductor
laser
Wavelength
780
—790
nm
Frequency
response
2
Hz
to
20
kHz
+1
dB
Signal-to-noise
ratio
More
than
93
dB
Dynamic
range
More
than
90
dB
Harmonic
distortion
Less than
0.01%
(1
kHz)
Channel
separation
More
than
90
dB
(1
kHz)
General
Power
requirements
120
V
AC,
60
Hz
Power
consumption
45W
Mass
Approx.
7.5
kg
(16
lb
9
oz)
Dimensions
Approx.
355
x
380
x
325
mm
(14
x
15
x
12’/,
inches)
(w/h/d,
including
projections)
Speakers
(SS-G2000/SS-D255)
Speaker
system
2-way
speaker
system
(SS-D255)
3-way
speaker
system
(SS-G2000)
Mass
Approx.
3
kg
per
speaker
(6
Ib
10
oz)
Dimensions
Approx.
220
x
395
x
180
mm
(8°/,
x
15°/,
x
7'/,
inches)
(w/h/d,
including
projections)
Supplied
accessories
Remote
commander
RM-S221
(1)
Batteries
Sony
SUM-3
(NS)
(2)
FM
wire
antenna
(1)
AM
loop
antenna
(2)
Design
and
specifications
are
subject
to
change
without
notice.
an
bi
colelo)(=s-Jaleloy
alate
mere
tel
Before
going
through
the
check
list
below,
first
refer
back
to
the
connections
and
operating
procedures.
Should
any
problem
persist
after
you
have
made
these
checks,
consult
your
nearest
Sony
service
facility.
Symptom
Cause
Remedy
No
power.
AC
power
cord
is
not
connected
Connect
the
AC
power
cord
securely.
securely.
No
sound.
Volume
is
not
turned
up.
Turn
up
the
volume.
Wrong
connection.
Connect
the
speaker
cords
correctly.
Loose
connections.
Make
connections
securely.
Reversed
left
and
right
sound.
Wrong
connection.
Connect
the
speaker
cords
correctly.
Severe
hum
or
noise.
Loose
connections.
Make
connections
securely.
Unit
is
near
TV
or
VTR.
Move
TV
or
VTR
away
from
the
unit.
Symptom
Cause
Remedy
The
“TUNED”
or
“STEREO”
indicator
Antenna
is
not
aimed
in
the
right
Adjust
the
location
and
direction
of
the
blinks.
ion.
antenna.
Weak
signal.
Connect
to
an
external
antenna
if
the
indication
still
blinks.
Set
the
STEREO/MONO
button
to
MONO.
Severe
hum
or
noise.
Antenna
is
not
aimed
in
the
right
Adjust
the
location
and
direction
of
the
direction.
antenna.
Weak
signal.
Connect
to
an
external
antenna
if
hum
or
noise
still
interferes
with
reception.
Cassette
deck
Symptom
Cause
Remedy
You
cannot
play
back
a
tape.
§§
PAUSE
is
engaged.
Press
the
i8
PAUSE
button
to
release
the
unit
from
the
pause
mode.
You
cannot
record
on
a
tape.
The
tab
has
been
removed
from
the
Cover
the
opening
with
plastic
tape.
cassette.
You
cannot
dub
tapes.
The
tab
of
the
cassette
in
deck
B
has
Cover
the
opening
with
plastic
tape.
been
removed.
Unbalanced
tone
in
higher
frequencies.
The
DOLBY
NR
switch
is
not
in
the
Set
the
DOLBY
NR
switch
to
the
same
correct
position.
position
as
was
set
for
recording.
Unclear
recording
or
playback.
Dirty
head.
Clean
and
demagnetize
the
recording/
playback
head.
Excessive
wow
or
flutter,
or
sound
Dirty
capstan
and
pinch
roller.
Clean
the
capstan
and
pinch
roller.
dropout.
Incomplete
erasure.
Magnetized
head.
Demagnetize
the
erasing
head.
NJ
0

This manual suits for next models

1

Other Sony Stereo System manuals

Sony CMT-C7NT User manual

Sony

Sony CMT-C7NT User manual

Sony ST-SP55 User manual

Sony

Sony ST-SP55 User manual

Sony CMT-E301 Setup guide

Sony

Sony CMT-E301 Setup guide

Sony CHC-P33D User manual

Sony

Sony CHC-P33D User manual

Sony CMT-LS1 - Micro Hi Fi Component System User manual

Sony

Sony CMT-LS1 - Micro Hi Fi Component System User manual

Sony CMT-NEZ3 - Micro Hi Fi Component System User manual

Sony

Sony CMT-NEZ3 - Micro Hi Fi Component System User manual

Sony HCD-GRX8 User manual

Sony

Sony HCD-GRX8 User manual

Sony MEX-BT2800 - Bluetooth Audio System User manual

Sony

Sony MEX-BT2800 - Bluetooth Audio System User manual

Sony SRS-X88 User guide

Sony

Sony SRS-X88 User guide

Sony SRS-XG500 User manual

Sony

Sony SRS-XG500 User manual

Sony HCD-VX222 User manual

Sony

Sony HCD-VX222 User manual

Sony CMT-SBT100 User manual

Sony

Sony CMT-SBT100 User manual

Sony MHC-V21D User manual

Sony

Sony MHC-V21D User manual

Sony HCD-GT444 User manual

Sony

Sony HCD-GT444 User manual

Sony MEX-XB100BT User manual

Sony

Sony MEX-XB100BT User manual

Sony CMT-X5CD User manual

Sony

Sony CMT-X5CD User manual

Sony CMT-U1 User manual

Sony

Sony CMT-U1 User manual

Sony RDP-XF300iPN User manual

Sony

Sony RDP-XF300iPN User manual

Sony CMT-EX100 User manual

Sony

Sony CMT-EX100 User manual

Sony ZS-X1 - Cd Boombox User manual

Sony

Sony ZS-X1 - Cd Boombox User manual

Sony MHC-M500AV User manual

Sony

Sony MHC-M500AV User manual

Sony CMT-EP305 Instruction Manual

Sony

Sony CMT-EP305 Instruction Manual

Sony SEN-211 User manual

Sony

Sony SEN-211 User manual

Sony MHC-RX30 User manual

Sony

Sony MHC-RX30 User manual

Popular Stereo System manuals by other brands

Sharp CD-ES222E quick start guide

Sharp

Sharp CD-ES222E quick start guide

Philips AZ1046 user manual

Philips

Philips AZ1046 user manual

Rotel RCX-1500 owner's manual

Rotel

Rotel RCX-1500 owner's manual

Audiovox Prestige P-57 Service manual

Audiovox

Audiovox Prestige P-57 Service manual

Yamaha GX-700 owner's manual

Yamaha

Yamaha GX-700 owner's manual

RCA RS2520 quick start guide

RCA

RCA RS2520 quick start guide

Angry Audio 991009 user guide

Angry Audio

Angry Audio 991009 user guide

Panasonic SC-AK48 operating instructions

Panasonic

Panasonic SC-AK48 operating instructions

Philips FW 33 manual

Philips

Philips FW 33 manual

Philips FW-C30/21 Specifications

Philips

Philips FW-C30/21 Specifications

TAG Bohemia 7B user manual

TAG

TAG Bohemia 7B user manual

Altec Lansing AL-SNB301W-001-SNOW user manual

Altec Lansing

Altec Lansing AL-SNB301W-001-SNOW user manual

Beta Three CS-1 Operation manual

Beta Three

Beta Three CS-1 Operation manual

TDK MAF Series manual

TDK

TDK MAF Series manual

Sanyo DC -X1000MD Service manual

Sanyo

Sanyo DC -X1000MD Service manual

Telefunken TF-PS2101 instruction manual

Telefunken

Telefunken TF-PS2101 instruction manual

LG XA146 owner's manual

LG

LG XA146 owner's manual

Samsung MX-H830 user manual

Samsung

Samsung MX-H830 user manual

manuals.online logo
manuals.online logoBrands
  • About & Mission
  • Contact us
  • Privacy Policy
  • Terms and Conditions

Copyright 2025 Manuals.Online. All Rights Reserved.