Sony LBT-XGV10AV User manual

Compact Hi-Fi
Stereo System
© 2002 Sony Corporation
Operating Instructions
4-239-139-12 (2)
LBT-XGV10AV

2
GB
You can
Enjoy video playback (moving
pictures) as well as audio CDs.
Play interactive software using
menu screens displayed on the
TV screen (menu playback), in
addition to the video playback
function of VIDEO CDs
without PBC functions.
Moreover, you can play high
or standard quality still picture.
WARNING
To prevent fire or shock hazard, do not
expose the unit to rain or moisture.
To avoid electrical shock, do not open the cabinet.
Refer servicing to qualified personnel only.
Do not install the appliance in a confined space,
such as a bookcase or built-in cabinet.
To prevent fire, do not Cover the ventilation of the
apparatus with newspapers, table-cloths, curtains, etc.
And don’t place lighted candles on the apparatus.
To prevent fire or shock hazard, do not place objects
filled with liquids, such as vases, on the apparatus.
The following caution label is located inside the
apparatus.
Don’t throw away the battery with
general house waste, dispose of it
correctly as chemical waste.
This appliance is classified as
a CLASS 1 LASER product.
This label is located on the
rear exterior.
This system can play the
following discs
VIDEO CDs Audio CDs
Disc logo
Contents Audio + Video Audio
(moving pictures)
Disc size 12 cm/8 cm 12 cm/8 cm
Play time 74 min./20 min. 74 min./20 min.
Notes on VIDEO CDs
•This system conforms to VIDEO CDs without PBC
functions (Ver. 1.1) and VIDEO CDs with PBC
functions (Ver. 2.0) of VIDEO CD standards. You
can enjoy two kinds of playback according to the
disc type.
Disc type
VIDEO CDs without
PBC functions
(Ver. 1.1 discs)
VIDEO CDs with
PBC functions
(Ver. 2.0 discs)
PBC = Play Back Control
•VIDEO CDs with CD audio tracks may not play
properly.
Notes on CD-R and CD-RW discs
This unit can play the following discs:
Type of discs Label on the disc
Audio CDs
MP3 files
•Discs recorded on CD-R/CD-RW drives may not be
played back because of scratches, dirt, recording
condition or the drive’s characteristics.
• You cannot also play a CD-R/CD-RW that is not
finalized*.
• Playback of multi-session CD-R/CD-RWs is not
supported.
*A process is necessary for a recorded CD-R/CD-
RW disc to be played on the audio CD player.
This stereo system is equipped with the Dolby Pro
Logic Surround decoder.*
* Manufactured under license from Dolby
Laboratories.
“Dolby”, “Pro Logic”, and the double-D symbol are
trademarks of Dolby laboratories. Confidential
unpublished works. © 1992-1997 Dolby
Laboratories. All rights reserved.
ENERGY STAR®is a U.S.
registered mark.
As ENERGY STAR®Partner, Sony
Corporation has determined that this
product meets the ENERGY STAR®
guidelines for energy efficiency.

3
GB
Table of Contents
List of Button Locations and
Reference Pages
Main unit ........................................................ 4
Remote control............................................... 5
Getting Started
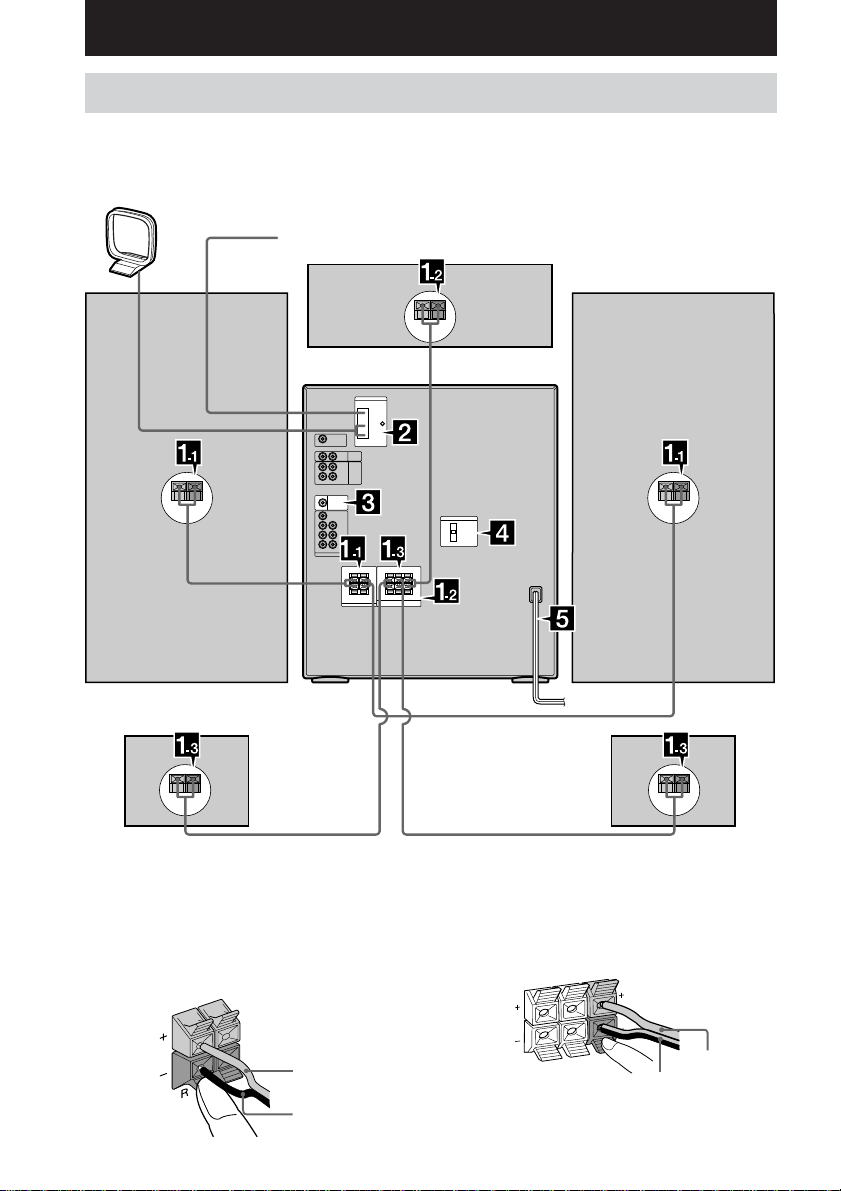
Hooking up the system .................................. 6
Inserting two size AA (R6) batteries into the
remote ..................................................... 8
Setting up the speakers for Dolby Pro
Logic ....................................................... 9
Setting the clock ..........................................10
VIDEO CD/CD/MP3 files
Loading a disc .............................................. 11
Playing a VIDEO CD
–– Normal Play/Shuffle Play/
Repeat Play ........................................... 11
Playing a VIDEO CD with the PBC functions
(Ver. 2.0)
–– PBC Play................................................. 13
Playing a CD
–– Normal Play/Shuffle Play/
Repeat Play ........................................... 14
Programming the VIDEO CD/CD tracks
–– Program Play ..........................................15
Playing a disc with MP3 files
–– Normal Play/Shuffle Play/
Repeat Play ........................................... 16
Locating a specific part on a VIDEO CD
–– Time Search/Disc Digest ........................ 18
Resuming playback from the point you
stopped a VIDEO CD
–– Resume Play ........................................... 19
Tuner
Presetting radio stations ............................... 20
Listening to the radio ................................... 21
Tape
Loading a tape.............................................. 22
Playing a tape............................................... 22
Recording to a tape
–– CD Synchro Recording/High Speed
Dubbing/Recording Manually/
Program Edit ......................................... 23
Timer-recording radio programs.................. 24
Sound Adjustment
Adjusting the sound ..................................... 25
Selecting the audio emphasis effect.............26
Selecting the surround effect .......................26
Making a personal audio emphasis file
–– Personal File ........................................... 27
Enjoying Dolby Pro Logic Surround
sound ..................................................... 27
Timer
Falling asleep to music
— Sleep Timer............................................. 28
Waking up to music
— Daily Timer............................................. 28
Other Features
Changing the spectrum analyzer display ..... 29
Singing along: Karaoke ............................... 29
Enhancing video game sound
–– Game Sync .............................................. 31
Mixing video game sound with other sound
source
— Game Mixing .......................................... 31
Display
Turning off the display
— Power Saving Mode................................ 32
Using the display ......................................... 32
Adjusting the VCD picture
— Picture Effect ..........................................33
Using the on-screen display ......................... 33
Optional Components
Hooking up optional components ................35
Listening to audio from a connected
component ............................................ 37
Recording audio from a connected
component ............................................ 38
Recording on a connected component .........38
Troubleshooting
Problems and remedies ................................ 38
Messages ...................................................... 41
Additional Information
Precautions ................................................... 42
Specifications ............................................... 43
Glossary ....................................................... 45

4
GB
ALPHABETICAL ORDER
E – K
ECHO LEVEL ej (30)
EDIT ef (8, 24)
EFFECT 5(26, 27)
ENTER 5(10, 24, 25, 27–29, 33)
FM MODE 8(21)
FUNCTION qd (8, 11, 14, 15, 17,
23, 30, 31, 37)
GAME qf (31, 37)
GAME INPUT AUDIO L/R jacks
wf (36)
GAME INPUT VIDEO jack wf
(36)
GAME MIXING qg (31)
GROOVE ra (25)
H SPEED DUB ql (23)
KARAOKE PON/MPX ea (29)
KEY CONTROL #/2ea (30)
M – R
MIC LEVEL ej (29, 30)
MIC 1/2 jacks eh (29)
NEXT wd (13, 19)
P FILE 5(26, 27)
PHONES jack w;
PICTURE EFFECT wd (33)
PLAY MODE eg (11, 14, 15, 17)
POWER SAVE/DEMO
(STANDBY) 3(32)
Power stream indicator 6
PREV wd (13, 19)
PRO LOGIC wg (9, 27)
PUSH OPEN wk (11, 12, 15, 17)
REPEAT eg (12, 15, 17)
RETURN Owd (13)
List of Button Locations and Reference Pages
How to use this page
Use this page to find the location of buttons and other
parts of the system that are mentioned in the text.
Illustration number
r
PLAY MODE eg (11, 14, 15, 17)
RR
Name of button/part Reference page
Main unit
wfwgwhwjwle;eaesed
ef
eg
eh
ej
ek
r;
ra
el
wk
qf
qd
234 5 76890qa qs
qg
qh
qj
qk
ql
w;
wa
ws
wd
1
A – D
A EJECTZ/ZB EJECT wl (22)
ALBUM +/– ed (17)
CD SYNC ql (23, 24)
Direct equalizer qh r; (26)
POP/ROCK/JAZZ/DANCE/
GAME
SALSA/REGGAE/TANGO/
SAMBA/MOVIE
DIRECTION ek (22–24, 30)
DISC SKIP eg (12, 14, 15, 17)
DISC 1 to 5 es (12, 14, 17)
DISPLAY 2(32)
DSP ra (26)
DVD 5.1CH wg (37)

List of Button Locations and Reference Pages
5
GB
Remote control
ALPHABETICAL ORDER
1
eh
ej
r;
el
eg
e;
wl
wk
ea
es
ef
2
3
4
5
6
7
8
9
0
qa
qs
qd
qf
qg
qh
qj
qk
ql
w;
wa
wd
ws
wf
wg
wh
wj
ed
ek
S – X
SELECT wd (13, 18)
SLEEP 0(28)
SPECTRUM ANALYZER 4(29)
SUPER WOOFER ra (25)
SUPER WOOFER MODE ra (25)
TIMER SELECT qa (25, 29)
TUNER/BAND 9(20, 21)
TUNER ENTER wh (20, 41)
TUNER MEMORY wh (20)
TUNING MODE 8(20, 21)
TUNING –/+ 9(20, 21)
VOLUME control 7
X-GROOVE wj (25)
BUTTON DESCRIPTIONS
@/1 1
c/CLOCK SET qs
h/H qj el
xqj el
.m /M> qj el
Xqk
zREC qk
.AMS>wa
HX ws
xws
m/Mws
R/r/T/t(cursor) e;
A–E
ALBUM +/– eg (17)
CD Nwl (11, 12, 14, 19)
CENTER LEVEL +/– w; (10)
CLEAR 6(15, 18)
CLOCK/TIMER SELECT r; (25,
29)
CLOCK/TIMER SET 1(10, 24,
28)
DISC SKIP ef (12, 14, 15, 17)
DISPLAY eh (32)
DSP wh (26)
DVD 5.1CH wg (37)
EFFECT q; (26, 27)
ENTER ws (10, 24, 25, 27–29, 33)
F–R
FILE SELECT +/– qf (26)
FUNCTION +/– ea (8, 11, 14, 15,
17, 23, 30, 31, 37)
KEY CONTROL #/2ql (30)
NEXT wj (13, 19)
Numeric buttons ej (12, 13, 18, 19)
ON SCREEN ek (33)
PICTURE EFFECT 9(33)
PLAY MODE ed (11, 14, 15, 17)
PRESET –/+ wj (21)
PREV wj (13, 19)
PRO LOGIC wf (9, 27)
REAR LEVEL +/– qh (10)
REPEAT es (12, 15, 17)
RETURN Oqa (13)
S–V
SELECT wl (13, 18)
SLEEP el (28)
SPECIAL MENU 8(18, 19)
TAPE A nN e; (22)
TAPE B nN qg (22)
TEST TONE wd (9)
TUNER/BAND wk (20, 21)
TUNING –/+ qj (20, 21)
TV CH +/– 5(8)
TV/VIDEO 7(8)
TV VOL +/– 4(8)
TV @/1 2(8)
VOL +/– qk
BUTTON DESCRIPTIONS
@/1 3
Xqs
xqd
m/Mqj
R/r/T/t(cursor) wa
./>wj

6
GB
Getting Started
Hooking up the system
Do the following procedure 1to 6to hook up your system using the supplied cords and
accessories.
1Connect the speakers.
1 Connecting the front speakers
Connect the speaker cords to the FRONT
SPEAKER jacks as below.
2 Connecting the center speaker
Connect the speaker cords to the
SURROUND SPEAKER CENTER jack as
below.
CENTER
REAR
L
R
Black/Stripe (#)
Red/Solid (3)
Insert only the stripped portion.
Black/Stripe (#)
Red/Solid (3)
AM loop antenna
FM antenna
Right front speaker Left front
speaker
Center speaker
Left rear
speaker
Right rear
speaker

Getting Started
7
GB
4For models with a voltage selector, set
VOLTAGE SELECTOR to the position of
your local power line voltage.
Refer to the print on your system’s
VOLTAGE SELECTOR for available
setting.
* Saudi Arabian model : 120 – 127 V
5Connect the power cord to a wall outlet.
The demonstration appears in the display.
When you press ?/1, the system turns on
and the demonstration automatically ends.
If the supplied adaptor on the plug does not
fit your wall outlet, detach it from the plug
(only for models equipped with the
adaptor).
6Set the color system according to your
TV while the power is off.
*When your TV automatically changes the color
system according to the input signal.
Notes
•When you play a VIDEO CD recorded in the
different color system from the one you set to the
unit, the picture image may be distorted.
•You cannot set the color system in the Power
Saving Mode.
The color system
of your TV
NTSC
PAL
AUTO*
Do this
While holding down
DANCE, press ?/1.
While holding down
ROCK, press ?/1.
While holding down JAZZ,
press ?/1.
continued
CENTER
REAR
L
R
Black/Stripe (#)Red/Solid (3)
3 Connecting the rear speakers
Connect the speaker cords to the
SURROUND SPEAKER REAR jacks as
below.
Note
Keep the speaker cords away from the antennas to
prevent noise.
2Connect the FM/AM antennas.
Set up the AM loop antenna, then connect
it.
Note
Keep the speaker cords away from the antennas to
prevent noise.
3Connect the video input jack of your TV
to the VIDEO OUT jack with the
supplied video cable.
VIDEO OUT
When using a TV
Turn on the TV and select the video input so you can
view the pictures from this system.
Jack type B
AM
COAXIAL
FM 75
AM loop antenna Extend the FM
lead antenna
horizontally.
Jack type A
FM 75
AM
AM loop antenna Extend the FM
lead antenna
horizontally.
VOLTAGE SELECTOR
120V*
220V
230~240V

8
GB
Inserting two size AA (R6)
batteries into the remote
Tip
When the remote no longer operates the system,
replace both batteries with new ones.
Note
If you do not use the remote for a long period of time,
remove the batteries to avoid possible damage from
battery leakage.
Using the remote
You can control Sony TVs using the buttons
below.
By pressing
TV ?/1
TV/VIDEO
TV VOL +/–
TV CH +/–
Note
Depending on the TV, you may not be able to control
your TV or to use some of the buttons above.
You can
Turn on or off the TV
Select the input source for the TV
Adjust the volume of the TV
Change the channel of the TV
TV ?/1
TV CH +/–
TV VOL +/–
TV/VIDEO
When carrying this system
Do the following to protect the CD
mechanism.
1Make sure that all discs are removed
from the unit.
2Press FUNCTION (or FUNCTION +/– on
the remote) repeatedly until “CD”
appears.
3Hold down EDIT and then press ?/1until
“LOCK” appears.
4Unplug the AC power cord.
Before connecting the Center and
Front speakers
Stick the supplied speaker pads to the bottom
of the center speaker and front speakers to
stabilize the speakers and prevent them from
slipping.
Hooking up the system (continued)
Front speaker
Center speaker

Getting Started
9
GB
Setting up the speakers
for Dolby Pro Logic
Dolby Pro Logic Surround improves the sound
image by using four separate channels. These
channels manipulate the sound to enhance the
action as it happens on the screen.
Since the center speaker cannot produce
enough bass, the bass sound of the center
channel is output from the front speakers.
Positioning the center and
rear speakers
1Place the front speakers at an angle of
45 degrees from your listening
position.
2Place the center speaker so it is placed
at about the same height as the front
speakers. Align the center speaker with
the front speakers or place it a little
behind the front speakers’ position.
3Place the rear speakers facing each
other at about 60 to 90 cm above your
listening position.
Adjusting the speaker volume
of each speaker (Test Tone)
To enjoy Dolby Pro Logic Surround sound,
adjust the volume of each speaker using the test
tone that the system provides.
1Press PRO LOGIC when the power is
on.
The button lights up.
2Press TEST TONE on the remote.
The test tone is heard from the speakers in
the following order.
LEFT (front left) tCENTER (center) t
RIGHT (front right) t
REAR (rear) t.....
Front speaker
(L) Front speaker
(R)
Rear
speaker
(R)
Rear
speaker
(L)
Center speaker
Rear speaker
60 to 90 cm
45
Front
speaker
(L)
Front
speaker
(R)
Rear
speaker
(L)
Rear
speaker
(R)
Center speaker
continued

10
GB
3From your listening position, adjust the
volume until the volume level of the
test tone from each speaker sounds the
same.
To adjust
the volume of the
center speaker
the volume of the rear
speakers
4From your listening position, adjust the
balance.
To adjust
the balance between
the front left and
front right speakers
the balance between
the rear left and rear
right speakers
5Press TEST TONE when you are done
adjusting.
The test tone is turned off.
Tip
If you turn VOLUME (or press VOL+ or – on the
remote) all the speaker volume changes.
Note
The test tone feature works only for Dolby Pro Logic
Surround sound.
Setting up the speakers for Dolby Pro
Logic (continued)
Press
CENTER LEVEL +/– on
the remote.
REAR LEVEL +/– on the
remote.
Setting the clock
1 Turn on the system.
2Press c/CLOCK SET (or CLOCK/TIMER
SET on the remote).
3Press R/rrepeatedly to set the hour.
4Press ENTER.
The minute indication flashes.
5Press R/rrepeatedly to set the minute.
6Press ENTER.
The clock starts working.
If you make a mistake
Press T/trepeatedly until the incorrect item
flashes, then set it again.
To adjust the clock
1Press c/CLOCK SET (or CLOCK/TIMER
SET on the remote).
2Press R/rto select “CLOCK SET,” then
press ENTER.
3Do the same procedures as step 3 to 6
above.
Notes
•The clock settings are canceled when you
disconnect the power cord or if a power failure
occurs.
•You cannot set the clock in the Power Saving
Mode.
Press
Tor twhile “LEFT”,
“CENTER”, or “RIGHT”
appears.
Tor twhile “REAR”
appears.

VIDEO CD/CD/MP3 files
11
GB
VIDEO CD/CD/MP3 files
Loading a disc
1Press PUSH OPEN.
The front cover opens.
2Place a disc with the label side up on
the disc tray.
To insert additional discs, press DISC SKIP
to rotate the disc tray.
3Close the front cover.
Playing a VIDEO CD
––Normal Play/Shuffle Play/Repeat
Play
You can play both VIDEO CDs without PBC
functions (Ver.1.1) and VIDEO CDs with PBC
functions (Ver.2.0).
This unit lets you play the VIDEO CD in
different play modes.
1Turn on your TV and select the video
input.
Refer to the instructions included with your
TV for details.
When you play
a CD single,
place it on the
inner circle of
the tray.
continued
Disc number in the playing position
Track number Playing time
2Press FUNCTION (or FUNCTION +/– on
the remote) repeatedly until “CD”
appears.
3Press PLAY MODE repeatedly in stop
mode until the mode you want appears.
Select
ALL DISCS*
(Normal Play)
1 DISC/ALBUM
(Normal Play)
ALL DISCS
SHUFFLE
(Shuffle Play)
1 DISC SHUFFLE/
ALBUM SHUFFLE
(Shuffle Play)
PROGRAM
(Program Play)
*Depending on VIDEO CDs with PBC function
(Ver.2.0), the disc does not change.
4Press HX (or CD Non the remote).
To play
All VIDEO CDs in the disc tray
continuously.
The VIDEO CD you selected in
the original order.
The tracks on all VIDEO CDs
in random order.
The tracks on the VIDEO CD
you selected in random order.
The tracks on all VIDEO CDs
in the order you want them to be
played (see “Programming the
VIDEO CD/CD tracks” on page
15).

12
GB
*1There may be some disturbance in the paused
video image.
*2Only when PBC function is set to off or when
playing VIDEO CDs without PBC functions (Ver.
1.1).
*3DISC 1 to 5 are not available when “ALL DISCS
SHUFFLE” is selected.
*4You cannot select “REPEAT” and “ALL DISCS
SHUFFLE” at the same time.
Tip
You can change the VIDEO CD in the loading
position during playback of the VIDEO CD in the
playing position.
To enter a track number using the
remote
You can also select the desired track using the
remote during Normal Play.
Press the numeric buttons. The playback
automatically starts.
To enter a track number over 10
1Press >10.
2Enter the corresponding digits.
To enter 0, press 10/0 instead.
Example:
To enter track number 30, press>10, then 3 and 10/0.
Playing a VIDEO CD (continued)
Other Operations
To
Stop playback
Pause
Select a track
Find a point
in a track or scene
(Lock Search function)
Select a VIDEO CD in
stop mode
Switch to VIDEO CD
function from another
source
Play repeatedly
(Repeat Play)
Remove the VIDEO
CD
Do this
Press x.
Press HX (or Xon the
remote)*1. Press again to
resume play (or CD Non
the remote).
Turn .AMS >
clockwise (to go forward) or
counterclockwise (to go
backward) and release it
when you reach the desired
track. (Or press >(to go
forward) or .(to go
backward) on the remote.)*2
Press Mor mduring
playback.
1Press once to start
searching.
2Press again to increase
the search speed. Each time
you press the button, the
speed changes as follows:
1(slow) t2 (normal) t
3 (high) t1(slow)...
3Press HX at the desired
point to stop searching.
Press one of the DISC 1to
5*3or DISC SKIP.
Press any of the buttons,
DISC 1to 5 or HX (or CD
Non the remote)
(Automatic Source
Selection).
Press REPEAT during
playback until “REPEAT” or
“REPEAT1” appears.
REPEAT*4: For all the
tracks on the VIDEO CD up
to five times.
REPEAT1*2: For a single
track only.
To cancel playing
repeatedly, press REPEAT
until “REPEAT” or
“REPEAT1” disappears.
Press PUSH OPEN.

VIDEO CD/CD/MP3 files
13
GB
To
Stop play
Go to the next menu
page or scene
Go back to the previous
menu page or scene
Go back to the previous
menu
Playing a VIDEO CD with
the PBC functions (Ver.
2.0)
–– PBC Play
You can use menus on your TV screen to enjoy
the disc’s interactive software. The menu
format and structure will differ with each disc.
1Start playing a VIDEO CD with PBC
functions (Ver. 2.0).
A PBC menu appears on your TV and
“PBC” appears in the display.
2Turn .AMS >to select a number
from the menu, then press SELECT (or
press numeric buttons on the remote).
3Continue according to the instructions
on the menus to enjoy interactive
playback.
Do this
Press x.
Press NEXT.
Press PREV.
Press RETURN (or
RETURN Oon the
remote).
Tips
• When appears on the TV screen, you have
pressed an invalid button. Press a button indicated
by the instructions on the menu screen.
•When you press NEXT during menu playback or
while playing moving pictures, the next scene on
the disc appears. Also refer to the instructions
supplied with the disc.
•“PBC” appears for the disc with PBC functions, and
“PBC OFF” appears when its function is canceled.
Note
Depending on the disc, the player may not be able to
advance to the next disc during playback even when
“ALL DISCS” is selected.
Press DISC SKIP to go to the next disc.
To
Cancel playback with
PBC functions (Ver.2.0)
Play with PBC functions
(Ver.2.0) following the
cancellation above
Select a menu number
using the remote
Do this
In the stop mode, turn
.AMS >(or
press ./ >on the
remote) to select the
desired track, then press
HX (or press the
numeric buttons on the
remote).
The PBC OFF indicator
lights up and playback
begins from the selected
track. Still images such
as menu screens will not
be shown.
In stop mode, press x.
Press numeric buttons
(see “To enter a track
number using the
remote” on page 12).

14
GB
Other Operations
To
Stop playback
Pause
Select a track
Find a point in a track
(Lock Search function)
Select a CD
Switch to CD function
from another source
Disc number in the playing position
Track number Playing time
Playing a CD
––Normal Play/Shuffle Play/Repeat
Play
This unit lets you play the CD in different play
modes.
1Press FUNCTION (or FUNCTION +/– on
the remote) repeatedly until “CD”
appears.
2Press PLAY MODE repeatedly in stop
mode until the mode you want appears.
Select
ALL DISCS
(Normal Play)
1 DISC/ALBUM
(Normal Play)
ALL DISCS
SHUFFLE
(Shuffle Play)
1 DISC SHUFFLE/
ALBUM SHUFFLE
(Shuffle Play)
PROGRAM
(Program Play)
3Press HX (or CD Non the
remote).
To play
All CDs in the disc tray
continuously.
The CD you selected in the
original order.
The tracks on all CDs in
random order.
The tracks on the CD you
selected in random order.
The tracks on all CDs in the
order you want them to be
played (see “Programming
the VIDEO CD/CD tracks”
on page 15).
Do this
Press x.
Press HX (or X on the
remote). Press again to
resume play.
During play or pause, turn
.AMS >clockwise
(to go forward) or
counterclockwise (to go
backward) (or press >
(to go forward) or .(to
go backward) on the
remote).
Press Mor mduring
playback.
At the desired point, press
HX to stop searching.
Press DISC 1 to 5*1or
DISC SKIP.
Press DISC 1 to 5 or HX
(or CD N on the remote)
(Automatic Source
Selection).

VIDEO CD/CD/MP3 files
15
GB
To
Play repeatedly
(Repeat Play)
Remove the CD
*1DISC 1 to 5 are not available when “ALL DISCS
SHUFFLE” is selected.
*2You cannot select “REPEAT” and “ALL DISCS
SHUFFLE” at the same time.
Tip
You can change the CD in the loading position during
playback of the CD in the playing position.
Programming the VIDEO
CD/CD tracks
–– Program Play
You can make a program of up to 25 tracks
from all the VIDEO CD/CDs in the order you
want them to be played.
1Press FUNCTION (or FUNCTION +/– on
the remote) repeatedly until “CD”
appears, then load a CD.
2Press PLAY MODE repeatedly until
“PROGRAM” appears.
3Press one of DISC 1 to 5 to select a
disc.
4Turn .AMS >until the track you
want appears.
5Press PLAY MODE once.
The track is programmed. First the
programmed playing order and “STEP”
appear, then the total playing time appears.
6To program additional tracks, repeat
steps 3 to 5.
Skip step 3 to select tracks from the same
disc.
7Press HX.
To
Cancel Program Play
Clear a track from the
end
Add a track to the end
of the program in stop
mode
Press
PLAY MODE repeatedly
until “PROGRAM,” “ALL
DISCS SHUFFLE,”
“ALBUM SHUFFLE,” or “1
DISC SHUFFLE”
disappears.
CLEAR on the remote in
stop mode.
Perform step 3 to 5.
continued
Do this
Press REPEAT during
playback until “REPEAT”
or “REPEAT1” appears.
REPEAT*2: For all the
tracks on the CD up to five
times.
REPEAT1: For a single
track only.
To cancel playing
repeatedly, press REPEAT
until “REPEAT” or
“REPEAT1” disappears.
Press PUSH OPEN.

16
GB
Playing a disc with MP3
files
About MP3 files
MP3 (MPEG 1 Audio Layer-3) is a standard
technology and format for compressing a sound
sequence. The file is compressed to about 1/10
of its original size. Sounds outside the range of
human hearing are compressed while the
sounds we can hear are not compressed.
Notes on discs
You can play MP3 files recorded on CD-
ROMs, CD-Rs (recordable CDs), and CD-RWs
(rewritable CDs).
The disc must be in the ISO 9660* level 1 or
level 2 format.
*ISO 9660 Format
The most common international standard for the
logical format of files and folders on a CD-ROM.
There are several specification levels. In Level 1,
file names must be in the 8.3 format (no more than
eight characters in the name, no more than three
characters in the extension “.MP3”) and in capital
letters. Folder names can be no longer than eight
characters. There can be no more than eight nested
folder levels. Level 2 specifications allow file names
and folder names up to 31 characters long.
To program the MP3 files
After step 3, press ALBUM +/– repeatedly
until the folder you want appears, and then go
to step 4.
Tips
•The program you made remains in the CD player
after it has been played back. Press HX to play
the same program again.
• “--.--” appears when the total CD program time
exceeds 100 minutes, when you select a CD track
whose number is 21 or over or when you
programmed MP3 files.
Programming the VIDEO CD/CD
tracks (continued)

VIDEO CD/CD/MP3 files
17
GB
––Normal Play/Shuffle Play/Repeat
Play
This unit lets you play a disc with MP3 files in
different play modes.
1Press FUNCTION (or FUNCTION +/– on
the remote) repeatedly until “CD”
appears.
2Press PLAY MODE repeatedly in stop
mode until the mode you want appears.
Other Operations
To
Stop playback
Pause
Select a file
Select a folder*1
Find a point in a file*2
(Lock Search function)
Select a disc
Switch to disc function
from another source
Play repeatedly
(Repeat Play)
Remove the disc
*1You cannot select a folder during “ALL DISCS
SHUFFLE” or “1 DISC SHUFFLE.”
*2The search function works only for the currently
playing MP3 file. Searching for a point over two or
more MP3 files is therefore not possible.
Furthermore, the playing time may not be
displayed correctly depending on the MP3 file.
*3DISC 1 to 5 are not available when “ALL DISCS
SHUFFLE” is selected.
*4You cannot select “REPEAT” and “ALL DISCS
SHUFFLE” at the same time.
Select
ALL DISCS
(Normal Play)
1 DISC
(Normal Play)
ALBUM
(Normal Play)
ALL DISCS
SHUFFLE
(Shuffle Play)
1 DISC
SHUFFLE
(Shuffle Play)
ALBUM
SHUFFLE
(Shuffle Play)
PROGRAM
(Program Play)
To play
All discs in the disc tray
continuously.
The disc you selected in the
original order.
The folder you selected in the
original order.
The files on all discs in random
order.
The files on the disc you selected
in random order.
The files in the folder you
selected in random order.
The files on all discs in the order
you want them to be played (see
“Programming the VIDEO CD/
CD tracks” on page 15).
continued
3Press HX (or CD Non the remote).
File number Playing time
Disc number in the playing position
Do this
Press x.
Press HX (or X on the
remote). Press again to
resume play.
During play or pause, turn
.AMS >clockwise
(to go forward) or
counterclockwise (to go
backward) (or press >
(to go forward) or .(to
go backward) on the
remote).
Press ALBUM +/– after
step 2.
Press Mor mduring
playback.
At the desired point, press
HX to stop searching.
Press DISC 1 to 5*3or
DISC SKIP.
Press DISC 1 to 5 or HX
(or CD N on the remote)
(Automatic Source
Selection).
Press REPEAT during
playback until “REPEAT”
or “REPEAT1” appears.
REPEAT*4: For all the files
on the disc up to five times.
REPEAT1: For a single file
only.
To cancel playing
repeatedly, press REPEAT
until “REPEAT” or
“REPEAT1” disappears.
Press PUSH OPEN.

18
GB
Tips
•To select a file number with the remote, press the
numeric buttons after step 3.
Example:
To play file number 100 in a folder containing 100
files or more, press >10, then 1, and 10/0 twice.
•You can change the disc in the loading position
during playback of the disc in the playing position.
Notes
•With formats other than ISO 9660 level 1 and 2,
folder names or file names may not be displayed
correctly.
•When naming, be sure to add the file extension
“.MP3” to the file name.
•If you up the extension “.MP3” to a file other than
MP3, the unit cannot recognize the file properly and
will generate random noise that could damage your
speakers.
•The following discs take a longer time to start
playback.
–adisc recorded with complicated tree structure.
•When the disc is inserted, the player reads all the
files on that disc. If there are many folders or non-
MP3 files on the disc, it may take a long time for
play to begin or for the next MP3 files to start play.
•Do not save unnecessary folders or files other than
MP3 ones in the disc to be used for MP3 listening.
We recommend that you do not save other types
files or unnecessary folders on a disc that has MP3
files.
•Afolder that does not include an MP3 files is
skipped.
•Maximum folder number: 255
(The maximum number of MP3 files and folders
that can be contained on a single disc is 512.)
• Playback is possible up to 8 levels. The MP3 files
are played in the order that they were recorded on
the disc.
•There may be exceptions to these rules depending
on the disc.
•Depending on the encoding/writing software,
recording device, or the recording media used at the
time an MP3 file is recorded, you may encounter
such problems as disabled playback, sound
interruptions, and noise.
Locating a specific part
on a VIDEO CD
–– Time Search/Disc Digest
The TV screen must be ON to use these
functions.
Use the remote for the operation.
Tips
•When you stop playback, press x.
• When you use VIDEO CDs with PBC functions
(Ver.2.0), cancel the PBC functions (see “Cancel
playback with PBC functions (Ver. 2.0)” on page
13).
Note
When the Time Search or Disc Digest function is
activated, Shuffle Play mode (SHUFFLE) or Program
Play mode (PROGRAM) automatically changes to
Normal Play mode (ALL DISCS).
Locating by elapsed time
–– Time Search
1Press SPECIAL MENU in stop mode.
2Press 1 to select “1) TIME SEARCH.”
3Press the numeric buttons to enter the
time (in minutes) for the desired
section.
The selected elapsed time appears on the
TV screen.
To reenter the time, press CLEAR, and then
press the numeric buttons again.
4Press SELECT.
Playback starts from the selected time.
Playing a disc with MP3 files
(continued)

VIDEO CD/CD/MP3 files
19
GB
Locating the desired track
–– Disc Digest
You can select the desired track by viewing the
first frame of each track. 9 different tracks can
be displayed on the TV screen at one time.
1Press SPECIAL MENU in stop mode.
2Press 2 to select “2) DISC DIGEST.”
The first frame of tracks 1 through 9 on the
current disc appear.
3Press the numeric buttons to select the
desired track.
To display the next 9 tracks
Press NEXT. The first frame of tracks 10
through 18 appear.
When there are more tracks in the disc, “>”
appears in the upper right corner of the TV
screen.
To display previous tracks, press PREV.
Resuming playback from
the point you stopped a
VIDEO CD
–– Resume Play
The system memorizes the point where you
stopped the VIDEO CD so you can resume
from that point.
Note that resume play is not available when
playing an audio CD and a disc with MP3 files.
1While playing a VIDEO CD, press xto
stop playback.
“RESUME” appears on your TV screen. If
“RESUME” does not appear, Resume Play
is not available.
2Press HX (or CD Non the remote).
The player starts playback from the point
you stopped the VIDEO CD in
step 1.
To view from the beginning of the
VIDEO CD
When “RESUME” appears on your TV screen,
press x, then press HX (or CD Non the
remote).
Notes
•Resume Play is not available in the Digest, Shuffle,
or Program Play modes.
•Depending on where you stopped the VIDEO CD,
the player may resume playback from a different
point.
•Resume play is cleared when:
–you press numeric buttons, PLAY MODE, xor
DISC SKIP or turn .AMS >.
–you remove the VIDEO CD.
–you unplug the system’s AC power cord.
–you turn off the system.
–you change the function.

20
GB
Tuner
Presetting radio stations
You can preset up to 20 FM stations and 10
AM stations. You can then tune in any of those
stations simply by selecting the corresponding
preset number.
There are two ways to store the station presets.
To
Automatically tune in all
of the stations that can be
received in your area and
then store them manually
Manually tune in and
store the radio frequency
of your favorite stations
Setting presets through
automatic tuning
1Press TUNER/BAND repeatedly to
select “FM” or “AM.”
2Press TUNING MODE repeatedly until
“AUTO” appears.
3Press TUNING –/+.
The frequency indication changes and the
scanning stops when the system tunes in a
station. “TUNED” and “STEREO” (for a
FM stereo program) appear.
If “TUNED” does not appear and
the scanning does not stop
Set the frequency of the desired radio
station as described in steps 2 through 6 of
“Setting presets through manual tuning.”
4Press TUNER MEMORY.
Method
Automatic Tuning preset
Manual Tuning Preset
5Press TUNING –/+ repeatedly to select
the desired preset number.
6Press TUNER ENTER.
“COMPLETE” appears.
7Repeat steps 1 to 6 to store other
stations.
Setting presets through
manual tuning
1Press TUNER/BAND repeatedly to
select “FM” or “AM.”
2Press TUNING MODE repeatedly until
“MANUAL” appears.
3Press TUNING –/+ repeatedly to tune in
the desired station.
4Press TUNER MEMORY.
5Press TUNING –/+ repeatedly to select
the desired preset number.
6Press TUNER ENTER.
“COMPLETE” appears.
7Repeat steps 1 to 6 to store other
stations.
Preset number
Preset number
Table of contents
Other Sony Stereo System manuals

Sony
Sony HCD-CZ1 - Amplifier, Cd Player User manual

Sony
Sony LBT-LX30 User manual

Sony
Sony ZS-2000 Primary User manual

Sony
Sony MEX-BT2800 - Bluetooth Audio System User manual

Sony
Sony MHC-GRX10AV User manual

Sony
Sony HCD-GN1100D User manual

Sony
Sony GTK-XB72 User manual

Sony
Sony DHC-MD313 - System Rack User manual

Sony
Sony MHC-W55 User manual

Sony
Sony HCD-XGR60 User manual

Sony
Sony MHC-GN100D User manual

Sony
Sony MHC-GN800 User manual

Sony
Sony LBT-LX7 User manual

Sony
Sony HCD-EH15 User manual

Sony
Sony LBT-G1000 User manual

Sony
Sony CMT-GPX5 User manual

Sony
Sony LBT-XB88KS User manual

Sony
Sony HCD-MD5 User manual

Sony
Sony CMT-CP1 - Micro Hi Fi Component System User manual

Sony
Sony CMT-EP50 User manual