Sooil Diabecare Dana-i User manual


1
This quick reference guide is an easy to follow step by step
guide to the most common and frequently used features
within the Diabecare DANA-i Insulin Pump.
The ‘Quick Reference Guide’ (QRG) is supplementary to the
IFU (Instruction For Use).
Warning All precautions and warnings within the IFU must
be read and adhered to always. Read the entire IFU before
commencing or using the Diabecare DANA-i Insulin Pump.
Refer to the DANA-i Manual for advanced features instruction
and more complex operation of the Diabecare DANA-i Insulin
Pump.

2
Inserting a battery and turning the pump on
1) Open the battery compartment with coin.
2) Place a new AAA alkaline battery into the hole with the positive(+)
at top and insert the negative(-) into the pump
3) Place the battery cap back onto the pump and tighten Firmly.
Once the battery is correctly inserted, the pump turns on
automatically and performs “self-checks” to make sure all the
systems are working properly.
.Notic. Altaline AAA batteries are recommended.

3
The Pump Buttons
This picture shows how the buttons are used to navigate through the
menus.
Press to increase insulin dosages, time and date.
Press to decrease insulin dosages, time and date or
to exit to previous menu. (cancel/stop button)
Press to move to the next function on the LCD
screen or to scroll to the right in menus.
Press to select the function highlighted on the LCD
screen. Confirmation button to confirm settings or
start a bolus.
The DANA-i insulin pump has a new and improved UI. The button
does not operate as a backwards button. The new UI menu works in
a circular rotation through the menu’s using .

4
Pump initial screen
This image shows what is displayed on the DANA-i home/initial
screen.
①
Date (MM/DD/YYYY)
②
Current Time
③
Current basal rate in units
per hour. The flashing
indicates the basal is active
④
Percentage of basal rate.
(100% is normal basal
delivery without a
temporary rate active)
⑤
Battery Status
⑥
Insulin remaining volume

5
Structure of the Pump Menu

6
Loading an Insulin Reservoir
Preparation - things to get ready before starting
•Analog Insulin (room temperature)
•DANA Reservoir (3ml)
•Auto Setter
•Linking Screw
•DANA Infusion Set and Alcohol
Swab (if required)
•DANA Insulin Pump
Procedure
1. Remove the round cap at the bottom (back) end of the Insulin
Reservoir and discard.
2. Remove the thin white plastic cap from within the reservoir
(place aside for using once full of insulin).
3. Holding the reservoir plunger barrel firmly –attach the linking
screw, ensure that it fits firmly and the teeth are aligned and
engaged.
4. Push the linking screw (and barrel of the reservoir) to the top –
ready to fill with insulin. This process ensures that the double O-
ring is moving freely and will not cause an occlusion within the
pump.
5. Remove the needle protective cap and insert into the 3ml vial of
room temperature insulin.
6. Using the needle protective cap –push the insulin plunger down
so that the insulin is slowly pushed into the DANA 3ml reservoir.
Draw the last bit out by pulling on the linking screw and barrel.
7. Place the clear needle protective cover back onto the needle.
Gently tap the reservoir with your finger in order to make the air
bubbles rise to the top of the reservoir. And push the plunger up
gently to remove the air bubbles from the reservoir.

7
8. Twist and pull to remove the needle from the reservoir and use
the small white plastic stopper put aside earlier to seal the top of
the reservoir.
9. Insert the reservoir into the Auto Setter. (the reservoir will
protrude from the top of the Auto Setter)
10. Press the button on the Auto Setter to start measuring. The
reservoir will wind down and then count the volume.
11. Remove the reservoir from Auto Setter. (Be gentle and do not
move the plunger or adjust the linking screw).
12. Insert the reservoir into the pump and screw the reservoir cap
down tightly.
13. The pump will automatically display correct refill volume. Press
OK to save and go to Refill-Prime menu and attach the new
Infusion set tube to the pump. Start the prime…
14. Stop or suspend the prime when the tube is full of insulin and
there are no air bubbles visible in the tube. Using the (-) key
will pause the prime. (5cm of insulin tube = 1 unit insulin)
15. If using a Teflon (plastic) cannula select the prime cannula
menu, this fills the empty needle within the cannula after it has
been inserted and after the tubing has been connected.
Priming of new infusion set tube is very important –it displaces air
within the tube with insulin ready for infusion. If this is not properly
completed it is likely that the pump will not deliver insulin as
accurately as expected. Ensure that during PRIME insulin can be
seen moving through the tube and that a puddle/droplet of insulin is
displaced from the end of the infusion set tubing.

8
Setting Basal Rates
Select the ‘Basal’ option from main menu
Select the ‘Edit Basal’ option from within
the ‘Basal’ menu
Confirm the current Basal profile.
Adjust the start time and end time for the
section (period) being changed or
amended.
(Note: TDB = Total Daily Basal)
Next adjust the Basal rate (u/hr) for the
period selected.
When press to save, a 'SETTING
SAVED' screen appears. Press to finish
the setting, or press to move to the
start time to set next Basal rate.
To confirm changes, select

9
Setting up and personalizing the DANA pump
Select the ‘Option’ from main menu
Select the ‘User Option’ from within the
‘Setting’menu
Within the ‘User Option’ menu there are 14 options that can be
personalized and configured. These options are specific to individual
preferences –such as pump alerts as beep or vibration and clock display
as 12 or 24 hour format?
Note –it is necessary to scroll through all options (even if no changes
are made, and confirm and/all changes by selected ‘Exit’ and confirming
‘YES’ to save options configured.
When setting or changing any of the selected options the or key
changes the selected option. The key moves to the next option.
confirms exit from option (15) exit.

10
DANA pump Setup –User Options menu
Top RH button moves through this menu, or changes
individual option. Select Exit at bottom to save any/all changes.
1. Time display 12 or 24 hour clock
2. Button Scroll On or Off –enables button press and hold to change
levels or dial up Carbohydrate –scrolling quickly.
3. Beep On or Off –this is individual key depression beeps
4. Alarm Sound, Vibration or Both
5. LCD On Time that LCD display remains active before defaulting
to sleep mode
6. Backlight On Time that LCD backlight remains on (in-between
button press)
7. Language Default language options for pump operation and
menu
8. Glucose Unit mmol/L or mg/dL –usually default setting based
upon country of origin
9. Shutdown Time setting before pump alarms due to no button
presses. If alarm not acknowledged –basal will suspend
10. Low Reservoir Personalized low volume level for alarm, 10, 20
30 units in 10u increments
11. Password Enables change to the password for unlocking the
Pump
12. Cannula Vol Enables the preset volume for filling cannula to be
pre-set (max 0.9 unit)
13. Modify Rate Change the volume of insulin within the pump
reservoir.
14. Ideal BG Ideal/Target BG value from the ‘BG Bolus Calculator’.
15. Exit Use this to save any/all changes made
11
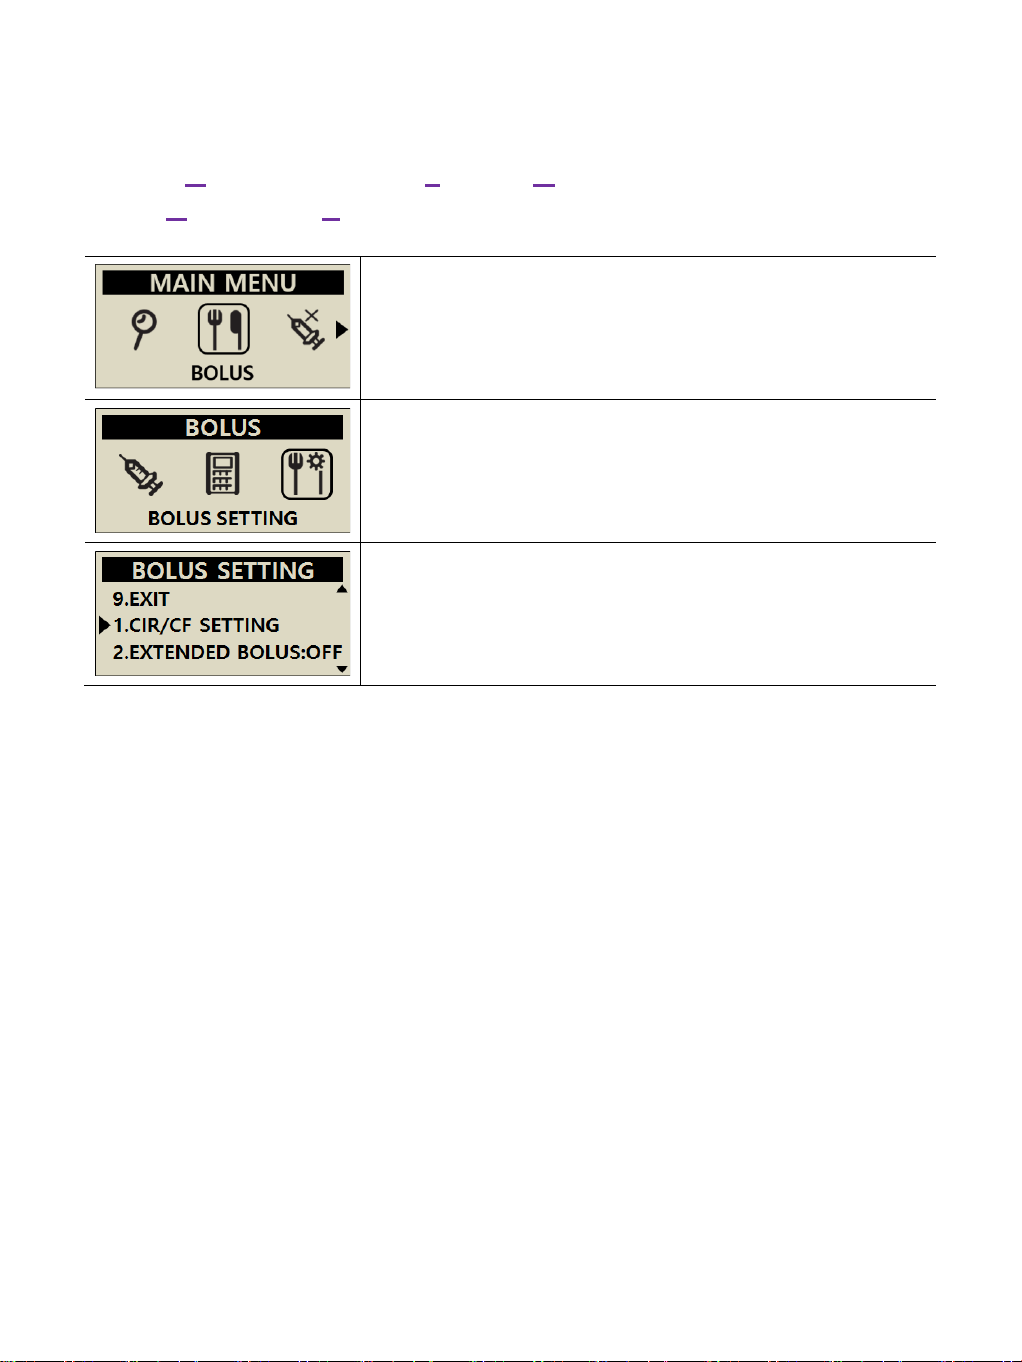
DANA pump Setup –Personalizing CIR and CF
CIR = Carbohydrate to Insulin Ratio
CF = Correction Factor
Select the ‘Bolus’ option from main menu
Select the ‘Bolus Setting’ option from
BolusOption menu
Select the first option = ‘CIR/CF’ from
setting menu.
Set and personalize CF and CIR ratios for
each specific time of day.
A Healthcare Professional and or Insulin Pump trainer will configure
some additional settings within the DANA ‘Dr. Mode’. These include
daily, hourly and bolus maximums, Basal and Bolus increments,
decreasing ratio (duration of active insulin) and target or Ideal BG.
12
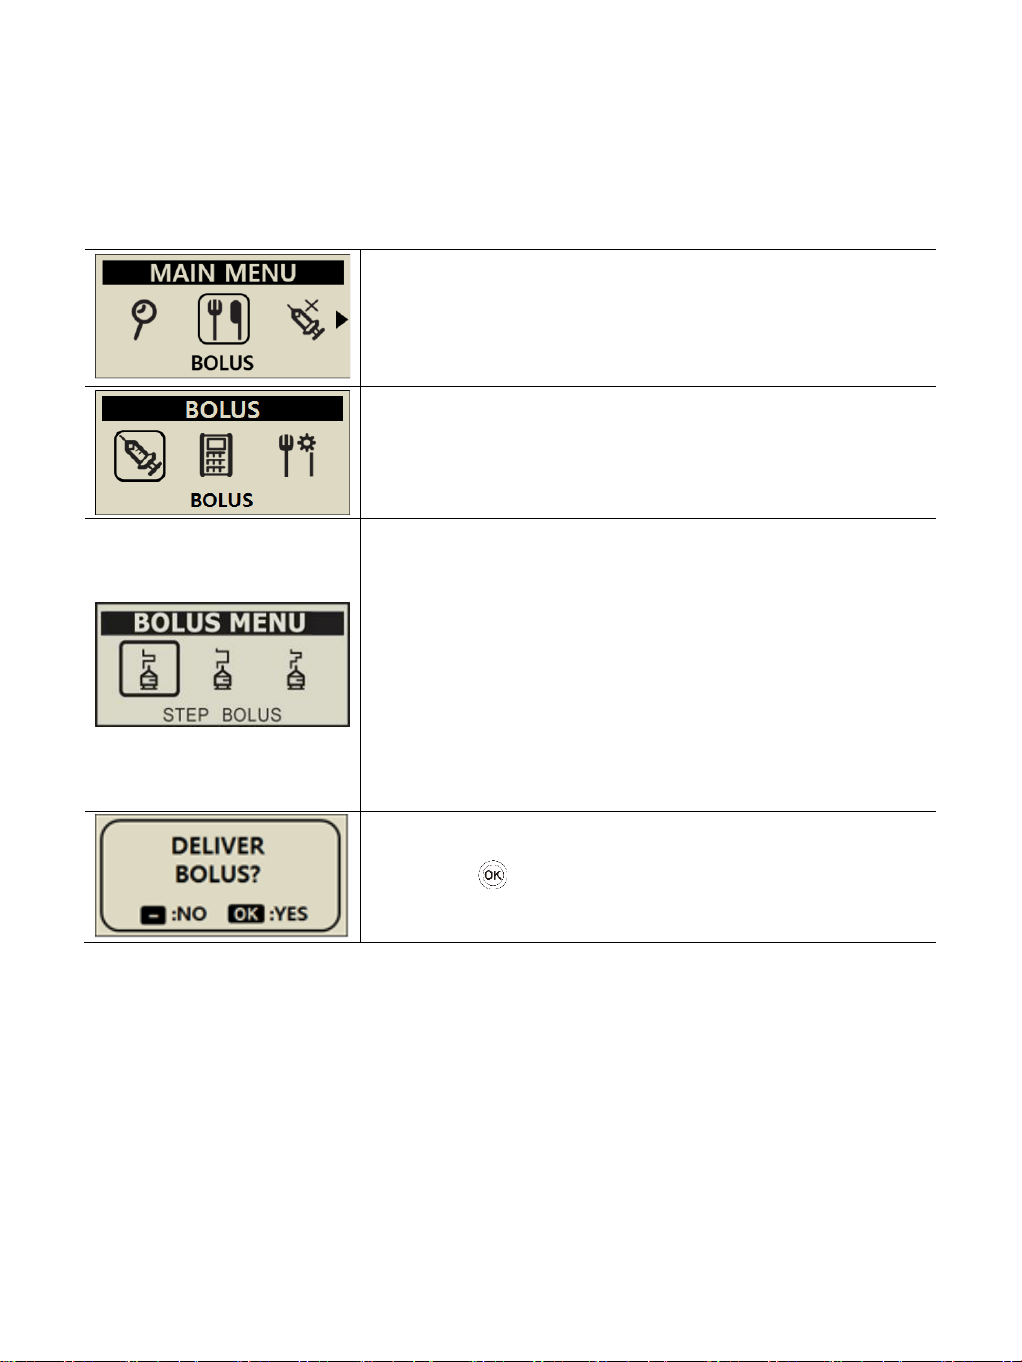
Quick Bolus - delivering a Food Bolus without
a Correction
(This bolus ignores any residual Active Insulin)
From the main menu select ‘Bolus’
Select ‘Bolus’ to deliver a standard food
bolus without including a correction dose
and without reducing the dose for Active
Insulin.
If enabled (extended bolus) in user options
the pump will offer a range of bolus types.
1. ‘Step’ is a standard bolus.
2. ‘Extended’ enables the bolus to be
delivered over a long period.
3. ‘Dual Pattern’ is a combination of both
above bolus types.
Select to start the delivery.
13
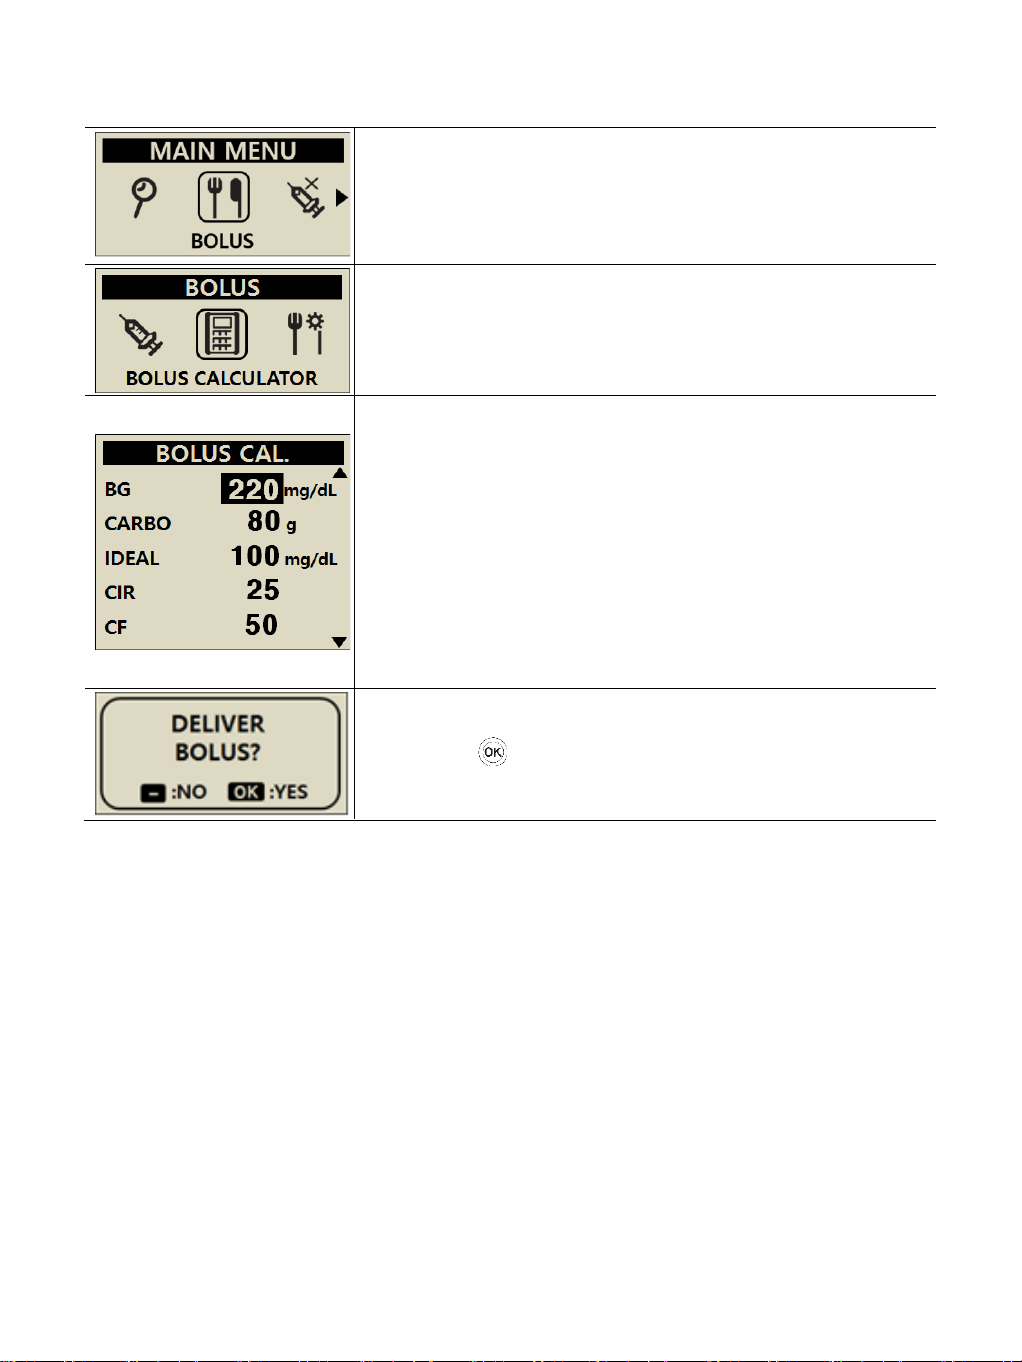
Delivering a Food Bolus with a Correction
Select the ‘Bolus’ option from the main
menu.
Select the ‘BG Bolus Calculator’ option from
the Bolus menu.
Input actual BG and grams of carbohydrate
in meal.
The next screen shows the pre-
programmed Ideal BG, Carb to Insulin ratio
and Correction factor.
Each of these can be altered or select (OK)
to confirm settings.
The pump calculates the suggested dose.
(G + C –A) This can be adjusted up or
down if change is needed.
Select to start the delivery.
DANA Insulin Pumps are set to display Blood Glucose in either
mmol/L or mg/dL –depending upon the region they are sold, some
regions the option can be changed from within the ‘user option
menu’.

14
Temporary Rate Start and Stop
Starting a new temporary rate
Select TEMPORARY BASAL from the
main menu.
Select the duration of the intended
temporary rate and the percentage
of standard basal rate.
Ex)150% is a 50% increase in standard rate.
80% is a 20% reduction in standard rate
Select to start the TEMP. RATE
Stopping a temporary rate
Select TEMPORARY BASAL from the
main menu.
The TEMP. STATE screen is
displayed, press to STOP the
TEMPORARY RATE.
Confirm the STOP TEMP. RATE with .

15
Flying with an Insulin Pump
1. Refill the pump before flight.
a. Ensure there is no air in reservoir.
b. Only load enough insulin for 1 or 2 days
(preferably only about 1ml).
2. Upon aircraft take off –disconnect pump for ½ hour or until
cruising altitude is reached.
3. Prior to aircraft decent –disconnect pump and prime the tubing
once landed before reconnecting.
4. Always carry plenty of supplies and spare insulin.
5. In the event of a mid-air emergency and if the oxygen masks fall
–disconnect the pump. Reconnect after departed from the aircraft
or when normal cabin pressure is achieved.
6. Take a medical certificate advising use of an Insulin Pump.
7. Ensure to test BG levelsfrequently –especially during long haul
flights.
8. On all flights carry non-liquid hypo treatment in accessible carry-
on luggage.
9. Get comprehensive travel insurance and ensure that it covers
diabetes and wearing an Insulin Pump and make sure it is
named/listed on the policy.
10. Change the pump time to destination time once at cruising
altitude –Complete this for each separate flight with successive
long haul flights.
11. Take at least one spare glucose meter, batteries and test strips.
Change the time on the glucose meter at the same time as pump.
12. Before departure, enquire about how to get supplies from each
destination travelling to. If necessary, ensure someone back at
home knows exactly what supplies and medication is required and
make arrangements so they can freight extra supplies if required.

SOOIL Development Co., Ltd.
62, Yonggu-daero 2325beon-gil,
Giheung-gu, Yongin-si, Gyeonggi-do,
16922,
Republic of Korea
MT Promedt Consulting GmbH
Altenhofstrasse 80,
66386 St. Ingbert Germany

IUQ-130-EN (rev.0_200622)
SOOIL DEVELOPMENT CO., LTD
Other manuals for Diabecare Dana-i
2
Table of contents
Other Sooil Medical Equipment manuals


Popular Medical Equipment manuals by other brands

Bedfont
Bedfont FeNObreath CaliBag quick start guide

aldes
aldes C.Integra Installation and maintenance instructions

LINET
LINET PURA Service manual

RESPICARE
RESPICARE AO3 Series user manual

novos
novos KI 1000 user manual

Alpine HC
Alpine HC Opera Signature Profiling Bed Installation guide and technical specifications


