Sooil Diabecare Dana-i User manual

User Guide.

This page left blank intentionally

Sooil Development Co.,Ltd.
2725 Nambusunhwan-ro, Gangnam-gu
Seoul, Korea, 06274, Koear
Tel: 82-2-3463-0041
Fax: 82-2-3463-7707
E-mail: sooil@sooil.com
http://www.sooil.com
Sooil LLC
9919 Hibert Street, Suite C, San Diego, CA 92131
Tel: 1-866-747-6645
ProMedT Germany Regulatory Agency Details….
MT Promedt Consulting GmbH
Altenhofstrasse 80, 66386 St. Ingbert, Germany
Phone: 49-6894-581020
Local Distributor / pump specialist contact details
Customer Support
1. Introduction
1. Diabecare DANA-i Insulin Pump Introduction
2. Explanation of Warning Symbols
3. Indications for Use
4. Contradiction
5. Potential Risks
6. Airport Security (Only for US manual)
7. Precautions
2. Getting Started
* Components of Diabecare DANA-i System
1. Getting to know the DANA Insulin Pump
*Diabecare DANA-i Insulin Pump
* Control Panel
2. Installing a battery
3. Display Screen
* Initial Screen
* Remote control mode
* Additional Options
4. Patient Education
*About Doctor Mode
3. Programming the Insulin Pump
* Structure of Diabecare DANA-i Menu:
1. Setting the time and date
2. Setting the Basal Rate
* Description of Basal Graph:
* How to edit the Basal Rate:
3. View Basal Rate
4. Setting User Options
* User Options
More Information Screen
4. Loading Insulin into the Pump
1. Preparation
2. Filling the Reservoir with Insulin
3. Adjust the length of linking screw with Auto Setter
* Using DANA Easy Setter :
4. Inserting the Reservoir into the Insulin Pump
6
6
6
7
7
7
8
9
11
11
12
12
13
14
16
16
18
18
20
20
21
21
22
23
24
26
28
29
30
34
36
36
38
40
41
42
Table of Contents

5. Connecting the Infusion Set to the Insulin Pump
6. Refill
7. Prime the Infusion Set Tubing
* PRIME procedure:
8. Prime the Cannula
* Connection of Pump & Reservoir
9. Inserting Infusion Set
* Recommending insertion site location
5. Delivering a Bolus
* Bolus calculation parameter
* Three type of Bolus Delivery
1. Bolus (Quick Bolus)
* How to start the (Quick) bolus delivery:
* Stop delivery during bolus:
2. BG Bolus Calculator (Smart Bolus)
3. Bolus Setting
* Bolus Setting
* Pre-set Bolus
6. Advanced features within Pump
1. Temporary Basal Rates
* Starting a Temporary Basal Rate
* Review Temporary Basal Rate Whilst in Operation
* Stopping a Temporary Basal Rate
2. Suspend
3. Button Lock
4. Basal Profile
5. HISTORY : Displays all the Pump History
* Review Menu
6. SHIPPING INFORMATION
7. Airplane mode
8. Extended Bolus
* Start Extended Bolus (Quick Bolus)
* Review Extended Bolus
* Stop an Extended Bolus
9. Dual Pattern Bolus
* Starting a Dual Pattern Bolus
* Stopping a Dual Pattern Bolus
7. Alarms and Error Messages
* WARNING Message
43
44
46
47
49
51
53
55
57
57
58
59
60
61
62
64
65
67
69
69
69
71
72
73
74
75
76
77
79
80
82
82
83
84
85
86
86
88
89
* ERROR Message
* ALARM Message
8. Troubleshooting
1. Hypoglycemia (low blood sugar)
* What is hypoglycemia (low blood sugar)?
* Reasons for Hypoglycemia
* What to do in case of hypoglycemia
* Hypoglycemia Troubleshooting
2. Hyperglycemia (high blood sugar)
* What is hyperglycemia (high blood sugar)?
* Reasons for Hyperglycemia
* What to do in case of High Blood Sugar
* Troubleshooting for Hyperglycemia
3. Occlusion Alarm
* Real Occlusion (Usually within the Cannula or tube)
* Occlusion caused by external factor
4. Troubleshooting the Insulin Pump
Taking care of your System
5. Cleaning your System
6. Storing your System
7. Disposing of System
9. Specification
1. Insulin Pump
2. Infusion Sets
3. Prime Volume of Infusion Sets
* Prime tube
* Cannula prime
4. Delivery accuracy
5. Classification and Compliance with Standards
6. Essential Performance
7. Wireless communication
* DATA Security
* FCC Notice
* Declaration of EMC compatibility
8. Explanation of Universal Symbols
10. Index
93
94
99
99
99
99
99
100
101
101
101
101
102
103
103
104
105
106
106
107
108
110
110
112
113
113
114
114
115
116
116
116
116
117
124
126

6 7
2. Explanation of Warning Symbols
1. Introduction
1. Diabecare DANA-i Insulin Pump Introduction
3. Indications for Use
4. Contradiction
5. Potential Risks
The Diabecare DANA-i Insulin Pump herein after will be referred to as ‘Insulin Pump’
throughout the manual.
The Diabecare DANA-i Insulin Pump is intended for the subcutaneous delivery of insulin
for the treatment of diabetes mellitus. The device is not intended for use with blood or
blood products.
This Insulin Pump is indicated for use in 2years of age and greater. (USA Only)
Insulin Pump therapy is not recommended for people whose vision or hearing does not
allow recognition of pump signals and alarms.
• Infection
• Skin irritation or redness
• Bruising
• Discomfort or pain
• Bleeding
• Irritation
• Rash
• Hypoglycemia
• Hyperglycemia
Warning The Diabecare DANA-i system is only to be used by patients who have
received training from a certified diabetes educator and/or insulin pump trainer and by
advice from a physician.
For safety and optimum benefits read the entire user manual before using the system.
Caution Read these instructions for use carefully and completely before using this
device for the first time. Especially, users who have used other pumps should be
cautious.
Warning Indicates the presence of a hazard which can cause severe personal injury,
death or substantial property damage if the warning is ignored.
Caution Indicates the presence of a hazard which will or can cause minor personal
injury or property damage if the warning is ignored.
Warning
Warning
Caution
Caution
Notice Advises the user of installation, operation or maintenance information which is
important but not hazard related.
6. Airport Security
Do not expose the system to x-ray screening used for carry-on and checked luggage.
Newer full body scanners used in airport security screening are also a form of x-ray and the
system should not be exposed to them. Notify the TSA Agent that the system cannot be
exposed to x-ray machines and request an alternate means of screening.
Visit TSA’s website if you have any questions or concerns. www.tsa.gov
The Insulin Pump, Infusion set, reservoir can withstand exposure to airport metal detectors
used at airport security checkpoints.

8 9
1. Pump users need more than 4 blood glucose measurements per day, and vision and
hearing to receive any pump alarm.
2. Patients must not open the Pump housing or handle any internal components.
3. The Diabecare DANA-i Insulin Pump is intended for use with a proprietary Infusion Set,
reservoir and other accessories specified in this booklet. DO NOT use the Pump with any
other infusion system or accessories.
4. Press buttons with the pad of the finger. DO NOT use fingernails or any sharp objects.
5. The Insulin Pump comes with factory default settings and alarms, maximum daily totals,
basal and bolus doses. These settings can be adjusted by a healthcare professional.
6. The pump is indicated for use with U-100 NovoLog insulin. The other insulin has not
been tested and may not be compatible for use with the Diabecare DANA-i insulin
pump.
7. Change the reservoir and the Infusion Set regularly, as recommended by your healthcare
professional. DO NOT use for longer than the intended period.
8. Check the expiration dates and dispose of any expired accessories.
7. Precautions
Glucose Check Alarm 120min
Maximum Daily Total 80u
Maximum Bolus 40u
Maximum Basal 3.3u/h
9. Avoid impact damage such as dropping. If there is any known damage of pump and
accessory, contact your healthcare professional or technical support from the local
Insulin Pump distributor.
10. For any trouble with any of the system components, turn off the Insulin Pump by
removing the battery and contact a healthcare professional or Insulin Pump trainer.
11. Remove the battery for long-term storage.
10 11
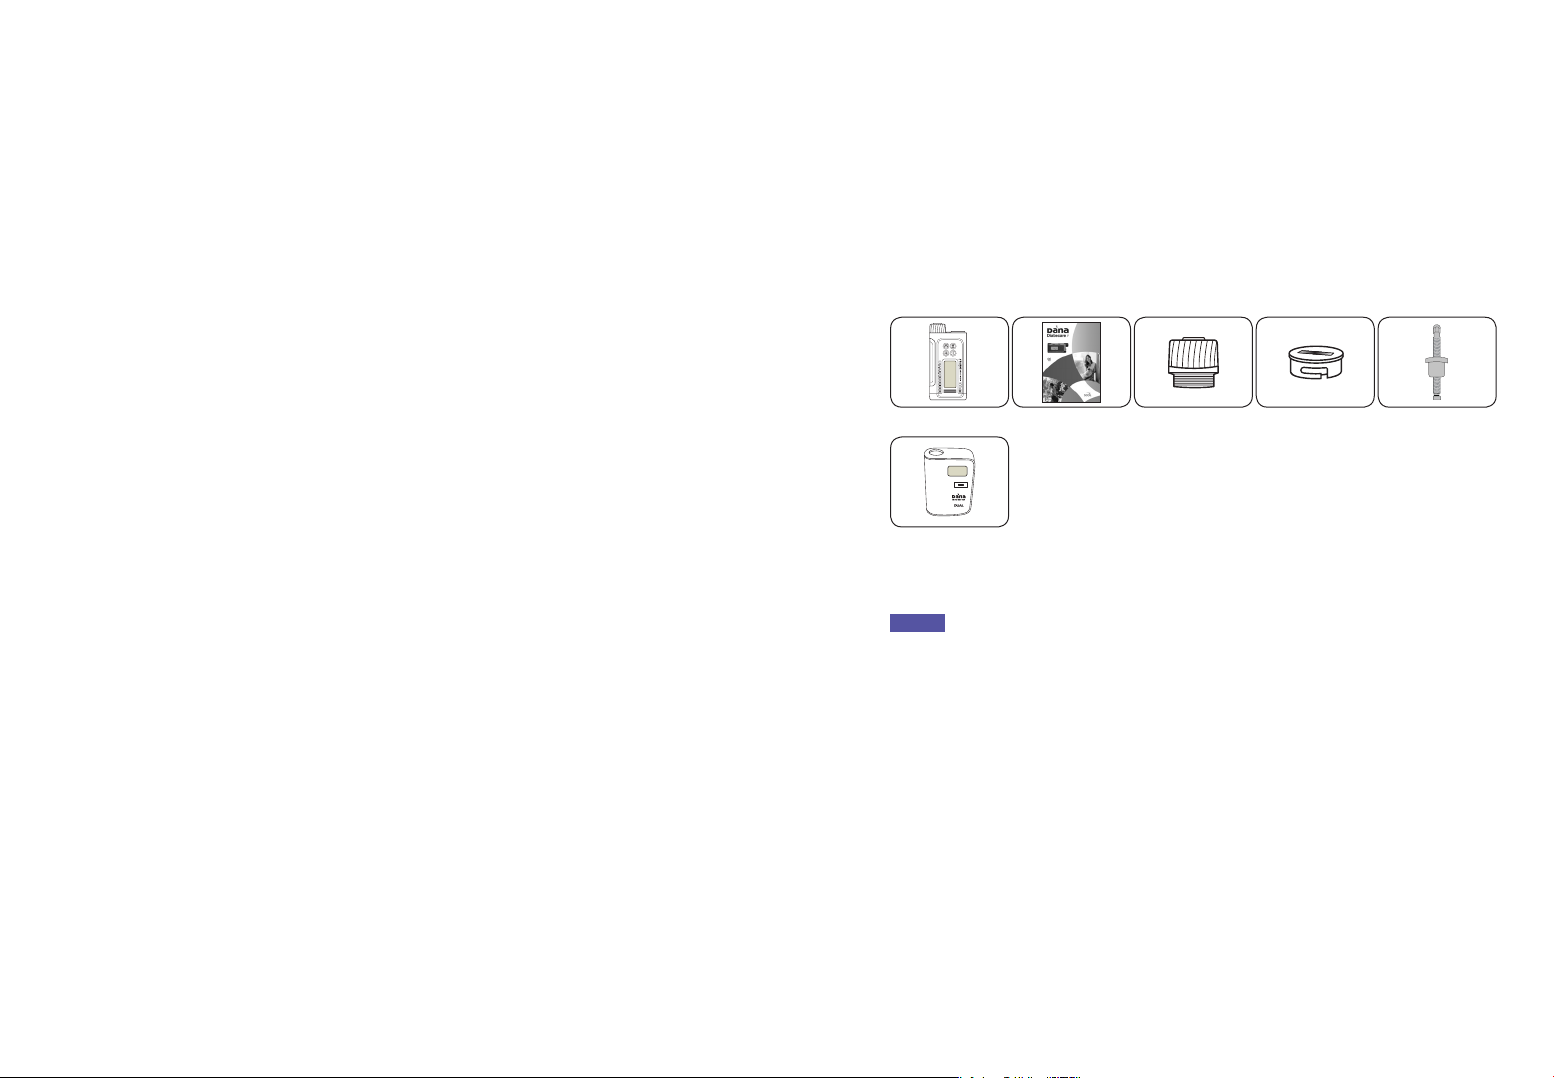
To make proper use of Diabecare DANA-i Insulin pump, the accessories and other
components are required
2. Getting Started
* Components of Diabecare DANA-i System
Notice
• Additional accessories may be purchased separately.
This page left blank intentionally
Instruction for Use ⑴ Syringe Cap ⑴ Battery Cap ⑴ Linking Screw ⑵
DANA Auto Setter (1)
Insulin pump ⑴
12 13
1. Reservoir Cap
The reservoir and linking screw are inserted
in this compartment. Turn the reservoir
cap clockwise ¼ turn to open.
2. Battery Cap
The battery is inserted in this compartment.
Turn the battery cap clockwise ¼ turn to
open.
3. Reservoir Window
Reservoir volume can be visually verified
here.
4. Control Panel
Includes the four buttons which are used
to navigate the insulin pump menus, adjust
settings and select functions.
5. LCD screen
Displays the pump status, system features
and system messages. This is the user
interface for operation of the Insulin Pump.
Lights automatically when buttons are
pressed.
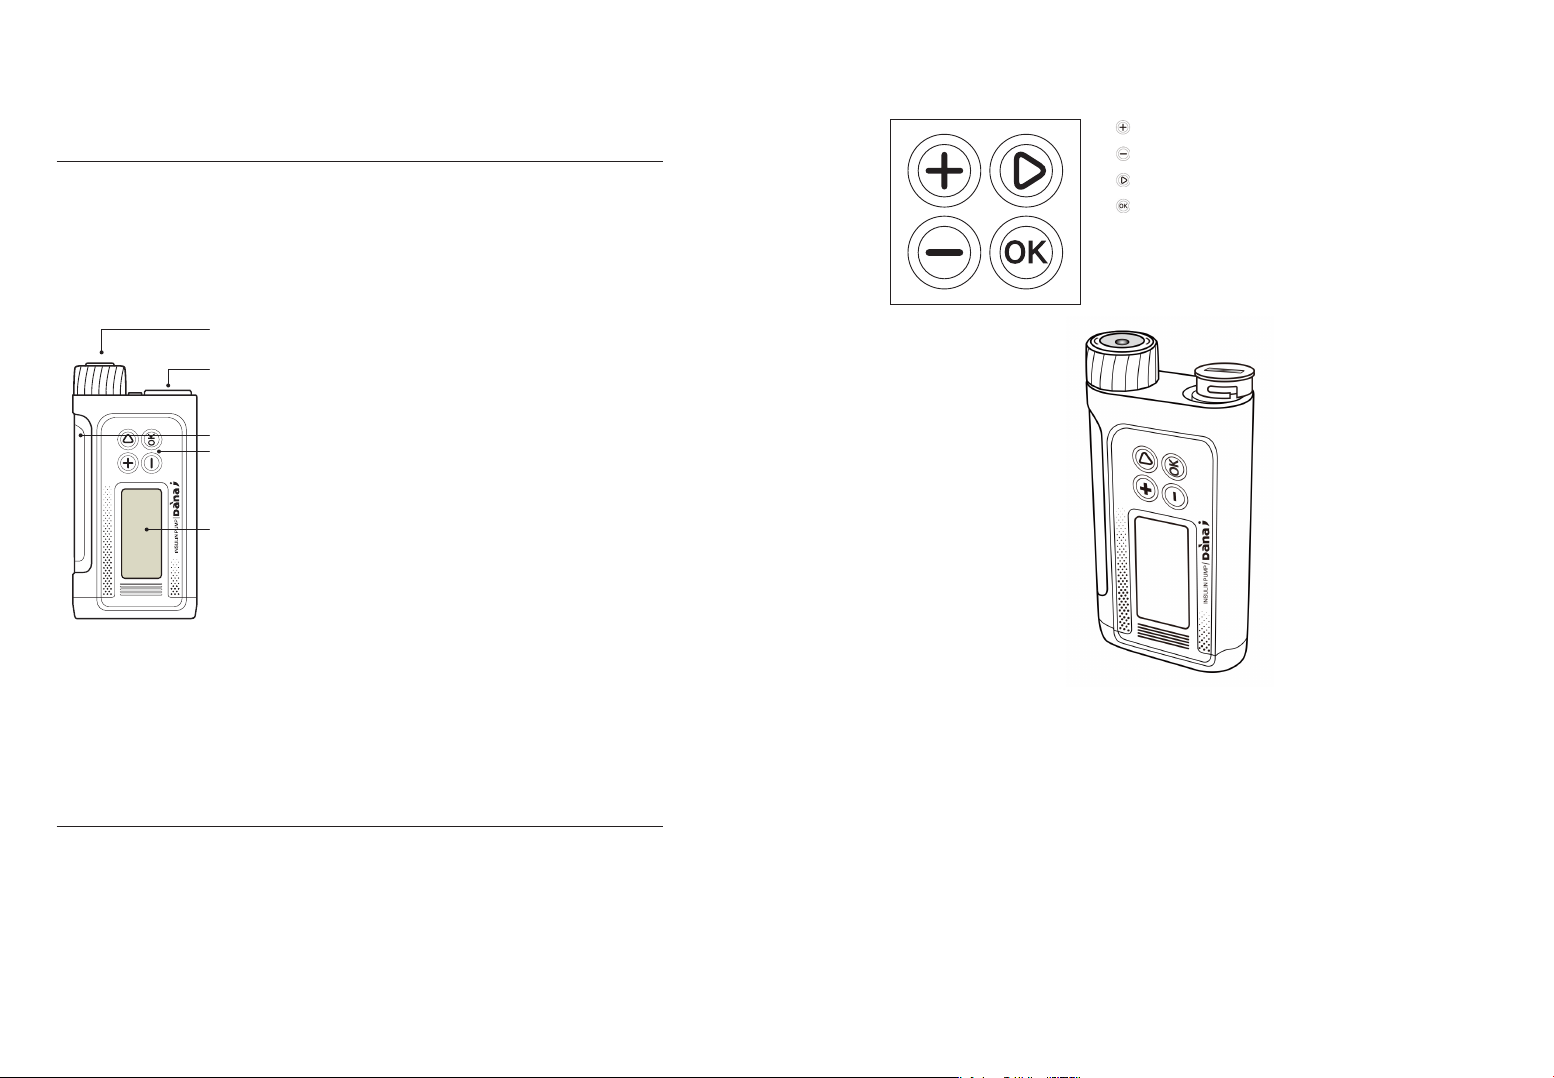
1. Getting to know the DANA Insulin Pump
* Diabecare DANA-i Insulin Pump
* Control Panel
Press to increase values
Press to decrease values / return to previous screen
Press to move to the next menu option
Press to select or confirm
1. Reservoir Cap
2. Battery Cap
3. Reservoir Window
4. Control Panel
5. LCD screen
14 15
Warning Change the battery in a clean dry environment to prevent water/ ingress from
entering the pump case. The battery cap is correctly installed with a push and turn
counter clock-wise to locked. This prevents water/ingress.
Warning
Notice
• The Diabecare DANA-i Insulin Pump is powered by an external (AAA) Battery
Notice
• SOOIL recommend using either a Duracell alkaline AAA battery or an ‘Energiser
Advanced’ alkaline AAA battery.
Caution The pump required one AAA 1.5V battery. Use a new AAA alkaline battery. Do
not use a carbon zinc battery in your pump. Carbon zinc batteries are not compatible
with this pump.
Caution Lithium batteries are not recommended as the battery level indicator may not
be accurate.
Caution
• DO NOT attempt to change the battery while a bolus is in progress.
• Dispose of used batteries in an environmentally friendly way according to local
disposal requirements or contact your local insulin pump distributor for disposal
information.
• It is recommended to keep a spare battery as backup.
• For accurate reading of the remaining battery charge, check the battery display
following the delivery of a bolus
Caution
Caution
Caution
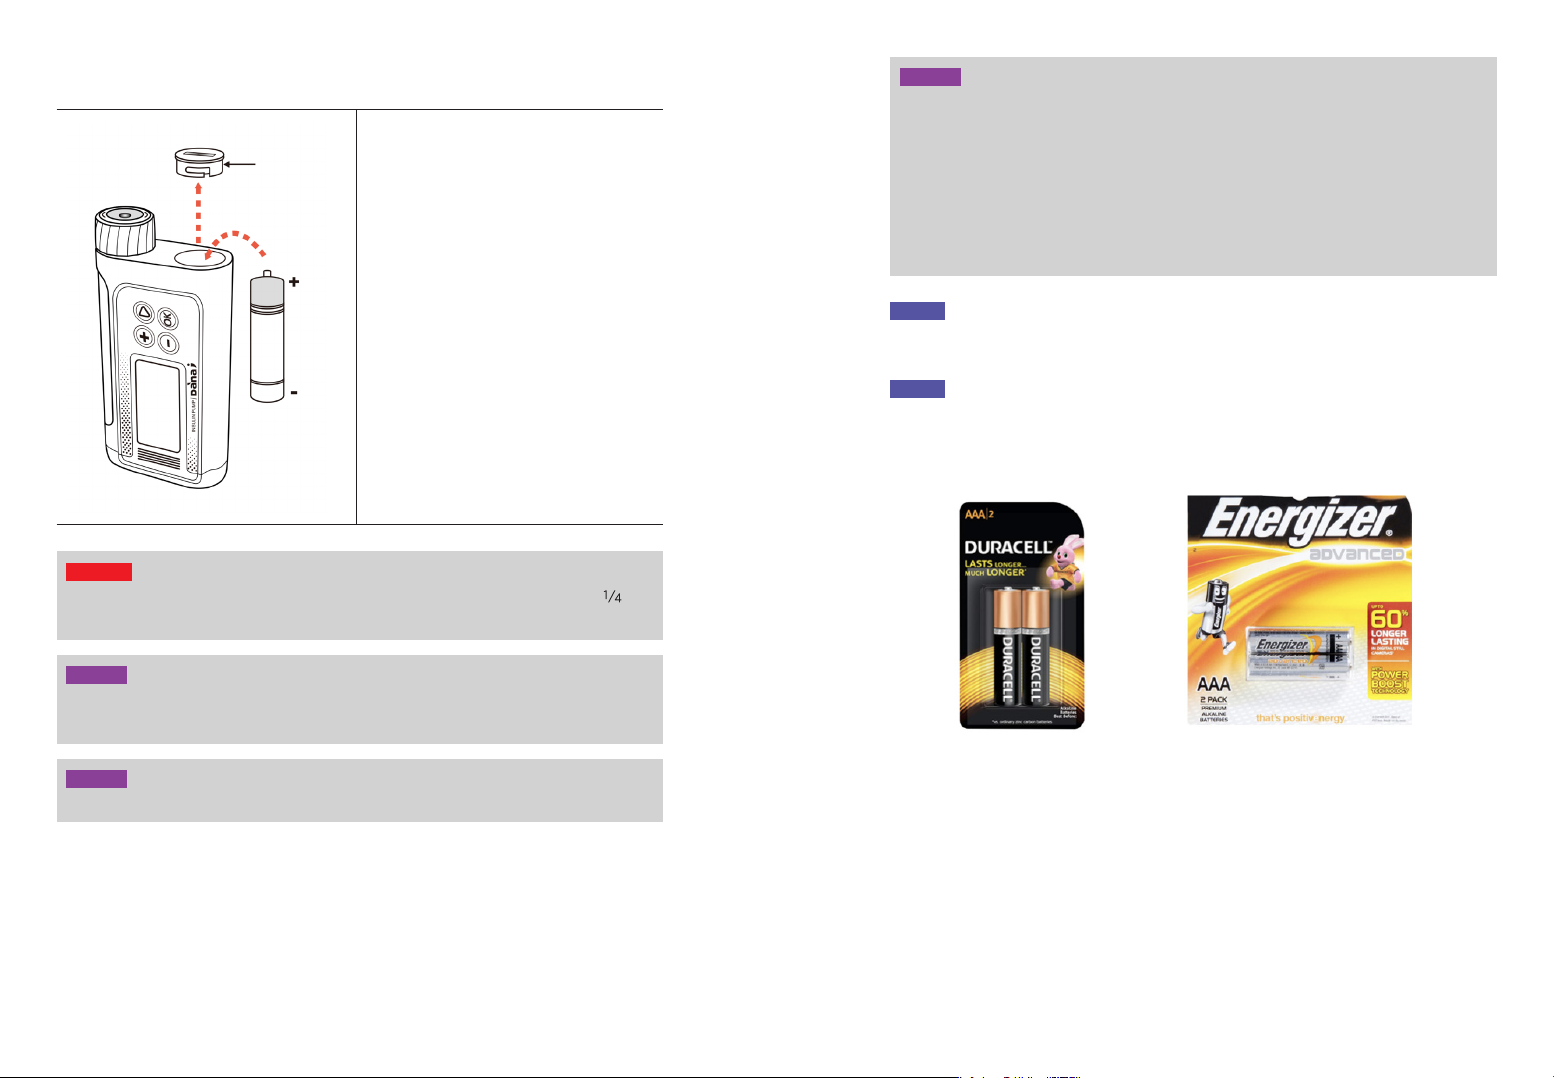
Insulin Pump
1. Open the battery cap by inserting the
into the battery cap slot and turning
clock-wise ¼ turn.
2. Insert the battery with the positive at
top and insert the (-) into the Insulin
Pump.
3. Replace the battery cap turning it
counter clock-wise.
4. Completed when the cap is tightly
locked with insulin pump.
2. Installing a battery
Battery Cap
With O-ring
A
A
A
16 17
Button lock
Appears on the screen when it is locked.
Refer 6.3 Button Lock
Insulin remaining volume
Displays volume of insulin in the reservoir.
Notice Low Reservoir indicator will flash
when insulin volume remaining is low.
Refer to chapter 7. Alarms and Error messages.
Extended bolus status
This icon (EXTENDED x.xx u/h) will be displayed
only when extended bolus is active.
Refer to 6.8 Extended Bolus
Dual bolus status
This icon (DUAL x.xx u/h) will be displayed only
when a dual pattern bolus is active.
Refer to 6.9 Dual Pattern Bolus
No delivery
This screen will be displayed when pump does
not deliver insulin.
Refer to chapter.7 Alarms and Error messages.
Current date and time
Time system option 12/24 available
Month/day/Year hh:mm am/pm
Refer to 3.1 Setting the time and date
Notice When the time is set to ‘12’, “AM/PM”
will be shown.
Basal active
This icon B symbol flashes when basal is active.
Temporary basal active
This icon T symbol flashes when a temporary
basal is active.
Current basal rate
Any number less than or greater than 100
indicates a temporary basal is active.
Refer to 6.1 Temporary Basal
*100% is normal basal delivery state.
*u/h = units/hour
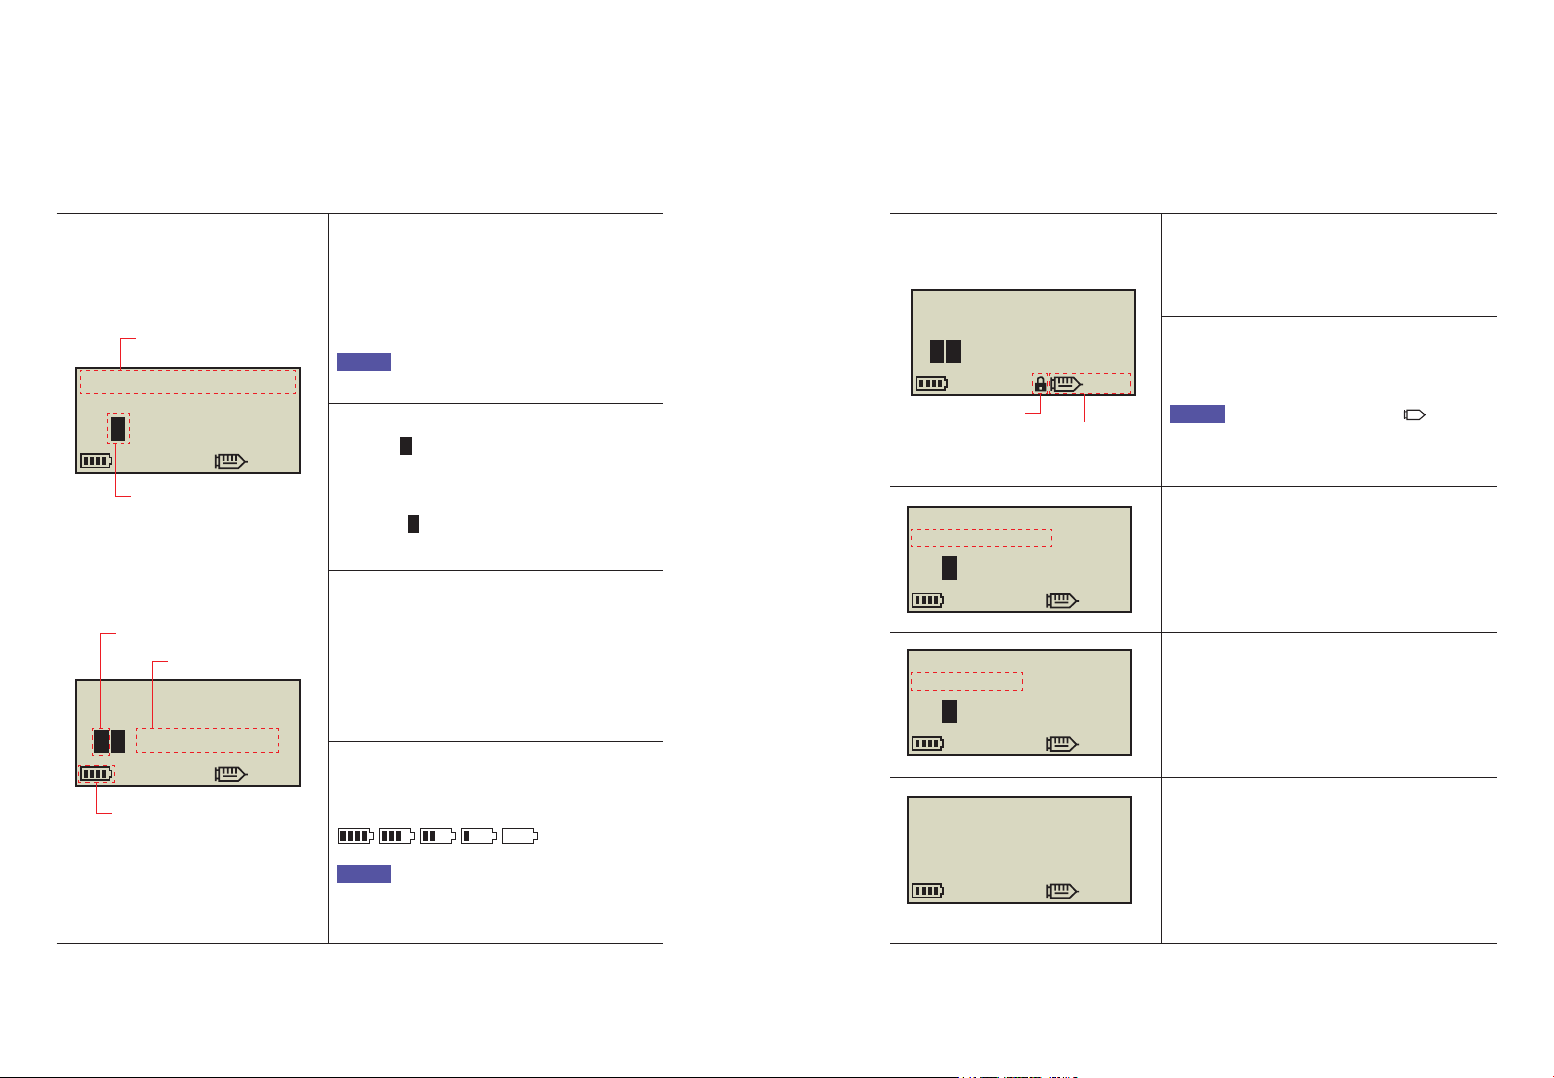
Battery status
Displays remaining battery charge as,
100%, 75%, 50%, 25%, 0%
Notice Lithium batteries may not give an
accurate battery level indicator.
Alkaline batteries are recommended.
3. Display Screen
* Initial Screen
The initial screen is the first menu display. Enter by depressing any key from battery save
mode.
Current date and time
Basal active
03/10/2019
u/h 100%
245u
0.20
10:04 AM
B
Temporary basal active
Current basal rate
Battery status
03/10/2019
u/h 100%
245u
0.20
10:04 AM
B
T
Button lock
Remaining Insulin volume
03/10/2019
u/h 100%
245u
0.20
10:04 AM
B
T
03/10/2019
EXTENED 1.20u/h
u/h 100%
245u
0.20
10:04 AM
B
03/10/2019
DUAL 1.20u/h
u/h 100%
245u
0.20
10:04 AM
B
03/10/2019
245u
10:04 AM
NO DELIVERY
18 19
* Additional Options
Bolus block
This icon is displayed when bolus
Block is active. This prevents a bolus
repetition during the pre-set block time
period.
Allowable Daily max
This icon (M:19u) is displayed when the
total daily dose is high and nearing the
allocated daily maximum set. Remaining
units displayed from less than 20u (default)
displayed.
Notice
• Additional options are configured by the Healthcare Provider or Insulin Pump Trainer.
• To save battery power the screen will automatically revert to blank after one minute
without any button depressed. Pressing any button will illuminate the display and also
activate the backlight for 10 seconds. (Refer to chapter 3.4 Setting User Options- “LCD
on(s)” and “Backlight on(s)”)
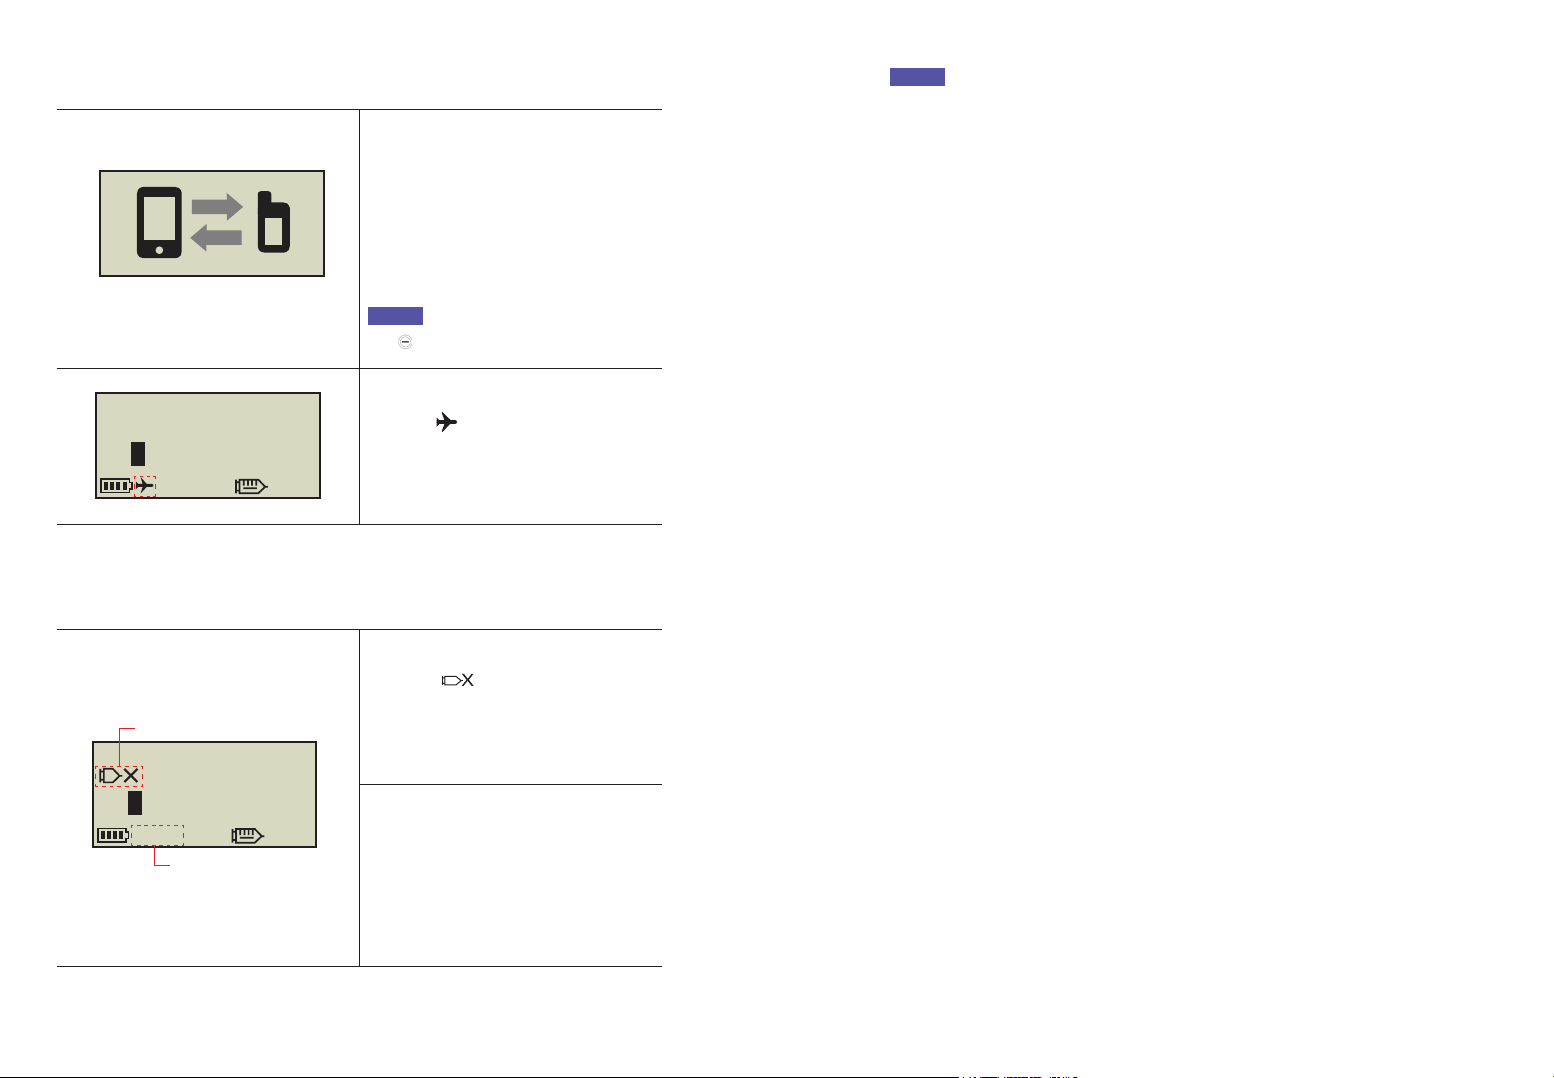
* Remote control mode
Remote control mode
When the smartphone with app installed is
connected to the pump, the pump screen
is displayed as shown in the figure.
In this state, the button of the pump does
not work.
Notice You can disconnect by pressing
the key for more than 5 seconds.
Airplane mode
This icon will be displayed only when
airplane mode is ON. The Bluetooth
function is interrupted/OFF
Refer to 6.7 Airplane Mode.
03/10/2019
u/h 100%
245u
0.20
10:04 AM
B
Bolus block
Allowable Daily max
03/10/2019
u/h 100%
245uM:19u
0.20
10:04 AM
B
20 21
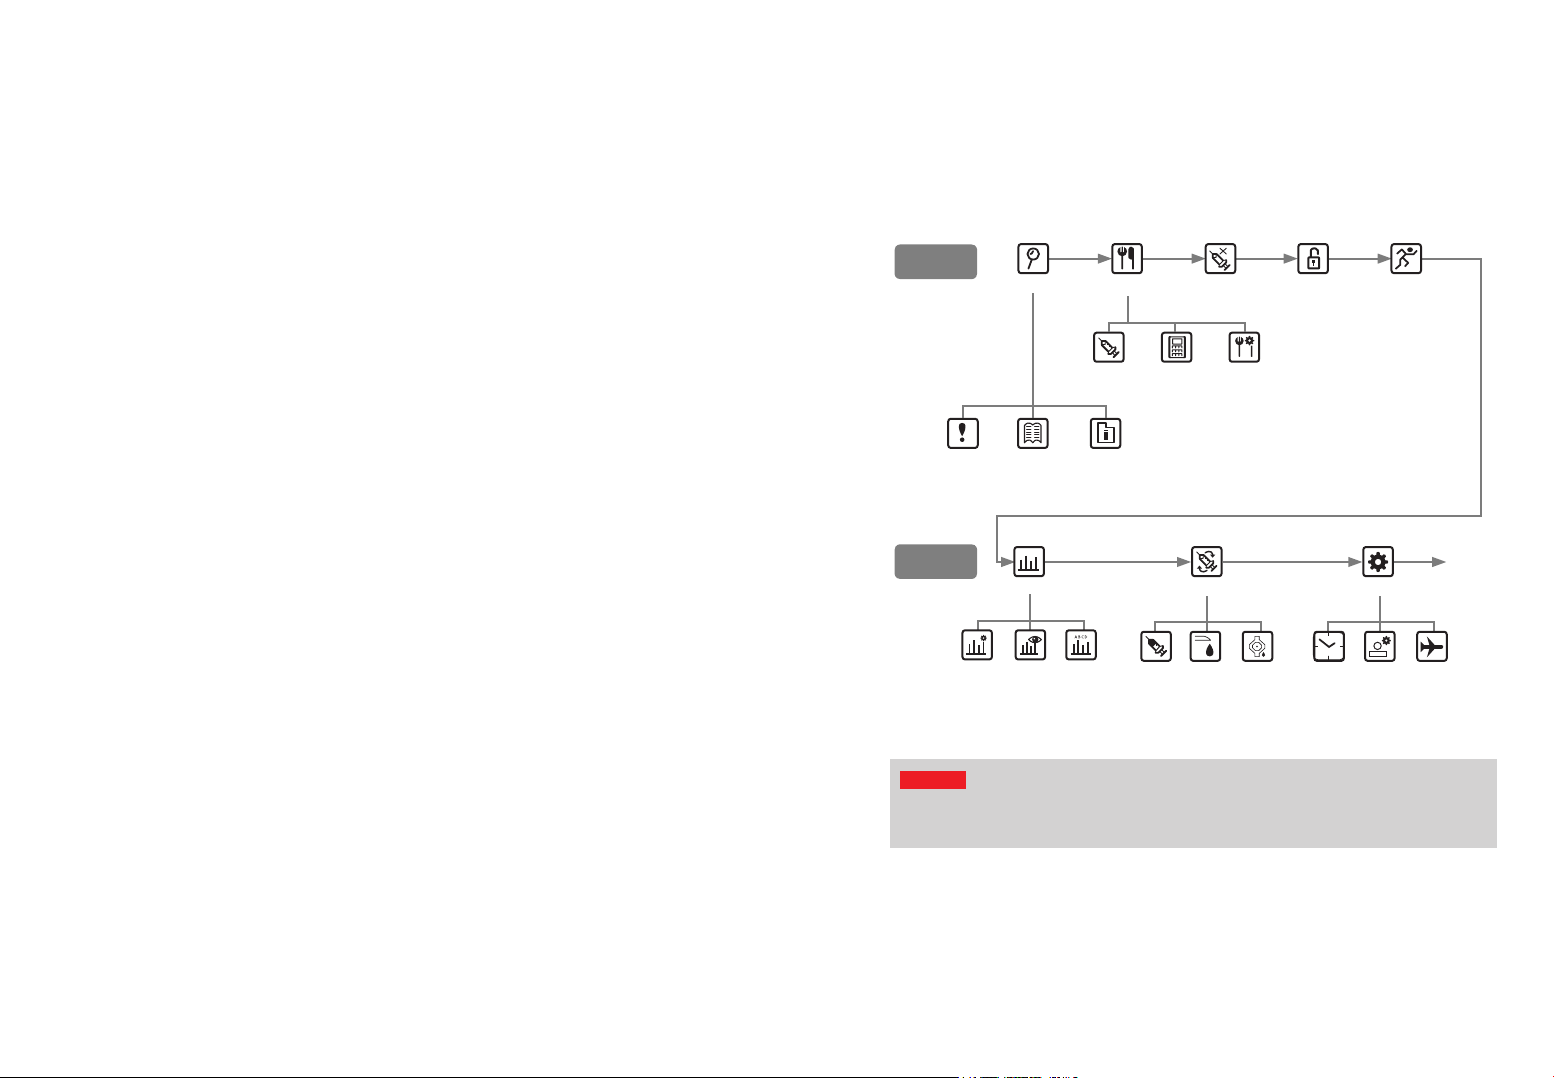
* Structure of DIABECARE DANA-i Menu:
3. Programming the Insulin Pump
Warning Follow the training and advice of a pump specialist Healthcare professional
and certified Insulin pump trainer whilst inputting the initial settings. Incorrect settings
may cause serious harm.
Warning
Follow up education is recommended for all insulin pump users.
1. When starting on insulin pump therapy, the patient should have daily contact with the
pump trainer and/or medical professional.
2. Visit with the Endocrinologist, Diabetologist or Advanced Practice Nurse within 3-7 days.
3. At first schedule weekly/biweekly consults then periodically as needed and advised.
4. Visit specialist monthly until pump regimen is established and then at least once every
three months or intervals advised by your medical professional.
DOCTOR MODE is a configuration menu accessed only by healthcare professionals and
certified insulin pump trainers. These settings are generally related to safety and to insulin
dosages about individual patients.
Contact your healthcare professional in order to change these settings.
✓ Preset Bolus
✓ Glucose Check Alarm
✓ Bolus Block
✓ Bolus Increment
✓ Basal Increment
✓ Clock (adjust time & date)
✓ Decrease Ratio (Active Insulin)
✓ Maximum Basal
✓ Maximum Bolus
✓ Maximum Daily Total
✓ Safety Ratio
✓ Block Sensitive
✓ UTC time Adj
4. Patient Education
* About Doctor Mode
MAIN MENU
MAIN MENU
BOLUS BG BOLUS
CALCULATOR
MORE
INFORMATION
HISTORY SHIPPING
INFORMATION
BOLUS
SETTING
BASAL REFILL OPTION
Back to
REVIEW
EDIT
BASAL
VIEW
BASAL
RATE
CHANGE
PROFILE
REFILL PRIME PRIME
CANNULA
CLOCK
SETTING
USER
OPTION
AIRPLANE
MODE
BOLUS SUSPENDREVIEW BUTTON
LOCK
TEMPORARY
BASAL
22 23
1. Adjust the time
Setting the correct time is necessary for accurate basal insulin delivery and for retaining an
accurate record of all insulin delivery.
From within the Clock Setting menu – adjust the time using
the (+) or (-) key. Press (ok) to save the setting.
Notice Changing 12 or 24hour clock format refer to 3.4 Setting User Options.
Notice The Diabecare DANA-i Insulin Pump has UTC time. Setting the date and time is
only completed within the Dr Mode.
2. Setting the Basal Rate
Basal settings must be programed before using the insulin pump.
Basal insulin is required to maintain an ideal glucose level while fasting.
Basal insulin infusion rates are specific to individual patients. There are 24 hourly rates each
day, these may increase or decrease to match personal insulin resistance and other factors.
The healthcare professional will advise what the initial rates need to be set at the start.
Notice It is only possible to EDIT the current (selected) Basal Profile. Default profile is #A.
(To change Basal Profile refer to 6.4 Basal Profile)
Step.1
Choose the Basal
Step.2
EDIT Basal Setting
OPTION
MAIN MENU
SUB MENU
CLOCK
SETTING
USER
OPTION
AIRPLANE
MODE
UTC = 0 Greenwich mean + 1 hour UK / Portugal / Europe West
-1 hour West Africa + 2 hour France / Germany / Italy
-2 hour Atlantic + 3 hour Europe East / Istanbul
-3 hour Atlantic + 4 hour Dubai
-4 hour US East + 5 hour Asia / Uzbekistan
-5 hour US Central / Chile + 6 hour India
-6 hour Canada + 7 hour Thailand
-7 hour US Pacific + 8 hour West Coast Australia / China
-8 hour Alaska + 9 hour Korea / Japan
-9 hour South Pacific Ocean +10 hour East Coast Australia
-10 hour Hawaii / Rarotonga + 11 hour Pacific / Noumea / Norfolk
-11 hour Samoa + 12 hour New Zealand
TIMEZONE : 00
UTC TIME
01/01/2019 00:00:00
LOCAL TIME
01/01/2019 00:00:00
24 25
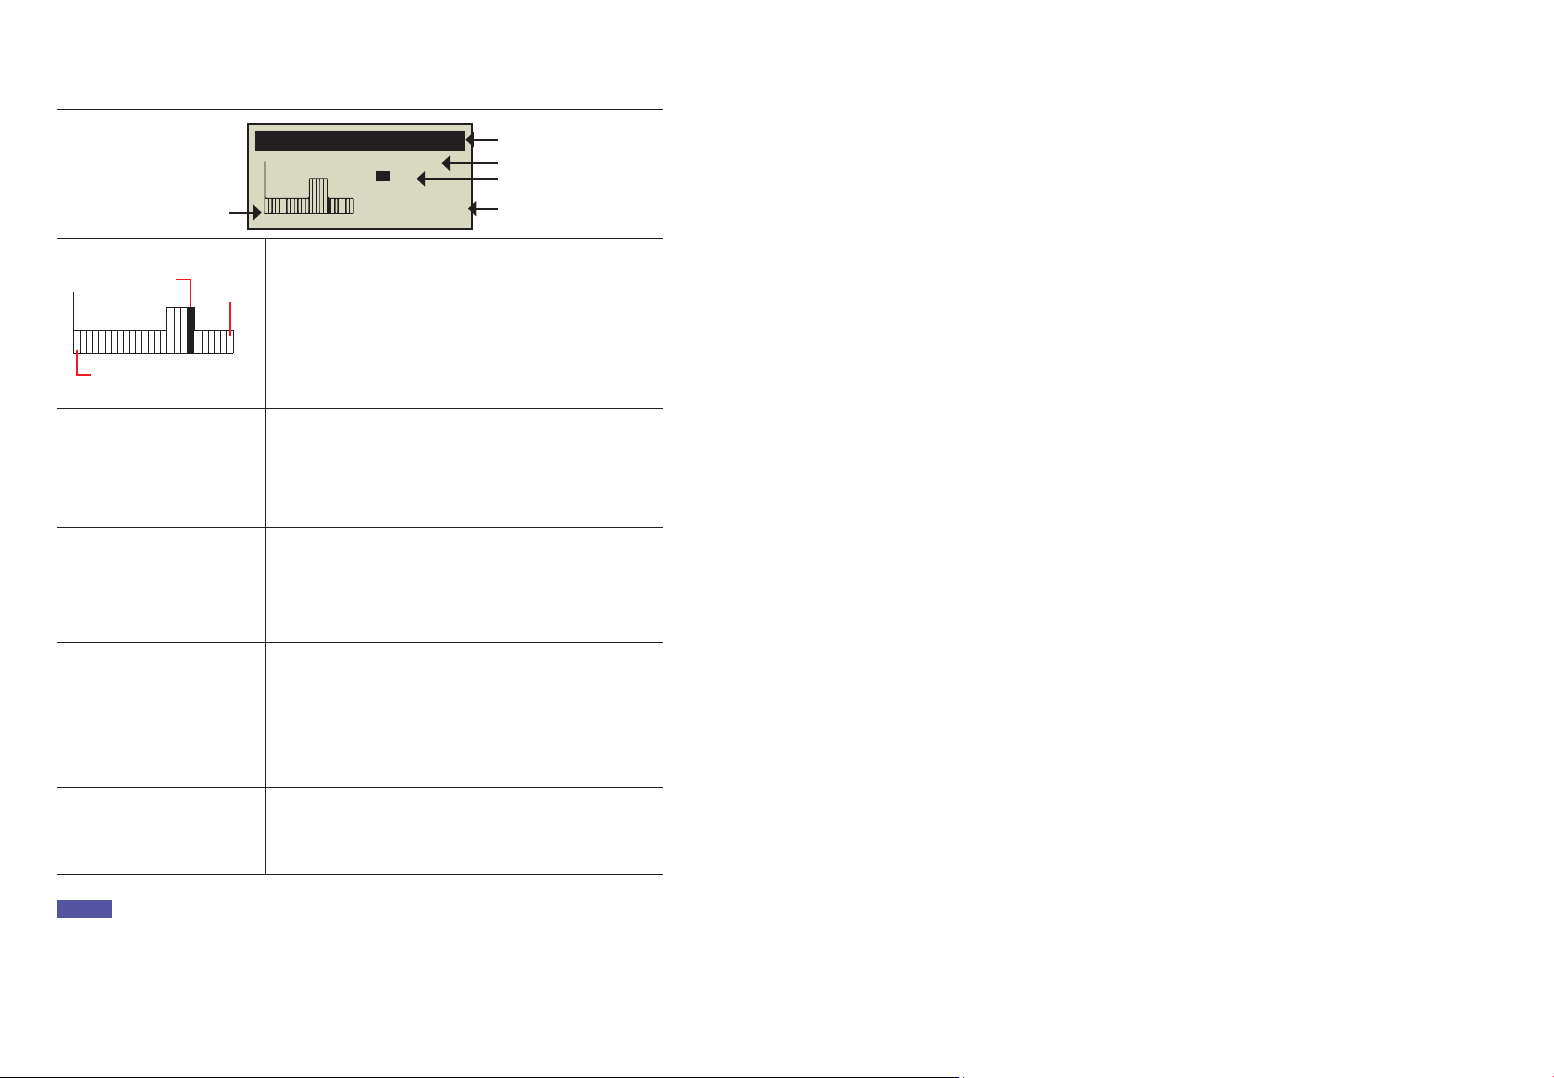
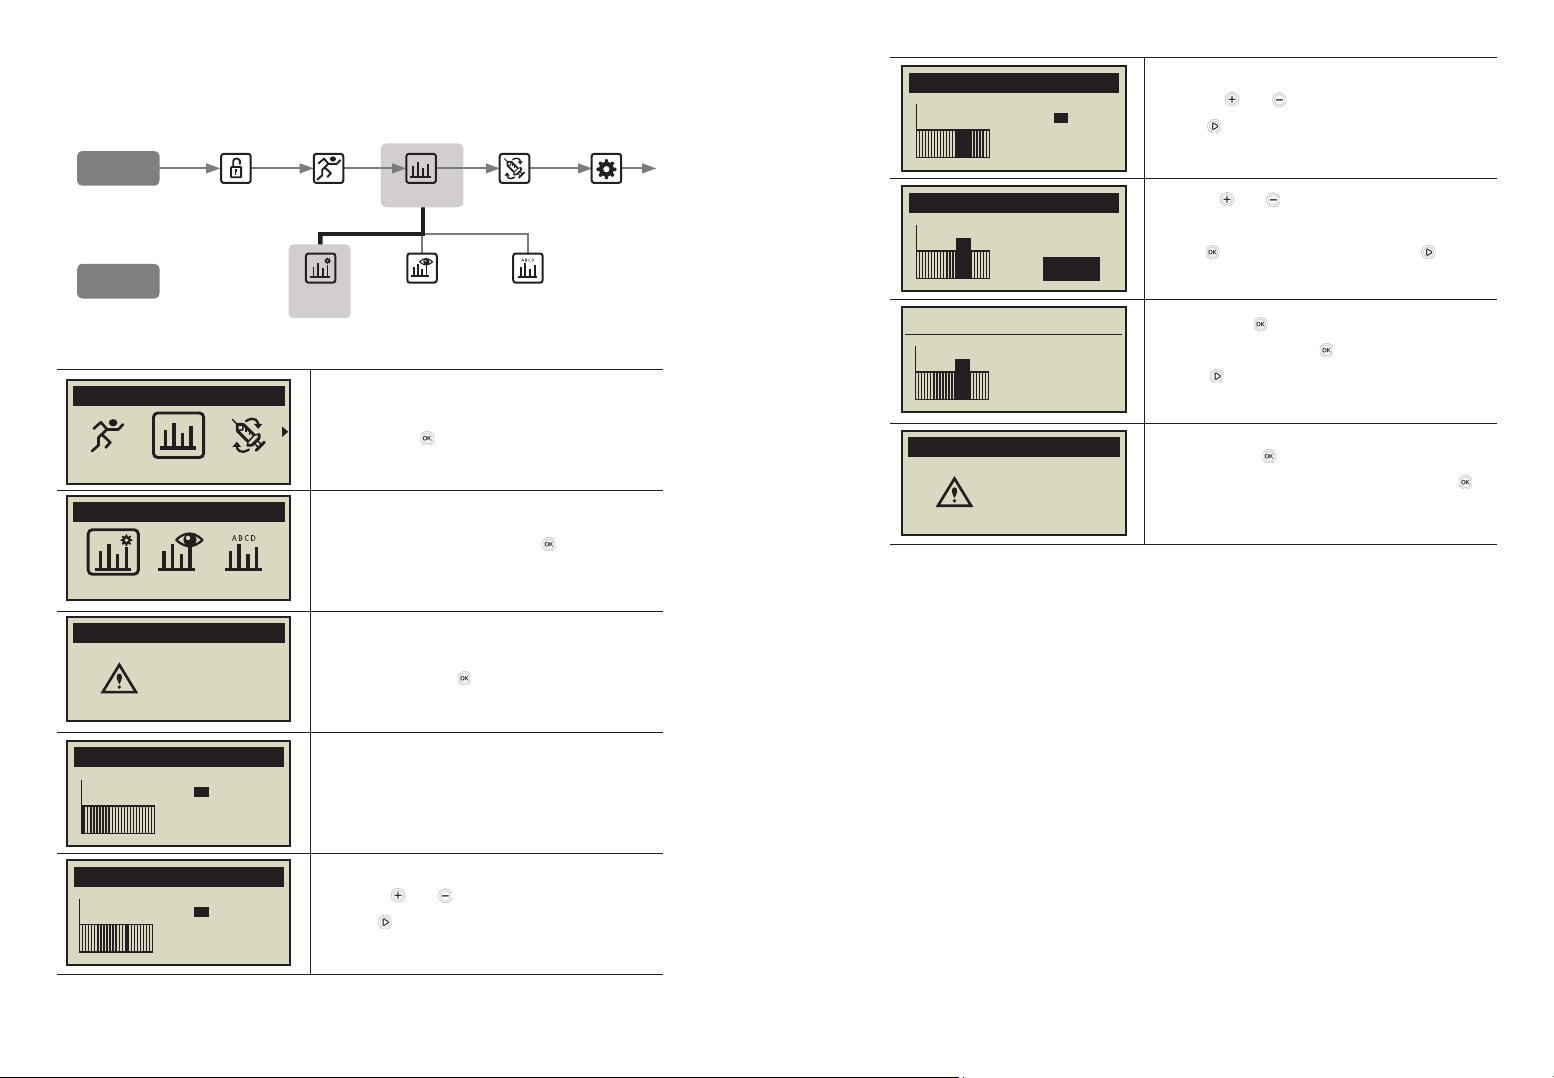
1. Basal rate bar graph per hour
The graph consists of 24 bars, and each bar represents
each hourly basal rate. In the graph, this bar starts with 00
and display until 24 (12:00AM).
When the specific time period is selected, the color of that
bar changes to black.
EDIT A
2. Basal Profile Letter
The active basal profile Letter# is in the title line.
The example indicates that Basal Profile #A is selected.
(Refer to 6.4 Basal Profile)
TDD : 05.20
3. TDD (Total Daily Dose)
TDD is total insulin which will be delivered during 24
hours from the basal.
Example, Total daily dose(basal) is 5.20 units.
18 - 19
4. Starting and ending time
The first is starting time of each hourly basal delivery, and
second is ending time.
The example indicates the basal between 18 and 19 (06
PM-07 PM) is 0.3u.
0.30 u
5. Basal Rate
In the example the basal rate between 18 and 19 (06 PM-
07 PM) is 0.30 u/h
* Description of Basal Graph:
Select time 23-24
00-01
EDIT A
0.30u
TDD : 05.60
18 - 19
①
②
③
④
⑤
Notice
• Edit basal is only available in 24-hour format.
• Basal increments can be changed by the pump trainer in Dr mode.
This page left blank intentionally
26 27
* How to edit the Basal Rate:
1. Within MAIN MENU scroll through and select
BASAL with .
2. Select EDIT BASAL and press .
3. The current Basal Profile is displayed, confirm
the selection with .
4. The edit basal screen is displayed.
The default time is 00-01.
5. Use the and to adjust the start time.
press to move to the End time.
MAIN MENU
BASAL
BASAL
EDIT BASAL
EDIT BASAL
EDIT
PROFILE A
EDIT A
0.20u
TDD : 0480
00 - 01
EDIT A
0.20u
TDD : 0480
14 - 15
6. Use the and to adjust the End time.
press to move to the Basal rate.
7. Use the and buttons to adjust the Basal rate
for the selected time.
Press to save the basal rate or press button
to move to the start time(step.5).
8. When press to save, a 'SETTING SAVED'
screen appears. Press to finish the setting, or
press to move to the start time to set next
Basal rate.
9. To save press . A confirmation message shows
that the Basal Rate has changed. Press to
confirm.
EDIT A
-.--u
TDD : 04.80
14 - 18
EDIT A
TDD : 05.20
14 - 18
0.30u
SETTING SAVED
TDD : 05.20
14 - 18
0.30u
EDIT A
PROFILE A
CHANGED
EDIT
BASAL
VIEW
BASAL
RATE
CHANGE
PROFILE
BASAL
SUB MENU
MAIN MENU
28 29
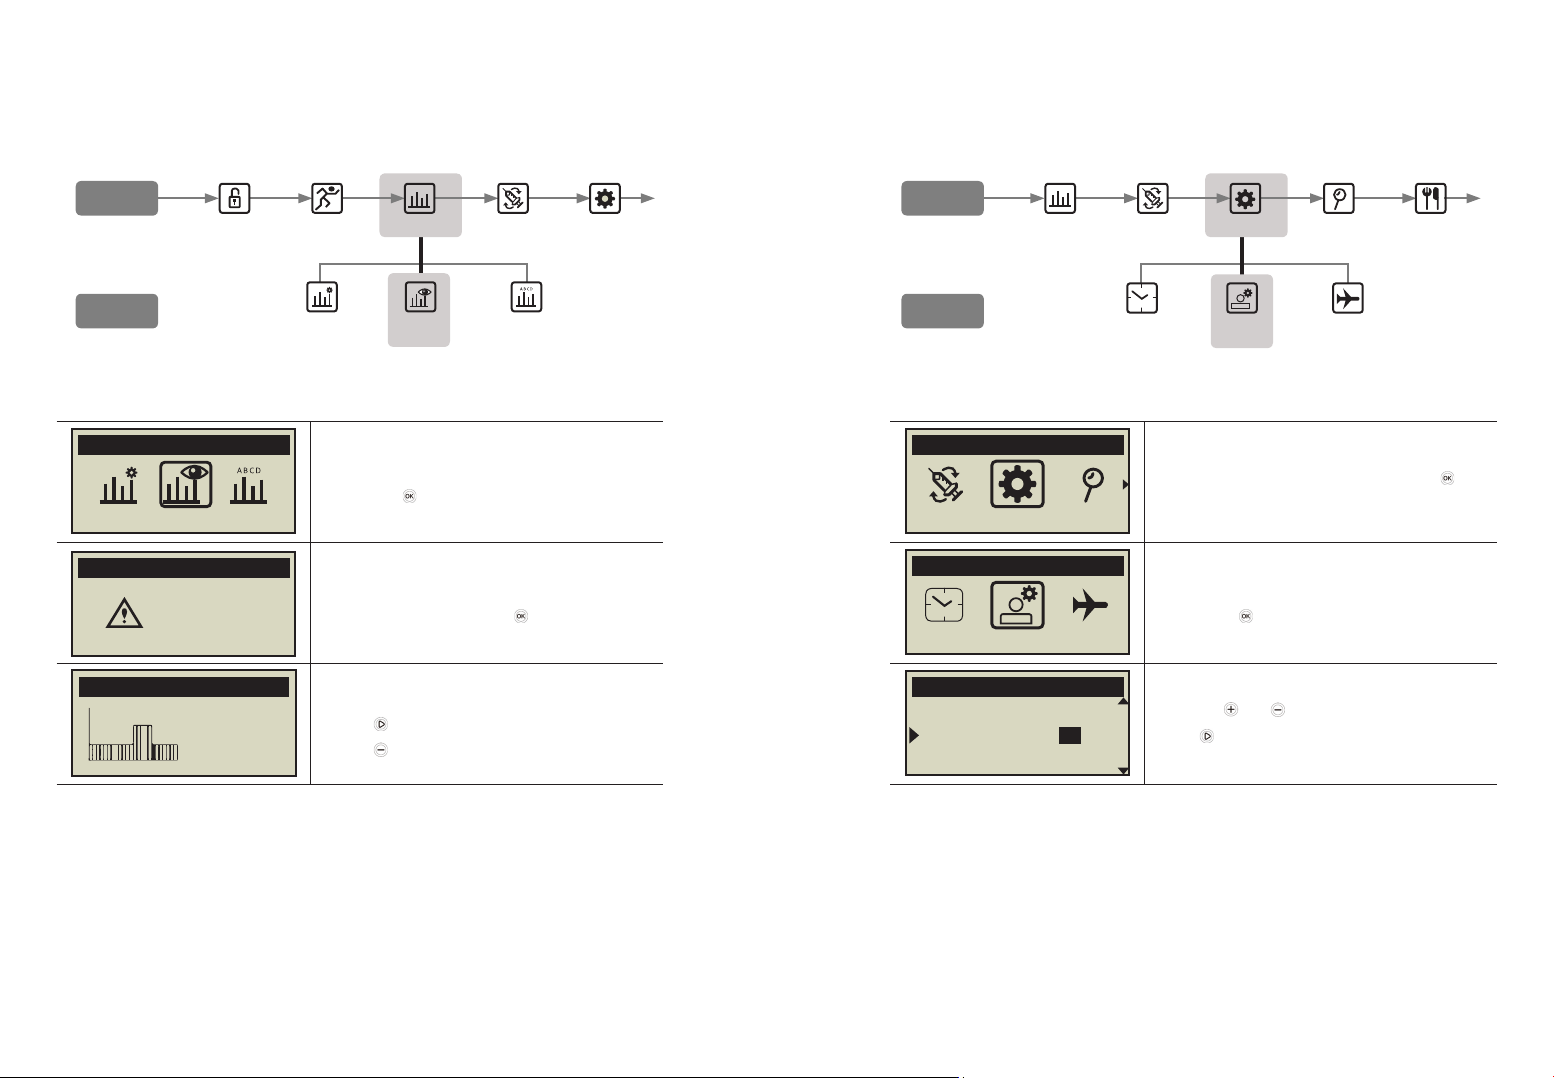
3. View Basal Rate
The view basal rate is used to view the current profile's time-specific settings.
1. Select VIEW BASAL RATE in BASAL's sub menu
and press .
2. The current Basal Profile letter is displayed,
confirm the selection with .
3. The cursor is positioned at the current time.
Press to see the next time value.
Press to exit.
REVIEW A
0.20u
TDD : 05.60
05PM - 06PM
BASAL
VIEW BASAL RATE
VIEW BASAL
VIEW
PROFILE A
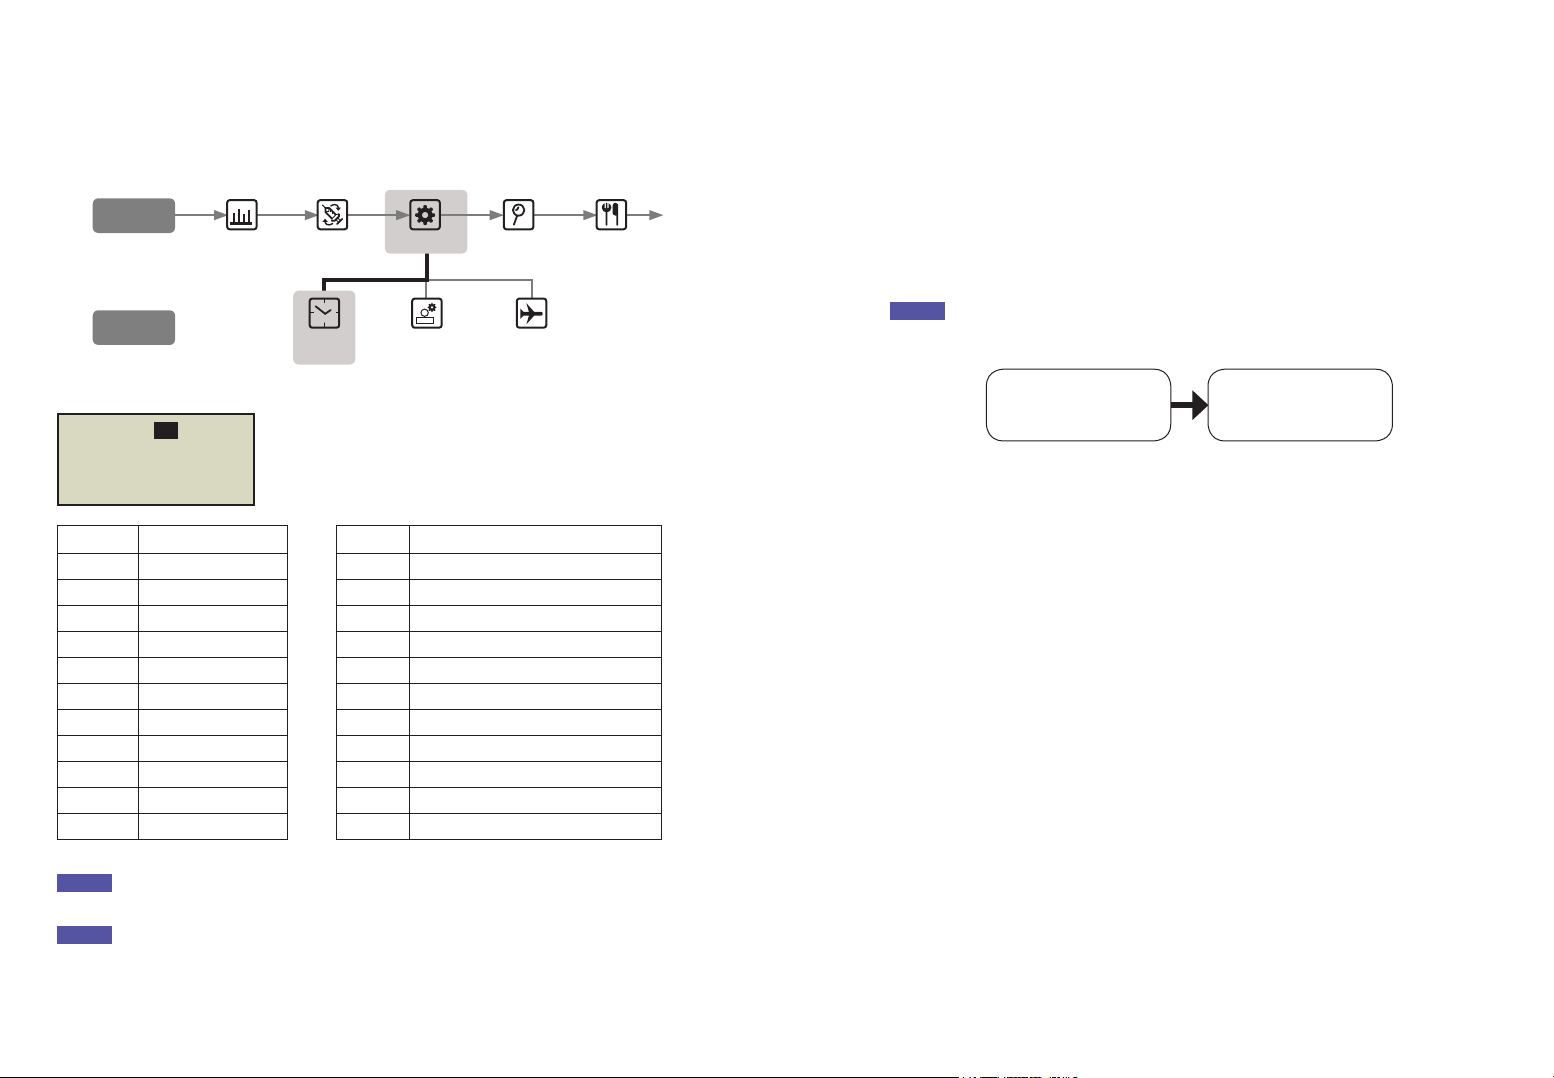
4. Setting User Options
The user can change the settings related to pump usage through the User option.
1. Select OPTION in main menu and press .
2. Select USER OPTION in OPTION’s sub menu
and press .
3. Use the and buttons to set the user option.
Use to move to next item.
MAIN MENU
OPTION
OPTION
USER OPTION
USER OPTION
14.EXIT
1.TIME DISPLAY:12
2.BUTTON SCROLL:ON
EDIT
BASAL
VIEW
BASAL
RATE
CHANGE
PROFILE
BASAL
SUB MENU
MAIN MENU
CLOCK
SETTING
USER
OPTION
AIRPLANE
MODE
OPTION
SUB MENU
MAIN MENU
30 31
1. TIME DISPLAY
Adjust the time display as 12hour or 24hour.
2. BUTTON SCROLL
When ON holding the or buttons adjusts the
value quickly.
3. BEEP
Key Beep ON/OFF enables an audio tone when
buttons are depressed.
4. ALARM
Change between SOUND, VIBRATION or BOTH for
alerts and pump alarms.
Notice for safety some important alarms will
SOUND even though VIBRATION is selected.
5. LCD ON(S)
Adjust the duration the LCD remains on before
changing to Screen Saver Mode.
Set between (5 – 240) seconds.
6. BACKLIGHT ON(S)
Adjust the duration that the LCD backlight remains
on between button presses.
Adjust time for backlight from 0 sec to 60
7. LANGUAGE
Change different language option set by Country /
Region.
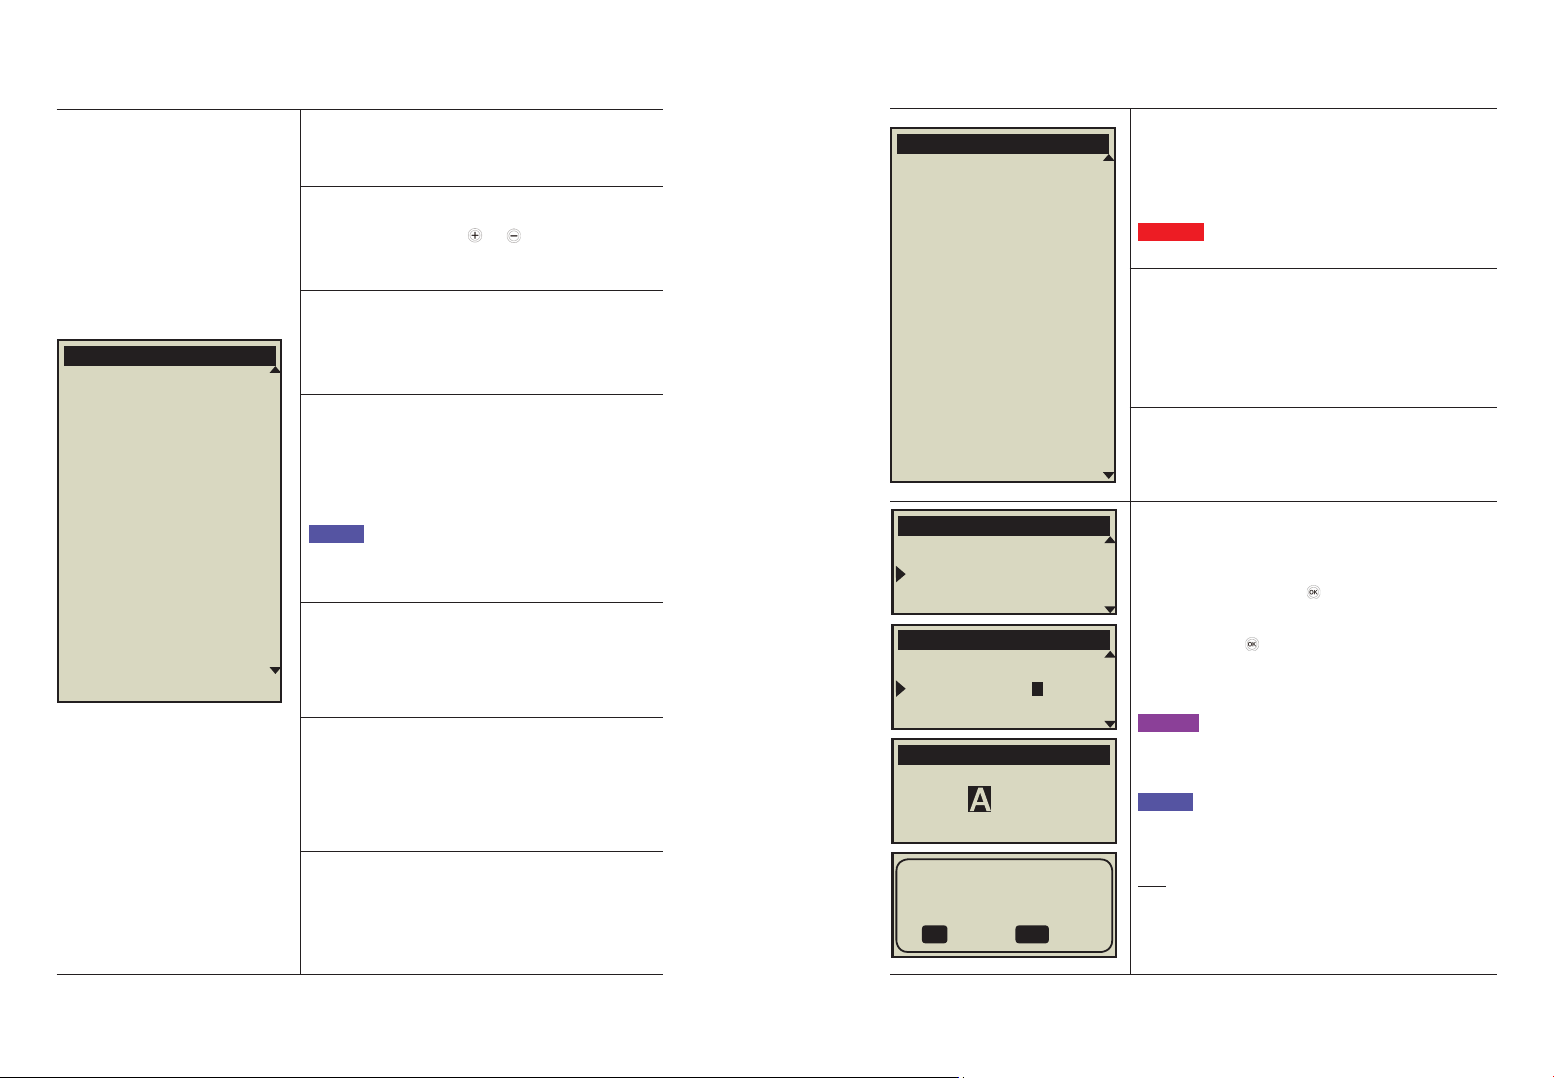
* User Options
USER OPTION
1.TIME DISPLAY:12
2.BUTTON SCROLL:ON
3.BEEP:ON
4.ALARM:SOUND
5.LCD ON(S):60
6.BACKLIGHT ON(S):10
7.LANGUAGE:EN
8.GLUCOSE UNIT:MG
9.SHUTDOWN:0
10.LOW RESERVOIR:20
11.PASSWORD
12.CANNULA VOL.:0.4
13.RES. VOL. MOD:245U
14.IDEAL BG:100
15.EXIT
8. GLUCOSE UNIT
Adjust the unit of measure for Glucose results
between ML (mmol/L) or MG (mg/dL).
Warning Using wrong unit of measure could lead to
Glucose results being misinterpret.
9. SHUTDOWN
This is a safety setting, where if no buttons are
depressed after the time set (0 – 24) the pump stops
deliver and an alarm sounds.
Set the time to (O) to disable this auto off.
10. LOW RESERVOIR
Adjust the LOW RESERVOIR warning alarm threshold
(10, 20, 30, 40, 50) units of insulin remaining.
11. PASSWORD
Change the BUTTON LOCK password. Enter the
current PASSWORD and . (Default is 1234)
From the PASSWORD screen enter the new
password then to save. The password can be set
from 0 to 9 and A to F.
Caution Password “0000” is easily unlocked.
This may be dangerous for children.
Notice If forget your password number, contact
your dealer.
TIP! If you want to unlock easily, set the password
small number which is close to zero. For example,
“1000” can be unlocked by pressing the button twice.
USER OPTION
1.TIME DISPLAY:12
2.BUTTON SCROLL:ON
3.BEEP:ON
4.ALARM:SOUND
5.LCD ON(S):60
6.BACKLIGHT ON(S):10
7.LANGUAGE:EN
8.GLUCOSE UNIT:MG
9.SHUTDOWN:0
10.LOW RESERVOIR:20
11.PASSWORD
12.CANNULA VOL.:0.4
13.RES. VOL. MOD:245U
14.IDEAL BG:100
15.EXIT
USER OPTION
10.LOW RESERVOIR:20
11.PASSWORD
12.CANNULA VOL.:0.4
USER OPTION
10.LOW RESERVOIR:20
11.PASSWORD:0000
12.CANNULA VOL.:0.4
PASSWORD
1 2 3 4
SAVE
SETTING?
:NO-OK :YES
32 33
12. CANNULA VOLUME:
Soft needle cannula has a pre-assigned volume
that needs to be filled with insulin before delivery.
Set the pre-set the required volume here for the
specific cannula used.
(Refer to 10.3 Prime Volume of infusion sets)
13. RES. VOL. MOD:
This is where the remaining reservoir volume in the
pump can be adjusted.
Caution Changing the volume to an incorrect
amount, may cause the pump to run out of insulin
without alarm.
14. IDEAL BG:
From the internal calculator and ‘Smart Bolus’
within the pump bolus menu. This is the Ideal or
Target BG value.
Use (+) and (-) key to adjust level – (ok) to save.
15. EXIT:
Press to exit and save settings.
USER OPTION
14.IDEAL BG:100
15.EXIT
1.TIME DISPALY:12
* User Options
SAVE
SETTING?
:NO-OK :YES
USER OPTION
12.CANNULA VOL.:0.4
13.RES. VOL. MOD:245U
14.IDEAL BG
USER OPTION
13.RES. VOL. MOD:245U
14.IDEAL BG:100
15.EXIT
USER OPTION
11.PASSWORD
12.CANNULA VOL.:0.4
13.RES. VOL. MOD:245U
Notice
When adjusting important USER OPTION settings like Language, Glucose Unit, or
Shutdown, a confirmation YES/NO is required.
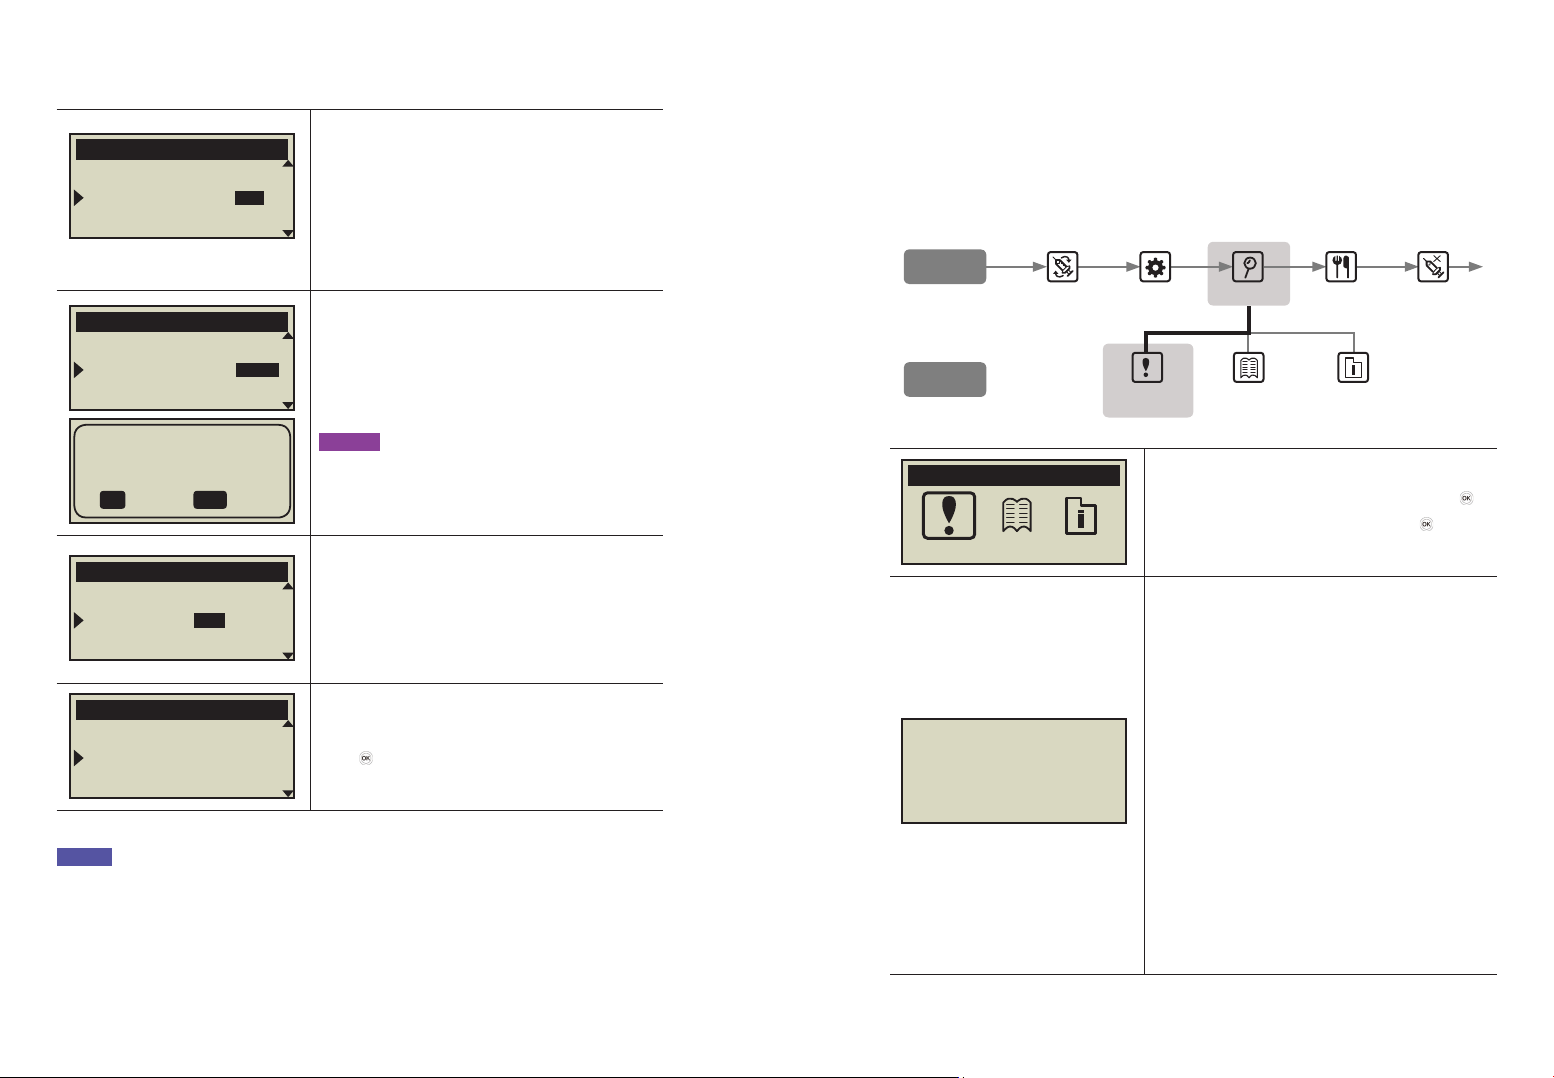
5. More Information Screen
The More Information screen provides a quick review of:
• Active Insulin from a previous bolus.
• Extended bolus information (if active).
• The most recent bolus delivery information including how many minutes ago the bolus
was delivery and the volume of the bolus.
1. From the main menu select REVIEW press .
2. Select MORE INFORMATION, press .
ACTIVE INSULIN
This is the Active Insulin sill working from previous
boluses.
DAILY TOTAL
Displayed in units for the current day.
EX T.B (Extended bolus)
If an Extended Bolus is active, the Bolus amount
and time remaining is displayed.
PRE. BOLUS (Previous bolus)
The most recent BOLUS is displayed as time since
bolus and bolus amount.
ACTIVE INSULINE: 4.2u
DAILY TOTAL: 25.0u
EXT. B:10.00u/00:30
PRE.BOLUS: Oh03m/3.5u
REVIEW
MORE INFORMATION
MORE
INFORMATION
HISTORY SHIPPING
INFORMATION
SUB MENU
MAIN MENU
REVIEW

34 35
4. Loading Insulin into the Pump
1. Preparation
Loading and refilling the Insulin Pump with insulin is a technical process which involves
medication (insulin) and sterile components.
It is recommended that:
• Retrieve the insulin vial from the refrigerator and let it warm up to room temperature
before starting.
• Place all necessary components on a clean dry surface with good lighting.
✓ DANA Insulin Pump
✓ Analog insulin (room temperature)
✓ DANA Reservoir (3ml)
✓ DANA Infusion Set
✓ DANA Auto Setter
✓ Linking screw
✓ Alcohol swab (x 1)
• Wash and dry hands before opening sterile packets and starting the refill process.
• Follow advice and recommended guidance from the healthcare professional and insulin
pump trainer.
• The room temperature in this manual is 15℃(59℉) ~ 30℃(86℉)
• The following insulin has been tested by Sooil Development Co., Ltd. and found to be
safe for use in Diabecare DANA-i Insulin Pump: Novolog (do not use beyond
"Timeframe"). Before using different insulin with this pump, check the insulin label to
make sure the insulin can be used with the pump
Warning Disconnect the insulin pump from the infusion set and body before opening
or starting any of the refill procedure. Insulin could be unintentionally delivered if the
pump is opened while still connected.
Warning
Notice Do not reuse parts or all of an old infusion set or reservoir.
36 37
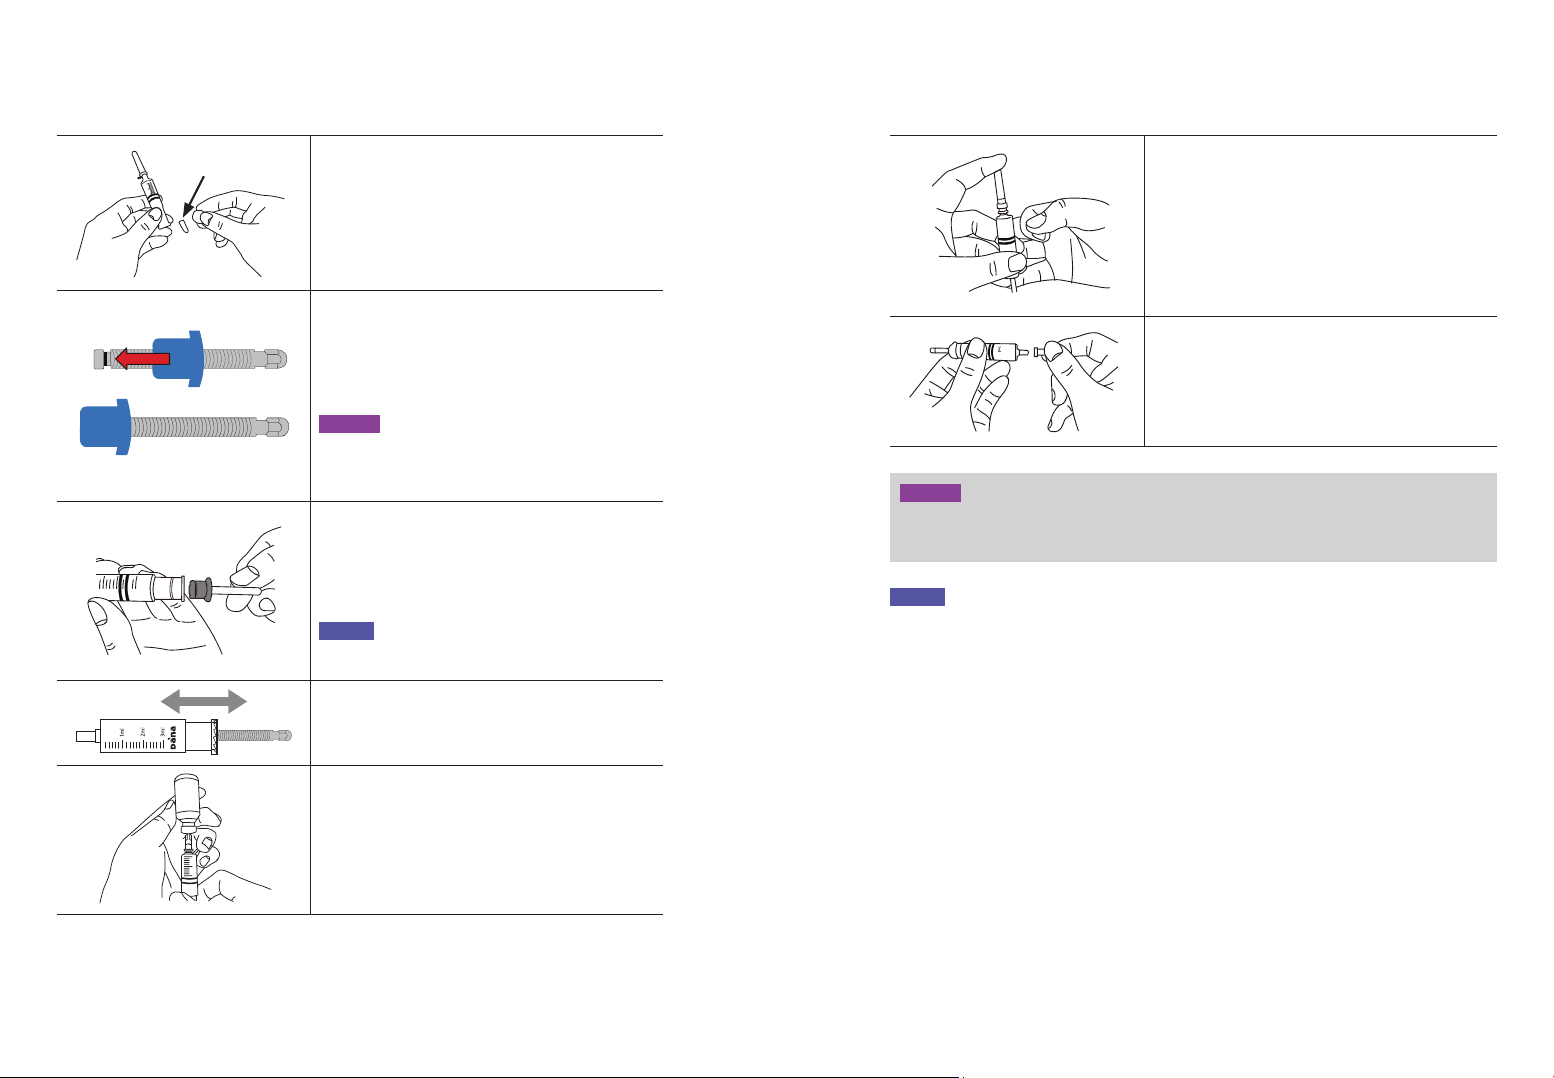
2. Filling the Reservoir with Insulin
1. Remove the round cap at the backend of the
reservoir plunger and discard. A small white
reservoir cap needs to be removed from the
plunger–keep this cap for later use. Pull back on
the plunger to the line marked with the 3 ml.
2. Loosen the linking screw until the shaft cap part
is covered up by the head part (blue part). This is
important to adjust the length accurately.
Caution If the linking screw is wound too far, the
wrong way or tight so it cannot rotate the DANA
Easy Setter may not operate properly.
3. Insert and fit the plastic component of the
linking screw into the end of the plunger/
reservoir.
Notice The ‘Blue’ part needs to firmly engage and
lock onto the reservoir plunger.
4. Push the plunger up and down 3-4 times to
lubricate the reservoir.
5. Clean the lid of the insulin vial with an alcohol
swab. Carefully remove the clear protective
needle cover and draw up the desired amount
of insulin.
6. Place the clear needle protective cover back
onto the needle. Gently tap the reservoir with
your finger in order to make the air bubbles rise
to the top of the reservoir. And push the plunger
up gently to remove the air bubbles from the
reservoir.
7. Remove the needle from the reservoir and cover
with the small white reservoir cap. Dispose of
the needle properly.
Caution Using insulin directly from the fridge can cause micro air bubbles in the
reservoir and tubing. Allow the insulin to reach room temperature before starting the
refill process. When filling the reservoir, take care to remove all air bubbles.
Caution
Notice When refilling from a 10 ml Insulin vial, pull down the plunger until the volume of
the reservoir matches the desired volume of insulin required. Insert the needle into the
insulin vial and inject the air from the reservoir into the vial. Than draw down the desired
volume of insulin.
Suggested fill amount formula:
(The usual daily requirement x 3 days) + Extra 40u.
※ For example, if a patient uses 60 units per day,
60 x 3 = 180u and extra +40u (suggest filling with 220 units).
Reservoir Cap
Other manuals for Diabecare Dana-i
2
Table of contents
Other Sooil Medical Equipment manuals


Popular Medical Equipment manuals by other brands


Getinge
Getinge Arjohuntleigh Nimbus 3 Professional Instructions for use

Mettler Electronics
Mettler Electronics Sonicator 730 Maintenance manual

Pressalit Care
Pressalit Care R1100 Mounting instruction

Denas MS
Denas MS DENAS-T operating manual

bort medical
bort medical ActiveColor quick guide

AccuVein
AccuVein AV400 user manual


