SoundMax SM-CCR3041 User manual

SM-CCR3041
USB/SD media player USB/SD-медиаплеер
Instruction manual Руководство по эксплуатации

2
Dear customer!
Thank you for purchasing our product. For safety, it is strongly recommended to read this
manual carefully before connecting, operating and/or adjusting the product and keep the
manual for reference in the future.
Table of contents
TABLE OF CONTENTS ......................................................................................................................................2
UTILIZATION OF THE PRODUCT..................................................................................................................3
IMPORTANT SAFEGUARDS ............................................................................................................................3
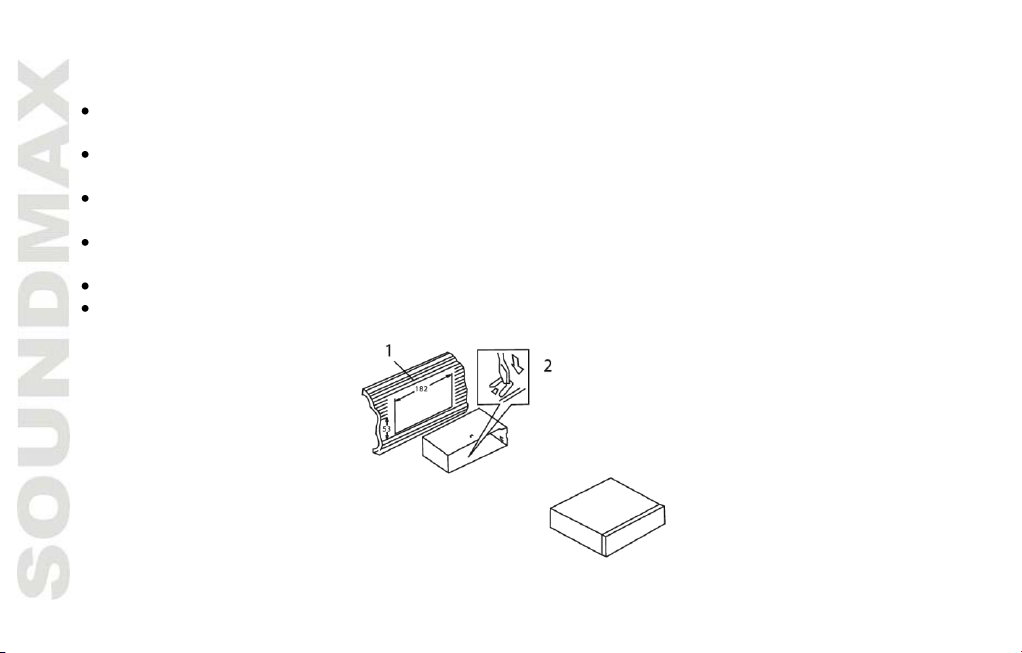
ACCESSORIES....................................................................................................................................................5
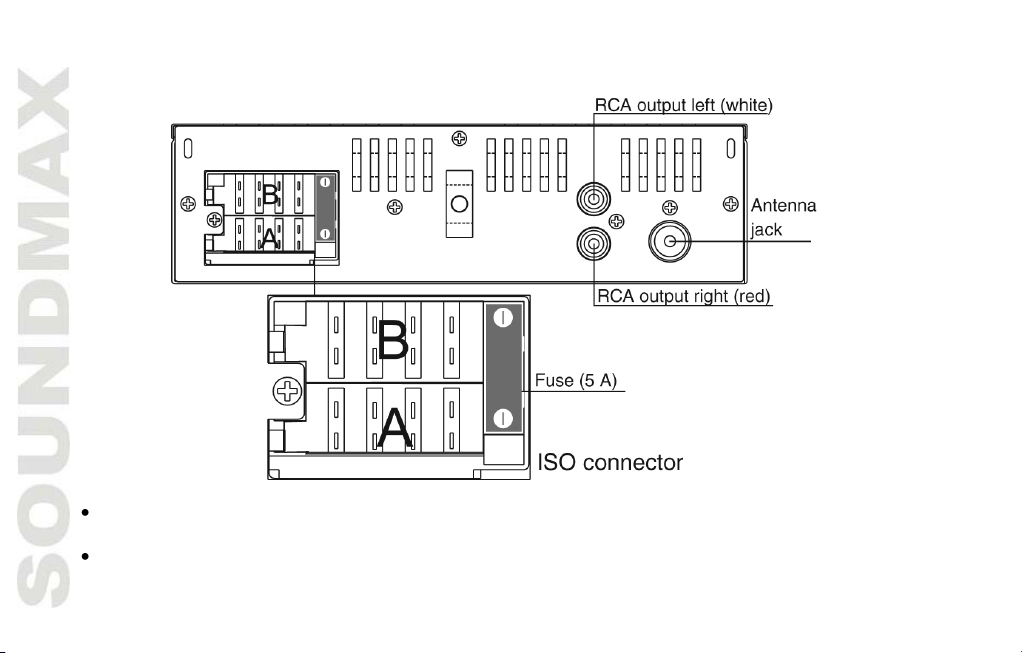
INSTALLATION/CONNECTIONS ...................................................................................................................6
PANEL CONTROLS.............................................................................................................................................10
LCD LAYOUT........................................................................................................................................................11
GENERAL OPERATIONS ..................................................................................................................................12
RADIO OPERATIONS........................................................................................................................................15
USB/SD/MMC OPERATIONS ..........................................................................................................................16
TROUBLESHOOTING GUIDE..........................................................................................................................18
SPECIFICATION .................................................................................................................................................19

3
Utilization of the product
If you want to dispose this product, do not mix it with general household waste. There is a
separate collection system for used electronic products in accordance with legislation that
requires proper treatment, recovery and recycling. Please contact your local authorities for the
correct method of disposal. By doing so, you will ensure that your disposed product undergoes
the necessary treatment, recovery and recycling and thus prevent potential negative effects
on the environment and human health.
Important safeguards
Read carefully through this manual to familiarize yourself with this high-quality sound
system.
The beginning of operation is the moment of the unit installation. Before use the device in
winter it is recommended to heat up the passenger compartment during 20 seconds or to
the operation temperature.
Use the unit with the temperature that goes beyond the operation temperature greatly
decreases the operation resource of the screen and other components of device and can
result an outage.
Disconnect the vehicle's negative battery terminal while mounting and connecting the unit.
When replacing the fuse, be sure to use one with an identical amperage rating. Using a
fuse with a higher amperage rating may cause serious damage to the unit.

4
Make sure that pins or other foreign objects do not get inside the unit; they may cause
malfunctions, or create safety hazards such as electrical shock.
Do not use the unit in places where it can be exposed to water, moisture and dust.
Do not open covers and do not repair yourself. Consult the dealer or an experienced
technician for help.
Make sure you disconnect the power supply and aerial if you will not be using the system
for a long period or during a thunderstorm.
Make sure you disconnect the power supply if the system appears to be working
incorrectly, is making an unusual sound, has a strange smell, has smoke emitting from it
or liquids have got inside it. Have a qualified technician check the system.
The unit is designed for negative terminal of the battery, which is connected to the vehicle
metal. Please confirm it before installation.
Do not allow the speaker wires to be shorted together when the unit is switched on.
Otherwise it may overload or burn out the power amplifier.

5
Accessories
1. Receiver 1 pc
2. ISO connector set (A+B) 1 pc
3. Mounting parts:
Release key 2 pcs
Mounting sleeve 1 pc
Trim frame 1 pc
4. Instruction manual 1 pc
5. Warranty card 1 pc
6. Consumer information 1 pc

6
Installation/Connections
Choose the mounting location where the unit will not interfere with the normal driving
function of the driver.
Before finally installing the unit, connect the wiring and make sure that the unit works
properly.
Consult with your nearest dealer if installation requires the drilling of holes or other
modifications of the vehicle.
Install the unit where it does not get in the driver's way and cannot injure the passenger if
there is a sudden stop, like an emergency stop.
If installation angle exceeds 30° from horizontal, the unit may not perform properly.
Avoid installing the unit where it would be subject to high temperature, such as from
direct sunlight, or from hot air, from the heater, or where it would be subject to dust, dirt
or excessive vibration.
DIN front mount
1. Car dashboard
2. Sleeve

7
1. Install the sleeve into the dashboard; ensure it is installed with the correct side and there
are no obstacles (wires, dashboard elements, etc) for the unit installation.
2. After installing the sleeve into the dashboard, bend tabs fitting to the size of the
dashboard to fix the sleeve in place.
3. Use the metal strap to fix the rear side of the unit. Determine a place for fixing and install
the strap as shown in the picture. You can bend the strap to the needed angle with your
hands.
4. Make the necessary wire connections. Ensure the connections are correct.
5. Install the unit into the sleeve until the side locks are fixed.
Dismantling the unit
а–Trim frame
б–Frame uninstall direction
в–Release key insertion
1. Switch off the unit.
2. Insert your fingers into the groove in the front side of the
trim frame (apply some effort to detach the frame). Pull
the frame to detach it.
3. Insert the supplied release keys into the both sides of the
unit body to click, as shown in the picture. To extract the
unit from the dashboard, pull the release keys or the unit
body to pull it out. Before detaching the unit, ensure it is not
fixed with the metal strap.

8
Connection diagram
Notes:
In spite of having any kinds of speaker system, must use 4 ohms impedance of speaker to
reduce the distortion during high volume level.
Prohibit to make the conductors of auto antenna and ground touch with each other.

9
Using the ISO Connector
1. If your car is equipped with the ISO connector, then connect the ISO
connectors as illustrated.
2. For connections without the ISO connectors, check the wiring in the
vehicle carefully before connecting, incorrect connection may cause
serious damage to this unit.
Cut the connector, connect the colored leads of the power cord to the car
battery as shown in the colour code table below for speaker and power cable
connections.
Location
FUNCTION
Connector A
Connector B
1
-
Rear Right(+)---Purple
2
-
Rear Right(-)---Purple/Black
3
-
Front Right(+)---Grey
4
Battery 12V (+)/yellow
Front Right(-)---Grey/Black
5
Auto Antenna/blue-white
Front Left(+)---White
6
-
Front Left((-)---White/Black
7
Ignition/red
Rear Left(+)---Green
8
Ground/black
Rear Left(-)---Green/Black
Auto antenna wire is intended for power supply of the antenna and for remote control of an
additional amplifier.

10
Panel controls
1. PWR/MOD button
2. button
3. VOLUME knob/SELECT button
4. APS button
5. MUT/LUD button
6. Display
7. USB port
8. button
9. BND/CLK button
10. 1/PLAY/PAUSE button
11. 2/INT button
12. 3/PRT button
13. 4/RDM button
14. 5/FOLDER- button
15. 6/FOLDER- button
16. AUX input
17. RESET button (hole)
18. Memory card slot

11
LCD layout
1. Radio band indicator
2. Digit display (frequency, track time,
etc.)
3. FM frequency
4. Signal indicator
5. Not active
6. SD playback indicator
7. USB playback indicator
8. Stereo signal reception indicator
9. Mute indicator
10. Intro mode on
11. Repeat mode on
12. Random playback on
13. Not active
14. Signal indicator

12
General operations
Turning the unit on/off
Press PWR/MOD button to turn the unit on. Press and hold the button again to turn the unit
off.
Reset the unit
When operating the unit for the first time or after replacing the car battery, you must reset
the unit. Press RESET button (hole) with a pointed object, such as a ballpoint pen, to set the
unit to initial state.
Note: When some errors occur, you can also press RESET button to resume to normal, and it
will erase some memorized functions.
Mode selection
Press PWR/MOD button repeatedly to select between Radio, auxiliary input, USB or Memory
Card modes. Modes of operation are indicated on the display. Memory card and USB modes
are not available unless a memory card or USB device is connected.
Volume control
Adjust volume by rotating VOLUME knob.
Mute function
Press MUT/LUD button to switch off the sound; press it again or rotate VOLUME knob to
resume the sound.

13
Loudness
Press and hold MUT/LUD button to select loudness ON or OFF (when ON, LOUD will be
displayed). Activating this feature will enhance bass and treble frequencies when listening to
music at low volumes.
Audio parameter setting
Press SELECT button repeatedly to select a parameter: BAS (bass) => TRE (treble) => BAL
(balance) => FAD (fader). Rotate VOLUME knob to adjust each mode:
Bass/Treble: from -7 to 7;
Balance: L07 (left) to R07 (right);
Fader: from R07 (rear) to F07 (front).
Note: When equalizer is in any mode except FLAT, bass and treble are not adjustable.
Preset equalizer modes
Press SELECT button repeatedly until ROCK/POP/CLASS/JAZZ equalizer mode is displayed.
Rotate VOLUME regulator to select equalizer mode.
Clock
Press BND/CLK button to display the time on the screen. Then press and hold this button
again; the hour indication will blink. Rotate VOLUME regulator to adjust hours; press BND/CLK
button to go to minutes; rotate VOLUME regulator to adjust minutes. To confirm the
adjustment, press BND/CLK button or leave the unit idle for several seconds.

14
Aux input
AUX-in jack is intended for connecting an external audio equipment to amplify the sound. If
connection is made correctly, the audio signal from the external source will be translated
through the acoustics of the head unit. This enables to adjust the volume and quality of the
sounding. For example, you can connect an MP3-player to listen to tracks using the car
acoustic system.

15
Radio operations
Band select
In Radio mode press BND/CLK button to select a radio band: F1 (FM1), F2 (FM2), F3 (FM3). 6
stations can be saved in each band.
Manual/automatical tuning
Press /buttons repeatedly to adjust the needed frequency manually.
Press and hold or button. The radio will seek to the next down or up strong and clear
frequency station.
Storing and recalling stations
Press and hold APS button for more than 2 seconds to automatically find and store 6
strongest stations in the current band.
After 6 strongest stations are saved, press APS button; scanning of all stored stations will
begin.
Press 1-6 buttons to select saved channels. If you want to save a new station in a preset
position, select corresponding station number with 1-6 buttons. Then tune to the needed
frequency as described in “Manual/automatical tuning” above and press and hold BND/CLK
button. The new frequency will be saved in the selected position.

16
USB/SD/MMC operations
Connecting a USB/Memory card
Insert a USB device into the USB port of this unit (remove the rubber cover first). Insert an
SD/MMC memory card until a click into the memory card slot. To remove the card, press it
until a click, then pull to remove.
Note: USB/SD/MMC supported capacity: up to 8 Gb. FAT16/FAT32 file systems are
supported.
For correct and satisfactory operation, licensed SD/MMC memory cards of famous brands
should be used with this unit. Avoid using memory cards of unknown brands. Some models of
According to the USB 1.1/2.0 Standard, usage of a USB device with power current
consumption exceeding 500 mA is not recommended without supplementary power supply.
Failure to use supplementary power for connected USB drives with power consumption
exceeding this value as well as defective USB drives may cause mechanical or thermal
changes of elements of this unit as well as failure of internal elements of the USB port. Such
damages are not warrantee cases.
Warning: usage of external USB drives containing BIN files in the root directory may cause
malfunction of the unit or damage to the software.
Playback
When a USB or a memory card is first connected, playback will begin automatically.
Depending on the number of files and folders, the device may take several seconds to begin
playback.

17
Track select
Press button to skip to the beginning of the next track. Press button to skips to the
previous track.
Press 5/FOLDER- to go to previous folder. Press 6/FOLDER+ button to go to next folder.
Fast forward/rewind
Press and hold or button to rewind or fast forward the current track. Release the button
to return to normal playback.
Pause
Press 1/PLAY/PAUSE button to temporarily stop file playback. Press it again to resume
playback.
Intro playback
Press 2/INT button to play first several seconds of each track consequently. Press again to
cancel.
Repeat
Press 3/RPT button to continuously repeat the current track. Press again to cancel.
Random
Press 4/RDM button to play all the tracks in the current folder in random order. Press again to
cancel.

18
Troubleshooting guide
Below is a table describing simple measures that can help you eliminate most problems likely
to emerge when this unit is in use. If below measures do not help, turn to a service center or
to the nearest dealer.
Symptom
Cause
Solution
No power
Wiring is connected
incorrectly.
Make correct wiring connection.
The car ignition is not on.
If the power supply is properly connected to
the car accessory, switch the ignition on.
The fuse is blown.
Replace the fuse.
No sound
Volume is in minimum.
Adjust volume to the desired level.
Wiring is not properly
connected.
Check wiring connection.
The radio does not
work
The antenna cable is not
connected.
Insert the antenna cable properly.
The radio station
automatic tuning
does not work
The signals are too weak.
Select stations manually.
Cleaning the unit body
Wipe with a soft cloth. If the cabinet is very dampen (not dropping wet) the cloth with a weak
solution of soapy water, and then wipe clean.

19
Specification
General
Power supply
12 V DC
Current consumption
5 A
Maximum power output
4 x 45 W
Dimensions of the unit
178 x 51 x 78 mm
Gross/Net weight
0.5/0.67 kg
Temperature range
-200C - +600C
FM stereo radio
Frequency range
87.5 - 108.0 MHz
Preset stations
18
Player
Supported storages
USB/SD/MMC
Supported formats
MP3
Connectors
Line out
Stereo RCA line out (2 V)
Specifications are subject to change without notice. Dimensions are approximate.

20
Уважаемый покупатель!
Благодарим Вас за покупку нашего изделия. Для обеспечения безопасности
рекомендуется тщательно изучить настоящее руководство перед подключением,
эксплуатацией и/или регулировкой изделия, и сохраняйте руководство для использования
в будущем.
Содержание
СОДЕРЖАНИЕ ....................................................................................................................................................20
УТИЛИЗАЦИЯ ИЗДЕЛИЯ ................................................................................................................................21
МЕРЫ ПРЕДОСТОРОЖНОСТИ......................................................................................................................21
КОМПЛЕКТ ПОСТАВКИ ..................................................................................................................................23
УСТАНОВКА/ПОДКЛЮЧЕНИЕ......................................................................................................................24
ЭЛЕМЕНТЫ УПРАВЛЕНИЯ.............................................................................................................................29
СИМВОЛЫ НА ЖК-ДИСПЛЕЕ.......................................................................................................................30
ОБЩИЕ ОПЕРАЦИИ .........................................................................................................................................31
ОПЕРАЦИИ С РАДИО.......................................................................................................................................34
ОПЕРАЦИИ С USB/КАРТАМИ ПАМЯТИ SD/MMC ..................................................................................35
РУКОВОДСТВО ПО УСТРАНЕНИЮ НЕИСПРАВНОСТЕЙ .....................................................................38
ТЕХНИЧЕСКИЕ ХАРАКТЕРИСТИКИ ............................................................................................................39
Table of contents
Languages:
Other SoundMax Media Player manuals

SoundMax
SoundMax SM-CCR3037 User manual

SoundMax
SoundMax SM-CCR3072F User manual

SoundMax
SoundMax SM-CCR3070F User manual

SoundMax
SoundMax SM-CCR3184FB User manual

SoundMax
SoundMax SM-CCR3186FB User manual

SoundMax
SoundMax SM-DVBT280 User manual

SoundMax
SoundMax SM-CCR3189FB User manual

SoundMax
SoundMax SM-CCR3073F User manual

SoundMax
SoundMax SM-CCR3048F User manual

SoundMax
SoundMax SM-CCR3182FB User manual