SousVideTools IV250 User manual

IV250 CHAMBER
VACUUM SEALER
USER GUIDE

2
IMPORTANT - READ BEFORE USE
Please read this user manual carefully before using the appliance.
SAFETY REGULATIONS
• Always unplug this appliance when not in use and prior to cleaning. The machine cover must be in the
unlocked position before plugging into the mains.
• This appliance is not a toy. When using around children, ensure that they are kept away from moving parts.
When not in use, store this appliance in a safe place, out of the reach of children.
• Do not use any bags or attachments not recommended or appointed, and don’t use this appliance for other
purpose except its intended use.
• If the cord is damaged, stop using the machine immediately and have it replaced by a professional.
• Keep away from moving parts.
• Never touch the hot sealing element located on edge of the top cover of this machine. It becomes very hot
when in use with the potential to burn..
• Do not try to repair this appliance by yourself.
• Do not use the appliance if it has been dropped, fallen or appears to be damaged.
• Never pull or carry the appliance by the cord, close a door on cord or pull the cord around sharp edges or
corners. Do not operate the appliance if either the cord or plug is wet.
• Keep away from stove tops, hot ovens, electric burners or any other heat source. Never use this appliance
on wet or hot surfaces.
• Avoid using an extension cord with this unit. If one is used, ensure it has a rating equal to or exceeding the
rating of this appliance.
• When disconnecting the appliance, avoid any injury or damage by grasping the plug, not the cord.
• Never plug in, or operate this appliance with wet hands.
• Always operate this appliance on a stable surface, such as a table or counter.
• Do not use lubricating oils or water on this appliance.
• Do not immerse any part of this appliance, power cord or plug in water or any other liquid.
• This appliance is recommended for household, indoor use only. Do not use this appliance outdoors or on a
wet surface.
• This appliance must not be used by children or persons with reduced physical, sensory or mental
capabilities, or lack of experience and knowledge.
• At the end of the life of the appliance, please dispose of the appliance according to the regulations and
guidelines applicable at the time. Throw packing materials like plastic and boxes in the appropriate
containers.

3
PRODUCT FUNCTIONS
1 SealingProle
Presses the bag against the sealing bar
2 Connector for vacuum hose
2a Air Filter
2b Adapter
Remove the air lter only if you want to connect a
vacuum hose.
3 Gasket
4 Sealing Bar
Contains a heating wire covered with Teon which
allows the bag to seal but not to stick to the strip.
5 Fixation
For Fixation of bag.
The sealing bar gets very hot. To avoid getting burned, never touch the sealing bar directly after
sealingprocess.DonotremovetheTeontape(T).
1
2
3
4
5
T
2
2A
2B
4
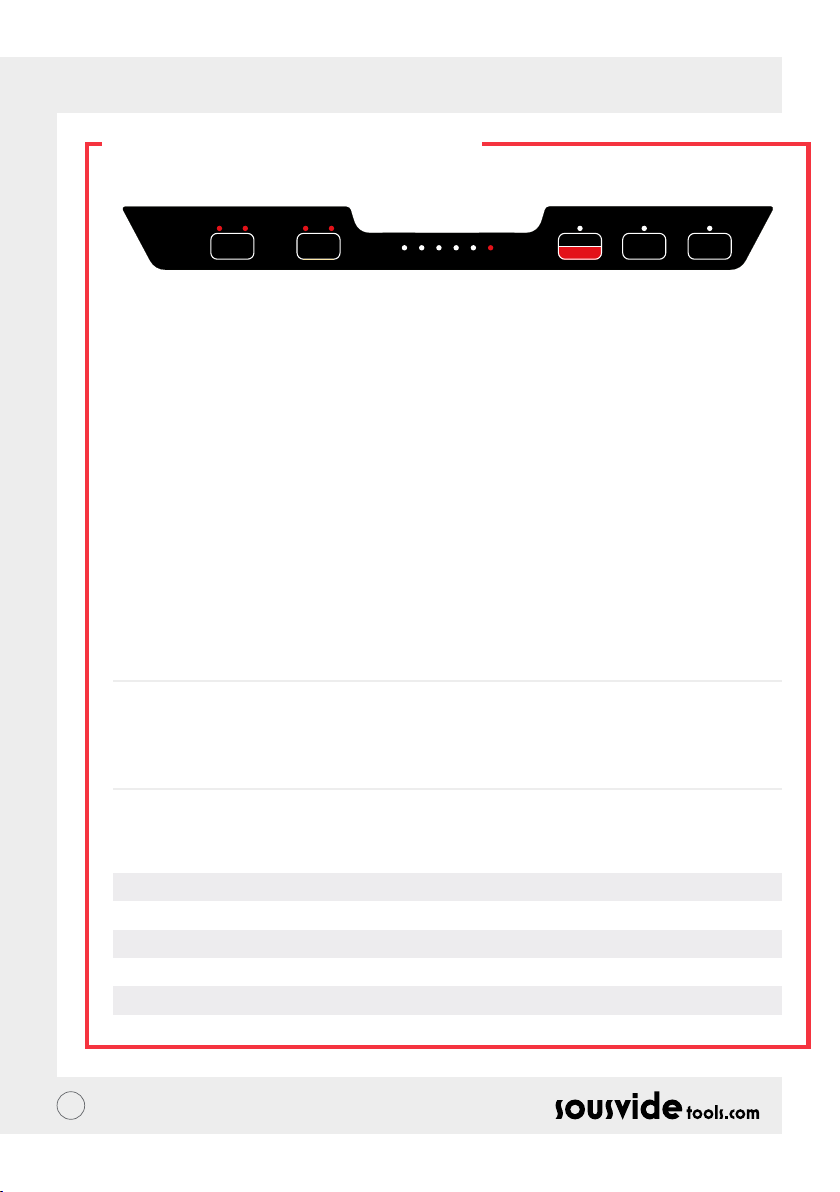
CONTROL PANEL
Vacuum
Setting of vacuum strength
•Normal: for sensitive or soft foods
•Strong: for insensitive or hard food (for a
particularly strong vacuum pressure)
Sealing
Setting of sealing time
•Normal: for dry food (short sealing time)
•Strong: for wet food or food with lot of liquid (long
sealing time)
Default setting is Normal for dry bags and shorter
sealing time.
Progress– Progress LED indicator
Show progress of operation
Auto/Cancel
•Automatic vacuuming: for the automatic
vacuuming and sealing of a bag.
•Vacuuming of canister or wine bottle: with open
lid of device a container can be vacuumed with a
vacuum hose
•Cancel: the device can be stopped at any time
during vacuum/sealing operation
Seal
•For sealing a bag without vacuuming it
•When the Automatic vacuuming function is in
operation, this button can be pressed to stop the
vacuum operation at any time and then and seal
the bag afterwards
Marinate
Marinate within a bag
Rating plate
The rating plate with the connection and performance data can be found on back of the unit.
Vacuum
Normal Strong
Sealing
Normal Strong
Seal Marinate
Auto
Cancel
Progress
TECHNICAL SPECIFICATION
Operating voltage and frequency: 220V - 240V / 50Hz
Power consumption: 280W
Sealing Length: 25cm
External Dimensions: 326h x 340w x 170d
Weight: 8.4kg

5
GENERAL INSTRUCTION
• Always expel as much air out as possible out of the bag, prior to closing the lid and starting the vacuum pump
• Always place the open end of the bag at and straight on the sealing bar, do not overlap or wrinkle
• Large or empty bags needs longer vacuuming times. Smaller bags vacuums quicker therefore need less time
• Increase the vacuum time for a tighter package
• Fresh fruit and vegetables are not recommended for vacuum packaging as the pressure could damage them
• For best marinating results, repeat the vacuum process 2 or 3 times
• Always check the seal line to ensure it is clear, at, and evenly melted. If not fully melted, seal for a further
1-2 seconds
• In cold weather the seal process may take longer. Set the seal time for slightly longer for a better result
Keep the open end of the bag clean and dry
SETUP LOCATION REQUIREMENTS
In order to ensure the safe and trouble-free operation of the device, the setup location must fulll the
following prerequisites:
• The device must be set up on a solid, even, horizontal surface capable of supporting the vacuum sealer and
any items to be vacuum-sealed.
• The device is not intended to be installed in a wall or a built-in cupboard.
• Select a setup location where children cannot reach the hot sealing strip of the device.
• Do not set up the unit in a hot or damp environment or near ammable material.
• Do not place the device near a gas or electric cooker or an oven
• To operate correctly, the unit requires sufcient air ow. Leave at least 10 centimeters (4 inches) of space
on all sides when setting up the unit.
• Do not move the vacuum sealer when it is in operation.
• The electrical outlet must be easily accessible so that the plug can be quickly disconnected in the case of an
emergency.
• The setup of this unit in non-stationary locations (e.g., boats, airplanes, motor homes) must be carried out by
a qualied electrician, provided they guarantee the prerequisites for the safe use of the unit.
OPERATING INSTRUCTIONS
Vacuum packing with a bag in the vacuum chamber
1Place the device on a dry surface.
2 Place the food to be preserved inside the bag.
Expel any extra air out of the bag after it is placed into the sealing bar. This will ensure a good seal.
3 Switch the device on. Open the lid of the device and place the open end of the bag over the sealing bar and
xate it. Lift xation, place the end of the bag and push the xation down again.

6
Sealing a bag without vacuuming
You can seal a bag without vacuuming it. Place the bag in the vacuum chamber as usual, then press Seal.
If this does not provide a satisfactory result, then hang the bag outwards. To do this, place the bag from the
outside over the sealing bar.
Then close the lid and press Seal.
4 Adjust the vacuum and sealing setting as desired.
5 Close the lid and press Auto/Cancel.
6 Press the lid down for 2 seconds after starting of vacuum process. The device automatically vacuums and
seals the bag.
7 The device beeps when the operation is completed.
8 Open the lid of the device and take out the bag.
Remove excessive liquid or food residues from vacuum chamber after each vacuum process.
Vacuuming outside the vacuum chamber can only be done with structured bags.
The device creates a very high vacuum. If necessary, you must interrupt the automatic vacuum
operation for sensitive foods and soups early. Then interrupt the operation with Seal, the bag will
be sealed automatically.
• We suggest to vacuum seal one bag within 1 minute to let the appliance cool down enough. But it
is also possible to seal several bags consecutively.
• Cut the bag at least 8 cm longer than needed. The sealed ends will take up the extra space.
• Do not overstuff the bag; leave enough empty length in the open end of the bag (at least a few
inches) so that the bag can be properly placed on the sealing bar.
• Do not wet the open end of the bag. Wet bags may not seal properly.
• lean and straighten the open end of the bag before sealing. Foreign matter or creases on the bag
may result in a faulty seal.
• If the food you’re sealing has sharp edges (such as bones or shells) pack the edges with kitchen
paper to avoid tearing the bag.
• Blanch vegetables by cooking them briey in boiling water. Allow them to cool then vacuum seal
them in convenient portions.
• When vacuum sealing unfrozen food, allow at least two additional inches of bag length for
expansion while freezing. Place unfrozen meat or sh on a paper towel and vacuum seal with the
paper towel in the bag to absorb any extra moisture.
• Before storing foods such as tortillas, crepes or bread, use wax or parchment paper between them
to stack the pieces. This will make it easier to remove an individual piece, reseal the rest and
immediately replace them in the freezer.
Vacuuming a bag outside the vacuum chamber
You can also vacuum a bag outside the vacuum chamber. To do this, place the bag from the outside over the
sealing bar. Then close the lid and proceed as described under "Vacuum packaging with a bag in the vacuum
chamber. However, this works only with structured bags. For best results, use double-sided bags.
7
Marinating
•Place the food which you want to marinate into the bag. Open the lid of the device and place the bag which
you want to marinate into the vacuum chamber and xate it. Lift xation (5), place the end of the bag and
push the xation down again.
•Close the lid of the device and press Marinate.
•The food will automatically be marinated. The device beeps when the operation is completed.
•Repeat the operation as often as you like until the desired intensity is reached.
•Then seal the bag manually
•Open the lid and take out the bag.
• The device will not seal and vacuum directly after marinate function.
• Please perform this operation manually if desired.
OPERATING INSTRUCTIONS
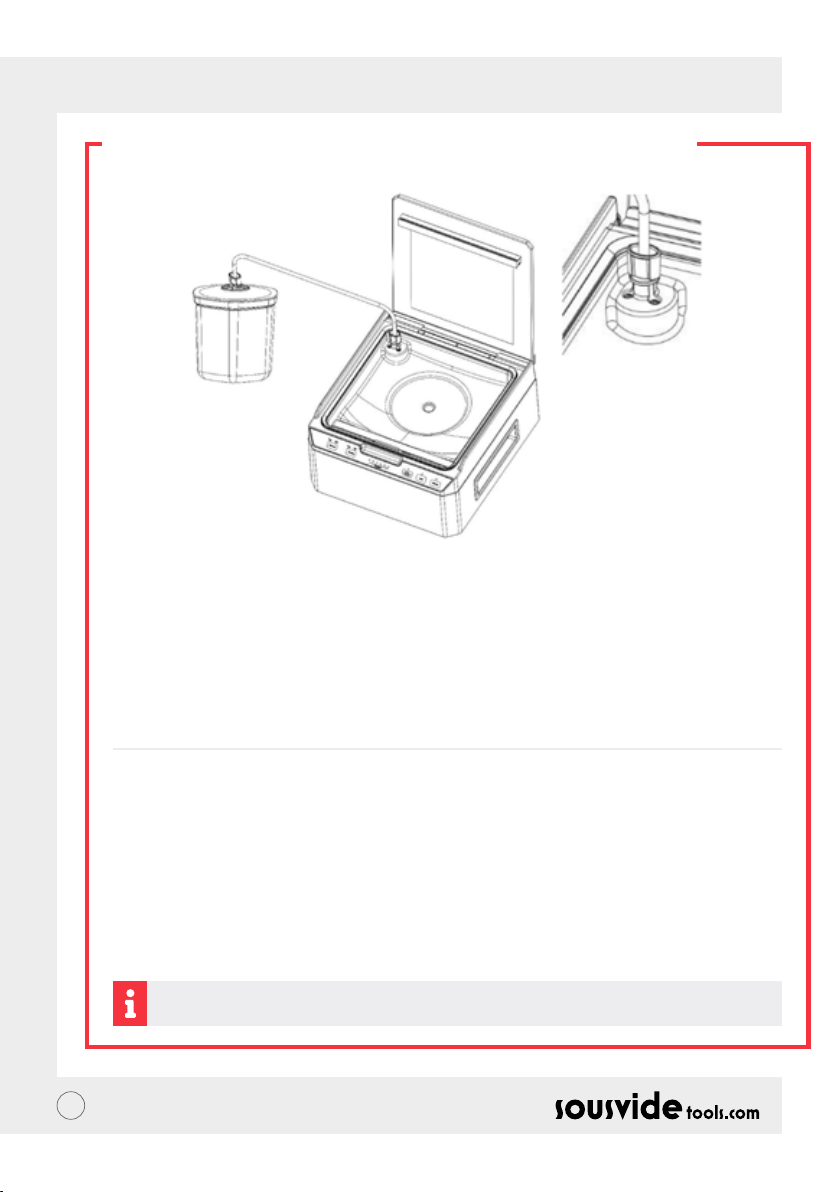
Vacuuming Canisters
• Remove the air lter above the connector for the vacuum hose and place the adapter.
•Place the food into the canister. Place the lid of canister. Connect the vacuum hose at lid of canister and
with adapter at the connector at the vacuum chamber of the device.
• Press Auto/Cancel for 3 seconds. Briey press down the lid of canister. The canister will automatically. be
vacuumed.
•The device beeps when the operation is completed. Depending on the desired vacuum strength, repeat the
process as often as you like.
• Then remove the adapter from the connector at the vacuum chamber and replace the air lter.

8
CLEANING & MAINTENANCE
Vacuum Sealer
1Always unplug the appliance before cleaning.
2Do not immerse in water or any other liquid.
3Avoid using abrasive products or material to clean the unit, as they will scratch the surface.
4Use a mild dishwashing soap and a warm, damp cloth to wipe away food residue around the components.
5Dry thoroughly before using again.
Vacuum Bags
1Wash bags in warm water with a mild dishwashing soap
2If washing bags in dishwasher, turn bags inside out and spread them over the top rack of the dishwasher, so
that the entire surface is exposed to the water during its cycle.
3Dry thoroughly before using again.
Storing Your Vacuum Sealer:
Keep your sealer in a at, safe place, out of the reach of children.
IMPORTANT:Donotreusebagsafterstoringrawmeats,rawshorgreasyfoods.Donotreuse
bags that have been microwaved or boiled.
The foam gaskets around the vacuum chamber should be dried thoroughly before reassembling.

9
TROUBLESHOOTING
Problem Troubleshooting
The appliance
vacuums the
bag but does
not seal
The bag
inates after
vacuuming
The appliance
seals but does
not vacuum
The bag melts
• Check that the sealing time is set. If not, please set the sealing time.
• Check the heating element for damage. If damaged, take it to be repaired by an
approved engineer.
• Check the sealing strip for damage. If damaged, please exchange the sealing strip,
ensuring it is correctly installed.
• Check that the edge of the bag is free from liquid. Remove and try again.
• Foods which corrode easily must be frozen or refrigerated after vacuuming to prolong
its shelf life (vacuuming does not guarantee that foods will never spoil).
• Does the vacuum package contain fresh fruit, vegetables or seeds? Fresh fruit,
vegetables and seeds are not suitable for room-temperature storage after vacuuming.
They should be stored in the refrigerator.
• Check that the vacuuming time is set. If not, please set the vacuuming time.
• Check the bag for sharp or bulky angles. Please pack any sharp edges with safe paper
before vacuuming the food
• Check that the edge of the bag is free from liquid. Remove and try again
• Check the sealing strip for damage. If damaged, please exchange the sealing strip,
ensuring it is correctly installed.
• Check that the sealing time has not been set for too long.
DISPOSAL OF THE DEVICE
Protection of the Environment
At the end of the life of your product, it should go to a specially adapted waste-recycling centre.
The symbol on the product or on its packaging indicates that this product may not be treated as
household waste. Instead it should be taken to the applicable collection point for the recycling of
electrical and electronic equipment.
By ensuring this product is disposed of correctly, you will help prevent potential negative consequences for
the environment and human health, which could otherwise be caused by inappropriate waste handling of this
product. For more detailed information about the recycling of this product, please contact your local council
ofce or your household waste disposal service.
Sealing bar/Lid gasket/Rubber strip replacement is not covered under warranty.
10
FOOD STORAGE & SAFETY
Food Items Temperature Normal Preservation Vacuum Preservation
REFRIGERANT
"NORMAL CONDITION"
FROZEN
Fresh Raw Meat 5±3ºC 2-3 days 8-9 days
Fresh Fish/ Sea Food 5±3ºC 1-3 days 4-5 days
Cooked Meat 5±3ºC 4-6 days 10-14 days
Vegetables 5±3ºC 3-5 days 7-10 days
Fruit 5±3ºC 5-7 days 14-20 days
Eggs 5±3ºC 10-15 days 30-50 days
Bread 25±2ºC 1-2 days 6-8 days
Biscuit 25±2ºC 4-6 months >1 years
Rice/ Flour 25±2ºC 3-5 months >1 years
Peanut/Legume 25±2ºC 3-6 months >1 years
Medical Material 25±2ºC 3-6 months >1 years
Tea 25±2ºC 5-6 months >1 years
Meat -16 ~ -20ºC 3-5 months >1 years
Fish -16 ~ -20ºC 3-5 months >1 years
Sea Food -16 ~ -20ºC 3-5 months >1 years
This vacuum chamber packaging machine uses the vacuum sealing method to pack food airtight. Vacuum
packaging is an easy and efcient way of packaging a variety of food, because it can prevent spoilage and
extend the shelf life of food. The lack of air in the bag hinders hinder the growth of bacteria and molds. You can
buy food in large quantities and vacuum pack them without the threat of food waste.
However, please keep in mind that not all kinds of food can benet from vacuum packaging. Never use vacuum
packaging to store garlic or fungi such as mushrooms. A dangerous chemical reaction will take place when air
is removed, causing these foods to be dangerous if ingested. Vegetables should be washed and peeled before
packaging to kill any enzymes that may cause deterioration when air is removed under vacuum packaging.
Above table is just for reference only and suggest to follow local hygienic and epidemiological regulations.
Vacuum packaging can only slow down the process of food spoilage, but it cannot stop food spoilage.
The food still need to be put in the freezer or fridge.

11
WARRANTY & AFTER
SALES SERVICE
1 Make sure the working platform is at, clean and tidy.
2 Warranty is limited to damage caused by production defects.
3 The cost of parts and maintenance will be charged due to improper use or other non-product
quality problems.
4 Please keep the purchase vouchers.
Maintenance Card
Repair Record
First Name:
Phone:
Address:
Machine Model:
Supplier:
Last Name:
Email:
Purchase Date:
Date Cause By

HEADQUARTERS
Central Barn, Claughton Business Park,
Hornby Road, Claughton, Lancaster, LA2 9JX
0800 678 5001
01524 770 060
www.sousvidetools.com
Table of contents
Other SousVideTools Kitchen Appliance manuals

SousVideTools
SousVideTools IVIDE WIFI COOKER User manual

SousVideTools
SousVideTools VS270-P User manual

SousVideTools
SousVideTools iVide Thermal Circulator Wifi User manual

SousVideTools
SousVideTools SVT-01008 User manual

SousVideTools
SousVideTools VS520-P User manual

SousVideTools
SousVideTools IVIDE CHAMBER User manual

SousVideTools
SousVideTools IV300 User manual

SousVideTools
SousVideTools SVT-12003 User manual

SousVideTools
SousVideTools Senses 300 User manual


