manuals.online logo
Brands
  1. Home
  2. •
  3. Brands
  4. •
  5. southpaw enterprises
  6. •
  7. Baby Swing
  8. •
  9. southpaw enterprises 1006 Standard User manual

southpaw enterprises 1006 Standard User manual

This manual suits for next models

1

Other southpaw enterprises Baby Swing manuals

southpaw enterprises 120020 User manual

southpaw enterprises

southpaw enterprises 120020 User manual

southpaw enterprises 120175 User manual

southpaw enterprises

southpaw enterprises 120175 User manual

southpaw enterprises 0133 User manual

southpaw enterprises

southpaw enterprises 0133 User manual

Popular Baby Swing manuals by other brands

Hudora Comfort INSTRUCTIONS ON ASSEMBLY AND USE

Hudora

Hudora Comfort INSTRUCTIONS ON ASSEMBLY AND USE

Fisher-Price M5585 manual

Fisher-Price

Fisher-Price M5585 manual

stilum patis2 Mounting instructions

stilum

stilum patis2 Mounting instructions

Fisher-Price K7192 manual

Fisher-Price

Fisher-Price K7192 manual

Fisher-Price 79739 instructions

Fisher-Price

Fisher-Price 79739 instructions

Fisher-Price G5914 manual

Fisher-Price

Fisher-Price G5914 manual

highwood Lehigh Porch Swing Assembly guide

highwood

highwood Lehigh Porch Swing Assembly guide

Graco OASIS owner's manual

Graco

Graco OASIS owner's manual

stilum seta Maintenance instructions

stilum

stilum seta Maintenance instructions

stilum simius2 Maintenance instructions

stilum

stilum simius2 Maintenance instructions

Central Park 5629033 manual

Central Park

Central Park 5629033 manual

Canvas BAFFIN 088-2292-4 Assembly instructions

Canvas

Canvas BAFFIN 088-2292-4 Assembly instructions

ABC Design Kiddie Ride On Instructions for use

ABC Design

ABC Design Kiddie Ride On Instructions for use

TP Pirate Boat TP903 Instructions for assembly, maintenance and safe use

TP

TP Pirate Boat TP903 Instructions for assembly, maintenance and safe use

Fisher-Price FLG84 manual

Fisher-Price

Fisher-Price FLG84 manual

Clas Ohlson 31-5722 quick start guide

Clas Ohlson

Clas Ohlson 31-5722 quick start guide

AOODOR 800-052 Assembly & instruction manual

AOODOR

AOODOR 800-052 Assembly & instruction manual

Sunjoy L-GZ330PCO-1 manual

Sunjoy

Sunjoy L-GZ330PCO-1 manual

manuals.online logo
manuals.online logoBrands
  • About & Mission
  • Contact us
  • Privacy Policy
  • Terms and Conditions

Copyright 2025 Manuals.Online. All Rights Reserved.

Instruction Sheet
Glider Bolster 1006 Standard / 1007 Mini
Store these instructions with the enclosed maintenance checklist in
a safe place. You may also access them on our website.
Take time to familiarize yourself with the use and maintenance of this equipment before using. Please file this
Instruction Sheet in an accessible location: the Instruction Sheet must be read and familiar to anyone who is
using Southpaw Enterprises Equipment.
Warning: Failure to properly install a forged
steel eyebolt (1/2” or 5/8”) may result in serious
injury or death. If you have any questions
about the installation of the forged steel
eyebolt, please contact Southpaw Enterprises
Customer Service at 1-800-228-1698.
IMPORTANT: Please check equipment immediately for any damage
that may have resulted during shipping. If any damage has occurred,
please contact Southpaw Enterprises, Inc. immediately.
SPACE REQUIREMENTS
 Minimum height must be 7 feet
 Clearance from walls and other obstacles must be at least 6 ft.
HANGING PROCEDURE
Note: Glider Bolster will hang from 2 or 4 suspension points. If 4 points are used, you will need 2 more safety
snaps. Height Adjusters (5000) and Safety Rotational Devices (2000) are recommended but not included with
Bolster. Be sure to use Southpaw Therapy Rope (150) and
Eye Splice (151) with Southpaw Height Adjuster.
Attach your Glider to your ceiling eye bolts with the
Safety Snaps provided.
Recommended suspension points for the Standard Glider
Bolster, must be between 5-1/2 ft and 6-1/2 ft. apart as this is
the most stable configuration. It can also be suspended from a
single suspension point. Suspension points for the Mini Glider
must be between 3-1/2 ft. and 5-1/2 ft. apart.
If you wish to suspend your Glider Bolster from 4 points you will
need 2 additional Southpaw Safety Snaps. The second set of
suspension points for the Glider Bolsters should be parallel to
the first set, and about 1-1/2 ft. to 2 ft apart from each other.
The WORKING LOAD is 400 lbs.
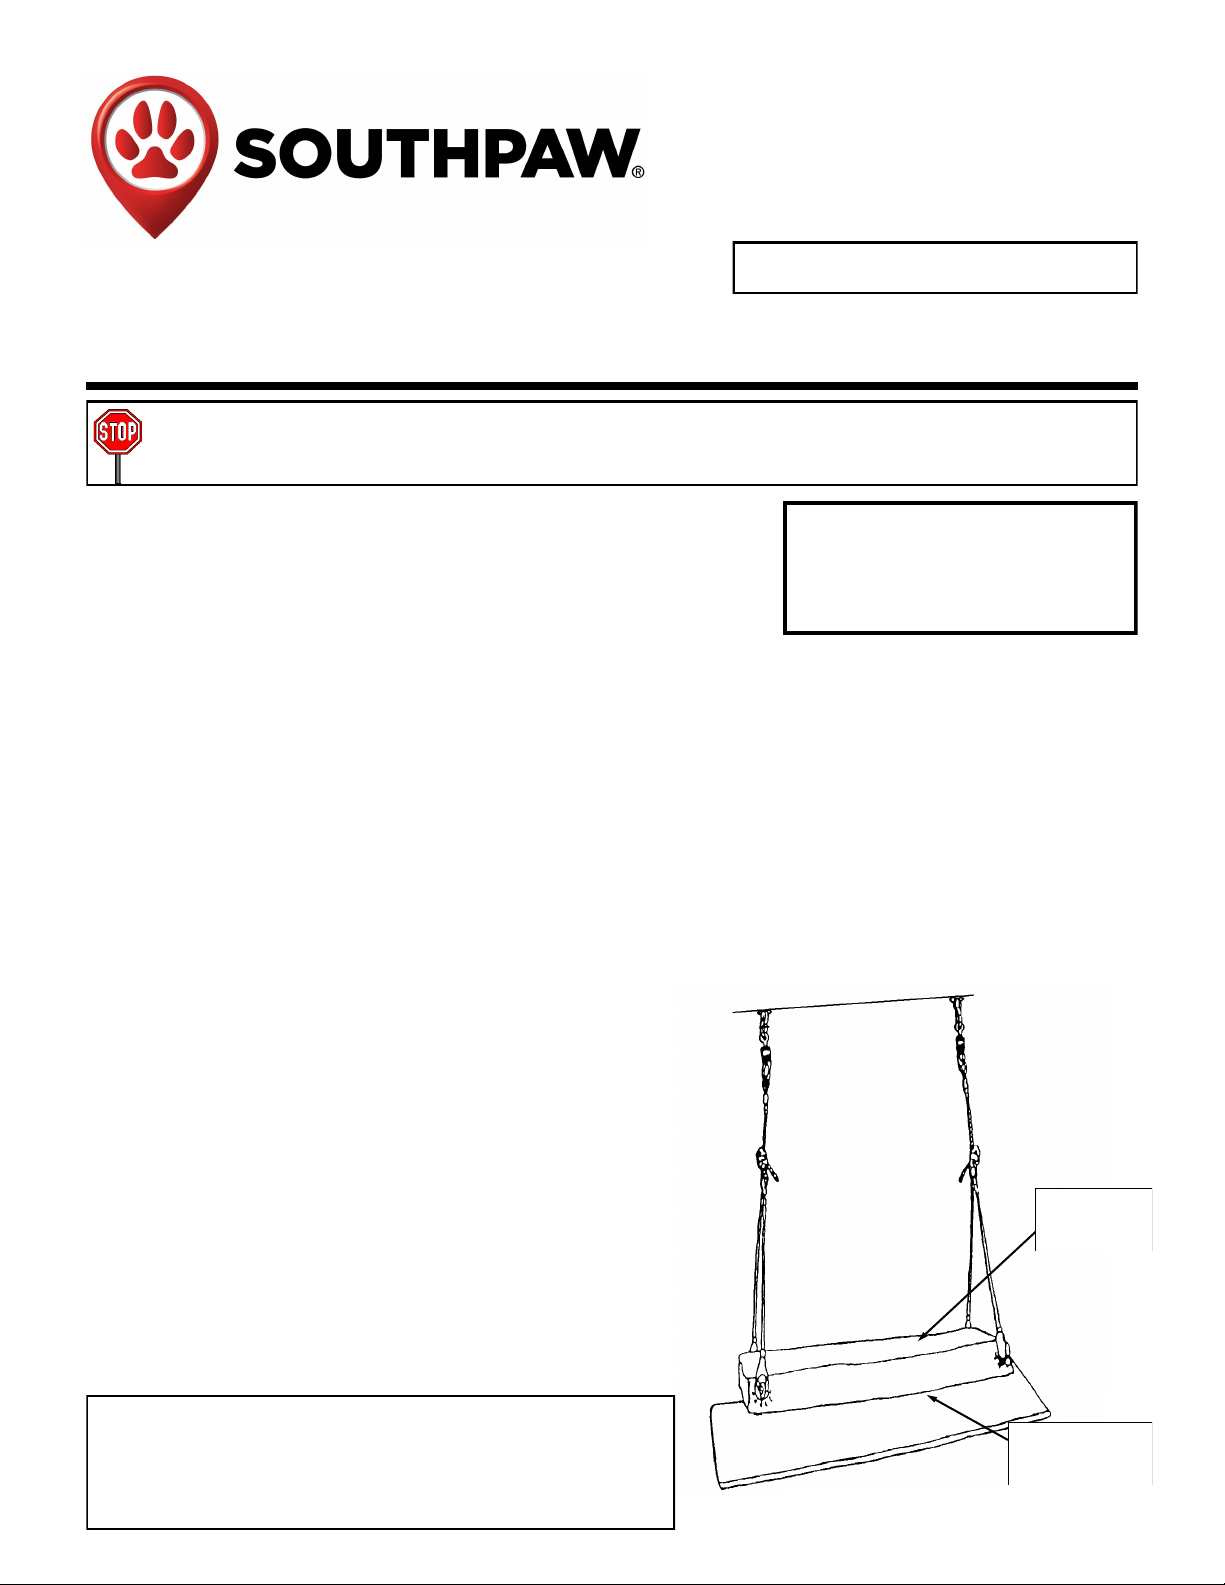
Drawing shown with two Southpaw Height
Adjustment Systems, not included
MATERIALS LIST
1006 Std. Glider Bolster 1007 Mini Glider Bolster
1 - 1006 Glider Bolster 1 - 1007 Glider Bolster
2 - Safety Snaps 2 - Safety Snaps
1 - Safety Snap Instruction Sheet 1- Safety Snap instruction Sheet
1 - Instruction Sheet 1 - Instruction Sheet
1 - Maintenance Checklist 1 - Maintenance Checklist
Soft/Firm
foam on top
Soft/Soft foam
on bottom
The Glider Bolster is designed with different density foams on each
side for the comfort of your clients. The top (blue) has one layer of
soft foam and one layer of firm foam, and the bottom (green) has two
layers of soft foam. Simply hang the bolster with the desired side fac-
ing up. The bolster is stable in both orientations.
If you have any questions or comments, please call or write
Southpaw Enterprises, Inc.
P.O. Box 1047, Dayton, Ohio 45401-1047
Toll Free - (800) 228-1698
Please visit us at www.southpaw.com
© 2019 Southpaw Enterprises, Inc.
Safety Precautions - The safety of your clients is dependent on the appr opr iate choice of activity to match, yet challenge their
physical abilities. Use appropriate spotting / safety techniques. In addition, the layout of your activity area, proper installation and
maintenance of your equipment is critical. Southpaw equipment is not intended for recreational or outdoor use. Under no condition
should this equipment be used without proper supervision.
This sheet is for example only. It is not meant to, in any way, r eplace local, county, state, or Feder al standar ds. Be awar e - it
is your responsibility to find all pertinent safety information that pertains to your facility.
 Check ceiling eye bolt for wear and movement. Use a Southpaw Safety Rotational Device to prevent
abnormal wear.
 Floor mats of proper thickness should be positioned properly under and around all suspended
equipment.
CAUTION
MAINTENANCE CHECKLIST
All of the following wear points should be checked on a monthly basis and recorded on the checklist enclosed.
 Lift eye bolt covers at the bottom of each rope and check eye bolts for wear.
 Check the metal lining on the rope where it contacts the eye bolt for wear.
 Look for metal dust or broken metal.
 Check all points where movement occurs for wear of any kind.
 Check Safety Snaps for wear. (See Safety Snap Instruction Sheet included).
 Check the cover for ripped or torn places. There are metal button sized fasteners on the ends of the bolster. If
these are loose or missing, discontinue use until repaired.
 If rope splice locks are loose or missing, discontinue use until repaired.
 If ropes are fraying, item should be taken out of service. Call Southpaw to refurbish.
STORAGE PROCEDURES
 Store out of direct sunlight.
 Store where not accessible by clients without proper supervision.
CLEANING INSTRUCTIONS
Check with your infectious disease department before using these procedures.
 Check for client allergies first.
 Bolster may be cleaned with a damp cloth using soap and water or appropriate disinfectant.
 Lines may be cleaned with a damp cloth.
 Make sure unit is dry before using.