Spedal NaviCam CL876 User manual

CL876
033C3807-EN
Spedal NaviCam User Manual
Multifunctional Smart Motorcycle CarPlay Screen

1. Safety Guidelines
· Do not operate this product while driving.
· Do not install or operate this product with wet hands.
· Do not install this product in a place with high temperature, humid-
ity, flammable, explosive gas or liquid.
· Do not install this product in an area that interferes with the
driver's sight or driving safety.
· Do not install this product on the airbag cover or within the work-
ing range of the airbag.
· Do not leave this product in a closed vehicle with high temperature
for a long time.
· Do not operate this product over rated voltage.
· Do not use non-original cables and accessories.
· Do not use sharp objects such as awls or scissors to cut this prod-
uct and its accessories.
· Do not disassemble, repair or modify this product and accessories
by yourself.
· Do not install, use or place this product within the reach of children
under 16 years of age.
1.1 Warnings
· Do not press the lens too hard to avoid damage or dislocation of the
lens.
· Do not directly touch the lens surface, so as not to affect the recording
effect.
· Do not remove the memory card during the shutdown process to
avoid file damage.
· When using the memory card for the first time, please format it on this
product to ensure stable reading and writing.
· When not using the product for a long time, please pull out the
memory card to ensure the performance of the memory card.
1.2 Precautions
Scan the QR code, select the corresponding model,
and view the User Manual.
https://spedal.cc/html/support/download/navicam.html
For any questions please contact [email protected]
01

2. User Manual
2.1 Packing List
Note
Do not use cables and components that are not original. Gifts
and accessories are not covered under warranty. The package
contents of this product may change without prior notice, and
the actual contents of the package shall prevail.
2.2 Product Illustration
Screen
TF
TF Card Slot
02
◆ Mount bracket
◆ Power cable
◆ Device
◆ Camera x2
(Optional)
◆ Wired remote
(Optional)
◆ Bottom
cover plate
◆ Screws
◆ Camera extension
cable(Optional)
◆ Anti-slip pad
(Optional)
◆ Tire pressure
sensor x2
(Optional)
◆ Quick guide
TPMS
◆ TF Card(Optional)
◆ Wrench
◆ Manual screw
Red: Power Interface
Blue: Camera Interface
AUX Audio
Yellow: Wired Remote Interface
Black: Camera Interface

Note
The installation position of equipment and brackets should
not block the driver's sight and affect driving safety.
2.3 Bracket Installation
1. Align the universal bracket's screw hole with the hole on
the back of the device, use a wrench to tighten the screw
into the hole.
2. Insert the bracket into the motorcycle crossbar and tight-
en the screws.
3. Adjust the device screen to the appropriate angle, and
then tighten the screws (as indicated by the arrow in the
figure below).
2. Insert the other end of the power cord into the power
port of the device.
03
2.4 Device Installation
1. Connect the power cord from the package to the power
take-off interface of the motorcycle (be careful not to
reverse the polarity).
Yellow wire: Connected to the constant power
supply from the power box.
Black wire: Connected to the ground line.
Red wire: Connected to the ACC power (only
powered when the ignition switch is on).

2.5 Wired Remote Installation
1.Use a screwdriver to unscrew the screws on the remote and
open the fixing ring.
2.Attach the remote's fixing ring to the motorcycle handlebar
and tighten the screw.
3.Adjust the remote to a convenient operation angle, tighten
the screw to prevent loosening.
4.Connect the remote to the device (the remote connects with
the device's green port), and the installation is complete.
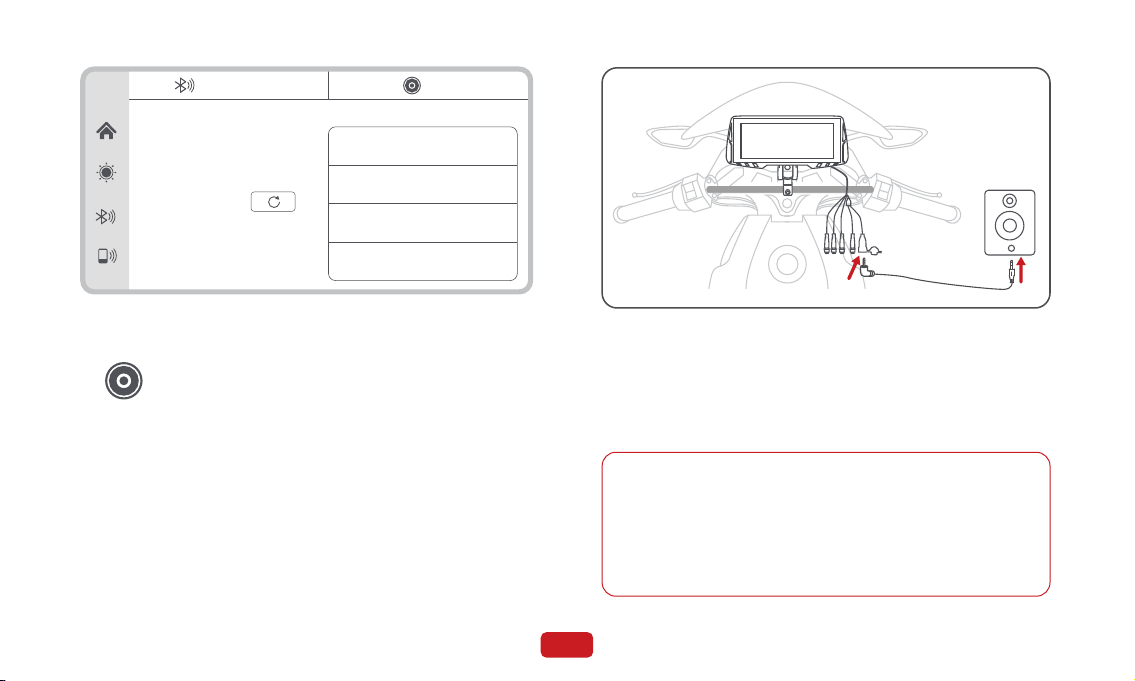
2.6 Audio Cable Installation
1.Insert the audio cable into the AUX port of the speaker,
then connect the other end to the AUX port of the
device.
2.Switch the audio output to AUX on the device.
Button A
Short press: One-click photo
Long press for 10 seconds: Forced shutdown
(short press again to turn on)
Short press during an incoming call: Answer the call
Bouton B
Short press: Toggle between the main page,
phone interconnection interface, and recording
interface Long press for 5 seconds:
Turn off/on touch function
Short press during an incoming call:
Hang up the call
B
A
04

2.7 Camera Installation
1.Use the screws in the package to respectively fix the front and rear
cameras to the front and rear of the motorcycle (as shown in the
figure below).
2.Connect the front and rear cameras to the device respectively (as
shown in the figure below).
3.Adjust the camera to an appropriate angle to complete the installation.
2.8 Tire pressure sensor Installation
1.Inflate the tires to the appropriate tire pressure, align the tire
pressure sensor with the tire valve stem, and tighten it using a
wrench.
2.Click on the motorcycle icon on the left side of the device
screen to enter the tire pressure settings menu and bind the
tire pressure sensor.
2.9 TF Card Installation
2.The self-provided TF card
should meet the following
conditions:
a.Read and write speed
is Class 10 or above.
b.Supports up to 256GB.
TF
05
1.Remove the bottom cover of the device and insert the TF card
into the TF card slot.
A
B
Sensor A:
Front wheel
Sensor B:
Rear wheel

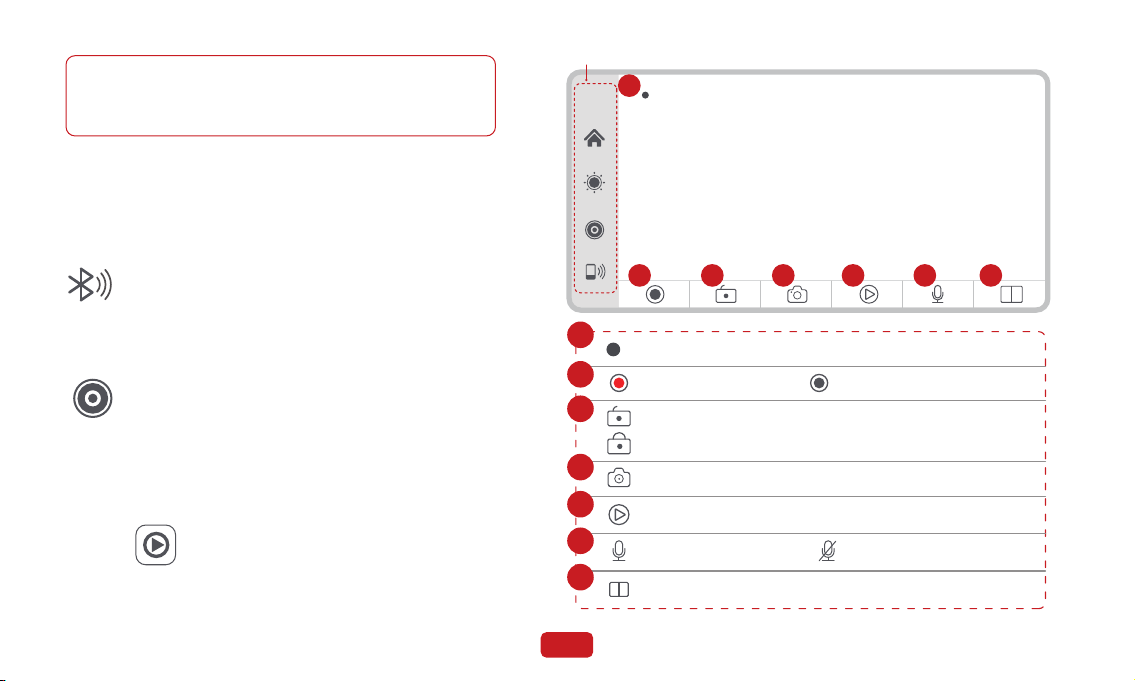
3. Features and Settings
3.1 Home Screen
12:00
Audio Out
Apple CarPlay Android Auto DVR
Playback Setting
16
7 8 9
10 11
12 13 14
2
3
4
5
15
System time
Homepage
Adjust Screen
Adjust AUX Audio Output Volume
1
2
3
4
12:00
Enter DVR Mode
5
Apple CarPlay Connected
Android Auto Connected
TF Card Inserted
Touch Function Turned Off (can be turned
on via wired remote)
Bluetooth Status
Blue : Connected
6
7
8
9
10 Front Tire Pressure
DVR Mode
Android Auto Mode
Apple CarPlay Mode
06

11
12
13
14
15
Rear Tire Pressure
Video Playback Mode
Binding Tire Pressure Monitoring Sensor, as well as
setting of tire pressure alarm and tire pressure unit.
Audio Output
Settings
3.2 Apple CarPlay
3.2.1 Apple CarPlay wireless connection
Requirements for phone versions that support wireless CarPlay:
iPhone running iOS 9 or later. (For example, iPhone XR and later,
iPhone 11 and later, iPhone SE (second generation) and later, etc.)
Both CarPlay in-car and iPhone voice system need to be turned on,
please check if Siri is enabled;
For the first time connecting to wireless CarPlay, the connection time
is about 30 seconds, please be patient.
For more detailed information, please visit:
http://www.apple.com/ios/carplay
Half screen mode
12: 00 Apple CarPlay Android Auto
How to setup:
1.Click Apple CarPlay widget on
SmartScreen
2.Pair your iPhone to SmartScreen using
Blutooth: Spedal-******.
3.When iPhone prompt”Use CarPlay with
”SmartScreen”?”,select”Use CarPlay”.
Tips:
1.Longer waiting for the first connection.
2.Only iPhone phones are supported.
3.After successful connection, Bluetooth
will be disconnected automatically.
If you need to display Apple CarPlay in split-screen mode, click
the "Half Screen mode" button before connecting Apple CarPlay
to enter split-screen display mode.
(If you need to switch to full-screen display mode, disconnect
CarPlay, then enter the Apple CarPlay interface and click the
"Full screen mode" button.)
1.Enter the Settings menu on your iPhone, and turn on
Bluetooth and Wi-Fi.
2.Go to the Bluetooth menu, and under the 'Other
DEVICES' list, select the Bluetooth name 'Spedal-******'.
3.Wait for about 20-30 seconds, a 'Bluetooth Pairing
Request' pop-up will appear on your phone. Choose
'Pair', and the pairing between your phone and the
device will be successful.
4.Then, a pop-up will appear on your phone asking, 'Use
CarPlay with "SmartScreen"?'. Select 'Use CarPlay'.
5.Please wait for a moment, you will enter CarPlay mode
shortly.
Note
1
2
3
4
07

Sign in to your iPhone
Airplane Mode
>
On
>
On
Settings
Wi-Fi
Bluetooth
Mobile Data
Bluetooth
Now discoverable as “X6”.
MY DEVICES
Other DEVICES
******
******
Spedal-******
******
<Settings
Bluetooth
Bluetooth
Not connected
Not connected
Now discoverable as “X6”.
MY DEVICES
Other DEVICES
******
******
Spedal-******
******
<Settings Bluetooth
Bluetooth Pairing Request
******
Cancel Pair
1 2 3
Bluetooth
Not connected
Not connected
Now discoverable as “X6”.
MY DEVICES
Other DEVICES
******
******
Spedal-******
******
<Settings Bluetooth
Use Carplay with
“SmartScreen”
CarPlay automatically connects
your iPhone to your car’s
built-in display,and can access
your phone while it is locked.
Not Now Use CarPlay
1.Different iOS versions may display
differently, please refer to the actual
situation.
2.The initial connection time is longer,
please be patient.
3.If you want to switch to Android Auto,
you need to turn off Bluetooth and WIFI
on your phone, and disconnect the Apple
CarPlay connection mode.
4
3.2.2 Apple CarPlay Audio Output
Click on “ ”on the main screen to enter the audio output mode.
Note
Sound is played through a Bluetooth headset via a Blue-
tooth connection.
1. Bluetooth
(1)First turn on the Bluetooth headset to make it searchable.
(2)Click on " " on the device's audio output page and wait for
the Bluetooth headset to be searched.
(3)Wait a moment, and the name of the Bluetooth headset will
be displayed in the "Bluetooth Headset" list.
(4)Click on the name of the Bluetooth headset, and after the
prompt box pops up, click "Connect" and wait for the device
to pair with the Bluetooth headset.
(5)After the pairing is complete, "Connected" is displayed next to
the name of the Bluetooth headset. The connection is com-
plete and the sound is played through the Bluetooth headset.
12:00 BT transmitter
Device Name:
Scan:
BTX-0B2
Bluetooth headset
AUX
08
Connected via AUX cable to the speaker, sound is
played from the speaker.
2. AUX Connection
2.1 Plug one end of the AUX cable into the device's AUX port, and
then connect the other end to the speaker's AUX port.
2.2 Switch audio output to AUX.
12:00 BT transmitter
Device Name:
Scan:
BTX-0B2
Bluetooth headset
Sony WH-1000
Galaxy S23
JBL GO
A8:1E:DD:89:70:4F
Connected
Disconnect
Disconnect
Disconnect
AUX
3.3.1 Android Auto Wireless Connection
1.Requirements for smartphones that support wireless Android
Auto:
Please make sure that the phone's system version is Android 5.0
or above, or update the phone's system version to the latest. The
first connection time takes about 20 seconds, please be patient.
3.3 Android Auto
Note
09

2.Phones running Android 11 or higher. (For example, Google Pixel 3
and above; Samsung Galaxy S8 and above; OnePlus 8 and above;
LG V40 and above, etc.)
3.Phones that support 5GHz Wi-Fi.
4.Phones with Google Play services.
1.Enter the Settings menu on your phone and turn on Wi-Fi and
Bluetooth.
2.Click on "Bluetooth" to enter the Bluetooth search page.
3.After entering the Bluetooth menu, click on "Pair new devices"
to find new Bluetooth devices.
4.In the list of discovered Bluetooth devices, select the one that
begins with "Spedal-*****" to pair.
5.Wait approximately 20 seconds, a dialog box pops up on the
phone saying "Pair with Spedal- ******", click "Pair", wait a
moment, once the Bluetooth pairing is complete, the Android
Auto connection will be completed, and it will automatically
enter Android Auto mode.
Profile Security Apps
*******
Connections
Wi-Fi,Bluetooth,Flight mode
Settings
Sound and vibration
Sound mode,Ringtone
Status bar,do not disturb
Notifications
Flight mode
Connections
Mobile networks
Wi-Fi
Bluetooth
>
NFC and Cast
Connected devices
Pair new devices
Previously connected devices
>
+
******
******
******
1 2 3
Pair new devices
Available devices
>
Spedal- ******
******
******
Pair new devices
Available devices
Pairing...
>
Spedal- ******
******
******
Pair with Spedal- ****** ?
Allow access to your contacts
and call history
Cancel Pair
1.Different Android phone models may display differently, please
refer to the actual situation.
2.The initial connection time may be longer, please be patient.
4 5
Note
1
2
3
4
5
10
3.If you want to switch to Apple CarPlay, you need to turn off
Bluetooth and WIFI on your phone and disconnect the Android
Auto connection mode.
3.3.2 Android Auto Audio out
1. Bluetooth
2.AUX Connection
The same as the page 09--3.2.2--2.Aux Connection.
The same as the page 08--3.2.2--1.Bluetooth.
Click on " " on the main screen to enter DVR mode.
3.4 DVR
12:00
Refer to [3.1 Home Screen]
2 3 4 5 6 7
01:30
1
Start Recording Stop Recording
Video Playback
2
1
3
4
5
6
7Front and Rear Camera Display
Recording with sound Recording without sound
Unlock Current Recording
Lock Current Recording
Take Photo on Current Screen
Video Duration
01:30
11

3.5 Playback
Click on the " " on the main screen to enter Playback Mode,
where you can play, lock, unlock, and delete videos or pictures.
Refer to [3.1 Home Screen]
��:��:��/��:��:��
12:00
1 2 3 4
5 6 7 8
9
10
11
Playback progress / Video duration
Delete current video
Sort video list from nearest to farthest
Sort video list from farthest to nearest
View locked video files
View photos
Video files
Locked video files
Photos
��:��:��/��:��:��
Play next video
Play video
1
2
3
4
5
6
7
8
9
10
11
12

3.6 Setting
Click on the " " on the main screen to enter the
settings mode.
Set the video resolution. It can be set to front and rear
720P+720P, 1080P+1080P, or 2K+2K.
Video Resolution
Set the language displayed by the system. It can be set to
简体中文, 繁體中文 , English, Français, Español, Português,
Deutsch, Italiano, Pусский, 日本語 and 한국어。
Loop Recording
Screen Mirroring
Flip the recording screen left and right.
Set the screen saver start time. It can be set to 10
seconds, 30 seconds, or 1 minute.
Set the recording time for each video. It can be set to 1
minute, 3 minutes, or 5 minutes. The system default is 3
minutes.
Screen Saver
Language Settings
Format
Delete all data on the TF card. This operation is
irreversible, so please backup videos and photos
before performing this operation.
Time Settings
Set the date and time, as well as the date format.
Software Version
View the current software version information of the device.
Factory Reset
Restore all settings to the factory default values.
13

3.7 Tire Pressure Monitoring Settings
12:00 TPMS1
Unbound
TPMS2
Unbound
Low pressure value
High pressure value
Tyre pressure unit
Binding sensor
Bar Psi
1
3
4
5
6
2
Appuyez sur la moto ou la zone d'affichage de la pression des pneus
à gauche de l'écran principal pour associer les capteurs de pression
des pneus et configurer les paramètres liés à la surveillance de la
pression des pneus. Définir la valeur d'alerte basse. Une
notification apparaîtra lorsque la pression
est inférieure à la valeur définie.
Définir la valeur d'alerte élevée. Une
notification apparaîtra lorsque la pression
est supérieure à la valeur définie.
Afficher la pression des pneus avant
1
2
3
4
5
6
Définir l'unité de pression des pneus,
en bar ou en psi.
Associer les capteurs de pression des pneus, associ-
er les capteurs avant, associer les capteurs arrière
ou dissocier tous les capteurs.
Afficher la pression des pneus arrière
14

For any questions please contact [email protected]
more product information
www.spedal.cc
more product videos
youtube search spedal
EN Download manuals of other languages from our homepage.
DE Laden Sie Handbücher in anderen Sprachen von unserer Homepage herunter.
FR Téléchargez des manuels dans d'autres langues depuis notre page d'accueil.
ES Descargue manuales en otros idiomas desde nuestra página de inicio.
IT Scarica manuali in altre lingue dalla nostra homepage.
USA Customer Service Hotline:+1(463)207-9998
Table of contents
Other Spedal Automobile Accessories manuals


Popular Automobile Accessories manuals by other brands


ULTIMATE SPEED
ULTIMATE SPEED 279746 Assembly and Safety Advice

SSV Works
SSV Works DF-F65 manual

ULTIMATE SPEED
ULTIMATE SPEED CARBON Assembly and Safety Advice

Witter
Witter F174 Fitting instructions

WeatherTech
WeatherTech No-Drill installation instructions

TAUBENREUTHER
TAUBENREUTHER 1-336050 Installation instruction