SPORLASTIC GENUDYN OA User manual
GENUDYN®OA
Knee brace for relief and
stabilization of the medial or
lateral compartments
Contra-Indications
Generally speaking, you should consult your doctor regarding the indication and method of wearing any orthopaedic aid and if
you have the following conditions:
_ Allergic, inflammatory or lesion-specific skin alterations (e.g. swelling, reddening) of the body areas being treated.
_ Impaired circulation or lymphatic soft tissue swelling.
_ Neurogenically caused disorders impairing sensation or abnormal trophic skin conditions with and without pathologic skin
leasons in the body area being treated.
Side effect
If used properly and placed correctly, no serious general adverse effects, consequential
incompatibilities, or allergic reactions have been reported to date.
Pressure effects on skin and nerves and impaired circulation can be prevented
safely in each individual taking into consideration possible contraindications by
placing the product in a non-constricting and form-fitting manner.
Important general information
GENUDYN® OA is supplied with a correct sequence of straps for dynamic stabilisation to achieve unicompartmental relief.
The fit, joint position and strapping must always be checked for correctness, including when the patient is standing.
The front straps remain closed while putting it on and taking it off, and the rear straps are opened and closed via the quick fasteners.
All straps must be tightly closed, but must not cause constriction.
The orthotic frame is made from aluminium and can be bent to fit by the orthopaedic technician. All strap lengths are adjusted during
customisation and should later only be changed by the patient in the event of problems, such as changes in the circumference of the leg.
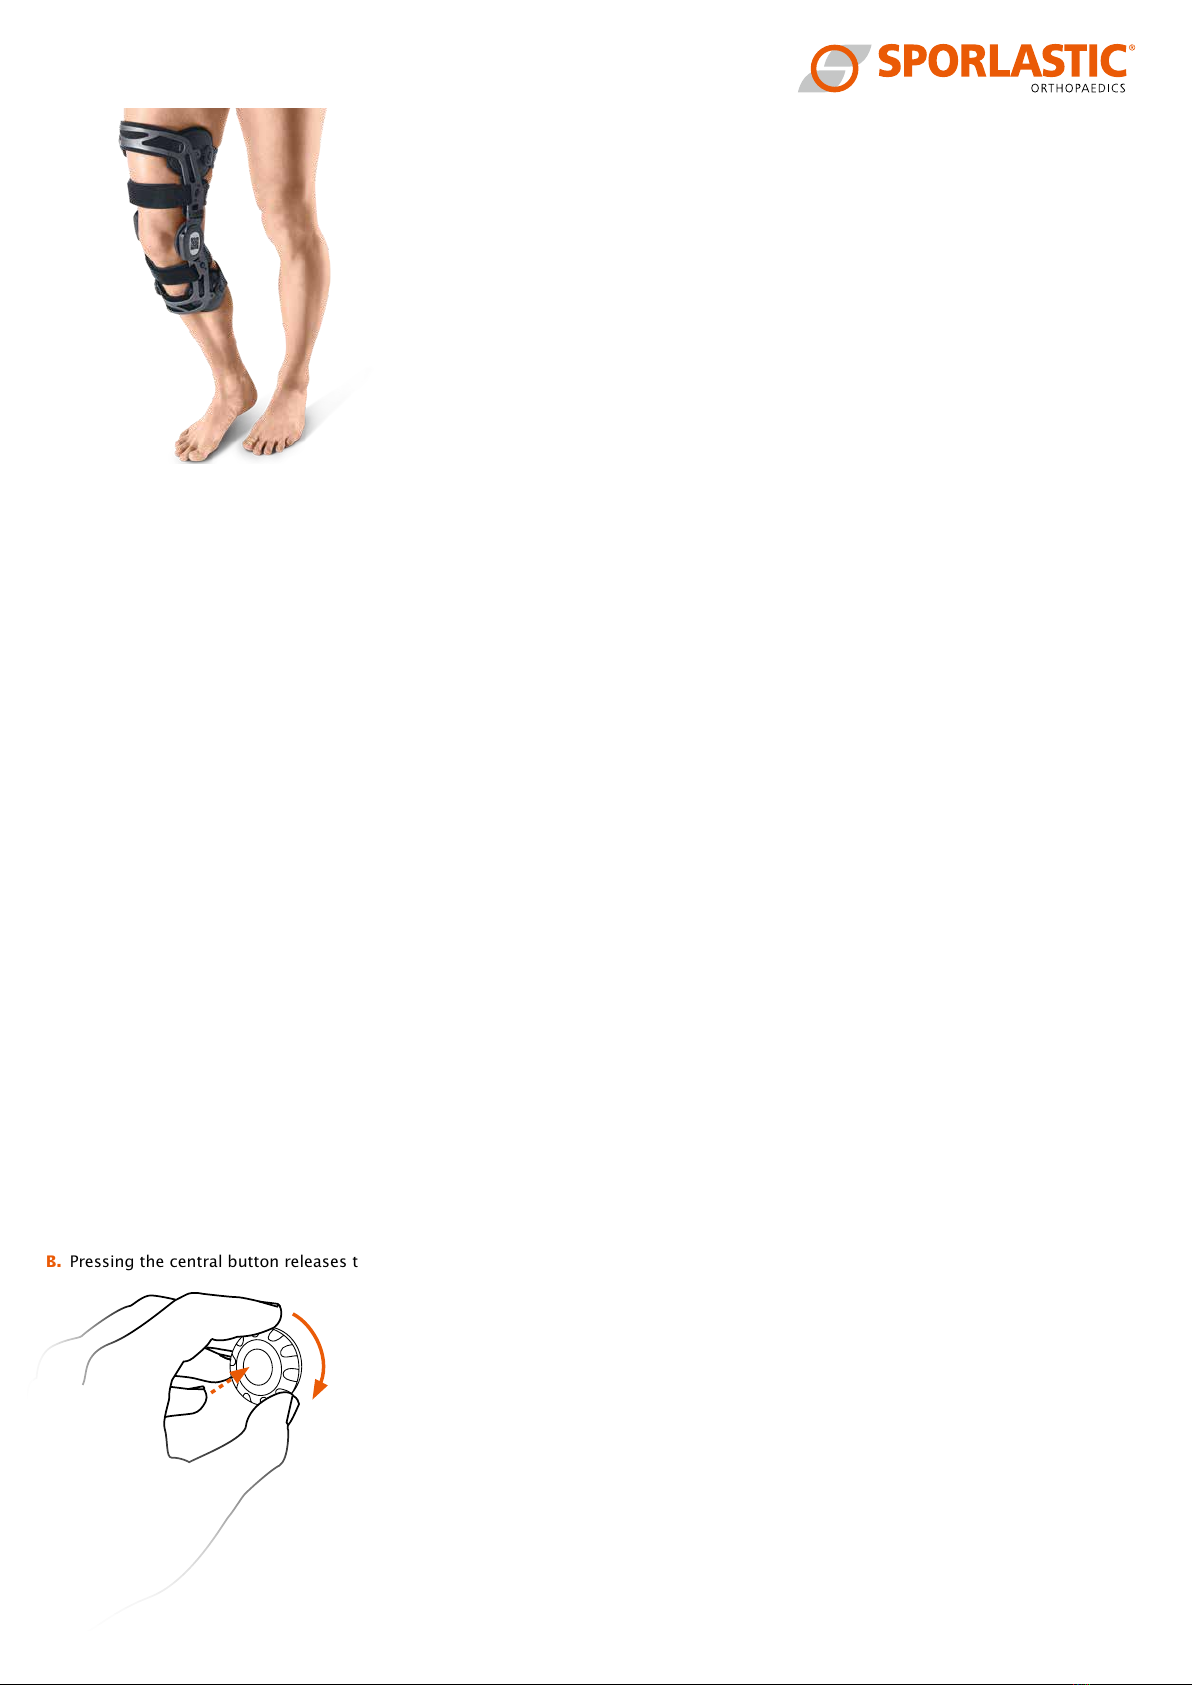
NOVEL cinching dial for adjustment
The innovative NOVEL system allows easy readjustment of the strap tension - even through clothing.
A. Turning clockwise tightens the straps.
B. Pressing the central button releases the tension.
A
B
Page 1/4
INSTRUCTIONS FOR USE (GB)
Dear Customer,
we would like to ask you to follow these Instructions with care. If you should have any
questions, please consult your doctor, orthotist, or contact us directly.
Indications
_ Conservative/post-operative
_ For pain reduction and relief of the medial or lateral compartment in cases of knee
arthrosis
_ Mild varus / valgus deformities
_ All indications and symptoms requiring unicompartmental reduction in weight-bearing
(e.g. pre and post-operatively for: degenerative meniscal tears, stable tibial head
fractures, lateral ligament injuries)
ART. NO. 07788 und 07789
Schließen Sie Gurt 3 und ziehen Sie
diesen an, bis der Abstand zwischen
Oberschenkelschelle und Bein ge-
schlossen ist. Hierdurch wird nach dem
Schließen der restlichen Gurte eine dy-
namische Vorspannung gegen eine hin-
tere Schublade erzeugt.
Schließen Sie abschließend Gurt 4 für
einen festen Sitz.
Kontrollieren Sie Passform, Gelenkposi-
tion und Gurtung bei stehendem Patien-
ten auf Korrektheit.
Kondylenpolster
Die medialen und lateralen Kondylen-
polster sollten gut am Knie anliegen.
Bei Abständen oder unterschiedlichem
Sitz der medialen oder lateralen Seite
sind die zusätzlichen Kondylenpolster
in 5 oder 15 mm Stärke für einen per-
fekten Sitz an beiden Seiten zu verwen-
den (10 mm Polster befinden sich in der
Orthese).
Anpassen der Polsterlänge
Für einen optimalen Sitz und
Tragekomfort müssen die
Gurtpolster beim Anziehen
der Gurte mittig am Bein auf-
liegen.
Ist ein Gurtpolster zu lang,
nehmen Sie es vom Gurt ab
und schneiden es mit einer
Schere passend zu
Seite 3/4
Anpassen der Gurtlänge
Zum Anpassen der Gurt-
länge öffnen Sie den
Schnellverschluss.
Lösen Sie die Klettverbin-
dung des anderen Gurten-
des und passen Sie die
Länge entsprechend an.
Einstellen des Gelenks
Im Auslieferungszustand ist der auf 0° eingestellte Ex-
tensionskeil bereits vormontiert. Weitere Keile für Ex-
tension (EXT) und Flexion (FLEX) sind im Lieferumfang
inkludiert. Außerdem liegt der Orthese ein Stift bei, der
das Wechseln der Keile vereinfacht.
Beim Auswechseln der FLEX oder EXT Anschläge ist
stets zu prüfen, ob sowohl die medialen als auch latera-
len Gelenkanschläge identisch eingestellt sind.
Folgende Gelenkanschläge sind möglich:
EXT: 0°, 10°, 20°, 30°
FLEX: 0°, 10°, 20°, 30°, 45°, 60°, 90°
Immobilisierung bei 0°, 10°, 20°, 30° möglich
Im Auslieferungszustand sind die 0° Extensionskeile bereits vormontiert.
Einstellen der FLEX und EXT Anschläge
Die Keile zur Bewegungslimitierung können werkzeuglos schnell
und einfach gewechselt werden - auch ohne die Orthese abzulegen.
1. Ziehen Sie hierzu einfach die entsprechenden Keile, jeweils an beiden Gelenken,
aus dem Gelenk.
2. Setzen Sie dann die gewünschten Keile auf demselben Weg ein.
Das korrekte Einrasten der Keile ist deutlich spür- und hörbar.
WICHTIG: ZUR IMMOBILISIERUNG
WICHTIG: ZUR IMMOBILISIERUNG
Wenn eine Immobilisierung gewünscht ist, so müssen die Keile in nachfolgender
Reihenfolge eingesetzt werden (an beiden Gelenken synchron):
1. FLEX Keile einsetzen
2. EXT Keile einsetzen
Die Demontage erfolgt in umgekehrter Reihenfolge.
Zum leichteren Entfernen der Keile wird ein kleines He-
belwerkzeug mitgeliefert. Führen Sie die Spitze in die
entsprechenden Löcher in den Gelenken ein und hebeln
Sie damit die Keile heraus.
Stift zur Keileentnahme
FITTING OF GENUDYN® OA
Open the click fasteners
Loosen the straps by pressing
the click fastener on the inside
of the orthosis. Do this with
all four straps.
Straps 2, 3 and 4
Repeat the steps from strap 1.
Releasing the strap tension
Press on the number of the
Novel button and pull on the
strap to extend it. Do this with
all four straps.
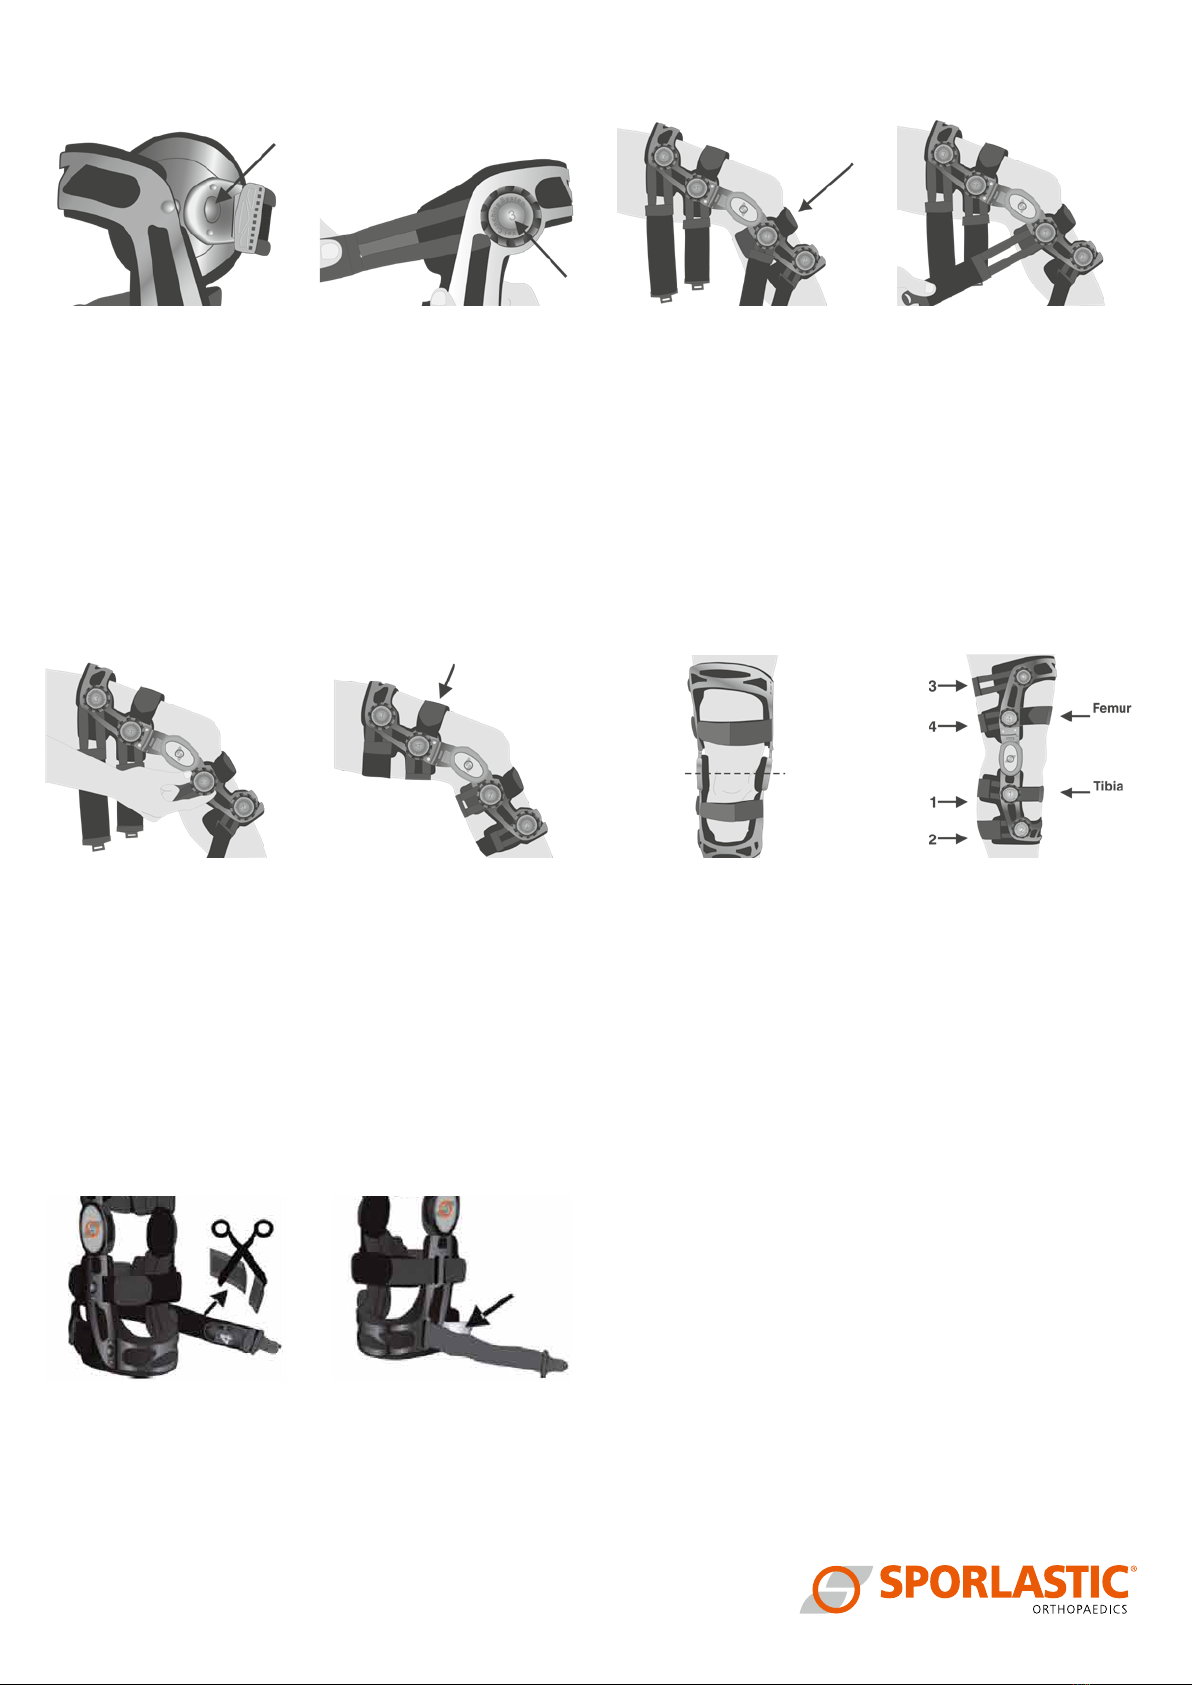
Next, sit on the edge of a chair
and place the orthosis around
the leg with the leg in around
30° of flexion. The middle of
the hinge should be at the level
of the top edge of the kneecap
(patella). Close the shin strap
so that the hinge lies in the
middle of the knee (A-P).
Close the front Velcro fasteners
Close the straps so that they
lie comfortably and in line
with the body, and are well
stabilised.
Front Velcro fasteners
The front tibial and femoral
strap have Velcro fasteners
instead of click fasteners.
Loosen both straps only during
the initial adjustment. The
patient should not readjust
these straps.
Check
Check the position of the
orthosis while standing and
with the leg extended. The
centre of the orthosis hinge
should lie at the top edge of
the kneecap (patella).
Closing strap 1
Pull strap 1 taut and ensure that
the strap is not twisted. Guide
the strap behind the lower
thigh and close it with the click
fastener on the medial side of
the orthosis. Ensure that strap 1
runs above the belly of the calf.
Note
All of the straps, apart from
the tibial and femoral straps,
are numbered consecutively.
Ensure that you always close
the straps in the correct
sequence. Normally, the tibial
and femoral straps do not need
to be readjusted after the initial
customisation.
Important: Sequence
ADJUSTMENT OF PADDING AND STRAPS
Adjusting pad length
For optimal fit and comfort,
ensure Strap Pads are centered
on the leg when straps
are tightened.
If a Strap Pad is too long,
remove the pad from the
strap and trim excess with
using a pair of scissors.
Adjusting strap length
To adjust the length of a strap,
depress the Quick Release
Button.
With the strap laid flat, open the
hook and loop fastener at the
tail end, adjust the length and
reattach the strap.
Page 2/4
Strap
Strap
Condylar padding
The medial and lateral condylar
padding is exchangeable and
should be adjusted according to
the indication.
For example, if the medial
compartment is to be relieved,
the condylar padding should be
positioned laterally in line with
the body and have a little room
for manoeuvre medially.
ADJUSTING THE HINGE LIMITATION
The wheel on the side allows the corrective force of the orthosis to be set and finely adjusted according to the degree of
knee arthrosis, pain, activity and patient’s form on the day.
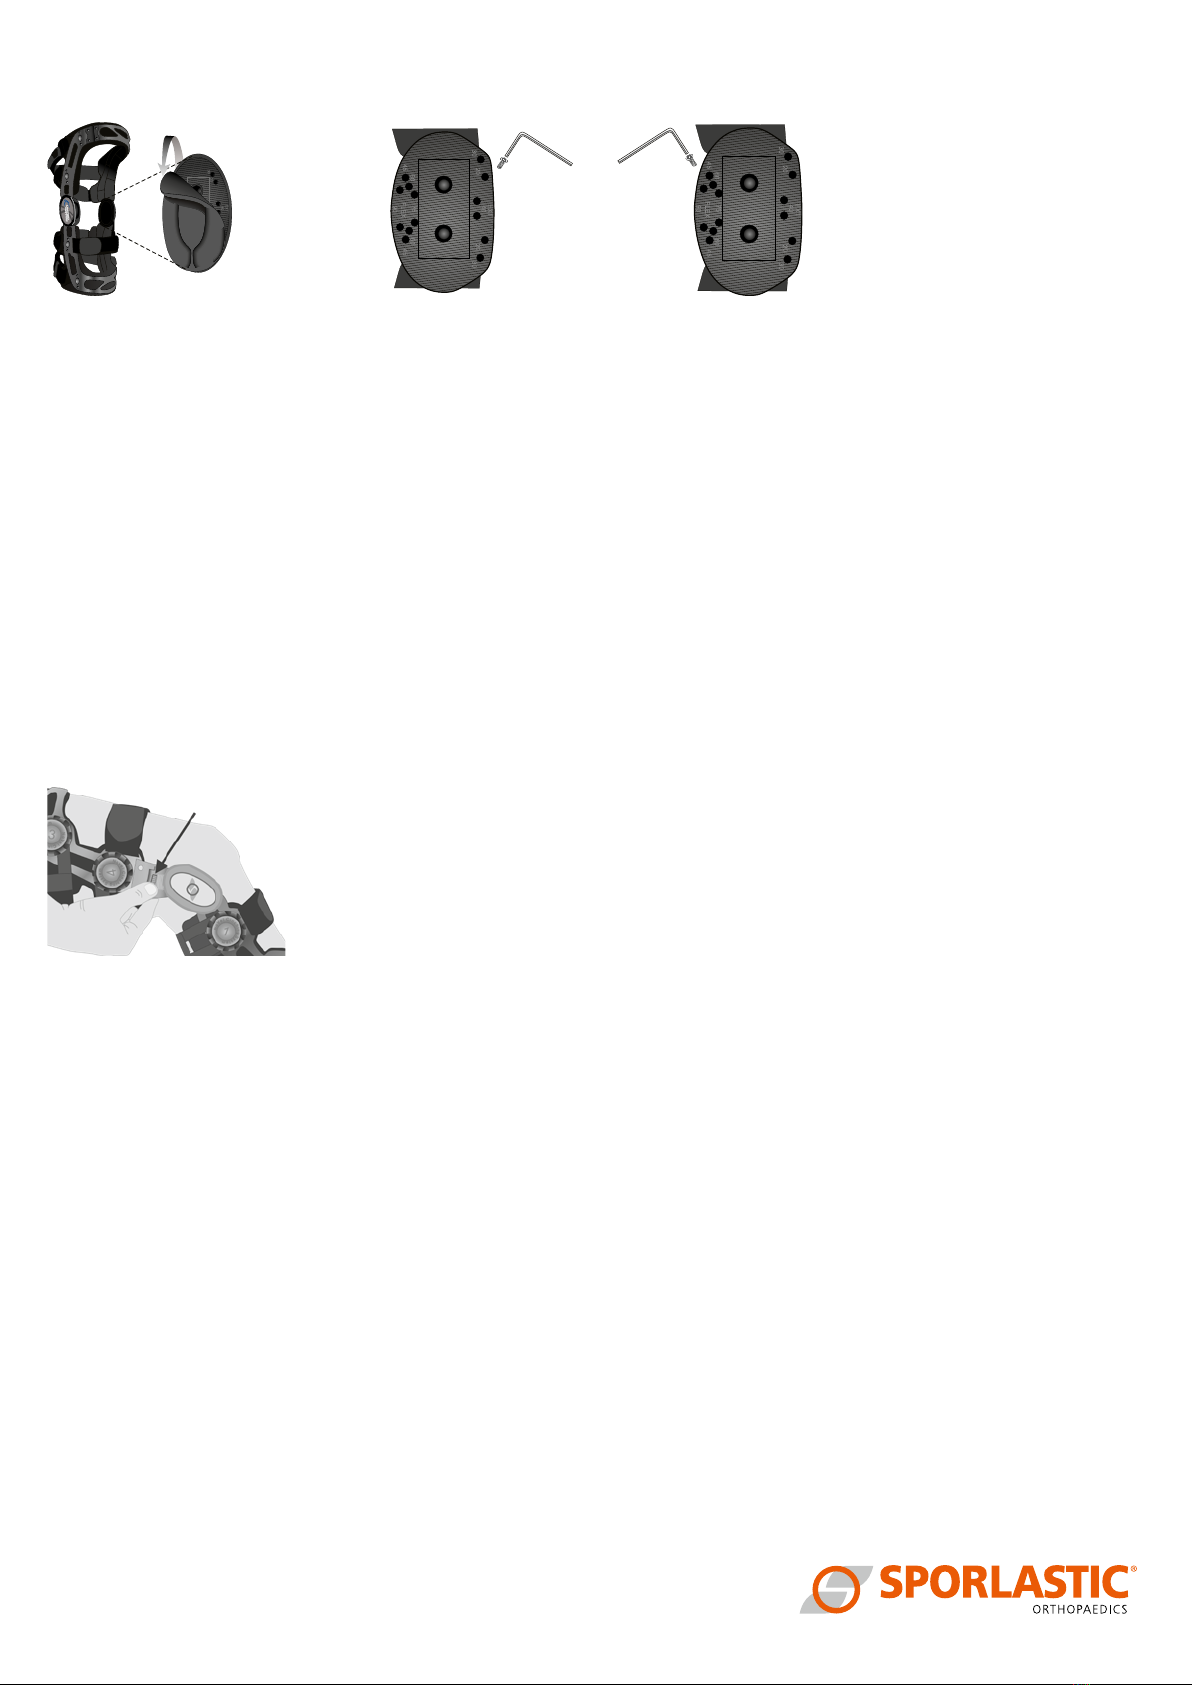
Remove the condylar padding EXT Insert screws FLEX Insert screws
In its new state, the orthosis is already set to 0° of extension.
Further screws and an Allen key for adjusting the extension (EXT) and flexion (FLEX) are included in the scope of delivery.
Folgende Gelenkanschläge sind möglich:
EXT: 20°, 30°, 40°
FLEX: 45°, 60°, 75°, 90°
1. Remove the condylar padding
Remove the condylar padding by detaching it from the inside of the orthosis (medially and laterally).
2. Insert screws
Determine the required degree of extension and/or flexion / stop and screw the enclosed screws into the corresponding hole
using the Allen key supplied.
Important: Screw the screws medially and laterally into the same EXT and/or FLEX holes.
Do not tighten the screws too tightly.
Page 3/4

SPORLASTIC GmbH
Medizinische Produkte
Weberstraße 1 _ 72622 Nürtingen _ Germany
Postfach 14 48 _ 72604 Nürtingen _ Germany
Telefon +49 70 22/70 51 81 _ Fax +49 70 22/70 51 13
Page 4/4
Quality Management System
All SPORLASTIC GmbH products undergo product testing as part of our Quality Management System. However, should
you have any complaints about our product, please get in touch with your stockist or directly with us.
General Note
The use of products involving direct exposure of the skin to an elastomer (e.g. a silicone pad) might possibly lead to
blisters on the skin if the product is applied too tightly or if it is shifted on the skin at high friction. In this case, we
recommend to discontinue the use of the product. Sweat may be generated under the silicone and, in rare cases,
this can lead to the body reacting to its own sweat and cause corresponding allergic skin changes. Sporlastic is
not aware of any allergic reactions related to the materials. If you experience any problems, please contact your
doctor or the supplier of the medical aid.
Brace Care
Padding and condyle pads should be removed and cleaned regularly depending upon your activity level and perspira-
tion. All padding is removably installed by hook and loop fasteners and can easily be removed from the frames, hinges
and straps. Wipe or HAND WASH with a MILD anti-bacterial soap, rinse well, then AIR DRY. Replace and position proper-
ly by pressing firmly against the fasteners.
Cleaning Hinges
The hinges of your brace are pre-lubricated. If sand, dirt or water gets inside the hinges, they may require cleaning
and lubrication. Remove the condyle pads and rinse the hinges thoroughly with tap water. If the joints don’t move
smoothly, please see your orthotist for cleaning and/or additional lubrication.
Ref 07788/07789 | 06/18 | 1.000 | A4 english
Other manuals for GENUDYN OA
1
Other SPORLASTIC Medical Equipment manuals


Popular Medical Equipment manuals by other brands


Getinge
Getinge Arjohuntleigh Nimbus 3 Professional Instructions for use

Mettler Electronics
Mettler Electronics Sonicator 730 Maintenance manual

Pressalit Care
Pressalit Care R1100 Mounting instruction

Denas MS
Denas MS DENAS-T operating manual

bort medical
bort medical ActiveColor quick guide

AccuVein
AccuVein AV400 user manual


