Spotlight Ribaltina RA 1 User manual

Manuale utente - User manual
cod: RA 1
Ribaltina
RA 1
2
ATTENZIONE: Prima di usare questi
apparecchi, leggere attentamente le istruzioni
che seguono. Spotlight srl non potrà essere
ritenuta responsabile di danni derivanti dalla non
osservanza di dette istruzioni.
SAFETY WARNING: Before using this
product, read the present instructions carefully.
Spotlight srl will not be responsible for damage
resulting from instructions not being followed.
2
4
1
33
6
5

RA 1
3
• Il faro può essere usato sia sospeso, sia appoggiato su
di un piano.
CONNESSIONI ELETTRICHE
Il vostro faro è stato progettato per una tensione di
alimentazione da 100V a 240V, 50-60 Hz, conforme-
mente alla lampada utilizzata.
Prima e durante l’installazione osservare le seguenti norme:
• Vericare sempre l’efcienza del collegamento a terra
della linea in uso.
• Vericare che il voltaggio della lampada corrisponda
al voltaggio di rete
• Non impiegare lampade diverse da quelle indicate
nella tabella lampade.
• Sull’apparecchio non sono montati fusibili che se necessari
dovranno essere installati sulla linea di alimentazione.
• L’apparecchio può essere collegato a un dimmer.
INSTALLAZIONE E CAMBIO DELLA LAMPADA
- Allentare il pomello ④ e ruotare verso l’alto il
tettuccio fermaccessori ⑤
- Rimuovere la rete di protezione ②
- Sostituire la lampada curando di non toccare il vetro
- Reinserire la rete di protezione inlandola nelle
apposite guide ③
- Riposizionare il tettuccio fermaccessori ⑤ e riavvitare
il pomello ④.
Si noti che per la sostituzione della lampada non è
necessario modicare la posizione del faro e che quindi
non si modica il puntamento del faro stesso.
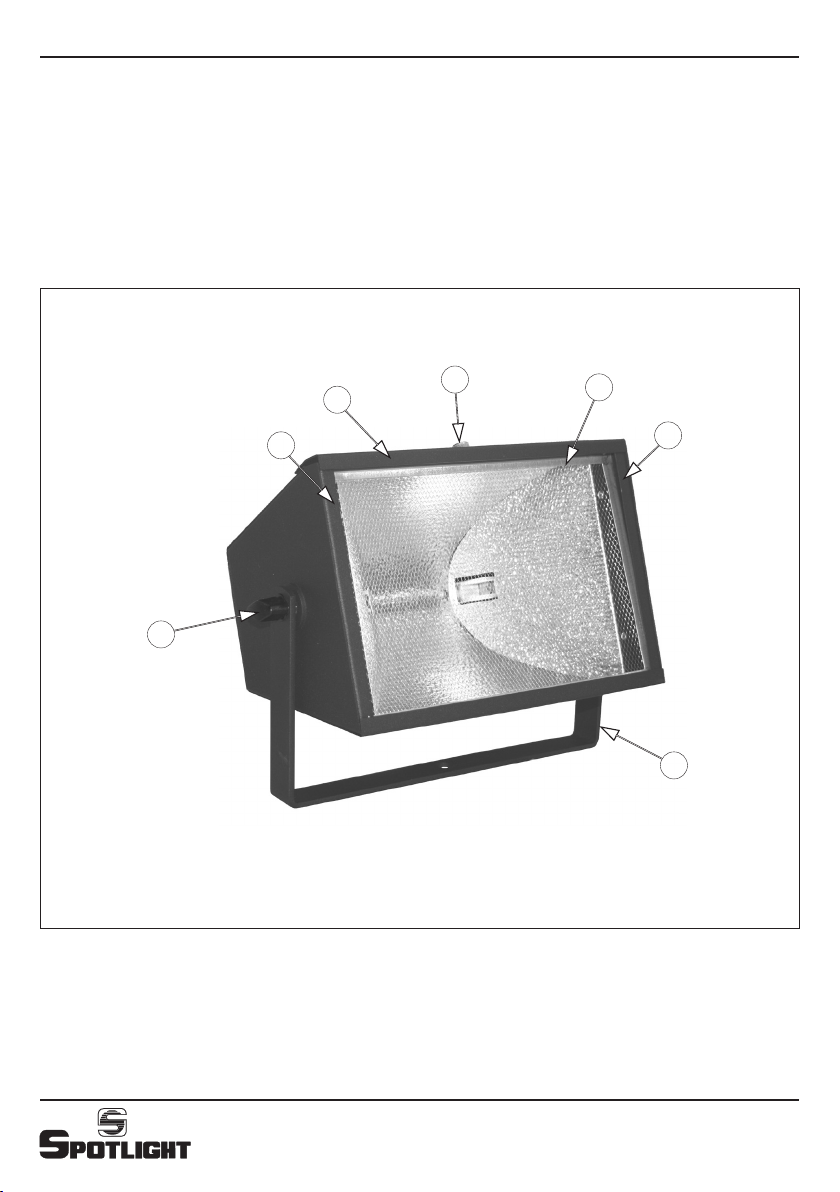
DESCRIZIONE DEL PROIETTORE
Riferendoci alle immagini di pagina 2:
① Staffa di sospensione
② Rete di protezione
③ Guide per accessori
④ Pomello per l’apertura del fermaccessori
⑤ Fermaccessori
⑥ Pomello per regolazione inclinazione faro
INDICAZIONI GENERALI
Il proiettore in Vs possesso risponde alle Direttive
Europee 2006/95/CE, 2004/108/CE e 2011/65/UE.
La targhetta localizzata sul retro del faro, contiene le
seguenti informazioni:
• modello
• massima tensione di alimentazione in V
• massima potenza della lampada in W
• indice di protezione IP
• massima temperatura ambiente ammissibile in °C
• massima temperatura del corpo del faro in °C
• distanza minima da ogni supercie inammabile
• informazioni per riconoscere la posizione °0 del faro:
quando la punta della freccia è rivolta verso l’alto
• angolo massimo di inclinazione verso l’alto e verso
il basso. Questi limiti, imposti dal costruttore
della lampada, non devono essere superati pena
una riduzione della vita utile della lampada o il
deterioramento del faro.
INSTALLAZIONE
• I proiettori sono progettati esclusivamente per
impiego professionale e quindi vanno installati ed
usati da personale qualicato.
• Gli apparecchi sono previsti per uso all’interno:
pertanto devono essere protetti dall’umidità e dalla
pioggia se usati in condizioni diverse (IP 20)
• Non installare il proiettore a contatto o vicino ad una
supercie inammabile.
• Si prega di prestare la dovuta attenzione alle note
riportate sulle etichette degli apparecchi.
• Ricordarsi di collegare la fune di sicurezza, se previsto
dalle norme di sicurezza locali.
• Le norme di sicurezza prevedono che davanti alla
lampada venga posta una rete metallica per evitare la
caduta di eventuali grossi frammenti di vetro in caso
di rottura.
ATTENZIONE: Per motivi di sicurezza,
scollegare sempre l'apparecchio dalla
rete di alimentazione prima di aprirlo per
cambiare la lampada.
ATTENZIONE: Gli apparecchi devono essere
sempre collegati a terra
ATTENZIONE: sostituire immediatamente la
lampada se visibilmente danneggiata, anche
se ancora funzionante.

RA 1
4
ACCENSIONE E PUNTAMENTO
Tramite il pomello ⑥ si può allentare il bloccaggio del
faro e modicare la sua inclinazione. Lo stesso si può
fare riguardo alla rotazione dell’asse verticale, facendolo
ruotare sul perno di aggancio.
Non utilizzare l’apparecchio inclinato lateralmente per
evitare di ridurre notevolmente la vita della lampada.
PULIZIA
Per una maggiore resa del faro, occorre tener puliti il
più possibile la rete di protezione ed il diffusore. Per
far questo, dopo aver scollegato il faro dalla rete di
alimentazione, si può aprirlo per pulire con uno straccio
sofce inumidito con alcool sia la rete di protezione che
lo specchio.
MANUTENZIONE
Sottoporre il faro a revisione almeno una volta
all’anno per controllare l’integrità delle parti elettriche
e meccaniche. A tal ne utilizzare solo rivenditori
qualicati, a garanzia di un corretto e completo
intervento.
RICICLAGGIO
Il prodotto deve essere riciclato o smaltito
secondo la direttiva 2002/96/CE
RA 1
5
ELECTRICAL CONNECTIONS
The luminaire is designed to operate with a 100V to
240V supply, 50-60Hz, according to the lamp used.
Before and during the installation, make sure you follow
the guidelines below:
• Always check the earth wiring for the line being used.
• Verify that the lamp voltage is correct for the main
voltage
• Do not use lamps other than the ones indicated on
the lamp table
• There are no fuses inside the unit, if it is necessary
they should be installed in the mains
• The luminaires can be connected to a dimmer
INSERTING AND CHANGING THE LAMP
- Loose the knob ④ and rotate the accessory locking
cover ⑤ upwards
- Remove the safety net ②
- Replace the lamp without touching the glass bulb
- Insert the safety net again in its guides
- Re-place the accessory locking cover ⑤ and screw in
The accessory locking knob ④.
Please note that when changing the lamp, the position
of the luminaire xture must not necessarily be
changed so that the focus of the luminaire xture can
stay still.
DESCRIPTION OF THE LUMINAIRE
Referring to images on page 2:
① Suspension yoke
② Safety net
③ Accessory guides
④ Accessory locking knob
⑤ Accessory locking cover
⑥ Tilt adjustment knob
INTRODUCTION
The luminaire you have bought complies to 2006/95/EC,
2004/108/EC and 2011/65/EU European Directives.
The label on the rear of the luminaire lists the following
information:
• model
• mains supply voltage (V)
• lamp wattage (W)
• IP protection index
• maximum allowed ambient temperature in °C
• maximum temperature of the body in °C
• minimum distance from ammable surface
• information to nd the position 0° of the luminaire:
when the tip of the arrow points upwards
• maximum tilt angle range. These limits, imposed by
the lamp manufacturer, should not be exceeded as
they would reduce the lamp’s useful life or lead to its
deterioration.
INSTALLATION
• The luminaires are intended for professional use only
so they have to be installed and used by qualied
technicians.
• The products are intended for indoor use:
consequently they have to be protected from humidity
and rain, if used in different conditions (IP 20)
• Do not mount the luminaire on or near a ammable
surface
• Please note carefully the notes written on the labels
of the luminaires.
• Do not forget to connect a safety cable, if required by
local country safety regulations
• For safety requirements the net shall be mounted
on the front of the lamp to prevent any large glass
fragments from falling in case of breaking.
• The luminaire can be either suspended or placed on a
plane surface.
WARNING: replace immediately the
lamp if visibly damaged, even if still
working.
WARNING: The luminaires must always be
earthed
WARNING: For safety reasons always discon-
nect the projector from the mains before
opening it to change the lamp.

RA 1
6
FOCUS AND REGULATION
Using the knob ⑥ it is possible to loosen the luminaires
and thus change their inclination.
In the same way, the luminaires can be rotated in
respect to their vertical axis by rotating on their
hooking hinge.
Do not use the luminaire while tilted on one side in
order to avoid reducing considerably the lamp life.
CLEANING
For utmost luminaire performance, both the safety net
and the reector must be kept as clean as possible. To
do so, after disconnecting the luminaire xture from
the mains, both the safety net and reector can be
cleaned with a soft cloth dampened with alcohol.
MAINTENANCE
At least once a year, the luminaire should be serviced
to ensure the integrity of the electrical and mechanical
components. For this purpose, please address only to
qualied dealer to ensure proper service.
RECYCLING
The product must be recycled or disposed of,
according to Directive 2002/96/CE.
RA 1
7
Lampade - Lamps
Codice/Code V W lm Kt(h)
K14 230 100 R7s 1550 2900 2000
K150 230 150 R7s 2550 2900 2000
K11 230 200 R7s 3520 2900 2000
K9 230 300 R7s 5600 2900 2000
K1 230 400 R7s 9900 2900 2000
P2/11 230 800 R7s 24400 3200 150
P2/20 (*) 230 1000 R7s 30000 3200 300
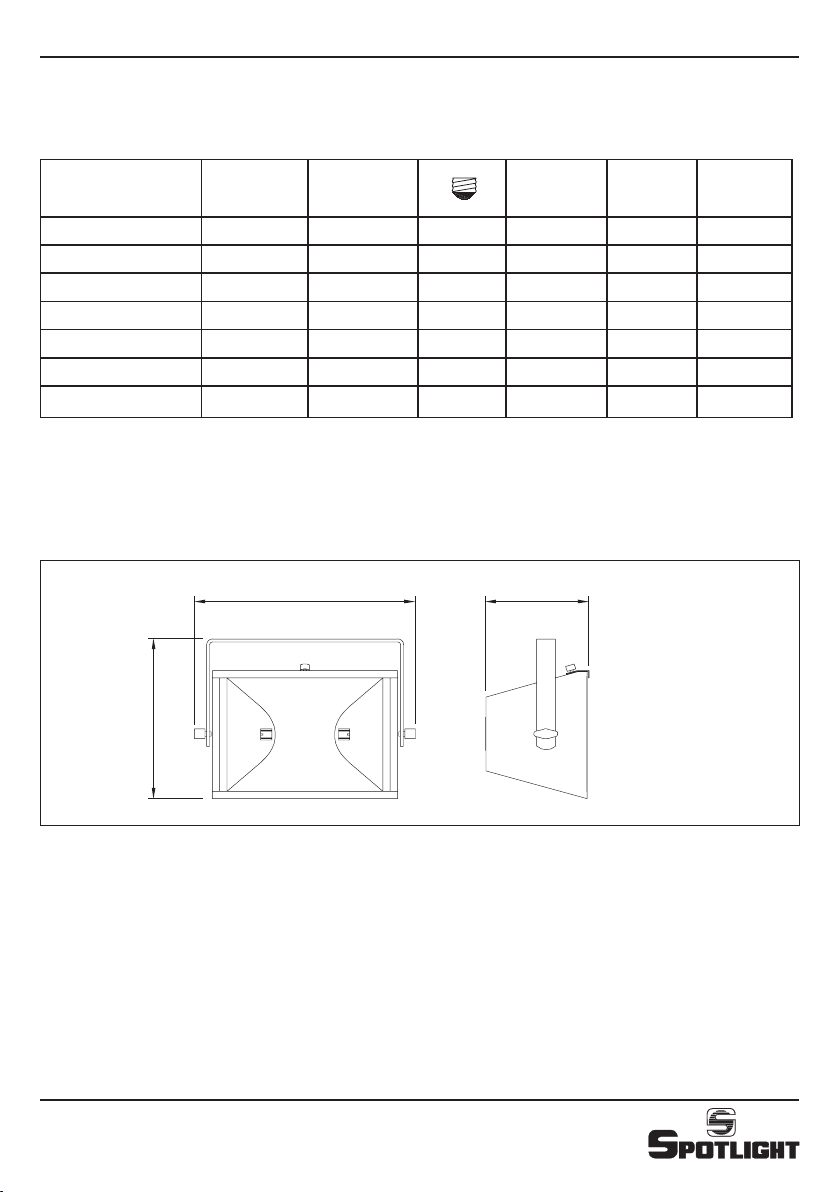
300 140
215
Dimensioni (mm) e peso - Dimensions (mm) and weight
Kg 2
(*) Non utilizzare con vetri colorati. Solo luce bianca - Do not use with coloured glasses. White light only

Spotlight s.r.l.
Via Sardegna 3
20098 S. Giuliano Milanese
Milano - Italy
Tel. +39.02.98830.1
Fax +39.02.98830.22
E-mail: [email protected]
www.spotlight.it
RA 1
Table of contents
Languages:
Other Spotlight Floodlight manuals


