Spyder CLIMB RIGHT Manual

CLIMB RIGHT SAFETY
BULLETIN FOR THE CARE
AND INSPECTION OF
CLIMB RIGHT SPIKES
Before you put this product into service, you must read and
understand this safety bulletin. Failure to do so can result in
injury or death.

Page 2
Climb Right and the team at
Spyder Manufacturing would like
to thank you for the purchase of
this product. You have purchased
Aluminum Climbers used for
ascending and descending wood poles and trees.
This product is to be accompanied with a proper tree
climbing systems. This equipment must only be
used by a trained professional arborist who is skilled
in the techniques of using this product safely.
Table of Contents:
Page 3.......................................Important Climber Warnings
Page 4-6................. Pad Assembly (Lpad, Tpad, & Super Pad)
Page 7..............................................UltraLight Pad Assembly
Page 8.......................Lower Strap Assembly (for all climbers)
Page 9.................................................... Completed Examples
Page 10-11................................. Inspection and Maintenance

Page 3
Please READ, UNDERSTAND, and FOLLOW
these warnings, as failure to do so can result
in serious injury or death!
• Climb Right Climbers are only to be used by trained professionals! Use of this
product without knowledge could result in serious injury or death!
• Climb Right Climbers are specialized equipment used to aid an arborist in
ascending / descending poles (wood) and trees, also to help keep a good
working position.
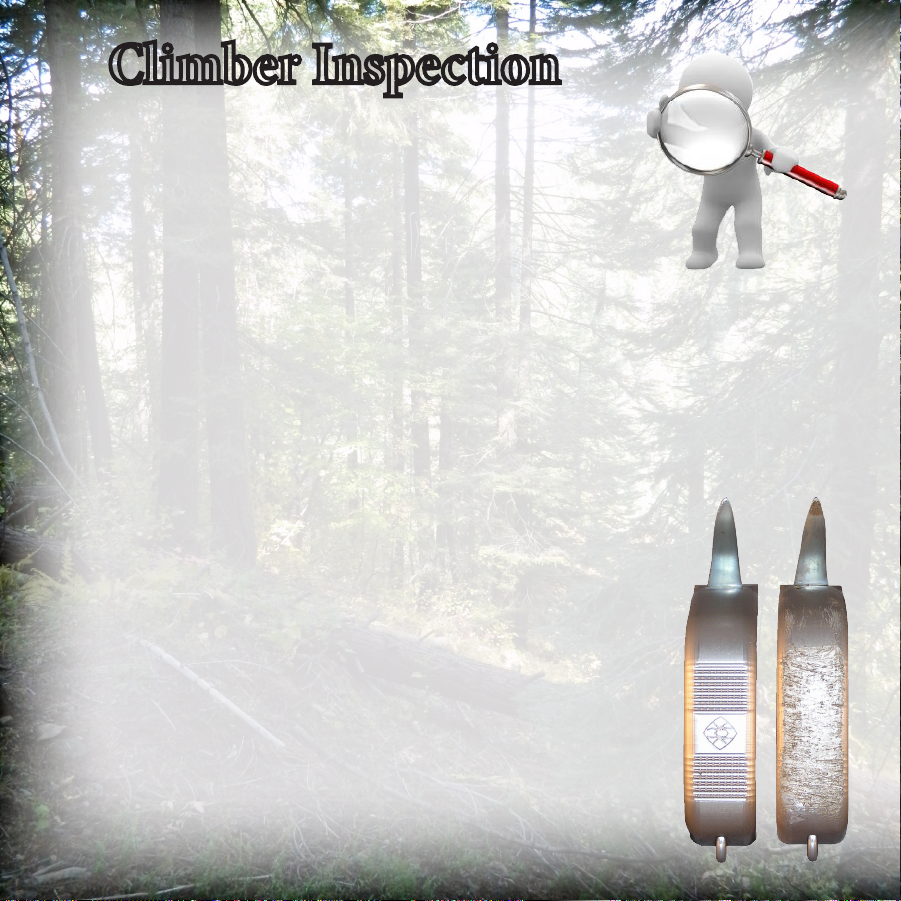
• Inspect your climber before every climb!
• You must have your climber inspected by someone other than yourself who is
qualiedtoinspectthistypeofequipmentaminimumoftwiceayear.
• Kicking and jamming gaffs cause unnecessary stress to the climber, and
should be avoided.
• Do not take large steps when ascending or descending. Doing so creates
unnecessary stress to the climber.
• Maximum weight limit of this product when fully equipped should not exceed
350lbs.
• When not in use, Climb Right Climbers should be stored safely with gaff
guards to avoid accidental injury to yourself or to the climber.
• DO NOT alter a Climb Right Climber in any way! Trying to bend, scratch or
etch this product could result in a weakening of the alloy which could lead to
serious injury or death!
• Avoid walking with your climbers on (especially on hard surfaces such as
cement and gravel). Doing so increases wear on the bottom of the climber
which will decrease the life expectancy of the climber.
• If this product is bent due to extended use or misuse, remove this climber
from use immediately and replace it. DO NOT try to bend it back to original
position. Bending could cause a weakening of the alloy which could lead to
serious injury or death!
• Once used, this product should never be sold or given to another party. We highly
recommend that this is a personal product and should never be borrowed or shared
between users.

Page 4
Size
To size your climbers, just follow these few easy steps:
• Put the aluminum J Hook on the ground and put your
foot in the J hook.
• Place the slide loosely on the aluminum J hook
• Roughly hold the slide approximately 1/2” below your
thigh. (This measurement is just a suggestion. Every
individualisdifferent.Ifyoundittobemorecom-
fortable slightly higher or lower, do what feels best.)
• Onceyoundthebestposition,looselyinstallthetwo
slide bolts into place.
• Now that you know your measurement, install the
sleeve onto the second climber at the same exact
height.
• Lastly, tighten all four sleeve bolts to secure the
sleeves to the climbers.
™
Sizing your Climb Right Climber is one of the
most important things to do correctly. If not
done properly, this could cause extra pressure to
your body which could result in serious pain.
Right Foot Pictured

Page 5
Pad Assembly
•Slide the Climber and
attached sleeve into the
Lpad opening following the
red arrow (Picture to le).
•Push the pad all the way
down until the steel loop
protrudes out of the oval
cut out on the pad. e end
result should look like the
picture to the right (Right
hook pictured).
Right Hook Pictured

Page 6
Upper Strap Assembly
• Slide the end of the upper strap and weave it through
the Lpad and sleeve (as shown in Figure A). Start on the
longer side of the Lpad and work your way to the shorter
end. Finished result should look like Figure B (Right
Hook Conguration Shown).
• Figure C is a picture of a super pad conguration (Right
Hook Conguration Shown). Super pads require two
upper straps. Second strap is to be weaved through the
lower loop holes of the pad. is strap does not weave
into the sleeve.
Figure B
Right Hook Pictured
Figure A
Figure C
Right Hook Pictured

Page 7
Ultra Light Assembly
Right Foot Pictured
• Slide climber through
pad channel.
• Adjust height to
desired length and
install slide screws at
that position.
• Make sure to fully
tighten all four screws
before use.

Page 8
Lower Strap Assembly
• CAREFULLY use the at blade of
a screw driver to separate the steel
ring and slide it on to the eye bolt
at the end of the climber. e belt
should be above the climber. e
buckle should be toward the front of
your foot.
Right Foot Pictured
Le Foot Pictured

Page 9
Fully Assembled Examples
Right Foot Right Foot
Right Foot
Right Foot
Le Foot Le Foot
Le Foot
Le Foot

Page 10
Climber Inspection
• Itisimportantthatsomeonequaliedinspectthe
climbers every 6 months and remove it from use at
once when it fails inspection.
• Retire the climber after a maximum of 3 years from the
dateofrstuse.
• Before using this product, the user must inspect the climbers to make sure
that there are no cracks or bends, all hardware is properly installed, and
tightenedtospecications.
• If the rivets are coming loose, or there is “play” where the upper portion of
the climber attaches to the lower “J hook” portion of the climber, the climb-
ers must be retired from use.
• Clean your climbers regularly to make sure it is free of any loose dirt or
debris.
• Make sure to inspect your pads and straps for any cuts,
abrasions, or worn stiching that could cause them to fail
during use, replace worn pads and/or straps immediately.
• Inspect bottom of climber. When you can no longer see
the climber grip and / or Spyder Logo, it is time to replace.
(See Picture)
Climb Right Climbers can give you many years of
use if they are properly maintained and taken care of.
Please be safe and use with caution!

Page 11
Date Examination Notes Examined By Signature
EXAMINATION RECORDS
Part Number:_____________
Purchased From:__________
Notes:___________________
Date First Used:__________
Purchased Date:_________
User:___________________
Retire the climber after a maximum of 3 years from the date of rst use.

After reading this bulletin, if you still have any
questions, please feel free to contact us using
our contact info below. Thank you very much
and remember to Climb Hard, Climb Safe and
CLIMB RIGHT!
Contact Info:
Toll Free: 800-874-7569
Tel: 714-528-8010
Fax: 714-961-0707
Email: [email protected]
#03110 V1.0
Other Spyder Safety Equipment manuals
Popular Safety Equipment manuals by other brands

Climbing Technology
Climbing Technology Quick Step General instructions

3M
3M DBI SALA EXOFIT STRATA 1112475 User instructions

FrontLine
FrontLine ST10HT Operation and instruction manual

Honeywell
Honeywell ESSIAN 2 Instructions for use

Innotech
Innotech TAURUS-GLEIT-HO-53 manual

KIDPRO
KIDPRO Safety Net for Children installation manual

Independence
Independence Emotion 2 owner's manual

ABB
ABB jokab safety Smile 11EA Tina Original instructions

Malta Dynamics
Malta Dynamics Hunter's Elite instruction manual

mShield
mShield mVISOR7001 user manual

Singing rock
Singing rock TACTIC MASTER quick start guide

HANCOM LIFECARE
HANCOM LIFECARE SCA680WN instruction manual