SSM NM-11 User manual

INSTRUCTION
MANUAL
NM-11
Manual.en © 09/2014 SSM
Produkt
AB

NM-11
Riveting Machine
Congratulations
on
your
purchase
of
a NM-11
Riveting
Machine.
We
sincerely
thank
you
for
selecting
a
product
from
SSM
Produkt
AB.
To
obtain
an
additional
copy
of
this
manual, please
contact
SSM
at:
SSM
PRODUKT
AB
TABLE
OF
CONTENTS
Vaksala-Eke
SE-755 94 Uppsala, Sweden
Tel: +46 (0)18 500840
E-mail: [email protected]
Internet:
www.ssmprodukt.com
Limited Warranty................
...
...............
..
...............
...
................
...
................................................2
Functional Description..............................................................................................................
..
3
Assembly
....
..
...............
...
........................................................................
...
...............
..
..
..............4
Technical Specifications and Dimensions..................................................................................4
Operation..............................................
...
...............
..
...............
..
..
...............
...
...........................5-9
Accessories................................................................................................................................
10
LIMITED WARRANTY
Scope
of
warranty
This warranty covers any defects
in
materials and workmanship under normal use.
Period
of
coverage
This warranty runs for two (2) years from the date
of
purchase. Please save your receipt or invoice.
Limitations
Failures due to abuse, misuse or
an
event or effect that cannot
be
reasonably anticipated or controlled (such as
flood, earthquake, act
of
God etc.) are not covered by this warranty. Surface coating problems caused by excessive
humidity, in-use scratches or abrasions, and direct exposure to the elements are also not covered.
Repair
or
replacement is the only option available under this warranty. SSM Produkt
AB
(SSM)
is
not responsible
for damages
of
any kind, including incidental and consequential damages.
Incidental damages include but are not limited to such damages as loss of time and loss of use. Consequential
damages include but are not limited to the cost
of
repairing or replacing property that was damaged ifthe product
from SSM does not work properly.
Correction
of
details
If your product cannot
be
repaired, we will replace your product free of charge.
How
to
get
service
Please return the defective product together with the purchase receipt or the invoice.
You
can obtain service by
contacting a dealer of SSM products or SSM directly. At our discretion, the dealer or SSM will either repair or replace
your product.
How
country
and
state
laws
relates
to
the
warranty
This warranty gives you specific legal rights.
You
may also have other rights that vary from country to country and
from state to state.
SSM
PRODUKT
AB
RESERVES THE RIGHT TO
MAKE
IMPROVEMENTS
AND
MODIFICATIONS TO DESIGN
WITHOUT
PRIOR NOTICE.
SSM
PRODUKT
AB
VAKSALA-EKE,
SE-75594
UPPSALA,
SWEDEN
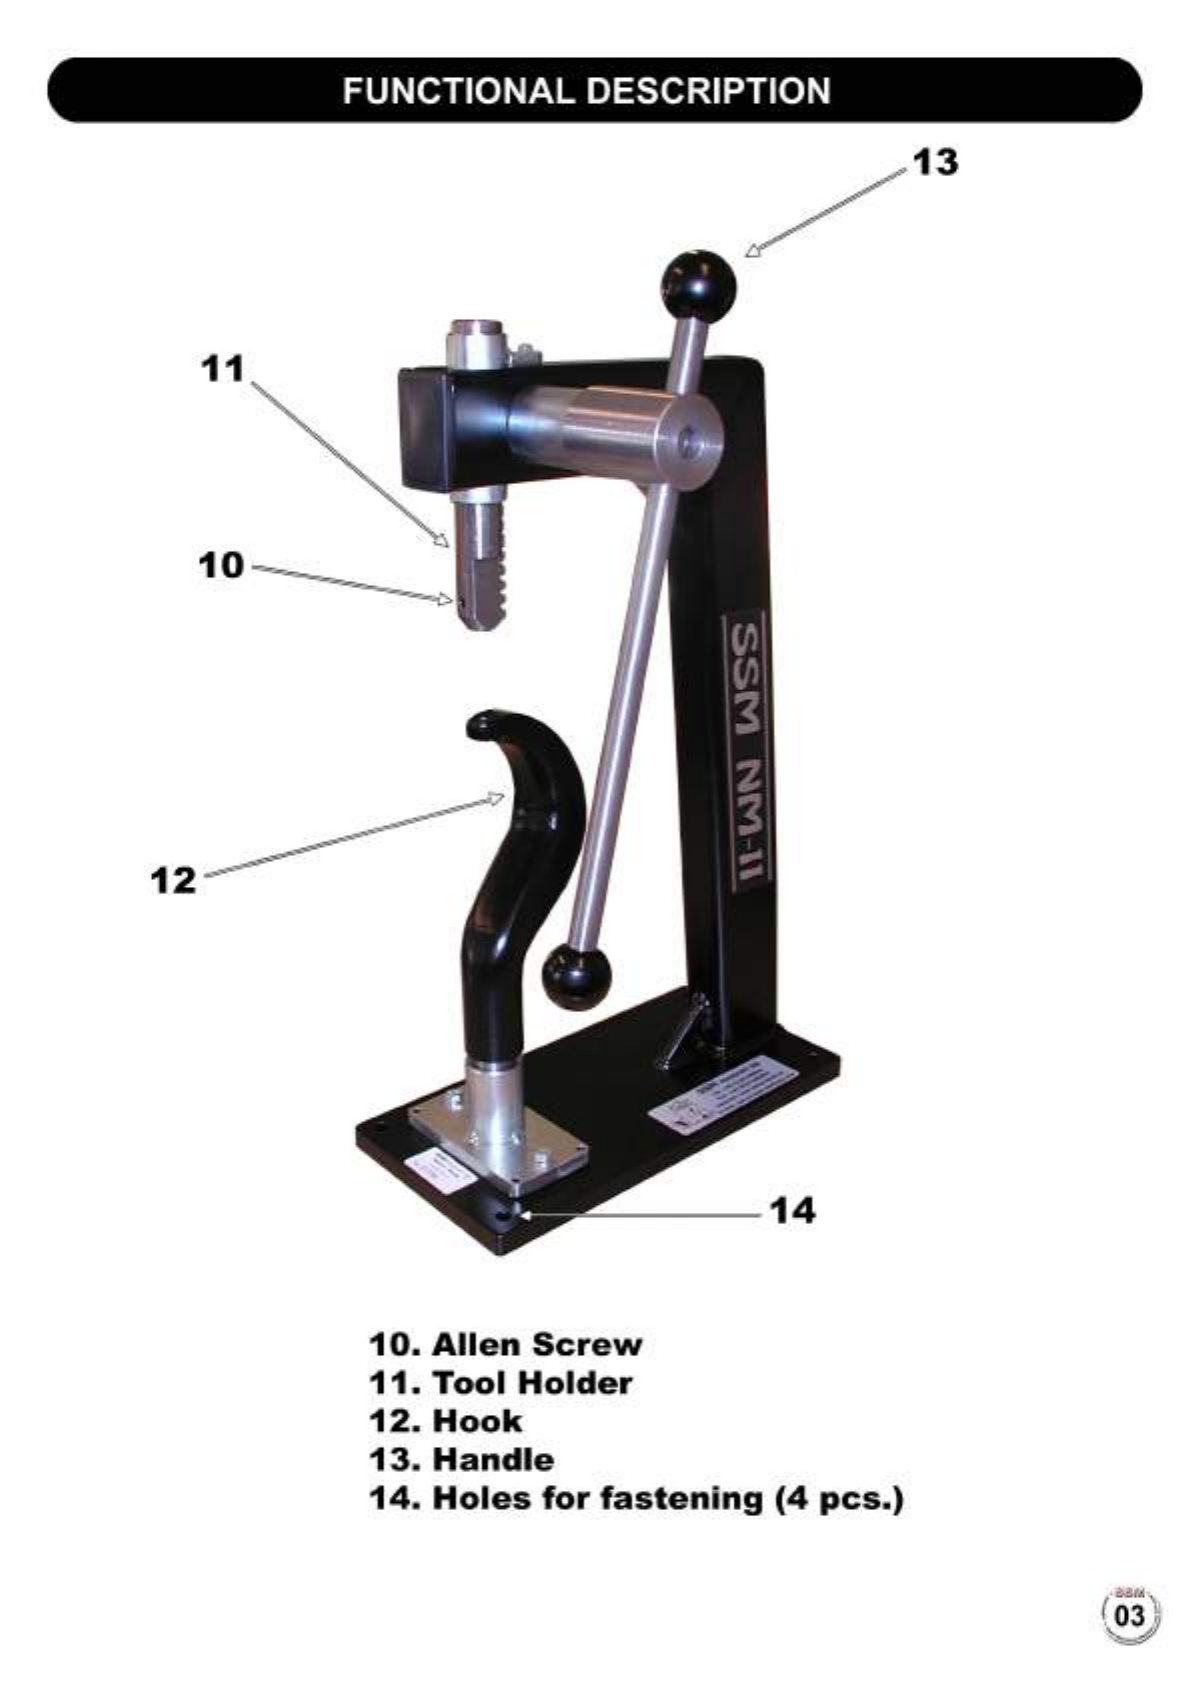
FUNCTIONAL DESCRIPTION
10
=
12
=======14
10.
Alien
Screw
11.
Tool
Holder
12.
Hook
13.
Handle
14.
Holes
for
fastening
(4
pes.)

ASSEMBLY
Your Riveting Machine
NM-11
is
delivered complete and protected inside its delivery box.
Remove all contents from the box and inspect to ensure
no
damage was incurred during shipping.
Your NM-11/21 package should include the following:
DESCRIPTION PART #QTY
Getting
started:
Instruction Manual
Riveting Machine
Hook
Tool
Set N-21+N-E
NM-11
Manual.en
NM-11
V12
N-21
, N-E 1
+1
Place the machine
on
a stable, level surface.
You
can fasten the machine with four screws through the holes (14)
in
the bottom plate.
TECHNICAL SPECIFICATIONS AND DIMENSIONS
HEIGHT:
WIDTH:
LENGTH:
WEIGHT (with hook):
DISTANCE (between
lower
and
upper
tool
holder):
FORCE:
TUBE RIVET:
COPPER RIVET + WASHER:
EYELET:
HOOKS FOR SHOELACE:
LARGER RIVET, JOINT RIVET:
495
mm
215mm
300
mm
14.5 kg
120
mm
(130
mm
with
the
ski
hook)
23 *
force
from
the
hand
Use
type
SN
from
SSM.
Use
type
KN
from
SSM.
Use
type
EL
from
SSM.
Use
type
FE
from
SSM.
Contact
the
manufacturer
of
the
ski
boot.
Your SSM
Produkt
AB
distributor:

N-f
OPERATION
, 2 3 5 7
REMOVING TUBE RIVETS
Screw tool
no.
1 into the fastening hole
in
the hook 12 (use the nut that
is
included).
Loosen the Alien screw
in
the tool holder
11
and fasten tool no. 4 (08).
Position the skate above the hook 12
so
that you can feel tool no. 1
in
the rivet.
(Note that
in
narrow positions the rivet may
be
mounted obliquely.)
Lower the tool holder
11
so that the tool 4 fits around the head of the rivet.
Press down and the rivet should come loose. It will not come completely free;
remove it with a pair of tongs.
REMOVING COPPER RIVETS
Copper rivets should be filed down to the copper washer. After that you can knock
it
out with a centre punch.
If possible, cut the copper rivet off with a pair of cutting nippers.
It
must
not
be
ground
away (the heat
that
arises can
melt
the plastic).
OPERATION
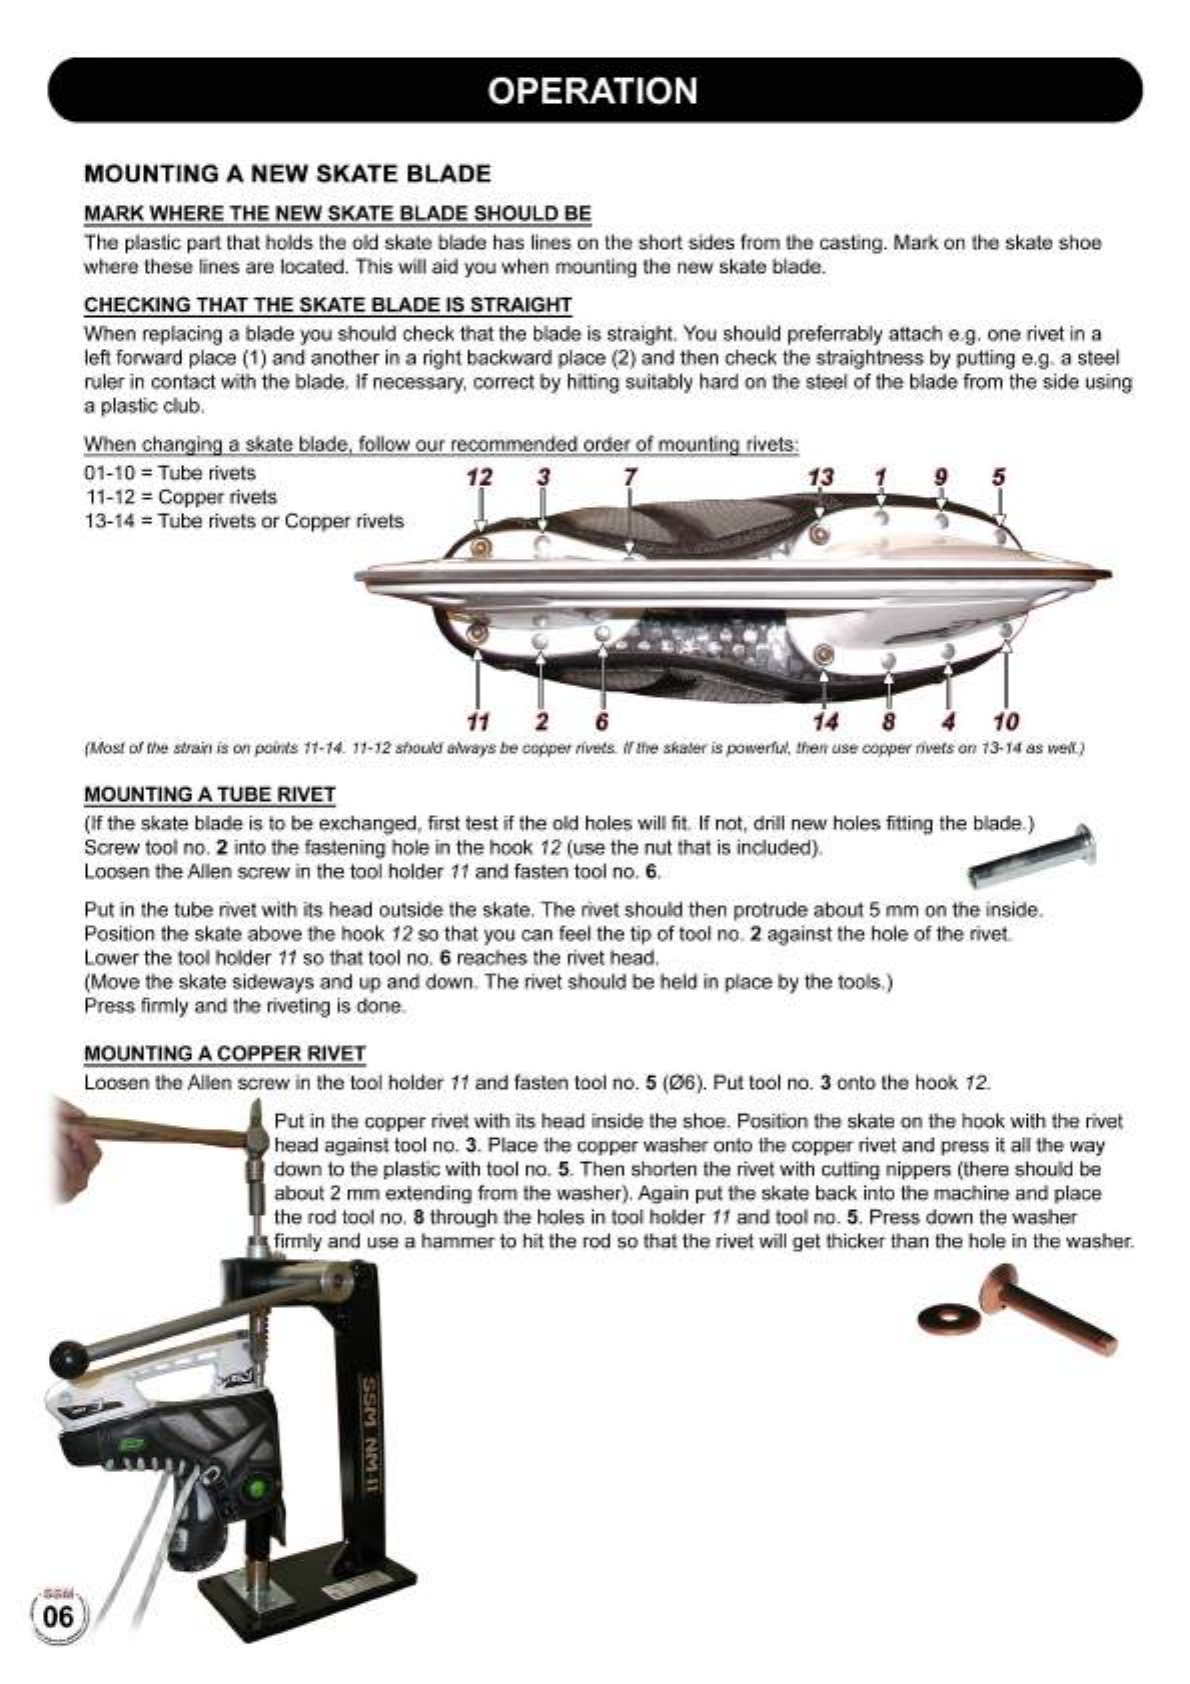
MOUNTING A NEW SKATE BLADE
MARK WHERE THE NEW SKATE BLADE SHOULD BE
The plastic part that holds the old skate blade has lines
on
the short sides from the casting. Mark
on
the skate shoe
where these lines are located. This will aid you when mounting the new skate blade.
CHECKING THAT THE SKATE BLADE
IS
STRAIGHT
When replacing a blade you should check that the blade is straight.
You
should preferrably attach e.
g.
one rivet
in
a
left forward place (1) and another
in
a right backward place (2) and then check the straightness by putting e.g. a steel
ruler
in
contact with the blade. If necessary, correct by hitting suitably hard
on
the steel
of
the blade from the side using
a plastic club.
When changing a skate blade, follow our recommended order
of
mounting rivets:
01-10 =Tube rivets 12
11-12 =Copper rivets
13-14 =Tube rivets or Copper rivets
11
2 6 14 8 4 10
(Most
ofthe
strain is on points 11-14. 11-12 should always be copperrivets.
If
the skateris powet1ul, then use copperrivets on 13-14 as well.)
MOUNTING A TUBE RIVET
(If the skate blade
is
to be exchanged, first test if the old holes will fit. If not, drill new holes fitting the blade.)
Screw tool
no.
2 into the fastening hole
in
the hook 12 (use the nut that
is
included).
Loosen the Alien screw
in
the tool holder
11
and fasten tool no.
6.
Put
in
the tube rivet with its head outside the skate. The rivet should then protrude about 5
mm
on
the inside.
Position the skate above the hook 12
so
that you can feel the tip
of
tool
no.
2 against the hole
of
the rivet.
Lower the tool holder
11
so that tool
no.
6 reaches the rivet head.
(Move the skate sideways and up and down. The rivet should
be
held
in
place by the tools.)
Press firmly and the riveting
is
done.
MOUNTING A COPPER RIVET
Loosen the Alien screw
in
the tool holder
11
and fasten tool no. 5 (06). Put tool
no.
3 onto the hook
12.
Put
in
the copper rivet with its head inside the shoe. Position the skate
on
the hook with the rivet
head against tool
no.
3.
Place the copper washer onto the copper rivet and press
it
all the way
down to the plastic with tool
no.
5.
Then shorten the rivet with cutting nippers (there should
be
about 2
mm
extending from the washer). Again put the skate back into the machine and place
the rod tool
no.
8 through the holes
in
tool holder
11
and tool no.
5.
Press down the washer
firmly and use a hammer to hit the rod so that the rivet will get thicker than the hole
in
the washer.

OPERATION
REMOVING AN EYELET
Put tool
no.
20 onto the hook
12.
Loosen the Alien screw
in
the tool holder
11
and fasten tool no. 21.
Position the skate above the hook 12
in
such a way that tool no. 20 protrudes through the outer part of the eyelet.
Lower the tool holder
11
so that the tool
21
fits around the outer part of the eyelet.
Press down and the eyelet should come loose.
It will not come completely free; remove it with a pair of tongs.
MOUNTING AN EYELET V 20
Put tool
no.
22 onto the hook
12.
Loosen the Alien screw
in
the tool holder
11
and fasten tool no. 23.
Put the two eyelet parts
in
the skate with the light part from the inside and the dark part from the outside.
Position the skate above the hook 12 such that you feel that tool
no.
22 fits the inner part of the eyelet.
Similarly lower the tool holder
11
so that tool
no.
23 fits the outer part
of
the eyelet.
Press firmly and the riveting
is
done.
Innerpart
of
eyelet
Y Outer
part
of
eyelet
NOTE! N-RE
is
extra equipment and not part of NM-11/21!
V 22 V 23
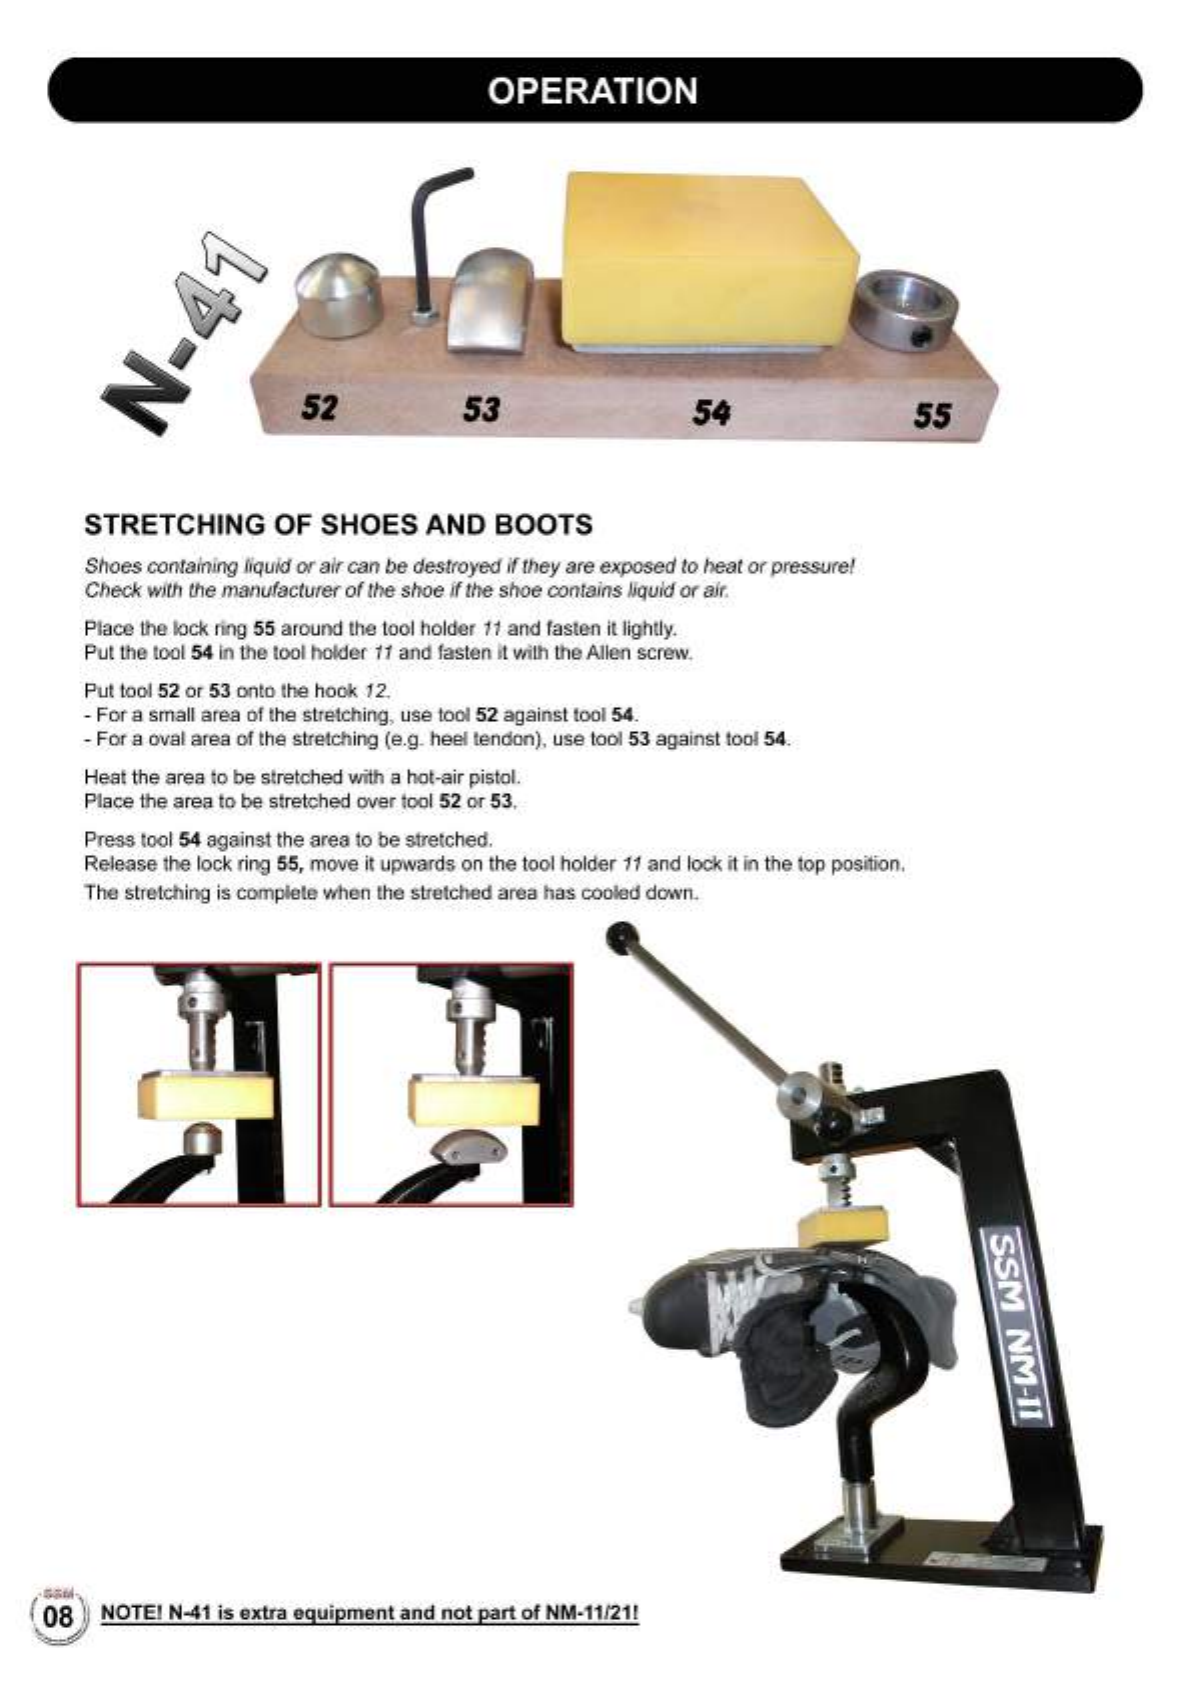
OPERATION
52
53 54
STRETCHING OF SHOES AND BOOTS
Shoes containing liquid
or
air
can be destroyed
if
they are exposed to heat or pressure!
Check with the manufacturer
of
the shoe
if
the shoe contains liquid
or
air.
Place the lock ring 55 around the tool holder
11
and fasten
it
lightly.
Put the tool 54
in
the tool holder
11
and fasten
it
with the Alien screw.
Put tool 52
or
53 onto the hook
12.
-For a small area
of
the stretching, use tool 52 against tool 54.
-For a oval area of the stretching (e.g. heel tendon), use tool 53 against tool
54.
Heat the area to
be
stretched with a hot-air pistol.
Place the area to
be
stretched over tool 52 or
53.
Press tool 54 against the area to
be
stretched.
Release the lock ring 55, move it upwards
on
the tool holder
11
and lock
it
in
the top position.
The stretching
is
complete when the stretched area has cooled down.
,®®j\J],
(08 )) NOTE! N-41 is extra equipment and not part
of
NM-11/21!
~
55

OPERATION
MOUNTING OF SHOE LACE HOOKS ON FIGURE SKATES
Put tool
no.
2 (from N-21) onto the hook
12.
Loosen the Alien screw of the tool holder
11
and fasten tool
no.
24.
Put the outer part of the lace hook
in
tool
no.
24. Then place
it
in
the hole
on
the figure skate.
Position the skate above the hook 12
so
that you can feel the tip
of
tool
no.
2 against the hole
in
the lace hook.
(Move the skate sideways and up and down. The lace hook should be held
in
place by the tools.) '\\
f7
0)/,1
Lower tool holder
11
and press firmly so that the outer part
of
the lace hook locks onto the skate. \Y
~
The outer part of the lace hook should still
be
positioned
in
tool
no.
24.
Remove tool no. 2 and put tool
no.
3 (from N-21) onto the hook
12.
Put the inner part of the lace hook
in
tool no. 3 and aim it into the hole
on
the cracked outer part.
Lower tool holder
11
and press firmly so that the inner part locks onto the outer part.
Inner
part
of
shoe
lace
hook
Outer
part
of
shoe
lace
hook
V2
SKI HOOK FOR SKI BOOTS
Ski boots (not all) have regular tube rivets that keeps the belt buckles
in
place.
Some also has large joint rivets
on
the sides.
REMOVAL OF TUBE RIVETS FOR THE BELT BUCKLES
Do
it
in
the same way as it
is
done
on
a skate but use
ski
hook
30 instead of hook 12. (See page 5.)
MOUNTING OF TUBE RIVETS FOR THE BELT BUCKLES
Do
it
in
the same way as it
is
done
on
a skate but use
ski
hook
30 instead of hook 12. (See page 6
MOUNTING OF LARGE JOINT RIVETS (with
025
mm
as maximum size)
Put tool
no.
28 onto the ski hook
30.
Loosen the Alien screw
in
the tool holder
11
and fasten tool
no.
29. Put
in
the joint rivet
with its head outside the ski boot. Position the ski boot above
the ski hook
30
so
that you can feel the tip
of
tool
no.
28 fits
in
the hole
of
the joint rivet. Lower the tool holder
11
so
that the
tool no. 29 fits the the joint rivet
on
the outside.
Press firmly and the riveting
is
done.
(Tools
no.
28 and 29 have guides making it possible
to
mount two different sizes.)
NOTE! V 24, V 28, V 29 and V 30 are extra
equipment
and
not
part
of
NM-11/21!
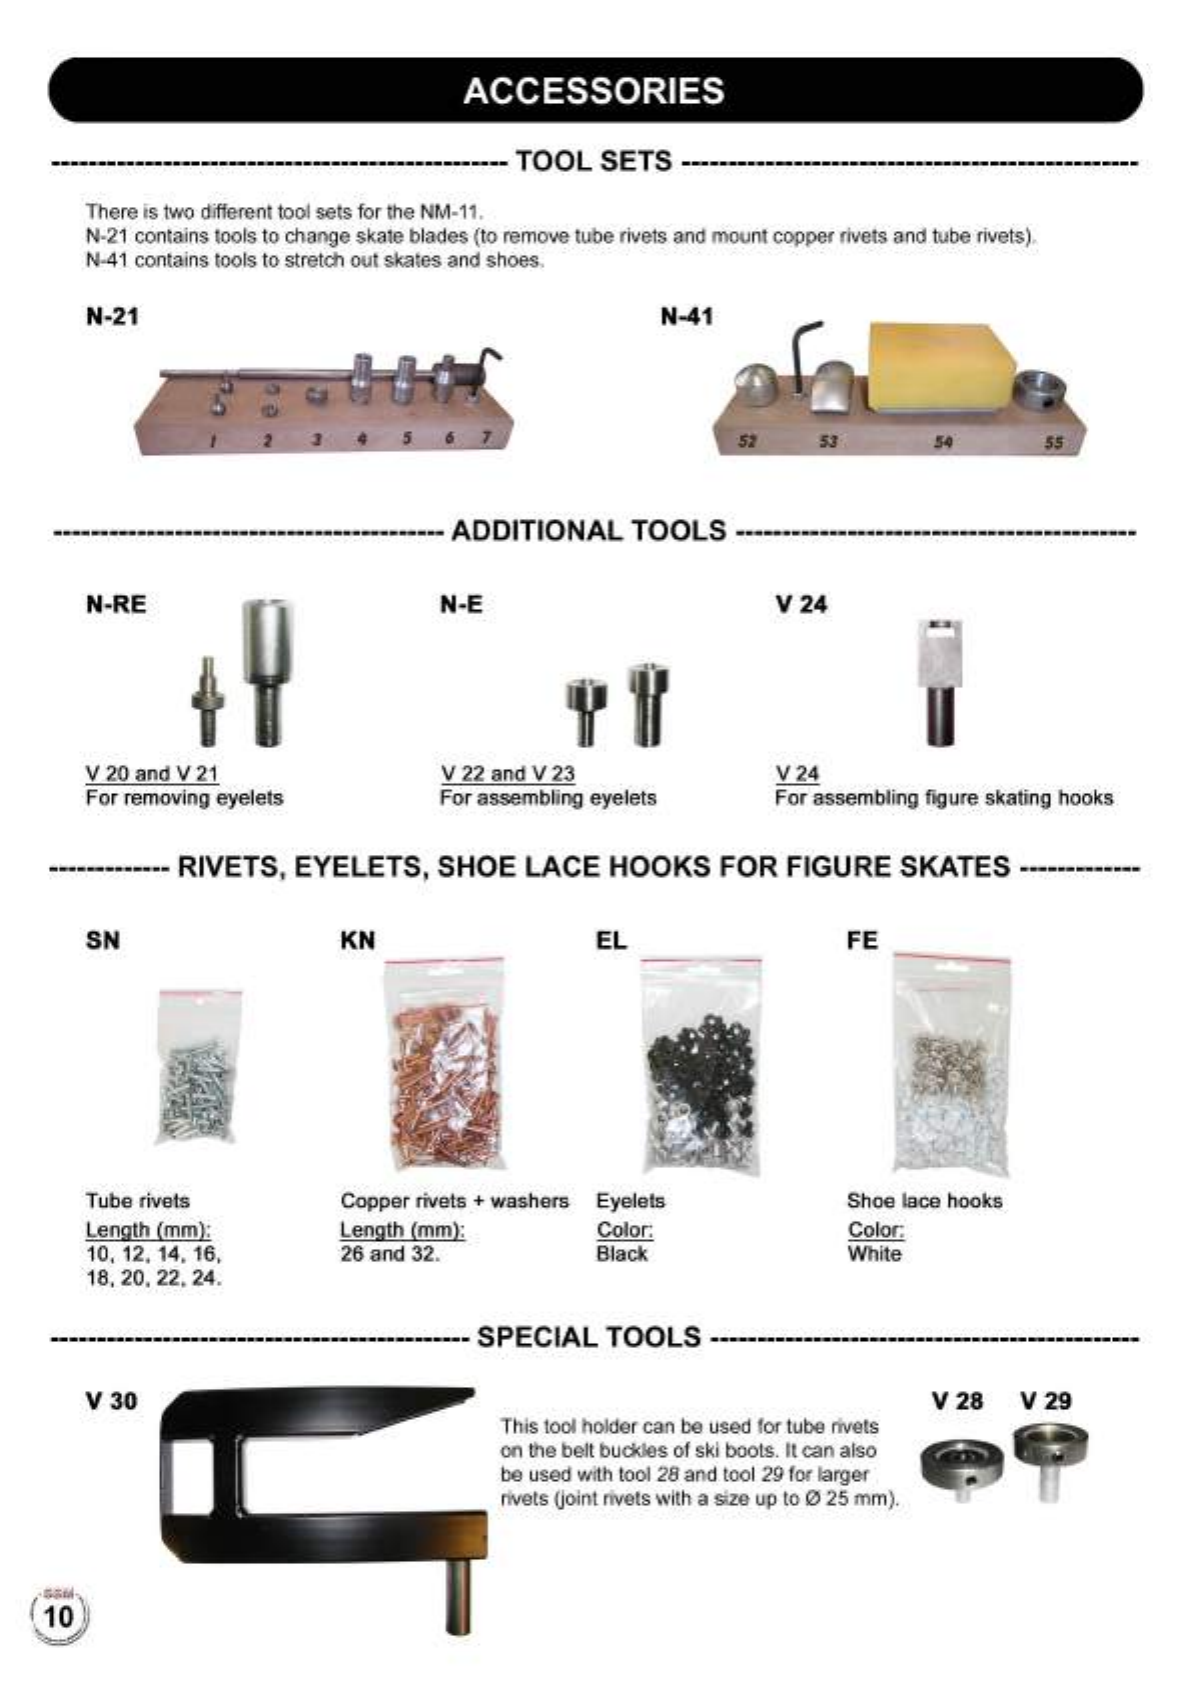
ACCESSORIES
------------------------------------------------- lr()()L.
~E:lr~
-------------------------------------------------
There is two different tool sets for the NM-11.
N-21
contains tools to change skate blades (to remove tube rivets
and
mount copper rivets and tube rivets).
N-41
contains tools
to
stretch out skates
and
shoes.
N-21 N-41
------------------------------------------
J\[)[)llrl()~J\L.
lr()()L.~
-------------------------------------------
N-RE N-E
V24
V 20 and V
21
V 22 and V 23
V24
For
removing eyelets
For
assembling eyelets
For
assembling figure skating hooks
-------------
RIVE:lr~,
E:YE:L.E:lr~,
~H()E:
L.J\CE:
H()()K~
F()R
FIGURE:
~KJ\lrE:~
-------------
SN
Tube rivets
Length (mm):
10, 12, 14, 16,
18,20,22,24.
KN
EL
Copper rivets + washers Eyelets
Length (mm): Calor:
26 and 32. Black
FE
Shoe lace hooks
Calor:
White
---------------------------------------------
~JlE:CIJ\L.
lr()()L.~
----------------------------------------------
V30
This tool holder
can
be
used for tube rivets
on
the belt buckles of ski boots. It
can
also
be
used with tool 28 and tool 29 for larger
rivets
Uoint
rivets with a size
up
to
0 25 mm).
V 28 V 29
Table of contents
Popular Rivet Tools manuals by other brands


Gesipa
Gesipa FireFox F operating instructions

Silver Eagle
Silver Eagle SE200 operating instructions

Central Pneumatic
Central Pneumatic 97857 Set up and operating instructions

Titgemeyer
Titgemeyer RL60-2 operating manual

Metabo
Metabo NMP 18 LTX BL M10 Original instructions

Cherry Aerospace
Cherry Aerospace G702A manual