Stahl Tools DSDS User manual
Model: DSDS
User Manual
Variable Temperature Digital
Solder and Desolder Station

Warning
This tool must be placed on its stand when not in use.
A re may result if the appliance is not used with care, therefore
----be careful when using the appliance in places where there are combustible materials;
----do not apply heat to the same place for a long time;
----do not use in presence of an explosive atmosphere;
----be aware heat may be conducted to combustible materials that are out of sight;
----place the appliance on its stand after use and allow it to cool down before storage;
----do not leave the appliance unattended when it is switched on.
2

Thank you for purchasing the Stahl Tools Digital Soldering & Desoldering Station. Its desktop design and variable temperature settings
makes it the perfect choice for low heat jobs like creating and repairing electronic circuit boards, or high heat jobs like soldering higher
gauge wires for speaker components, plus a desoldering gun for rework. Save time and space having both units in one convenient station.
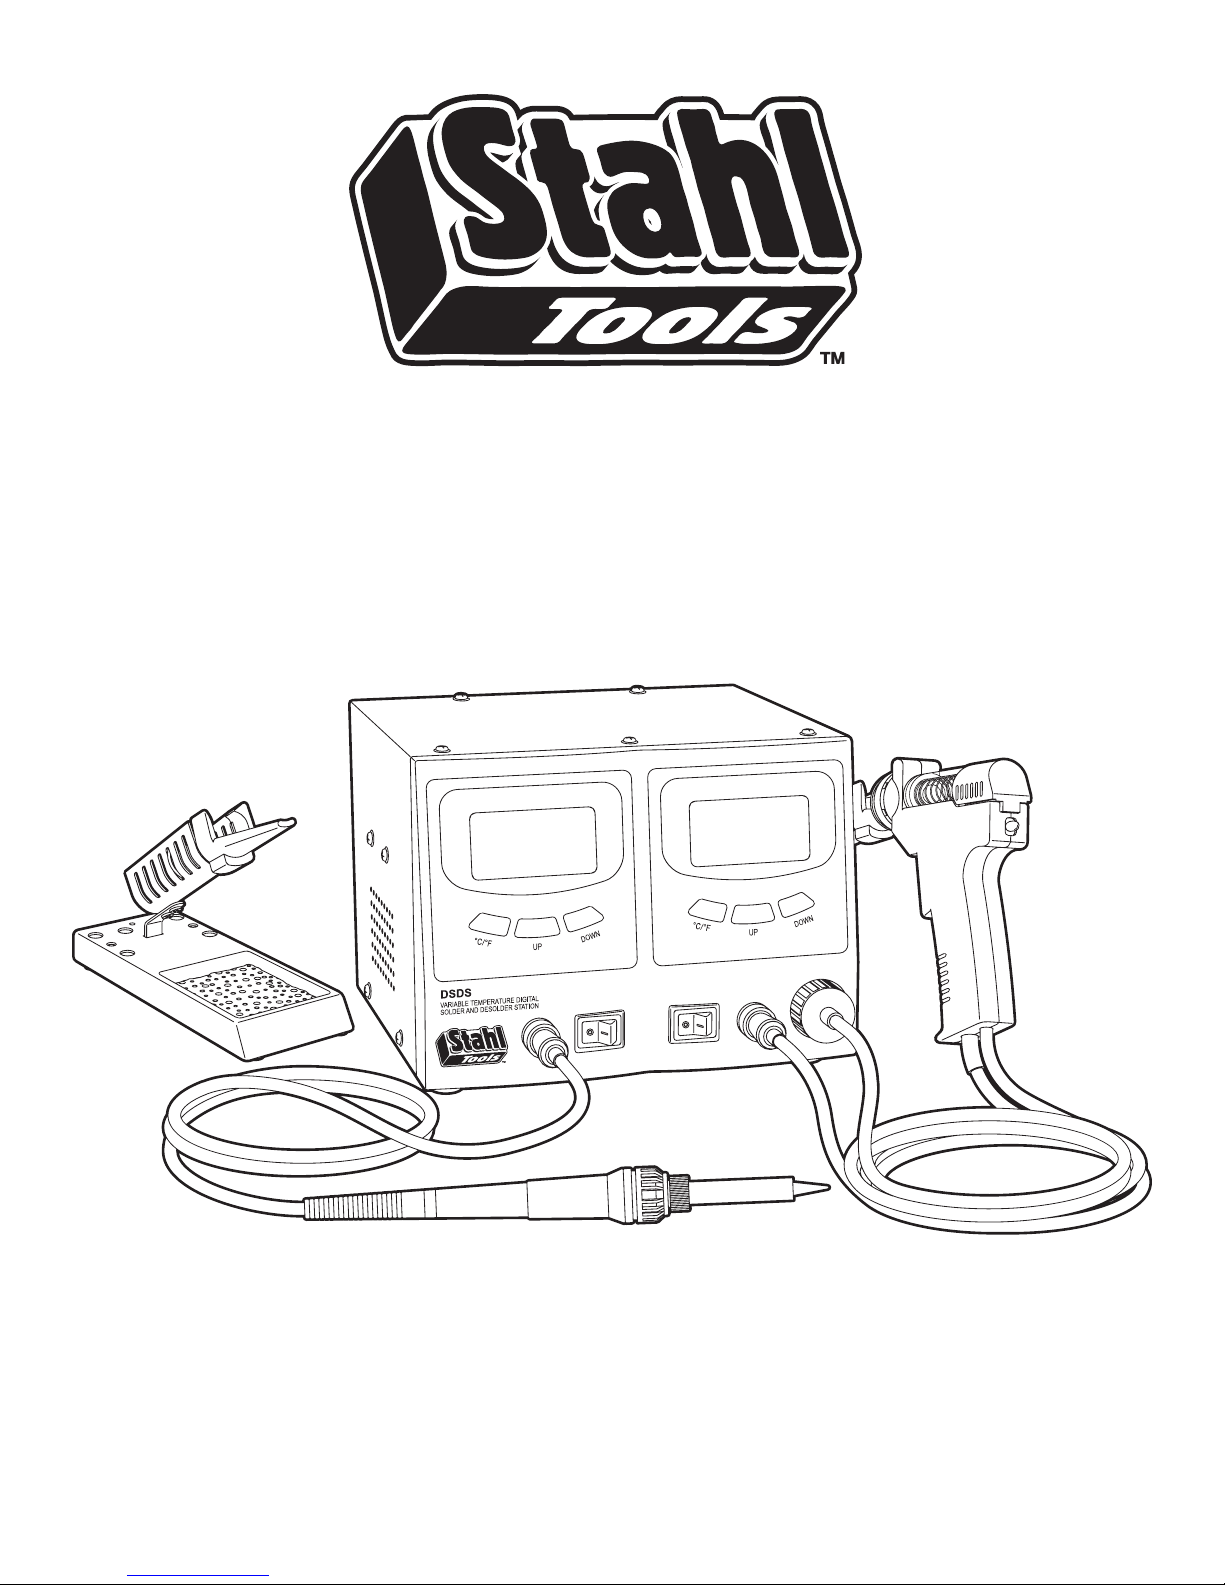
Callouts
3
9. Button for temperature increase
10. Button for temperature decrease
11. Master power switch (back)
12. AC power socket and fuse holder (back)
13. Soldering iron holder
14. Desoldering gun switch for changing
the lter
15. Desoldering gun holder
1. Soldering iron six-pin port
2. Lighted soldering iron power switch
3. Lighted desoldering iron power switch
4. Desoldering iron seven-pin port
5. Desoldering vacuum port
6. Desired heat setting read-out
7. Current temperature read-out
8. Button for C° or F° reading

1. Description
The Stahl Tools DSDS Soldering & Desoldering Station is a high-performance and multi-function station developed by Stahl
Tools to use in electronic product research, production, and rework. This tool is used in the elds of electronic research,
teaching and production, especially for repairing and reworking electronic appliances and communication equipment.
1.1 Control Unit
The soldering iron and the desoldering gun are controlled automatically by two micro-processors. The digital control
electronics, high-quality sensor and heat exchange system guarantee precise temperature control at the soldering tip. The
highest degree of temperature precision and optimal dynamic thermal behavior under load conditions is obtained by the
quick and accurate recording of the measured values in a closed control circuit. This design works especially well with lead-
free production techniques.
1.2 Soldering Iron
Soldering iron is 60W and offers a wide spectrum of optional soldering tips that can be used anywhere in the electronics eld.
The high power and slim design makes this iron suitable for ne soldering work. The heating element is made of PTC and
the sensor on the soldering tip controls the soldering temperature quickly and accurately.
1.3 Desoldering Gun
Desoldering gun with a power of 80W has three optional tip sizes that can be used anywhere in the electronics eld.
The high power and gun type design makes this iron suitable for ne desoldering work. The heating element is made of PTC
and the sensor on the desoldering tip controls the desoldering temperature quickly and accurately.
2. Technical Specication
Rated voltage range 110-130V AC 60Hz; rated power input 160W.
3. Operating Instruction
Place the soldering and desoldering guns in their holders separately. Then connect the plug to the receptacle on the station
and turn clockwise to tighten the plug nut. Check that the power switch is on the “OFF” position. Connect the control unit
to the power supply and switch on the power. Then a self-test is carried out in which all display elements are switched on
briey. The electronic system then switches on automatically to the set temperature and displays this value.
Adjust the temperature and wait for the gun’s current read-out to reach the desired heat setting. Apply the tip of the soldering
gun to the solder joint and squeeze the trigger as soon as the solder melts.
3.1 Display and Temperature Setting
The digital display:
1. Shows the actual temperature of the tip.
2. Shows the setting temperature. Press the UP
or DOWN button to set the digital display to
the desired heat setting. The set-point can be
changed for ±1°C by tapping the UP or DOWN
button. Holding the button down will change the
set-point quickly. The digital display will return
automatically to the actual value and the iron
heats up quickly to the desired setting.
3. °C/°F display: Switching the temperature display
from °C to °F by pressing the “°C/°F” button and
then the electronic system will display the actual
temperature (1) and setting temperature (2) in °F,
and vice versa.
4. When the actual temperature on the soldering tip is less than the set-point, “HEAT ON” will display when the tip is heating
up to maintain the desired temperature.
5. When the absolute offset is more than ±10°C between the actual temperature and the set-point on the soldering tip or
the nozzle, “WAIT” will display. This means that the temperature control system detects a non-stable situation. Pause for
a moment until “WAIT” disappears.
6. When “ERROR” displays, there may be an issue with the temperature control system, or the soldering iron is not
connected to the control system correctly.
4

4. Safety Instruction
The manufacturer assumes no liability for uses other than those described in the operating instructions or for unauthorized
alterations.
The operating instructions and cautions should be read carefully and kept in an easily visible location in the vicinity of the
control system. Non-observance of the cautions will result in accidents, injury or risks to health.
5. Caution
5.1 Power Cord
The power cord only can be inserted in approved power sockets or adapters.
5.2 High Temperature
The temperature of the soldering tip or the nozzle will reach as high as 400°C (752°F) when the power switch is on. Since
mishandling may lead to burns and re, be sure to comply with the following precautions:
Do not touch metallic parts near the soldering tip/ nozzle.
Do not use this system near ammable items.
Advise other people in the work area that the unit can reach a very high temperature and should be considered potentially
dangerous.
Turn off the power switch while taking breaks and when done using it.
Before replacing parts or storing the system, turn off the power and let it cool down to room temperature.
5.3 Take Care of Your Tools
Do not use the tools for any applications other than soldering or desoldering.
Do not smack the iron/gun against the work bench or subject the iron to severe shocks.
Do not le the soldering tip to remove the oxide, please wipe the tip on the cleaning sponge.
Use only accessories or attachments which are listed in the operation manual. Use of other tools and other accessories can
lead to injury.
Please turn off the power before connecting or disconnecting the soldering iron.
5.4 Maintenance
Before each use, safety devices and all parts must be carefully checked. Inspect moving parts for error-free operation and
that they’re not bound-up, or damaged. Damaged safety devices and parts must be repaired or replaced by a qualied
technician, so long as nothing else is indicated in the operation manual. Use only accessories or attachments which are
listed in the operation manual. Use of other tools and other accessories is dangerous and may cause injury.
5.5 Keep Children at a Distance
This appliance is not intended for use by persons (including children) with reduced physical, sensory or mental capabilities,
or lack of experience and knowledge, unless they have been given supervision or instruction concerning use of the appliance
by a person responsible for their safety.
Warning: Young children should be supervised to ensure that they do not play with the appliance. Unused soldering tools
should be stored in a dry location which is out of the reach of children. Switch off all unused soldering tools.
5.6 Protect Yourself Against Electrical Shocks
Avoid touching grounded parts with your body, e.g. pipes, heating radiators and so on.
The soldering tools antistatic grip is conductive.
5.7 Work Environment
Do not use the soldering tool in a moist or wet environment. The soldering iron and the desoldering gun should be placed in
the holder when not is use.
5.8 Workplace Safety
Observe the valid safety regulations at your workplace.
5

WARRANTY COVERAGE
Stahl Tools products are warranted to be free of all defects in material and workmanship for 1 YEAR from the date of pur-
chase from an authorized Stahl Tools dealer. This warranty and all rights provided are limited to the original owner and are
non-transferable. Responsibility is limited to replacement or repair as set forth in this warranty statement.
Should a product require warranty service during this period, Stahl Tools will repair or replace without charge, any part or
product proving defective in material or workmanship. All warranty repairs and service must be performed by an authorized
Stahl Tools technician or service facility. The use of non-autho rized repair services renders this warranty null and void, and any
charges relating to non-authorized repair are the responsibility of the product owner.
All expenses related to replacing or repairing a defective part or product under this warranty shall be assumed by Stahl
Tools. Stahl Tools reserves the right to replace defective product with a new or factory reconditioned unit.
WARRANTY EXCLUSIONS
1. This warranty does not cover product failure or damage resulting from misuse, abuse, neglect, accidents, alterations,
standard environmental deteriora tion, natural disasters, or improper use and/or installation.
2. This warranty does not cover cosmetic damage due to misuse or neglect. This includes paint damage, scratches,
cracks or other supercial marks related to improper use.
3. Failures arising from attempted servicing of a non-authorized Stahl Tools repair facility or technician are excluded from
this warranty.
LIMITATION OF DAMAGES
In no event shall Stahl Tools be liable for consequential damages for breach of this warranty including installation charges,
excessive shipping expenses, property loss or other incidental loss. Some states do not allow the exclusion or limitation of
incidental or consequential damages, so the above limitation or exclusion may not apply to the buyer.
HOW TO OBTAIN WARRANTY SERVICE
To obtain services under this warranty, the buyer shall contact Stahl Tools’s authorized service provider, Parts Express, at
1-800-338-0531 x780 to obtain a return authorization number (RA#).
The buyer must carefully pack the warranted product along with a copy of the original purchase receipt, the return authori-
zation number (RA#), and a description to the repair facility listed below. Shipping for warranty service dependent upon the
return policy where the Stahl Tools product was purchased.
Parts Express
Attn: Stahl Tools Warranty Repairs RA# (please write your RA# here)
725 Pleasant Valley Drive
Springboro, Ohio 45066
NOTICE TO BUYER
This warranty gives you specic legal rights, and you may also have other rights which vary from state to state.
© Stahl Tools™ Last Revised: 9/8/2017
stahltools.com
Table of contents
Other Stahl Tools Soldering Gun manuals


