2 3DE DE
PRODUKTBESCHREIBUNG
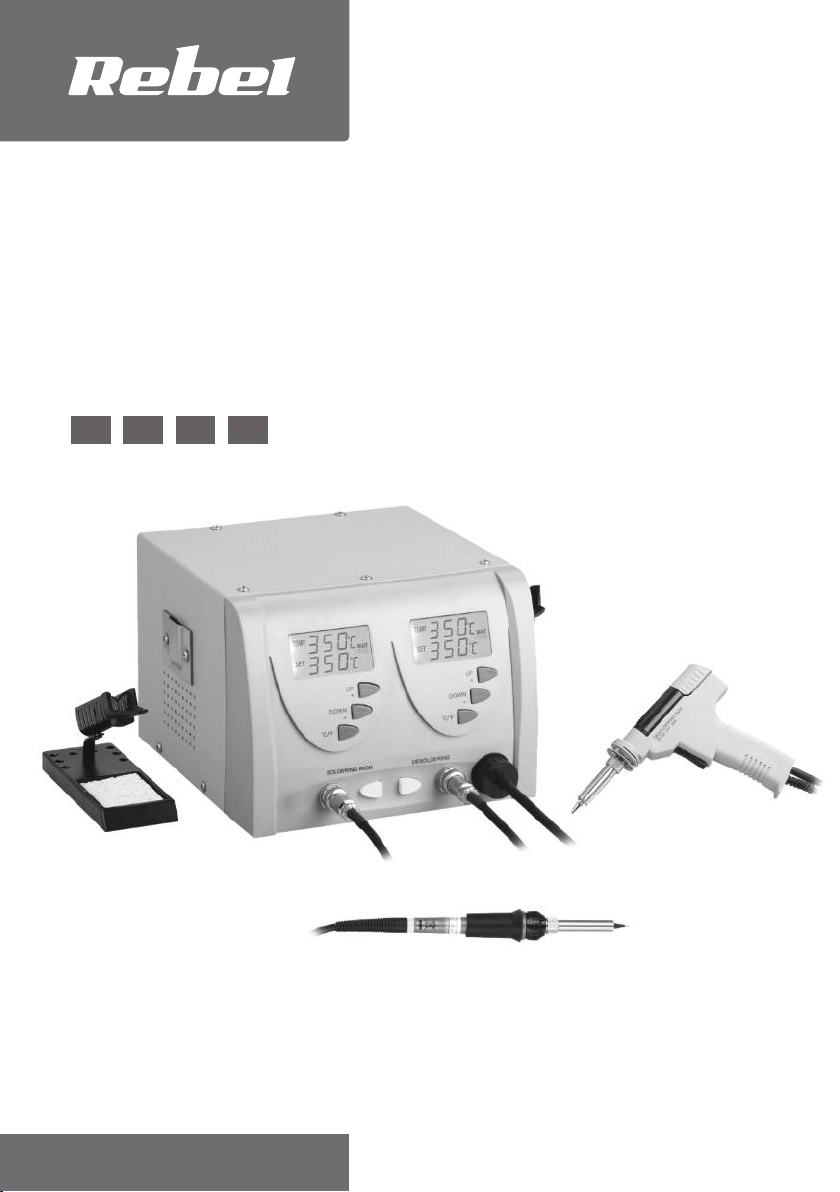
Tastenbeschreibung
1. °C / °F – Taste Tempe atu einheit
2. UP [AUFWÄRTS] – D ücken e höht die eingestellte Tempe atu um 1°C
3. DOWN [ABWÄRTS] - D ücken ve inge t die eingestellte Tempe atu um 1°C
4. Netztasten fü Lötkolben mit Spitze und Entlötpistole.
5. Netztaste de Lötstation (auf de Rückseite des Ge ätes)
Dis laybeschreibung
• Das Display zeigt zwei Tempe atu we te an - de unte e mit dem Wo t SET zeigt
die aktuell eingestellte Tempe atu an; Die obe e mit dem Wo t TEMP gibt die
aktuelle Tempe atu de Lötspitze / Heißluft an.
• HEAT ON wi d angezeigt, wenn die aktuelle de Tempe atu de Lötspitze /
Heißluft, nied ige als die eingestellte Tempe atu ist.
• WAIT wi d angezeigt, wenn de Unte schied zwischen de Tempe atu de
Lötspitze / Heißluft und de eingestellte Tempe atu g öße als 10°C ist. Dieses
bedeutet, dass das Tempe atu -Kont ollsystem unstabil ist und Sie sollten
wa ten bis WAIT vom Display ve schwindet bevo Sie weite machen.
• Im Falle eines fehle haften Bet iebs, z. B. bei einem beschädigten
Tempe atu senso ode wenn das Netzkabel de Lötspitze vom Lötkolben
get ennt wi d, zeigt das Display ERROR [FEHLER] an und ein Tonsignal e tönt
BETRIEB
1. Stellen Sie die Lötstation auf einen stabilen, ebenen Unte g und
2. Stecken Sie die Lötstation in eine Steckdose und schalten diese mit dem
Netztaste auf de Rückseite de Station ein.
Lötkolben
1. De Lötkolben sollte auf einen Stände gestellt und an die Zent aleinheit
angeschlossen we den.
2. De Lötkolben sollte mit de Taste neben de Buchse zum Anschließen des
Lötkolbens eingeschaltet we den.
3. Ve zinnen Sie vo dem e sten Geb auch die Lötspitze. Schalten Sie dazu den
Lötkolben ein, schmelzen eine kleine Menge Zinn und kleben es nach E eichen
de Tempe atu von 200 °C an die Spitze.
4. Ve wenden Sie die Tasten, um die Tempe atu einzustellen.
5. Schalten Sie nach Abschluss de A beiten die Station mit de Netztaste aus und
wa ten, bis de Lötkolben abgekühlt ist.
Entlöten
1. Die Entlötpistole sollte auf einen Stände gestellt und mit einem Netzkabel an
die Zent aleinheit angeschlossen we den.
2. De zweite Eingang ist fü die Luftansaugung vo gesehen. De angeb achte
Adapte sollte auf das he vo stehende Gewinde gesch aubt und das zweite
Kabel fü die Entlötpistole da auf gelegt we den.
3. Ve wenden Sie die Tasten, um die Tempe atu einzustellen.
SICHERHEITSHINWEISE
Bitte lesen Sie diese Bedienungsanleitung so gfältig vo de Benutzung und
bewah en diese auf zum späte en Nachschlagen.
1. Bevo Sie das Ge ät an die St omve so gung anschließen, stellen Sie siche ,
dass die auf dem Ge ät angegebene Spannung mit de Spannung de
Steckdose übe einstimmt.
2. T ennen Sie das Ge ät IMMER von de St omve so gung, wenn es nicht in
Geb auch ist.
3. Das Ge ät ist nicht fü Kinde bestimmt. Bewah en Sie die Lötstation auße halb
ih e Reichweite auf.
4. Netzkabel da f nu in eine auto isie ten Se vicestelle e setzt we den.
5. Ve suchen Sie nicht das Ge ät selbst zu epa ie en. Bei Beschädigung, wenden
Sie sich an eine auto isie te Se vicestelle fü Übe p üfung /Repa atu .
6. T ennen Sie imme das Ge ät vo dem Reinigen vom St omnetz.
7. Halten Sie das Ge ät und dessen Kabel fe n von Hitze, Wasse , Feuchtigkeit,
scha fen Kanten und ande e Fakto en, die das Ge ät ode das Kabel
beschädigt können.
8. Be üh en Sie keine heißen Metallteile des Ge ätes.
9. Ve wenden Sie dieses Ge ät nicht in de Nähe von b ennba en / explosiven
Mate ialien.
10. Vo de Lage ung ode dem Austauschen de Spitze stellen Sie siche , dass das
Ge ät abgekühlt ist.
11. Lassen Sie dieses Ge ät nicht unbeaufsichtigt wäh end des Bet iebs.
12. Ve wenden Sie dieses Ge ät nicht fü ande e Zwecke als in diese
Bedienungsanleitung angegeben sind.
13. Das Ge ät da f nicht sta ken E schütte ungen ausgesetzt we den.
14. Ve wenden Sie nu O iginal-Zubehö und We kzeuge.
15. Ve wenden Sie dieses Ge ät nicht, wenn es beschädigt ist ode de Bet ieb ist
nicht no mal.
16. De He stelle dieses P odukts ist nicht ve antwo tlich fü die du ch
unsachgemäße Handhabung und Ve wendung des Ge äts ve u sachten
Schäden.
17. Wa nung: Dieses We kzeug muss bei Nichtgeb auch auf den Stände gestellt
we den.
18. Wenn das Ge ät nicht ve wendet wi d, sollte es an einem t ockenen O t
auße halb de Reichweite von Kinde n auewah t we den.
19. Bei Beschädigung des Netzkabels wenden Sie sich zum Austausch ode zu
Wa tung des Kabels an einen auto isie ten Se vicepunkt.
20.Das Ge ät wi d automatisch ausgeschaltet, wenn das Ge ät eine bestimmte
Tempe atu übe sch eitet. Sobald die Tempe atu auf ein Siche heitsniveau
gefallen ist, wi d die St omve so gung automatisch eingeschaltet.
21. Das Ge ät kann nu in gut belüfteten Räumen ve wendet we den.
22.Ve wenden Sie das Ge ät nicht zum E hitzen von Flüssigkeiten ode Kunststo.
23.Das Ge ät ist nu fü den Innenbe eich bestimmt.
24.Kühlen Sie die heiße Lötspitze nicht in Wasse ab.