YIHUA 853A User manual

853 Serise
Thank you for choosing this type of product. The product is designed for soldering and unsoldering
without lead. Please read the User Guide thoroughly before use, and keep it in a safe place for future
reference.
Preheating station/Hot air reworks
&soldering station combination
Statement: The company reserves the right to improve and upgrade products, product specifica-
tions and design are subject to change without notice.
English
INSTRUCTION MANUAL

1 2
Using this machine, the following basic measures to abide by, in order to
avoid electric shock or cause harm to human body.
1. In order to ensure the personal safety, the machine work has been
completed, please close the total power switch to the machine, not use
for a long time please unplug the power cord!
2. You must use the original approved or recommended by parts, otherwise
will lead to serious consequences.
3. Machine failure must be by professionals or the company designated
personnel for repair.
4. This product use three-wire grounding plug, grounding must be inserted
into the three hole socket, don’t change the plug or make with three head
off ground adapter and make bad earth.
5. Please make sure that in the safe state, the machine open, and do not
leave work.
6. Do not use the machine near flammable, explosive gas, objects!!
7. After machine open, its temperature can reach 400 degrees above, do not
touch the preheating plate near the chassis, aluminum mesh.
8. Do not touch the air pressure gun metal parts, heat gun nozzle and jet of
hot air is very hot, don't treat the heat directly spray to the body, is in
danger of burn the body. (853 AA/AAA)
9. Please keep the air pressure gun inlet/outlet flow, there can be no
blockages. (853AA/AAA)
10. Do not touch the iron metal parts, high temperature dangerous! (853AAA)
11. Do not use the soldering iron welding outside of work; Don’t do the
soldering iron percussion work surface to remove fluxes residual, a move
that could seriously damage the iron. (853AAA)
12. When the replacement parts must pull the plug, and cool to room
temperature rear can be carried out.
13. Please put back to handle the heat gun handle frame, machine into sleep
again after power off. (853 AA/AAA)
14. Welding will emit smoke, please get proper ventilation.
15. After use, remember to cooling the fuselage,
WARNING!
I. General Usage
1. Suitable for de-soldering and soldering BGA, SOIC, CHIP, QFP, PLCC packa-
ge SMD IC, particularly suitable for de-soldering BGA module, computer mo-
ther board north and south bridge, all kind of mobile phone motherboard SMT
IC and LED lights.
2. Shrinking, paint drying, adhesive removal, thawing, warming, plastic welding
etc.
II. Feature
1. If the supply cord is damaged, it must be replaced by a special cord or
assemble available from the manufacturer or its service agent.
2. WARNING: This tool must be placed on its stand when not in use.
3. --Be careful when using the appliance in places where there are
combustible materials;
--Do not apply to the same place for a long time.
4. --Be aware that heat may be conducted to combustible materials that
are out of sight;
--Do not leave the appliance unattended when it is switched on.
5. --This appliance is not intended for use by persons (including children)
with reduced physical, sensory or mental capabilities, or lack of
experience and knowledge. Unless they have been given supervision or
instruction concerning use of the appliance by a person responsible for
their safety.
--Children should be supervised to ensure that they do not play with the
appliance.
1. Using microcomputer processor PID programmable temperature control techn-
ology, the program cycle every 20 milliseconds to detect the actual temperature
of the heating element and a quick correction, rapid return temperature, tempe-
rature stability LED display, precise preheating station, air gun and soldering
iron temperature.
2. Preheating station is to use a glaze layer having a high thermal effect, good the-
rmal shock resistance of the ceramic as the substrate, high-quality nickel brand-
ed alloy wire once sintering. It has a high thermal effect, overall good, good the-
rmal stability, uniform heating, high dielectric strength, clean, easy to install and
so on features.

3. Air Gun heater use ceramic heater, heating elements firmly wrapped around the
model ceramic, rapid and uniform heating. Use the upgraded version fan, the
airflow larger than the ordinary fan, spiral out of the wind, long life.
4. Soldering iron part using Hakko heater, heating up rapidly, temperature stability,
long service life; antistatic design to prevent electrostatic damage to delicate
SMD components.
5. The machine has a self - test function full intelligent over - temperature, short-
circuit, overload and fault display and protection functions.
6. 853 preheating station practical and easy to operate,the card plate sliding series
bracket bearing technology, to move around durable, convenient card board,
coupled with a fixed sliding bracket screws at the same time, the card board is
solid and reliable.
7. 853AA/853AAA temperature correction function to adapt to the environmental
impact:
Or replace the heating elements, soldering iron tips etc. Spare parts caused by
temperature deviation, can use this function calibration temperature. The corre-
ction temperature range is -50°C~+50°C.
8. 853AA/853AAA has Celsius/Fahrenheit temperature display function:
Meet different market needs to design the temperature display mod, you can
choose under customary interest.
3 4
III. Specification
Voltage
Weight
Power
853A 853AA 853AAA
AC 220V ±5% AC 220V ±5%AC 220V ±5%
≤500W ≤1200W ≤1270W
3.0kg
0~40°C/32~104°F
-20~80°C/-4~176°F
35%~45%
Model
Work environment
Storage environment
Store humidity
Size L320xW220xH100mm ±5mm
L250xW220xH90mm ±5mm
4.5kg 5.6kg
50~300°C or 50~400°C / 122~572°F or 122~752°F
±2°C(static)
LED
120x120mm
Preheating station
Temperature Range
Temperature Stability
Display Type
Area
≤130L/min
100°C~480°C/212°F~896°F
LED
≥100cm
200°C~480°C/392°F~896°F
<2mV
<2ohm
LED
≥100cm
Hot Air Reworks
Airflow type
Air Flow
Temperature Range
Temperature Stability
Display Type
Handle cable length
Soldering Iron
Temperature Range
Temperature Stability
Tip of ground voltage
Tip ground impedance
Display Type
Handle cable length
±1°C(static)
±1°C(static)
Brushless fan gentle wind
IV. Performance Comparison Table
Function
Functional components
Preheating station Preheating station
+Hot air reworks
Preheating station
+Hot air reworks+
Soldering station
Display type
Fahrenheit/Celsius
Conversion
Temperature correction
High temperature protection
Gun Type
Control Temperature way
853A 853AA 853AAA
Model
Digital PID Digital PID Digital PID
YES YES
YES YES YES
YES YES
LEDLED LED
Brushless fan Brushless fan
---
NO
NO

5 6
1. 853A:
A. Preheating station laid out plugged power cord.
B. Move bracket card board, preheat element is placed above the plate, tight-
en the four screws on the bracket, fixed need to preheat components.
C. Turn on the heating switch, the preheat plate heating, set the appropriate
temperature can be preheated.
2. 853AA/853AAA:
A. Preheating station laid out plugged power cord.
B. Move bracket card board, select the appropriate orientation preheat comp-
onents placed above the preheat plate. Note that bracket above three card
board ports,usually use the below one you need to preheat the components
from the hot plate farther, preheat temperature is a little lower.
C. Open the master switch, then open the preheat plate switch set the appro-
priate temperature can be preheated.
D. Preheat station, hot air reworks, soldering station can flexibility combinat-
ion to use. Preheat station, hot air reworks, soldering station three functio-
ns are independent, you can turn off no need part to save energy.
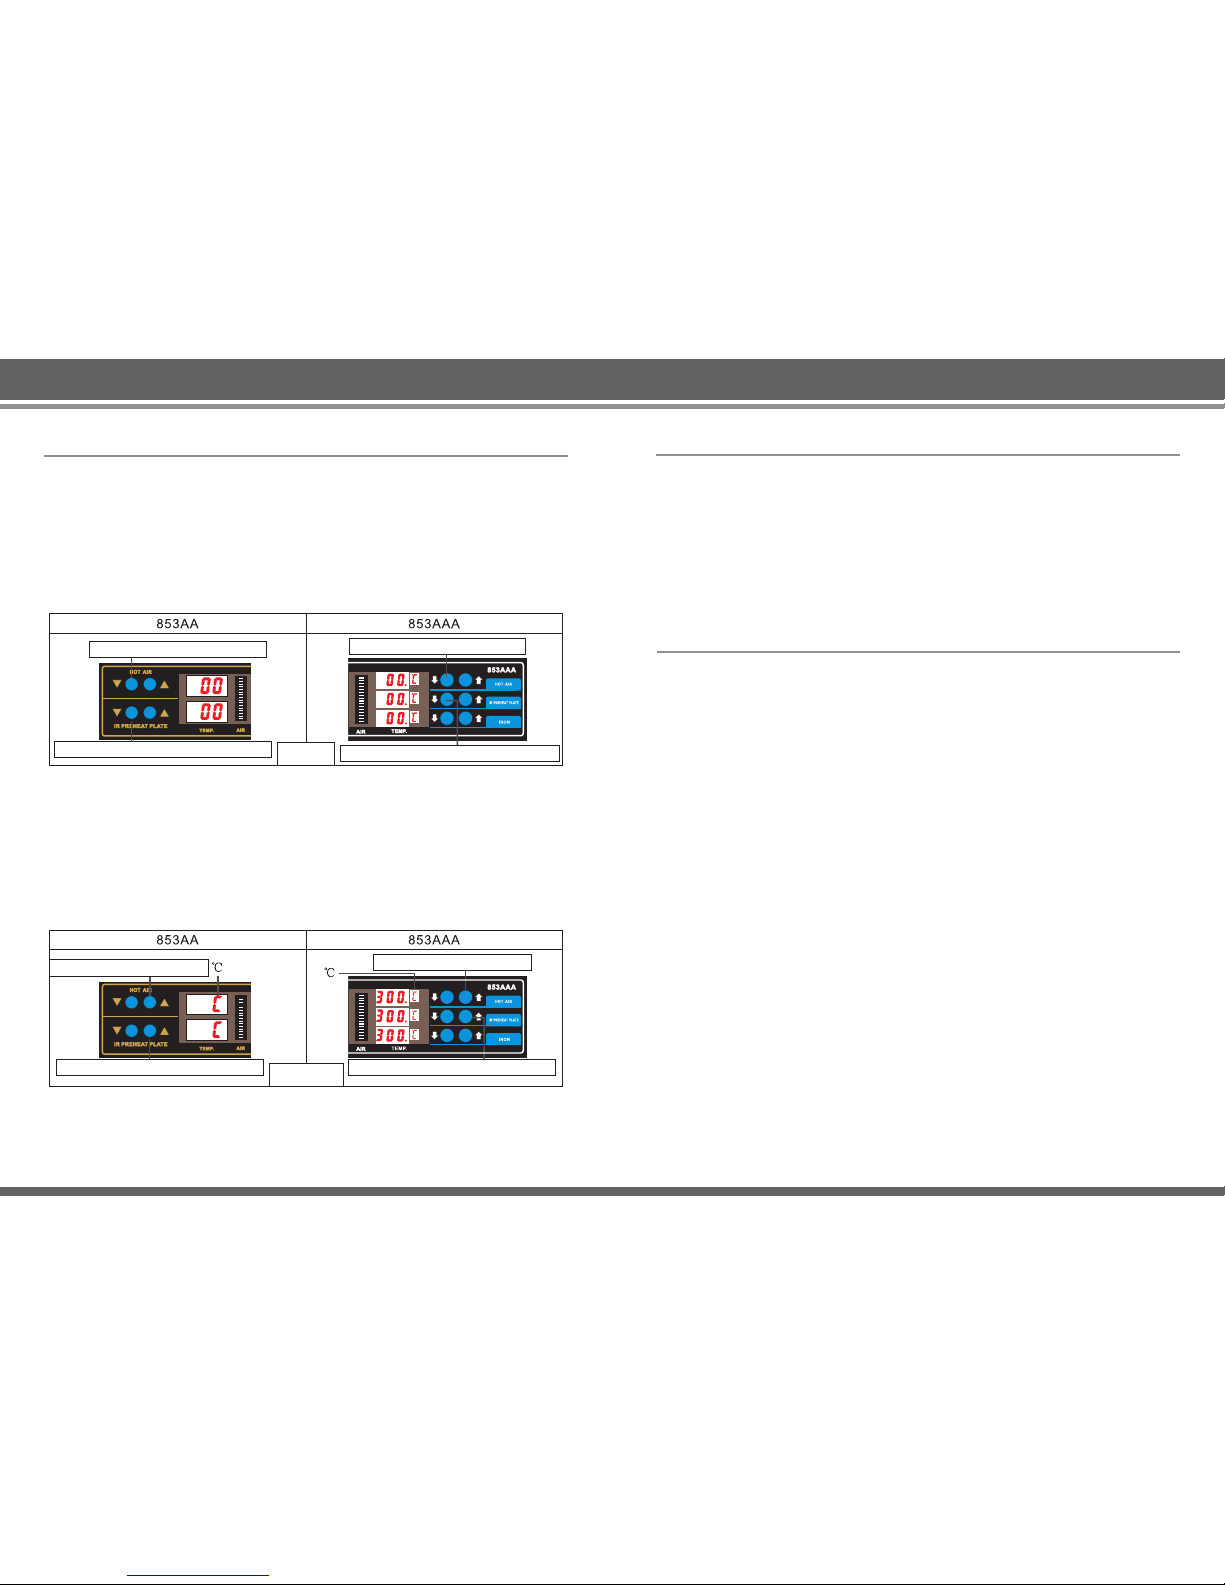
V. Operation
Preheating station part
1. The soldering iron handle on the iron holder.
2. Open the soldering iron power switch, heating elements begin to heating, pre-
ss soldering iron temperature plus button “ ” and minus buttons “ ” to set
the appropriate temperature, when the soldering iron work indicator regular
flash at high speed into the thermostat state can work properly!
3. After work, you can use the residue under high temperature cleaning sponge
cleaning up the soldering iron lips and re-coated with a new layer of solder,
the soldering iron into the iron hp; der can turn off the power!
Soldering station part
1. The hot air gun rework station is laid out handle frame is installed on the side
of the chassis,air gun bracket rack installed in the back of the chassis, fixed to
the handle in the air guns handle frame.
2. Open the back of the chassis whole switch, open air gun switch, air gun begin
heating, press air gun temperature plus button “ or ” and minus buttons
“ or ” to set temperature, adjust the airflow knob to set the appropriate
airflow, gun indicator regularly flashing means the temperature stability will be
able to normal operation.
3. After work, turn off the air gun switch, the machine automatically cut off the air
gun heating body the power to enter the cooling heating element mode. When
the temperature is below 100°C, the air gun display window goes off and stop
the wind.
Hot air reworks part 853AA/853AAA
853AAA
Remove the components:
1. The successful rework first removal location of the fault on mother board, and
the solder is heated to the melting point, and then carefully scored the compo-
nents from the board.
2. Heating control is key factor in the rework, the solder must be fully melted, so
as to avoid injury in the removed component plate and copper. While the tem-
perature is not too high ,to prevent the circuit board is heated excessively cau-
sed motherboard distorted.
PCB and component heating:
1. Advanced rework system uses a microcomputer to control the heating process,
with solder paste manufacturer specifications given parameters as possible,
and using a combination of the top and bottom of heating.
2. Bottom heating to complement the board due to pass of heat, while elevated
board temperature; The top heating is used heating components, in addition
the use of coders bottom heater can be eliminated due to local over - heating
the circuit board caused by distortions.
3. Motherboard heating can be used three methods, namely conduction, conve-
ction, and thermalefferma effects. Conduction heating when the heat source
with the motherboard contacts ( for example, using a hot plate ), which on the
rear components of the circuit board not applicable(NA).
4. Components heating (or top heating) generally use a convection hot air nozzl-
es, careful control of top heating components uniformly heated is extremely
important , especially for small quality components is particularly critical
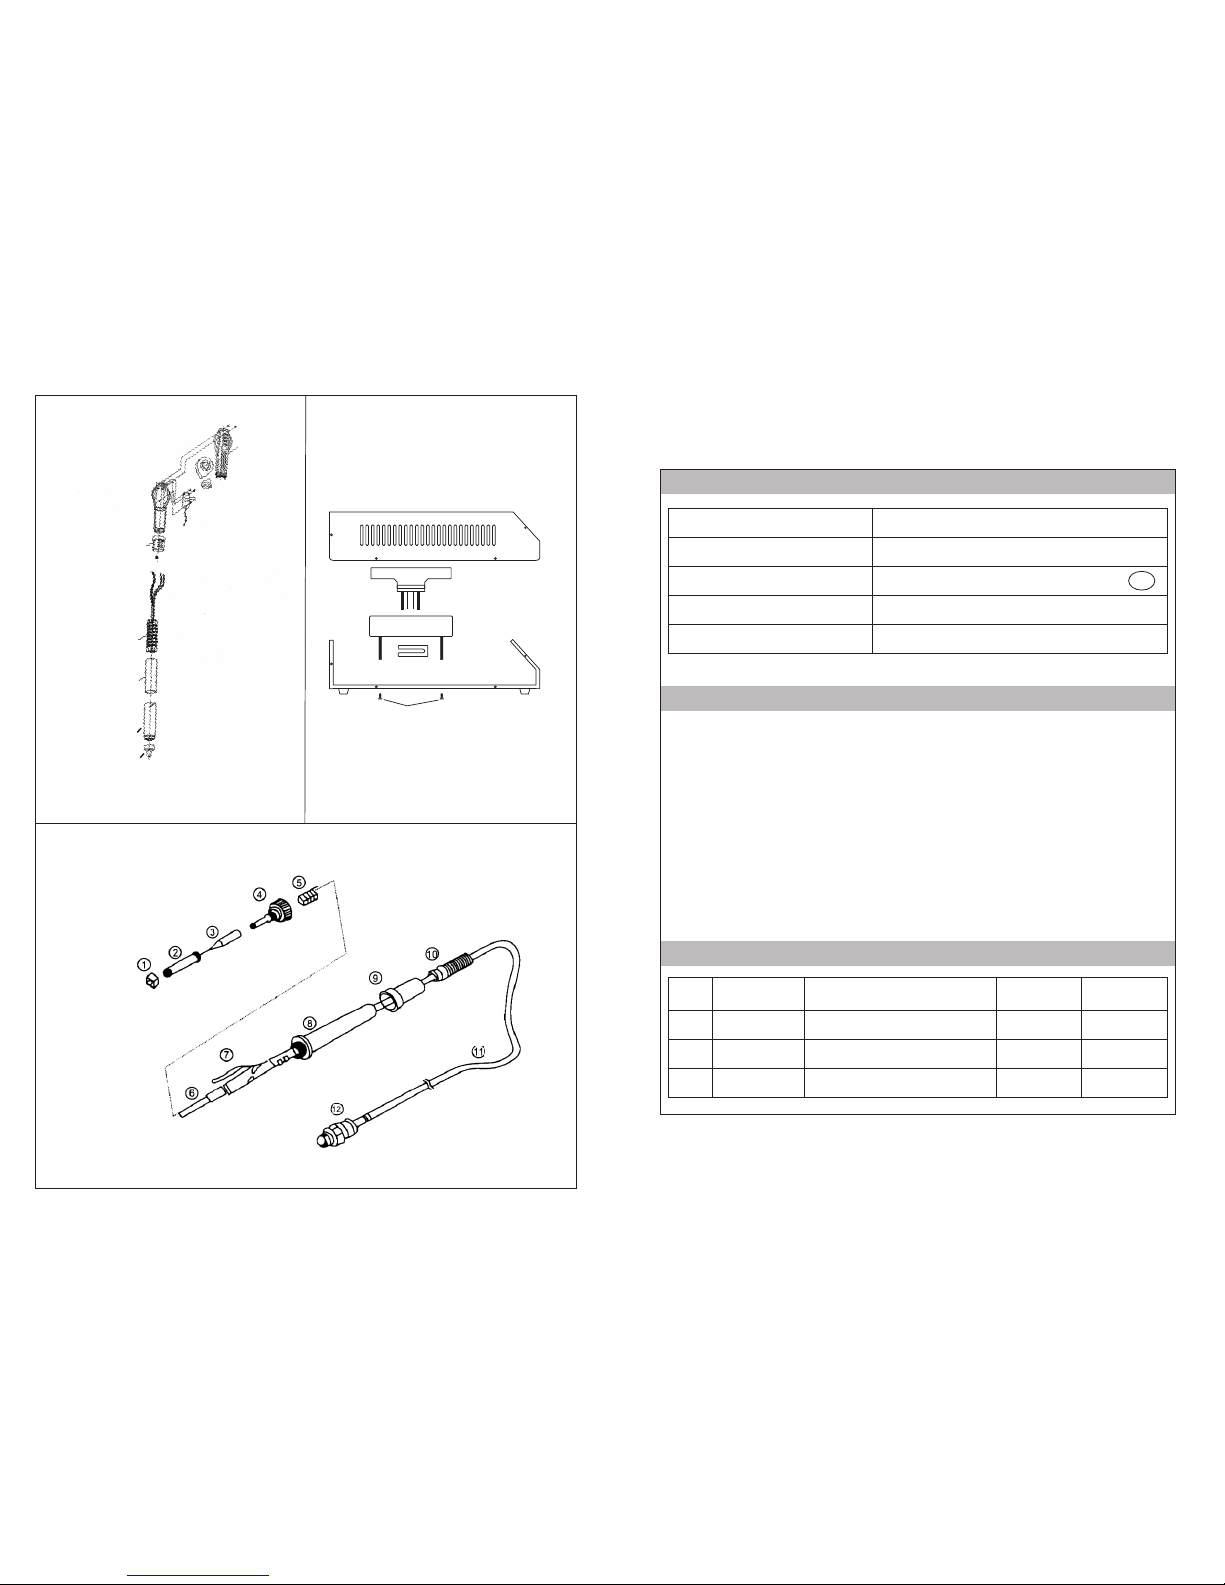
(Figure 1).
Attached:technical article-Rework the process(for refeerence only)
Air gun with preheating station, to facilitate the large flat IC,dual-panel large compon-
ents de-soldering.
Figure 1
5. Pay attention to avoid rework station nearby components reflow or blow away
small chip components, the hot gas stream discharged by the nozzle must be
isolated with these elements, the thin layer of shielding plate or the mask can
be put in the surrounding components of the reword station. Mask technology
is quite effective,but more trouble consuming, but can be used dedicated BGA
rework nozzles, it can reduce the damage to the components in the vicinity of
the demolition components and circuit boards in the process of unsoldering.

VI. Description For Function Setting
1. The temperature correction function setting(Figure 2):
In the case of shutdown, to press the air gun and preheat the cool button for 3
seconds, then preheat window will show the factory default the correction
temperature“00”,If need to correct the working temperature of the preheating
stage or electric iron, you can press button heating and cooling to make comp-
ensation of the respective temperature ( compensation range: -50°C~50°C).
After 4 seconds, the program and exit the automatic memory, display windows
shows working temperature, the setting is completed.
7 8
Air gun temperature down button
Preheating station teperature down button
2. Celsius/Fahrenheit display the conversion feature setting (Figure 3):
In the case of shutdown, pressing the air gun and the preheating station heati-
ng button for 3 seconds, then (853AA) the temperature display window shows“
C or F”, (853AAA) “C or F” are flashing in display window, then pressing air gun
and preheat station warming button to set the status of Celsius or Fahrenheit,
after set 4 seconds and the program is automatically memory setting and exit,
the setting is completed.
Figure 2 Preheating station teperature down button
Air gun temperature down button
Air gun temperature up button
Preheating station temperature up button
Air gun temperature up button
Preheating station temperature up button
Figure3
1. When the LED digital displays “---”, it means the outlet temperature is below
100°C; the hot air rework station is standby mode, and the handle is placed on
the handle’s rack.
2. When the LED digital displays”S-E”,it means the Soldering iron and Hot air
rework’s sensor is having a problem or handle is un-plugged,if this the case it
needs to replace the heating element (heating core’s element and sensor
components).
VII. Display Notes
Dear User! Our air gun and soldering iron handle adopt high strength stainless steel
tube, the machine must be inspected or calibrated four times in normal working
condition during the production process, the copper tube could be slight yellowing
due to high temperature! When use the new machine first time, it is normal that the
steel tube at tube at a slight yellowing, please be assured!
Special Instructions:
VIII. Description For Function Setting
1. Please ensure the outlet is clear,must free from any blockages or obstructions.
2. After the work is completed, put the air gun handle on the frame,turn off air gun
switch , the machine automatically cooled to display “---” , then turn off the
whole device power switch in the back of the chassis.
3. When using the machine standard nozzles other than the smaller nozzle, must
set air volume to the maximum, avoid long time use damage the air gun.
4. In regards to the usage requirements, choose the appropriate Hot air flow, diff-
erent Hot air flow will cause the temperature to be slightly different, and please
maintain the distance between the outlet and the object must be at least 2mm.
5. When the iron is used for the first time, please pay attention to check the iron
tip warming condition, when the tip can melt the tin wire, please plate some tin
on tip, then adjust to the desired temperature.
6. The tip temperature should not be too high,too high temperature would weaken
the tip function. When interval using ,can lowering the temperature.
7. Should be regularly use clean sponge to clear soldering tip, after finish use,
should wipe clean soldering iron tip, plate new tin to prevent soldering iron tip
oxide.
8. Preheat plate non-turn on the water structure, therefore, do not install the sto-
rage and use of contact with oil, water, and plastic pellets to prevent leakage
and other security risks.
9. The preheat plate should avoid being forced to tap or hard objects collided
causing tiles fracture, alloy resistance wire exposed affect the operating life.
10. The preheat plate DO NOT for prolonged use,and prevent chassis overheating.

IX. The do’s and don’ts
1. DO NOT install/De-install Nozzles with excessive force. DO NOT use pliers to
pull the nozzle edge out, DO NOT tight the nozzle’s bolt exessively.
2. Only install nozzles when the unit is cool(room temperature)
3. DO NOT use unit near flammable gas or liquid or any combustible material
WHATSOEVER especially when using the unit in high-temperature operation.
DO NOT face the hot air outlet or touch the soldering Iron to the human body
WHATSOEVER because it is very hot and can instantly burn the skin/body.
When the first use the unit might emit white smoke. But this soon will go away.
4. Replacement heater, be carful not to damage the grounding line!
5. Replacement the cable should pay attention to the order and color, can not be
wrong.
6. Please replace the same model heater.
9 10
X. Interchangeable component description
Replacement of Hot Air rework heating element(Figure 4)
1. Ensure the Hot Rework is fully cooled down before replacing the element.
2. As Figure, loosen the two screws on the handle.
3. Turns the handle antic-clockwise until it comes off and then remove the handle’s
cover.
4. Gently takes out the fan, loosen the three screws to remove the fixed wiring board.
5. The wiring board vice versa, apart from the heater wiring board connection cable,
pay attention to the connection location.
6. Remove from the heat pipe heat body with mica paper, careful not broken ground
wire of the steel.
7. Wraps well with the new heater mica, inserted into the tube, the attention heater to
install in place.
8. According to the original location of the connection to connect heater.
9. When the revers process by open bottles and handle back.
Replacement of the soldering iron’s tip and soldering iron heating core’s
element(Figure5)
1. Unscrews the nut NO.1,and then removes the steel tube NO.2, followed by
removing the tip which is going to be replaced.
2. For the replacemnet of heating core’s element can be performed by unscrewing
the plastic cap NO.4,pulls out gently the heating core’s element NO.6 along with
the circuit board NO.7, please carefully remember the connection of spring
NO.5.
3. The iron core from the circuit board welding, the replacement of the heating
core, can be fitted well.Note that the order of the iron corewire connection.
1. Remove the topo cover1.
2. Unscrew the screws2.
3. Remove the warm-up bracket.
4. Pull out the clamp.
5. Remove the preheated plate.
Replacement of the preheating plate(Figure6)

1. Cover
5. Preheating place
3. Preheating place bracket
4. Fasten
2. Screws
Figure6
Handle cover 2
Handle cover 1
Component handle
Skeleton-type heater
Mica paper
Nozzle
Earthing spring
Thread head
Tips
Gun
Screw
Spool
Glovelike
Handle cover
Board
Heater
Handle line
Voyage seat
Preheat plate disassembly diagram
Figure5 Soldering iron disassembly diagram
Figure4 Hot air gun disassembly diagram
Steel tube
Product certification
Maintenance records
Thank you for choosing this type of products, please read the following terms
before using:
1. From purchasing date within 7 days, under normal use(Artificial damage),new
package, not be disassemble and repaired ,enjoy replacement service.
2. From purchasing date within one year, under normal use, if there are quality
problem, not be disassemble and repaired ,enjoy free repair service.
3. For more than warranty, we provide a lifetime warranty service, free of labor
costs, charge only spare parts costs.
4. Failure to present warranty card during warranty period, the company will not be
a free service.
5. Users need warranty service, please contact your original sales unit.
6. When users need warranty service, please provide warranty card and purchase
invoice, or receipt of the certificate of the company seal.
7. Warranty does not include transportation costs and provide on-site service.
Warranty Card
Date of manufacture
Sales Date
Model NO.
Product ID
Examine QC
PASS
Upon examination products meet technical
standards
NO. Date for repair Cause Fix date Repairer
This manual suits for next models
2
Table of contents
Other YIHUA Soldering Gun manuals