Stanley BRANDON User manual

BRAND N
80K/100K GAS FIRED C KER
OPERATION INSTRUCTIONS
THIS MANUAL IS TO BE LEFT WITH THE END USER

TABLE F C NTENTS
PAGE N .
1. ntroduction . . . . . . . . . . . . . . . . . . . . . . . . . . . . . . . . . . . . . . . . . . . . . . . . . . . . . . . . . .2
2. Technical Data . . . . . . . . . . . . . . . . . . . . . . . . . . . . . . . . . . . . . . . . . . . . . . . . . . . . . . . . .3
3. Operation . . . . . . . . . . . . . . . . . . . . . . . . . . . . . . . . . . . . . . . . . . . . . . . . . . . . . . . . . . . .4
Pre-Operational Checks . . . . . . . . . . . . . . . . . . . . . . . . . . . . . . . . . . . . . . . . . . . . .4
4. Clock Features . . . . . . . . . . . . . . . . . . . . . . . . . . . . . . . . . . . . . . . . . . . . . . . . . . . . . . . .4
Operating The Oven Manually . . . . . . . . . . . . . . . . . . . . . . . . . . . . . . . . . . . . . . . .5
Setting the Cooking Programme . . . . . . . . . . . . . . . . . . . . . . . . . . . . . . . . . . . . . .5
Programming for Central Heating, Hot Water, Or Oven Pre-Heat . . . . . . . . . . . . .5
Setting The Boiler Set Temperature . . . . . . . . . . . . . . . . . . . . . . . . . . . . . . . . . . . .6
Setting Alarm Timer . . . . . . . . . . . . . . . . . . . . . . . . . . . . . . . . . . . . . . . . . . . . . . . .7
Boost Function . . . . . . . . . . . . . . . . . . . . . . . . . . . . . . . . . . . . . . . . . . . . . . . . . . . .7
Advance Function (Auto Mode Only) . . . . . . . . . . . . . . . . . . . . . . . . . . . . . . . . . . .7
Display Lock Function . . . . . . . . . . . . . . . . . . . . . . . . . . . . . . . . . . . . . . . . . . . . . .7
5. Power Failure . . . . . . . . . . . . . . . . . . . . . . . . . . . . . . . . . . . . . . . . . . . . . . . . . . . . . . . . .7
Fault Diagnoses . . . . . . . . . . . . . . . . . . . . . . . . . . . . . . . . . . . . . . . . . . . . . . . . . . .7
6. Hotplate nsulating Covers . . . . . . . . . . . . . . . . . . . . . . . . . . . . . . . . . . . . . . . . . . . . . . .8
7. Cooking Utensils . . . . . . . . . . . . . . . . . . . . . . . . . . . . . . . . . . . . . . . . . . . . . . . . . . . . . . .8
8. Cleaning . . . . . . . . . . . . . . . . . . . . . . . . . . . . . . . . . . . . . . . . . . . . . . . . . . . . . . . . . . . . .8
9. Chimney Cleaning . . . . . . . . . . . . . . . . . . . . . . . . . . . . . . . . . . . . . . . . . . . . . . . . . . . . . .9
10. Mild Steel . . . . . . . . . . . . . . . . . . . . . . . . . . . . . . . . . . . . . . . . . . . . . . . . . . . . . . . . . . . .9
11. Ovens . . . . . . . . . . . . . . . . . . . . . . . . . . . . . . . . . . . . . . . . . . . . . . . . . . . . . . . . . . . . . . .9
12. Hotplate . . . . . . . . . . . . . . . . . . . . . . . . . . . . . . . . . . . . . . . . . . . . . . . . . . . . . . . . . . . . . .9
13. Opening Cooker Door . . . . . . . . . . . . . . . . . . . . . . . . . . . . . . . . . . . . . . . . . . . . . . . . . . .9
14. Wiring Diagram . . . . . . . . . . . . . . . . . . . . . . . . . . . . . . . . . . . . . . . . . . . . . . . . . . . . . . .11
15. Cooking Guidence . . . . . . . . . . . . . . . . . . . . . . . . . . . . . . . . . . . . . . . . . . . . . . . . . . . . .11
General nformation . . . . . . . . . . . . . . . . . . . . . . . . . . . . . . . . . . . . . . . . . . . . . . . .11
Grilling . . . . . . . . . . . . . . . . . . . . . . . . . . . . . . . . . . . . . . . . . . . . . . . . . . . . . . . . . .11
The Care of Your Cooker . . . . . . . . . . . . . . . . . . . . . . . . . . . . . . . . . . . . . . . . . . .11
Servicing . . . . . . . . . . . . . . . . . . . . . . . . . . . . . . . . . . . . . . . . . . . . . . . . . . . . . . . .11
Cookware . . . . . . . . . . . . . . . . . . . . . . . . . . . . . . . . . . . . . . . . . . . . . . . . . . . . . . .11
16. User Cooking Tips . . . . . . . . . . . . . . . . . . . . . . . . . . . . . . . . . . . . . . . . . . . . . . . . . . . . .14
17. Fault Findings . . . . . . . . . . . . . . . . . . . . . . . . . . . . . . . . . . . . . . . . . . . . . . . . . . . . . . . . .15
1
0558

INTR DUCTI N
To help you make the best use of your cooker, PLEASE READ THIS B KLET CAREFULLY.
To ensure safety, satisfaction and reliable operation, this quality cooker should be installed and commissioned
by a trained and competent person. The provision of the central heating facility, and the hot water systems
involved, must conform fully to good plumbing practice, established standards and recommendations.
Your new cooker is guaranteed, the guarantee is only applicable if the cooker has been installed in accordance
with the installation instructions
IMP RTANT N TICE: Any alteration to this appliance that is not approved in writing by Waterford Stanley will
render the guarantee void.
The cooker is designed specifically for domestic use and responsibility will not be accepted for use in any other
installation. When the cooker is first used, a slight odour may be noticed, this should cease after a short period
of use.
The installation must comply with the following:
The Building Regulations: Part J England & Wales, Part F Section 5 Scotland, Part L Northern reland and
Part J reland.
B.S. 5449: Forced circulation hot water central heating system for domestic installation.
B.S. 7671: Requirements for Electrical Regulations.
Safety Document 635: The Electricity at Work Regulations.
B.S. 7074: Part 1 & 2: Hot water supply.
B.S. 4814: Sealed Systems.
B.S. 7593: Treatment of Water in Domestic Hot Water Systems.
B.S. 5440: Part 1 & 2: nstallations of Flues and Ventilation.
D.M.2. nstallation in Timber Framed Buildings.
B.S. 6891: Pipe Sizing
.S. 813: Domestic Gas nstallation
PAS 33: 1999: Product Assessment Specification for Design, nstallation and Commissioning of Gas Fired
Central Heating Systems in domestic premises.
Important: Control of Substances Harmful to Health –
t is the Users/ nstallers responsibility to ensure that the necessary personal protective clothing is worn when
handling materials that could be interpreted as being injurious to health and safety.
When handling Firebricks, Fire Cement or Fuels, use disposable gloves.
Exercise caution and use disposable masks and gloves when handling glues and sealants.
When working with fibre glass, mineral wool, insulation materials, ceramic blanket/board, avoid inhalation as it
may be harmful if inhaled. Avoid contact with skin, eyes, nose and throat, use disposable protection.
nstallation should be carried out in a well ventilated area.
Cookers can become very hot with use and retain their heat for a long period of time after use.
Children, aged or infirm persons should be supervised at all times and should not be allowed to touch
the hot surfaces or be in the vicinity when in use or until the appliance has thoroughly cooled down
after use.
The manufacturers reserve the right to make alterations to design, materials or construction for manufacturing or other reasons subsequent to publication.
As manufacturers and suppliers of cooking and heating appliances, we take every possible care to ensure, as reasonably
practicable, that these appliances are so designed and constructed as to meet the general safety requirements when
properly used and installed.
U.K.
Section 10 of the Consumer Protection Act.
Gas Safety ( nstallation and Use) Regulations 1998 (as amended).
Gas Appliance Safety Regulations (as amended).
Health & Safety at Work Act.
Ireland
Safety Health and Welfare at Work Act 1989
S. . 101 of 1992 (as amended).
S. . 150 of 1995 (as amended).
2

3
TECHNICAL DATA
FUELS: 2nd Family, Natural Gas
PRODUCT DENT F CAT ON: 63AR5080
COUNTRY OF DES GNAT ON: E, GB
GAS TYPES: N.G.: 2H, G20, 20 mbar ( E, GB)
MA NS CURRENT: 230V - 240V, 50 Hz, A.C.
SUPPLY FUSE RAT NG: 5 Amp.
ON SAT ON CURRENT: Minimum of 7µa
.P. PROTECT ON DEGREE: P 20
ELECTR CAL NPUT: 90 watts.
MA NS GAS PRESSURE: 20 mbar 8” wg
100K 80K
BO LER BURNER -
GAS RATE : 3 m3/ hr (106 ft3/ hr) 2.6m3/hr (91.8 ft3/hr)
(Continuous running)
COOKER BURNER:
GAS RATE: 1.65 m3/ hr (58 ft3 / hr) 1.65m3/hr (58 ft3/hr)
(Continuous running)
BO LER NOM NAL HEAT NPUT: 34.0 kW /116,008 Btu/hr 28 kW/ 95,536 Btu/hr
OVEN NOM NAL HEAT NPUT: 17.60 kW/60,051 Btu/hr 17.60 kW/ 60,051 Btu/hr
NOM NAL HEAT OUTPUT
TO WATER Boiler Mode 28.7 kW/98,000 Btu/hr 23.8 kW/81,206 Btu/hr
Oven Mode 2.05 kW/7,000 Btu/hr 2.05 kW/7,000 Btu/hr
SPACE HEAT NG -Boiler Mode 0.70 kW/2,500 Btu/hr 0.7 kW/2,500 Btu/hr
Oven Mode 2.91 kW/10,000 Btu/hr 2.91 kW/10,000 Btu/hr
BO LER CAPAC TY: 17 Litres (3.74 Gallons)
FLUE GAS TEMPERATURE: Boiler: 180°C (356°F) Cooker: 250°C. (482°F)
BO LER CONSTRUCT ON: 4mm & 6mm mild steel plate
BO LER TYPE: B23
MAX. BO LER WORK NG PRESSURE: 1.9 Bar 27.3 P.S. .
TEST PRESSURE OF BO LER: 2.7 Bar 40 P.S. .
OPERAT NG TEMP. L M T N BO LER: 96°C (205oF)
COOKER WE GHT: 380Kgs (838 lbs)
Whilst the primary air is fixed and the gas rate has been set on this appliance, combustion tests and gas rating
must be carried during commissioning and adjusted properly.
N TE: This appliance shall be installed in accordance with the regulations in force and only used in a well
ventilated location. Read the technical instructions before installing this appliance. Read the user’s
instructions before lighting this appliance.

PERATI N
4
PRE- PERATI NAL CHECKS
(a) Check that the cooker is connected to the mains
electricity.
(b) Check that all valves in the gas supply are open
and purged of air.
(c) Check that appliance thermostats are in the off
position.
(d) Check that the boiler and heating system is full
of water and purged of air.
IMP RTANT: ALL GAS APPLIANCES MUST
BY LAW BE INSTALLED & C MMISSI NED
BY A C MPETENT PERS N. NLY USE A
REGISTERED ENGINEER.
The programmable clock controls your central
heating system and oven preheat function, and
allows you to set your cooking times automatically.
The clock offers the following features:
* 7-Day heating programme.
* Three ON/OFF switching times each day.
* Facility allowing a separate heating
programme for Weekdays (MON-FR ) and a
different programme for the Weekend (SAT-
SUN).
* Separate programme facilities for Central
Heating, Hot Water and Oven preheat needs.
* ndependent oven timer.
* Advance buttons for Central Heating, PreHeat
and Hot Water functions.
* Boost Facility for Central Heating and Hot
Water functions.
* Alarm Timer allowing timing of cooking.
Day Marker
Current
Time
Lock
Button
‘F’
Button
Set HOT
WATER
Light
Oven
Pre-Heat
Set
Central
Heating
Set Boiler
Temperature
“+” Button
“-” Button
Oven Dial
Hot Water
Auto/On
/Off
Set
Alarm
Cook
Time
Start
Cook
Time
Stop
Manual/
Automatic
On/Off Period
Switch On Time
Switch Off Time
Central
Heating
Auto/On/Off
Oven Pre-Heat
Auto/Off
Set DAY/T ME
Light
PR GRAMMABLE CL CK
* Built-in battery to prevent loss of programmes
during power cuts.
* Fault diagnostics.
GENERAL N TE N SETTING THE
PR GRAMMER
When there is a time or setting that can be edited,
or adjusted by the user, then that time flashes to
indicate that it is editable. Editing is carried out by
scrolling the + or – buttons. These buttons have a
different function when there are no editable times.
SETTING THE C RRECT TIME AND DAY (See
Fig.2)
1. Press the "F" button and hold it for five
seconds. The red "SET DAY/T ME" light
will illuminate and the arrow signifying the day
setting will flash.
2. Adjust the day setting by pressing the + or -
buttons, until the day marker is pointing to the
correct day.
Fig1

5
3. Press the “ ” button to accept the setting,
then the hour figure will flash. Adjust the hour
setting by pressing the + or - buttons.
4. Press the " " button and the minutes figure
will flash. Adjust the minute setting by pressing
the + or - buttons.
5. Press the "F" button five times to exit the
setting time facility.(or simply do nothing – the
setting mode will revert to the normal mode
after 60 seconds)
PERATING THE VEN MANUALLY
1. Simply turn the oven temperature control until
the temperature desired appears on the LCD
screen. ( f oven ON and OFF times are shown,
cancel the oven timer by pressing the Oven
Manual button)
2. When cooking is finished, to turn the oven
OFF, rotate the temperature control fully
anticlockwise
3. Tip: f you use the oven pre-heat, the oven will
attain the set temperature much more quickly!
Simply program pre-heat to come on about
half an hour before you normally would start
cooking.
Fig 2
SETTING THE C KING PR GRAMME
and “SW TCH OFF” times will appear below
the current time display. (see Fig 3)
2. To set the cook start time, press the “
button and the “COOK START” time will flash.
3. Adjust it to the desired start time using the + or
- buttons.
4. To set cook stop time, press the “
and the “COOK STOP” time will flash.
5. Adjust it to the desired finish time using the +
or - buttons.
6. Set the oven thermostat to the required
temperature.
7. To return to Manual oven cooking, press the
8. f desired, you can leave the oven timer
selected, in which case the oven will come on
to the selected temperature at the same time
every day.
PR GRAMMING CENTRAL HEATING, H T
WATER R VEN PREHEAT
The heating can be set individually for both Central
Heating, Hot Water, and Oven preheat and each
setting has 3 on/off programmes for each day. These
can be set in three different ways:
A. All 7 Days simultaneously.
B. First Monday-Friday, then Saturday & Sunday
C. Each Day ndividually.
1. Press the "F" button and hold it for five seconds
until the red “SET DAY/T ME” light illuminates.
Fig3
1. Press the “ “ button and the “SW TCH ON”
“
“ button
” button.
“
Cook Start
Time
Cook Start
Time Button Cook Stop
Time Button Manual
Cook Stop
Time
Fig4

6
Press the “F” button again and the red light
moves to set Domestic Hot Water. Each
subsequent time it is pressed the mode will
move on to the next position.
2. The display will be as shown in Fig 4, with the
arrow flashing underneath the day you wish to
program for. The time on the bottom left and
bottom right sides are the ON and OFF times
respectively. The number “1” at the bottom of
the display signifies that these are the times for
the first ON/OFF setting of the day/days.
3. The programs can be set for the individual
days, for weekdays, for weekends and for the
entire week. The days you wish to program for
can be changed by moving the flashing arrow
using the + and - buttons. Fig 5 (a) shows the
day setting for setting the same programme for
Monday to Friday, Fig 5 (b) shows it for setting
the same programme for Saturday & Sunday
and Fig 5 (c) shows it for setting the same
programme for the entire week.
4. After selecting the day, press the “ ” button
and the 1st ON time will flash. This time can be
adjusted in ten minute intervals using the + and
- buttons.
5. Press the “ ” button and the corresponding
OFF time can be adjusted using the + and -
buttons.
Note that you cannot set an OFF time to be
earlier than ON time, or the ON time to be
earlier than the previous OFF time. The
programmer will automatically correct settings
if you do this.
6. The 2nd & 3rd ON/OFF times can be viewed by
pressing the “ ” button and can be set by
repeating Steps 4 & 5
7. Note that if you do not want to use all three
ON/OFF times, simply set the OFF time the
same as the ON time.
8. To exit DHW setting press the “F” button four
times, or press once to edit the Central heating
programs. Press once more to edit the pre-
heat programs in just the same way.
9. To have the appliance operate on the
programmed settings, press the appropriate
button on the right hand side of the control
panel once so that a light can be seen beside
auto.
Fig 5B
Fig 5A
Fig 5C
SETTING THE B ILER SET TEMPERATURE
1. Press the "F" button and hold it for five seconds
until the red “SET DAY/T ME” light illuminates.
Press the “F” button repeatedly until the LED
beside “ °C ” is illuminated.
The boiler set temperature will be displayed.
2. The boiler set temperature can be adjusted
between the limits 60 – 80 °C by pressing the
+ and - buttons.

7
Fig 6
SETTING THE ALARM TIMER
The alarm timer allows cooking to be timed up to a
period of 99 minutes. (it does not turn the oven on or
off) The alarm can be set by following the procedure
below:
1. Press the “alarm” button and a “00 ALARM” will
flash on the display (See Fig 6).
2. Adjust the alarm time to the desired setting
using the + or - buttons.
3. The timer will start immediately when the
setting + or - button is released.
4. When the time has elapsed, the acoustic signal
will sound for 60 seconds and the word Alarm
flashes. t can be cancelled by pressing the
Alarm button.
Note: This timer operates only when the oven is set
to “manual” mode.
Fig7
selected then the display will revert to current time
and day. f a mode is selected the symbol for this
mode and the word “BOOST” will remain displayed
for 1 hour, providing none of the oven control
functions on the clock are used within this hour.
Boost can be cancelled by pressing the relevant
ADVANCE FUNCTI N (IN AUT M DE NLY)
By pressing the “ADV” button, ADVANCE will be
displayed and the symbols for central heating and
hot water will flash. Then pressing either the “Hot
Water” or “Central Heating” or “Pre-heat” buttons
will bring forward the next switching time for that
mode. The symbols will flash for 10 seconds within
which one of the 3 options must be selected before
the display will revert to current time and day.
Advance can be cancelled by pressing the relevant
Note: Advance function is only applicable when
timer is in ‘Auto Mode’.
The DHW , Heating and oven Pre-heat programs
can be turned OFF by de-selecting AUTO, so that
no lights are visible.
The DHW and Heating can also be set to
continuous ON by pressing the button so that the
ON light illuminates.
DISPLAY L CK FUNCTI N
By pressing and holding the “LOCK” Button for 10
seconds the display will become locked, and
LOCKED will be displayed. To unlock the display
press and hold the “LOCK” button for 10 seconds. f
any button is pressed while the display is locked the
word “LOCKED” will flash on the display.
P WER FAILURE
Your clock has a built-in battery to ensure correct
operation after a mains supply power cut. No action
should be necessary following a power loss.
Fault diagnoses
f an error occurs in the appliance the electronics will
detect it and narrow down the problem area.
Code no 1. Oven thermocouple failure
Code no 2. Boiler thermistor failure
Code no 3. Flue thermistor failure (Gas only)
Code no 4 Boiler high limit switch opened
Code no 5 Oven high limit switch opened
function button, i.e.
B ST FUNCTI N
By pressing the “BOOST” button, boost will be
displayed and the symbols for central heating and
hot water will flash. Then pressing either the “Hot
Water”, “Central Heating” or “Pre Heat” buttons will
turn this mode on for 1 hour. The symbols will flash
for 10 seconds and if neither of the 3 options are

Code no 6 Flue thermistor over temperature
(Gas only)
Code no 8 Oven burner faulty
Code no 9 Boiler Excess Temperature
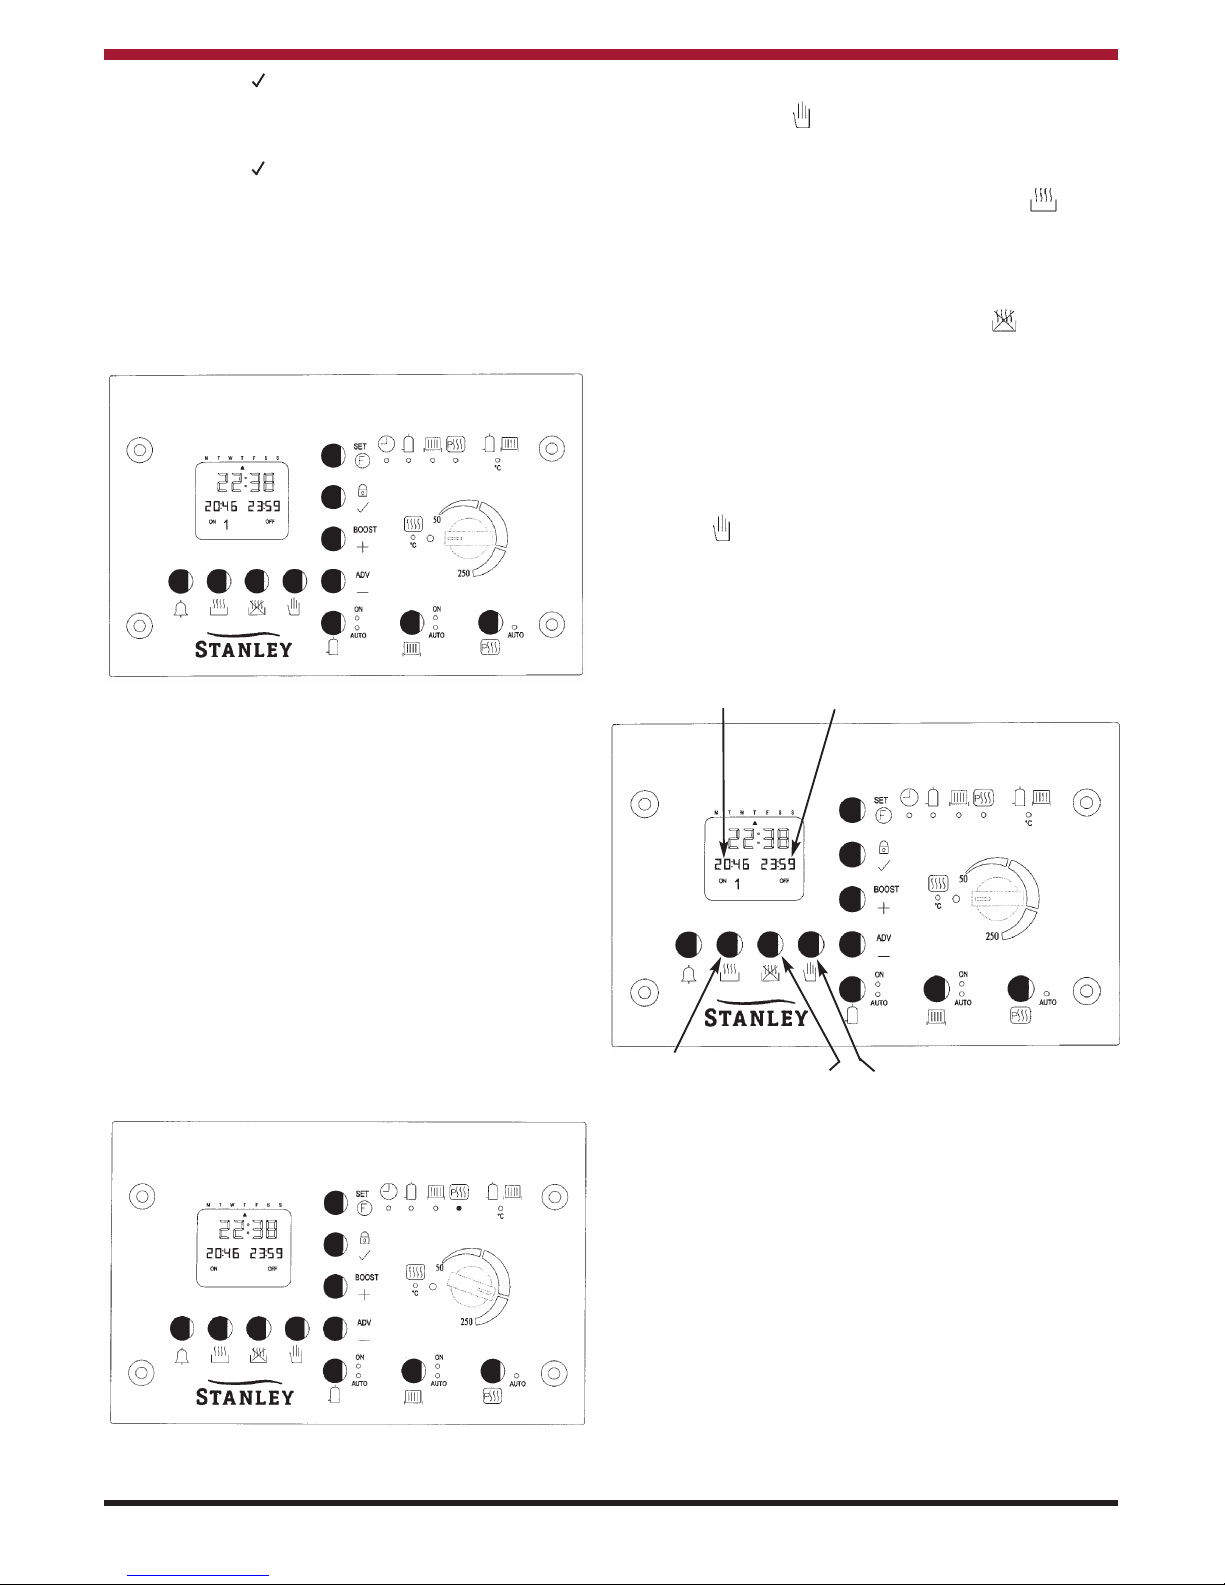
When an error occurs it can be reset by pressing the
“ ” button for 5 seconds, the code no. on the display
will disappear, if the error is still present the code no.
will reappear, it will be necessary to call the Stanley
service centre.
n the special case of a no. 9 code, this could be due
to all radiator valves being turned off. t is a
requirement that at least 1 radiator in zone 1 is
permanently on.
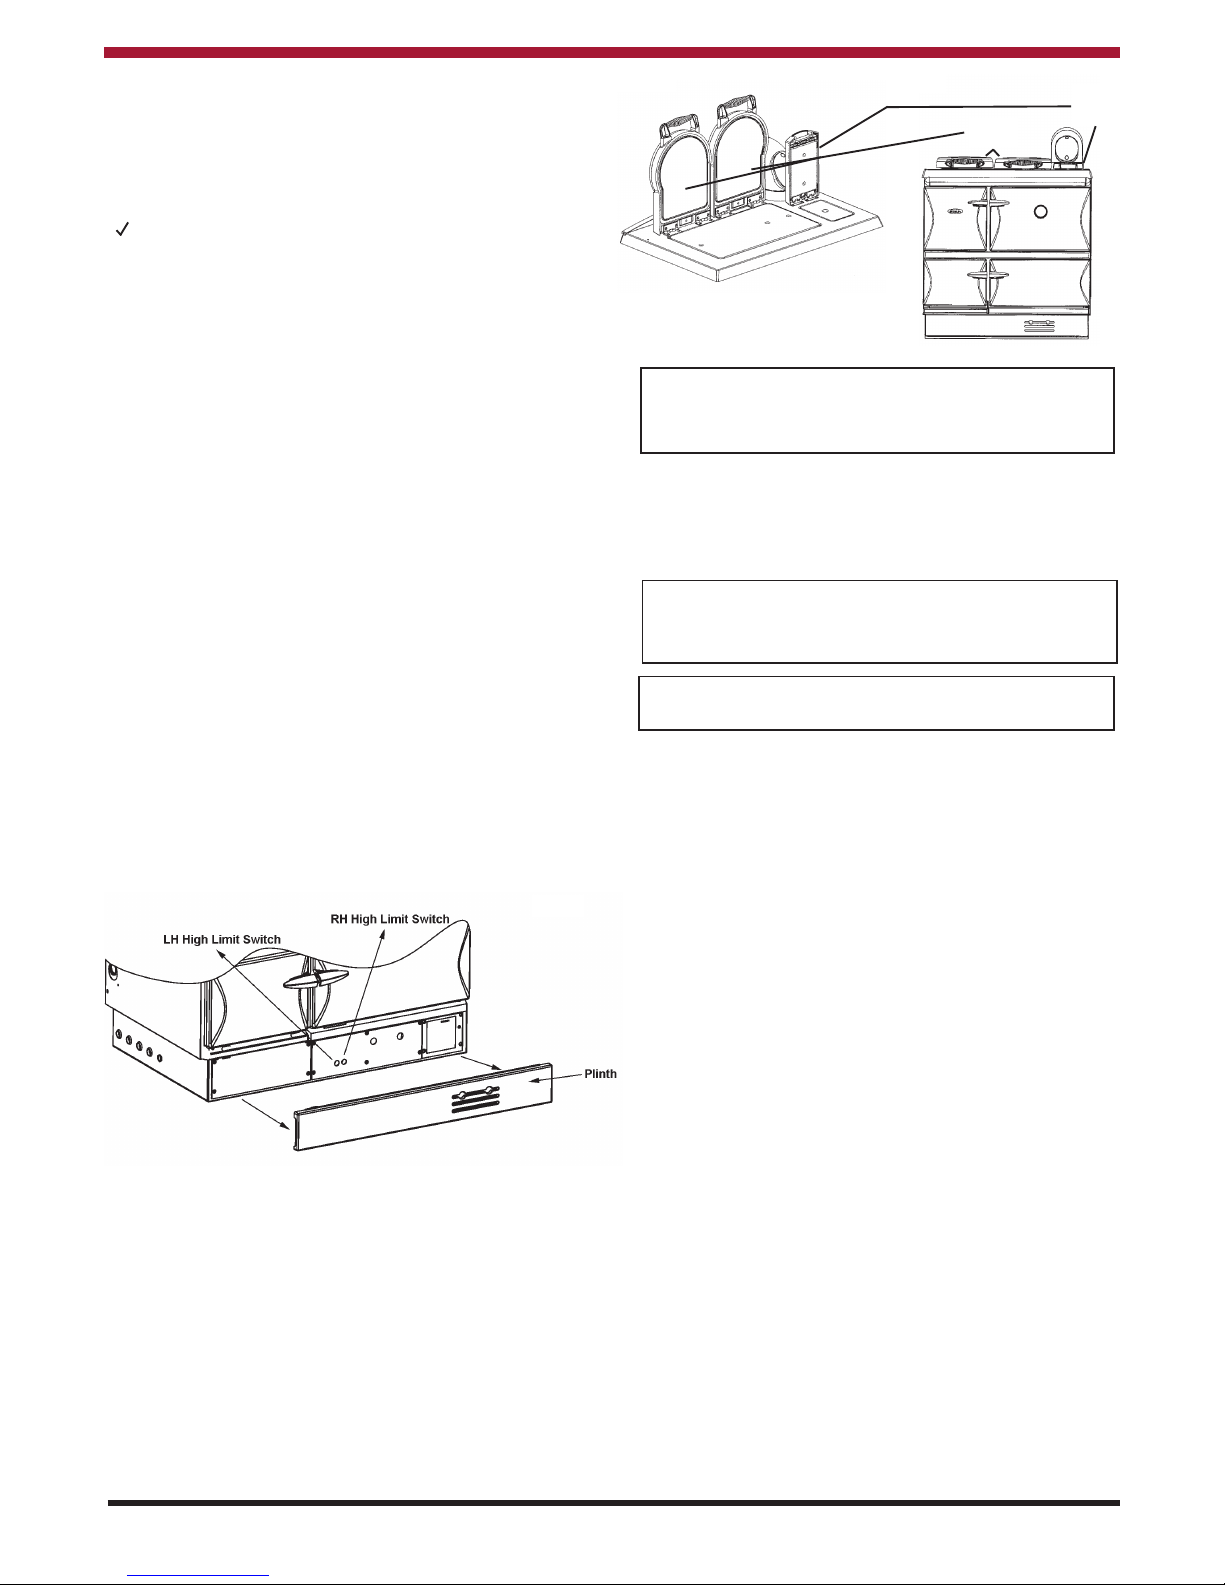
f Code 4 or 5 appear on the display screen prior to
the fault being cleared using the F button, it will
require the high limit swiches to be reset, to access
and reset the high limit switches take the following
steps:
1. Remove plinth at base of cooker, the high limit
switches are located in the centre of the base
plate, see Fig.8.
2. Press the LH & RH buttons to reset the High Limit
reset switches, then press the F button for 5
seconds to clear the fault on the display screen.
However, if the high limit does not reset it may be
due to the appliance being excessively hot, wait until
the appliance has cooled and press the high limit
switches again, if they do not reset when appliance
is cool, please contact your local service engineer.
Fig 8
H T PLATE INSULATING C VERS
The insulating covers retain most of the heat that
would otherwise be radiated into the kitchen. They
also retain the heat in the hot plates so that rapid
heating of cooking utensils will occur when one or
both of them are lifted for cooking purposes.
Hotplate
Covers
Simmer
Plate
Cover
Fig.9 Fig.9a
C KING UTENSILS
For best cooking results and economy of operation
use heavy based, flat bottomed utensils.
IMP RTANT: WHEN HOTPLATE S NOT N USE
ENSURE THAT HOTPLATE COVERS ARE N A
DOWN POS T ON.
IMP RTANT: DO NOT USE M S-SHAPED PANS
WH CH MAY BE UNSU TABLE. DO NOT USE
ROUND BASED WOKS.
IMP RTANT: WE DO NOT RECOMMEND DEEP
FAT FRY NG ON TH S APPL ANCE.
CLEANING
IMP RTANT: BE CAREFUL F THE H T
APPLIANCE.
General cleaning must be carried out when the
cooker is cool.
Stanley cookers are finished in a high gloss vitreous
enamel. To keep the enamel in the best condition
observe the following tips:
1. Wipe over daily with a soapy damp cloth,
followed by a polish with a clean dry duster.2.
f milk, fruit juice or anything containing acid is
spilt on the hob or down the cooker, be sure to
wipe it immediately or the vitreous enamel may
be permanently discoloured. Jam and
preservatives containing sugar can permanently
damage the vitreous enamel.
3. Keep a damp cloth to hand while cooking, to
wipe up any spills as they occur, so they do not
harden and become more difficult to remove
later.
4. f spills do become baked on, a cream cleanser
can be used. For stubborn deposits a soap
impregnated pad can be carefully used on the
vitreous enamel.
8

5. Use only products recommended by the
Vitreous Enamel Association, these products
carry the Vitramel label.
6. n the oven, spills and fat splashes are
carbonised at high temperatures: occasionally
brush out with a stiff brush. The shelves can be
soaked and cleaned with a cream cleanser.
7. Both insulating covers should be raised and
allowed to cool before cleaning the enamel with
a soapy damp cloth. Use a wire brush to keep
the cast iron hotplate clean.
D N T USE ABRASIVE PADS R VEN
CLEANERS C NTAINING CITRIC ACID N
ENAMELLED SURFACES. ENSURE THAT THE
CLEANSER MANUFACTURERS INSTRUCTI NS
ARE ADHERED T .
CHIMNEY CLEANING
Whichever type of flue is chosen, there must be
cleaning access to the whole of the flue system. The
flue of the chimney will need to be cleaned regularly.
The combustion products of any burning appliance
will have a descaling effect on hardened soot
deposits left from burning solid fuels if an existing
chimney is used in your installation.
Although, the chimney may have been cleaned of
loose soot prior to installation, it is imperative that
the chimney is inspected for scaled soot particles
after the first month of operation and any loose
material removed to avoid blockage. The frequency
of cleaning will depend a lot on how your cooker
isrun, but to start with, make a point of inspecting the
flue system every six months. This period may well
be extended to twelve months as time goes by if
there is little sign of deposits.
MILD STEEL
The steel side panels and splash back must not be
cleaned with steel wool. Use only washing-up liquid
in hot water with a lint free cloth. Dry off and apply
a coat of good quality furniture polish.
ASSOCIATION
9
VENS
Grease spillages will burn off from the oven interior
when the oven is hot and any other loose materials
can be emptied out with a cloth when cold.
Stubborn stains in the oven and on the shelves can
be cleaned off with a paste of bread soda and water.
H T PLATE
The hotplate may be cleaned using a small amount
of paraffin oil or fine steel wool to remove rust or
cooking stains, dry off with a lint free cloth and apply
a light coat of cooking oil to preserve the finish.
PENING C KER D R
To open the cooker door grip the door handle
between the fingers and thumb as per Fig.C, lift the
door handle in an outward and upward direction as
shown in Fig. D.
Fig.A
Fig.B

10
Fig.C
Fig.D
Fig.E

11
BRAND N GAS WIRING DIAGRAM

C KING GUIDANCE
GENERAL INF RMATI N
GRILLING
Turn the oven thermostat to a reasonably high
setting and this will give a greater temperature at the
top of the main oven. The flue gases are passing
over the top face of this oven, so this face is being
heated on both sides. The roasting tin supplied with
the cooker contains a grill rack. Place any foods that
require grilling onto the rack, and place the roasting
tin as near to the top of the oven as possible. Any
gratin type recipe that requires browning, place the
dish on a shelf as near to the top of the oven as it
will allow. For a delicious breakfast, lightly grease
the base of the roasting tin and place slices of bread
with a hole cut out of the centre, onto the base,
carefully breaking an egg into each hole. Foods
such as mushrooms and halved tomatoes can be
placed around the eggs. Place the grilling rack over
the eggs and lay the bacon, sausage, black pudding
etc., onto the grilling rack. The fat will drop onto the
eggs, helping to cook and flavour them. Fatty foods
such as lamb cutlets are best suited to this method
of oven grilling, most of the fats are drawn out into
the roasting tin. Certain foods with little fat, benefit
from pan frying/dry frying, using a ribbed frying or
griddle pan. The foods cooked this way look
attractive with the bar markings from the pan.
THE CARE F Y UR C KER
The vitreous enamel finish on your cooker is tough
and hard wearing but should be treated with care.
Acidic spills on the hob should be wiped off with a
clean damp cloth. The vitreous enamel front, sides
and hob only need a wipe with a warm soapy cloth,
then a polish with a dry one. Do not use an abrasive
cleaning material on the vitreous enamel. f there
are stubborn marks on the hob, use a good quality
enamel cleaner. Look for cleansers carrying the
VDEC (Vitreous Enamel Association). Follow the
manufacturers instructions carefully. The hotplate
will carbonise any food spilt on it, which should be
removed with a wire brush or metal scraper. This
will ensure a good contact between cooking utensil
and the hotplate. Take care when cleaning the
insulating lids, the hotplate may be hot. The ovens
are self cleaning, any food that spills on the oven
floors will carbonise and can be brushed or scraped
away. t is often easier to use the vacuum cleaner to
remove all the bits. Keep the glass door clean by
wiping with a hot soapy cloth and then drying with a
dry cloth.
SERVICING
We recommend that the cooker be serviced by a
trained competent person every twelve months in
accordance with the manufacturers instructions.
C KWARE
You do not have to rush out and buy a new set of
pans when you take delivery of your new Stanley
cooker, but it is advisable to check your cookware.
Thin, lightweight saucepans are liable to buckle, so
it is recommended that you use saucepans which
have a flat, thermic base. This design of saucepan
will give you complete contact with the hotplate and
maximum heat retention for a good cooking
performance. This design is usually of 18/20
stainless steel, with the thermic base encapsulated
onto the bottom of the pan. The base will have a
core of aluminium sandwiched between two layers
of stainless steel. The aluminium does not come
into contact with the food while cooking, but will very
quickly pick up the heat and evenly distribute it over
the base of the pan. Some continental designs of
saucepans will have this inner sandwich of
aluminium, not only at the base but up the sides as
well. Many people prefer the look of cast iron
cookware. This cookware is just as versatile as
stainless steel, absorbing and distributing the heat
evenly, and serving from the oven to table. They are
available in a range of colours and designs, some
with knobs and handles of a heat resistant material.
Good quality saucepans can be expensive to buy,
but the versatility they offer means that fewer items
need to be purchased. Oven proof earthenware will
also produce satisfactory results. Your traditional
cake tins, baking trays, loaf tins and any other
favourite ovenware you use, will be suitable. There
is a bakeware on the market of Continental design
which has a steel base, ideal for quickly absorbing
the heat. t is covered with a magnum (enamel like)
coating, which is safe to cut on, non stick effect and
easy to clean. A roasting tin, containing the grilling
rack is provided. You can use a pressure cooker on
the hotplate but however, do check that the base of
the pressure cooker makes good contact with the
hotplate.
All timings are guidelines only, as there are no set
rules for roasting meat - each cut lends itself to
several different ways of preparation and cooking
and each family will have a preference. When meat
is roasted quickly the juices are sealed in,
preserving the full flavour, but there will sometimes
be shrinkage. prefer to slow roast at a lower
temperature, a method that will reduce shrinkage
and give a more tender joint.
12

TYPE F MEAT TEMPERATURE TIMING per 500g (1 lb)
BEEF N THE B NE 180oC RARE 10 mins + 10 mins over
SIRL IN MED 12mins + 12 mins over
F RE RIB WELL DONE 20 mins + 20 mins over
BEEF B NED AND R LLED 180oC RARE 12 mins + 12 mins over
T PSIDE
T P RUMP MED 15 mins + 15 mins over
FILLET WELL DONE 20 mins + 20 mins over
R LLED RIB
P RK N THE B NE 180oC 25 mins + 25 mins over
SH ULDER
L IN
LEG
P RK B NED AND R LLED 180oC 30 mins + 30 mins over
SH ULDER
L IN
LEG
LAMB N THE B NE 180oC MED 20 mins + 20 mins over
CR WN WELL DONE 25 mins + 25 mins over
GUARD F H N UR
LEG
BEST END
L IN
LAMB B NED AND R LLED 180oC MED 25 mins + 25 mins over
WELL DONE 30 mins + 30 mins over
VEAL B NED AND R LLED 180oC MED 20 mins + 20 mins over
T PSIDE WELL DONE 25 mins + 25 mins over
SH ULDER
FILLET
VENIS N N THE B NE 180oC RARE 12 mins + 12 mins over
HAUNCH (LEG) MED 15 mins + 15 mins over
SADDLE WELL DONE 20 mins + 20 mins over
RABBIT/HARE 180oC Up to 1 kg (2 lb): 45 - 60 mins
Up to 2 kg (4 1/2 lb): 60 - 90 mins
CHICKEN 190oC 20 mins + 20 mins over
TURKEY 160oC
3.6 - 4.5 kg (8 - 10 lb) 3 1/2 - 3 3/4 hrs
4.9 - 5.4 kg (11 - 12 lb) 3 3/4 - 4 hrs
5.4 - 6.3 kg (12 - 14 lb) 4 - 4 1/2
6.3 - 7.2 kg (14 - 16 lb) 4 1/4 - 4 1/2 hrs
7.2 - 8.1 kg (16 - 18 lb) 4 1/2 - 4 3/4 hrs
8.1 - 9 kg (18 - 20 lb) 4 3/4 - 5 hrs
DUCK 200oC MED 25 mins + 25 mins over
WELL DONE 30 mins + 30 mins over
G SE 180oC 20 mins + 20 mins over
PHEASANT 200oC 50 - 60 mins total cooking
GR USE 220oC 30 - 45 mins total cooking
PARTRIDGE 220oC 45 mins total cooking
RECIPE N TES
Eggs used are size 3 unless otherwise stated.
All herbs used are fresh unless otherwise stated. f unavailable use dried herbs in half the quantity stated.
Milk should be full-fat unless otherwise stated
Spoon measures are level unless otherwise stated.
Whichever roasting method you choose, the joint
should first be weighed to calculate the cooking
time. Place the meat on the grilling rack in the
roasting tin, fat side uppermost. This will baste the
meat as it is cooking, but check the roast from time
to time and using a metal spoon, baste the meat
yourself.
f you are using a meat thermometer, do take care
when inserting it that it does not touch bone or
excess fat. This will give you a false internal
reading.
Stuffed joints of meat will need extra cooking time -
approximately 10 minutes more for every 500g
(1 lb).
13

You will soon come to look upon the Stanley as a
reliable companion to help you during a busy baking
session or when you are preparing that extra-
special meal. The following tips are ways in which
you will find the Stanley invaluable: no doubt you
will quickly add discoveries of your own to the list.
1. Baking: f you are using butter or margarine
from the refrigerator, simply place the required
amount of fat in a heat-proof bowl on the hob,
near to the hotplate. t will be quickly brought
to room temperature, making it easier to work
with.
2. Breadmaking: Stand the required liquid for
the recipe in a heat-proof jug on the hob near
the hotplate to warm. Take care not to
overheat as yeast is killed at high temperat-
ures.
3. Breadmaking: Depending on what mode the
cooker is set at, the hob, plate rack or lower
oven can be used for proving the dough.
4. Baking: To dissolve gelatine, place two
tablespoons of water or liquid from the recipe in
a small heat-proof bowl. Sprinkle the required
amount of gelatine on the liquid and place on or
near the hotplate to dissolve. A small stainless
steel bowl is useful for this type of job.
5. Baking: When melted chocolate is needed in
a recipe or for decoration work, simply place
the chocolate in a heat-proof bowl near the
hotplate. This method is easier than placing
over a pan of hot water, which can often splash
into the chocolate and spoil it.
6. Baking: Syrup tins and jam jars with only a
little left in them are easier to empty when they
have warmed on the hob.
7. Cooking: f a recipe requires a small amount
of fried or softened onion, place the finely
chopped onion and a little butter or oil in a
heat-proof bowl on or near the hotplate to
soften. use this method often, because it is so
much easier than having to wash up a frying-
pan! Many different types of vegetables can be
prepared this way before adding to a recipe.
8. Cooking: To make breadcrumbs, simply place
the bread on a baking sheet in the lower oven
and allow to dry out. Crush and store for future
use.
9. Cooking: To make croutons, cut the bread
into small cubes, place in a shallow cast iron
dish with a little oil and fry, using the base of
the main oven. ( f the oven is not in use, fry
on the hotplate) Drain, spread out on a baking
sheet and put to crisp in the lower oven.
Croutons can be frozen for use when required.
10. Drying: An abundance of fresh herbs need
not be wasted. Place on a baking sheet, after
washing and patting dry with kitchen paper,
and leave to dry in the lower oven. Store for
future use.
11. Drying: Cooker rice can be spread out on a
baking sheet and left to dry in the lower oven.
12. Baking: When making fruit cakes, wash the
dried fruit, place on a baking sheet and allow to
dry off in the lower oven before use. Moist fruit
will sink to the bottom of a cake and spoil it.
13. Preserving: When you are bottling, the depth
of the main oven makes it easy to sit a tray of
bottled fruit all on the same shelf to cook in one
session.
14. Preserving: When you are making jam the
graduated hotplate enables you to control the
simmering of a large preserving pan much
more easily than on a conventional cooker,
where the pan is too large for the burner or
ring. The warming of sugar, drying of the
prepared fruit and the warming of jars and
bottles can all be done with plenty of space
using the lower oven and plate rack, if you
have one.
USER C KING TIPS
14

15
FAULT FINDINGS
PR BLEM CAUSE REMEDY
1. Poor Flue Draught: (a) Obstruction. (a) Clear and clean.
(b) Chimney too low. (b) Raise height above ridge.
(c) Chimney too wide. (c) Fit flue liner 150mm (6”)
(d) Crack in wall. (d) Repair cracks.
(e) No flue liner (e) Fit flue liner
2. Excessive Flue Draught (a) High chimney. (a) Fit draught stabiliser.
3. Down Draught: (a) High trees (a) Raise chimney height.
(b) High buildings (b) Raise chimney height.
(c) Low chimney. (c) Raise chimney height.
(d) Negative pressure zone. (d) Fit anti-down draught cowl.
4. Cooker Smoking: (a) nsufficient primary air. (a) Provide additional room air inlet or adjust burner air intake.
(b) Chimney choked. (b) Clean chimney.
(c) Downdraught. (c) Raise chimney height or fit anti-downdraught cowl.
(d) Poor combustion. (d) Check air supply, adjust settings.
5. Hot Plate Not Heating: (a) Burner cutting out. (a) ncrease cooker thermostat setting.
(b) Utensils not flat. (b) Use machined based utensils.
6. Oven Not Heating: (a) Flueways blocked with soot. (a) Clean out.
7. Radiators Not Heating: (a) Circulating pump not working. (a) Check and replace if defective.
(b) Pipe thermostat set too high. (b) Reduce thermostat settings.
(c) Air in system. (c) Bleed system.
(d) Pipe system faulty. (d) Check pipe sizes and circuit.
(e) Excessive number of radiators (e) Turn off un-needed radiators.
(f) Radiator valves not balanced. (f) Adjust valves to give an even flow.
(g) By-pass incorrectly set. (g) Adjust by-pass valve
8. Domestic Hot Water (a) Cylinder too large. (a) Use 180 litre cylinder.
Cylinder not getting (b) Flow pipe too large. (b) Use 28mm bore pipe.
hot enough: (c) Check valve’ is closed. (c) Open ‘check valve’.
(d) Cylinder thermostat set too low. (d) ncrease thermostat setting.
(e) Circulating pump not working. (e) Check and replace if defective.
9. ntermittent Performance: (a) Cooker starved of primary air. (a) Provide air inlet in room.
(b) Extraction fan in room. (b) Provide additional air inlet in room.
(c) Dirty burner. (c) Service burner.
10. Domestic Hot Water (a) Leak in indirect cylinder. (a) Replace cylinder.
Rusty: (b) ncorrect cylinder fitted. (b) Check with installer.
t is of the utmost importance to keep the flue pipe and chimney clear of deposits. Blocked or partially
obstructed flueways and chimneys may cause dangerous fumes to be emitted into the room, these may well
be invisible.
Rev 003 DP 130913
N00350AXX
Manufactured by
Waterford Stanley Ltd.,
Unit401-403, DA ndustrial Estate, Cork Road,
Waterford, reland.
Tel: (051) 302300 Fax (051) 302315
Other manuals for BRANDON
1
This manual suits for next models
2
Table of contents
Other Stanley Kitchen Appliance manuals

Stanley
Stanley standley User manual

Stanley
Stanley Mourne User manual

Stanley
Stanley NUA Electric Instruction Manual

Stanley
Stanley BRANDON DHW User manual

Stanley
Stanley DRY User manual

Stanley
Stanley COMERAGH - 50 User manual

Stanley
Stanley Alpha 150K User manual

Stanley
Stanley BRANDON DRY OIL User manual

Stanley
Stanley Supreme Deluxe Instruction Manual

Stanley
Stanley Brandon OCD User manual