STC Livewire TS+ User manual

QUICK START GUIDE

SECTION 1:
PARTS+ CHECKLIST
LIVEWIRE TS+ DEVICE
LIVEWIRE TS+ WINDOW MOUNT
MICRO USB™ CABLE
HDMI/OBD II CABLE
TOOLS NEEDED:
Fuse Puller | Voltage Tester | Battery Charger | Pliers

SECTION 2:
PRE-INSTALL CHECKLIST
BUSINESS HOURS
If you need to contact Tech Support, please be sure to
have your device with you before initiating contact.
INTERNET ACCESS
In the unlikely event that technical support is needed,
Internet access may be required to troubleshoot. Our
Technical Support team may also need to remotely connect
[V`V\YJVTW\[LY[VÄ_HU`PZZ\LZ`V\TH`ILOH]PUN
ALLOW TIME FOR INITIAL SETUP
Make sure you have at least an hour to complete the initial
setup, update, and installation process.
READ LIVEWIRE TS+ USER MANUAL
SCT highly recommends taking a moment to read through
your Livewire TS+ User’s Manual found on our website
before your initial installation. There is a lot of in depth and
useful information inside the manual that won’t be covered
in this Quick Start Guide.
This device is not legal for sale or use in California on pollution
controlled vehicles.
SECTION 3:
IMPORTANT ON-DEVICE INFO.
)URPWKHMain MenuVHOHFW Device Info.
Within Device Info`V\^PSSÄUK!
SERIAL NUMBER:
Needed for dealers to create custom tunes for your vehicle
and device.
FIRMWARE VERSION:
This is essentially your device’s operating system.
TUNE REVISION
The version number of your preloaded tunes.
UNLOCKS LEFT:
Number of unlocks remaining. An unlock is used when the
[\ULK]LOPJSLPZYL[\YULK[VZ[VJRHUKHKPɈLYLU[]LOPJSLPZ
programmed.
MARRIED STATUS:
Unmarried = Unlocked and ready for vehicle pairing.
Married = Locked to a vehicle.
VBATT:
The amount of voltage being run through the device from
your vehicle’s battery. As a general rule, 12.75 volts+ is
ULLKLK[VÅHZOH[\UL[VH]LOPJSL

SECTION 4:
UPDATING YOUR LIVEWIRE TS+ DEVICE
INSTALLING THE UPDATE SOFTWARE
2. Click “7HFK6XSSRUW”tab at the top of the page.
3. Click the picture of the /LYHZLUH76
(Part Number 5015P/5416P).
4. Click the œ'RZQORDG1RZŔ button to the left of the
listing that reads “Livewire TS+ Performance Ford Pro-
grammer & Monitor Device Update Software.”
5. Wait for that program to download, then double click
and “Run” the 6&7'HYLFH8SGDWHUH[HÄSLPMP[KVLZUV[
open automatically.
6. Follow the on-screen directions of the 6&7'HYLFH
8SGDWH6RIWZDUH,QVWDOOHU until it allows you to click
“Finish”.
7. Follow the on-screen directions of the 6&7'ULYHUV
,QVWDOOHU until it allows you to click œ)LQLVKŔ.
8. Your SCT Device Update Software and Drivers are now
fully installed and ready for use.
UPDATING YOUR LIVEWIRE TS+ DEVICE
1. Connect your Livewire TS+ Device to your
Windows™ based PC using the SURYLGHG0LFUR
86%ŠFDEOH<UMVY[\UH[LS`^LKVUV[VɈLYZ\WWVY[
for Apple computers at this time.
2. Double click and open the 6&7'HYLFH8SGDWH
6RIWZDUH.
3. Click œ$XWRPDWLFDOO\&KHFNIRU8SGDWHVŔ.
4. *VUÄYT[OL\WKH[LI`WYLZZPUN[OLœ8SGDWHŔ button.
The update will now begin.
5. Let the updater run until it says œ<RXUGHYLFHLVQRZ
XSWRGDWHŔ
6. You may now unplug your device from your computer
and load a tune to your vehicle!
NOTE: Make sure the Livewire is unplugged from your
computer before starting this process.

SECTION 5:
READING VEHICLE VIN &
STRATEGY/OS PART#’S
)URPWKHMain MenuVHOHFWVehicle Info.
You’ll be asked to turn
the key on. The VIN
and if a Ford vehicle/
device, it will give you
the Strategy. If using
a GM vehicle/device,
it will give you the OS
Part Numbers.
SECTION 6:
CHECKING/CLEARING
VEHICLE TROUBLE CODES
)URPWKH Main MenuVHOHFWVehicle
Diagnostics.
Within this menu, you
will be given the option
to read or clear DTC
codes. Make your
selection and follow the
on-screen prompts.
SECTION 7:
PROGRAMMING THE VEHICLE
POWERING ON THE LIVEWIRE TS+
To power up your device, using the provided HDMI to
OBDII cable, connect to the vehicle’s OBDII port. The OBDII
port is most commonly found within 24” of the steering
column under the driver’s side dash.
1. Once connected, press the power
button on the top right of the
device. The device should power
on.

BEGIN PROGRAMMING
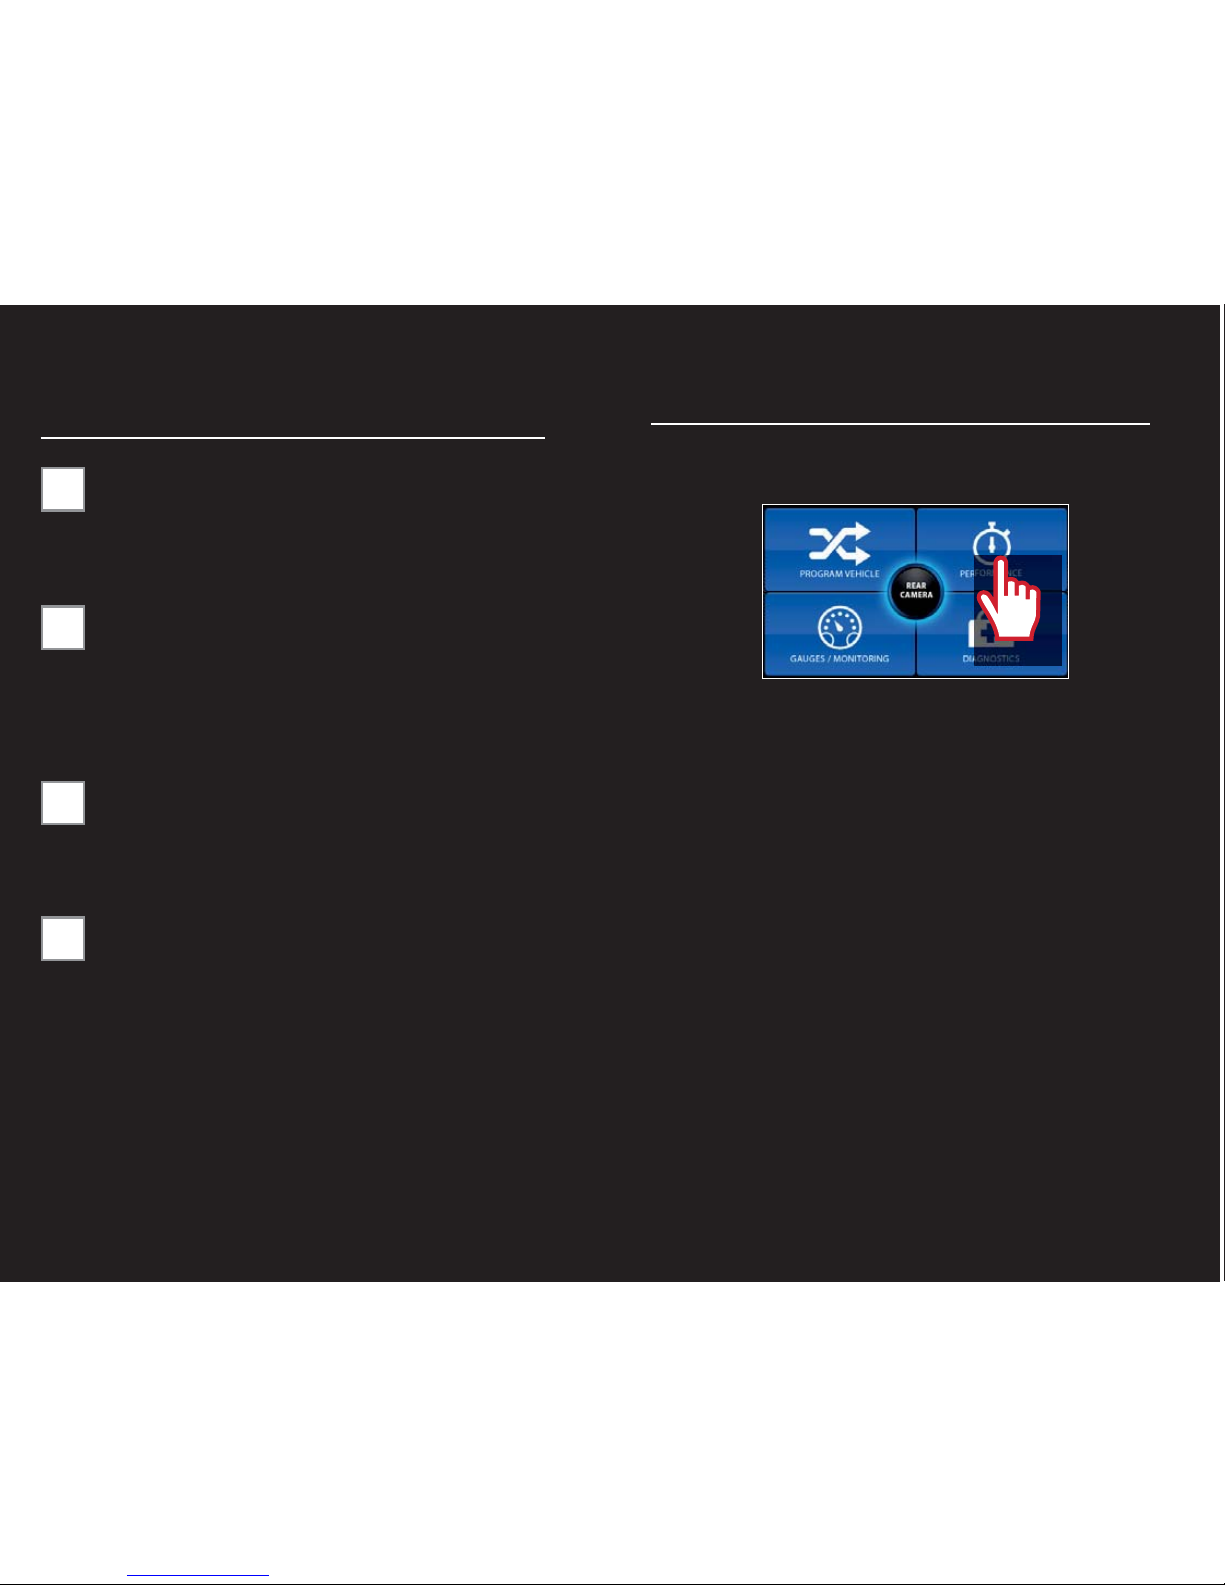
1. From the Main Menu, select Program Vehicle.
2. At this point, the key should be in the ignition, but in
the OFF position until prompted to turn key ON.
:LWKLQ3URJUDP9HKLFOHWKHUHDUHVHOHFWLRQV
GHSHQGLQJRQWKHVWDWHRIWKHYHKLFOH
Pre-Loaded Tune Files = Preloaded SCT tunes for
use on stock vehicles only.
Custom Tune$*\Z[VT;\UPUN+LHSLYÄSLZPM[OLYL
are any on the device.
Return to Stock$9LZ[VYLVYPNPUHSMHJ[VY`ÄSL[V
vehicle.
USING PRE-LOADED TUNE FILES
6UJL`V\MVSSV^[OLMPYZ[“Key On”prompt, the device will show
you a selection of vehicles and engine sizes. Select yours here.
This will take `V\[V(KQ\Z[HISL6W[PVUZ^OLYL`V\^PSSILHISL[V
HKQ\Z[[VKPMMLYLU[performance levels, vehicle characteristics, and
options including, but not SPTP[LK[VZWLLKSPTP[LYZH_SLYH[PVHUK
[PYLZPaL(KQ\Z[HISL6W[PVUZHYL]LOPJSLZWLJPMPJ-VYTVYL
PUMVYTH[PVUVU(KQ\Z[HISL6W[PVUZWSLHZLZLLthe Adjustable
Options Explained section of this guide.)
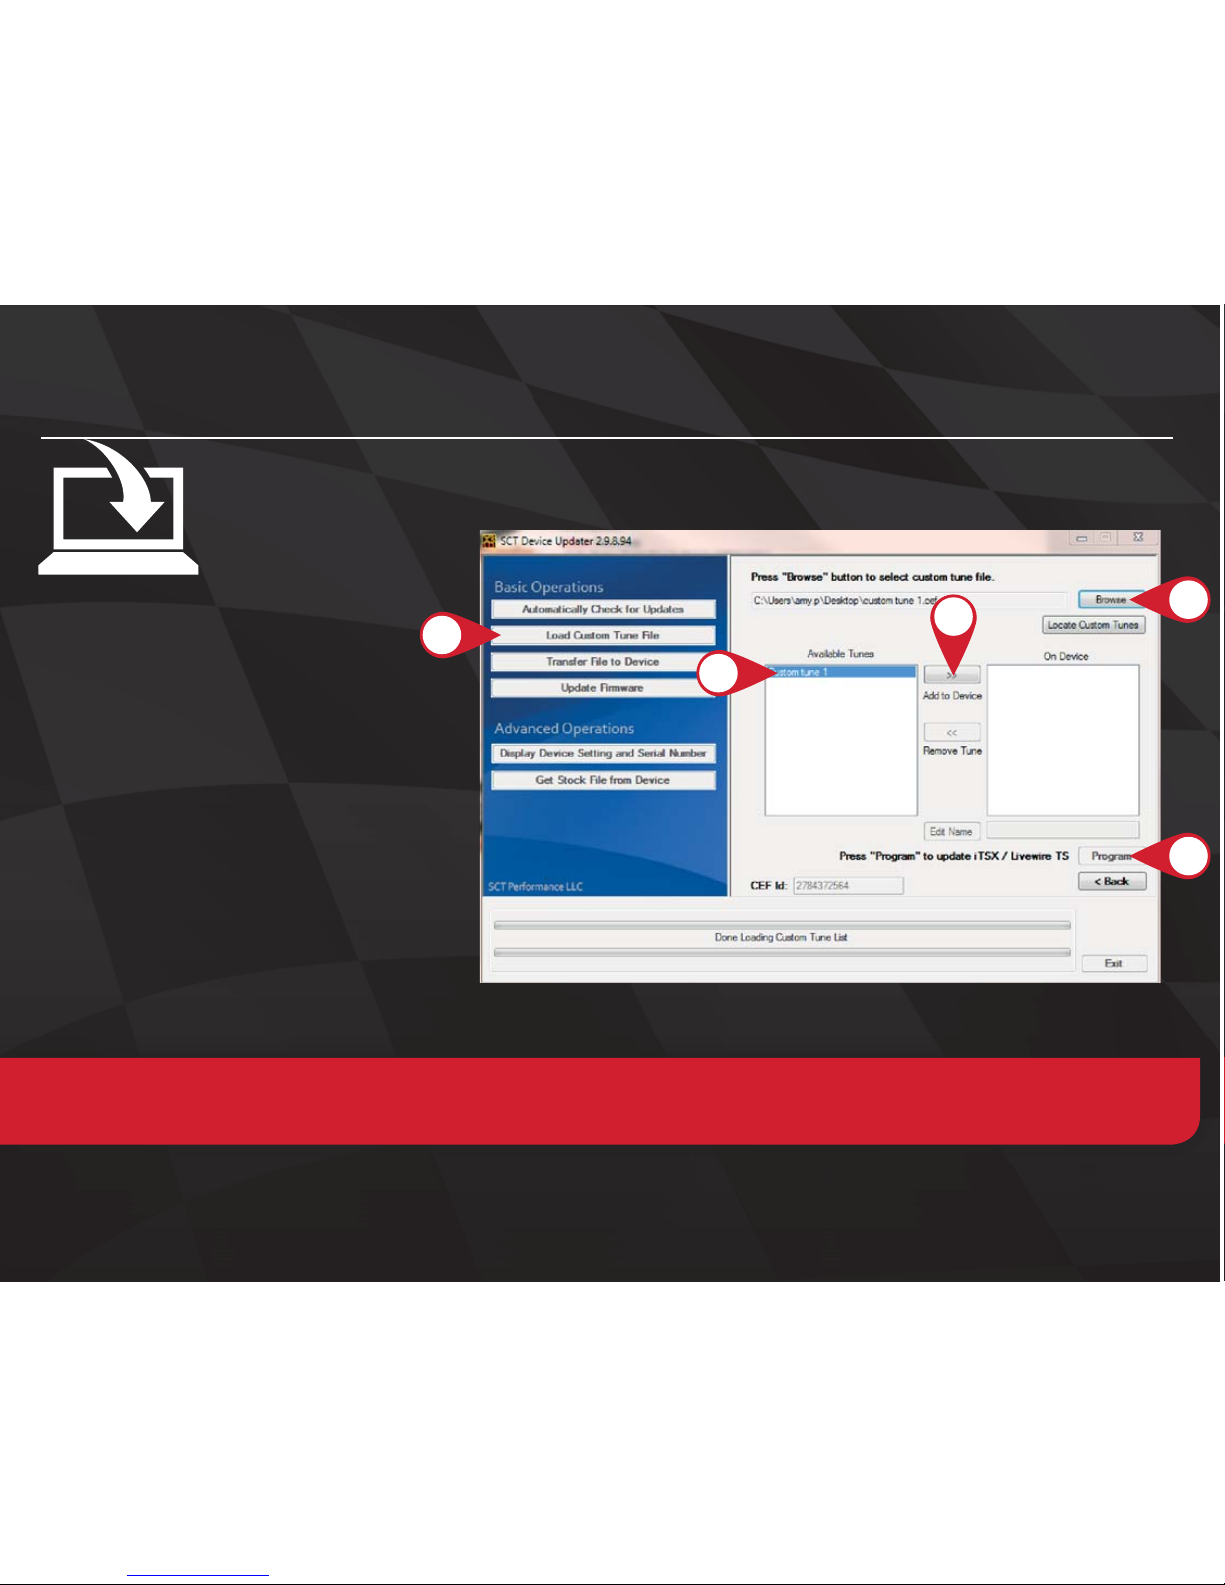
USING CUSTOM TUNES
To install Custom Tunes, select Program Vehicle, and scroll down to
the Custom Tunes section. If your device contains any cus-tom
tunes for your vehicle, this is where they will be listed. Once you’ve
found your desired tune select it by pressing on it and follow the on-
RETURNING TO STOCK
>P[O:*;KL]PJLZ`V\YZ[VJRMPSLPZZ[VYLKK\YPUN[OLPUP[PHS
WYVNYHTTPUN;OLZ[VJRMPSLZ[H`ZVU[OLWYVNYHTTLY\U[PS
returned to stock. From Program Vehicle, select Return to Stock
and follow the on-screen instructions to advance through the
programming process.
NOTE: Custom Tunes are built by SCT’s network of
Custom Tuning Dealers and any questions related to
them need to be directed toward the tuning dealer.

SECTION 8:
LOADING CUSTOM TUNES
Download and install the SCT Device Updater software and Drivers
1. From your e-mail, save your custom
tunesJLMÄSLZ[V`V\YJVTW\[LY»Z
Desktop.
2. Open the SCT Device Updater
software and click the Load Custom
Tune File button.
3. Click Browse and locate your custom
tunes on your Desktop. Alternatively,
click Locate Custom Tunes.
4. Select the Tune you wish to load.
5. The tune you selected should move
to the Available Tunes section.
6. Select the listed tune in the Available
Tunes section, then click the >>
button to move the selected tune to
the On Device section.
7. Once you have gotten all the tunes you’d like to program under the On Device section and they’re named to
your liking, just click Program, and the Device Updater will load the tunes to your device.
2.
4.
7.
6.
NOTE!;VLKP[[OLUHTLVM[OLÄSLHZP[HWWLHYZVU`V\YKL]PJL`V\T\Z[ZLSLJ[[OLÄSL^OPSLP[»ZPU[OL6U+L]PJL
ZLJ[PVU[`WLPU[OLKLZPYLKUHTLPU[OLIV_ILSV^HUKJSPJR:H]L

SECTION 9:
ON–DEVICE DATA LOGGING
1. Connect the Livewire TS+ to the OBDII port.
2. From the Main Menu, select the Gauges/Datalog on
the Livewire TS+.
3. On initial setup, you will need to move to the
*VUÄN\YH[PVU, icon at the bottom left and select
your vehicle MYVTHSPZ[VMKH[HSVNÄSLZ0U[OLM\[\YL
you can continue without going through the vehicle
selection.
4. Once you select your vehicle, default gauges will show
up and you can now monitor these gauges.
5. The items being monitored can be adjusted by double
tapping on the item you’d like to change. Within this
menu, you can change the item you’re monitoring, and
the units in which it will be displaying.
6. To start or stop data logging,Tap the screen once to
bring up the options and select the top left icon that
says 9,*
7. While monitoring, you can be pull up the Gauges/Da-
talog menu by tapping the screen once to. From this
TLU\`V\TH`Z[HY[YLJVYKPUNZLSLJ[HKH[HSVNÄSL
with which to log, change the gauge layout, and reset
[OLTPUTH_]HS\LZVU[OLTVUP[VY
56;,!0M`V\JHU»[KPZWSH`HZWLJPÄJ]HS\LMYVT
[OLWYLSVHKLKJVUÄNÄSLZ`V\JHUKV^USVHK
livelink software for free from the SCT website

SECTION 10:
ADJUSTABLE OPTIONS EXPLAINED
DIESEL VEHICLE SPECIFIC OPTIONS
3HUIRUPDQFH
The most aggressive preloaded diesel tune. Good for every-
day use, racing, or economy but not recommended for any
type of towing.
6WUHHW
Less power than Performance. Moderate gain over stock,
safe for light towing, under 5,000 lbs.
7RZLQJ
:OV\SKIL\ZLK^OLU[V^PUNHU`ZPNUPÄJHU[SVHK:OPM[PUNPZ
towing centered.
7UDQV2QO\
For Heavy Loads. Engine and boost left stock. Trans Only
tune.
-DNH%UDNH
Exhaust brake to increase engine braking while coasting.
Lowers brake temps.
/RFNHGDW&7
Keeps the torque converter locked during deceleration to aid
in engine braking.
/RFN,Q
Locks the torque converter in 1st, 2nd and 3rd gear.
NOTE: Adjustable Options vary for each vehicle and
are not available on all vehicles
DIESEL & GAS VEHICLE OPTIONS:
(*5'HOHWH
Removes the check engine light from deleting EGR me-
chanically.
$[OH5DWLR
Sets axle ratio to correct shift patterns/speedo. (Not
available on all vehicles)
7LUH6L]H
Sets tire size to correct shift patterns/speedo. (Not available
on all vehicles)
,GOH6SHHG
Sets idle speed in RPM.
7UDFWLRQ&RQWURO
6U6ќZL[[PUNKPZHISLZ[YHJ[PVUJVU[YVS^P[OV\[\ZPUN[OL
TCS button.
:276KLIW
Increase or Decrease the WOT Shift points of each gear
individually by MPH.
6KLIW3UHVVXUH
% change in transmission pressure during shifts. (+ = Firmer,
- = Softer)

GAS VEHICLE SPECIFIC OPTIONS:
7XQH7\SH
Performance levels vary by the octane you select. Higher
octane will provide higher performance increase.
93 octane would be the highest increase.
7RZLQJ7XQH
Adjust the octane based tunes to focus more on towing
over performance.
(FRQRP\7XQH
Adjusts the octane based tunes to focus more on econo-
my over performance.
5HDU2V
Disables the rear O2s and eliminated the CEL caused by rear
O2removal.
*OREDO6SDUN
Add or remove timing advance to the entire RPM range.
6SDUNE\530
Add or remove timing by RPM range. (0-2000) (2000-4000)
(4000-8000)
:27)XHO
Add or remove fuel at wide open throttle. (WOT)
)XHO,QMHFWRUV
(SSV^Z`V\[VHKQ\Z[MVYKPќLYLU[ZPaLKPUQLJ[VYZ5V[H]HPSHISL
on all vehicles)
GAS VEHICLE SPECIFIC OPTIONS:
&0&9'HOHWHV
Updates tune to handle the CMCV/IMRC delete
WSH[LZTVKPÄJH[PVU
)DQ&RQWURO
Lowers the temperature at which the fan turns on.
5HY/LPLWHU'ULYH
Sets rev limit in RPM while in drive.
5HY/LPLWHU1HXWUDO
Sets rev limit in RPM while in neutral.
6SHHG/LPLW
Remove, increase, or decrease the vehicle speed
limiter. (AKA Governor)

Livewire TS
Part Numbers:
Ford 5015
GM 5416

*This product is not legal for sale or use in
California on pollution controlled motor vehicles
IMPORTANT NOTES
It is always a good idea to turn-off any vehicle systems that may become active duringthe tuning process such as
cooling fans, fuel pumps etc. to avoid draining the vehicle’s battery. To disable these functions, consult your vehicle’s owner’s
manual and remove the fuse for each of these systems. Also be sure to turn-off the vehicle's stereo and HVAC system. Make sure
the ignition key is turned OFF before you connect your device to the vehicle.
Plug the device into the OBD-II port and wait for them main menu screen to appear. The default menu screen is “Program
Vehicle”. If you are using the device for custom tuning, you will need to read the vehicle strategy first through the “Vehicle Info”
main menu screen and send that information to your custom tuning dealer. (See Section 4.1)
SCT does not recommend using this device with any other tuning module or device that modifies the vehicle PCM parameters,
increases horsepower, torque or modifies transmission characteristics.
Before taking your vehicle to the dealer service department for any type of service or warranty work, you should first return the
vehicle back to the stock configuration. Check engine warning lights can be reset by simply unplugging the battery cables from
the battery for 5-10 minutes. Diagnostic trouble codes can also be read and cleared through the “Vehicle Info” menu.

1. GENERAL INFORMATION
1.1 SCT Performance, LLC Limited Warranty for Livewire TS
What Does This Warranty Cover?
This warranty covers any defects or malfunctions in your SCT Livewire TS product within the warranty period set forth below, subject to the following
conditions and limitations.
How Long Does The Coverage Last?
This warranty lasts for a period of one (1) year following the date of sale by SCT of the Livewire TS product to the original SCT dealer/distributor;
provided, however, the duration of this warranty will be extended to one (1) year from the date of original purchase by the consumer from the SCT dealer/
distributor so long as the consumer submits the required online registration information within thirty (30) days of purchase, as provided below. All implied
warranties, including warranties of merchantability and fitness for a particular purpose are limited to the warranty period set forth above.
What W
ill SCT Do?
SCT will, at its option and as its sole obligation under this warranty, replace or repair any Livewire TS product that has a defect(s) in manufacturing,
material and/or workmanship provided that SCT is notified of the claim within the warranty period provided herein. SCT will not be liable for, nor will it
reimburse the consumer for any fees, charges or expenses for shipping and/or handling costs associated with the return to SCT of any defective Livewire TS
products sent in for replacement or repair.
What Does This Warranty Not Cover?
Any d
amage and/or other problem(s) caused by abuse, misuse, neglect, vandalism, accident, act of God (e.g., flood, fire, lightning), or other cause beyond
the reasonable control of SCT is/are not covered. Also, any d amage or roblem resulting from faulty or improper installation is not covered and shall be the
responsibility of the ins taller. SCT IS NOT LIABLE FOR AND HEREBY EXCLUDES ANY AND ALL INCIDENTAL, SPECIAL OR
CONSEQUENTIAL DAMAGES RELATING TO THE PRODUCTS COVERED BY THIS WARRANTY. This is the consumer’s exclusive warranty and
is in lieu of all other warranties, express or implied, except as may be required by applicable law. Without limiting the generality of the foregoing, SCT
shall not be liable for any breach of any other written or oral warranties given to the consumer by any third party(ies) such as those (if any) given to the
consumer by dealers or distributors of the products.
Can This Warranty Be Transferred?
This warranty is not transferable and applies only to the consumer who originally purchased the Livewire TS product.
How Does State Law Apply?
This warranty gives you specific legal rights, and you may also have other rights which may vary from state to state. Pertinent state law shall control for
what period of time following the sale a consumer may seek a remedy under the implied warranty of merchantability or fitness for a particular purpose.
Some states do not allow the exclusion or limitation of incidental or consequential damages so the above limitation or exclusion may not apply to you.

1.2 Device Firmware & Tune Revision Updates
From time to time, you may wish to update your device to the latest version of firmware or tune revision. Make sure you have returned your
vehicle back to stock before updating your unit.
NOTE: If viewing this document online you can click on the following link to download the SCT Device Updater: SCT Device Updater
1.3 About your SCT Device
Available Gasoline Tunes: 93, 91, 87 octane and economy as applicable. Available Diesel Tunes:
Performance, Street, Towing.
Note: Not all options are available for all vehicles.
x Livewire TS VIN locks (marries) to a single vehicle. You cannot use the device to tune a new or
different vehicle, until you have returned the original vehicle back to stock, which will unlockthe device. You can only change
vehicles 5 times before the unit is permanently locked. To resetthe Changes or Unlock device you will need to contact SCT.
Service charges do apply.
x Standard pre-programmed tuning files are designed for vehicles with minor performance
modifications such as; cold air kits, high-flow exhaust systems, and other basic modifications. Vehicles that have aftermarket
superchargers or turbochargers will require custom tuning, which can be purchased only through authorized SCT Custom Tuning
Dealers.
x If you later add a blower, turbo or nitrous to your vehicle or add a more ‘wild’ naturally aspirated
combination of parts, you will need to obtain a custom tune from an SCT dealer. The Livewire TS programmer is flexible
enough so that your original investment will not be lost –it can be loaded with a custom tune from the SCT dealer.
x Read your vehicle’s warranty carefully before installing or using this Product. You are solely
responsible for determining whether use or installation of this Product will negate or diminishany applicable warranty coverage.
Under no circumstances will the Seller be liable for thevoidance of all or any part of the Buyer’s vehicle warranty. Rather, the
Buyer assumes all riskand responsibility if an automotive manufacturer and/or dealer voids the Buyer’s vehiclewarranty in whole
or in part due to use or installation of this product.
x The stock file is stored during initial programming. The stock file stays on the programmer until
returned to stock. You should always return your vehicle back to stock before taking your vehicle in to any auto service
facility or before updating your device.
The Livewire TS is NOT legal for sale or use in California on pollution controlled motor vehicles

2. GETTING STARTED
2.1 Powering on the Livewire TS
There two ways to power on the device. If you’d like to flash you vehicle, you will need to use the Vehicle instructions below.
If you are looking to update or load custom tunes onto your device you will use the Computer instructions below.
x Using the Vehicle
Locate the vehicle’s OBD Diagnostic port. This connector is usually located under the vehicles dash board on the
driver’s side. The port may be covered with a cap or compartment door labeled OBD Diagnostic Port.
If the connector pins are covered or the port is located behind a compartment door,
remove the cap or open the compartment door.
Connect the OBD connector from the Livewire TS to the vehicles OBD Diagnostic port.
x Using the Computer
Install SCT Device Updater before connecting your unit via USB
Locate the computers USB port. This port can be found on the front or the back of the
computer, if using a laptop the ports will usually be on either side of the laptop.
Using the USB cable provided connect the USB end of the cable to the PC and the other
to the bottom of the Livewire TS

•Ambient Light Sensor
•Audio
•Ignition Key Check
•Power Save Mode
2.2 Loading Email Custom Tunes to the Livewire TS
Before connecting your LWTS to your PC. Select the image of your device, download
andcompletely install SCT Device Updater.
Connect your device with the USB cable provided to the back of your computer. (Allow
about 30 seconds for the drivers to install)
Save your custom tunes from your email to your desktop.
Open SCT Device Updater software that you just installed, there will be a shortcut iconon
your desktop.
Now select “Load Custom Tune File” from the Basic Operations menu followed by
clicking on “Locate Custom Tunes”
Select the desired tune and select the slot you would like to load the file to. Press “Program” when
ready to transfer the custom tune to the LWTS.
Repeat steps 5-7 if you wish to load more than one file.
2.3 Menu Navigation
Program Vehicle
•Return to Stock
•Strategy Tunes
•Custom Tunes
Gauges / Datalog
•Configuration
•Monitor
Diagnostics
•Read DTC
•Clear DTC
Performance Tests
•0-60 PMH
•¼ Mile
•Braking
Vehicle Info
•Vin
•Strategy
•Vehicle Weight
Device Info
•Device Name
•Device Part #
•Serial Number
•Firmware Version
•Preloaded Tuning
•Custom Tuning
•Tune Revision
•Market
•Unlocks Left
•Married Status
•Current Flash
•Total Flashes
•Support Info
•Vehicle Batt
•Vehicle Board FW
•License Notice
Device Settings
•LCD Brightness Day Time
•LCD Brightness Night Time
•Theme: Red / Blue / Dark

2.4 Using the Touch Screen
The screen on the Livewire TS is pretty simple to use, simply use your index finger to scroll through the sub-menu options by pressing firmly
on the screen of the LWTS. When you see the menu you would like to choose, press firmly on the icon with your finger. If you’d like to
back out of a menu simply press the Exit button.
While programming your vehicle, the screen will guide you and explain whether to press the Cancel button or the Select button to
perform certain actions or select different items.
2.5 Reading Vehicle Strategy
Ford will often times update the computer in your vehicle. The new update ID (calibration ID) that is loaded into your computer is
called a strategy. Many times your SCT dealer will ask you to read your vehicles strategy for many reasons which includes creating
custom tunes.
1. Once the device is powered on using the OBDII cable provided, swipe from right to left once to get to the “VEHICLE INFO”
icon.
2. Press on the “VEHICLE INFO” icon; you will be prompted to turn the key to the ON position.
3. Make sure you turn the key forward to the position before firing up the vehicle. Your dashboard
should be lit with indicator lights.
4. Once the Livewire TS has detected you turned the key on, it will proceed to display your VIN,
COMM and ECU Strategy.
2.6 Reading/Clearing Vehicle DTCs
If you are experiencing a check engine light on your dashboard, you will be able to retrieve the code and read the cause of the code using
your Livewire TS. You will also have the ability to clear these codes if you have gone ahead and taken care of the problem that was
causing the check engine light.
1. Once the device is powered on using the OBDII cable provided, on the bottom right of the screen press the “DIAGNOSTICS”
function.
2. You will have the choice on the following screen whether to Read DTC or Clear DTC, make
your selection by pressing the appropriate option.
a. READ DTC: Turn key ON, the device will automatically detect it; if any codes are present they will be listed on the
next screen. You will be able to read the meaning of the code by simply touching the code being
displayed. To go
back to the list of DTC’s present simply press the OK button.
b. CLEAR DTC: Turn Key On, the device will automatically detect it; when the codes
have been deleted successfully the device will let you know it.

3.0 Programming your vehicle
3.1 Installing a Preloaded Tune File
1. Connect the Livewire TS to your vehicle’s OBD IIservice port and power on the device by
pressing down on the power button in the upper right hand corner of the device as you are
looking at the screen.
2. Start with the unit powered on and connected to the vehicle, press
the “Program Vehicle” button on the screen.
3. Next you will be prompted with a “Street Use Notice” which you
must agree to and approve to begin tuning. If you approve and agree press the “Continue”
button on the screen to proceed.
4. You may be prompted to “Turn Key On”. If so, please turn the
ignition key to the “On” position but do not start the vehicle.
5. A screen will appear asking you to select your vehicle. Please touch
the menu listing that contains your vehicle.
6. Next you will be prompted to adjust options. These options are
items available from SCTto make minor adjustments to the calibration being loaded. It is
not necessary to make adjustments in this area. If you wish to make an adjustment, simply
press the option you would like to change and the screen will change to display the available
values for that option. When you are satisfied with the values of these options or if you do
not wish to changethem, simply touch “Approve”.
7. You will now be prompted with a screen to review your vehicle and
options (if any selected). Press “Continue”.
8. The next screen, possibly two, will differ between vehicles. You
will be prompted to “Turn key Off” and/or “Turn Key On”. It’s important here to
follow the prompts from the device.
9. Livewire TS will now Upload the current file that is in your vehicle,
referred to as the “Stock File”, and will proceed to download the new calibration you
have selected with all options applied if you have selected any.
10. After this is complete the device will display a “Download
Complete” screen. You can now turn the key to the off position. For GM vehicles you may
see a “Power Down ECU” screen while the vehicle completes some power down
procedures.
11. You have now successfully tuned your vehicle!
Which tune file do I choose?
Gasoline Engine: Tunes are based on Octane, make sure you choose the correct octane rating based on the octane you are
running in your vehicle.
87 Octane
91 Octane
93 Octane

Diesel Engine: We offer a few tunes based on what you’re going to be doing with your truck.
Street: Less power than Performance. Moderate gain over stock, safe for light towing, under 5k
lbs.
Performance:The most aggressive preloaded diesel tune. Good for everyday use, racing,
economy but not recommended for any type of towing.
Tow: Should be used when towing any significant load. Shifting is towing centered
How do I know what the Options do?
In section 3.4 there’s are a list of options, their functions
and are also explained. For suggestions on using any of these options
refer to a custom tuning dealer.
NOTE: Adjustable Options vary for each vehicle and are not available on all vehicles
3.2 Installing a Custom Tune File
4 Start with the unit powered on and connected to the vehicle, press the
“Program Vehicle” button on the screen.
5Next you will be prompted with a “Street Use Notice” which you must
agree to and approve to begin tuning. If you approve and agree press the “Continue” button
on the screen to proceed.
6You may be prompted to “Turn Key On”. If so, please turn the ignition
key to the “On” position but do not start the vehicle.
7 A screen will appear asking you to select your vehicle. Please scroll
down until you see the area “Available Custom Tunes” and touch the menu listing that
contains the custom tune you would like to load.
8 Next you will be prompted to adjust options. These options are items
available from SCTto make minor adjustments to the calibration being loaded. It
is not
necessary to make adjustments in this area. If you wish to make an adjustment, simply press the
option you would like to changeand the screen will change to display the available values for that
option. When you are satisfied with the values of these options or if you do not wish to change
t
hem, simply touch “Approve”.
9 You will now be prompted with a screen to review your vehicle and
options (if any selected). Press “Continue”.
10 The next screen, possibly two, will differ between vehicles. You will be
prompted to “Turn key Off” and/or “Turn Key On”. It’s important here
to follow the prompts from the device.
11 Livewire TS will now Upload the current file that is in your vehicle,
referred to as the “Stock File”, and will proceed to download the new calibration you have
selected with all options applied if you have selected any.
12 After this is complete the device will display a “Download Complete”
screen. You can now turn the key to the off position. For GM vehicles you may see a “Power
Down ECU” screen while the vehicle completes some power down procedures.
You have now successfully tuned your vehicle!
Custom tunes are built by SCT’s network of Custom tuning Dealers and any questions related to them
need to be directed towards the tuning dealer.

3.3 Returning your Vehicle to Stock
1. Start with the unit powered on and connected to the vehicle, press the “Program Vehicle”
button on the screen.
2. Next you will be prompted with a “Street Use Notice” which you
must agree to and approve to begin the Return to Stock procedure. If you approve and agree
press the “Return Stock” button on the screen to proceed.
3. A verification screen will now be displayed confirming your
selection to return to the stock tune. Simply touch “Continue” here to confirm.
4. Depending on your device settings you may be prompted to “Turn
Key On”. If so, please turn the ignition key to the “On” position but do not start the vehicle.
5. The next screen, possibly two, will differ between vehicles. You
will be prompted to “Turn key Off” and/or “Turn Key On”. It’s important here to
follow the prompts from the device.
6. Livewire TS will now load the original file saved from when you
tuned the vehicle (“Stock File”) back into the vehicle.
7. After this is complete the device will display a “Download Complete” screen. You can now turn
the key to the off position. For GM vehicles you may see a “Power Down ECU” screen while the vehicle completes some
power down procedures.
8. You have now successfully returned your vehicle to Stock.
3.4 User Adjustable Options Explained
User Adjustable Options are contained within the pre-loaded tuning files. You will be prompted to Adjust Options during the tuning
process. The Adjust Options menu will appear and you will navigate through the options using the touch screen. To enter the option or
select the option, use the approve button. To cancel the option or go back to the previous screen, press the cancel button.
The user adjustable options allow you to adjust common vehicle parameters such as the list provided below. The available user adjustable
options for your vehicle will appear in the on-screen list. Use the arrow up & down keys toscroll through the options list and use the
select key to enter and modify any option. Once you have selected each option to change, you will be prompted to save all adjustments.
Once the adjustments have been saved, you will be prompted to continue the upload process.
NOTE: Adjustable Options vary for each vehicle and are not available on all vehicles
DIESEL VEHICLES SPECIFIC OPTIONS:
PERFORMANCE
STREET
TOWING TRANS
ONLY JAKE
BRAKE
The most aggressive preloaded diesel tune. Good for everyday use, racing, economy but not recommended for any
type of towing.
Less power than Performance. Moderate gain over stock, safe for light towing, under 5k lbs.
Should be used when towing any significant load. Shifting is towing centered.
For Heavy Loads, Engine and Boost left stock, Trans Only tune.
Exhaust brake to increase engine braking while coasting, lowers brake temps.
Table of contents