Steadicam Merlin Arm & Vest Technical manual
The Tiffen Company, 90 Oser Avenue, Hauppauge, NY 11788 • 631-273-2500 • 1-800-645-2522 • www.tiffen.com
Tiffen Steadicam Operations, Glendale, CA • 818-843-4600 • 1-800-593-3331
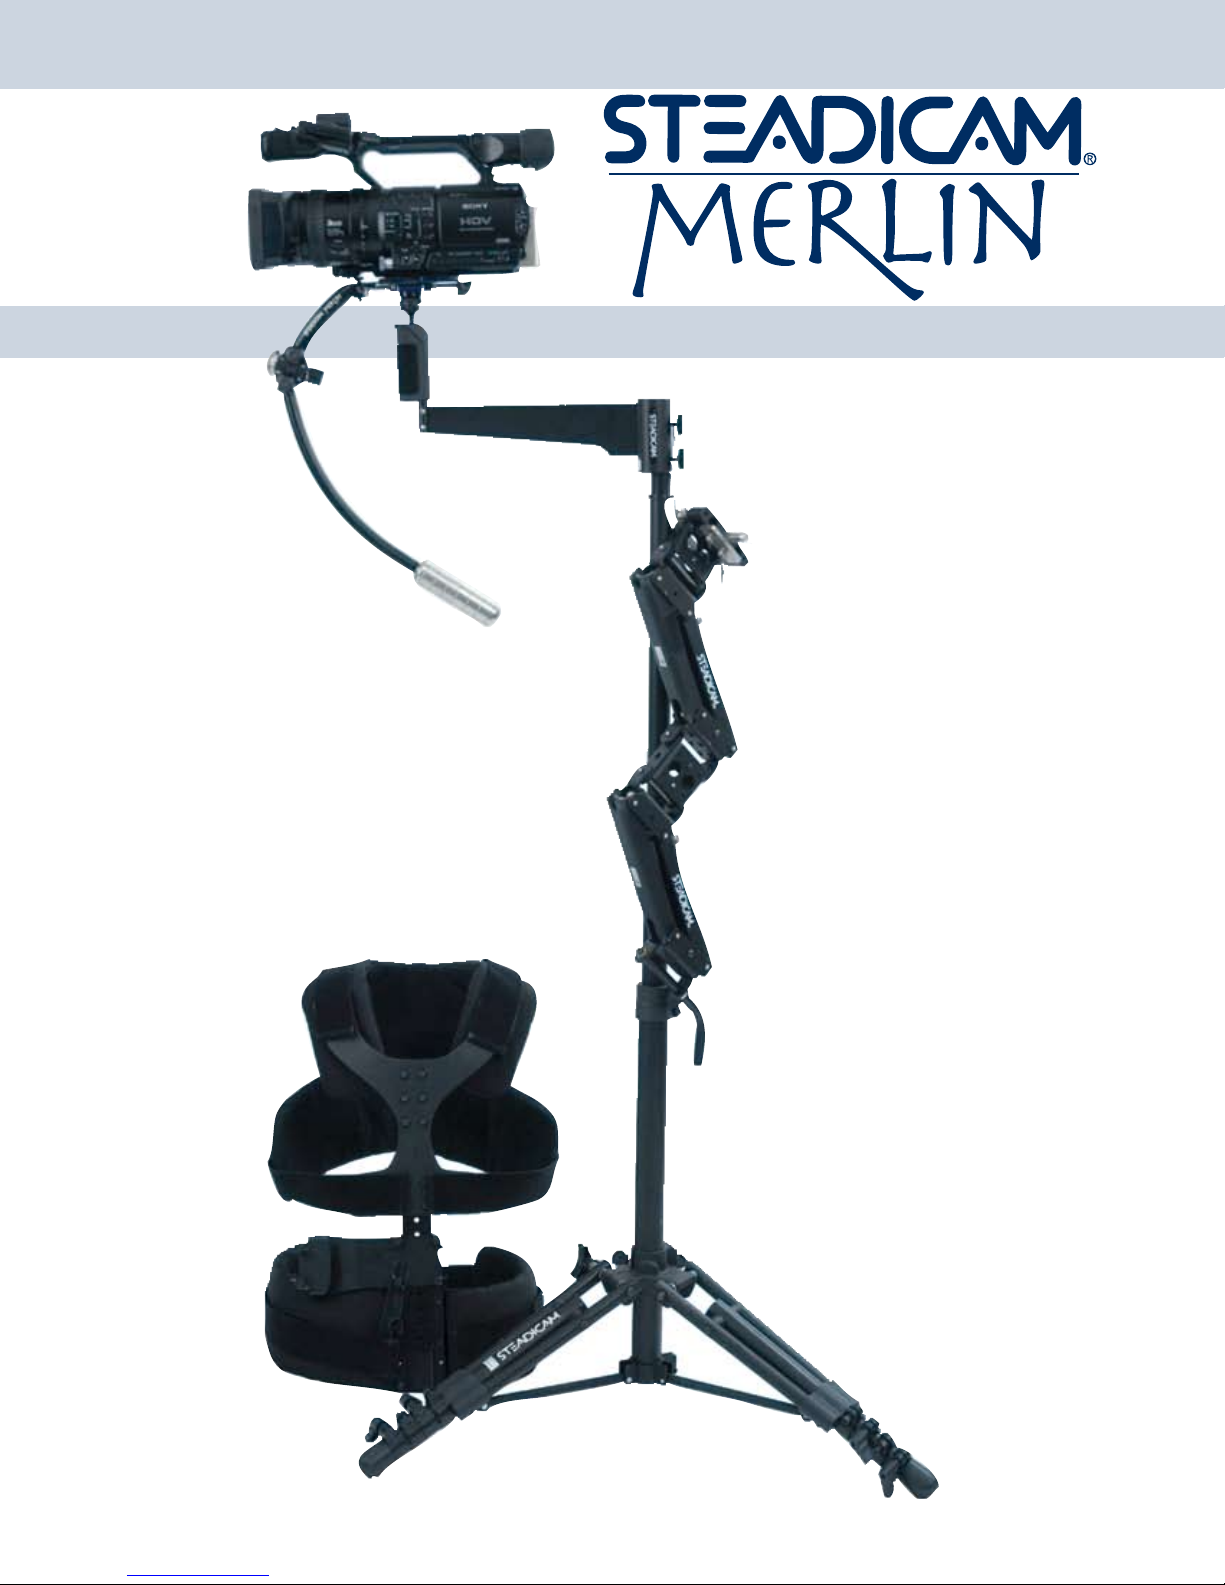
When the Merlin
Vest/ Arm sys-
tem is properly
adjusted, both arm
sections are paral-
lel to the ground.
The Merlin Handle
is held in the right
hand. The left hand
operates the Merlin
gimbal as usual.
Practice proper
standing, walking
and hand position.
See the Merlin
DVD for further
operating tips.
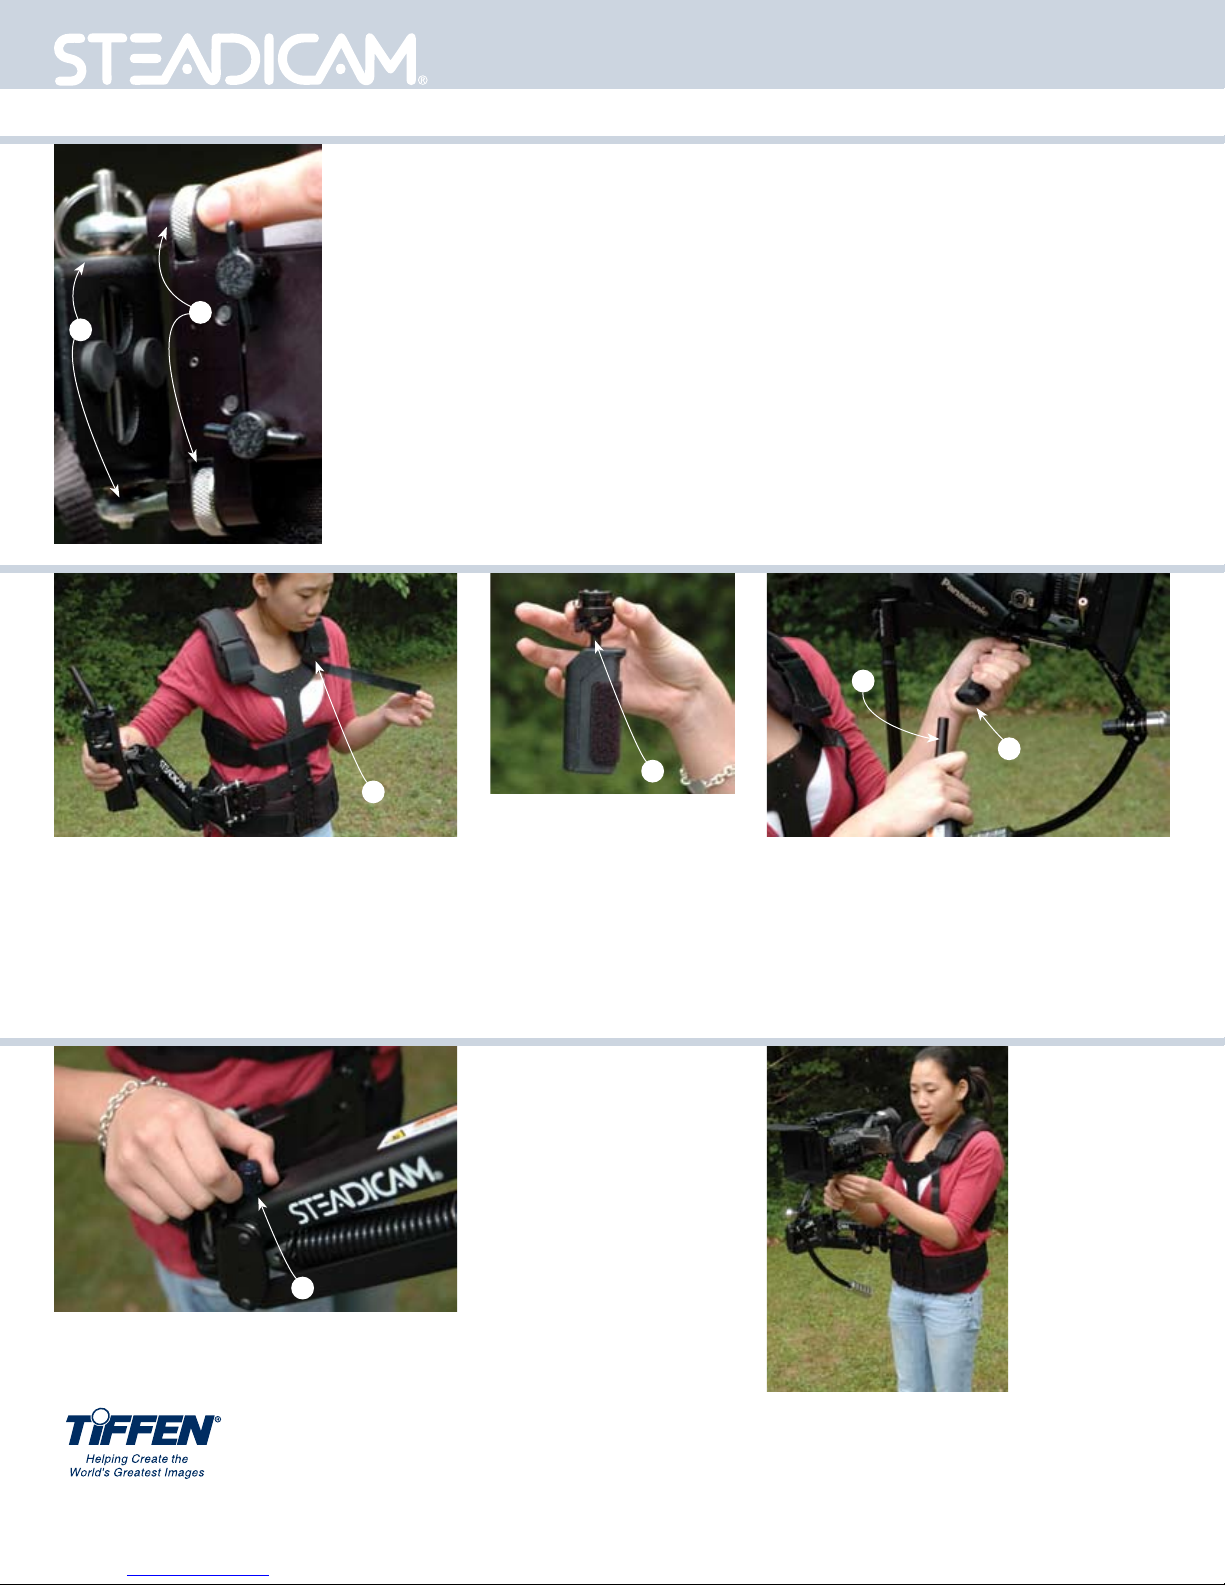
Before mounting the Merlin on the arm, we suggest turning the bottom wheel until the rod end (14) is all
the way in. Then turn the top most wheel in the opposite direction (out) until about 3 threads are showing.
That will lean the arm slightly away from the operator, allowing for proper use.
When switching the arm mounting to the opposite side for left or right-handed operation, be sure to
re-adjust these wheels so the ‘top’ attachment is out and be sure the ‘bottom’ one is always in.
DON’T OVEREXTEND EITHER ATTACHMENT SCREW
AS THE ARM WILL EVENTUALLY COME APART
FROM THE MOUNTING BLOCK.
To operate the Merlin on the right side of the body, remove the pin from arm as shown in the photo detail-
ing wheels (13). Turn the socket block upside down, insert pin again. Then, lay the vest down on a table.
Loosen and remove all four thumb screws holding the arm bridge (9) to the vest and turn the bridge
around 180 degrees so it rests on the left side of the vest center. (right of center as you look at it) Lock it in
place again using thumb screws.
Insert the arm. Tighten the bottom wheel all the way and loosen the top one a few turns and you are set.
This mode frequently offers an easier view of the camera’s flip-out viewfinder that’s used when operating the
Merlin system.
There is an arm restraint strap (15) on your Merlin
vest. To capture the arm from moving about while
the Merlin is not mounted, open the strap. Draw it
away from the vest. Tuck the Steadicam arm up
against the left vest spar area near the strap. Wrap
the strap around the arm and capture it against
itself. Now the arm cannot move, but can quickly
be freed.
Your Steadicam Merlin Vest/
Arm system comes with an
all-metal gimbal (16). As per
instructions in the Merlin for
adjusting your gimbal, remove
your Merlin gimbal and replace
it with this new one. There is no
need to go back and forth. Us-
ing this new all-metal gimbal,
you can use the Merlin on or
off the Arm/Vest system.
To mount the Merlin onto the arm, hold the arm
still with your right hand. Grasp the Merlin gimbal/
handle (16) with your left hand and lift off of the
optional docking bracket. Line up the hole in the
bottom of the Merlin handle with the arm post (17)
in the Steadicam arm. Rest the Merlin onto
the arm post.
To adjust the lift delivered by your
Steadicam Merlin arm, lower the
arm by pushing down with the left
hand until the arm section closer
to your body is just above horizon-
tal. This is the “sweet spot” for turn-
ing the lift adjust knob (18). Turn to
the right to increase lift. Turn to the
left to decrease lift. When that sec-
tion appears to feel as though it is
floating flat – parallel to the ground-
make the identical adjustment to
the other section.
Tiffen, Steadicam and Steadicam Merlin are registered trademarks of The Tiffen Company.
Covered by U. S. patents 5,435,515 and 5,360,196 and pending foreign patents. Steadicam reserves the right to change specications without prior notice. 0707
17
16
16
15
14
18
13
Arm and Vest Quick Start Card
LIT-801001
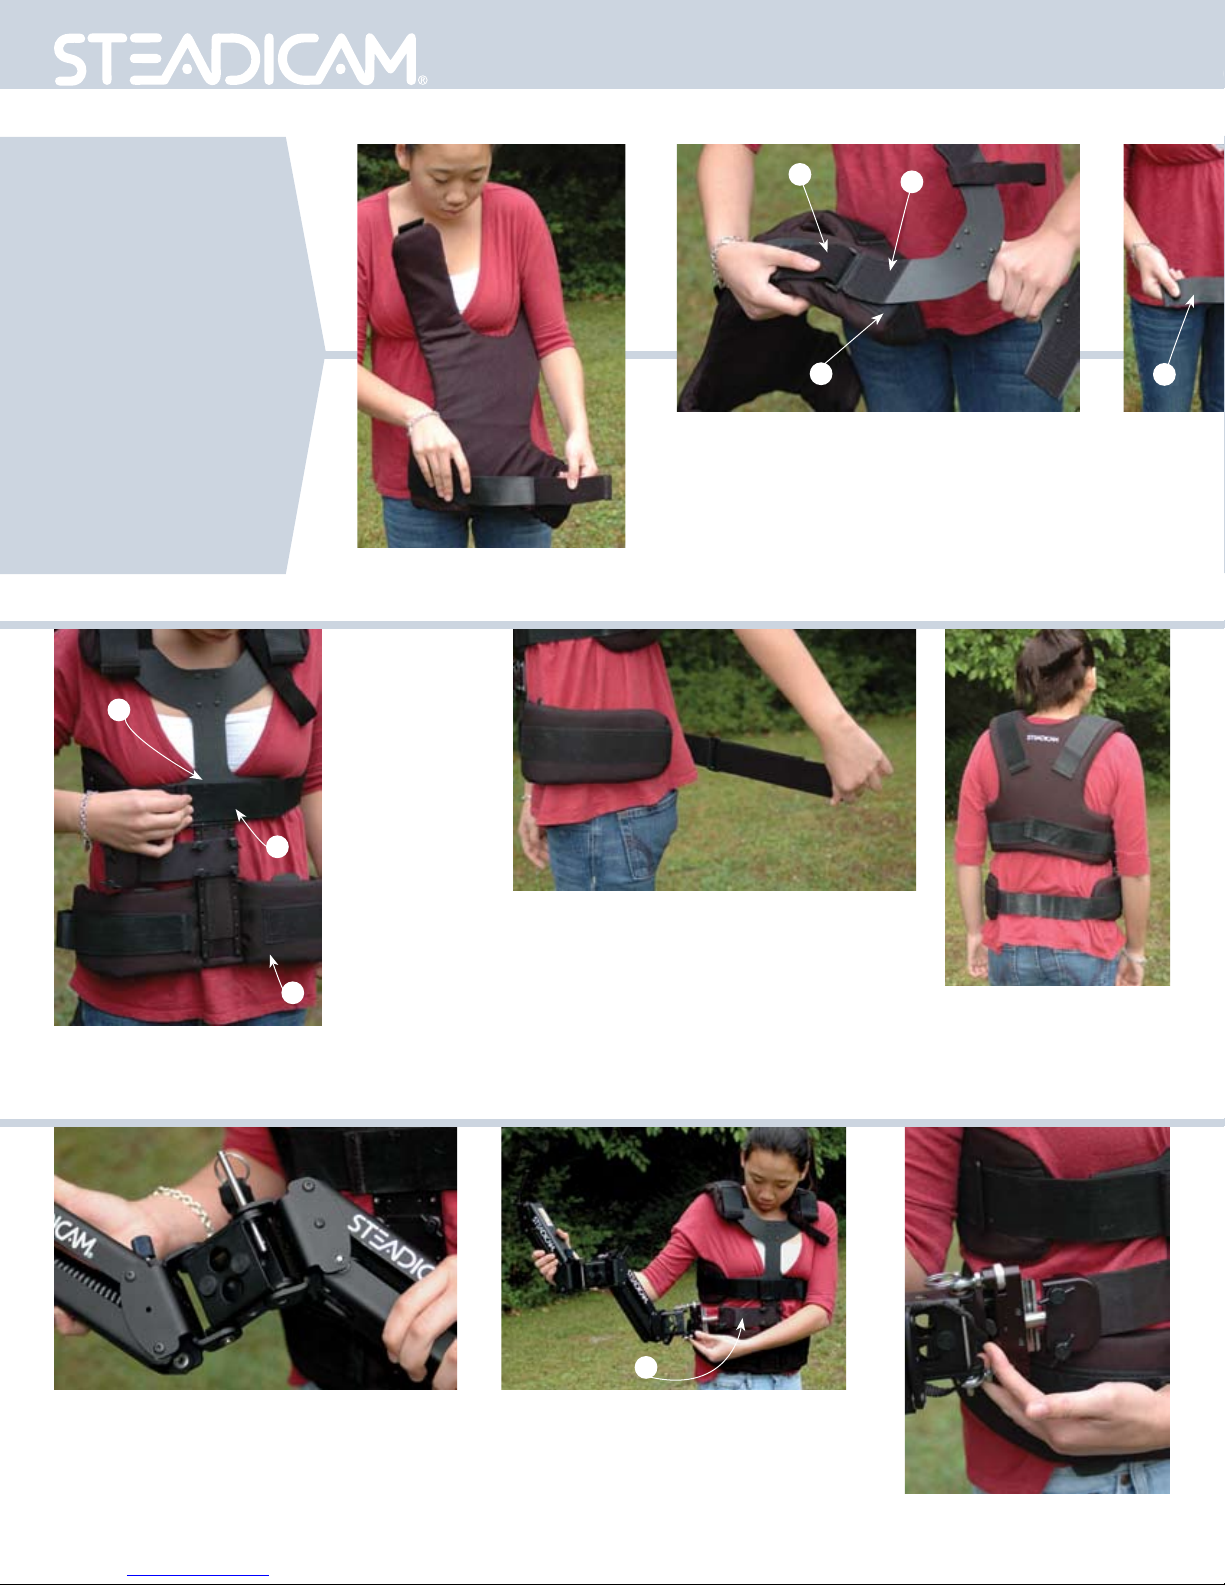
Remove the straps from
the bag. There are two that
are 12” long. These are the
shoulder straps. Attach to
both shoulder areas as shown
in the photos, using the keeper
near the end.
Two straps are 22” long. One is
18” long. Attach one of the 22”
straps to the right side of the waist
panel of the vest. Overlap the sec-
ond 22” strap on top of it. Pass the
open end of that second 22”
strap through the keeper, and
fold it back on itself. This is your
waist strap length adjustment.
Then take the 18” strap and
pass it through the keeper.
Follow directions to affix to
waist panel.After you put the straps in place,
the vest will look like this.
Fold back the right shoulder strap (1), so that the
right-hand pad clasp (2) is able to line up with the
right top of the chest spar (3). Press the spar end
against the hook area on the pad clasp. Close the
shoulder strap over onto the top of the chest spar.
This insures a very tight grasp. Do not repeat this
step on the left hand side-it is left open until you
put the vest on.
Draw the left chest
(7) strap across the
chest bridge (6),
while at the same
time holding firmly
onto the waist
panel (8). Make
sure chest spar
is vertical to your
body as you do
this, not crooked.
Press the left
chest strap on top
of the right chest
strap on the chest
bridge.The vest is
now 2/3 fitted to
your body.
The waist strap should look like this as you reach
behind with your left hand to grasp it. The long
smooth part is pressed into the right side of the
waist panel. The adjustable part is grasped in the
left hand.
Hold the waist panel with the right hand. Draw the
waist strap firmly around your back and press it
down onto the left side of the waist panel.
From the back the straps
are symmetrical, insuring an
even fit with good distribu-
tion of the weight.
Insert the connecting pin through the sections as
shown. Insert it so that the ring is on the top of
the arm.
Insert the arm into the vest socket block
(12). Holding the section shown in your right
hand, guide the arm socket into the vest
socket block. Line up the pin to the hole.
Using the left hand, gently guide
the socket into place.
2
3
1
4
6
7
8
12
We thank you for investing the time and resources in our Steadicam Merlin Vest and Arm system. Step by step you will
build the components into a compete system and begin to create the Steadicam shots of which you have always dreamed.

Pull the right chest strap (4)
through the keeper (5) and affix
to the back of the vest. This will
take a few tries back and forth.
The goal is to have both chest
straps symmetrical, and to have
the upper part of the vest held
firmly against the torso.
Take the portion of the right chest strap (4) that will
hold the right side of the vest and press it against
the chest bridge (6). Slip your right arm through
the armhole and pull the vest on until it is resting
on your shoulders.
Repeat the shoulder clasp maneuver on the left
side, pressing the left shoulder strap onto the
left top of the chest spar. Line up the left chest
strap with the chest spar. Attach it.
From the front, the chest
spar is straight. The straps
snugly fit along the chest
and waist. The shoulder
pads of the vest are resting
on your shoulders.
The length of your vest can
be adjusted. Loosen the
thumb screws located on
the bottom area of the arm
bridge (9). They hold the
bridge on the vest spar
and also permit for vertical
adjustment. All four screws
should be loosened no more
than three turns. This is
enough to allow the spar to
be moved. Once the thumb
screws are loose, grasp the
chest bridge in the right
hand and the waist panel
in the left hand. Gently tug
them apart and the two
parts will slide easily.
To move the arm bridge along the vest spar when the vest is
made shorter, lay the vest down. Loosen all four thumb screws
until they come out. Remove the arm bridge and move it lower
on the vest spar, lining up the holes in the bridge with holes in
the spar. Re-attach using the four thumb screws.
Hold the lower section of the Steadicam
arm (10) in the right hand and pull the
connecting pin (11). It is the steel pin with
the ring attached. Line up the two sections
of the Steadicam Merlin arm. One section
nests just inside the other. Some find this
easier if the sections are held as shown,
others prefer to lay the sections on a table.
The arm is not properly inserted in this view. Note
the shiny steel back plate pressed against the
bolts. The thumb screws must be turned out far
enough to allow the socket to insert fully.
The arm is properly inserted in this view, with the
thumb screw bolts nested in the slight groove
in the steel back plate. Now the screws can be
adjusted for each operator.
Wheels (13) on arm mount are
used to fit the side-to-side angle
of the Steadicam Merlin arm to
the individual user.
5
4
6
11 10
13
Merlin Arm & Vest
We thank you for investing the time and resources in our Steadicam Merlin Vest and Arm system. Step by step you will
build the components into a compete system and begin to create the Steadicam shots of which you have always dreamed.

The Tiffen Company, 90 Oser Avenue, Hauppauge, NY 11788 • 631-273-2500 • 1-800-645-2522 • www.tiffen.com
Tiffen Steadicam Operations, Glendale, CA • 818-843-4600 • 1-800-593-3331
When the Merlin
Vest/ Arm sys-
tem is properly
adjusted, both arm
sections are paral-
lel to the ground.
The Merlin Handle
is held in the right
hand. The left hand
operates the Merlin
gimbal as usual.
Practice proper
standing, walking
and hand position.
See the Merlin
DVD for further
operating tips.
Before mounting the Merlin on the arm, we suggest turning the bottom wheel until the rod end (14) is all
the way in. Then turn the top most wheel in the opposite direction (out) until about 3 threads are showing.
That will lean the arm slightly away from the operator, allowing for proper use.
When switching the arm mounting to the opposite side for left or right-handed operation, be sure to
re-adjust these wheels so the ‘top’ attachment is out and be sure the ‘bottom’ one is always in.
DON’T OVEREXTEND EITHER ATTACHMENT SCREW
AS THE ARM WILL EVENTUALLY COME APART
FROM THE MOUNTING BLOCK.
To operate the Merlin on the right side of the body, remove the pin from arm as shown in the photo detail-
ing wheels (13). Turn the socket block upside down, insert pin again. Then, lay the vest down on a table.
Loosen and remove all four thumb screws holding the arm bridge (9) to the vest and turn the bridge
around 180 degrees so it rests on the left side of the vest center. (right of center as you look at it) Lock it in
place again using thumb screws.
Insert the arm. Tighten the bottom wheel all the way and loosen the top one a few turns and you are set.
This mode frequently offers an easier view of the camera’s flip-out viewfinder that’s used when operating the
Merlin system.
There is an arm restraint strap (15) on your Merlin
vest. To capture the arm from moving about while
the Merlin is not mounted, open the strap. Draw it
away from the vest. Tuck the Steadicam arm up
against the left vest spar area near the strap. Wrap
the strap around the arm and capture it against
itself. Now the arm cannot move, but can quickly
be freed.
Your Steadicam Merlin Vest/
Arm system comes with an
all-metal gimbal (16). As per
instructions in the Merlin for
adjusting your gimbal, remove
your Merlin gimbal and replace
it with this new one. There is no
need to go back and forth. Us-
ing this new all-metal gimbal,
you can use the Merlin on or
off the Arm/Vest system.
To mount the Merlin onto the arm, hold the arm
still with your right hand. Grasp the Merlin gimbal/
handle (16) with your left hand and lift off of the
optional docking bracket. Line up the hole in the
bottom of the Merlin handle with the arm post (17)
in the Steadicam arm. Rest the Merlin onto
the arm post.
To adjust the lift delivered by your
Steadicam Merlin arm, lower the
arm by pushing down with the left
hand until the arm section closer
to your body is just above horizon-
tal. This is the “sweet spot” for turn-
ing the lift adjust knob (18). Turn to
the right to increase lift. Turn to the
left to decrease lift. When that sec-
tion appears to feel as though it is
floating flat – parallel to the ground-
make the identical adjustment to
the other section.
Tiffen, Steadicam and Steadicam Merlin are registered trademarks of The Tiffen Company.
Covered by U. S. patents 5,435,515 and 5,360,196 and pending foreign patents. Steadicam reserves the right to change specications without prior notice. 0707
17
16
16
15
14
18
13
Other Steadicam Camera Accessories manuals

Steadicam
Steadicam G-70x User manual

Steadicam
Steadicam Ultra2 User manual

Steadicam
Steadicam Volt User manual

Steadicam
Steadicam Ultra2 User manual

Steadicam
Steadicam ARCHER2 User manual

Steadicam
Steadicam M-1 User manual

Steadicam
Steadicam Ultra2 User manual

Steadicam
Steadicam G-70x Arm User manual

Steadicam
Steadicam Merlin 2 Manual instruction

Steadicam
Steadicam MERLIN2 User manual


