Steadicam G-70x User manual

G-70x Operating Manual
Rev. B
p/n LIT-805720
Operating Manual

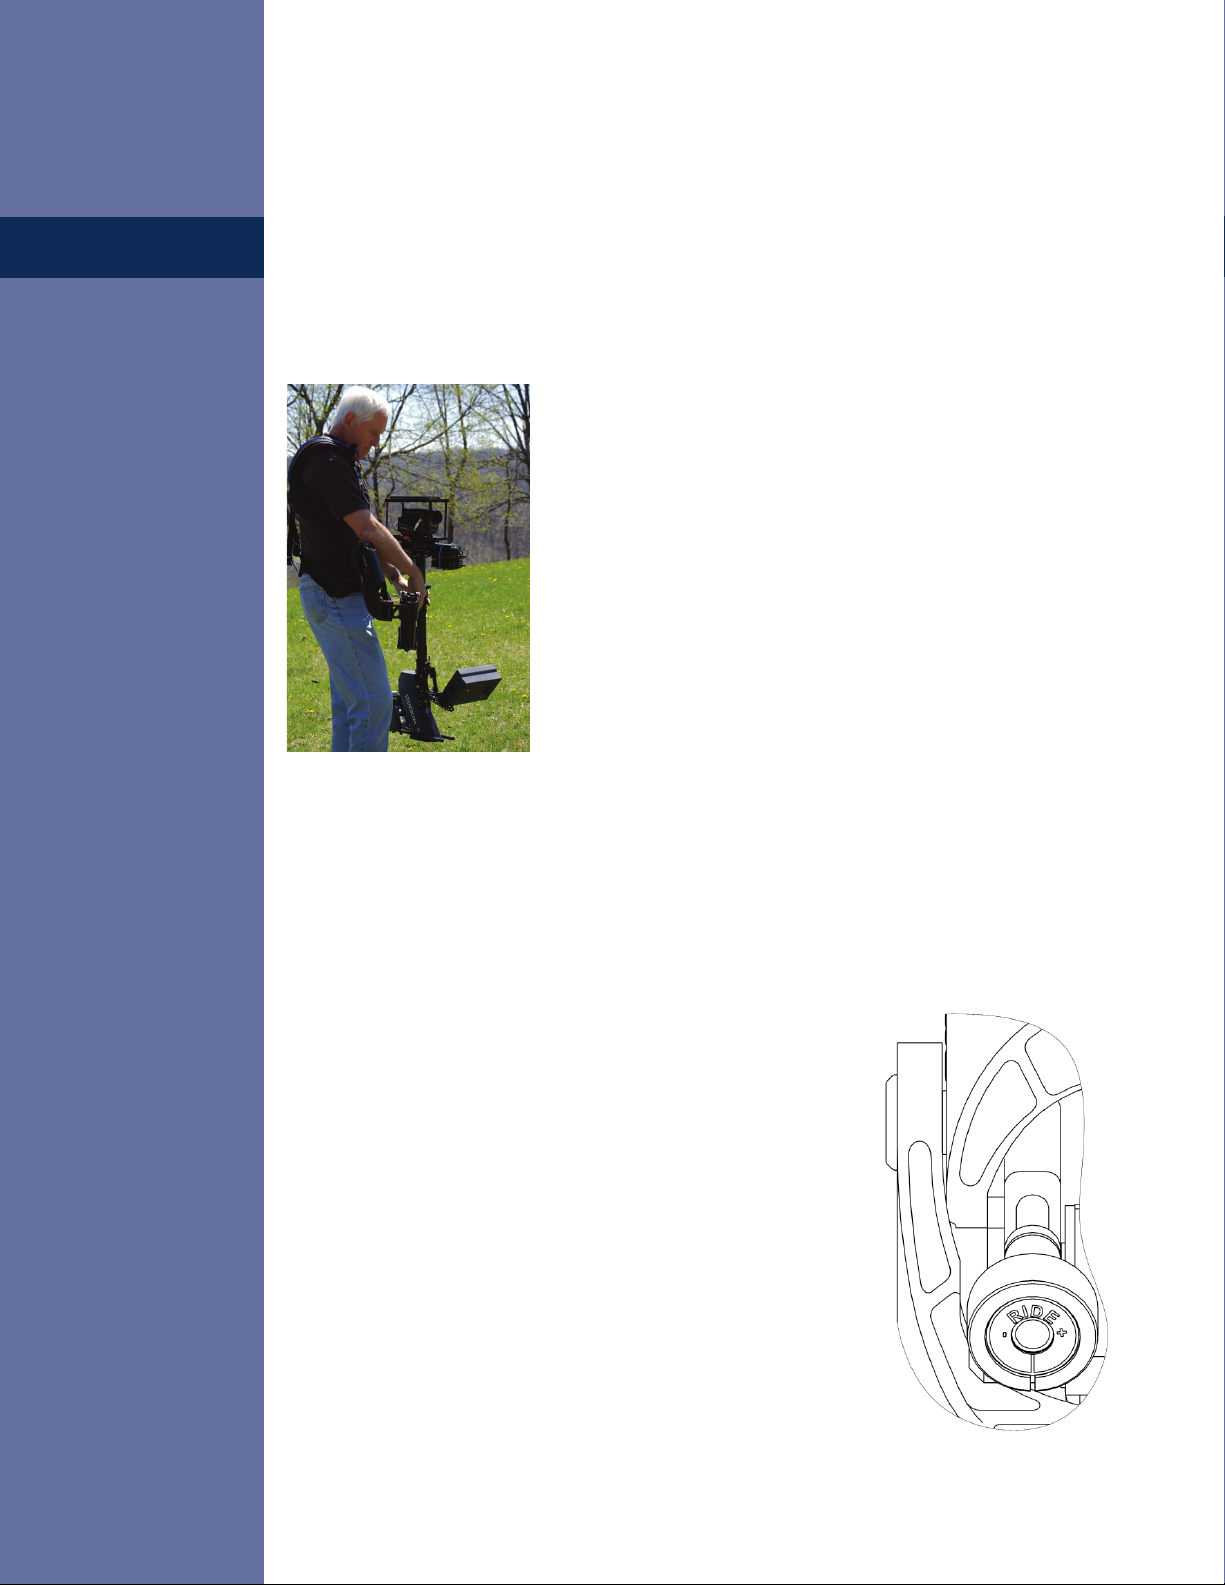
The Steadicam®G-70x Arm is the third release of
Tiffen’s G-Series arms. The revolutionary, patented Geo spring geometry optimizes
performance throughout its lifting range. It tames high/low arm travel with adjustable-
length crankshafts that dynamically rock the spring termination as the arm is boomed
up or down. Powered by coaxial titanium spring sets, the G-70x arm smoothly carries
any load from 13 to 70 pounds (5.8 to 32 kg).
The design criteria for the G-70x arm: light weight (10.8 lbs / 4.9 kg), user-
maintainable, and a 29 inch (73 cm) boom range. It has soft bumpers at each end of
travel so the arm can be boomed right to its limits without shot-disturbing clunks. The
G-70x also has a Ride control that adjusts the iso-elastic response of the arm.
Note: Iso-elasticity can be dened as the vertical bandwidth throughout which
lifting power closely approximates load.
Two more G-70x innovations: The arm posts are locked in place by a single lever,
so switching arm posts is quick and easy. This quick-change mechanism also has an
adjustable drag for the post’s rotation, from completely free to totally locked.
At the socket block end of the arm is a new, “kick back” link, which gets the arm
further out of the way as the sled crosses the operator’s body, and keeps the arm from
banging against the stops in normal operation.
The net result: the smoothest, best performing arm ever built, and all
parameters are user adjustable.
Tiffen Steadicam
2815 Winona Avenue
Burbank, CA 91504
818 843-4600 or 800 593-3331
818 843-8321 fax
Tiffen International Ltd.
Pinewood Studios
Pinewood Road
Iver Heath SL0 0NH
United Kingdom
44 870 1001220
44 1869 321766
Overview
Steadicam‚ G-70x™
Iso-Elastic Stabilizer Arm
tiffen.com/steadicam
steadicam.com
Email: [email protected]
The Tiffen Company
90 Oser Avenue
Hauppauge, New York 11788
631 273-2500 or 800 645-2522
631 273-2557 fax

3
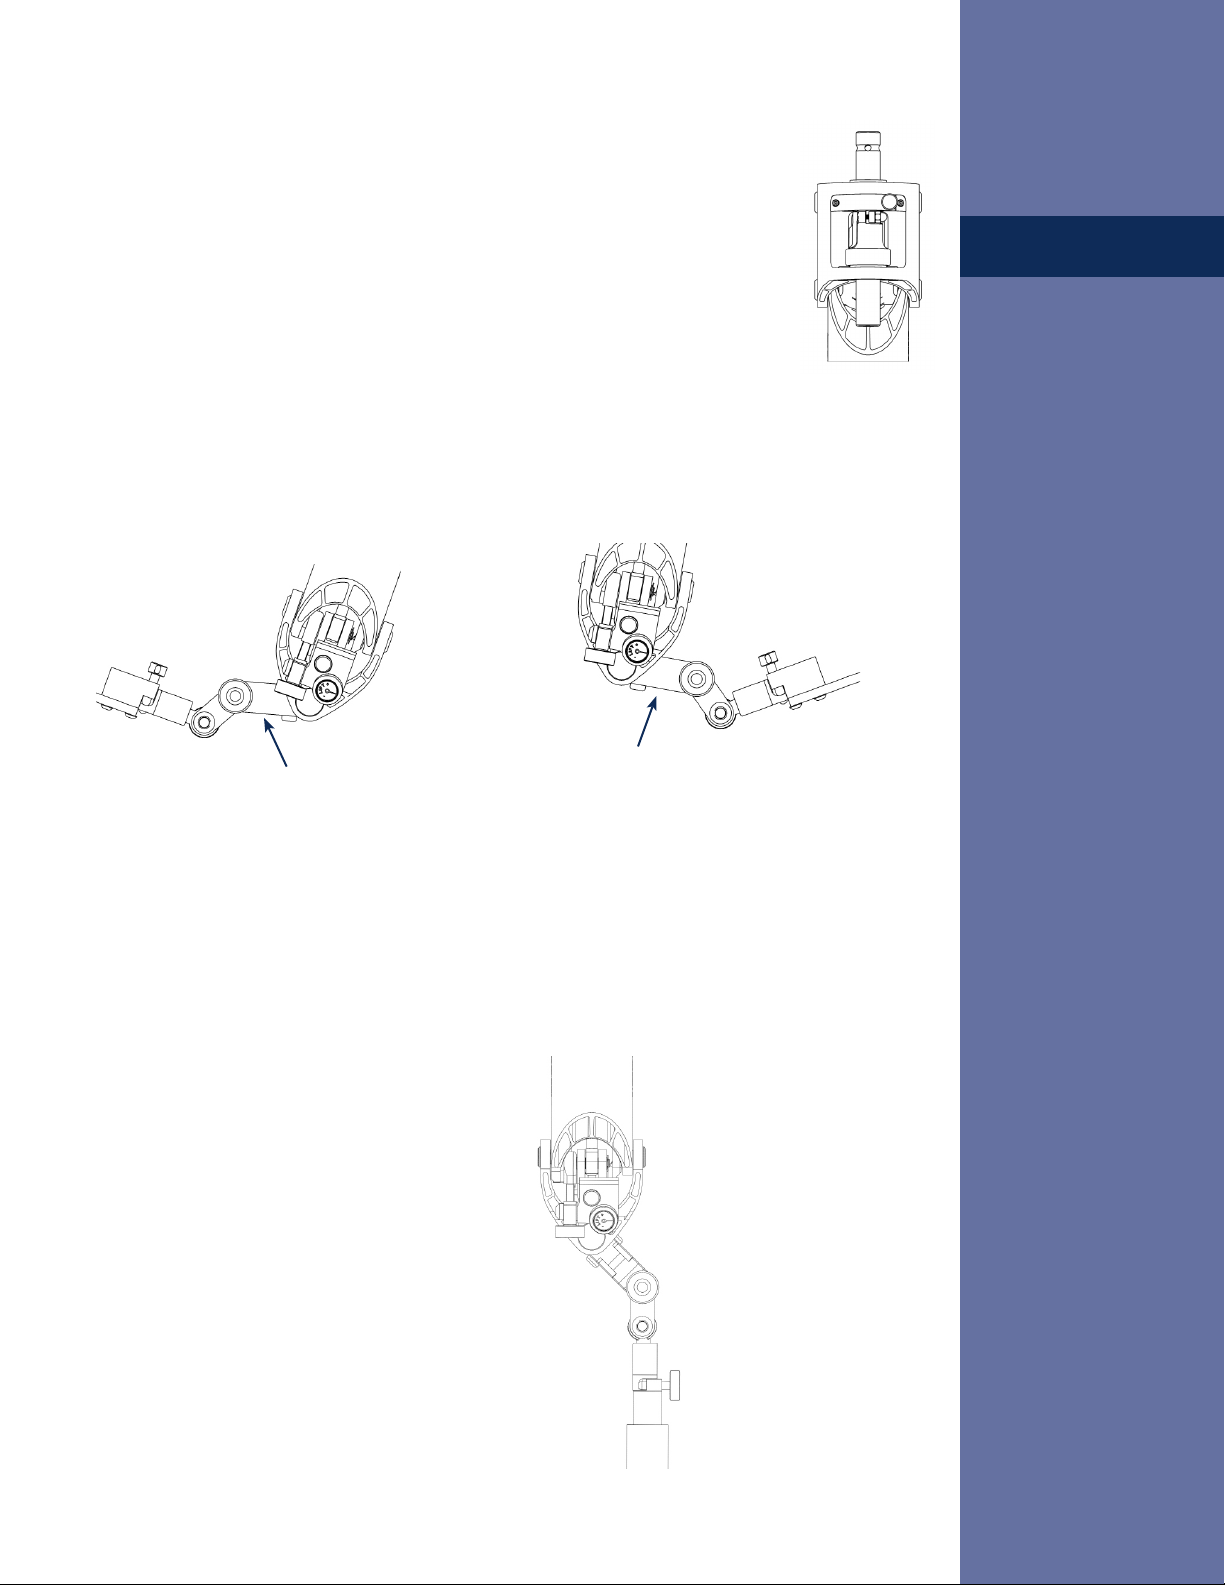
The Parts
The G-70x Arm
Arm post
Double action
hinge
Rod ends
Socket
Titanium
springs
Quick release pin
Lift adjustment
knob
Upper arm section
Adjustment knobs
Forearm section
Ride adjustment
knob
Titanium
springs
Adjustment
knobs
Kick-back link
Release lever for arm posts
4
The basic adjustments: Ride and Lift
Each arm segment has two adjusting knobs. The Ride knob alters iso-elasticity from a hard ride to a
super iso-elastic ride, and the Lift knob dials lifting power continuously from 12 to 50 pounds (5.4 to 22
kg) with the G-50x arm and 13 to 70 pounds (5.8 to 32 kg) with the G-70x arm.
Adjustment of Ride:
If you can, preset Ride close to the desired level of iso-elasticity in both
arm segments before picking up the sled and adjusting Lift. Because
the ride knob can only be turned when the arm segment is raised to its
highest, unloaded position, it is easiest to adjust before you pick up the
sled. Ride also can be adjusted when carrying the sled by booming up
fully. We’ve found it’s often easier to roll the knobs rather than use the
classic “pinch and twist” technique.
Start by presetting the both Ride knobs to the middle of their travel
(about 20 -25 threads visible). Once you get the iso-elastic feel you like,
make a note of the threads and the camera weight for future reference.
Setting Ride
Adjusting the ride or “iso-elasticity”
The G-50x and G-70x arms have an adjustable active link as part of the “Geo” feature. This adjustable
link gives the operator greater control over the dynamic changes, and thus more control over the arm’s
performance.
We want to achieve three things in setting a G-series arm:
1. We want both arm segments to lift the sled and “oat” at the same
angle. (This is true of all arms.) The default angle is about 5 -10
degrees up from horizontal, but this angle can be varied up or down 30
degrees or more as needed by the shot.
2. We want both arm segments to work or track together, without
lagging, leading, or hanging up.
3. We want to exert the least amount of effort to boom the arm fully
up or down. Or to put it another way, we want the most iso-elasticity
the geometry of the arm will allow. With the Ride set to the maximum
possible setting for the required lift, there is not only less effort to
boom up or down, but there also is less vertical reactivity in the arm
as one walks, climbs a curb, goes over a bump, etc. The result is less
dampening work for the operator and more vertical control.

5
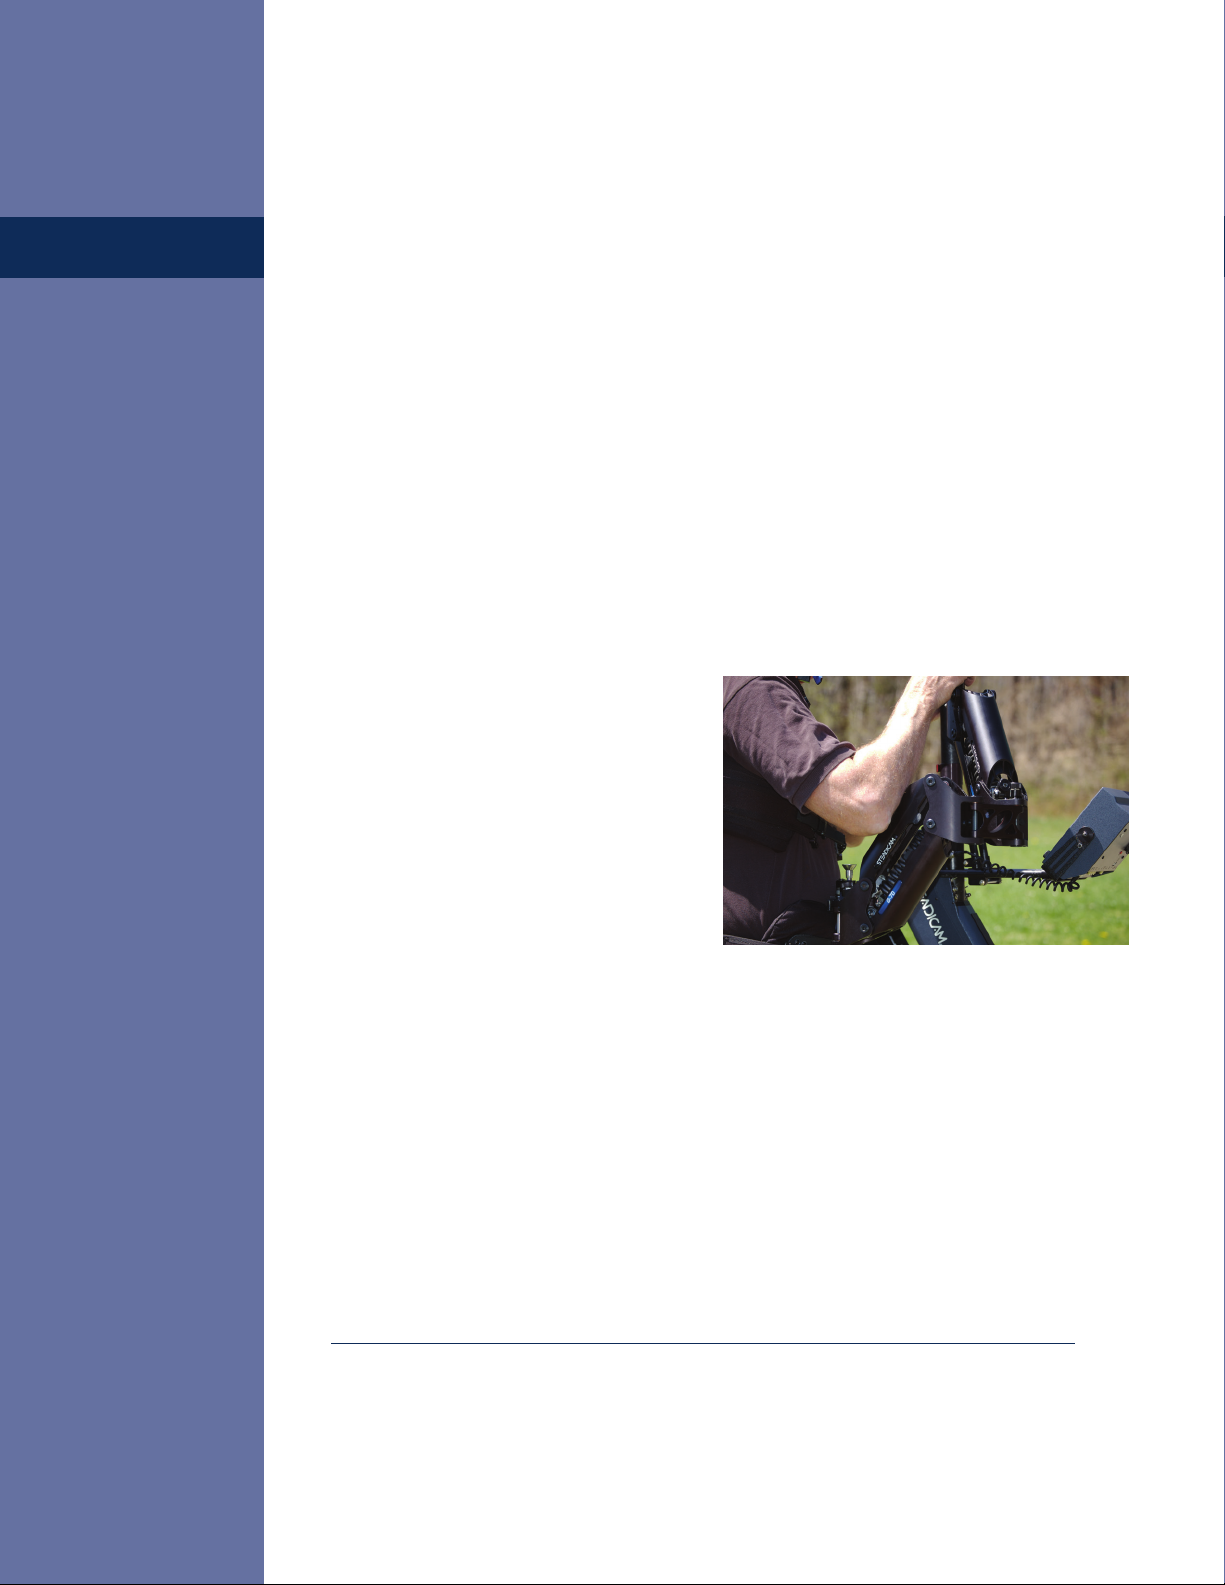
Setting Lift
Adjusting the ride: the arm must be
angled up at the top of its range.
Note: the ride knob is horizontal, the
lift knob is nearly vertical.
Adjustment of Lift:
All lift adjustments must be done while wearing
the rig, standing properly, and with your normal
threads in the vest to arm connection.
Adjust the forearm segment rst (the arm segment
closest to the gimbal).
Hold the arm segment slightly above level.
Slightly raise or lower the arm segment to nd
the sweet spot where it’s easy to turn the knob.
Adjust the arm’s lifting power so that the foream
arm segment seeks a position (or oats) slightly
above horizontal. When the forearm segment is
set correctly, adjust the upper arm segment to
follow (track with) the upper arm segment as
you boom fully up and down. At this point, don’t
worry if either arm segment tends to lock up or
down, or dwells in the middle.
After the lift is set, re-adjust the Ride knob for
the desired iso-elastic response.
Note that the Lift knob has a range of adjustment of 30 turns. This means that
each turn of the Lift knob will add or subtract about 1.5 pounds (.7 kg) of lift.

6
Adjusting iso-elastic response:
With the arm set to carry the load, we micro-adjust the Ride.
If we dialed in too much iso-elasticity, the arm segments will “hang up” at
the upper or lower extremes of boom travel. If we dialed in too little iso-
elasticity, the arm may not track well in the middle of its range. The only way
to tell if the ride is set correctly is to wear the rig, boom up and down fully,
and watch how the arm behaves.
To adjust the arm for maximum iso-elasticity at any given lift, we turn the Ride knob counterclockwise
until the arm segment begins to “lock” up or down at the extremes of travel. We then turn the ride knob
clockwise a couple of turns. This will keep the arm from locking up or down. We test and micro-adjust
the lift and ride knobs as necessary.
Next, we watch the arm segments as we boom up and down. If the upper arm segment hesitates or
dwells in the middle of its boom range, it is not iso enough to work with the forearm segment. We can
either increase the iso of the upper arm segment or decrease the iso of the forearm segment to correct the
problem.
Typically we try to increase the upper arm segment rst – to have the most iso in the whole arm. But if
we can’t increase the iso, that is, if the upper arm locks up at the extremes of travel, we must decrease
the iso in the forearm segment until the upper arm does not hesitate or dwell in the middle of its travel.
Lift and ride interact to some degree, so some tweaking of lift may be needed after setting the ride.
Typically, the G-Series arms are very forgiving of less than perfect adjustments of lift and ride.
Some tips in setting up the G-Series arms:
To minimize any lifting required with heavier cameras and/or to hold high boom heights, we often set
the arm segments to oat at a higher nominal angle (+25 degrees or more!). We nd pushing down is
easier than lifting fully with the extended boom range possible with the G-Series arms.
The arm can also be adjusted to hang lower than normal for shots with low boom heights, with very little
penalty in performance.
Ride does not have to be adjusted if you set the oat point higher or lower than “normal.” Minor
changes in sled weight (± several pounds) also do not require adjustment of the Ride knob: it’s not
something you change during the average day.
Some operaters prefer a centered ride setting for a feel similar to a IIIA arm. In addition, a centered ride
setting is preferred while using a hard mount on rough terrain. Our advice: experiment and use the arm
the way it helps you operate and get the shot. However, our preference is to have the maximum iso in all
situations.
Physical reality: With the same ride setting, all G-Series arms become progressively less iso-elastic as
the arm’s lift is increased. Heavier loads will require turning the Ride knob to increase iso-elasticity.
Lighter loads need the Ride knob turned to reduce iso-elasticity. Learn to adjust the Ride knob to obtain
— or maintain — your desired iso-elastic performance as the load changes.
Iso-elastic
Response
7
More G-70x Tips
Working with arm posts:
To change posts, rotate the mechanism to expose the release lever. Raise the lever to
horizontal to unlock the post. Note: the mechanism will remain in place. Replace post
with desired length post, leaving at least 1.125 inches (2.8 cm) protruding above the
arm. Clamp by rotating lever back to vertical.
To set the rotational drag, turn the drag knob clockwise to increase drag and
counterclockwise to decrease drag. Changing a post does not affect the drag setting.
Working with the “kick back” element:
To accommodate both regular and goofy-foot operators, the two mating parts held by the quick release
pin can t together in two ways. The design intent is to “kick back” the upper arm segment as shown
in the examples below. The parts need to be set one way for regular operating, and the opposite way
for goofy foot operating.
Operators with
“back mounted”
vests should also
orient the connection
to send the arm to
the inside. Regular
operating orientation
is shown in the
diagram.
When using with a back mounted vest:
When using a back mounted vest, set the kickback link inwards as shown in the photo. This is the
opposite direction from the kickback link’s use in a front mounted vest. The idea is to get the socket
block both closer to the body and to the Steadicam sled. Why? See the next tip.
When using any back mounted vest, all arms are more extended from the load (the sled) to the
attachment point (the socket block). Additionally, the “end block” nearest the body is pointing fore and
aft. With a normal, front-mounted vest, the arm extension is less and the end block is oriented sideways
to the load.
When you lean back with a back mounted vest,
the upper arm section’s end block leans back in
line with the upper arm section. (With a front
mount vest, the end block rotates perpendicular
to the upper arm section as you lean back). With
a back mounted vest, this leaning back puts the
end block in a more iso-elastic position, making
the upper arm section more likely to lock up.
All arms behave this way, but the consequences
become evident with an extended range (+/- 70
degree) and very iso-elastic arm like the G-70x
or G-50x. The travel in most other arms is
restricted to +/-50 degrees, and this effect occurs
above that angle.
Regular
Kick-back link
Goofy-foot
Kick-back link
8
The solution is to have about one-half the “iso” help (1/2 the threads) in the upper arm section that
one has in the forearm section. You ne tune the adjustment the same way as described on page 4 & 6,
increasing the iso-elastic response until the arm starts to lock up, then dialing it back in a few turns.
Walking with a back mounted vest also “activates” the socket block more than with a front mounted
vest; it rocks back and forth in line with the upper arm section, again with consequences for the arm’s
response. It may require an even smaller “less iso” link.
If you leave the forearm fully iso, it has the “helper torque” throughout its range, low to high, and when
the arm is extended, it tends to force the upper arm over centers. Consequently, you should not only
reduce the iso for the upper arm link with a back mounted vest, but also reduce the iso for the forearm.
That way when raised, the operator is lifting a little, the torque is reduced correspondingly and the
transferred torque is likewise reduced – hence a smaller tendency for the upper arm section to lock up.
Even with the iso dialed down, the G-70x’s response in the +/- 50 degree range is more iso-elastic than
other arms.
Some adjustment tips:
When adjusting from a light load to a heavy load: It helps to have an assistant independently control the
height of the upper arm and make his lift adjustment at the same time as you adjust the forearm lift.
It also helps if you raise your docking stand so you
can stand next to it and insert the arm post into the
gimbal yoke of your docked sled with your heavy
camera aboard. As you and your assistant adjust
the lift of both arm segments, they will gradually
pick up the weight until it oats free of the dock.
When adjusting from a heavy load to a light load:
Leave the heavy load aboard if possible, and with
the sled on the stand, remain adjacent to the stand
while you lighten the lift of both arm sections at
the same time. Then remove the heavy weight and
rebalance the sled for the light camera and then see
if the lift needs further adjustment.
Lift can be altered by forcefully holding the arm segments at the correct
angle while adjusting, but be prepared for some exertion! You might be
shocked how energetic the springs feel if you are raising or lowering the lift
by 30 pounds (13.6 kg)!
Steadicam®, G-50x, G-70x and Iso-Elastic are trademarks of the Tiffen Company, LLC.
Disclaimer: There is no implied or expressed warranty regarding this material. Specications,
accessories, etc. are subject to change without notice.
Other Steadicam Camera Accessories manuals

Steadicam
Steadicam Merlin 2 Manual instruction

Steadicam
Steadicam MERLIN2 User manual

Steadicam
Steadicam Ultra2 User manual

Steadicam
Steadicam M-1 User manual

Steadicam
Steadicam Ultra2 User manual

Steadicam
Steadicam ARCHER2 User manual

Steadicam
Steadicam X3 User manual

Steadicam
Steadicam Volt User manual

Steadicam
Steadicam Merlin Arm & Vest Technical manual

Steadicam
Steadicam Steadimate-S User manual


