Steiss Standing Sling with Clips User manual

SteissTM Standing
Sling with Clips
USER MANUAL

2
Standing Sling with Clips
Introduction
The Standing sling with Clips is an easy t sling suitable for standing and supporting. It is not a general
purpose sling and clients should be carefully assessed for suitability. It will not suit double amputees or
lifting from a horizontal position and clients must have a good degree of weight bearing ability.
Special Sling Orders
On occasions, material, dimensional and other changes outside of the standard specication are requested.
Please be advised, that aside of any model specic references, tting, washing and safety guidelines remain
applicable. If you are in any doubt, please contact Blueleaf Ltd.
Statement of Intended Use
A sling is an item of moving and handling equipment that is used with a mechanical lift in order to facilitate the
transfer of a patient. It comprises a specially designed and constructed piece of fabric that is placed under and/
or around a patient before being attached to the spreader bar/cradle of a lift to raise, transfer and lower the
patient. When selected and used correctly, a sling and lift combination will achieve a safer transfer and reduce
the risks associated with manual handling.
It is the responsibility of a competent person to conduct a thorough risk assessment prior to using any sling, to
ensure that the sling choice, method of positioning in the sling and procedure for transfer has been correctly
determined for the patient. For further guidance, please contact Blueleaf Ltd.
FOR USE WITH ACTIVE LIFTS ONLY.
Expected Service Life
The expected service life of a Steiss sling will vary dependent on use and following the care and washing
instructions provided in the user guide. Factors such as wash temperature, detergents, frequency of use and
patient weight will impact on the lifetime of your sling. Blueleaf Ltd recommends that slings are checked each
and every time prior to use to ensure the safety of the patient. Bleached, torn, cut, frayed or broken slings are
unsafe and must be discarded and replaced. It is a requirement under LOLER (Lifting Operations and Lifting
Equipment Regulations 1998) that slings are thoroughly checked and passed t for use. For further advice,
please contact Blueleaf Ltd.
WARNING
• For the safety of the patient and carer; before using a sling a full risk assessment must be
conducted to ensure that the correct sling choice, method of positioning in the sling and
procedure for transfer has been determined for the patient.
• CHECK sling and stitching before each use. Using bleached, torn, cut, frayed or broken slings
is unsafe and could result in serious injury or death to the patient.
• DO NOT alter slings. Destroy and discard worn slings.
• NEVER leave a patient unattended.
• DO NOT exceed the rated capacity of the sling or lift.
• DO NOT attempt to re-position a patient by pulling on the sling loops.
3
Standing Sling with Clips
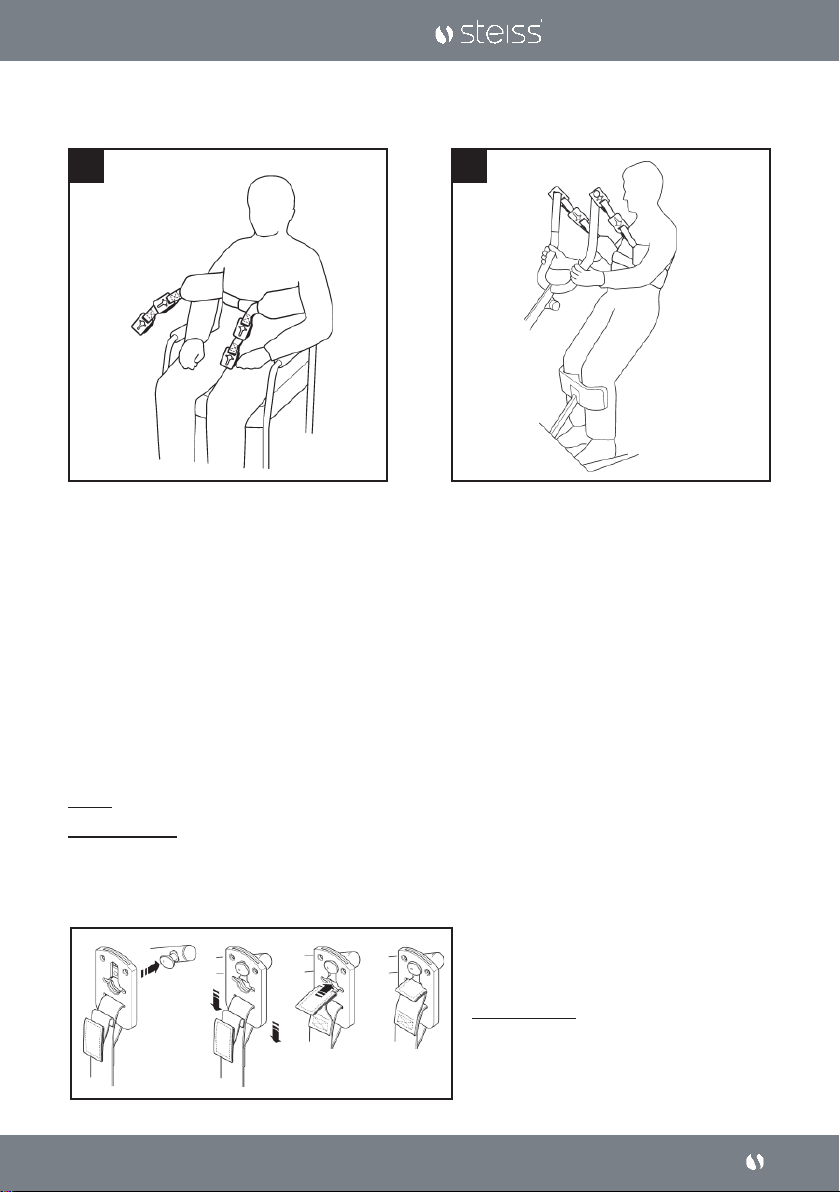
Fitting the Standing Sling with Clips
Place sling down behind client’s back between
base of shoulder blades and bottom of rib cage.
Attach strap around the front of the client. This
strap need not be tight. It is there to hold the
sling in position whilst attaching the sling to
the stand-aid. Ensure that the client’s arms are
outside the sling.
2
1
Position the stand-aid so that the client’s feet
t in the foot trays and knees rest against the
knee pad. Noting the instructions below, attach
the Securi3 clips to the location pins at the end
of the hand grips/cow-horn. There are two clip
positions to choose from to ensure a safe and
comfortable lift. The shorter clips may achieve
a more upright position. Ensure the equivalent
positioned clip is used on either side of the sling.
The client’s hands should be placed on the
hand grips or support handles. Double check for
secure attachment of the clips and reassure the
client before pushing the ‘UP’ button on the hand
control to raise the client to an upright standing
position.
NOTE: THIS SLING IS NOT A GENERAL-PURPOSE SLING AND WILL NOT BE SUITABLE FOR ALL CLIENTS.
TIPS FOR USE: ASK THE CLIENT TO LEAN BACK INTO THE SLING DURING LIFTING.
PLEASE NOTE:
1. Attach Securi3 clips to the attachment pins
as described in the illustration shown.
2. Ensure all green safety loops are visible
before lifting.
When tted to the patient, the sling is connected
to the clip attachment pin by using the Securi3 clip
system (step by step guide as follows). To remove,
simply reverse this procedure.
SECURI3 CLIP SYSTEM
Attaching the Securi3 Clips
4
Standing Sling with Clips
SIZE SAFE WORKING LOAD
PAEDIATRIC (BROWN) 200kg / 31st
SMALL (RED) 200kg / 31st
MEDIUM (YELLOW) 200kg / 31st
LARGE (GREEN) 200kg / 31st
EXTRA LARGE (BLUE) 200kg / 31st
Technical Specifications
STANDARD BS EN ISO 10535
Sizing & Safe Working Load
Washing Instructions
Machine wash at 85ºC.
DO NOT wash with bleach. Bleach will damage the sling’s material and make it unsafe for use.
Cool tumble dry, air dry or dry at very low temperature.
DO NOT dry clean.
85ºC
WARNING
Slings can suffer damage during washing and drying and should be checked carefully before
each use.
PLEASE NOTE: Additional slings are available to meet individual patient needs. We advise that
you always seek the advice of a trained clinician or Blueleaf ltd prior to purchase or use.

5
Standing Sling with Clips
Additional Important Safety Information
Following Medical Device Alerts on other manufacturers’ slings, it is important that users of Steiss slings
always follow the instructions in the user manuals provided with each sling and also the labels which are
stitched into each sling.
In particular, it is critical to the safety of the patient that the sling is checked each and every time prior to use.
Failure to do so may result in patient injury.
If any of the following faults are identied, the sling should not be used and immediately destroyed:
• There are signs of general wear and tear
• There is loose or broken stitching on any part of the sling (including the straps)
• There are worn areas on the attachment points
• There are discoloured areas
• There are areas of frayed or torn material
• There are areas of bleached material
• The label is illegible
Inspection is required on all areas of the sling. The following information provides some guidance on key
areas for inspection:
Example of a sling:
Key areas for inspection include:
1. Sling strap attachment point
2. Seams
3. Handle attachment points
4. End loops on sling straps
1
1
1
1
22
3
4
Table of contents
Other Steiss Medical Equipment manuals


Popular Medical Equipment manuals by other brands


Getinge
Getinge Arjohuntleigh Nimbus 3 Professional Instructions for use

Mettler Electronics
Mettler Electronics Sonicator 730 Maintenance manual

Pressalit Care
Pressalit Care R1100 Mounting instruction

Denas MS
Denas MS DENAS-T operating manual

bort medical
bort medical ActiveColor quick guide

AccuVein
AccuVein AV400 user manual


