Stella PRO reflex User manual

User Manual
stellaprolights.com


Table of Contents
Section 1
Reex Light
Section 2
Battery Handle
Section 3
Connecting the light to battery
handle and powering on
Section 5
OLED display
Section 6
Menu overview
Section 7
Light settings for operation with
wireless transmitters
Section 8
Notes on Use
Umbrella Mount
Speedring Mount
REFLEX LIGHT
Direct mount
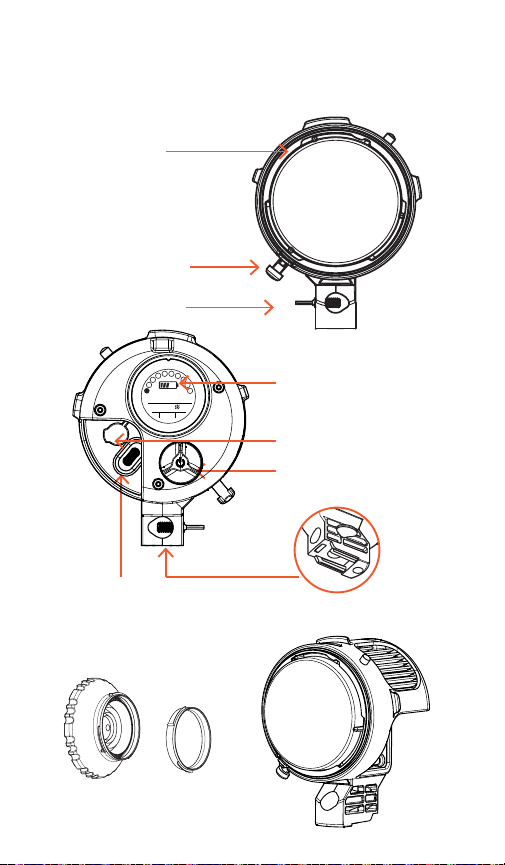
Section 1
DIRECT MOUNT
Medium
Spot Optic
Flat Port
Cover
USB-C Port
3.5 mm port
External Transceiver
OLED Display
Control Dial
Mounting Point
!
P
GR
Lm
4
HSS
CH 20
4000
USB-C Port Cover
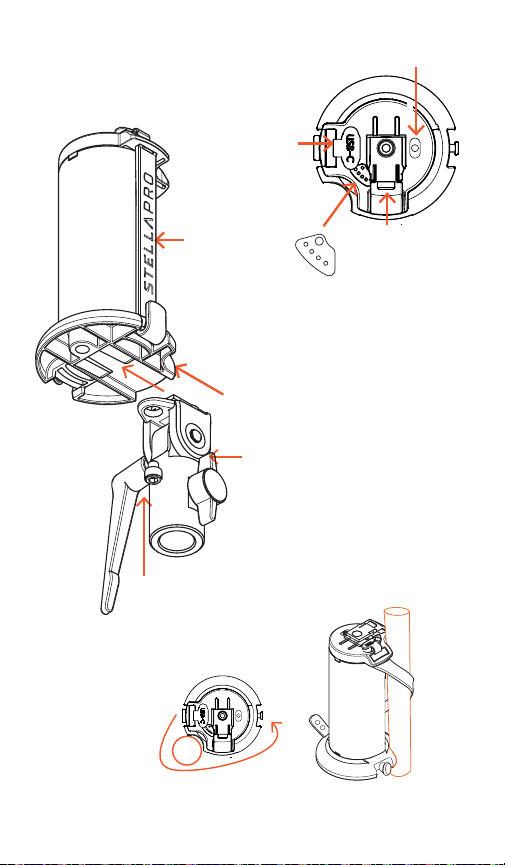
Section 2
Light Stand Mount Interface
(Sold Seperately) 800-0381
BATTERY HANDLE
MOUNTING BATTERY
HANDLE TO LIGHT STAND
Handstrap /
Pole Strap
Pole Mounting Feature
MOUNTING ON POLE
Power Button
Mounting Latch
State of Charge (SOC)
LEDs
(25%, 50%, 75%, 100%)
BATTERY INDICATOR LED to indi-
cate battery state
Charging (Green)
Discharging (Red)
Allen bolt
secures
connection
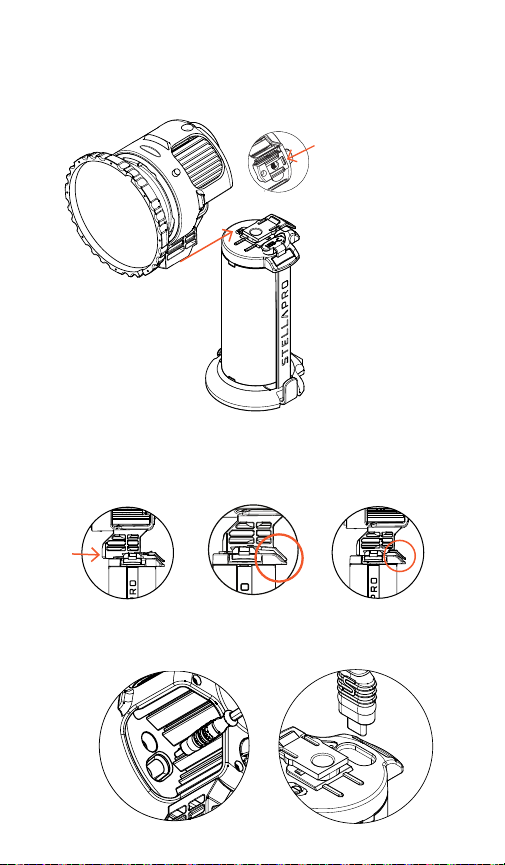
Section 3
Unlatched Secured
Connect USB-C cord to Reex light and battery USB-C ports
CONNECTING LIGHT TO BATTERY
Push light onto battery until it
snaps into place
Tip: Push at the top front of
the optic
Connector tab
should no longer
be compressed
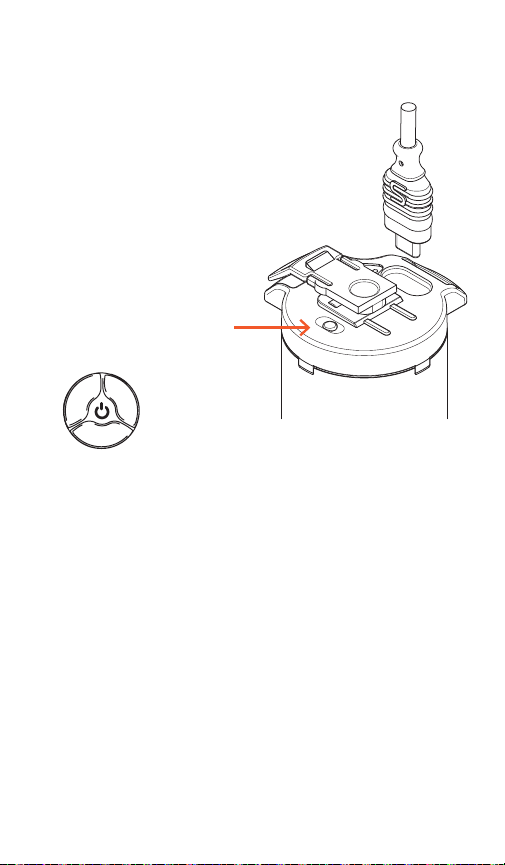
Section 4
OPERATION BASICS
To turn on, press white button on battery.
Look for battery indicator light to turn on.
OLED display turns on once battery is on.
If light display does not turn on, check
that cable is fully inserted.
•
•
•
•
•
Short press (1 sec) switches between
Continuous and Digital Burst*
Medium press (approx. 2 sec) enters and exits the
the set-up menu
Long press (4 sec) to power o
Rotate Clockwise to increase output
Rotate Counter-clockwise to decrease output
CONTROL DIAL FUNCTIONS
*Transmitter is required for burst operation
Power Button
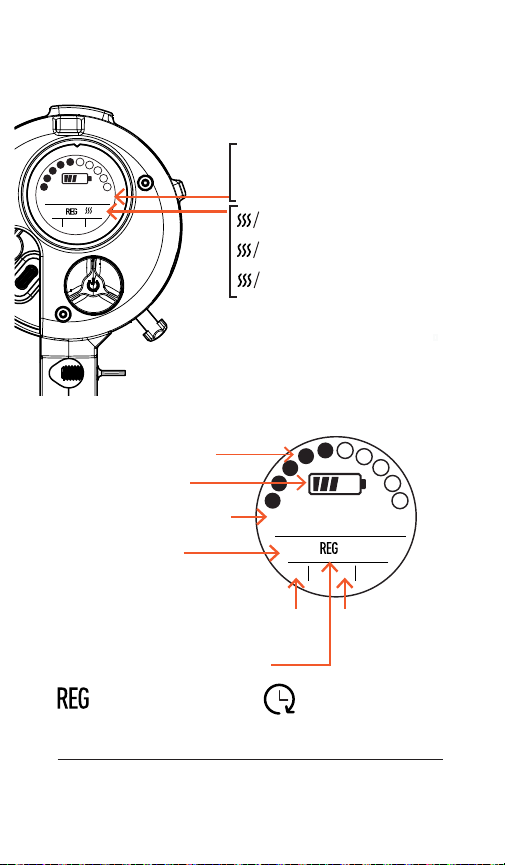
Section 5
OLED DISPLAY
Section 6
MENU OVERVIEW
L
B
Lm
Burst
LED Overheating
(Turn o to cool down)
Battery Overheating
(Turn o to cool down)
Sensor Fault
(Return for service)
Lumen (100-6000)
Digital Burst (1.0-4.4 Stops)*
!
P
GR
Lm
4
HSS
CH 20
!
4000
Group Channel
Digital Burst Mode
GR CH
!
P
GR
Lm
4
HSS
8000
CH 20
Wireless Modes
Godox,
Elinchrom,
Bluetooth,
-Radio O
Battery Level
Continuous/Burst Power
To navigate the menu, short press
control dial to change the sub-menu.
Rotate dial to change the setting.
Always 5ms Burst
Adjust Power
Adjust Duration (0.4ms - 6ms)
Always 12000 Lumens***
REGULAR DURATION **
* With 100W Power Supply lumens to 9000 and Digital Burst to 5-stops
**Duration Mode only available on the Reflex S
***18000 Lumens o 100W USB-C Power Supply
Burst3.0
E
E
Control the lumen output with a
set burst duration of 5 milliseconds
Control the burst duration with a set
lumen output of 12000 lumens
Power Level Indicators

Section 7
CHANGING LIGHT SETTINGS
Enter the menu by pressing the control dial
for 2 sec.
Menu selection: Short press to advance
through sub-menus
G
GR
A
CH
20
MENU
WIRELESS
CH 20
MENU
CHANNEL
G
GR A
C
H
2
0
MENU
GROUP
G
C
H
2
0
MENU
Group - Rotate dial to select group
Wireless - Rotate dial to select
transmitter type (Elinchrom, Godox,
Bluetooth)
Set wireless mode to Bluetooth to
perform rmware updates.
Channel - Rotate dial to select
channel
Mode - Rotate dial to select Burst
Mode: Reg or Duration
(Note: duration mode only available on
Reex S model)
Elinchrom
Godox
Bluetooth
G
A
G
R
A
G
R
MODE
E(1-4)
G(A-F)
E(1-20)
G(1-32)

Section 8
HOW TO USE REFLEX
Reex has three distinct ways to be used. Reex responds
to trigger signals whether in continuous or burst mode. If
you turn the transmitter off it is a continuous light only.
1. Continuous power lm (lumens)
• Rotate dial to desired power output in lumens.
• Your trigger may also allow remote adjustment of
continuous power.
• Maximum power from the battery handle is 6000
lumens.
• Maximum power when the light is powered from a
remote USB-C 100 watt source is 9000 lumens
2. Burst
• When set to REG, rotate the dial to set burst power.
Maximum burst power is 1 stop more light than max-
imum continuous mode.
• In Duration mode , rotate the dial to set duration
from 0.4ms to 6ms (1/160th sec).
3. A continuous light that bursts when
trigger signal is detected.
• Make sure trigger is synced, as shown in Burst mode
above.
• Press dial to select continuous mode. Adjust output
with compatible trigger control or manually using dial.
• Press dial to change to Burst mode. Rotate dial to
select burst power (or duration).
• Press dial to return to continuous mode and work
with your subject. When you take a still, the light will
automatically change to burst mode and deliver
ashes in sync with your camera at the pre-set
power or duration level.
Other manuals for PRO reflex
1
Table of contents
Other Stella Lighting Equipment manuals


Popular Lighting Equipment manuals by other brands


Qazqa
Qazqa Suplux SL 3 Black 103062 instruction manual

Commercial Electric
Commercial Electric 54568141 Use and care guide

CREE LIGHTING
CREE LIGHTING 304 Series installation instructions

Goobay
Goobay 49867 user manual

ECOMAN ITALIA
ECOMAN ITALIA LED T8 instruction manual

Alkalite
Alkalite Krypton KT-81 user manual


