manuals.online logo
Brands
  1. Home
  2. •
  3. Brands
  4. •
  5. Dimplex
  6. •
  7. Heater
  8. •
  9. Dimplex EMC4240 User manual

Dimplex EMC4240 User manual

Other manuals for EMC4240

4

This manual suits for next models

2

Other Dimplex Heater manuals

Dimplex CXL User manual

Dimplex

Dimplex CXL User manual

Dimplex Unidare UPX Series User manual

Dimplex

Dimplex Unidare UPX Series User manual

Dimplex DTD Series User manual

Dimplex

Dimplex DTD Series User manual

Dimplex Evo Rad User manual

Dimplex

Dimplex Evo Rad User manual

Dimplex OFC1500TLG User manual

Dimplex

Dimplex OFC1500TLG User manual

Dimplex EWa-C Series User manual

Dimplex

Dimplex EWa-C Series User manual

Dimplex BEETHOVEN User manual

Dimplex

Dimplex BEETHOVEN User manual

Dimplex AC6RN User manual

Dimplex

Dimplex AC6RN User manual

Dimplex TRP 150 X User manual

Dimplex

Dimplex TRP 150 X User manual

Dimplex Heater User manual

Dimplex

Dimplex Heater User manual

Dimplex QM070 Quantum User manual

Dimplex

Dimplex QM070 Quantum User manual

Dimplex EUH-B Series User manual

Dimplex

Dimplex EUH-B Series User manual

Dimplex QM070 Quantum User manual

Dimplex

Dimplex QM070 Quantum User manual

Dimplex EWA-C 3kW Series User manual

Dimplex

Dimplex EWA-C 3kW Series User manual

Dimplex EUL-B Series User manual

Dimplex

Dimplex EUL-B Series User manual

Dimplex CXLS12N User manual

Dimplex

Dimplex CXLS12N User manual

Dimplex DHCER24SG User manual

Dimplex

Dimplex DHCER24SG User manual

Dimplex DES 1821 User manual

Dimplex

Dimplex DES 1821 User manual

Dimplex DHPH20F User manual

Dimplex

Dimplex DHPH20F User manual

Dimplex SRX 080 EM User manual

Dimplex

Dimplex SRX 080 EM User manual

Dimplex SAF6 Series User manual

Dimplex

Dimplex SAF6 Series User manual

Dimplex CEL50 User manual

Dimplex

Dimplex CEL50 User manual

Dimplex MH NO Series User manual

Dimplex

Dimplex MH NO Series User manual

Dimplex TAYLOR SUITE User manual

Dimplex

Dimplex TAYLOR SUITE User manual

Popular Heater manuals by other brands

Porter-Cable PCXH80KT Operating instructions and owner's manual

Porter-Cable

Porter-Cable PCXH80KT Operating instructions and owner's manual

Dyna-Glo RA18LPDG user manual

Dyna-Glo

Dyna-Glo RA18LPDG user manual

EOS Herkules XL S120 installation instructions

EOS

EOS Herkules XL S120 installation instructions

Trebs Comfortheat 99209 manual

Trebs

Trebs Comfortheat 99209 manual

Biddle STYLE2 Series Installation operation & maintenance

Biddle

Biddle STYLE2 Series Installation operation & maintenance

Vermont Castings Non-Catalytic Convection Heater 2477CE Installation and operating manual

Vermont Castings

Vermont Castings Non-Catalytic Convection Heater 2477CE Installation and operating manual

Fagor RA-1505 Instructions for use

Fagor

Fagor RA-1505 Instructions for use

THERMAL FLOW Delta 175 Operating instructions manual

THERMAL FLOW

THERMAL FLOW Delta 175 Operating instructions manual

GET G2CH instructions

GET

GET G2CH instructions

ApenGroup PK Series User, installation, and maintenance manual

ApenGroup

ApenGroup PK Series User, installation, and maintenance manual

oventrop Regucor Series quick start guide

oventrop

oventrop Regucor Series quick start guide

Blaze King CLARITY CL2118.IPI.1 Operation & installation manual

Blaze King

Blaze King CLARITY CL2118.IPI.1 Operation & installation manual

ELMEKO ML 150 Installation and operating manual

ELMEKO

ELMEKO ML 150 Installation and operating manual

BN Thermic 830T instructions

BN Thermic

BN Thermic 830T instructions

KING K Series Installation, operation & maintenance instructions

KING

KING K Series Installation, operation & maintenance instructions

Empire Comfort Systems RH-50-5 Installation instructions and owner's manual

Empire Comfort Systems

Empire Comfort Systems RH-50-5 Installation instructions and owner's manual

Well Straler RC-16B user guide

Well Straler

Well Straler RC-16B user guide

EUROM 333299 instruction manual

EUROM

EUROM 333299 instruction manual

manuals.online logo
manuals.online logoBrands
  • About & Mission
  • Contact us
  • Privacy Policy
  • Terms and Conditions

Copyright 2025 Manuals.Online. All Rights Reserved.

GROUNDING INSTRUCTIONS
This heater is for use on 240 Volts.
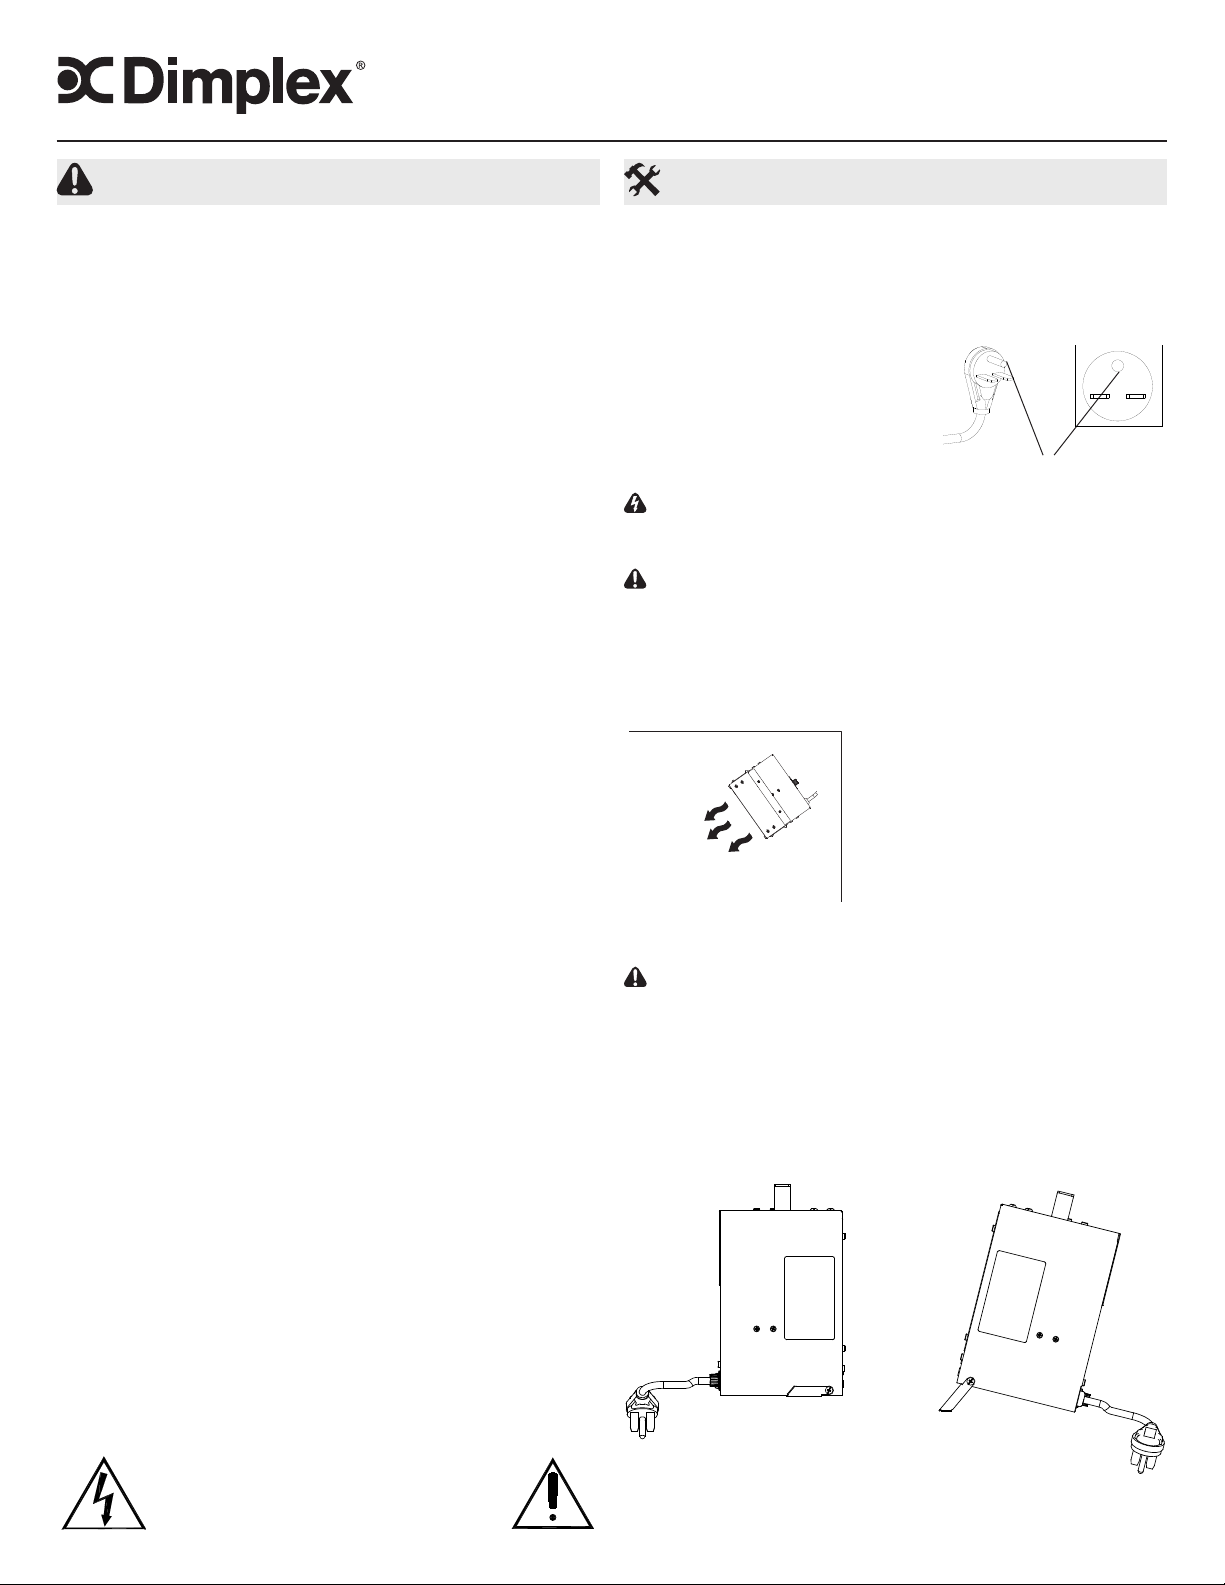
The cord has a plug as shown
on Figure 1. No adapter should
be used with this unit. The type
outlet is a 240 Volt grounding
outlet. When properly installed,
it provides a ground connection
through the cord to the heater to
protect the operator from electric
shock.
WARNING: To reduce the risk of re, do not store or use
gasoline or other ammable vapors or liquids in the vicinity of the
heater.
CAUTION: High temperature, risk of re, keep electrical
cords, drapery, furnishings, and other combustibles at least 3 feet
(0.9 m) from the front of the heater.
Heater Location And Clearances
The heater is intended for horizontal
use on a hard oor, table top, desk or
on shelf, and the like.
The discharge air should wipe the
walls without blowing directly on
them (Figure 2).
Ensure the air discharge is parallel to
or away from walls.
!
NOTE: To prevent personal injury always use a licensed
electrician to install new outlets or circuits.
CAUTION: When turning and/or tilting the heater do not block
the exhaust opening.
Use Of Support Stand (EMC4240 only)
The pre-installed support stand can be swivelled out to allow
an upward angle for the air discharge. When in down position,
the heater should be placed on a at surface such that it will be
stable and not fall over (Figure 3).
7208970100R07
Construction Heaters
DCH4831 & EMC4240
Installation Instructions
IMPORTANTINSTRUCTIONS
When using electrical appliances, basic precautions should
always be followed to reduce the risk of re, electric shock and
injury to person, including the following:
1. Read all instructions before using this appliance.
2. The heater is hot when in use. To avoid burns, do not let bare
skin touch hot surfaces. The trim around the heater outlet
becomes hot during heater operation. Keep combustible
materials, such as furniture, pillows, bedding, papers, clothes,
and curtains at least 3 feet (0.9m) from the front of the unit.
3. Extreme caution is necessary when any heater is used by
or near children or invalids and whenever the unit is left
operating and unattended.
4. Always unplug the heater when not in use.
5. Do not operate any unit with a damaged cord or plug, or if the
heater has malfunctioned, or if the heater has been dropped
or damaged in any manner have the heater inspected by a
reputable electrician before reusing.
6. Do not use outdoors.
7. The heater is not intended for use in bathrooms, laundry
areas and similar indoor locations. Never locate heater where
it may fall into a bathtub or other water container.
8. Do not run the cord under carpeting. Do not cover cord with
throw rugs, runners or the like. Arrange cord away from tra󰀩c
area and where it will not be tripped over.
9. To disconnect the unit, turn the controls o󰀨, then remove the
plug from the outlet.
10. Connect to properly grounded outlets only.
11. Do not insert or allow foreign objects to enter any ventilation
or exhaust opening as this may cause an electric shock or
re, or damage to the heater.
12. To prevent a possible re, do not block air intake or exhaust
in any manner.
13. All electrical heaters have hot and arcing or sparking
parts inside. Do not use in areas where gasoline, paint, or
ammable liquids are used or stored.
14. Do not modify the heater. Use it only as described in this
manual. Any other use not recommended by the manufacturer
may cause re, electric shock or injury to persons.
15. Always plug heaters directly into a wall outlet/receptacle.
Never use with an extension cord or relocatable power tap
(outlet/power strip).
16. This heater includes a visual alarm (red light) to warn that
parts of the heater are overheating. If the red light turns on,
immediately turn heater o󰀨 and inspect for any objects on or
adjacent to the heater that may cause high temperatures. DO
NOT OPERATE WHEN RED LIGHT IS ON.
17. Always use a certied electrician should new circuits or
outlets be required.
18. Disconnect power supply before performing any cleaning,
maintenance or relocation of the unit.
19. When transporting or storing the unit and cord, keep in a dry
place, free from excessive vibration and store so as to avoid
damage.
SAVE THESE INSTRUCTIONS
Figure 1:
Plug and outlet conguration
for 240 Volt, 30 Amp circuit
Ground
Plug Outlet
Figure 2
CAUTION
RISK OF ELECTRIC SHOCK
DO NOT OPEN
NO USER-SERVICEABLE PARTS INSIDE
Figure 3
Outside Wall
Discharge
Down Position
Warranty
Dimplex Electric Heaters are tested and inspected prior to shipment and are
guaranteed free from defect to the purchaser of each new product. Any part
which proves to be defective in material or workmanship under normal use
within one year will be repaired or replaced without charge. The Company
will not be responsible for any expense incurred for installation, removal from
service, or transportation costs. Any such defect should be brought to the
attention of the Dealer where the product was purchased and is authorized to
repair or replace within the terms of this warranty.
The Company’s only obligation under this warranty will be at its sole option
to repair or replace any part proving defective or to refund the purchase price
thereof.
The owner/user assumes all other risks, if any, including the risk of any direct,
indirect or consequential loss or damage arising out of the use of or inability
to use the product.
The warranty will not apply if, in the sole judgment of the Company, damage
or failure has resulted from accident, alteration, misuse, abuse, incorrect
installation, or operation on an incorrect power source.
The foregoing is in lieu of all other warranties expressed, implied, or statutory,
and the Company neither assumes, nor authorizes any person to assume for
it any other obligation, or liability in connection with said product.
WARNING: Disconnect power before attempting any
maintenance or cleaning to reduce the risk of re, electric
shock or damage to persons.
CAUTION: Allow at least 30 minutes for the heater to cool
before attempting any maintenance or cleaning.
!NOTE: This heater should not be operated with an
accumulation of dust or dirt on or in the unit, as this can cause
a build up of heat and eventual damage. For this reason the
heater must be inspected regularly, depending upon conditions
and at least at yearly intervals.
To clean the exterior surface, use a solution of water and mild
detergent, apply with damp sponge. Wipe dry with a dry cloth.
DO NOT plug heater into outlet until it has dried thoroughly.
Maintenance
WARNING: This heater must be properly installed before it
is used.
SETTING THE THERMOSTAT
1. Before connecting or disconnecting plug, turn knob fully
counterclockwise.
2. Heater is equipped with a thermostat. To adjust temperature
to your individual requirements, turn thermostat control knob
clockwise all the way to turn heater on. The yellow power
light will illuminate (Figure 4). When room reaches desired
temperature, turn thermostat knob counterclockwise
until you hear a click. Leave in this position to maintain
room temperature at this setting. For additional heat, turn
clockwise until you hear a click again and heater will turn on.
To shut heater o󰀨 turn thermostat knob counterclockwise
all the way. The yellow power indicator light will turn o󰀨.
!
NOTE: Heater is equipped with a fan delay to dissipate
residual heat from the element. Heater fan will run for a brief
period after heater has reached room temperature.
WARNING: Should the heater overheat, an automatic cut
out will turn the heater o󰀨 and it will not come back on
without being reset. It can be reset by unplugging the unit
and waiting 5 minutes before plugging the unit back in.
If you need to continuously reset the heater, unplug the
unit and contact a licenced electrician. DO NOT USE
THE HEATER UNTIL THE CAUSE OF THE PROBLEM IS
DETERMINED AND FIXED.
Operation
Power On
En marche
Encedido
Over Temp
Surchauffe
Temperatura
Excesiva
O
Low
High
Red light
Yellow light
Figure 4
1-888-346-7539 | www.dimplex.com
In keeping with our policy of continuous product improvement,
we reserve the right to make changes without notice.
© 2019 Glen Dimplex Americas