Stihl FS-MM User manual

Contents
1 MultiSystem................................................ 2
2 Guide to Using this Manual.........................2
3 Safety Precautions and Working Techni‐
ques............................................................ 2
4 Approved MultiEngines............................... 7
5 Approved Combinations of Cutting Attach‐
ment and Deflector .....................................7
6 Fitting, removing the MultiTool....................7
7 Mounting the Deflector................................9
8 Mounting the Cutting Attachment................9
9 Starting / Stopping the Engine.................. 10
10 Storing the Machine.................................. 11
11 Maintaining the Mowing Head...................11
12 Maintenance and Care..............................12
13 Main Parts.................................................12
14 Specifications............................................12
15 Maintenance and Repairs......................... 13
16 Disposal.................................................... 13
1 MultiSystem
469BA028 KN
+
+
In the STIHL MultiSystem, various MultiEngines
and MultiTools are combined to form a machine.
In this Instruction Manual, the functional unit of
MultiEngine and MultiTool is referred to as a
machine.
Accordingly, the instruction manuals for the Mul‐
tiEngine and the MultiTool constitute the entire
Instruction Manual for the machine.
Always read both manuals carefully before using
your machine for the first time and keep them
safe for future reference.
2 Guide to Using this Manual
2.1 Pictograms
All the pictograms attached to the machine are
shown and explained in this manual.
2.2 Symbols in text
WARNING
Warning where there is a risk of an accident or
personal injury or serious damage to property.
NOTICE
Caution where there is a risk of damaging the
machine or its individual components.
2.3 Engineering improvements
STIHL's philosophy is to continually improve all
of its products. For this reason we may modify
the design, engineering and appearance of our
products periodically.
Therefore, some changes, modifications and
improvements may not be covered in this man‐
ual.
3 Safety Precautions and
Working Techniques
Special safety precautions must be
observed to reduce the risk of per‐
sonal injury when operating this
power tool because of the very high
speed and sharpness of its cutting
attachment.
Always read and and make sure you
understand both user manuals (Multi‐
Engine and MultiTool) before using
your power tool for the first time, and
keep them in a safe place for future
reference. Non-compliance with the
user manuals may cause serious or
even fatal injury.
The machine must only be provided or loaned to
people familiar with this model and its operation.
The MultiEngine and MultiTool user manuals
must always be handed over with the machine.
Exclusively use your MultiTool for mowing grass.
The machine must not be used for any other pur‐
poses – risk of accident!
English
2 0458-480-0121-B
© ANDREAS STIHL AG & Co. KG 2022
0458-480-0121-B. VA0.G22.
Printed on chlorine-free paper
Printing inks contain vegetable oils, paper can be recycled.
Original Instruction Manual
0000008240_004_GB

Only use attachments and accessories that are
explicitly approved for this power tool model by
STIHL or are technically identical. If you have
any questions in this respect, consult your
dealer.
Only use cutting attachments and accessories
that are explicitly approved for this power tool
model by STIHL or are technically identical. If
you have any questions in this respect, consult
your dealer.
Use only high-quality parts and accessories. in
order to avoid the risk of accidents and damage
to the machine.
STIHL recommends the use of original STIHL
tools, cutting attachments and accessories. They
are specifically designed to match the product
and meet your performance requirements.
The guard provided with your machine may not
protect the operator from all foreign objects
(gravel, glass, wire etc.) ejected by the revolving
cutting attachment. Ejected objects may also ric‐
ochet and strike the operator.
Never attempt to modify your power tool in any
way since this may increase the risk of personal
injury. STIHL excludes all liability for personal
injury and damage to property caused while
using unauthorized attachments.
Do not use a high-pressure washer to clean the
power tool. The solid jet of water may damage
parts of the unit.
3.1 Clothing and Equipment
Wear proper protective clothing and equipment.
Clothing must be sturdy but allow
complete freedom of movement.
Wear close-fitting clothes such as a
boiler suit, not a loose jacket.
Do not wear clothing which could become trap‐
ped in wood, brush or moving parts of the
machine. Do not wear a scarf, necktie or jewelry.
Tie up and secure long hair above your should‐
ers.
Wear safety boots with steel toe caps
and non-slip soles.
WARNING
To reduce the risk of eye injuries,
wear close-fitting safety glasses in
accordance with European Standard
EN 166. Make sure the safety
glasses are a snug fit.
Wear face protection and make sure it is a good
fit. Face protection alone is not sufficient to pro‐
tect the eyes.
Wear "personal" sound protection, e.g. ear
defenders.
Wear sturdy protective gloves made
of a resistant material (e. g. leather).
STIHL offers a comprehensive range of personal
protective equipment.
3.2 Transporting the Unit
469BA060 KN
Always stop the engine.
Transport the machine by the handle or loop
handle, working tool facing forward.
Never touch hot parts – risk of burns!
Transporting by vehicle: Allow engine to cool
down, properly secure your power tool to prevent
toppling over, fuel spillage and damage.
3.3 Before starting
Check that your power tool is properly assem‐
bled and in good condition – refer to appropriate
chapters in the MultiEngine and MultiTool user
manuals.
–The combination of cutting attachment and
deflector must be permissible and all parts
must be mounted correctly
–Check cutting attachment for correct and
secure assembly and good condition
–Check safety devices (e. g., deflector for cut‐
ting attachments) for damage and/or wear.
Always replace damaged parts. Do not oper‐
ate your machine with a damaged deflector
and/or worn cutting attachment (lettering and
arrows no longer legible)
3 Safety Precautions and Working Techniques English
0458-480-0121-B 3

–Do not attempt to modify the controls or safety
devices in any way – only work with the deflec‐
tor fitted
–Keep the handles dry and clean – free from oil
and dirt – this is important for safe control of
the machine.
–Swing the bike handle to the normal operating
position and tighten it down firmly with the
rotary knob. See chapter "Adjusting the bike
handle" in the MulitEngine User Manual
The power tool must only be operated when it is
in good operating condition – Risk of accident!
1
486BA012 KN
21
To use MultiTools for mowing grass, trimming
and thinning out, remove the gearbox. For this
purpose:
► Undo the screws (1)
► Pull off the gearbox (2).
Use this position for:
–Clearing saw FS-MM
3.3.1 Wheel kit
9911BA010 KN
Only use MultiTool together with wheel kit (spe‐
cial accessory) on MultiEngine.
Use only genuine STIHL wheels. The use of
other wheels may result in damage to the
machine or personal injury.
The wheels can be locked in various positions –
also see information about "wheels" in the Multi‐
Engine User Manual.
3.4 Holding and Guiding the Tool
Make sure you always have a firm and secure
footing.
469BA045 KN
Always hold the unit firmly with both hands on
the handles.
Right hand on control handle, left hand on grip
on handlebar.
English 3 Safety Precautions and Working Techniques
4 0458-480-0121-B

3.5 While Working
In the event of impending danger or in an emer‐
gency, switch off the engine immediately by mov‐
ing the slide control / stop switch/button to
0 or STOP.
15m (50ft)
There is a risk of accident from ejected objects
within a wide area around the working space, so
you must ensure that there is no-one within a
15 m radius of the machine. This distance must
also be maintained in relation to objects (vehi‐
cles, window panes) – risk of property damage!
Even at distances beyond 15 m, the danger can‐
not be ruled out.
Avoid contact with the cutting attach‐
ment – risk of injury!
Check that the engine is properly idling so that
the cutting tool will not continue rotating after you
release the throttle trigger. Check and correct the
idle speed setting at regular intervals. If the
attachment still rotates when the engine is idling,
have your dealer check your machine and make
proper adjustments or repairs – see MultiEngine
User Manual.
Never work without deflector suitable
for the respective machine and cut‐
ting tool – risk of injury from ejected
objects!
The gear head becomes hot during
operation. Do not touch the gear
housing – risk of burns!
Take special care in slippery conditions – damp,
snow, ice, on slopes or uneven ground!
Watch out for obstacles: Tree stumps, roots –
risk of tripping or stumbling!
Check the work site – rocks, metal
objects etc. could get caught up and
ejected – potentially beyond a dis‐
tance of 15 m – risk of injury! Such
objects can also damage the cutting
attachment and other property (e.g.
parked vehicles, windows).
Be particularly careful when working on difficult,
densely grown terrain.
Make sure you always have a firm and secure
footing.
Careful when working on steep slopes – risk of
slipping.
Never operate your power tool with one hand.
Be particularly alert and cautious when wearing
ear protection because your ability to hear warn‐
ings (shouts, alarms, etc.) is impaired.
Take breaks when you start getting tired or feel‐
ing fatigue – risk of accidents!
Work calmly and carefully – in daylight conditions
and only when visibility is good. Proceed with
caution, do not put others in danger.
If your power tool is subjected to unusually high
loads for which it was not designed (e.g. heavy
impact or a fall), always check that it is in good
condition before continuing work – see also
"Before Starting". Make sure the safety devices
are working properly. Never use a power tool
that is no longer safe to operate. In case of
doubt, contact a dealer.
Examine the cutting attachment periodically at
short intervals and as soon as you perceive any
noticeable changes:
–Stop the engine, hold the machine securely,
allow the cutting attachment to come to a stop
–Check condition and secure fitting; watch out
for cracks
–Replace damaged or blunt cutting attachments
immediately, even in the event of minor hair‐
line cracks
Clean grass and plant residue off the cutting
attachment mounting at regular intervals –
remove any build up of material from the cutting
attachment and deflector.
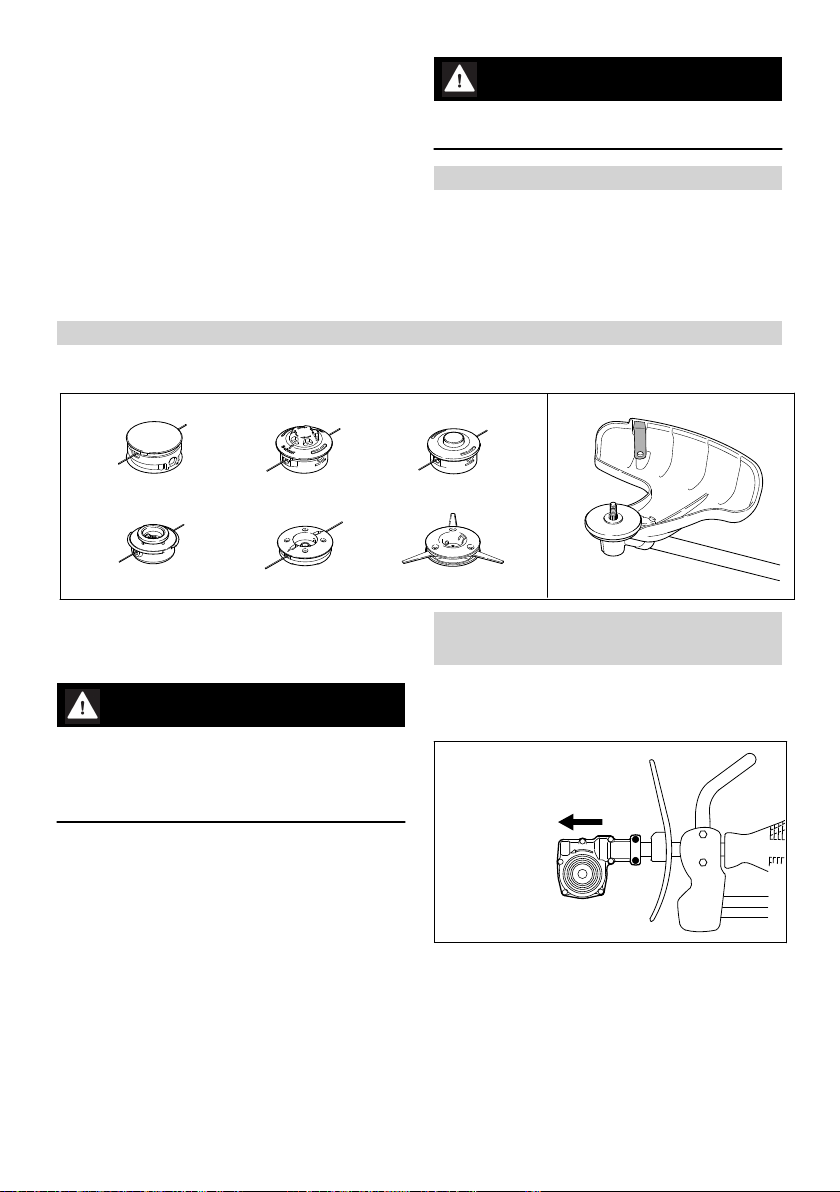
To reduce the risk of injury, shut off the engine
before replacing the cutting attachment.
Do not continue using or attempt to repair dam‐
aged or cracked cutting attachments by means
of welding, straightening or modifying the shape
(unbalanced).
Particles or pieces may come off and hit the
operator or a bystander at a high speed – risk of
most severe injuries!
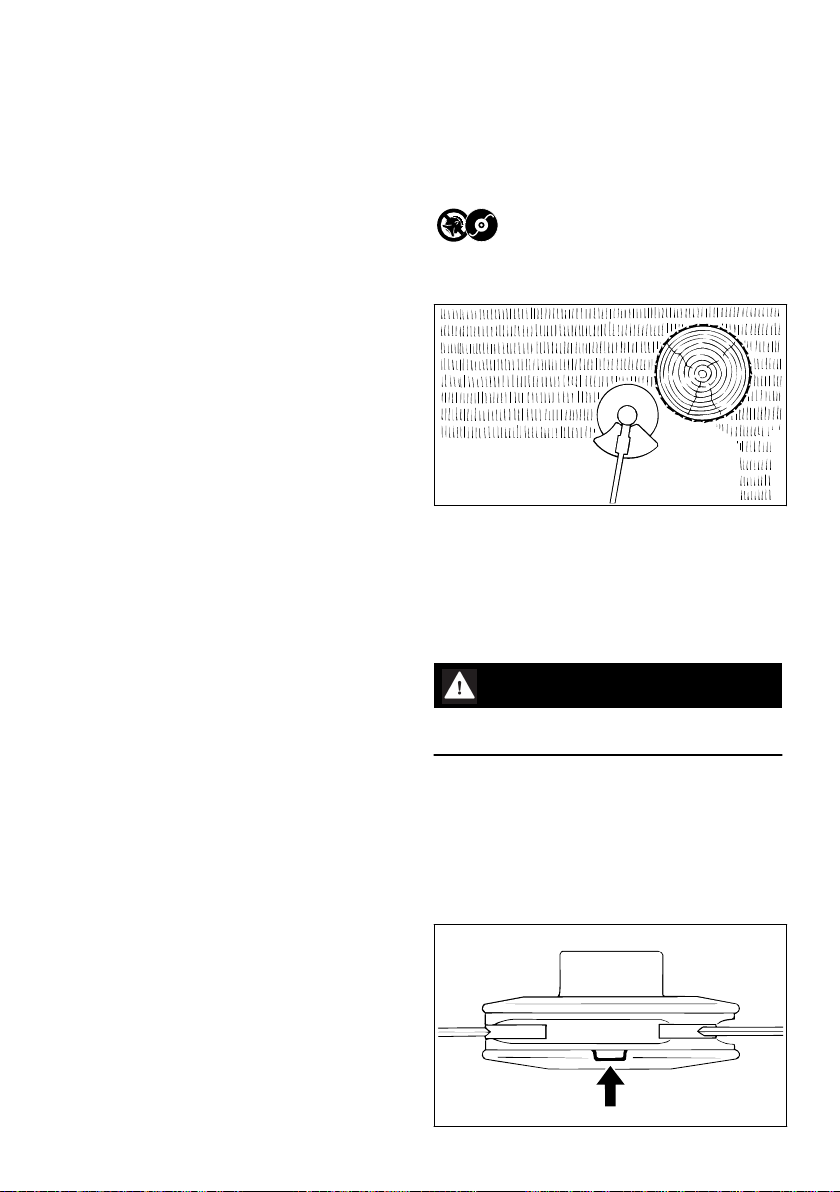
If a rotating cutting attachment touches a rock or
another hard object, sparks may be generated
which may possibly ignite combustible materials.
Dried-out plants and undergrowth are combusti‐
ble, especially in hot and dry weather. If there is
a risk of fire, do not use cutting attachments in
3 Safety Precautions and Working Techniques English
0458-480-0121-B 5

the vicinity of combustible materials, dried-out
plants or brushwood. It is mandatory that you ask
the responsible forestry office about current fire
hazards.
3.5.1 Using mowing heads
Enhance the cutting attachment deflector with
the attached parts specified in the User Manual.
Only use the deflector with properly mounted
blade that ensures the mowing line is restricted
to the permissible length.
Always switch off the engine to adjust the mow‐
ing line for manually adjustable mowing heads –
risk of injury!
Misuse with mowing lines that are too long
reduces the working speed of the engine. The
constant slipping of the clutch causes overheat‐
ing and damage to important components (e. g.
clutch, plastic housing parts) – e. g. due to the
cutting attachment rotating during idling – risk of
injury!
3.6 After Finishing Work
After finishing work or before leaving the power
tool unattended: Shut off the engine.
Clean the cutting attachment regularly after fin‐
ishing work to remove dust, dirt, soil and plant
debris – wear gloves – risk of injury!
Do not use any grease solvents when cleaning.
3.7 Maintenance and Repairs
Service the machine regularly. Do not attempt
any maintenance or repair work not described in
the KombiTool and KombiEngine instruction
manuals. Have all other work performed by a
servicing dealer.
STIHL recommends that you have servicing and
repair work carried out exclusively by an author‐
ized STIHL servicing dealer. STIHL dealers are
regularly given the opportunity to attend training
courses and are supplied with the necessary
technical information.
Only use high-quality replacement parts in order
to avoid the risk of accidents and damage to the
machine. If you have any questions in this
respect, consult a servicing dealer.
STIHL recommends the use of genuine STIHL
replacement parts. They are specifically
designed to match your model and meet your
performance requirements.
To reduce the risk of injury, always shut off the
engine before carrying out any maintenance or
repairs or cleaning the machine.
3.8 Symbols on Deflectors
An arrow on the deflector shows the correct
direction of rotation of the cutting attachments.
Use deflector in combination with
mowing heads only. Do not use metal
cutting attachments.
3.9 Mowing head with mowing line
002BA354 KN
For soft "cut" – for cleaner cutting too of rugged
areas around trees, fence posts, etc. – little dam‐
age to bark.
The mowing head is supplied with an information
sheet. Only equip the mowing head with a mow‐
ing line according to the details in the information
sheet.
WARNING
Do not replace the mowing line with metallic
wires or ropes – Risk of injury!
3.10 STIHL Polycut Mowing Head
with Polymer Blades
For mowing unobstructed edges of meadows
(without posts, fences, trees or similar obsta‐
cles).
Check the wear limit marks!
002BA049 KN
English 3 Safety Precautions and Working Techniques
6 0458-480-0121-B

If one of the wear limit marks on the PolyCut
mowing head is worn through (arrow): Do not
continue using the mowing head. Install a new
one. There is otherwise a risk of injury from
thrown parts of the head.
It is important to follow the maintenance instruc‐
tions for the PolyCut mowing head.
The PolyCut can also be equipped with mowing
line in place of the polymer blades.
The mowing head comes with instruction leaflets.
Equip the mowing head with polymers blades or
nylon line as described in the instruction leaflets.
WARNING
Never use wire in place of the nylon mowing line
– risk of injury.
4 Approved MultiEngines
Only use MultiEngines supplied by STIHL or
expressly approved by STIHL for use with the
MultiTool.
This MultiTool may only be used in combination
with the STIHL MM 56 MultiEngine.
5 Approved Combinations of Cutting Attachment and Deflector
Cutting attachment Deflector
7
123
45
0000-GXX-0425-A0
6
5.1 Permissible combinations
Choose the correct combination from the table
depending on the cutting tool!
WARNING
For safety reasons, no other combinations are
permitted – risk of accidents!
Only mowing heads (1, 2, 3, 4, 5, 6) may be
used on the FS-MM MultiTool.
5.2 Cutting attachments
5.2.1 Mowing heads
1 STIHL SuperCut 20‑2
2 STIHL AutoCut C 25-2
3 STIHL AutoCut 25-2
4 STIHL TrimCut 31-2
5 STIHL DuroCut 20-2
6 STIHL PolyCut 20-3
5.3 Deflector
7 Deflector for mowing heads
6 Fitting, removing the Multi‐
Tool
6.1 Mounting the MultiTool
Remove the gearbox
1
486BA012 KN
21
► Loosen the clamp screws (1) and pull the
gearbox (2) off the drive tube.
4 Approved MultiEngines English
0458-480-0121-B 7

Remove the deflector
3
486BA013 KN
4
► Loosen the screw (3) and pull the deflector (4)
off the drive tube.
WARNING
Keep the deflector in a safe place and always
refit it before using other MultiTools – there is
otherwise a risk of accidents.
2
9911BA002 KN
1
► Push the coupling sleeve (1) onto the drive
tube (2) as far as stop.
3
9911BA004 KN
4
The coupling sleeve (1) is properly positioned
when the arrow is in line with the gap in the
flange (4).
► Tighten down the wing screw (3) firmly.
6.2 Removing the MultiTool
► Loosen the wing screw and pull off the FS-
MM.
1
2
9911BA011 KN
► Push the deflector (1) onto the drive tube (2)
as far as stop.
► Tighten down the screw (2).
English 6 Fitting, removing the MultiTool
8 0458-480-0121-B

4
9911BA008 KN
3
► Push the gearbox (3) into position and tighten
down the clamp screws (4).
481BA011 KN
► Tighten the two clamp screws on the gearbox
in the following sequence:
–Tighten the first screw moderately.
–Tighten the second screw moderately.
–Tighten down first screw firmly.
–Tighten down second screw firmly.
7 Mounting the Deflector
7.1 Mount the wheel guard.
23
1
9911BA007 KN
► Attach the wheel guard to the gearbox, while
doing so, insert the nose (1) into the recess (2)
on the wheel guard.
► Turn-in and tighten the screw (3).
8 Mounting the Cutting
Attachment
8.1 Placing Power Tool on the
Ground
9911BA009 KN
► Shut off the engine.
► Turn the power tool so that the cutting attach‐
ment mounting face is pointing up.
8.2 Blocking the shaft
2
3
1
002BA569 KN
2
To mount and remove the cutting attachments,
the shaft (1) must be blocked with the locking
pin (2) or Allen wrench (2). The parts are inclu‐
ded in the scope of delivery and are available as
special accessories.
► Push the locking pin (2) or Allen wrench (2) as
far as it will go into the hole (3) in the gear –
press gently
► Turn the shaft, nut or cutting attachment until
the locking pin engages and the shaft is
blocked
8.3 Fitting the mowing head with
screw mounting
Keep the supplement sheet for the mowing head
in a safe place.
7 Mounting the Deflector English
0458-480-0121-B 9

1
002BA385 KN
► Fit the thrust plate
► Turn the mowing head anticlockwise on the
shaft (1) as far as it will go
► Retain the shaft
► Tighten the mowing head
NOTICE
Remove the tool that was used to block the
shaft.
8.4 Removing the Mowing Head
► Retain the shaft
► Turn the mowing head clockwise
9 Starting / Stopping the
Engine
9.1 Starting the Engine
Always follow the starting procedure described in
the MultiEngine instruction manual.
469BA061 AS
469BA062 AS
► Secure the handlebar in the normal operating
position.
► Retract the wheels, if fitted – see chapter on
"Wheels" in MultiEngine instruction manual.
► Retract the spur, if fitted.
► Check that the MultiTool is not touching the
ground or any other obstacles. The unit must
rest on the engine flange and the support on
the frame.
► Make sure you have good balance and secure
footing – as shown in the illustration.
WARNING
To reduce the risk of injury from contact with the
rotating attachment, always stand to the side of
the power tool, never in front of the attachment.
► With your left hand on the loop handle, press
the unit firmly against the ground – do not
touch the throttle trigger or lockout lever.
NOTICE
Do not stand or kneel on the handlebar or frame.
WARNING
The attachment may begin to move as soon as
the engine starts. For this reason, blip the throttle
after starting – the engine returns to idling speed.
Now follow the starting procedure described in
the MultiEngine instruction manual.
English 9 Starting / Stopping the Engine
10 0458-480-0121-B

9.2 Stopping the Engine
► See MultiEngine instruction manual.
10 Storing the Machine
If not used for periods of about 30 days or longer
► Remove, clean and inspect the cutting attach‐
ment.
► Store the machine in a dry and secure loca‐
tion. Keep out of the reach of children and
other unauthorized persons
11 Maintaining the Mowing
Head
11.1 Placing Power Tool on the
Ground
9911BA009 KN
► Shut off the engine.
► Turn the power tool so that the cutting attach‐
ment mounting face is pointing up.
11.2 Replacing Nylon Line
Always check the mowing head for signs of wear
before replacing the nylon line.
WARNING
If there are signs of serious wear, replace the
complete mowing head.
The nylon mowing line is referred to as "nylon
line" or "line" in the following.
The mowing head is supplied with illustrated
instructions for replacing the nylon line. Keep the
instructions for the mowing head in a safe place.
► If necessary, remove the mowing head.
11.3 Adjusting Nylon Line
STIHL SuperCut
Fresh line is advanced automatically if the
remaining line is at least 6 cm (2 1/2 in) long.
The blade on the deflector trims overlong lines to
the correct length.
STIHL AutoCut
► With the engine running, hold the rotating
mowing head above the grass surface.
► Tap it on the ground once – fresh line is
advanced and the blade on the deflector trims
it to the right length.
Fresh line is advanced every time the mowing
head is tapped on the ground. For this reason
observe the mowing head's cutting performance
during operation. If the mowing head is tapped
on the ground too often, the line limiting blade
will unnecessarily cut off unused lengths of nylon
line.
Line feed operates only if both lines are still at
least 2.5 cm (1 in) long.
STIHL TrimCut
WARNING
To reduce the risk of injury, always shut off the
engine before adjusting the nylon line by hand.
► Pull the spool up – rotate it about 1/6 turn
counterclockwise until it engages – and allow it
to spring back.
► Pull ends of the lines outward.
Repeat the above procedure as necessary until
both lines reach the limiter blade on the deflec‐
tor.
Rotating the spool from one stop to the next
advances about 4 cm (1 1/2 in) of fresh line.
11.4 Replacing Nylon Line
STIHL PolyCut
Precut lengths of nylon line can be fitted to the
PolyCut in place of the cutting blades.
STIHL DuroCut, STIHL PolyCut
WARNING
To reduce the risk of injury, always shut off the
engine before refilling the mowing head.
► Fit precut lengths of nylon line in the mowing
head as described in the instructions supplied.
11.5 Replacing Cutting Blades
11.5.1 STIHL PolyCut
Always check the mowing head for signs of wear
before installing new cutting blades.
10 Storing the Machine English
0458-480-0121-B 11

WARNING
If there are signs of serious wear, replace the
complete mowing head.
The thermoplastic cutting blades are referred to
as "blades" in the following.
The mowing head is supplied with illustrated
instructions for replacing the blades. Keep the
instructions for the mowing head in a safe place.
WARNING
To reduce the risk of injury, always shut off the
engine before installing the blades.
► Remove the mowing head.
► Replace blades as shown in the illustrated
instructions.
► Mount the mowing head on the machine.
12 Maintenance and Care
The following information applies in normal oper‐
ating conditions. The specified intervals must be
shortened accordingly when working for longer
than normal or under difficult cutting conditions
(extensive dust, etc.).
All accessible screws, nuts and bolts
► Tighten if necessary
Cutting attachments
► Visual inspection, check they are secure
before starting work and whenever the tank is
refilled
► Replace if damaged
Safety information label
► Replace illegible safety information labels
13 Main Parts
4
3
1
2
5
9911BA006 KN
6
1 Mowing Head
2 Deflector (for mowing heads only)
3 Line Limiting Blade
4 Drive Tube
5 Coupling Sleeve
6 Wing Screw
14 Specifications
14.1 Engine speed
Max. output shaft speed at cutting attachment
with MultiEngine:
MM 56: 7,000 rpm
14.2 Weight
without cutting attachment, with
deflector:
0.9 kg
14.3 Sound and Vibration Values
Noise and vibration data measurements on
power tools with the FS-MM MultiTool include
idling and rated maximum speed in a ratio of 1:6.
For further details on compliance with Vibration
Directive 2002/44/EC, see
www.stihl.com/vib
14.3.1 Sound pressure level Lpeq in accord‐
ance with EN 14910
MM 56: 93 dB(A)
English 12 Maintenance and Care
12 0458-480-0121-B

14.3.2 Sound power level Lw in accordance
with DIN EN 14910
MM 56: 102 dB(A)
14.3.3 Vibration level ahv,eq to EN 14910
Handle, left Handle,
right
MM 56: 4.0 m/s24.3 m/s2
The K‑factor in accordance with Directive
2006/42/EC is 2.0 dB(A) for the sound pressure
level and sound power level; the K‑factor in
accordance with Directive 2006/42/EC is
2.0 m/s2 for the vibration level.
14.4 REACH
REACH is an EC regulation and stands for the
Registration, Evaluation, Authorization and
Restriction of Chemical substances.
For information on compliance with the REACH
regulation (EC) No. 1907/2006 see
www.stihl.com/reach
15 Maintenance and Repairs
Users of this machine may only carry out the
maintenance and service work described in this
user manual. All other repairs must be carried
out by a servicing dealer.
STIHL recommends that you have servicing and
repair work carried out exclusively by an author‐
ized STIHL servicing dealer. STIHL dealers are
regularly given the opportunity to attend training
courses and are supplied with the necessary
technical information.
When repairing the machine, only use replace‐
ment parts which have been approved by STIHL
for this power tool or are technically identical.
Only use high-quality replacement parts in order
to avoid the risk of accidents and damage to the
machine.
STIHL recommends the use of original STIHL
replacement parts.
Original STIHL parts can be identified by the
STIHL part number, the { logo and the
STIHL parts symbol K (the symbol may appear
alone on small parts).
16 Disposal
Contact the local authorities or your STIHL serv‐
icing dealer for information on disposal.
Improper disposal can be harmful to health and
pollute the environment.
000BA073 KN
► Take STIHL products including packaging to a
suitable collection point for recycling in accord‐
ance with local regulations.
► Do not dispose with domestic waste.
15 Maintenance and Repairs English
0458-480-0121-B 13

English 16 Disposal
14 0458-480-0121-B

16 Disposal English
0458-480-0121-B 15
Other manuals for FS-MM
2
Table of contents
Other Stihl Lawn And Garden Equipment manuals

Stihl
Stihl BT 120 C User manual

Stihl
Stihl FS 100 RX User manual

Stihl
Stihl FS 310 User manual

Stihl
Stihl HSA 60.0 User manual

Stihl
Stihl PolyCut 28-2 User manual

Stihl
Stihl KM 85 R User manual

Stihl
Stihl KombiTool KombiSystem SP-KM User manual

Stihl
Stihl RLA 240 User manual

Stihl
Stihl HSA 26 User manual

Stihl
Stihl FC 75 User manual

Stihl
Stihl STIHL PC 70 User manual

Stihl
Stihl HTA 50.0 User manual

Stihl
Stihl FSA 86 R User manual

Stihl
Stihl AR 2000 L User manual

Stihl
Stihl FS-KM User manual

Stihl
Stihl SP 92 T User manual

Stihl
Stihl SP 200 User manual

Stihl
Stihl SPA 65 User manual

Stihl
Stihl MM 56 User manual

Stihl
Stihl BT 130 User manual