STOLZENBERG KSV 910 User manual

Operating manual
(Translation of the original version)
KSV 910
Stolzenberg GmbH & Co. KG
Reinigungsmaschinen - Maschinenbau
Hamburger Str. 15 - 17
D-49124 Georgsmarienhütte
Telefon +49 (0 54 01) 83 53-0
Telefax +49 (0 54 01) 83 53-11
E-Mail: info@stolzenberg.de
Internet: www.stolzenberg.de

2 KSV 910 11/06/2010

Table of Contents
11/06/2010 KSV 910 I
Table of Contents
1
Introduction....................................................................................................................................... 3
1.1
Usage conformant with intended purpose .......................................................................... 3
2
Safety information............................................................................................................................ 4
2.1
Safety device ...................................................................................................................... 5
3
Sweeper description ........................................................................................................................ 6
3.1
Sweeper description ........................................................................................................... 6
3.2
Initial start-up ...................................................................................................................... 7
4
Operation........................................................................................................................................... 8
4.1
Movement operation ........................................................................................................... 8
4.2
Sweeping operation ............................................................................................................ 8
4.3
Sweeping wet refuse........................................................................................................... 8
4.4
After sweeping .................................................................................................................... 9
4.5
Setting the traversing mechanism ...................................................................................... 9
4.6
Parking the sweeper ........................................................................................................... 9
4.7
Emptying the dustbin ........................................................................................................ 10
5
Maintenance.................................................................................................................................... 11
5.1
Safety Information............................................................................................................. 11
5.2
Filling up the fuel tank ....................................................................................................... 11
5.3
Cleaning ............................................................................................................................ 12
5.4
Filter cleaning.................................................................................................................... 12
5.5
Changing the filter............................................................................................................. 12
5.5.1
Dismantling the filter .......................................................................................... 12
5.5.2
Filter mounting ................................................................................................... 13
5.6
Side brushes ..................................................................................................................... 13
5.6.1
Mounting the side brushes ................................................................................ 13
5.6.2
Removing the Sidebrushes ............................................................................... 13
5.7
Changing the sweeping rollers ......................................................................................... 13
5.7.1
Dismantling the sweeping roller......................................................................... 13
5.7.2
Assembling the sweeping roller......................................................................... 14
5.8
Maintenance chart ............................................................................................................ 15
5.8.1
Maintenance daily.............................................................................................. 15
5.8.2
In addition, after every 50 running hours........................................................... 15

Table of Contents
II KSV 910
5.8.3
In addition, after every 100 running hours......................................................... 15
5.9
Malfunctions / error messages and troubleshooting......................................................... 16
5.10
Technical Data .................................................................................................................. 17
5.11
Product marking................................................................................................................ 17
5.12
Disposal ............................................................................................................................ 17
5.13
Accessories and spare parts ............................................................................................ 18
5.14
Service .............................................................................................................................. 18
5.15
Transport........................................................................................................................... 18
6
EC Declaration of conformity (Translation of the original version) .......................................... 19

Introduction
11/06/2010 KSV 910 3
1 Introduction
This operating manual contains instructions for using the hand-operated
sweeper.
Our products are subject to continuous improvement. Therefore, design
changes that were made after this manual went to print could not be
incorporated. If you have any questions, please contact our Service
department.
The operating manual must be read and applied by all persons who
operate the sweeper.
Apart from the operating manual and the regulations for accident pre-
vention applicable in the country of use and the location of use, the
common, recognised rules for safe and technically correct working must
also be followed.
1.1 Usage conformant with intended purpose
The appliance is intended exclusively for sweeping on solid surfaces (for
example.: parking areas, walkways, shop floors). The area to be swept
should not be wet.
The sweeper may only be used by reliable and instructed personnel.
revent children, juveniles and other unauthorised persons from using the
machine (e.g. by pulling out the key after use).
Any other use, or any use over and above that, will be considered to be
non-conformant with intended purpose. The manufacturer rejects any
and all liability for damage resulting from such use. The risk is that of the
user alone.
Usage conformant with intended purpose also includes compliance with
the operating manual and the inspection and maintenance specifica-
tions. Drive the sweeper only along expressly marked routes and
spaces.

Safety information
4 KSV 910
2 Safety information
1. The machine should only be used in a flawless state, as
well as in keeping with its intended purpose, in a safety-
conscious and risk-conscious manner and in compliance
with these operating instructions.
2. In addition to the operating manual, please heed general le-
gal and other binding regulations for accident prevention
and environmental protection.
3. Sweeping and picking up of flammable, toxic or explosive
substances, along with flammable gases or diluted acids
and solvents, burning or smouldering objects is prohibited!
4. The appliance is not suitable for picking up fluids, cables,
cords, wires or the like.
5. The machine should only be used with the dust box fitted to
prevent injuries caused by parts being slung out.
6. Transporting loads with the sweeper is not allowed.
7. Faults should be eliminated immediately, particularly those
that could impair safety.
8. Do not make any changes, modifications or additions to the
sweeper without the approval of the manufacturer.
9. Replacement parts must meet manufacturer specifications.
This is always ensured by using original replacement parts.
10. Ensure that operating media, auxiliary media and replace-
ment parts are disposed of in a safe and environmentally-
friendly manner, particularly batteries!
11. Suitable non-slip footwear should be worn to avoid acci-
dents.
12. If you have any questions, please contact our Service de-
partment.
13. Persons (including children) who are not able to use this
machine safely due to their physical, sensory or mental ca-
pabilities or their inexperience or lack of knowledge may not
use this machine without the supervision or instruction by a
responsible person! Children should be supervised to en-
sure that they do not play withthe appliance.
14. Caution: loose clothing can be caught and drawn in on rotat-
ing parts.
15. Personal safety equipment, particularly hearing protection,
must be worn when operating the machines.
16. The machine should only be used outdoors or in ade-
quately-ventilated rooms.

Safety information
11/06/2010 KSV 910 5
17. Removal of the motor filter while the motor is running can
lead to a sudden increase in motor speed. This applies in
particular if the filter is dirty or blocked in another manner.
18. Work using the unit should be interrupted at regular inter-
vals.
19. Observe general guidelines relating to explosive, inflamma-
ble and highly flammable fuels. Particular care should be
exercised when filling the machine with fuel to ensure that
the motor is deactivated and cold, and that filling is only re-
alised outdoors or in a well-ventilated location.
20. Warning: parts of the machine become hot during use.
There is a risk of burn injuries.
2.1 Safety device
The hood switch prevents the machine from getting switched on when
the hood is open and switches off the machine if it is opened during
operation

Sweeper description
6 KSV 910
3 Sweeper description
3.1 Sweeper description
The suction sweeper is driven by an internal combustion engine.
Sweeping is done with two side brushes which convey the refuse to the
two sweeping rollers that are mounted at 90 degrees to the direction of
motion. The rollers throw the refuse overhead in the rear dirt collector.
The dust that is collected by the sweeping rollers is kept in a lamellar
filter in the machine by the dust extraction.
The lamellar filter can, in turn, be cleaned by a manually actuated filter
vibrator.
1 driving hoop 6 dustbin
2 driving lever 7 hood
3 operating console 8 side brushes
4 filter cleaning lever 9 engine
5 dustbin holder
1
operating lever, left side brush
2
key switches
3
operating lever, sweeping rollers
4
operating lever, right side brush
1
Cold-start device (Choke)
2
Recoil starter
3
Oil dipstick

Sweeper description
11/06/2010 KSV 910 7
3.2 Initial start-up
Ensure that the machine was supplied complete and undamaged.
In case of any objections, contact your specialist dealer or our Service
department.
•Open the packaging and carefully lift the machine off the pallet.
Reach under the frame of the machinery to lift it. There is a risk of
injury if you attempt to lift the machinery by the hood, the side
brush retainer, or the dustbin!
Open the hood and fasten it.
Push the driving hoop -1- into the receptacles till the cross hoop is
at hip height (ergonomically correct height).
Tighten the driving hoop screws -2-.
Set the side brush arms to the top position and mount the side
brushes.
Close the hood again.
The sweeper is ready for operation.
VORSICHT
Operation
8 KSV 910
4 Operation
4.1 Movement operation
Insert the key in the key switch and rotate it in the clockwise direc-
tion.
Pull the starter-hurry: The motor starts.
Pull the movement lever: The sweeper moves forward.
Use the choke, if the engine is cold
If the lever is released, the sweeper remains at standstill.
4.2 Sweeping operation
The height adjustment of the side brushes and the sweeping rollers is
done via levers on the operating console. Each of the side brushes can
be used invdividually.
Start the movement operation.
By lifting and pushing forward the corresponding lever, the side
brushes and/or the sweeping rollers can be deployed in a purpose-
ful manner.
(Also see "Device description")
1 Operating lever, left side brush
2 Operating lever, sweeping rollerst
3 Operating lever, right side brush
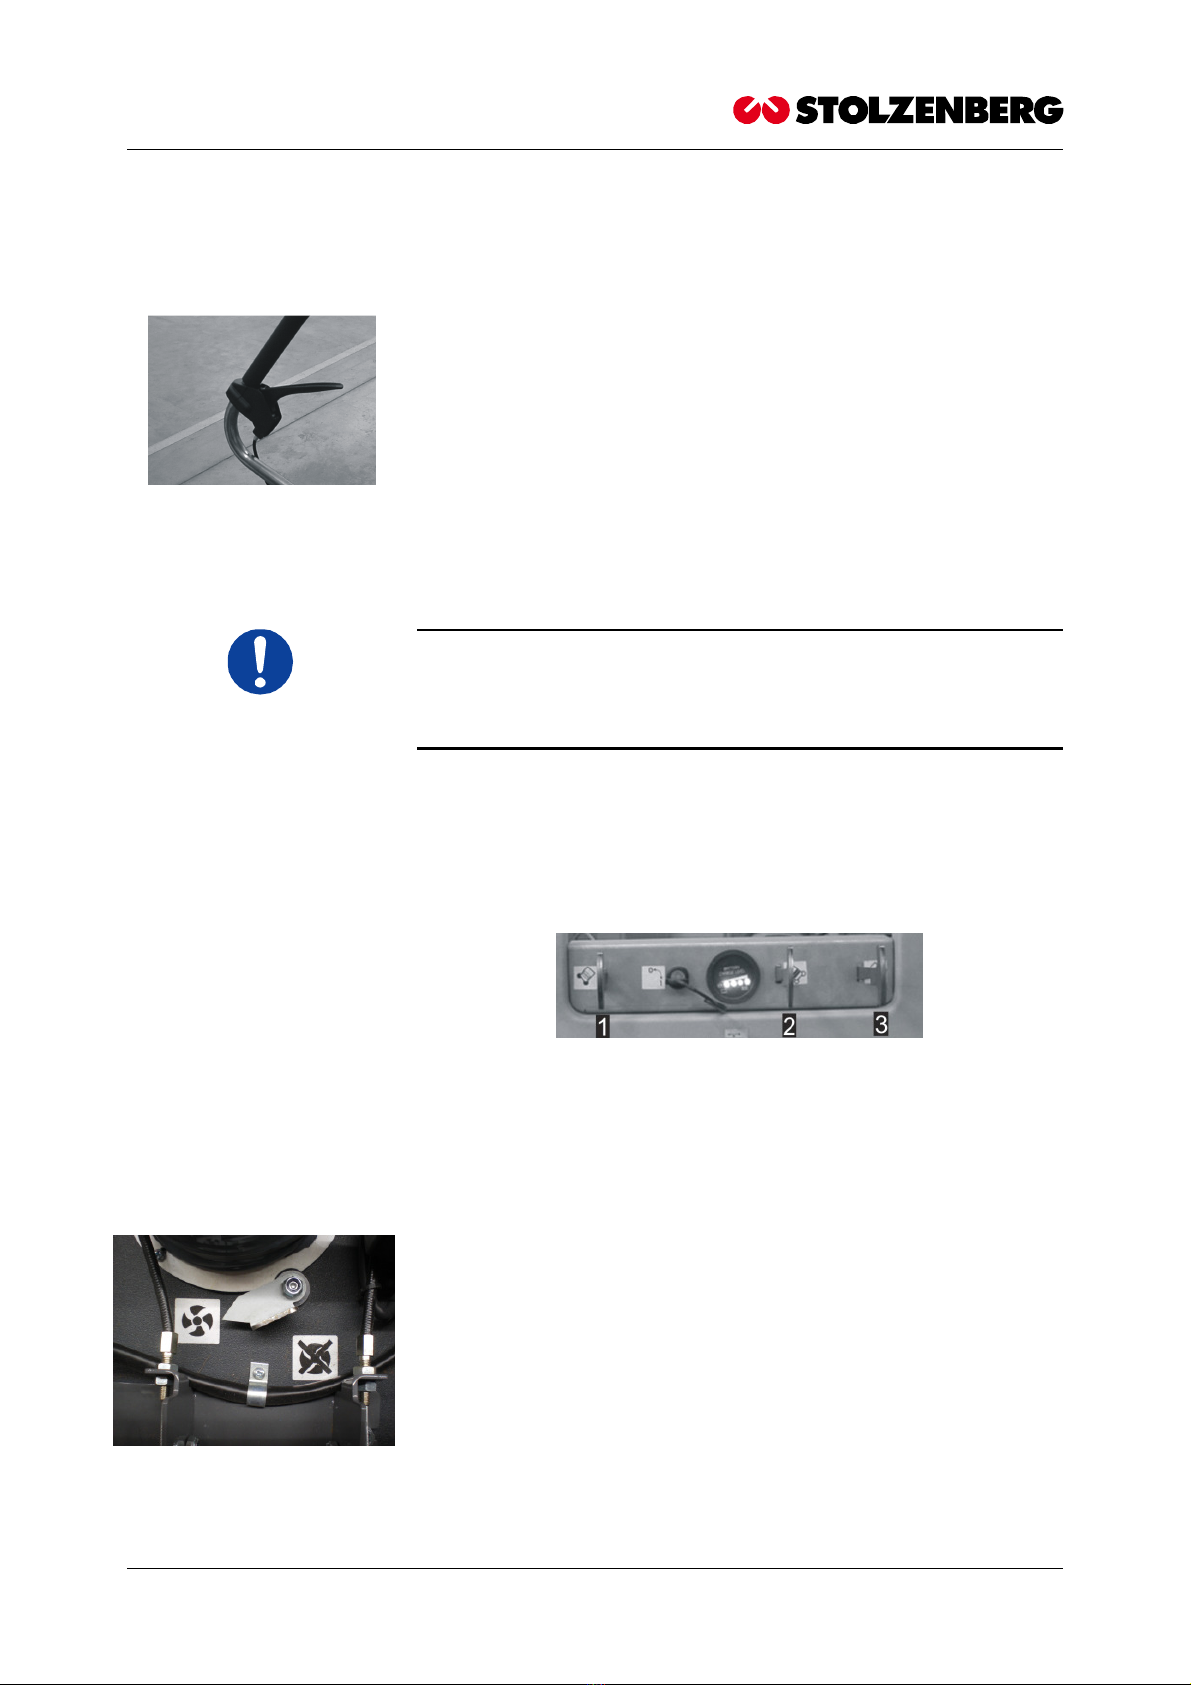
4.3 Sweeping wet refuse
For sweeping wet refuse, it is recommended that the fan shutter be
closed, to prevent clogging and softening of the filter.
This is how to adjust the fan shutter.
With the machine switched off, open the hood and fasten it.
To close the fan shutter, rotate the lever -1- to the front position.
To open the fan shutter, you must get the lever -1- into the rear position.

Operation
11/06/2010 KSV 910 9
4.4 After sweeping
Switch off the machine.
Adjust the side brushes and sweeping rollers in the upper position.
If the sweeping rollers are not set to their top position, the bristles
of the side brushes will be put under permanent load in their off-
position and consequently will wear prematurely when used!
Always empty the dustbin once you've finished sweeping.
4.5 Setting the traversing mechanism
The traversing mechanism can be readjusted at the adjusting screws at
the handle and at the belt tensioner.
Adjust the belt tensioner in such a way that the belt lies loosely on
the handle without tension.
It should be possible to press the belt 4 cm inwards in the middle till the
first resistance is felt.
4.6 Parking the sweeper
•Move the machine to an area provided (assigned) for the purpose.
•The sweeper does not have any brakes.
•Therefore, secure the sweeper against rolling away (for example:
wheel chocks).
•Turn the key in the anticlockwise direction to switch off the motor
and pull out the key.
Improper handling of the suction sweeper can result in harm to
persons and property!
Prevent unauthorised usage of the suction sweeper, by:
Caution!
Caution!
Operation
10 KSV 910
•never leaving the suction sweeper, when it is ready for operation,
unattended,
•pulling out the key of the key switch when leaving the sweeper (for
example, at the end of the working day or depending on deploy-
ment),
•keeping the key separately from the sweeper.
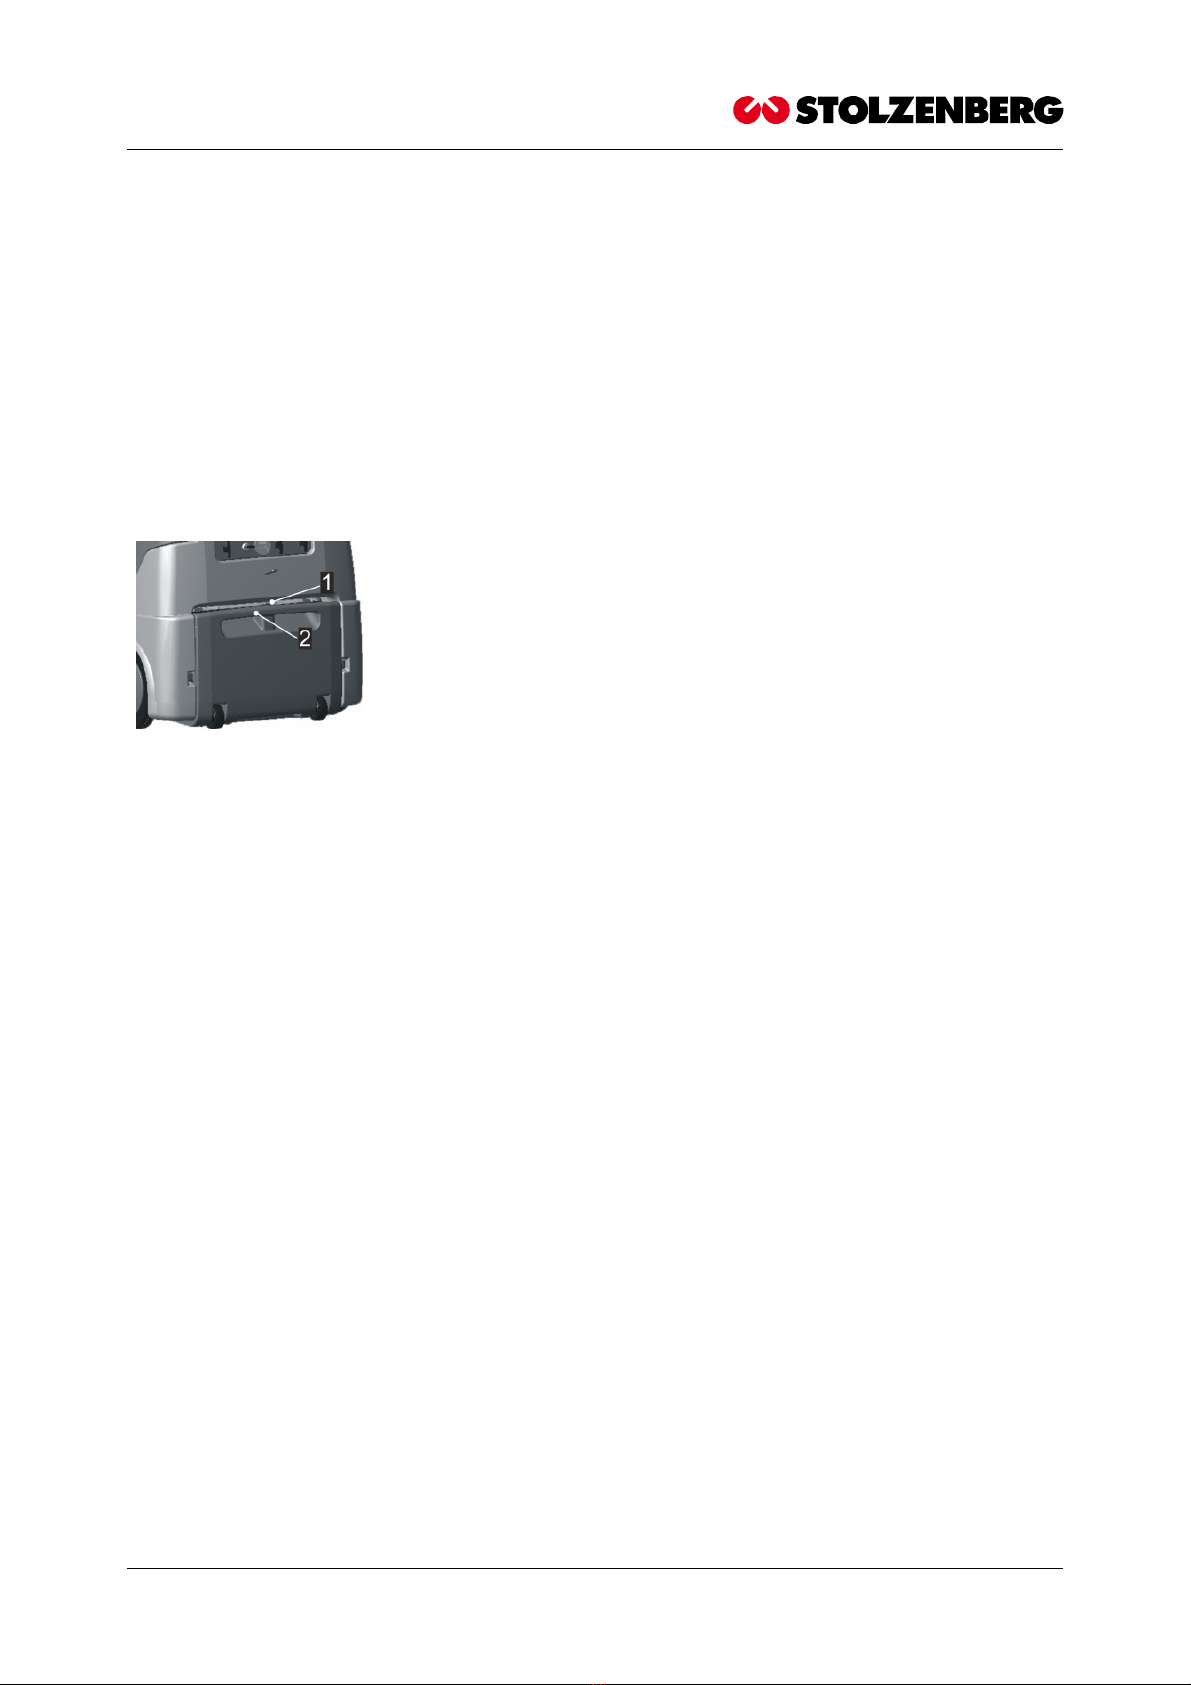
4.7 Emptying the dustbin
In order to ensure proper sweeping performance, the dustbin has to be
emptied at regular intervals.
Lift the dustbin securing device -1- and pull the dustbin on the han-
dle -2- from the frame of the machine.
Empty the dustbin into a suitable container.
Push the dustbin back into the machine.
Do not park the sweeper with a full dustbin.

Maintenance
11/06/2010 KSV 910 11
5 Maintenance
5.1 Safety Information
Only complete the type of maintenance work described in the following
chapter. All other maintenance and upkeep work may only be carried
out by the manufacturer or by companies and persons authorised by the
manufacturer, who are familiar with the relevant safety specifications,
because portable devices in industrial use are subject to the safety test
according to VDE 0701.
Closely follow the steps listed in the maintenance instructions. The im-
proper completion of maintenance tasks may result in malfunctions
when using the sweeper and may possibly render the warranty granted
null and void.
When working on the electrical system, the battery should be discon-
nected.
Maintenance work/ troubleshooting at the electric motor must not be
done while the electric motor is running.
Use only flawless and appropriate tools to complete maintenance work.
Note the requirements for spare parts.
If covers and/or safety devices were removed during maintenance
work/repairs, they will have to be reattached prior to starting the
sweeper.
For carrying out any work on the sweeper, it must be switched off and
secured from rolling away by accident.
5.2 Filling up the fuel tank
Switch off the suction sweeper.
Allow the engine to cool down.
Open the lid of the tank
Place a clean funnel in the inlet of the tank
Pour some fuel in the funnel and wait until the fuel has run through.
Repeat the process until the tank is full.
Remove the funnel.
Close the tank
Carefully wipe off any spilt fuel.
Maintenance
12 KSV 910
5.3 Cleaning
The suction sweeper may only be cleaned in the off state, when it is dry.
The suction sweeper is a machine with electrical components.
Moisture damages the eletronics of the device. Moisture can result
in leakage currents and short-circuits.!
Do not use any high-pressure cleaners
5.4 Filter cleaning
Make sure the dust collector has been installed.
Move the filter cleaning lever -1- back and forth a few times.
•The filter gets cleaned as a result.
•The dust that is stripped off falls in the dustbin.
It is recommended to wait for a few seconds till the dustbin is emp-
tied, till the fine dust has settled.
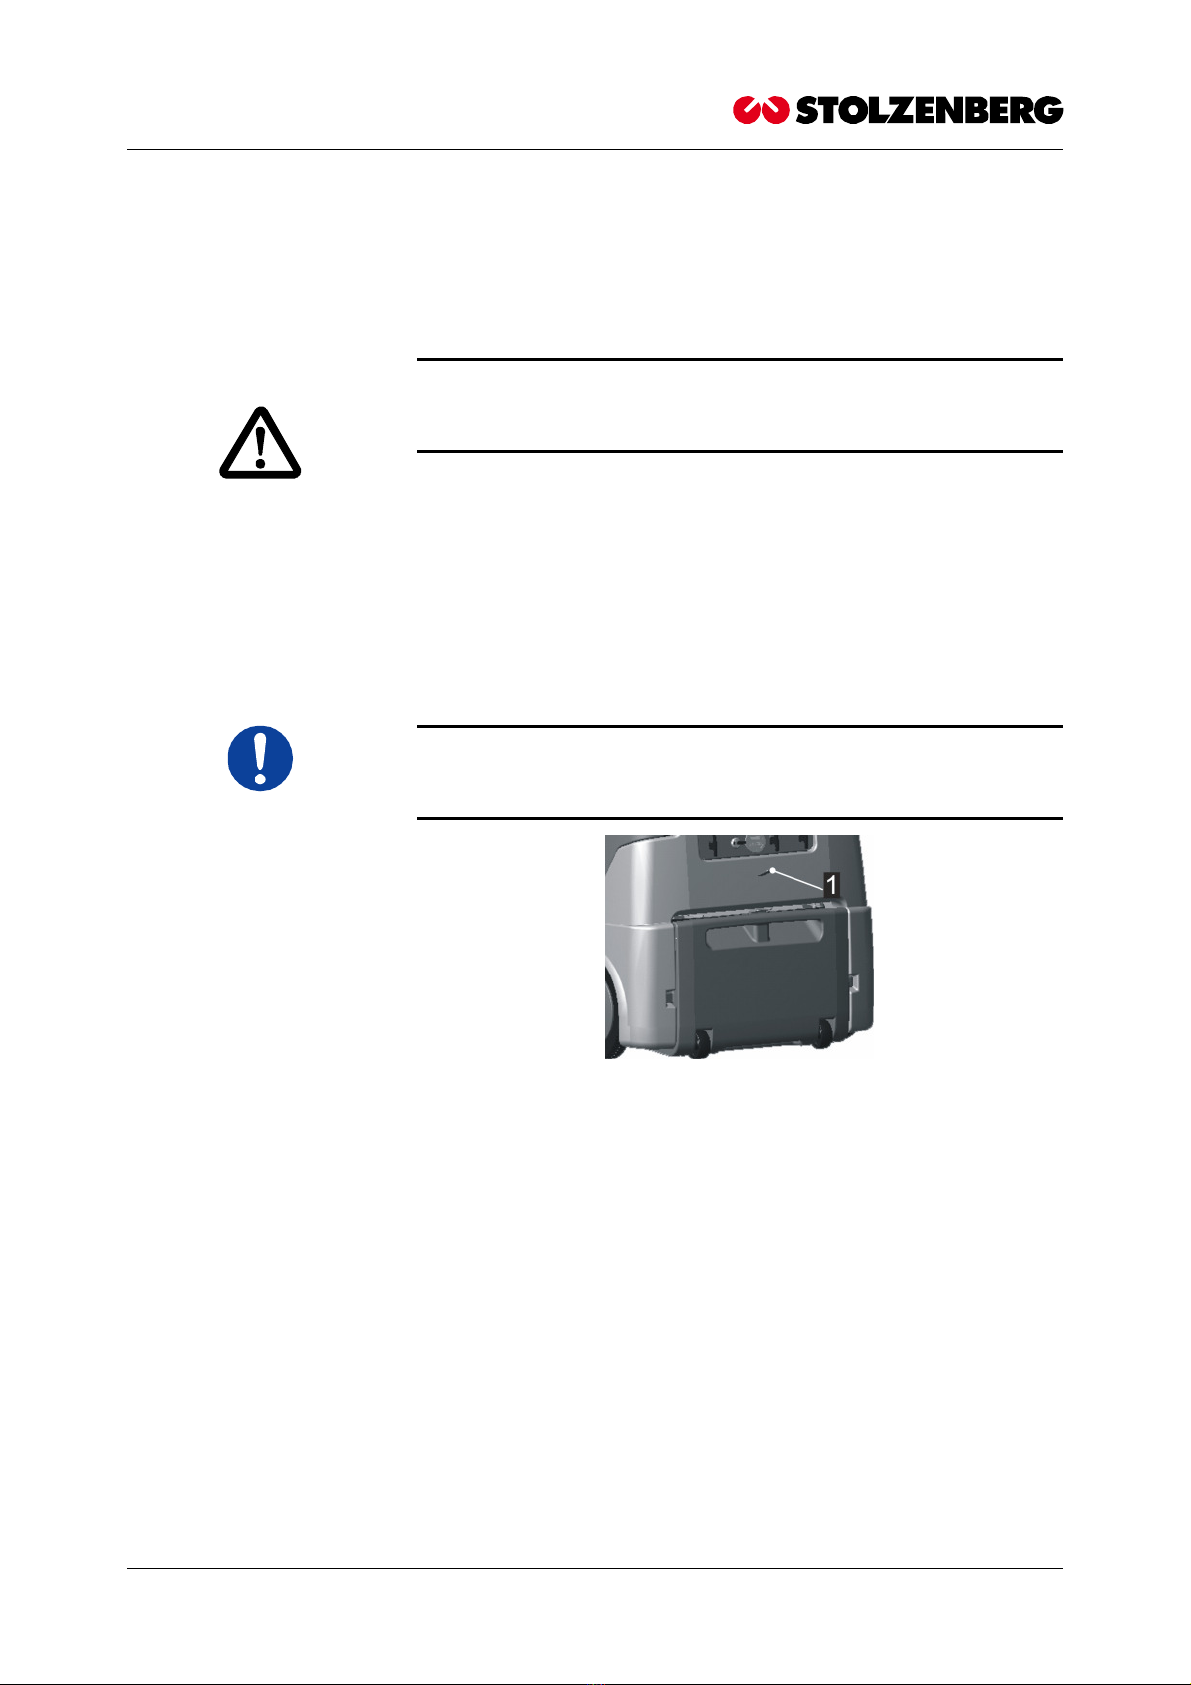
5.5 Changing the filter
5.5.1 Dismantling the filter
E Remove the dustbin.
Press the filter holders –1-inwards in such a way that they point to
one another.
Take out the filter downwards
WARNING
Maintenance
11/06/2010 KSV 910 13
5.5.2 Filter mounting
Place the filter in the filter frame and press the filter frame upwards
with the hand.
Hold the filter frame in this position.
Rotate the filter holder outwards with the other hand.
5.6 Side brushes
5.6.1 Mounting the side brushes
Hold the side brushes below the side brush arm and rotate the side
brushes in such a way that the side brush clips are located below the
relevant recesses.
Press the side brush upwards till it tangibly clicks into place.
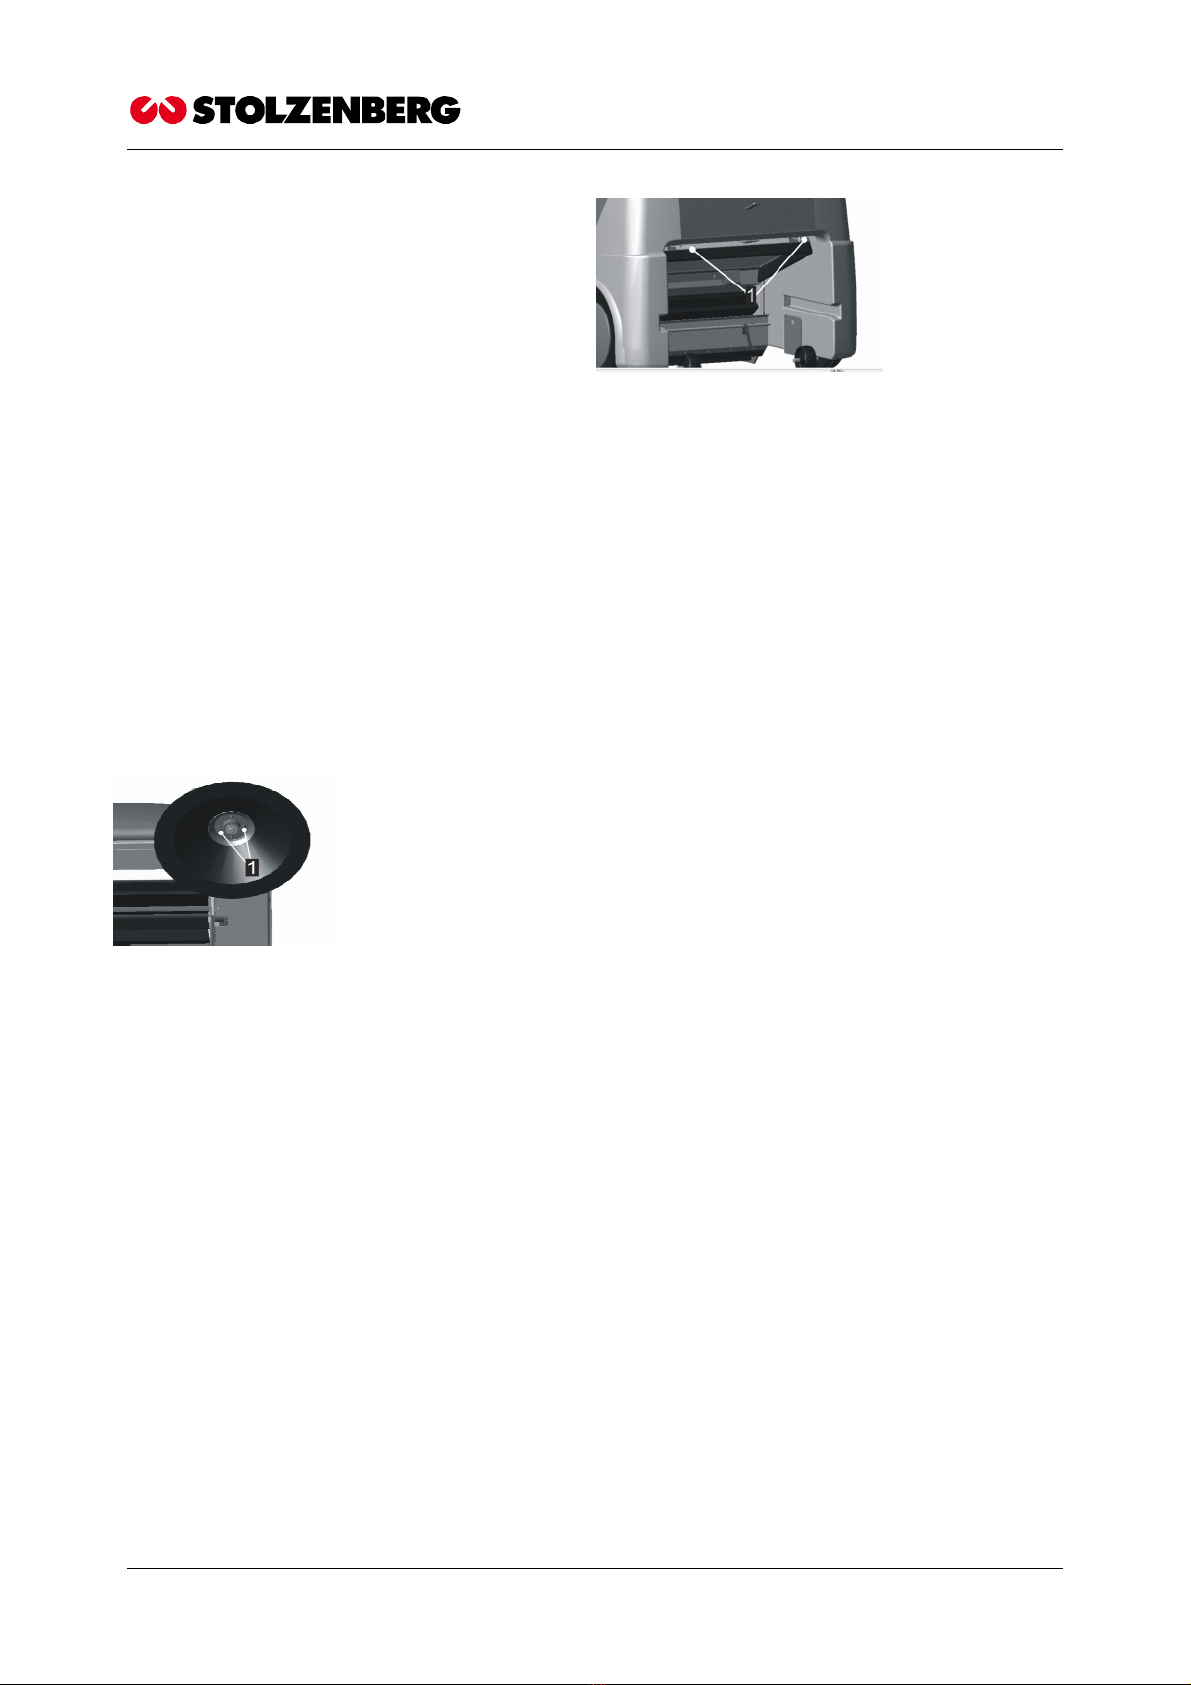
5.6.2 Removing the Sidebrushes
Press the clips -1- below the side sweeper brushes inwards and at the
same time, pull down the side sweeper brushes downwards.
5.7 Changing the sweeping rollers
The sweeping roller consists of two split shells with brushes.
Screws join the split shells.
5.7.1 Dismantling the sweeping roller
To dismantle the sweeping roller, follow the procedure below:
Remove the dustbin.
Support the machine securely (for example: second person).
Rotate the sweeping rollers till the threaded joints on the sweeping
rollers become visible.
Loosen and remove these threaded joints.

Maintenance
14 KSV 910
Remove the sweeping roller split shells from the shaft and if re-
quired, clean the running gear box and the shaft.
5.7.2 Assembling the sweeping roller
The split shells of the sweeping roller have square recesses. These
recesses serve for locating the sweeping roller axis.
The two split shells must be put on the rectangular axis of the brush
roller in such a way that the axis fits exactly into the recess of the
split shells.
Then, screw each set of brushes with 3 screws each, till you can no
longer see a gap between the split shells

Maintenance
11/06/2010 KSV 910 15
5.8 Maintenance chart
5.8.1 Maintenance daily
Check the machine as to visual damages and correct operation.
Empty the dust container.
Check the brushes-, roller tunnel for any parts that are sticking to
them or for jammed debris, which narrow the brush tunnel and re-
strict the free movement of the roller brushes.
Charge the battery.
Check the state of the dust filter, clean it if required.
5.8.2 In addition, after every 50 running hours
Check if sweeping rollers are worn or obstructed by foreign objects
and replace, if necessary.
Check sweeping contour and readjust, if necessary.
Check if side brush adjustment is worn and readjust or replace, if
necessary.
5.8.3 In addition, after every 100 running hours
Check all belts for cracks or impermissible elongation, replace if
required.
Check all bearings for wear.
Check all seals as to damage and tightness.
Check cable joints for firmness, replace faulty cables.
Check the dust filter and replace if necessary.
Check dust suction for foreign objects, and clean.

Maintenance
16 KSV 910
5.9 Malfunctions / error messages and
troubleshooting
Error Possible causes Possible remedies
Engine does not work Key-operated switch has not
been activated
Turn the key in the key-operated
switch
Fuel tank is empty Fill up fuel tank
The hood is still open Close the hood
Fault in the electrical cables Check all the plug-and-socket
joints and restore the contact
Sweeping result not satisfactory Side brushes or brush rollers not
lowered
Lower
Side brushes or brush rollers
worn
Readjustment and if required,
replacement of the brushes
Trajectory clogged by dirt Check and clean the roller space
Brush rollers are stuck because
of dirt, cables, strings or some-
thing similar
Clean the brush rollers and roller
bearings, check the bearings for
damage
Side brushes are stuck because
of dirt, cables, strings or some-
thing similar
Check the side brushes and re-
move whatever is stuck
Side brushes and/or roller belts
are worn
Control and replacement of the
belts
Fault in the traversing mecha-
nism
Traversing mechanism not cor-
rectly set
Set traversing mechanism
Traversing mechanism belt worn Checking and replacement of the
belt
Blockage of the driving roller or
the running wheels owing to dirt
Remove blockage
Heavy dust accumulation while
sweeping
Filter heavily soiled Clean the filter (see “Filter clean-
ing”)
Filter used up / Filter material
worn
Check and replace filter
Filter not correctly fitted Correct filter position
Leaks and result suction of im-
pure air in the area of the filter
chamber
Check for suction of impure air

Maintenance
11/06/2010 KSV 910 17
5.10 Technical Data
Dimension and Weight
Length 1150 mm
Width 790 mm
Height 600 mm
Weight 95 kg
Sweeping Width
Main sweeping roller 500 mm
With Side brushes 900 mm
Dust Container Volume 60 L
Engine Honda GC135E
Engine type Single-cylinder, four-stroke engine
Capacity/Power 135 cm³/2.9 kW at 3600 min-1
Tank 1.7l, standard unleaded
(minimum octane rating of 91)
Engine oil 0.85l, SF/SG; SAE 10W-30
Vibration < 2m/s²
Noise Valu < 83 dB(A)
5.11 Product marking
Suctionsweeper
Tandem KSV 910
Power: 2,9kW
Serialnumber: 060 058
Build in: 200
Weight: 8 kg
Stolzenberg GmbH & Co. KG
Hamburger Straße 15-1
D-49124 Georgsmarienhütte
5.12 Disposal
Dispose of faulty parts, especially electrical components, batteries and
plastic parts according to the locally applicable waste disposal specifica-
tions.
Used batteries must be disposed of according to Directive 2006/66/EC.

Maintenance
18 KSV 910
5.13 Accessories and spare parts
Accessories and spare parts must conform to the requirements of the
manufacturer. This is ensured by using genuine replacement parts.
5.14 Service
Stolzenberg GmbH & Co. KG
Hamburger Straße 15-17
D-49124 Georgsmarienhütte
Telefon: 0049 / (0)5401 83 53-0
Fax: 0049 / (0)5401 83 53-11
www.Stolzenberg.de
5.15 Transport
Transport the machine only in the switched-off condition, sufficiently well
fastened.
Other manuals for KSV 910
1
Table of contents
Other STOLZENBERG Blower manuals

STOLZENBERG
STOLZENBERG Tandem 900 KSE User manual

STOLZENBERG
STOLZENBERG US 5 User manual

STOLZENBERG
STOLZENBERG MATRIX MTX-900-V TRS User manual

STOLZENBERG
STOLZENBERG NU5 User manual

STOLZENBERG
STOLZENBERG NU9 User manual

STOLZENBERG
STOLZENBERG CS 650 User manual

STOLZENBERG
STOLZENBERG TwinSweep 900E User manual

STOLZENBERG
STOLZENBERG KSE 910 User manual
Popular Blower manuals by other brands

Lithium Earthwise
Lithium Earthwise LB20024 Operator's manual

EINHELL
EINHELL GE-CL 36 Li E Original operating instructions

EINHELL
EINHELL VENTURRO 18/210 operating instructions

Troy-Bilt
Troy-Bilt 657 Operator's manual

Weed Eater
Weed Eater VS2000BV instruction manual

KRAUSMANN
KRAUSMANN U37020-00 Operation manual


