STOLZENBERG KSE 910 User manual

KSE 910 Date 0507
Operating Manual
Battery-operated suction sweeper
KSE 910

2

KSE 910 Date 0507 3
Table of Contents
Introduction ............................................................................................................. 4
Usage Conformant with Intended Purpose.............................................................4
Safety device .......................................................................................................... 5
General safety instructions ..................................................................................... 5
Safety instructions for handling batteries ............................................................ 5
Sweeper description ............................................................................................... 6
Initial start-up .......................................................................................................... 7
Operation ................................................................................................................ 7
Movement operation ........................................................................................... 8
Parking the sweeper ...........................................................................................8
Sweeping operation ............................................................................................ 8
Sweeping wet refuse ....................................................................................... 9
After sweeping................................................................................................. 9
Emptying the dustbin .......................................................................................9
Cleaning................................................................................................................ 10
Maintenance ......................................................................................................... 10
Filter cleaning .................................................................................................... 11
Changing the filter ............................................................................................. 11
Dismantling the filter ...................................................................................... 11
Filter mounting............................................................................................... 11
Mounting the side brushes ................................................................................ 11
Removing the side brushes............................................................................... 11
Changing the sweeping rollers.......................................................................... 12
Setting the traversing mechanism.....................................................................12
Battery charging ................................................................................................ 13
Maintenance chart ................................................................................................ 13
Malfunctions / error messages and troubleshooting.............................................14
Accessories and spare parts ................................................................................ 15
Transport............................................................................................................... 15
Disposal ................................................................................................................ 15
Technical Data ...................................................................................................... 15
Product marking.................................................................................................... 16
Service .................................................................................................................. 16
Declaration of conformity ...................................................................................... 17

4
Introduction
This operating manual contains instructions for using the hand-
operated sweeper KSE 910.
Our products are subject to continuous improvement.
Therefore, design changes that were made after this manual went to
print could not be incorporated.
If you have any questions, please contact our Service department.
The operating manual must be read and applied by all persons who
operate the sweeper.
Apart from the operating manual and the regulations for accident
prevention applicable in the country of use and the location of use, the
common, recognised rules for safe and technically correct working
must also be followed.
Usage conformant with intended purpose
The appliance is intended exclusively for sweeping on solid surfaces
(for example.: parking areas, walkways, shop floors).
The sweeper may only be used by reliable and instructed personnel.
Any other use, or any use over and above that, will be considered to
be non-conformant with intended purpose.
The manufacturer rejects any and all liability for damage resulting
from such use.
The risk is that of the user alone.
Usage conformant with intended purpose also includes compliance
with the operating manual and the inspection and maintenance
specifications.
Drive the sweeper only along expressly marked routes and spaces.
Transporting loads with the sweeper is not allowed.
Operation by children and youth is prohibited.
The appliance is not suited for picking up fluids, cables, cords, wires
or the like.
Danger
Under no circumstances may the machine be used for
sweeping up flammable or toxic or explosive materials or
inflammable gases or undiluted acids and solvents,
burning
or glowing objects.

KSE 910 Date 0507 5
Safety device
The hood switch prevents the machine from getting switched on when
the hood is open and switches off the machine if it is opened during
operation.
General safety instructions
The sweeper has been built according to the state-of-the-art and the
recognised rules of engineering safety. Nonetheless, there may be
some danger for the user or for third parties, or hindrances of the
sweeper and other property may result during the use of the machine.
Therefore, use the sweeper only in a flawless state, as well as in
keeping with intended purpose, in a safety-conscious and danger-
conscious manner, in compliance with these operating instructions.
In particular, have faults that could hinder the safety eliminated
immediately.
Always keep the operating manual easily accessible at the location of
the sweeper.
In addition to the operating manual, follow the general legal and other
binding regulations for accident prevention and environmental
protection. Do not make any changes or modifications to the sweeper
without the approval of the manufacturer.
Open the hood only for maintenance work and for charging the
battery. Never while the motor is running.
Safety instructions for handling batteries
The operating instructions of the battery manufacturer for his product
must be followed. Please note the regulations laid down by law for
handling accumulator batteries.
Charge discharged batteries as quickly as possible and only in well
ventilated rooms.
Danger!
Note that the accumulator batteries are filled with battery
acid. Keep open flames and electrical sparks away from the
charging area, since a highly explosive electrolytic gas
mixture is generated when batteries are being charged.
Never short-circuit battery poles. The batteries must always
be kept clean and dry to avoid leakage currents. For
avoiding damage to health,
smoking, eating and drinking in the vicinity of the battery
charging station must be avoided.

6
Sweeper description
The suction sweeper is driven by an electric motor.
Sweeping is done with two side brushes which convey the refuse to
the two sweeping rollers that are mounted at 90 degrees to the
direction of motion.
The rollers throw the refuse overhead in the rear dirt collector.
The dust that is collected by the sweeping rollers is kept in a lamellar
filter in the machine by the dust extraction.
The lamellar filter can, in turn, be cleaned by a manually actuated filter
vibrator.
Legend:
1 driving hoop
2 driving lever
3 operating console
4 filter cleaning lever
5 dustbin holder
6 dustbin
7 hood
8 side brushes
Operating console
Legend:
1 operating lever, left side brush
2 key switches
3 operating hours counter
4 operating lever, sweeping rollers
5 operating lever, right side brush
KSE 910 Date 0507 7
Initial start-up
Ensure that the machine was supplied complete and undamaged.
In case of any objections, contact your specialist dealer or our Service
department.
•Open the packaging and carefully lift the machine off the pallet.
Caution! Danger of injury!
Reach under the frame of the machinery to lift it.
There is a risk of injury if you attempt to lift the machinery
by the hood, the side brush retainer, or the dustbin.
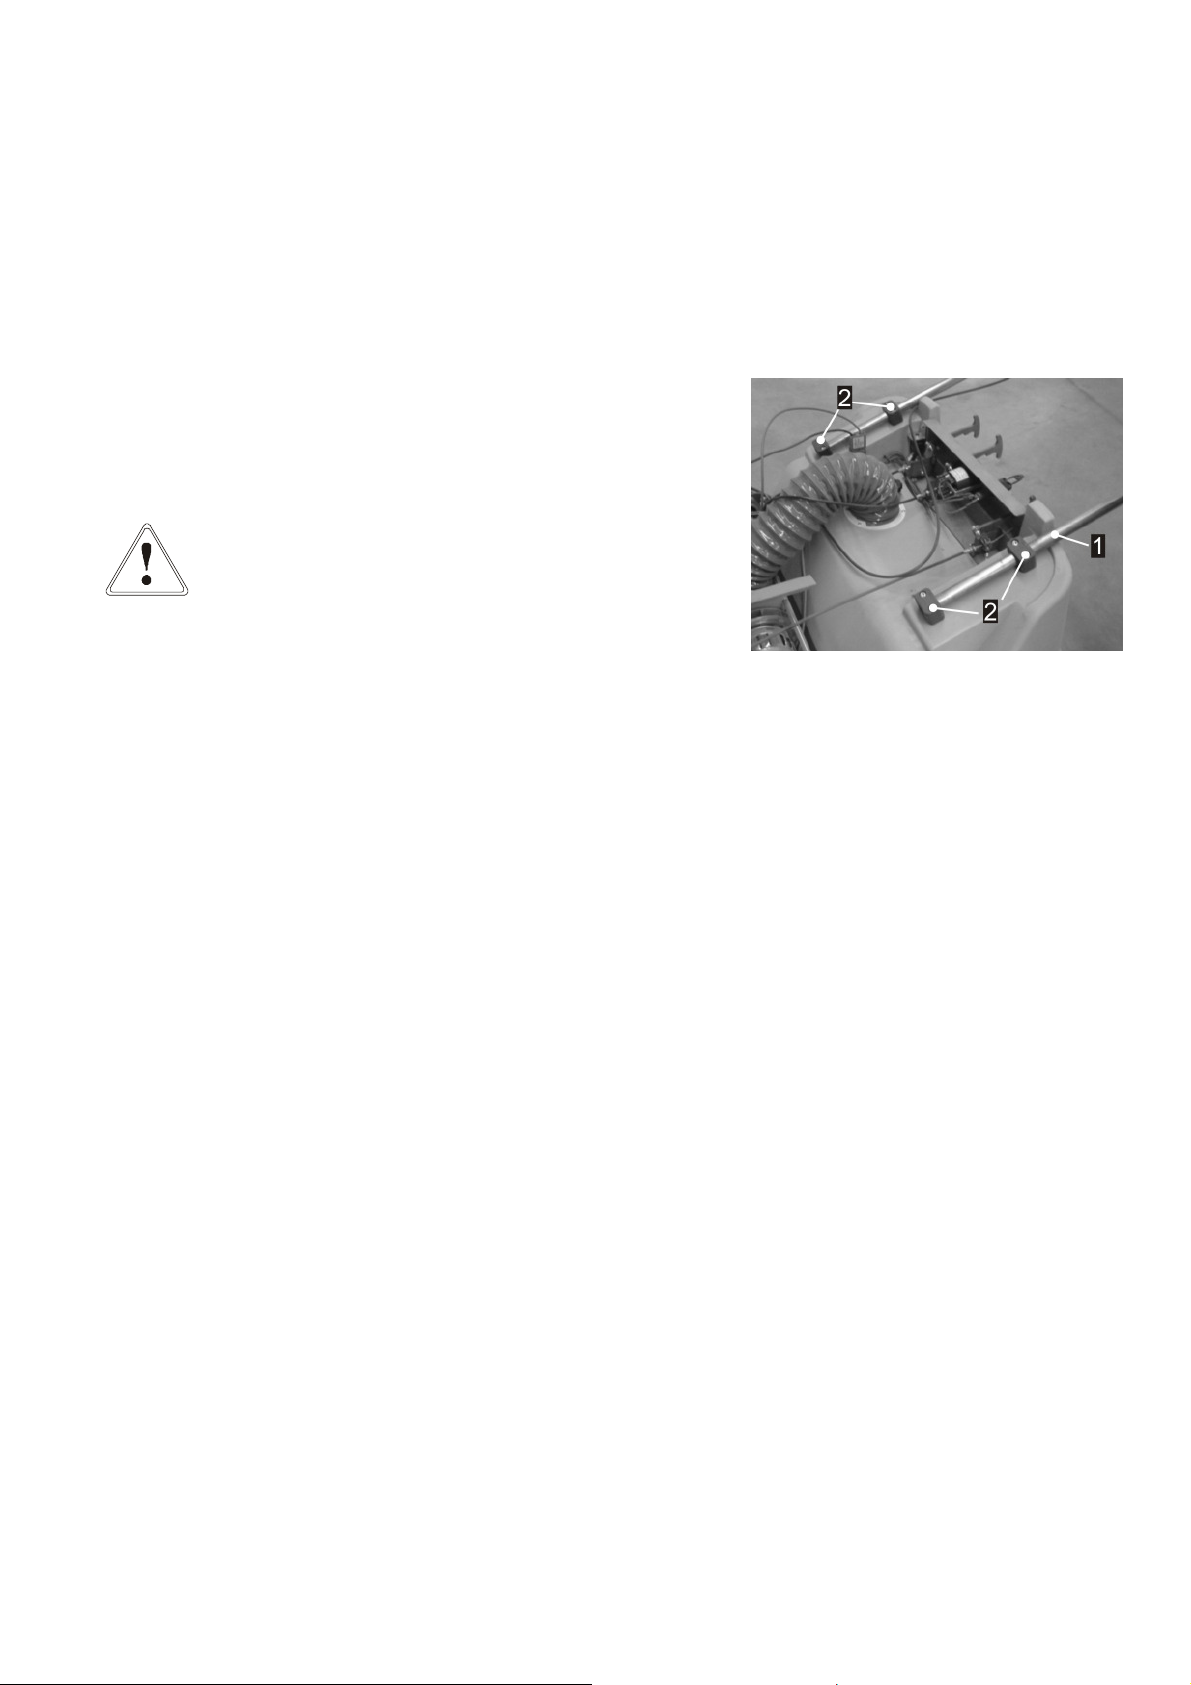
•Open the hood and fasten it.
•Push the driving hoop –1- into the receptacles till the cross hoop
is at hip height (ergonomically correct height).
•Tighten the driving hoop screws –2.
•Set the side brush arms to the top position.
•and mount the side brushes (see page 10 "Mounting the side
brushes“).
•Connect the battery.
(See technical data - wiring diagram).
•Close the hood again.
The sweeper is ready for operation.
Operation
Safety information
Before starting movement, check the suction sweeper for correct
working and technical safety. Do not use the machine if it is faulty.
Operation must be matched to the prevailing conditions. Pay attention
to third parties, especially children, who are present in the working
area of the machine.
Never leave the running machine unattended.
Securely switch off the machine (see page 7."Switching off the
sweeper“).
In this manner, prevent unauthorised use by third parties.
8
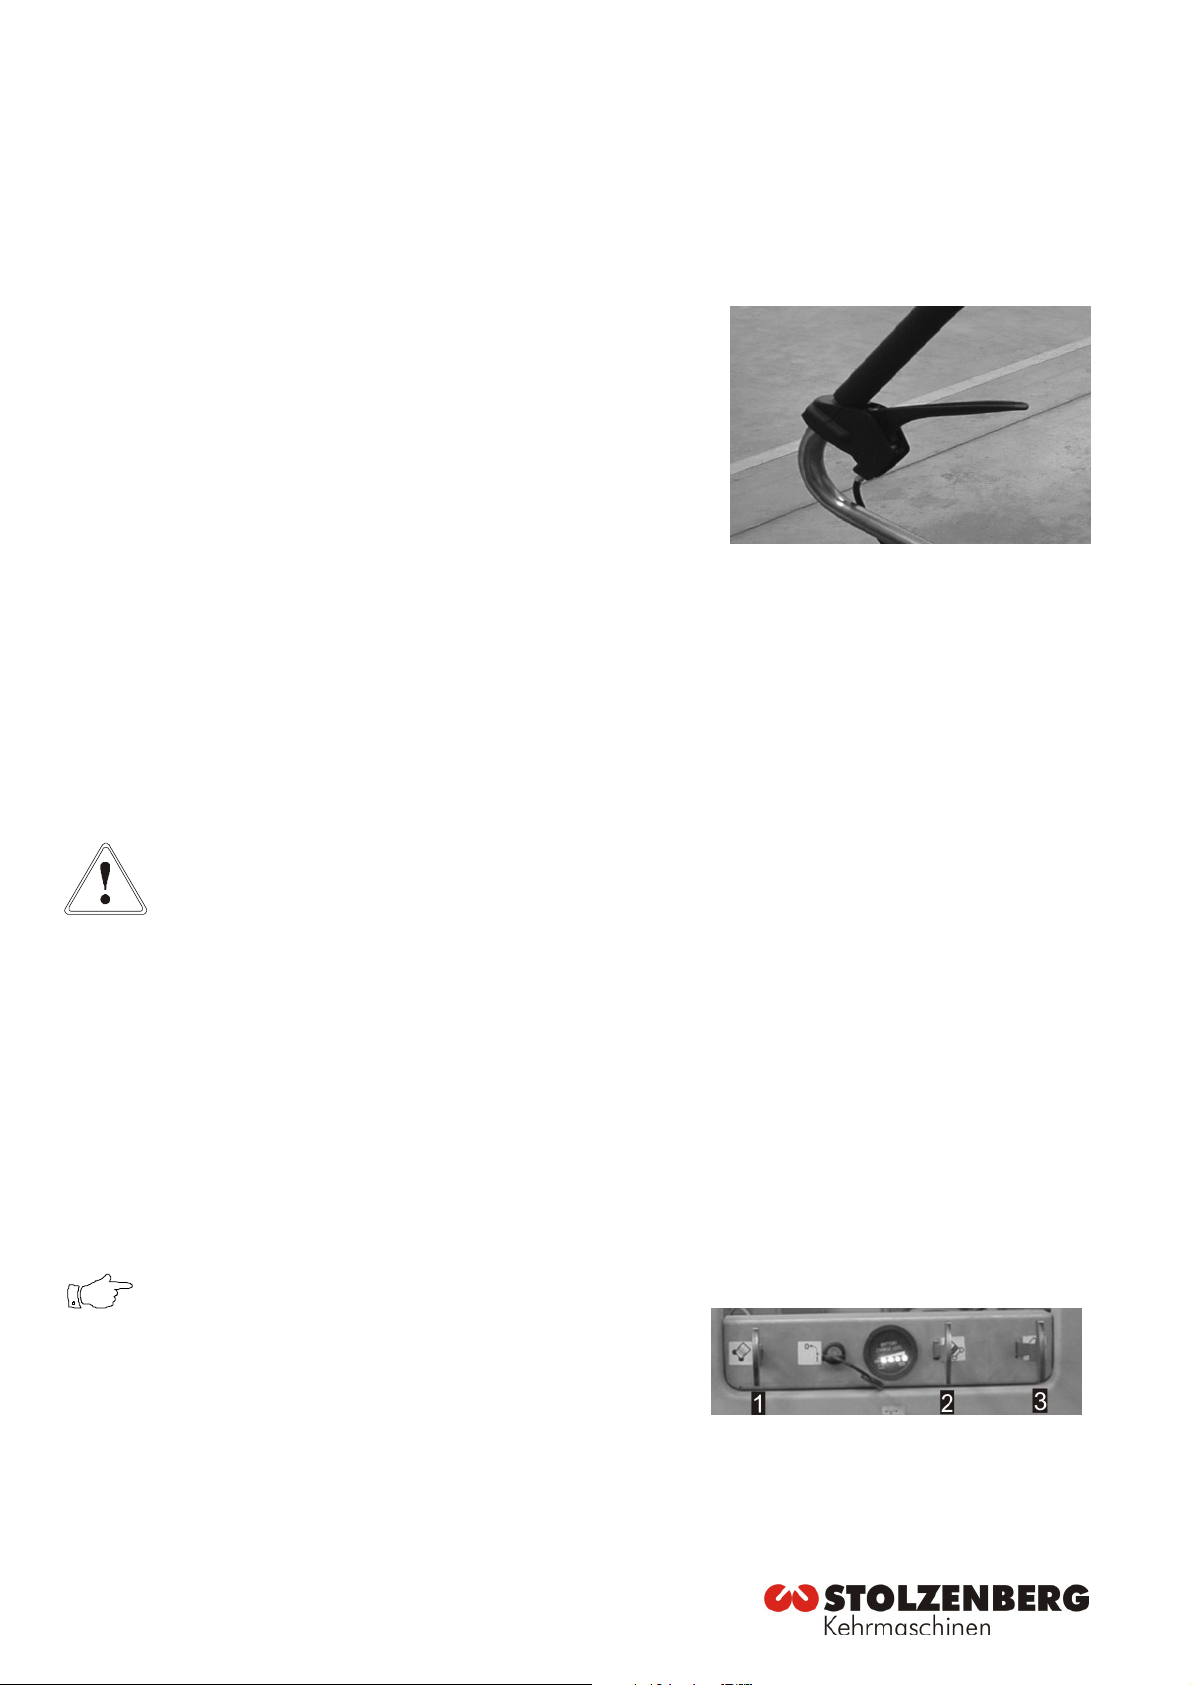
Movement operation
•Insert the key in the key switch and rotate it in the clockwise
direction:
The electric motor starts.
•Pull the movement lever.
The sweeper moves forward.
If the lever is released, the sweeper remains at standstill.
Parking the sweeper
•Move the machine to an area provided (assigned) for the purpose.
The sweeper does not have any brakes.
•Therefore, secure the sweeper against rolling away (for example:
wheel chocks).
•Turn the key in the anticlockwise direction to switch off the motor
and pull out the key.
Caution!
Improper handling of the suction sweeper can result in
harm to persons and property.
•Prevent unauthorised usage of the suction sweeper, by :
-
never leaving the suction sweeper, when it is ready
for operation,
unattended,
-
pulling out the key of the key switch when leaving the
sweeper (for example, at the end of the working day
or depending on deployment),
-
keeping the key separately from the sweeper.
Sweeping operation
Note
The height adjustment of the side brushes and the
sweeping rollers is done via levers on the operating
console.
Each of the side brushes can be used individually.
•Start the movement operation (see page 7 "Movement“).
•By lifting and pushing forward the corresponding lever, the side
brushes and/or the sweeping rollers can be deployed in a
purposeful manner.
(Also see page 5 "Device description"
Legend:
1 operating lever, left side brush
2 operating lever, sweeping rollers
3 operating lever, right side brush
KSE 910 Date 0507 9
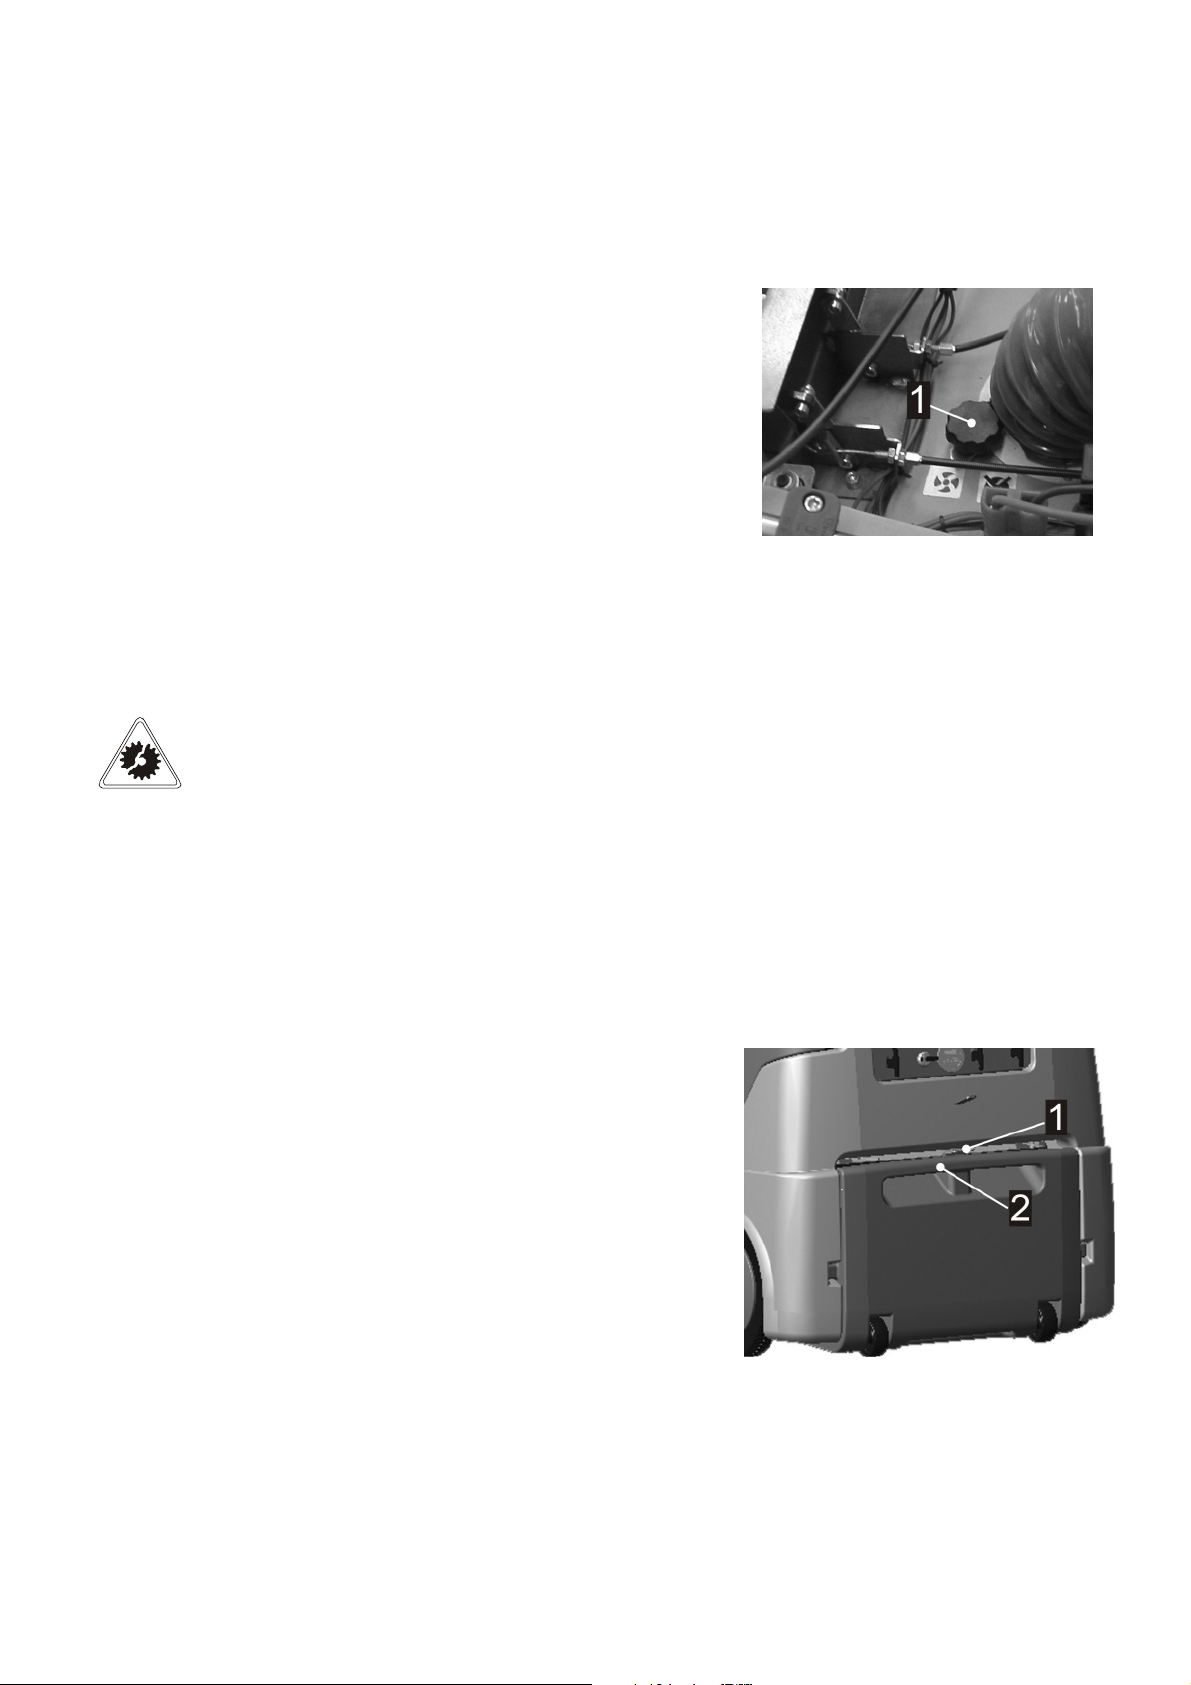
Sweeping wet refuse
For sweeping wet refuse, it is recommended that the fan shutter be
closed, to prevent clogging and softening of the filter.
This is how to adjust the fan shutter:,
•with the machine switched off, open the hood and fasten it.
•To close the fan shutter, rotate the lever –1-to the front position.
•To open the fan shutter, you must get the lever –1 into the rear
position.
After sweeping
•Switch off the machine (see page 7."Switching off the sweeper“).
•Adjust the side brushes and sweeping rollers in the upper
position.
Caution!
If the sweeping rollers are not set to their top position, the
bristles of the side brushes will be put under permanent load
in their off-position and consequently will wear prematurely
when used.
•Always empty the dustbin once you've finished sweeping.
(See "Dustbin emptying“)
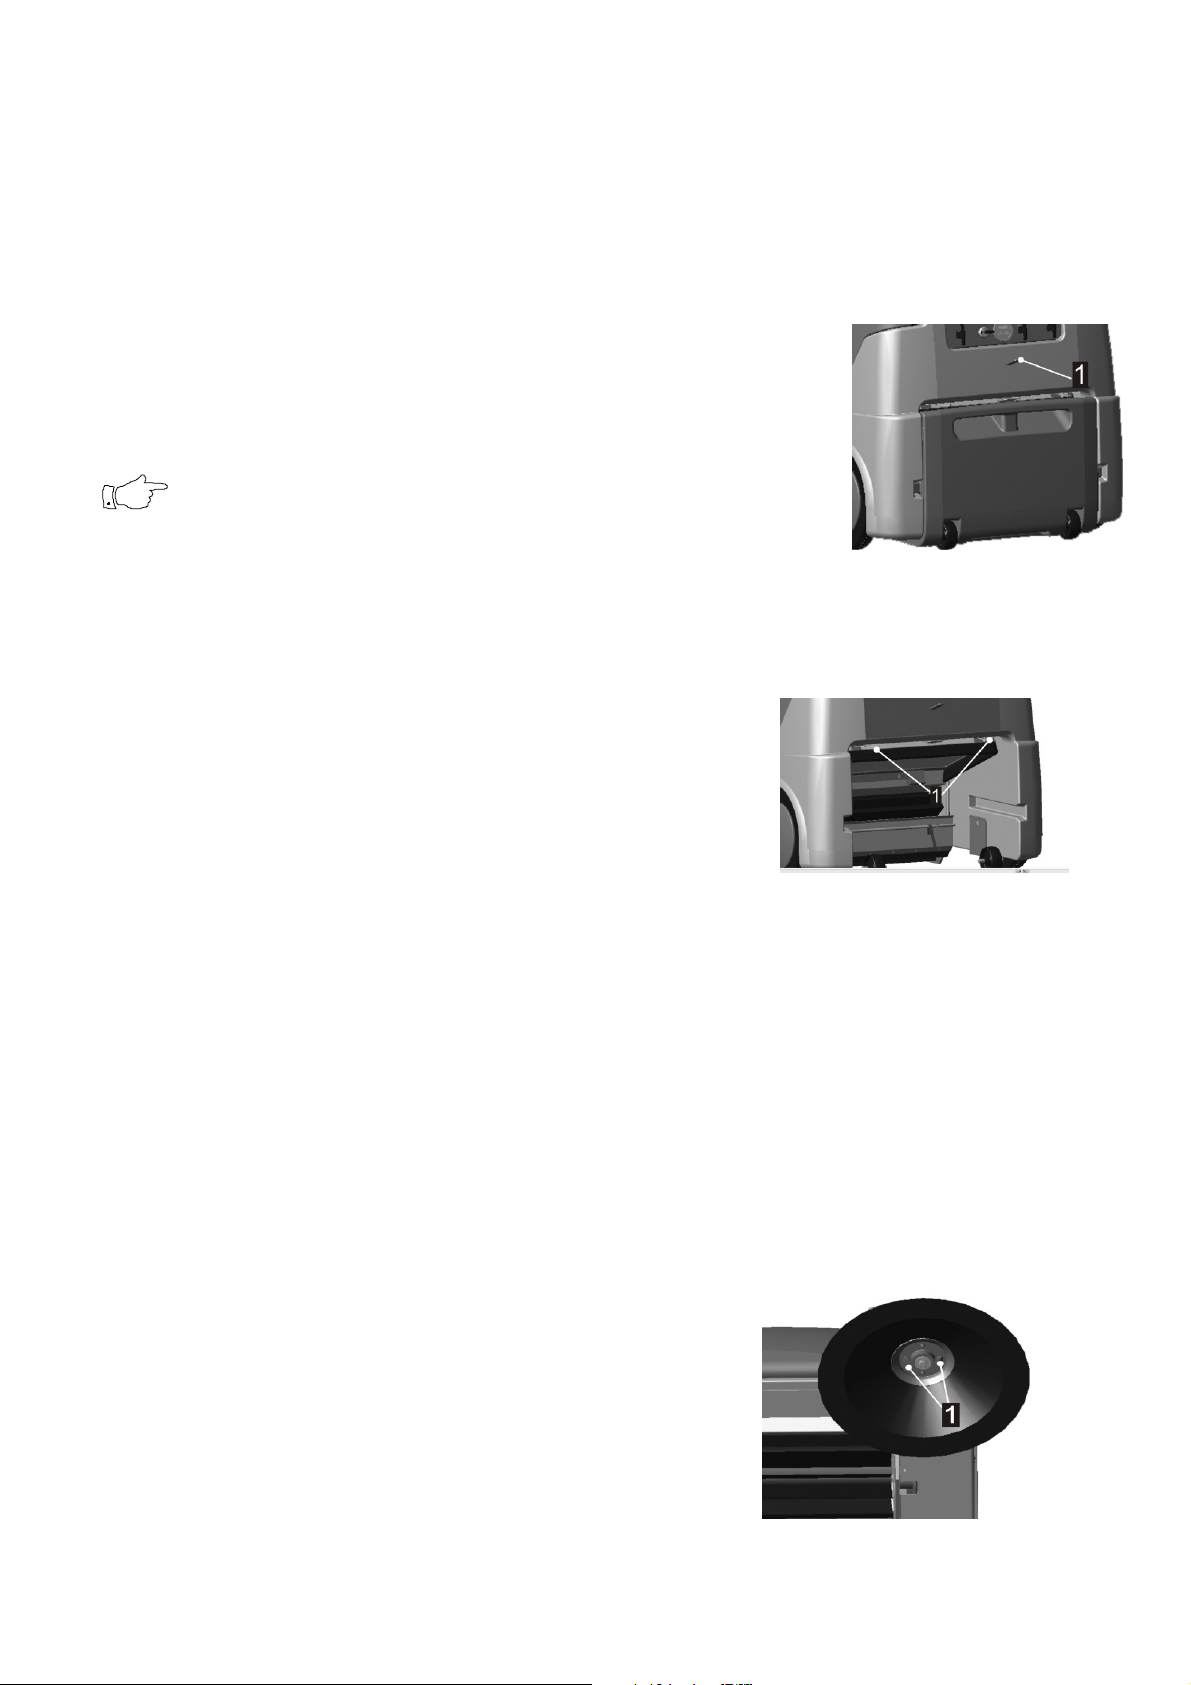
Emptying the dustbin
In order to ensure proper sweeping performance, the dustbin has to
be emptied at regular intervals.
•Lift the dustbin securing device –1-and pull the dustbin on the
handle –2-from the frame of the machine.
•Empty the dustbin into a suitable container.
•Push the dustbin back into the machine.
Do not park the sweeper with a full dustbin.

10
Cleaning
The suction sweeper may only be cleaned in the off state, when it is
dry (for example: sweeping away).
The suction sweeper is a machine with electrical components.
Caution!
Moisture damages the electronics of the device.
Moisture can result in leakage currents and short-circuits.
Do not use any high-pressure cleaners
Maintenance
Safety information
Only complete the type of maintenance work described in the
following chapter. All other maintenance and upkeep work may only
be carried out by the manufacturer or by companies and persons
authorised by the manufacturer, who are familiar with the relevant
safety specifications, because portable devices in industrial use are
subject to the safety test according to VDE 0701.
Closely follow the steps listed in the maintenance instructions. The
improper completion of maintenance tasks may result in malfunctions
when using the sweeper and may possibly render the warranty
granted null and void.
When working on the electrical system, the battery should be
disconnected.
Maintenance work/ troubleshooting at the electric motor must not be
done while the electric motor is running.
Use only flawless and appropriate tools to complete maintenance
work.
Note the requirements for spare parts (see page.. Spare parts).
If covers and/or safety devices were removed during maintenance
work/repairs, they will have to be reattached prior to starting the
sweeper.
For carrying out any work on the sweeper, it must be switched off and
secured from rolling away by accident.
KSE 910 Date 0507 11
Filter cleaning
Make sure the dust collector has been installed.
•Move the filter cleaning lever –1-back and forth a few times.
The filter gets cleaned as a result.
The dust that is stripped off falls in the dustbin.
Note
It is recommended to wait for a few seconds till the dustbin
is emptied, till the fine dust has settled.
Changing the filter
Dismantling the filter
•Remove the dustbin (see the page...dustbin emptying).
•Press the filter holders –1-inwards in such a way that they point to
one another.
•Take out the filter downwards.
Filter mounting
•Place the filter in the filter frame and press the filter frame
upwards with the hand.
•Hold the filter frame in this position.
•Rotate the filter holder outwards with the other hand.
Mounting the side brushes
•Hold the side brushes below the side brush arm and rotate the
side brushes in such a way that the side brush clips are located
below the relevant recesses.
•Press the side brush upwards till it tangibly clicks into place.
Removing the side brushes
•Press the clips –1- below the side sweeper brushes inwards and
at the same time, pull down the side sweeper brushes
downwards.
12
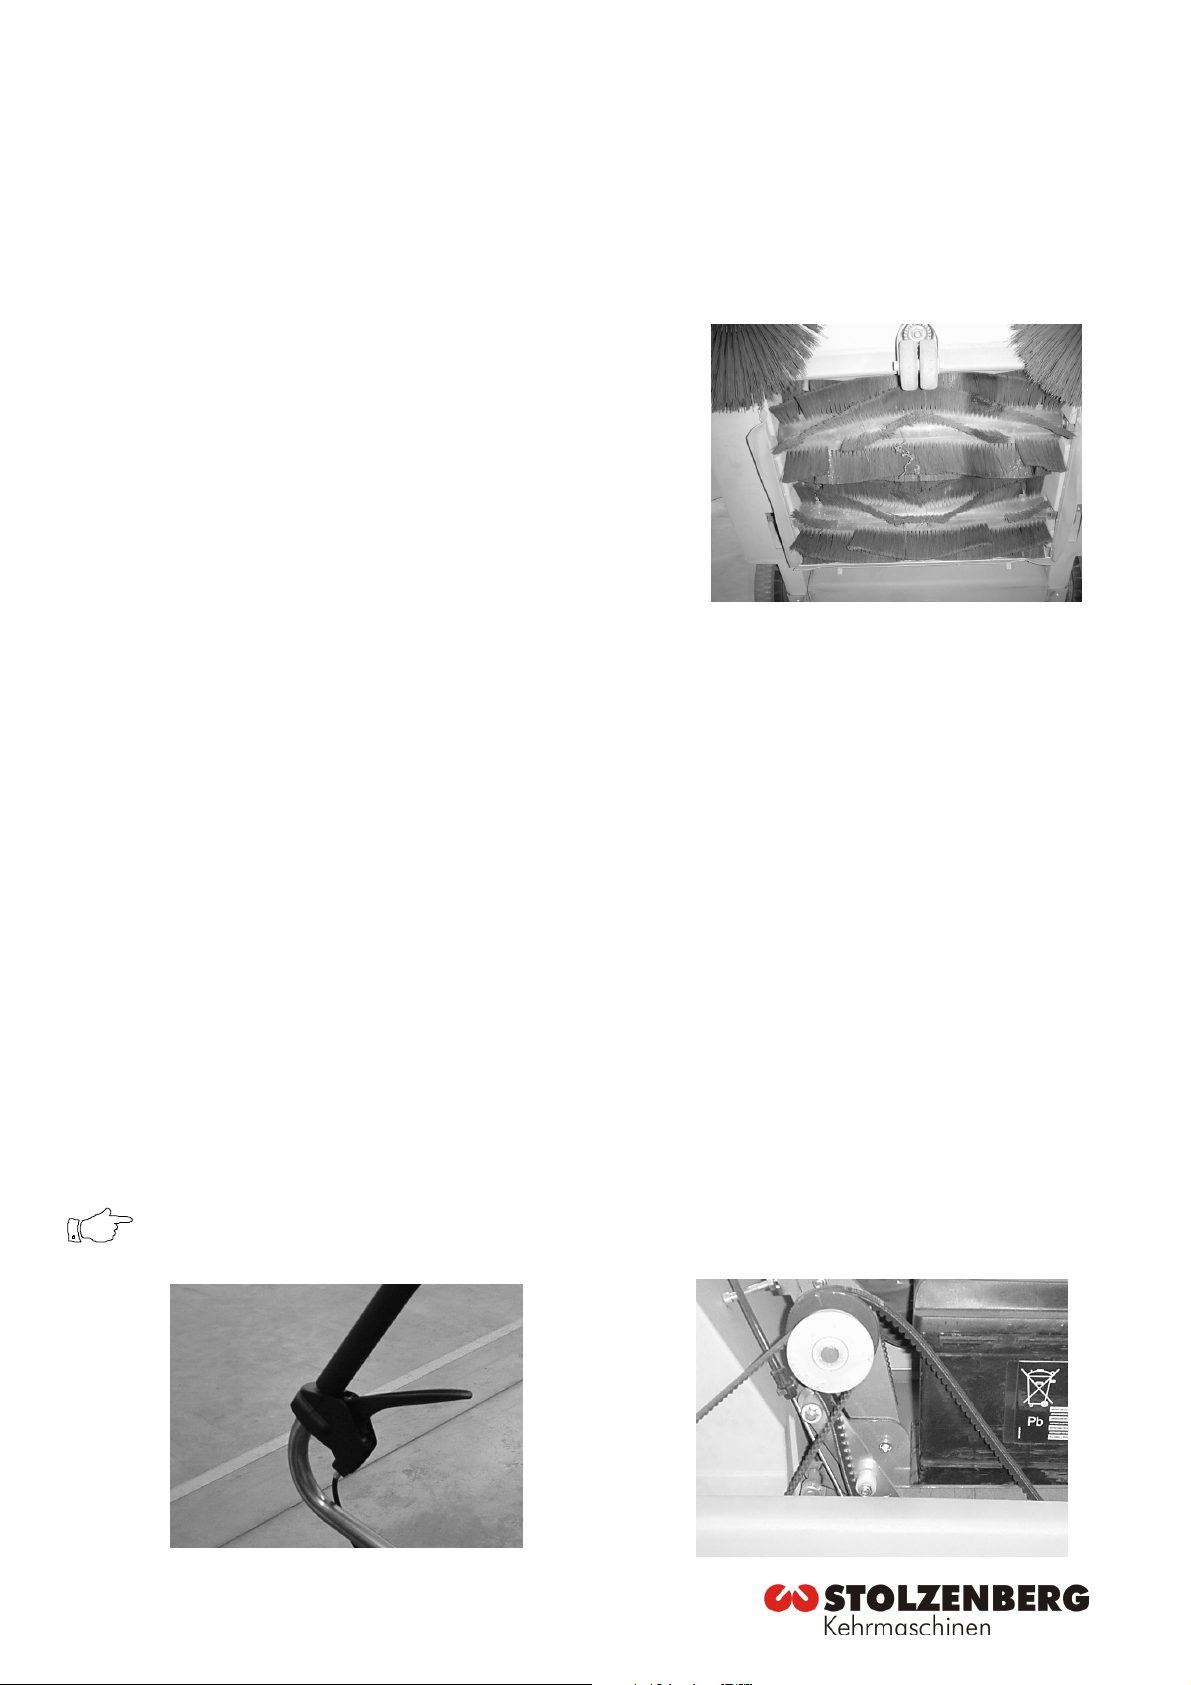
Changing the sweeping rollers
The sweeping roller consists of two split shells with brushes.
Screws join the split shells.
Dismantling the sweeping roller
To dismantle the sweeping roller, follow the procedure below:
•Remove the dustbin (see the page 8."Emptying the dustbin").
•Dismantle the batteries.
•Press the driving hoop onto the floor till the front of the machine
points upwards.
•Support the machine securely (for example: second person).
•Rotate the sweeping rollers till the threaded joints on the
sweeping rollers become visible.
•Loosen and remove these threaded joints.
•Remove the sweeping roller split shells from the shaft and if
required, clean the running gear box and the shaft.
Assembling the sweeping roller
The split shells of the sweeping roller have square recesses. These
recesses serve for locating the sweeping roller axis.
•The two split shells must be put on the rectangular axis of the
brush roller in such a way that the axis fits exactly into the recess
of the split shells.
•Then, screw each set of brushes with 3 screws each, till you can
no longer see a gap between the split shells.
Setting the traversing mechanism
The traversing mechanism can be readjusted at the adjusting screws
at the handle and at the belt tensioner.
•Adjust the belt tensioner in such a way that the belt lies loosely on
the handle without tension.
Note
It should be possible to press the belt 4 cm inwards in the
middle till the first resistance is felt.

KSE 910 Date 0507 13
Battery charging
To charge the battery, you must:
•switch off the sweeper,
See page.. Switching off the sweeper
•open the hood and fasten it,
•pull out the charging plug and connect to the plug of the charger,
•switch on the charger.
The charging process takes about 10 hours.
The automatic charger has a charge retention and can remain
connected to the battery even for a longer time without any problems.
This ensures that you always have a fully charged battery available
when you start work.
Exclusively use this charge cable or you may experience trouble with
the charging process or you may break the battery charger or the
battery.
You must not use the sweeper if it is connected with the battery
charger.
Maintenance chart
Maintenance daily
- Check the machine as to visual damages and correct operation.
- Empty the dust container.
- Check the brushes - roller tunnel for any parts that are sticking to them or for jammed debris,
which narrow the brush tunnel and restrict the free movement of the roller brushes.
- Charge the battery.
- Check the state of the dust filter, clean it if required.
In addition, after every 50 running hours
- Check if sweeping rollers are worn or obstructed by foreign objects and replace, if necessary.
- Check sweeping contour and readjust, if necessary.
- Check if side brush adjustment is worn and readjust or replace, if necessary.
In addition, after every 100 running hours
- check all belts for cracks or impermissible elongation, replace if required.
- Check all bearings for wear.
- Check all seals as to damage and tightness.
- Check cable joints for firmness, replace faulty cables.
- Check the dust filter and replace if necessary.
- Check dust suction for foreign objects, and clean.

14
Malfunctions / error messages and
troubleshooting
Error
Possible causes
Possible remedies
Electrical actuators
are not working
After charging, the battery charging
plug was not connected with the
on-board charger plug
Reinsert the battery charging plug
Battery is discharged or not
correctly connected
Charge the battery and connect it
The hood is still open
Close the hood
Fault in the electrical cables Check all the plug-and-socket joints and
restore the contact
Sweeping result
not satisfactory
Side brushes or brush rollers not
lowered
Lower
Side brushes or brush rollers worn Readjustment and if required,
replacement of the brushes
Trajectory clogged by dirt Check and clean the roller space
Brush rollers are stuck because of
dirt, cables, strings or something
similar
Clean the brush rollers and roller
bearings, check the bearings for
damage
Side brushes are stuck because of
dirt, cables, strings or something
similar
Check the side brushes and remove
whatever is stuck
Side brushes and/or roller belts are
worn
Control and replacement of the belts
Fault in the
traversing
mechanism
Traversing mechanism not
correctly set
Set traversing mechanism (see page 11)
Traversing mechanism belt worn
Checking and replacement of the belt
Blockage of the driving roller or the
running wheels owing to dirt
Remove blockage
Heavy dust
accumulation while
sweeping
Filter heavily soiled Clean the filter (see page 10)
Filter used up / Filter material worn
Check and replace filter
Filter not correctly fitted
Correct filter position
Leaks and result suction of impure
air in the area of the filter chamber
Check for suction of impure air
Filter box not inserted correctly Check if it fits tightly

KSE 910 Date 0507 15
Accessories and spare parts
Accessories and spare parts must conform to the requirements of the
manufacturer. This is ensured by using genuine replacement parts.
Transport
Transport the machine only in the switched-off condition, sufficiently
well fastened.
Disposal
Dispose of faulty parts, especially electrical components, batteries
and plastic parts according to the locally applicable waste disposal
specifications.
Used batteries must be disposed of according to Directive
2006/66/EC.
Technical Data
Dimension and Weight
Length 1091 mm
Width 790 mm
Height 740 mm
Weight 97 kg
Sweeping Width
Main sweeping roller 500 mm
With Side brushes 900 mm
Dust Container Volume 58 L
Battery
Voltage 12 V
Capacity 50 / 66 / 70 / 80

16
Product marking
Suctionsweeper
Tandem KSE 910
Weight: 97 kg
Stolzenberg mbH & Co. K
Hamburger Straße 15-17
D-49124 eorgsmarienhütte
Build in: 2007
Serialnumber: 0607058
Power: 0,3 KW
Service
Stolzenberg GmbH & Co. KG
Hamburger Straße 15-17
D-49114 Georgmarienhütte
Telefon: 0049 / (0)5401 83 53-0
Fax: 0049 / (0)5401 83 53-11
www.Stolzenberg.de

KSE 910 Date 0507 17
Declaration of conformity
according to the EC Machine Directive 98/37/EC
We hereby declare that the machine described below corresponds, in its conception and
construction, as well as the model brought into use by us, to the basic safety and health
requirements of the EC Machine Directive. In case of a change being made that has not
previously been agreed with us, this declaration will lose its validity.
Manufacturer: Stolzenberg GmbH & Co. KG
Designation of the machine: KSE 910
Machine type: Suction sweeper with tandem-roller-system
relevant EC Directives: EC Machine Directive 98/37/EC
Low voltage directive 73/23/EEC
Noise Directive 2000/14/EC
The following standards, in particular, were applied:
EN 292
EN 294
DIN EN 61000-6-4
DIN EN 60335-1
DIN EN 60335-2-67
DIN EN 60335-2-69
Georgsmarienhütte, 11.04.2007
………………………………
Kai Stolzenberg
(Dipl. Wirtsch. Ing., Management

18
Table of contents
Other STOLZENBERG Blower manuals

STOLZENBERG
STOLZENBERG TwinSweep 900E User manual

STOLZENBERG
STOLZENBERG MATRIX MTX-900-V TRS User manual

STOLZENBERG
STOLZENBERG Tandem 900 KSE User manual

STOLZENBERG
STOLZENBERG CS 650 User manual

STOLZENBERG
STOLZENBERG KSV 910 User manual

STOLZENBERG
STOLZENBERG US 5 User manual

STOLZENBERG
STOLZENBERG NU5 User manual

STOLZENBERG
STOLZENBERG NU9 User manual
Popular Blower manuals by other brands

Powr-Flite
Powr-Flite PF2004 Instructions for operation and care

Nilfisk-Advance
Nilfisk-Advance SW5500 Instructions for use

Ikra
Ikra LSN 2600 E operating instructions

Husqvarna
Husqvarna 580BTS Mark II Operator's manual

Scarab
Scarab Merlin Series Abbreviated operating instructions

Skil
Skil PWRCORE 20 JB4712B-00 owner's manual


