Stone Mountain Elite User manual
Stone Mountain, Ltd.
1597 Eagle Point Road
Huddleston, VA 24104
Customer Support: 540.297.6434 x200
www.stonemountainltd.com
Effective 19Apr22
Innovation… Quality… Passion
Stone Mountain Elite Speaker Microphone (SM) User Manual
Starting Out
1. Charge the SM for a full cycle (at least 6 hrs)
prior to use.
2. Configure the SM for your PTT app (see
instructions below).
3. Ensure the SM 3.5mm plug is clean and free of
contaminants.
4. Fully insert and seat the 3.5mm male SM
connector into the mating remote audio
accessory port on the Device.
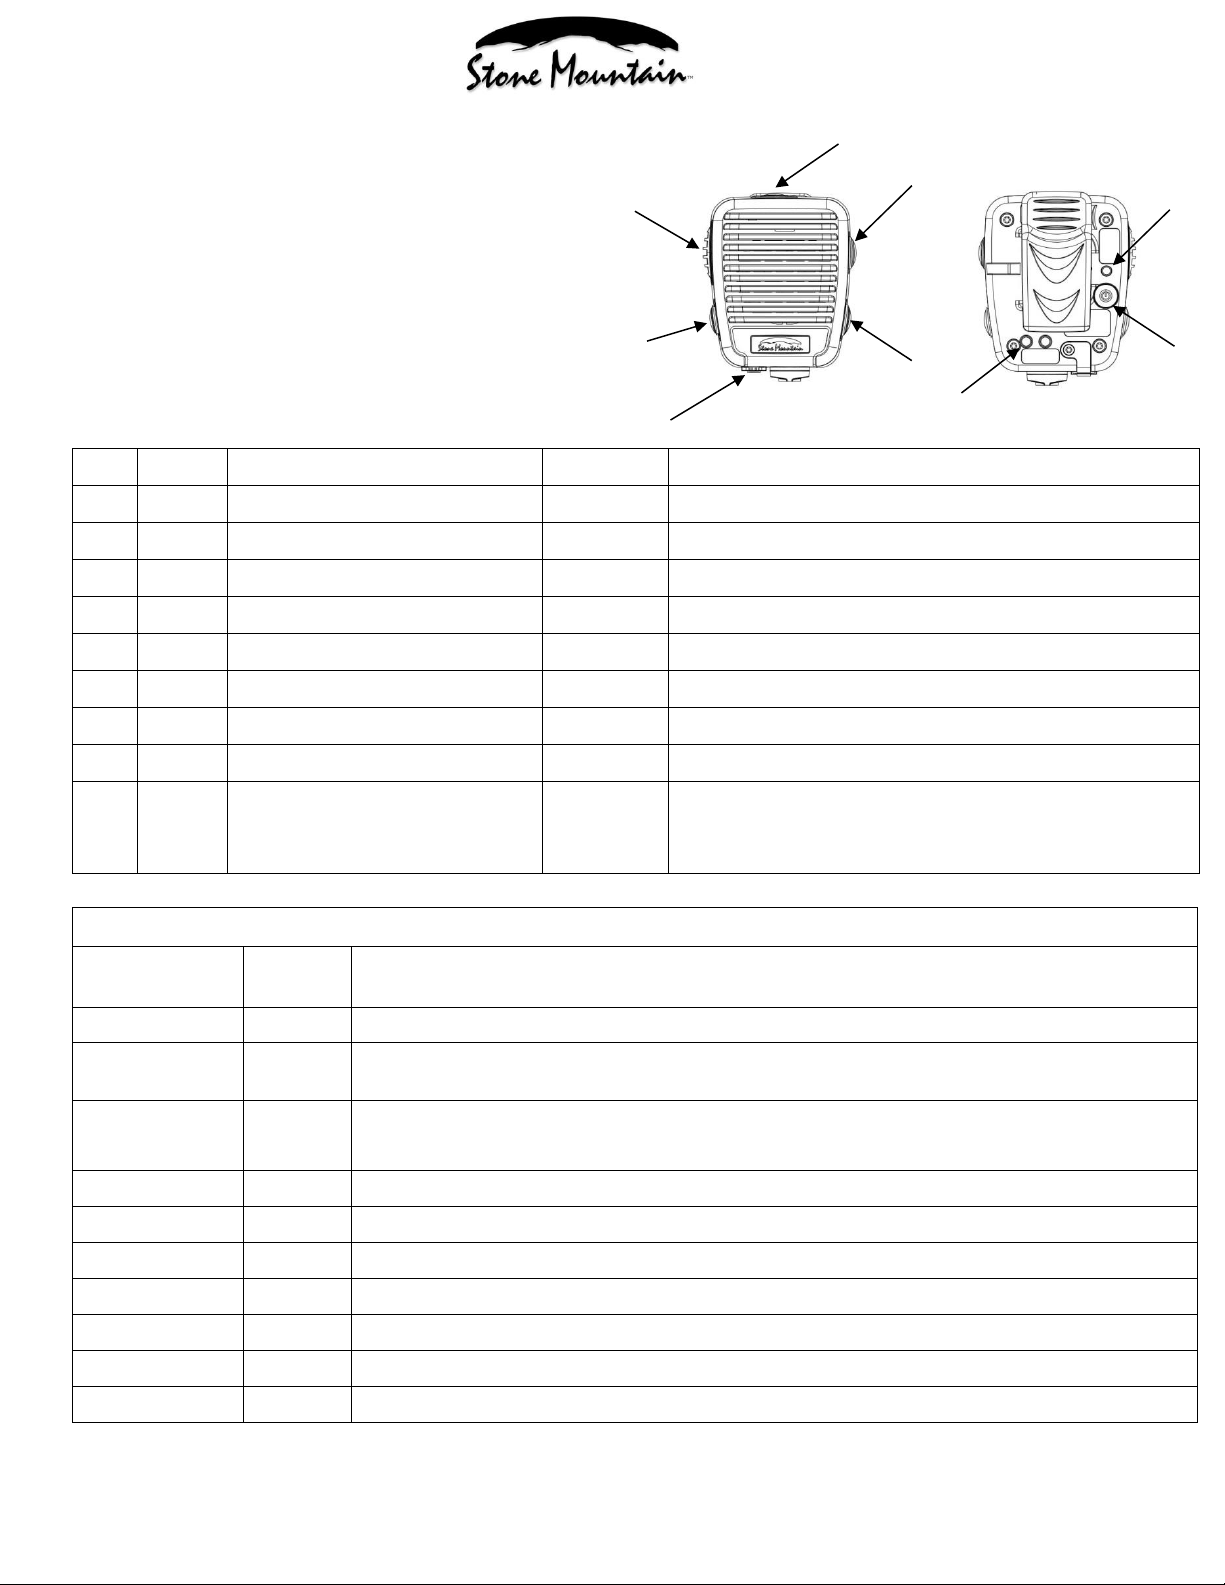
Button
Function
Notes
1
SW1
Emergency
Standard
2
SW2
PTT
Standard
3
SW3
Volume Control
Standard
RampClikTM one touch 10 position
4
SW4
DSP Noise Reduction
Optional
ProClearTM DSP noise reduction system
5
SW5
Message Record/Store/Playback
Optional
CallCheckTM Rx Audio Record, Store &Playback System
6
SW6
PTT APP Configuration
Standard
7
LED
Standard
8
3.5mm Rx Audio Port
Standard
9
TruDockTM Cradle Contacts
See Notes
TruDockTM remote charging comes standard. Optional
HanzFreeTM remote Rx, Tx & PTT accessories purchased
separately
Table 1
Configuration
# Beeps /
Flashes
PTT APP’s
ZZ
1
Factory Test
ZE
2
Aldio, Azetti, Genaker, Instavox, Talk-IP, Tassta, Team on the Run, Voxer, WeChat, WT
Pushcom, Zello, etc. (Android & iOS)
SM
3
Stone Mountain proprietary (Android & iOS)
Zello v4.42 & higher (Android only)
ES
4
ESChat (Android & iOS)
KA
5
Kodiak/Wave on Cloud (Android)
KI
6
Kodiak/Wave on Cloud (iOS)
WA
7
Wave (Android & iOS)
GR
8
Grouptalk (Android & iOS)
XX
9
Legacy/Conventional PTT (Android & iOS)
SE
10
Stone Mountain proprietary, includes emergency (Android & iOS)
1
2
3
4
5
6
7
8
9

Stone Mountain, Ltd.
1597 Eagle Point Road
Huddleston, VA 24104
Customer Support: 540.297.6434 x200
www.stonemountainltd.com
Effective 19Apr22
Innovation… Quality… Passion
Operating the Speaker Microphone
Setting/Changing PTT APP Configuration
Unless you purchased your SM factory pre-configured, you will need to one-time configure your SM for your applicable
PTT app before using.
1. Ensure the SM 3.5mm plug is not installed in the Device.
2. Refer to Table 1 for a list of available PTT apps.
3. Press SW6 for about 4 seconds to enter Configuration Mode. Release when you hear a “booBEEP”.
4. Next you will hear/see a series of beeps/LED lights that correspond to the PTT app that is presently active on the
SM.
oIf the beep/lights(s) correspond to your PTT app, don’t do anything. About 4 seconds after the last
beep, you will hear a “BEEboop” –You have now exited Configuration Mode. You are ready to use your
SM.
oIf the beep/lights(s) do not correspond to your PTT app, press SW6 a number of times equal to that
shown in Table 1 for your PTT app. Next you will hear/see the same number of beeps/lights from the
RSM confirming your entry. About 4 seconds after the last beep, you will hear a “BEEboop” –You have
now exited Confirmation Mode. You are ready to use your SM.
Transmitting Audio (Tx)
To transmit audio, depress SW2 and speak into the microphone opening near the top left side of the SM. Hold the SM
about 6 to 8” from your mouth to avoid distortion. Release SW2 when finished transmitting.
Receiving Audio (Rx)
Incoming audio will automatically be received via the SM speaker.
Note: Some Devices automatically decrease volume by 50% for safety reasons when an accessory is attached. The User
can manually adjust the volume control on the Device for desired volume level.
RampClikTM Volume Control
Receive audio volume is adjusted using SW3. Press the button and hold to increase volume level. Press and immediately
release for each step decrease in volume level. An increasingly/decreasingly loud tone plays for each volume level
during adjustment. There are 10 available volume levels.
Emergency/Man Down Alert
You may declare an emergency/man down condition by depressing SW1 if your PTT app & Device supports it. Check
with your Service Provider, PTT app Provider and/or Device Provider to ensure this feature is supported.
Audio Accessory Interface
3.5mm SureSealTM accessory jack: This interface supports remote receive audio accessories, e.g. surveillance kits,
external speaker, etc. The speaker in the SM is disabled when a receive audio accessory is connected to the audio
accessory jack.
Keep the rubber connector cover inserted when an audio accessory is not attached. Note that only Stone Mountain
audio accessories are guaranteed to function correctly with Stone Mountain SM products. Consult your Stone
Mountain Product Guide for a complete list of available accessories or contact Customer Support at 540.297.6434 x200
with any inquiries.
Optional ProClearTM Noise Reduction System
ProClear utilizes true DSP noise cancelling algorithms and a powerful processing engine to provide noise reduction in
loud environments. Engage/disengage DSP via SW4:
Press & release button - If you hear:
obooBEEP: ProClear is now turned on.
oBEEboop: ProClear is now turned off.
oYou can cycle ProClear on and off accordingly.
For maximum battery life, you may wish to use ProClear primarily during loud background noise conditions.

Stone Mountain, Ltd.
1597 Eagle Point Road
Huddleston, VA 24104
Customer Support: 540.297.6434 x200
www.stonemountainltd.com
Effective 19Apr22
Innovation… Quality… Passion
Optional CallCheckTM (CC) Receive Audio Record, Store and Playback System
Communicate with optimum efficiency and confidence using the patented CallCheck feature.
To record:
Quickly double-click SW5. Note, an Rx transmissions must have occurred prior to recording.
Each new Rx transmission is stored in cache memory. As such, you can record anytime during or after the last Rx
transmission and up to the next Rx transmission (double clicking SW5 will record the last Rx transmission). In
either scenario, the entire Rx transmission will be recorded and stored.
You will hear a high pitched "beep" after a successful record.
You will hear a lower pitched "boop" after an unsuccessful record. An example of an unsuccessful recording
attempt would be if you double-clicked (record) without receiving a new Rx transmission since the last stored
transmission.
Record time limit is about 2.5 minutes (2’30”).
The message will be stored until:
oA new message is recorded and stored, which will record over the last message.
oThe SM battery loses power, i.e. needs to be recharged. In this case, the message will be deleted.
To playback:
Single-click SW5.
You can stop playback with a single-click.
If you single-click again after stopping playback, playback will restart at the beginning of the message.
If you are in playback and a Rx transmission is received, the playback function will terminate and the Rx
transmission will come through the speaker. Playback can be resumed after the Rx transmission ends by a single
click to SW5.
TruDockTM Remote Charging, Rx, Tx & PTT
You can purchase TruDockTM cradles and HanzFreeTM accessories that transform your SM into a 100% hands free
charging and communication system. Remote charging is standard –Remote Rx, Tx and PTT is optional. Contact Stone
Mountain for more information.
Charging
1. There is a low battery audible beep/LED flash that occurs every thirty (30) minutes when the battery gets to 15%
capacity. At this point, the unit should be recharged as soon as possible. Note, depending upon the amount of
usage, the SM will continue to function for approximately one full normal business day when the first low
battery beep/LED occurs.
2. To recharge the unit, remove the protective rubber plug from the charging port on the SM cable. Plug the
5.5mm connector of the Stone Mountain approved charger into the cable charging port. Full charge takes
between 5 to 6 hours assuming a completely discharged battery.
3. Replace the protective rubber plug after charging is complete.
General Care & Maintenance
Do not use solvents, abrasives or other cleaning solutions to clean your Speaker Microphone.
Clean with mild soap and tap water.
Do not insert objects into the speaker chamber or the microphone port, as this will adversely impact the audio
quality and may result in subsequent water leakage.
Innovation... Quality... Passion
Designed, Assembled, Tested and Supported with Pride in the USA, at Stone Mountain we strive to provide our
customers with innovative products of the highest quality, reliability and value. We welcome and appreciate your input -
Feel free to contact us.
Other Stone Mountain Microphone manuals


