Strategic Scents Shopfront User manual

Shopfront
Diffuser manual and setup guide
Introduction
Please read these instructions carefully before use.
For further information please contact info@strategicscents.com
Warnings
• Do not disassemble this device.
• Do not tilt this machine while in use, or when it contains scent oil.
• Only use the provided power supply. Any other power supply could cause damage to the machine
• Do not use in environments above 45 degrees celcius or 95% humidity
• Please keep out of reach of children
• For Bluetooth connectivity, it is recommended to be within 5m of the machine
• Only add scent oil directly into the bottle using the instruction further in this manual. pouring oil into the
diffuser hose will cause damage.
• When refilling the scenting oil, please check the condition of the bottle o ring and replace if damaged
• When the machine will be out of service for a long period. Please remove the scenting oil and unplug
from the power supply
• Please install the maching with the weigh of the machine in mind. Do not install into drywall without
attaching to a wall stud.
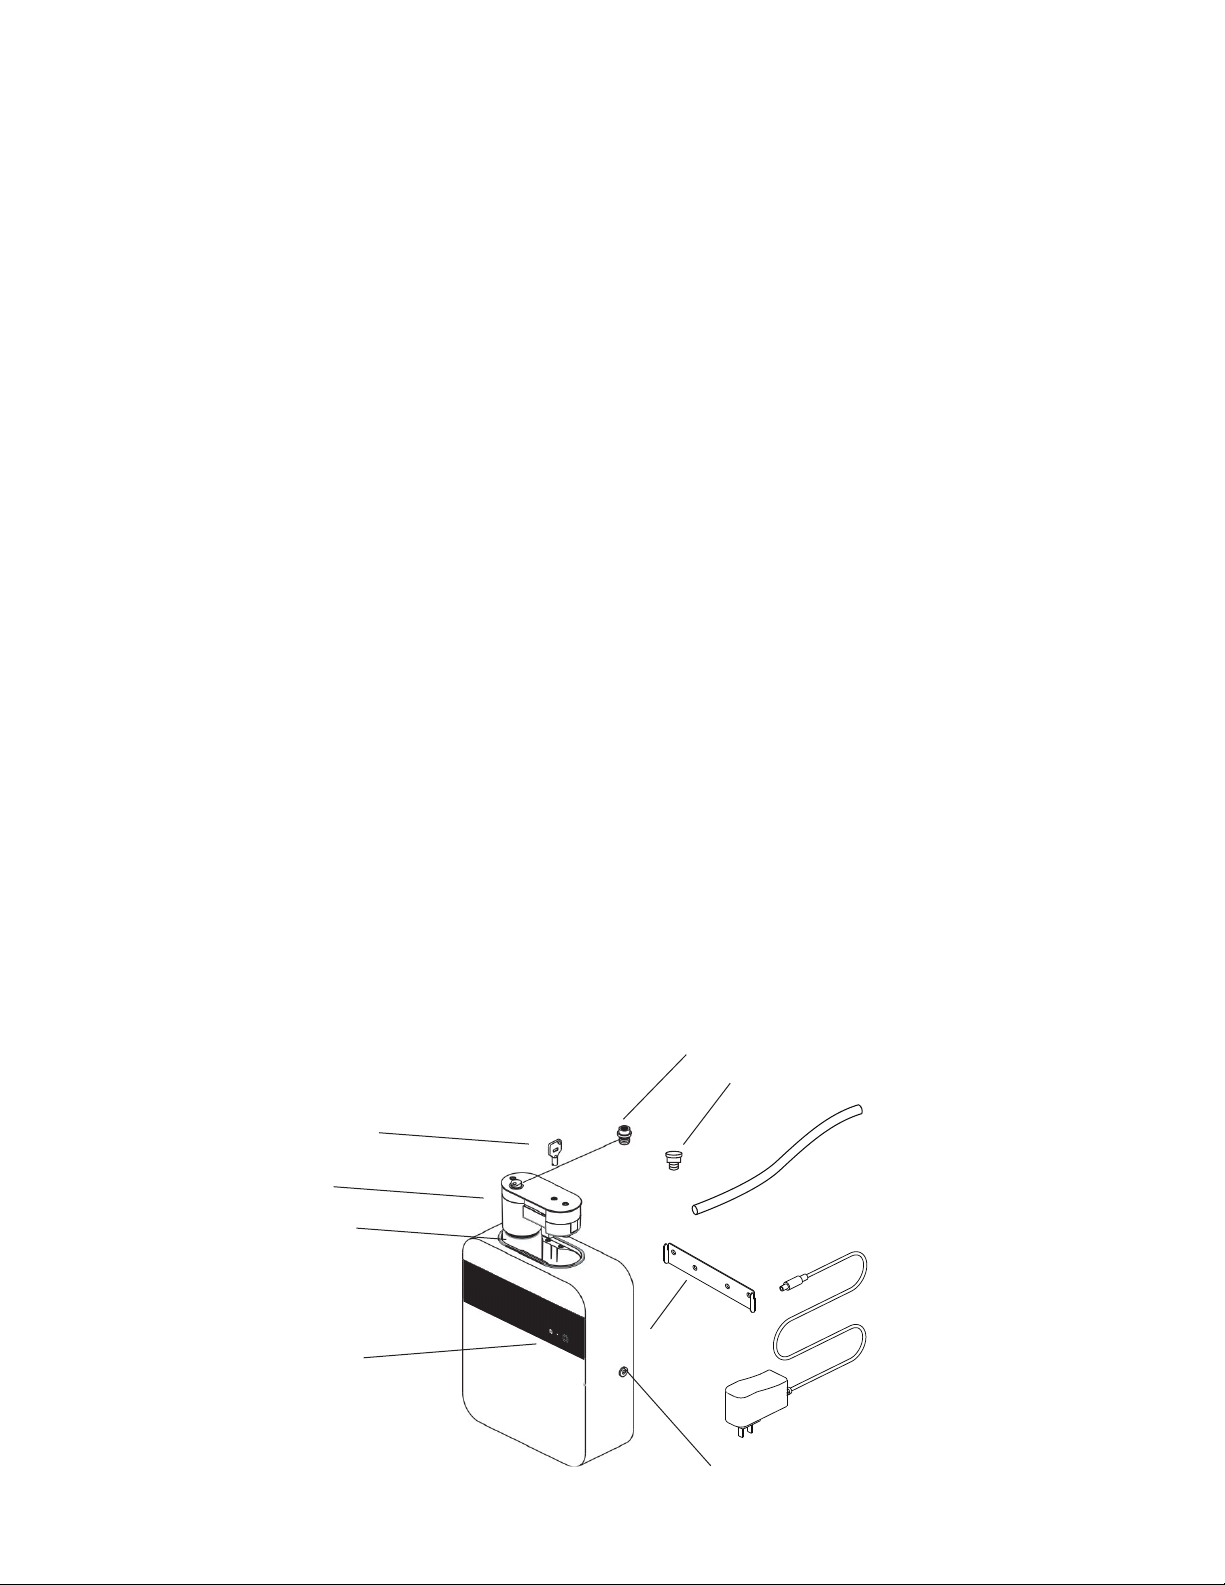
Diffuser Overview
Locking key
Mounting bracket
Nozzle
Brass hose fitting
Supply hose
Power inlet
Power supply
Atomizing head assembly
Scent bottle
Setting button and
indicator light
Installation
First. locate a mounting point that is close to a power outlet and close enough to the HVAC air duct you wish
to plumb into that the supplied hose will reach. The machine MUST be plumbed into the HVAC air duct AFTER
the fan unit. And remember that the diffused scent will travel with the air. So if you are scenting an entire
area with multiple air outlets, make sure you are upstream from all the outlets. If you just want to scent one
area and exclude others (such as a single retail space within a mall), be upstream of the area you wish to
scent, and downstream from the ones excluded.
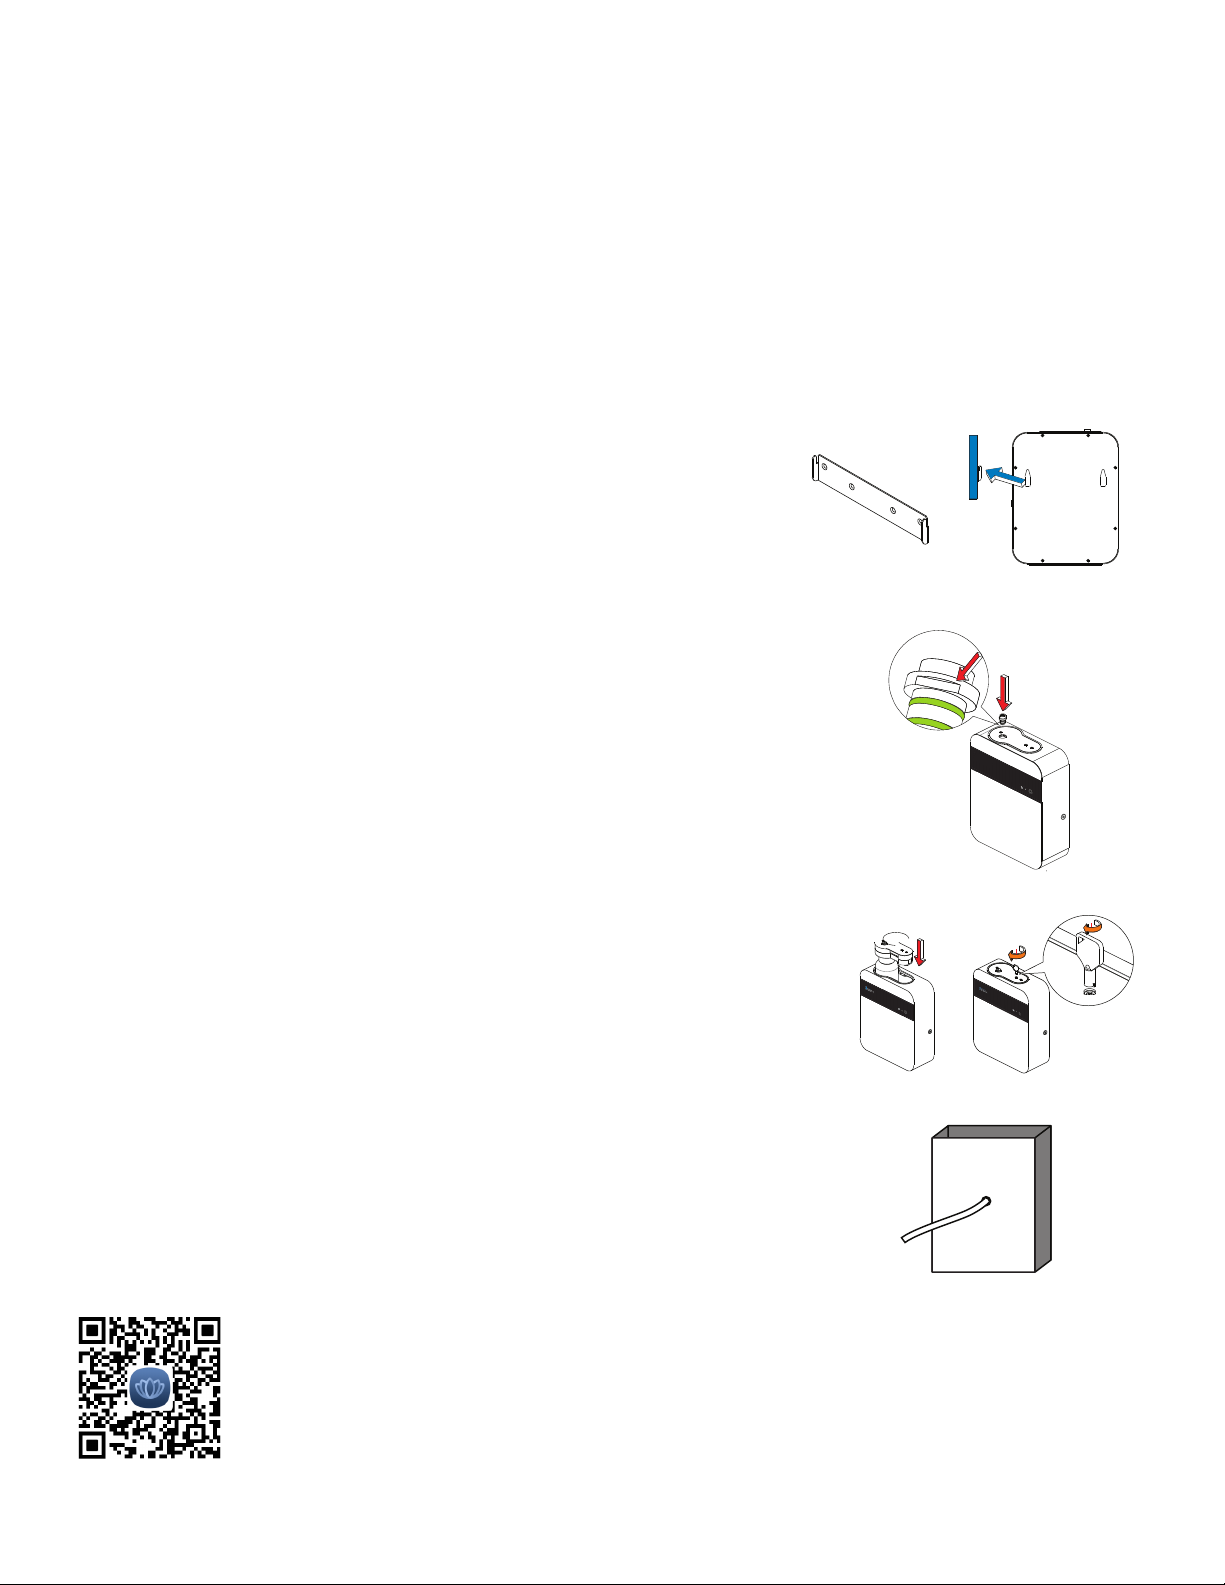
To mount the Shopfront diffuser to a wall, please use the wall mount supplied.
Affix the wall mount to a supporting beam or wall stud to prevent mounting
failure making sure that the unit is close enough to the HVAC air duct that the
supllied hose can reach. Then align holes on the rear of the machine to the
mounting points on the bracket.
Once the mounting is complete, unlock the atomizing head assembly and press in the
nozzle, be sure to align the notch on the nozzle with the notch on the atomizing head.
Then screw the brass hose fitting into the nozzle.
Next, fill the bottle with the Strategic Scent of your choice, place the atomising
head back into the machine, press down till you hear a click and lock it down.
Finally, Connect the hose to the machine. And to the HVAC air duct by drilling a 7/8” hole
in the centre of the duct. Ensuring that your hole is downstream from the fan assembly.
Then install the supplied rubber grommet and push the end of the hose through into the
ducting by ~ 1” (20mm).
REPLACE ESSENTIAL OIL
WARRANTY CARD
REPLACE ESSENTIAL OIL
PRODUCT INSTALLATION
A Wall Mounted Installation
First take the wall mount and
fix it on the wall that the product
needs to be installed.
Align the wall-reserved holes on
the fuselage with the wall mounts
and slowly lower them.
B Connect to fan coil unit installation
Roof
Air outlet
Fan coil unit
Celling
Air inlet
Scent machine
1.Insert the key into the lock slot
and turn it 90° counterclockwise
to unlock.
2.Press the aluminum plate
above the atomizing head
with both hands and press
hard. After hearing the "click",
unlock it.
3.The atomizing head
assembly pops up.
4.Pick up the edge of the
aluminum plate with your
hand and remove the
component.
6.Put the components down
into the machine.
5.Turn the essential oil bottle clockwise
and remove the essential oil bottle for
refueling or replacement. Then turn it
counterclockwise to install it back onto
the assembly.
8.Insert the key into the lock slot
and turn it 90° clockwise to lock.
7.Press the aluminum plate above the
atomizing head with both hands and
press hard. After hearing the “click”,
lock it.
Note: The picture above shows the W600, and the W300 is installed in the
same way.
APP DOWNLOAD QR CODE AND OPERATION
APP operation guide
APP download QR code
Since the date of sale, the product will be free of charge for one year, beyond
the scope of warranty, paid maintenance, and lifetime maintenance.
Maintenance records
Maintenance
Date
Maintenance
Organisation Maintenance item Serviceman
WARRANTY CARD
CERTIFICATION
Product Name: Aroma Diffuser
Model: W300/W600
Grade: First Class
Place of Origin: Guangzhou, China
Inspectors:
Production Date:
1. Any belongs to under normal usage circumstance cause because of the
product’s own quality,customers can bring the card and the machine get
the free repair from our company.
2. In normal use conditions,for the causes of manufacturer’s fault, we will
offer warranty. There is one year warranty since purchase date.
3. The following are no warranty services:
●The damage caused by natural disaster and accident
(For example:Conflagration, Earthquake and so on);
●Don’t according to the operational requirement to use;
●The damage caused by transport improper;
●Can’t provide the warranty card or certificate of content be altered.
4. If maintenance,the guarantee of quality assurance and obligations,
the time limit according to the warranty card.
Download
Smart Scent Pro
Download the Smart Scent Pro app and you’re ready to set up the machine!
Please Note: when changing the strength of the scenting, remember less is more. Start off
very light (scenting level 2-5) and adjust from there. The scent should be very subtle. If you
think the scent may be too light, remove yourself from the scented area for around 15 minutes,
then re-enter. This will give a clearer indication of scent levels.
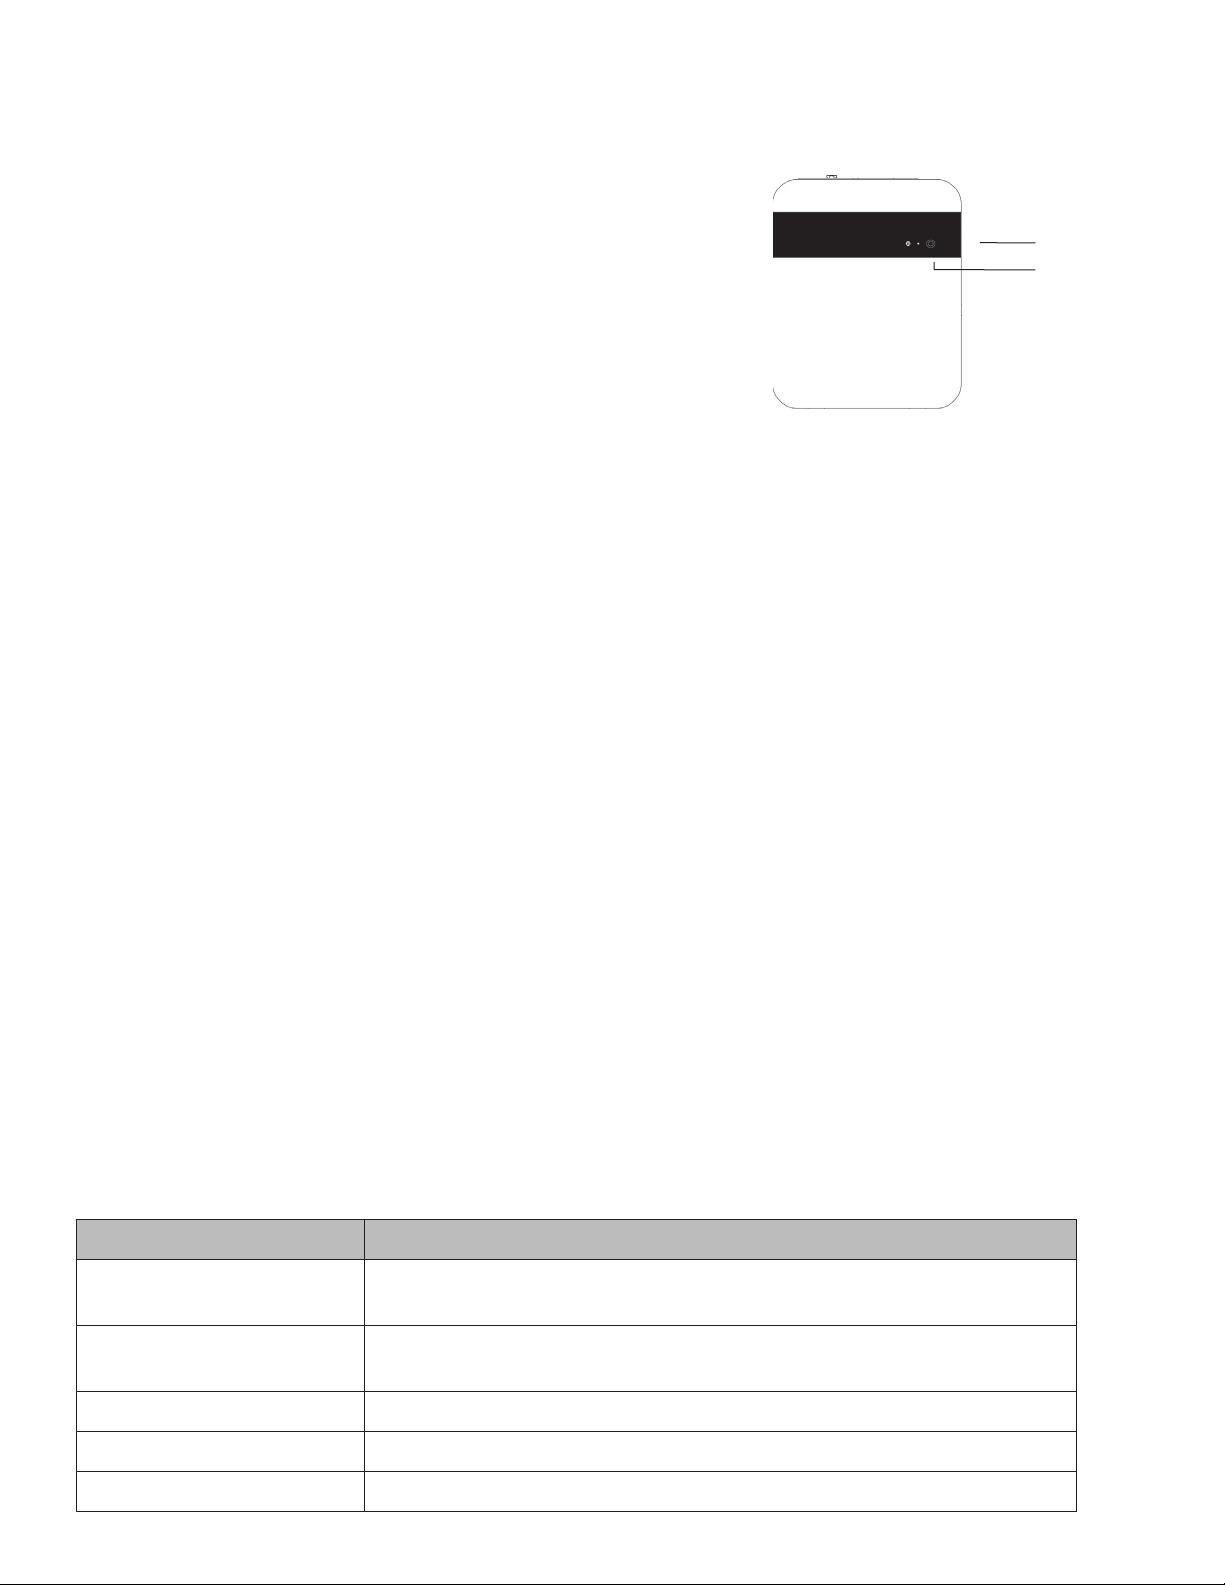
Panel Instructions
Light indications:
Solid Red: Available to connect via Bluetooth
Solid Blue: Connected Via Bluetooth
Fast Flashing Red: Connected via One Key WIFI
Slow Flashing Red: Connected via AP WIFI
Purple Flashing: Connecting to the cloud
Solid Purple: Connected to the cloud
Red Light Flashing every 10 seconds: Oil resevior low. Please refill.
Note:
• The indicator light will automatically turn off after 30 seconds, double click the setting button to reilluminate.
• To complete a connection refresh, when the light is red press and hold the setting button for 3 seconds.
The light will then flash red and the connection refresh will be complete.
• To complete a full factory reset, when the light is red press and hold the setting button for 3 seconds the red
light will flash, CONTINUE HOLDING for anoher 3 seconds. The light will flash blue and the factory reset will
be complete.
Machine setup (through the app)
1. Download the Smart Scent Pro app
2. Create a profile
3. Connect to your new Strategic Scents Machine through wifi or bluetooth (recommended)
4. Create a scenting schedule. This should reflect the opening hours of your business.
5. Chose a scent strength. We recommend using the “gear” options. And starting light. around 2-5. then
adjusting up or down from there. Remember less is more and the scent should be very subtle. If you think
the scent may be too light, remove yourself from the scented area for around 15 minutes, then re-enter. This
will give a clearer indication of scent levels.
6. Enjoy a strategically scented area!
Troubleshooting
Problem Solution
No Atomization Ensure power is connected, Air pump is functioning and schedule is set
through the app
Atomization level low Check the delivery hose is not blocked or kinked. Check scent cencentration
level through the app
Oil leak Check O ring around bottle
Machine excessively noisy Check for air leaks
Cannot connect through app Check that if connecting through Bluetooth you’re within 5m of the machine.
Setting Button
Indicator light
Table of contents
Other Strategic Scents Spa Accessories manuals

Popular Spa Accessories manuals by other brands


OZU
OZU UM-016 user manual

Balboa
Balboa GS100 quick start guide

Gecko
Gecko M-CLASS MC-MP-SBD owner's manual
ICON Health & Fitness
ICON Health & Fitness Pro-Form Restoration PFHS61590 user manual

SPAccessories
SPAccessories Classic Lifter Installation & use manual

GHARiENi
GHARiENi Lounger RLX ELECTRIC instruction manual

Clou
Clou SJ/09.26040 Using instructions

Leisure Concepts
Leisure Concepts Smartop SwimSpa Upright 3.0 installation instructions

Luraco
Luraco Magna Air user manual

HoMedics
HoMedics ARMH-970-CA Instruction manual and warranty information

GHARiENi
GHARiENi SL XP instruction manual

Concept2
Concept2 Perfect Air DF101 Series manual