Strong SRT 4935II User manual

USER’S MANUAL
Manuel D’utilisation
HIGH DEFINITION DIGITAL SATELLITE
TELEVISION RECEIVER AND RECORDER
DEMODULATEUR & ENREGISTREUR DE
TELEVISION NUMERIQUE DE HAUTE DEFINITION
VIA SATELLITE
[2015.06.15]SRT4935Ⅱ Manual_english+French_NIG_rev1.0.indd 1 2015-06-16 오후 2:21:40

2
Contents
1. Introduction ------------------------------------------------------- 3
1.1 Overview
1.2 Main Features
2. Safety Precautions ----------------------------------------------- 4
2.1 safety
2.2 Precautions
3. Points to Check before Use -------------------------------------- 5
3.1 Accessories
3.2 The Satellite dish
4. Controls/Functions ------------------------------------------------ 6
4.1 Front Panel
4.2 Rear Panel
4.3 Remote controller
5. How to Connect -------------------------------------------------- 9
6. Operation --------------------------------------------------------- 10
6.1 Getting Started
6.2 System Setting
6.3 Channels
6.4 Electronic Program Guide
6.5 Entertainment
6.6 System Information
6.7 Conditional Access System
6.8 External Device
6.9 DVR
7. Troubleshooting --------------------------------------------------- 28
8. Specifications ------------------------------------------------------ 29
[2015.06.15]SRT4935Ⅱ Manual_english+French_NIG_rev1.0.indd 2 2015-06-16 오후 2:21:41

3
English
1. Introduction
1.1 Overview
This satellite receiver is designed for the reception of free-to-air and encrypted channels.
Depending on your location, enjoy the rich choice of up to 6,000 different channels
broadcasting a large range of programs: culture, sports, cinema, news, events, etc.
This receiver is assembled with highly qualified electronic parts.
1.2 Main Features
▪Video Resolution : 1080p / 1080i / 720p / 576p / 576i / 480p / 480i
▪DVR Ready via USB External Mass Data Storage Device
▪Time Shift, Record & Playback
▪USB 2.0 Host for MP3 Playback, JPEG Viewing & Firmware Update
▪ Embedded CONAX Chipset Pairing
▪6,000 Programmable Channels
▪DVB-S, DVB-S2 Compliant
▪HDMI Output
▪On-screen display with true color full resolution
▪Advanced Blind Scan
▪Auto & Manual Channel Search
▪Dolby Digital Output
▪Channel Sorting by Alphabet, Transponder or CAS
▪16 Favorite Channel Groups
▪OSD in 17 Languages
▪Multi Picture Display and Zoom
▪16:9 Full Screen, 4:3 Letterbox & Full Screen
▪DiSEqC 1.2 and USALS Compatible
▪Extended Electronic Program Guide (EPG) and program reservation through EPG
▪Teletext by OSD/VBI (Vertical Blanking Interval)
▪High speed software upgrade via USB 2.0
▪Parental Lock/ Installation Lock / Receiver Lock / Channel Lock / Lock Channel Confirm
▪ Manufactured under license from Dolby Laboratories.
“Dolby” and the double-D Symbol are trademarks of Dolby Laboratories.
✽ DiSEqC is a trademark of EUTELSAT
[2015.06.15]SRT4935Ⅱ Manual_english+French_NIG_rev1.0.indd 3 2015-06-16 오후 2:21:41

4
2. Safety Precautions
2.1 Safety
2.2 Precautions
lBe sure to read this user’s manual before
starting the operation of the unit.
lDo not touch the power cord with wet hands
as it may cause electric shock.
lNever open the cover. It is very dangerous
to touch the inside of the unit due to possible
electric shock.
lPlace the unit in a well ventilated and
no-heat environment.
lWhen you do not use this unit for a long
time, make sure that power cord is pulled out
from the outlet. Also do not use a damaged
power cord as it may cause fire or electric shock.
lA professional installation is required.
If reception is interrupted, contact
your local service centre.
lInstall the unit horizontally. An uneven
installation may cause the unit to be damaged.
✽ Where the MAINS plug or an appliance coupler is used as the disconnect device, the
disconnect device shall remain readily operable.
lDo not put heavy items such as a TV set on
the unit. That may damage the unit.
lDo not leave the unit where the water drops
or splashes.
lDo not put water holding items such as vases
on the unit.
lDo not install the unit:
▪ Where it is subject to vibrations
▪ Where it is exposed to direct sunlight
▪ Where there is humidity
▪ Where the temperature is too high or too low
▪ Where there is no ventilation
lMoving the unit to a hot area from a cold
one will cause condensation. Do not operate
the unit for one or two hours or until it has
dried completely.
When installing the unit
[2015.06.15]SRT4935Ⅱ Manual_english+French_NIG_rev1.0.indd 4 2015-06-16 오후 2:21:41

5
English
✽ This unit supports DiSEqC 1.2 and can work with a compatible antenna positioner.
Ask your dealer for information.
✽ If any of the above-listed accessories is missing, contact your sales representative.
3. Points to Check before Use
The accessories below are included with this receiver:
Your dish should be properly installed and azimuth and elevation must be precisely set up
3.1 Accessories
3.2 The Satellite dish
Remote controlUser’s manual Batteries(AAA type) 2EA
BATTERY
BATTERY
BATTERY
BATTERY
RCA Cable
HDMI
HDMI
HDMI Cable
Abuja - Nigeria
Plot 746, IDU Industrial Area Phase 1
www.stronghd.tv
Warranty card
Power Adaptor
[2015.06.15]SRT4935Ⅱ Manual_english+French_NIG_rev1.0.indd 5 2015-06-16 오후 2:21:43

6
4. Controls/Functions
4.1 Front Panel
❶Standby/Power on Indications Lamp: Flashes red light in ‘Standby’ mode and
shows no light in ‘Power ON’ mode.
❷ Power: Switches the receiver between ‘Standby’ and ‘Power ON’ modes.
❸ - ❹CH. (▲/▼): To switch channels or change the cursor position
❺ Smart Card Reader: Insert smart card for encrypted channel access.
❻ USB: 1USB A -type (USB2.0)
❶LNB INPUT: IF input from LNB to digital tuner
❷ LOOP OUT: IF loop-through output from digital tuner
❸ VIDEO: Composite video output
❹ AUDIO L: Left audio output
❺ AUDIO R: Right audio output
❻ S/PDIF: Digital audio output(Coaxial)
❼ USB: 1USB A -type (USB2.0)
❽HDMI: Digital Video/Audio Output
❾RF OUT UHF 21-69: Output to TV
❿TV ANT IN: Input from terrestrial antenna
4.2 Rear Panel
❶ ❸ ❹❷ ❺ ❻
❶❷ ❽ ❾
❸❿
❹ ❺ ❻❼
[2015.06.15]SRT4935Ⅱ Manual_english+French_NIG_rev1.0.indd 6 2015-06-16 오후 2:21:44
7
English
4. Controls/Functions
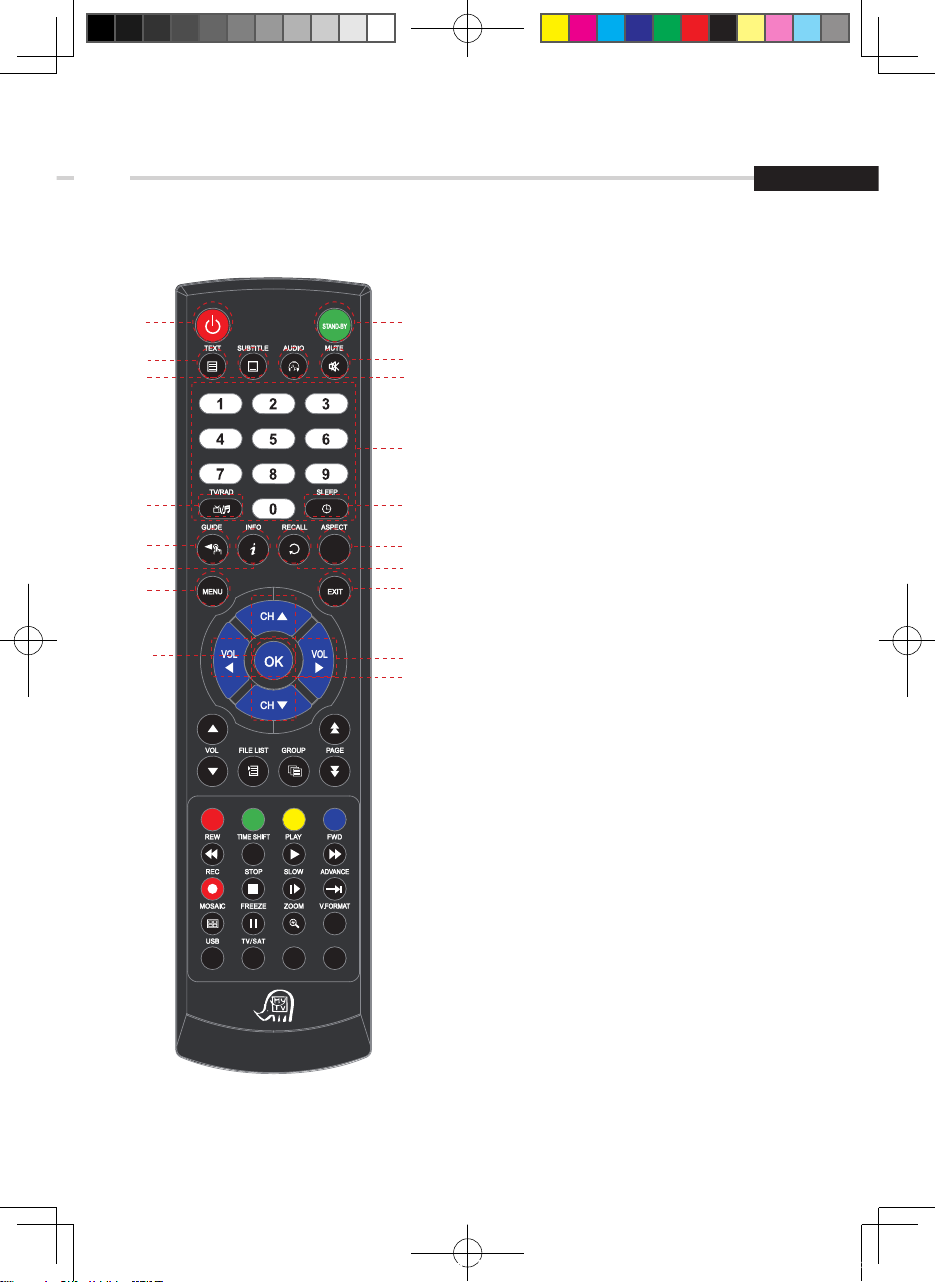
4.3 Remote Controller
❶POWER: To turn the receiver On/Off.
❷STAND BY: Just turn the receiver off.
❸TEXT: To show the teletext contents.
❹SUBTITLE: To turn closed captions on or off.
❺AUDIO: To show the Multi-language
audio track, the stereo-mono mode and
subtitle information.
❻MUTE: To turn the sound On/Off.
❼Numeric Keys (0-9): To enter numerical
settings (such as channel numbers) directly.
❽TV/RADIO: To switch between TV and Radio.
❾SLEEP: To set the STB off after minutes.
❿GUIDE: To show the TV/Radio program guide.
⓫ INFO: To display information box.
⓬ RECALL: To move to the previous channel
Used for special functions in menu mode.
⓭ ASPECT: To select a TV aspect ratio
with Pan Scan or Letter-Box(4:3)
(Full screen or pillar box(16:9).
⓮ MENU: To enter or exit the main menu.
⓯ EXIT: To exit from the present menu and
move to the previous menu.
⓰Up & Down: To switch channels in
non-menu mode and move the cursor
up/down in menu mode.
⓱ Vol Up & Down: To change the volume level.
⓲ OK: To show the Channel List in non-menu
mode and select an item or confirm in menu
mode.
❶
❸
❹
❼
❿⓭
❺
❷
❻
❽❾
⓫ ⓬
⓮ ⓯
⓰
❶
❷
[2015.06.15]SRT4935Ⅱ Manual_english+French_NIG_rev1.0.indd 7 2015-06-16 오후 2:21:44

8
4. Controls/Functions
4.3 Remote Controller
❶ Vol Up & Down: To change the volume level.
❷Double arrow Up/Down: To move to the next
or previous page when many pages are available.
❸ FILELIST: To display the filelist.
❹ GROUP: To change the channel groups.
❺Color Key: Select the option such as View List,
Select Disk, Rename.
❻ REW: Playback in rewind mode.
❼ Time Shift: Play Content.
❽ PLAY: Play Content.
❾FWD: Playback in forward mode.
❿REC: Start recording.
⓫STOP: Stop Playback.
⓬SLOW: Playback in slow mode.
⓭ADVANCE: Go to live channel.
⓮MOSAIC: To display multiple pictures.
⓯FREEZE: To pause the video.
⓰ZOOM: To zoom In/Out.
⓱V.FORMAT: To switch the resolution of
video output.
⓲USB: To show the file manager menu.
⓳TV/SAT: To switch between the satellite input and
UHF/VHF antenna input.
❺
❽
⓭
⓮
⓯
⓫
❸❹
❻
❼
❾
❿
⓬
⓱
⓰
⓲
❶❷
⓳
[2015.06.15]SRT4935Ⅱ Manual_english+French_NIG_rev1.0.indd 8 2015-06-16 오후 2:21:45

9
English
5. How to Connect
When Connecting the Receiver to a TV
1. Connect the TV antenna to TV ANT IN
2. Connect the Video and Audio of the TV to Video and Audio: connect the red and white
connectors to Audio R and Audio L, and the yellow connector to Video
3. Connect your satellite dish
Video
Audio
HDMI
TV
Satellite Dish
L
R
[2015.06.15]SRT4935Ⅱ Manual_english+French_NIG_rev1.0.indd 9 2015-06-16 오후 2:21:46

10
6. Operation
6.1 Getting Started
After your receiver is powered on, proceed with installation as follows :
➊ Menu Language Setting
1. Turn on your TV and receiver.
2. The wizard menu for language selection will appear.
< Fi gure 6 .1.1>
Select one language and press OK on proceed.
Figure 6.1.1
➋Antenna Setup
1. Press the MENU button to display the main menu.
2. Press OK on ‘Dish Setting’. The following window will appear. <Figure 6.1.2>
3. If you have a motorized dish, press OK on ‘Motorized Setting’. < Figure 6.1.3>
✽Note: Enter a 4-Digit password if need arise. The default password is ‘0000’.
4. Select the item that you want to edit, and set its
parameters as desired. <Dish Setting>
▪ LNB Power: Select among ON/OFF/13V/18V.
▪ LNB Type: Select among Single/Universal/OCS
▪ LNB Freq: Set the frequency of the LNB oscillator.
▪ 22KHz: When not AUTO, set the signal path from
LNB or switch by selecting a control signal among
0/22KHz.
▪ DiSEqC 1.0: Select DiSEqC 1.0 Port
▪ DiSEqC 1.1: Select DiSEqC 1.1 Port
Figure 6.1.2
[2015.06.15]SRT4935Ⅱ Manual_english+French_NIG_rev1.0.indd 10 2015-06-16 오후 2:21:46

11
English
➊ Menu Language Setting
1. Turn on your TV and receiver.
2. The wizard menu for language selection will appear.
< Fi gure 6 .1.1>
Select one language and press OK on proceed.
6. Operation
Figure 6.1.3
(When the DiSEqC Motor parameter is set as 1.2)
If you select “diseqc1.2”, “Sat Degree/Antenna Longitude/Antenna Latitude” is not available.
▪ Moter Setup : Setup motor by press OK.
▫ Frequency : Press button to change TP.
▫ Go to x : Press OK to open a list you can to to X or go to reference.
▫ Save : Press to move the dish and press OK to save position.
▫ Recalculate : Press OK to recalculate.
(When the DiSEqC Motor parameter is set as USALS)
▪ Sat Degree: Satellite location.
▪ Antenna Longitude: Your longitude at present.
▪ Antenna Latitude: Your latitude at present.
▪ Motor Setup: Press OK
Set the Antenna Longitud/Antenna Latitude, Usals can move dish automatically.
✽Note: You need to know what LNB you are using to correctly set the L.O.
(local oscillator) frequency.
✽Note: You need to understand how your receiver is connected to properly set the
22KHz and DiSEqC.
5. Select the item that you want to edit and set its
parameters as desired. <Motorized Setting>
▪ Frequency: You can select appropriate TP frequency
at which to check for signal.
▪ DiSEqC Motor: Select DiSEqC protocol among OFF/1.2/
USALS as appropriate for your Motor.
▪ Limit Setting : press OK
▫ Save : Move the dish to west or east by pressing .
When you are moving to the target place, press OK to
save point.
▫ Goto Reference : Move the dish to the 0 position.
[2015.06.15]SRT4935Ⅱ Manual_english+French_NIG_rev1.0.indd 11 2015-06-16 오후 2:21:47

12
6. Operation
Figure 6.1.4
➌Satellite Scan
Through this function, the receiver searches for all the available channels
▣Auto Scan <Figure 6.1.4>
1. You can select satellites by pressing the button
and OK button on the remote.
▪Search Type:
▫ All: To search all the Free To Air and scrambled channels,
TV & Radio channels.
▫ Free: To search Free To Air channels only.
▫ TV: To search TV channels only.
▪Network Search: Select Network Search ON/OFF
to find more transponders through NIT Search.
2. Move to highlight to “Press OK” and press OK
to scan.
Figure 6.1.5
▣Blind Scan <Figure 6.1.5>
1. Select the satellites you want to search by pressing
the OK button
2. Press , to set the parameters
▪ TP: Select TP Frequency
▪ Polarization: Select among All / Vertical /
Horizontal
▪ Mode: Select among All / Free / TV
▣Manual Scan <Figure 6.1.6>
1. Select a transponder.
2. To change a transponder’s information (Frequency,
Symbol Rate), use the NUMERIC buttons.
3. To add a new transponder, press the GREEN button.
4. To delete a transponder, press the YELLOW button
5. To search a transponder, set its different parameters
and press RED button.
Figure 6.1.6
[2015.06.15]SRT4935Ⅱ Manual_english+French_NIG_rev1.0.indd 12 2015-06-16 오후 2:21:48

13
English
➍Channel Selection
▣If you know the channel number, you can enter it with the NUMERIC buttons and wait
2 seconds until the channel is changed.
▣You can press OK to display the channel list <Figure 6.1.7>
1. You can use the following buttons to navigate between channels:
6. Operation
▣OTA Menu
1. Select a satellite for OTA service
2. Enter the transpondes’s information (frequency, symbolrate)by 0~9 buttons.
3. Press RED button to start Scan.
4. If transponder’s information is correct, a pop-up window will display to update software.
Figure 6.1.7
▪ : Moves one channel up/ down.
▪ : Moves one page up / one page down.
▪ RED: Shows all channels in the current group.
▪ GREEN: Shows all channels sorted alphabetically.
▪ YELLOW: Shows all channels sorted by Transponder.
▪ BLUE: Shows all channels sorted by CAS system.
2. Press OK when the selection bar is positioned on the
desired channel.
➎Other Functions of the Remote Control
▣Volume Control
1. While watching a program, press or to control the volume.
2. You can press the MUTE button to remove the sound of the program: the mute icon will be
displayed. Press the MUTE button again to turn the sound back on.
▣Channel Information
1. You can press the INFO button to display the information banner for a few seconds.
2. If you then press the INFO button again, a detailed banner will be displayed.
▣ TV/ RADIO switching
You can press this key to change from a TV channel to a Radio channel or vice versa.
▣RECALL
Press to return to the previous channel.
[2015.06.15]SRT4935Ⅱ Manual_english+French_NIG_rev1.0.indd 13 2015-06-16 오후 2:21:48

14
6. Operation
▣ZOOM
You can press to zoom in the video. (x2, x4, x6, x8 ,x12, x16)
▣SUBTITLE
You can press to select the subtitle language of current channel.
▣ SLEEP
You can set the your receiver to turn off after a few minutes. Press to set the sleep timer.
(Disable, 10, 20, 30, 60, 100, 120 Minutes)
▣V.FORMAT
You can press to change the video resoultion Select between, 1080p->1080i->720p->
576p->567i(480p->480i)->AUTO
▣WIDE
You can press ASPECT to change the TV aspect ratio.
▪ 4:3: Pan-Scan or Letter-Box
▪ 16:9: Full-Screen or Pillar-Box
▣Audio
Press to adjust the subtitle and/or audio status of the current channel:
▪ Audio Mode: Select between, Stereo -> Mono-Left -> Mono-Right
▪ Audio Track: Select between tracks available in this program
✽Note: These subtitle and audio parameters are workable only when the desired channel
supports these functions.
▣TEXT
The Teletext service is a text data service sometimes available from the Service Provider.
▣FREEZE
You can press this key to freeze the video. Press it again to resume the video.
▣GROUP
When watching TV or listening to Radio, you can press this button to view the list of satellites
and/or favorite channel groups. Only registered satellites and favorite groups are displayed.
▣Multi Picture Display
You can press to display multiple pictures; 1X2, 2X2, 2X3 or 3X3.
[2015.06.15]SRT4935Ⅱ Manual_english+French_NIG_rev1.0.indd 14 2015-06-16 오후 2:21:49

15
English
6. Operation
6.2 System Setting
You can set some settings from the submenus in “System settings” menu.
➊Time Settings
▪ Region: local area
▪ GMT Usage: Set Region for the local time to be determined by adjusting the time
difference with the GMT (Greenwich Meantime) according to your location.
▪ Local Offset: If GMT Usage is not OFF, Local time is GMT time + Local Offset.
▪ Current Date: If GMT Usage is OFF, you can modify the date by pressing OK.
▪ Current Time: If GMT Usage is OFF, you can modify the time using the NUMERIC buttons.
▪ Summer Time: Select the period during which Summer Time is in force.
▪ Wake Up Mode: Select the wake up frequency. (Off/Once/Daily)
▪ Wake Up Time: Set the wake up time using the NUMERIC buttons.
▪ Wake Up Channel: Press OK to set the wake up channel.
▪ Sleep Mode: Select the Sleep frequency. (Off/Once/Daily)
▪ Sleep Time: Set the sleep time using the NUMERIC buttons.
➋A/V Output Settings
▪ Audio Language: Set the default audio language when selecting a channel.
▪ Subtitle Language: Set the default subtitle language.
▪ TV Type : Select TV Type. (PAL / NTSC / AUTO)
▪ Screen Format: Select the screen format. (16:9 / 4:3)
▪ Display Format: Select the TV aspect ratio(FULL Screen/Pillar-Box, Letter Box/Pan Scan)
▪ Video Format: Select the Video format.(1080p, 1080i, 720p, 576p(480p), 576i(480i))
▪ Digital Audio Out: Select the Audio output type.(SPDIF/PCM)
▪ RF system : Select the RF system(PAL-BG, PAL-I, PAL-DK)
▪ RF Channel : Select the RF channel(21 ~ 69)
➌OSD Settings
▪ Menu Language: Select the desired language for the menu.
▪ Information Timeout: Select the display duration of the information banner.
(1, 2, 3, 5 or 10 seconds)
▪ Volume Timeout: Select the display duration of the volume box. (1, 2, 3, 5 or 10 seconds)
▪ Recall List: Set ON to display previous channel list.
[2015.06.15]SRT4935Ⅱ Manual_english+French_NIG_rev1.0.indd 15 2015-06-16 오후 2:21:49

16
6. Operation
➍Security Settings
✽Note: PIN code and password are the same
▪ Receiver Lock : Set ON to require entering a PIN code at powering on.
▪ Install Lock : Set ON to require entering a PIN code to access the installation menu.
▪ Channel Lock : Set ON to require entering a PIN code to access the channels menu.
▪ Lock Channel Confirm : Set ON to require entering a PIN code to access a locked channel.
▪ Age Limit : Set to prevent children or unauthorized people from watching programs.
Select among (Free / 8 above / 12 above / 15 above / 18 above). When
program information (age limit) is available from broadcaster and this age
limit exceeds the selection, a PIN code is required to access the channel/program.
▪ Current Password : To change your password, first enter your current password.
▪ New Password : Enter the new password that you want to set.
▪ Verify Password : Enter the new password again for confirmation.
✽Note: The default password is “0000”
➎Database Reset
This function is useful when encountering problems after changing settings.
▪ Delete Radio Channels: Erase all radio channels in the database.
▪ Delete Scramble Channels: Erase all scramble channels in the database.
▪ Delete All Channels: Erase all channels.
▪ Factory Set: Erase all channels and restore the factory default settings.
[2015.06.15]SRT4935Ⅱ Manual_english+French_NIG_rev1.0.indd 16 2015-06-16 오후 2:21:49

17
English
6. Operation
6.3 Channels
➋Edit Channels
This submenu allows you to rename channels and input user PID.
✽Note: The VIDEO PID, AUDIO PID and PCR PID are very important for optimal satellite signal
reception. We recommend you get professional advice where available.
Figure 6.3.1
Figure 6.3.2
You can edit favorite lists, Rename, Move, Lock, Skip, Delete, Add channel.
You can select TV or Radio channels in an alternative way by pressing the TV/RADIO button
and choose a channel list group by pressing the GROUP button.
➊Set Favorites
The receiver supports 16 favorite groups.
1. Press on OK ‘Set Favorites’. The list of groups will
be displayed. <Figure 6.3.1>
2. Press and OK to choose a group. The
following menu will be displayed. <Figure 6.3.2>
If you want to change the name of a favorite
group, press the RED button.
3. Press to OK add (or remove if previously added)
the selected channel to/from the favorite channel
group.
➌Move Channels
1. Press OK on the channel that you want to move; a ‘move’ icon will be displayed.
2. After press , use the , , NUMERIC buttons to move the selected channel.
3. Press OK again to place the channel.
[2015.06.15]SRT4935Ⅱ Manual_english+French_NIG_rev1.0.indd 17 2015-06-16 오후 2:21:50

18
6. Operation
➍Lock Channels
Once a channel is locked, you will be asked to enter a password whenever you try to watch it.
✽If you set ‘Lock Channel Confirm’ (refer to security setting on page 16) to OFF, you will not be
asked to enter a password even if the channel is locked.
Press OK on the channel that you want to lock/unlock; the lock icon will be displayed/removed.
➎Skip Channels
Once a channel is set to be skipped, it will be whenever you navigate channels using in
non-menu mode.
✽Note: You can still access a ‘skipped’ channel if you enter its number using the NUMERIC
buttons in non-menu mode.
Press OK on the channel that you want to skip/un-skip; the skip icon will be displayed / removed.
➏Delete Channels
✽Note: Be careful! If you delete a channel, you will not be able to access it again until you rescan.
1. Press OK on the channel that you want to set/unset for deletion; the delete icon will be
displayed/removed.
2. Press the INFO button to delete all channels in the current list
➐Add Channels
▪ Frequency: Select TP Frequency
▪ Channel Name: Press to display Keypad pop-up; Edit a channel’s name
▪ Channel Type: Select among TV / RADIO
▪ You can add specific channel of the transponder by setting its PID data (Video, Audio and PCR).
▪ Video Type: Select the video type (MPEG1/2, H.264)
▪ Audio Type: Select the video type
(MPEG1/2, HE-AAC, Dolby Digital(AC3), MPEG4, AAC, Dolby Digital+(DD+))
[2015.06.15]SRT4935Ⅱ Manual_english+French_NIG_rev1.0.indd 18 2015-06-16 오후 2:21:50

19
English
6. Operation
6.4 Electronic Program Guide
➊EPG
This submenu allows you to access the electronic program guide when available.
1. Press the GUIDE button to display the guide
menu. <Figure 6.4.1>
2. Press OK to watch the selected channel and access
its EPG data.
If you press OK in the right side of the screen (Event display list).
▪ If the current time EPG is selected, you will return to the previous menu and get signal from
the selected channel.
▪ If a future time (next) EPG is selected, the selected program will be reserved and the event
color will change.
Figure 6.4.1
[2015.06.15]SRT4935Ⅱ Manual_english+French_NIG_rev1.0.indd 19 2015-06-16 오후 2:21:50

20
6. Operation
Figure 6.4.2
▪ If you want to record a program in the right side of the screen, you can select a program by
using . The selected program will be reserved and the evnet color text will change to red.
▪ You can also see change the timer menu.
6.5 Entertainment
➊Calendar
Figure 6.5.1
➋Timer
This sub menu allows you to set the on/off time of your receiver.
To display the timer menu,
press the RED button while in the guide menu.
<Figure 6.4.2>
▪ Timer No: Select the timer that you want to modify. (1- 32 )
▪ State: Select the timer frequency. (off/once/daily)
▪ Date: Press OK to display a Calendar pop-up; Select a date
▪ Start Time: Input the time for your receiver power-on; use the NUMERIC buttons
▪ End Time: Input the time for your receiver power-off; use the NUMERIC buttons
▪ Channel: Press OK to display a Channel list pop-up; Select a channel
▪ File Name: Press OK and enter file name using keypad.
▪ Record: Set the record mode (ON/OFF)by using the left and right arrow button.
▪ Power Off: Select Power Off should you wish the receiver to turn to standby
after recording has finished.
[2015.06.15]SRT4935Ⅱ Manual_english+French_NIG_rev1.0.indd 20 2015-06-16 오후 2:21:51
Table of contents
Languages:
Other Strong TV Receiver manuals

Strong
Strong SRT 2400 User manual

Strong
Strong SRT 5024 User manual

Strong
Strong SRT 8202 User manual

Strong
Strong SRT 4950E User manual

Strong
Strong SRT 5011 User manual

Strong
Strong SRT 8205 User manual

Strong
Strong SRT 8213 User manual

Strong
Strong SRT 5005 User manual

Strong
Strong SRT 5023X User manual

Strong
Strong SRT 6010 User manual

Strong
Strong SRT 8530 User manual

Strong
Strong PRIMA IV User manual

Strong
Strong SRT 5000 User manual

Strong
Strong SRT 5203 User manual

Strong
Strong SRT 8119 User manual

Strong
Strong SRT 5410 User manual

Strong
Strong SRT 5405 User manual

Strong
Strong SRT 5510 MHP User manual

Strong
Strong SRT 5425 User manual

Strong
Strong SRT 8215 User manual


