Stryker Endoscopy X7000 Operating instructions


Table of Contents
1
Table of Contents . . . . . . . . . . . . . . . . . . . . . . . . . . . . . . . . 1
Warnings and Cautions . . . . . . . . . . . . . . . . . . . . . . . . . . . 3
Product Description / Intended Use . . . . . . . . . . . . . . . . . 5
Setting Up the X7000 . . . . . . . . . . . . . . . . . . . . . . . . . . . . . 8
Connecting the AC Power Cable . . . . . . . . . . . . . . . . . . . . . . . . 8
Connecting the Camera and Monitor. . . . . . . . . . . . . . . . . . . . . . 9
Connecting the Light Cable. . . . . . . . . . . . . . . . . . . . . . . . . . . 10
Operating the X7000. . . . . . . . . . . . . . . . . . . . . . . . . . . . . 12
Powering the System On and Off . . . . . . . . . . . . . . . . . . . . . . . 12
Selecting the Operation Mode . . . . . . . . . . . . . . . . . . . . . . . . . 13
Adjusting the Brightness. . . . . . . . . . . . . . . . . . . . . . . . . . . . . 13
Receiving Feedback from the X7000. . . . . . . . . . . . . . . . . . . . . 14
Safety Shutoff . . . . . . . . . . . . . . . . . . . . . . . . . . . . . . . . . . . 15
Checking the ESST Feature . . . . . . . . . . . . . . . . . . . . . . . . . . 16
Using the X7000 with a Voice-Controlled System Interface . . . . . . 16
Using the Ethernet Interface . . . . . . . . . . . . . . . . . . . . . . . . . . 17
Cleaning and Maintenance . . . . . . . . . . . . . . . . . . . . . . . 18
Cleaning the X7000. . . . . . . . . . . . . . . . . . . . . . . . . . . . . . . . 18
Caring for the Lamp Module . . . . . . . . . . . . . . . . . . . . . . . . . . 18
Replacing the Lamp Module . . . . . . . . . . . . . . . . . . . . . . . . . . 19
Replacing the Fuses . . . . . . . . . . . . . . . . . . . . . . . . . . . . . . . 21
Disposing of the X7000 . . . . . . . . . . . . . . . . . . . . . . . . . . . . . 21
Troubleshooting . . . . . . . . . . . . . . . . . . . . . . . . . . . . . . . . 22
Technical Specifications . . . . . . . . . . . . . . . . . . . . . . . . . 25
Electromagnetic Compatibility Tables . . . . . . . . . . . . . . 27
Warranty . . . . . . . . . . . . . . . . . . . . . . . . . . . . . . . . . . . . . . 31
Service and Claims. . . . . . . . . . . . . . . . . . . . . . . . . . . . . . 32
Table of Contents


Warnings and Cautions
3
Please read this manual and follow its instructions carefully. The words
warning, caution, and note carry special meanings and should be
carefully reviewed:
Warning The personal safety of the patient or physician may be
involved. Disregarding this information could result in injury
to the patient or physician.
Caution Special service procedures or precautions must be
followed to avoid damaging the instrument.
Note Special information to make maintenance easier or
important information more clear.
An exclamation mark within a triangle is intended to alert
the user to the presence of important operating and
maintenance instructions in the literature accompanying
the product.
A lightning bolt within a triangle is intended to warn of the
presence of hazardous voltage. Refer all service to
authorized personnel.
To avoid potential serious injury to the user and the patient and/or
damage to this device, the user must:
1. Read this operating manual thoroughly and be familiar with its
contents prior to using this equipment.
2. Carefully unpack the unit and check if any damage occurred
during shipment. If damage is detected, please refer to the
Service and Claims section in this manual.
3. Be a qualified physician, having complete knowledge of the use
of this equipment.
4. Test this equipment prior to a surgical procedure. This unit was
fully tested at the factory before shipment.
5. Attempt no internal repairs or adjustments not specifically
detailed in this operating manual.
6. Never sterilize any part of the X7000 console.
7. Disconnect the X7000 from the electrical outlet when inspecting
the fuses.
The warranty is void if any of these warnings is disregarded.
Warnings and Cautions

4
Stryker Endoscopy accepts full responsibility for the effects on safety,
reliability, and performance of the equipment only if:
• Readjustments, modifications, and/or repairs are carried out
exclusively by Stryker Endoscopy.
• The electrical installation of the relevant operating room
complies with the applicable IEC, CEC, and NEC requirements.
Stryker Endoscopy reserves the right to make improvements in the
product(s) described herein. Product(s), therefore, may not agree in detail
with the published design or specifications. All specifications are subject
to change without notice. Please contact the local Stryker Endoscopy
Distributor listed in the Other Service section, or phone your local Stryker
Endoscopy sales representative or agent for information on changes and
new products.
Warning Federal law (United States of America) restricts this device
to use by, or on order of, a physician.
Other Symbol Definitions:
Type CF Applied Part
Protective Earth Ground
Equipotentiality
Denotes compliance to CSA 22.2 No.601.1-M90 and
UL2601-1.

Product Description / Intended Use
5
The Stryker Endoscopy X7000 Xenon Light Source is a light-generating
unit designed to illuminate surgical sites during endoscopic applications.
The X7000 uses a 300-watt xenon lamp to generate bright, crisp light,
which it delivers to the surgical site via a fiberoptic light cable. The X7000
is compatible with all Stryker light cables, and, with the proper light cable
and adapters, can connect to any flexible or rigid endoscope.
The X7000 is equipped with Electronic Scope Sensing Technology
(ESST), a special safety feature that helps prevent accidental burns
caused by an unattended light cable. When operated with an ESST light
cable, the X7000 senses when the scope and the light cable are
separated and places the light source in STANDBY mode. In STANDBY
mode, the X7000 will reduce light output to a minimum, preventing the
light cable from generating excessive heat.
The Stryker Endoscopy X7000 Xenon Light Source consists of one of
each of the following:
• light source console
• power cord
• video cable (purchased separately)
• xenon lamp module (spare or replacement lamp modules can
be purchased separately)
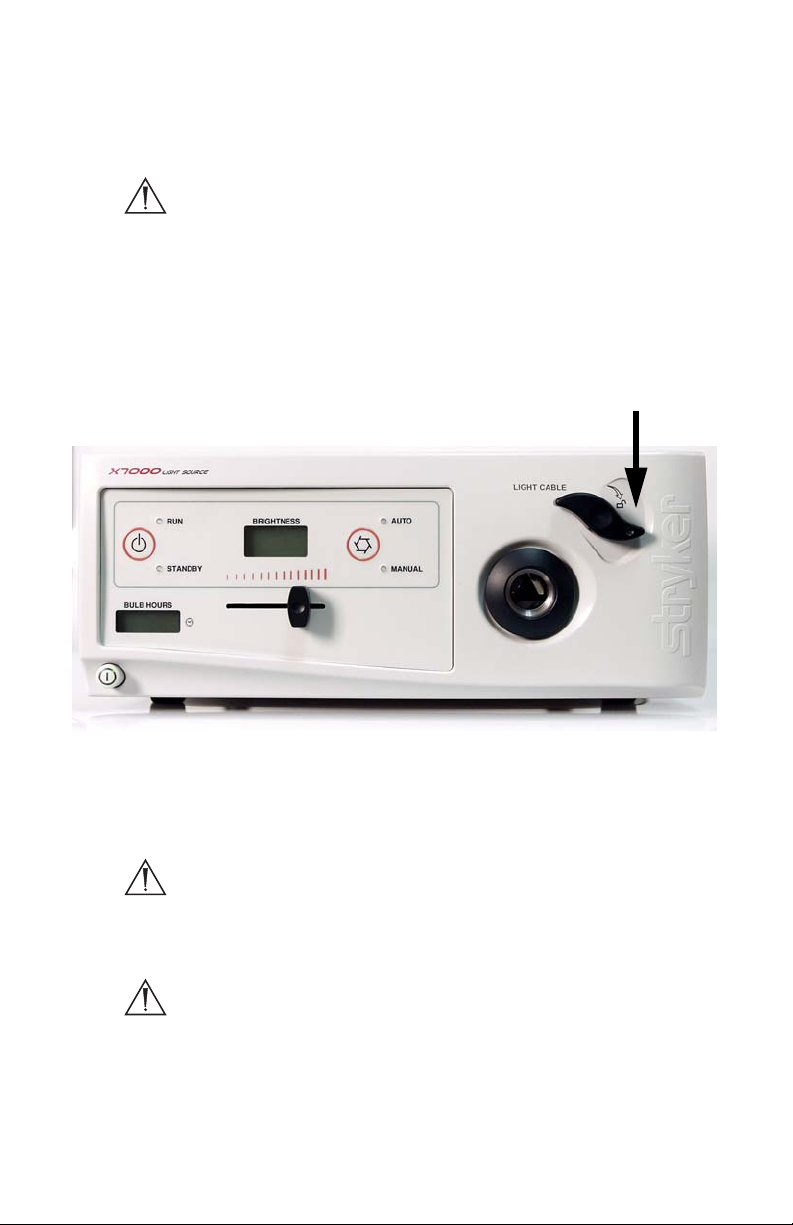
The features of the X7000 console are described in Figure 1 on the
following page.
Product Description / Intended Use

6
Figure 1: The X7000 console, front panel (top) and rear panel (bottom)
4
3
2
1
56 78 9
101112
13 14 15
16
17
18

Product Description / Intended Use
7
1. Power Button: Powers the unit on and off.
2. Bulb-Hours LCD: Displays the total number of hours the lamp has
operated since the last lamp change.
3. STANDBY LED: Illuminates when the unit is operating in the
STANDBY mode. In STANDBY mode, light output is reduced to a
minimum level.
4. Mode Switch: Selects either STANDBY or RUN mode when
pressed. STANDBY is the default mode when the light source is
powered on.
5. RUN LED: Illuminates when the unit is operating in the RUN mode.
In RUN mode, light output is determined by the automatic or
manual shutter.
6. Brightness LCD: Indicates the light intensity level (0-100%).
7. Shutter Switch: Selects either the AUTO or MANUAL shutter
mode when pressed. MANUAL is the default mode when the light
source is powered on.
8. AUTO LED: Illuminates when the shutter is in the AUTO mode. In
AUTO mode, light output is determined by the brightness setting
and the input video signal.
9. Jaw Handle: Opens the fiberoptic-cable holder.
10. Cable Clamp: Grasps the light-source end of an inserted fiberoptic
cable. (When no cable is inserted, the lamp automatically turns off
to save bulb hours.)
11. MANUAL LED: Illuminates when the shutter is in the MANUAL
mode. In MANUAL mode, light output is determined by the
Brightness Slide Bar.
12. Brightness Slide Bar: Increases light intensity when moved to the
right; decreases light intensity when moved to the left.
13. Voice-Control Port: Connects to Stryker voice-control systems.
14. Ethernet Port: Provides an ethernet connection.
15. Video-In Port: Provides a BNC connection for camera video input.
16. AC Inlet: Connects to the provided power cord for AC power supply.
17. Fuse Holder: Contains two 5A fuses.
18. Equipotentiality Plug: Provides a grounding post for common
grounding with other equipment.

8
Note Your local Stryker Endoscopy sales representative will
perform at least one inservice at your convenience to help
set up the equipment and instruct you and your staff on its
operation and maintenance. Please contact your local
Stryker Endoscopy sales representative to schedule an
inservice after the equipment has arrived.
Note When selecting a setup location for the X7000, consult the
“Electromagnetic Compatibility” section included in this
manual to determine the best location.
To set up the X7000, make the following connections:
• Connect the AC power cable
• Connect the camera and monitor
• Connect the light cable
Connecting the AC Power Cable
1. Plug in the AC power cord to the AC Inlet on the rear console
panel.
2. Plug in the other end of the AC cord to a hospital-grade outlet.
Setting Up the X7000

Setting Up the X7000
9
Connecting the Camera and Monitor
Figure 2 below illustrates a sample system in which a Stryker medical
camera, monitor, and X7000 are connected. The letters in the figure
correspond to the letters in the instructions.
Figure 2: A sample system including a medical camera, monitor, and the X7000
1. Connect a BNC cable to the VIDEO IN port (a) on the rear panel
of the X7000.
2. Connect the other end of the BNC cable to the VIDEO OUT port
(b) on the rear panel of the camera.
3. Connect a DVI cable to the DVI Out 1 (c) on the rear panel of the
camera.
4. Connect the other end of the DVI cable to the DVI input (d) on the
rear of the flat-panel monitor.
Note BNC cables have push-and-turn connectors. DVI cables
have push-only 29-pin connectors.
Warning When the X7000 is interconnected with other medical
electrical equipment, leakage currents may be additive.
To minimize total patient leakage current, any Type CF
applied part should be used together with other Type
CF applied parts. Ensure all systems are installed
according to the requirements of IEC 60601-1-1.
X7000
Camera
Monitor
(c)
(b)
(a)
(d)
10
Connecting the Light Cable
Warning Use only nonconductive fiberoptic cables with the
X7000 to maintain electrical isolation.
Note The X7000 Xenon Light Source is compatible with all
Stryker Light Cables.
1. Lock open the cable clamp by turning the jaw handle clockwise
until it stops (see Figure 3).
Figure 3: Locking open the cable clamp
Warning Keep fingers away from the cable clamp as the clamp
may inadvertently deploy and cause injury.
Warning Do not look directly into the cable port. The high-
intensity light may cause damage to the eyes.

Setting Up the X7000
11
2. Insert a clean, dry fiberoptic cable into the cable port until the jaw
latch releases and the jaw clamps the cable in place (see Figure
4). Pull gently on the fiber optic cable to test that it is securely
seated in the cable port.
Figure 4: Inserting the light cable into the cable port
3. Connect an endoscope to the opposite end of the fiber optic
cable.
4. To remove the light cable, turn the jaw handle clockwise until it
latches fully open.
Note The Light Source will default to STANDBY mode when a
light cable is inserted.

12
Note Before operating the X7000, follow the steps in the “Setting
Up the X7000” section of this manual.
Powering the System On and Off
Caution Do not power the system on and off in rapid
succession. Allow the lamp to run for at least five
minutes once it has been powered on. Failure to do so
can cause the lamp to rapidly darken and fail.
To power on the X7000:
1. Confirm that the X7000 contains a properly installed lamp. If no
lamp is installed, follow the instructions in the “Replacing the
Lamp” section of this manual before proceeding.
2. Press the power switch on the front panel. The STANDBY LED
will illuminate, indicating the unit is in STANDBY mode.
Note The lamp will not illuminate unless a light cable is installed
in the cable port.
To power off the X7000:
1. Disconnect the light cable from the X7000 console.
2. Run the fan for at least one minute to cool the unit.
3. Press the power switch on the front panel of the X7000.
Warning To allow for adequate cooling, never block the rear or
side fan vents.
Operating the X7000

Operating the X7000
13
Selecting the Operation Mode
The X7000 has two operation modes, RUN and STANDBY.
•RUN mode: The RUN mode is used during normal operation. It
enables light output to be controlled by the brightness controls
on the front console panel.
•STANDBY mode: The STANDBY mode is used when the
X7000 is powered on but not in immediate use. It reduces the
light output to a minimum and minimizes the heat generated at
the tip of an unattended light cable or scope.
To select either the RUN or STANDBY mode, press the Mode Switch. The
LED for the selected mode will illuminate.
Warning To prevent burns and possible fire, always put the
X7000 in STANDBY mode whenever the endoscope is
removed from a non-ESST light cable.
Adjusting the Brightness
The X7000 has two shutter settings for adjusting the lamp brightness:
AUTO and MANUAL.
•AUTO shutter: The AUTO shutter automatically adjusts
brightness to compensate for variable light levels in the surgical
site. Receiving input from the medical camera, the AUTO
shutter adjusts light levels around the brightness selected on
the Brightness LCD. (For optimal AUTO-shutter performance,
use the Brightness Slide Bar to set the brightness between 30
and 70%.)
•MANUAL shutter: The MANUAL shutter allows the operator to
adjust brightness manually with the Brightness Slide Bar. Move
the Brightness Slide Bar to the right to increase brightness and
to the left to decrease brightness. The selection will appear on
the Brightness LCD as a percentage between 0 and 100.
To select either the AUTO or MANUAL shutter, press the Shutter Switch.
The LED for the selected shutter will illuminate.
Note For the AUTO shutter to work properly, a medical video
camera must be connected to the Video-In Port on the rear
X7000 console panel.

14
Warning The higher the brightness, the more heat energy that
will be generated at the endoscope tip. Always adjust
the light source to the minimum brightness necessary
to illuminate the surgical site.
Warning The surface temperature near the scope adapter and at
the tip of the scope may exceed 41º C if the unit is
operated at maximum brightness for extended periods
of time. The heated scope and adapter may cause
burns.
Receiving Feedback from the X7000
The X7000 provides feedback through the Brightness LCD and the Bulb-
Hours LCD.
•The Brightness LCD shows the intensity level of the light as a
percentage between 0 and 100. For example, if the LCD shows
“75,” the light output to the fiberoptic cable is running at 75
percent of capacity.
•The Bulb-Hours LCD shows how many total hours the lamp
has operated. For example, if the LCD shows “250,” the lamp
has operated 250 total hours. The Hour-Meter LCD also
displays warning and error codes. The table below lists and
defines the warning and error codes displayed.
Code Definition Recommended
Action
E-1 All conditions are met for the lamp
to illuminate, yet it remains off.
Return the X7000 for
repair.
E-2 All conditions are not met for the
lamp to illuminate, yet it remains on.
Return the X7000 for
repair.
E-3 The lamp-identification system is
not working properly.
Replace the lamp
with a Stryker lamp.
If the condition
persists, return the
X7000 for repair.

Operating the X7000
15
Safety Shutoff
The X-7000 Xenon Light Source is equipped with a Safety Shutoff
feature which will temporarily turn off the bulb in the event of excessive
heat.
Warning WARNING Once the Light Source cools down (after 7-
10 minutes), power will resume to the bulb and the unit
will restart in STANDBY mode. To prevent accidental
burns, ensure that the following precaution is taken:
Always securely place the scopes and/or fiber-optic
cables to assure safe resumption of light output.
Note If the X-7000 Xenon Light Source
experiences a temporary shutdown, it is recommended that
the device is submitted for service.
E-5 The lamp is kept off because the
ballast fan-sensing circuit has
detected an error.
Return the X7000 for
repair.
E-6 The lamp is kept off because the
bulb fan-sensing circuit has
detected an error.
Return the X7000 for
repair.
BULB The X7000 does not detect a lamp. Install a Stryker lamp.
If the condition
persists, return the
X7000 for repair.
OVER The lamp has significantly exceeded
its recommended lifetime.
Install a new Stryker
lamp.
WARM The X7000 is looking for an ethernet
connection to check for software
upgrades.
See the “Using the
Ethernet Interface”
section of this
manual.
Code Definition Recommended
Action
16
Caution Do not abruptly interrupt power to the unit. This will
turn off the fan and may cause severe damage to the
internal cooling system.
Checking the ESST Feature
The X7000 is equipped with Electronic Scope Sensing Technology
(ESST), a special safety feature that helps prevent accidental burns
caused by an unattended light cable. When operated with an ESST light
cable, the X7000 senses when the scope and light cable are separated
and places the light source in STANDBY mode. In STANDBY mode, the
X7000 will reduce light output to a minimum, preventing the light cable
from generating excessive heat.
To verify the ESST feature is active, perform the following test before
every surgical procedure:
1. Set up the X7000 system with an ESST light cable and scope,
and then power on the system.
2. Place the X7000 in RUN mode.
3. Remove the light cable from the ESST scope adapter.
The X7000 should return to STANDBY mode, indicating that the ESST
feature is functioning properly.
Warning If the unit fails to return to STANDBY mode, there may
be a fault with the ESST feature. In this case, do not
assume ESST safety protection.
Warning Even with ESST protection, never place the tip of the
light cable directly on drapes or on the patient as
burns or fire may result.
Using the X7000 with a Voice-Controlled System
Interface
The X7000 can be used in conjunction with Stryker voice-control systems
(Sidne™). For more information about using the X7000 with Stryker
voice-control systems, refer to the Sidne™ Operating and Maintenance
Manual (p/n 1000-400-653).

Operating the X7000
17
Using the Ethernet Interface
The ethernet connection on the rear panel of the X7000 enables remote
connection to the Stryker Endoscopy Software Management Site.
Connecting to this site enables remote diagnostics and software updates.
Note This system feature is not necessary for regular light-
source operation.
1. Prior to powering on the X7000, connect one end of a CAT5
ethernet cable to the Ethernet Port on the rear console panel, and
the other end to the existing hospital network.
Note The hospital network must have a Dynamic Host
Configuration Protocol (DHCP) server that can assign an
IP address to the unit.
2. Power on the X7000. The unit will search for, download, and
install any necessary software updates. It may also transmit
diagnostic information. This period will typically take less than
one minute. (The Brightness LCD will display the word “WARM”
during this period.) Press the MODE Switch to reset the LCD.
Note The Ethernet Interface checks for updates each time the
X7000 powers on.
18
Cleaning the X7000
Warning Unplug the X7000 before cleaning the unit.
1. Clean the external surfaces of the X7000 using a cloth or sponge
dampened with a mild detergent or disinfectant.
2. Clean and maintain the light cable according to the
manufacturer’s instructions.
Caution Do not use any abrasive cleaners. Do not allow any
liquid to drip into the unit.
Caution Do not sterilize or immerse the X7000.
Caring for the Lamp Module
The X7000 uses a Xenon Cermax lamp, which has a guaranteed life of
500 hours when used properly. Always follow these guidelines to ensure
maximum lamp life:
1. Clean the lamp face with alcohol and a cotton swab if it is
touched. Dirt or oil on the lamp face will cause the lamp to heat
unevenly and fail.
2. Do not power on and off the lamp in rapid succession. Allow the
lamp to run for at least five minutes once it has been powered on.
Failure to do so can cause the lamp to rapidly darken and fail.
3. The X7000 has been designed to start the lamp under most
conditions, even when it is hot. However, if the lamp does not
start within 10 seconds after the X7000 has powered on and
completed its Ethernet activity (see the “Using the Ethernet
Interface” section of this manual), turn the unit off and wait at
least five minutes for the lamp to cool before restarting. Further
attempts to start the lamp can damage the lamp and possibly the
internal circuitry.
Cleaning and Maintenance
Table of contents
Other Stryker Endoscopy Medical Equipment manuals


Popular Medical Equipment manuals by other brands


ellemka
ellemka LMK-500D user manual

Halyard
Halyard MIC GJ-Tube Instructions for use

bk ultrasound
bk ultrasound flex Focus Getting started

EchoNous
EchoNous Kosmos Grab and Go on AI Stand installation guide

Lowenstein Medical
Lowenstein Medical LM Flow Instructions for use and Technical description

Dräger
Dräger Infinity Acute Care System Evita Infinity... manual


