Suaoki PS5B User manual

技术要求
成品尺寸:A5(145*210mm).
材质:封面封底157G双铜版纸+裱哑膜,
内页80G双铜版纸,装钉。
颜色:黑白印刷。
PS5B六国语言说明书
16.061.00034-02
OPS005-644A1
PS5B
(HQC81)
郭窑元
160704
郭窑元 1 6 0 7 0 4
A 0 首次发行
封面
封底
封底 封面
目录
说明书示图
A 1 内容更新 杨 寻 1 7 0 1 1 6
16.061.00034-02A1
145
210
此页不可印刷

Suaoki Portable Power Supply
User Manual
www.suaoki.com


CONTENTS
English.........................................................................01---12
Deutsch.......................................................................13---24
Français.......................................................................25---36
Italiano.........................................................................37---48
Español........................................................................49---61
日本語 .........................................................................62---73


1
Friendly tips:
Thank you for choosing suaoki.Please read the User Manual carefully before using this product
so that you can be familiar with this product quickly and use it correctly.(Photos are for reference
only,product in kind prevail)
Introduction
This product is designed to keep you powered while you’re doing what you love.Whether you’re
climbing a mountain,living in your van while you travel the world,or camping in the open,we will
keep you powered.
Congrats on your portable power supply, a plug and play generator for emergencies whenever
and wherever you need power.With 400 watt-hours of power,you can keep laptops,mobile
phones,television and more electric devices going for hours longer.
English

2
1. Get To Know Your Portable Power Supply
1. Handle
2. Solar Charging Port
3. Adapter Charging Port
4. Jumping Port For 12V Vehicles
5. Master Power Button(ON/OFF)
6. DC Power Button(ON/OFF)
7. AC Power Button(ON/OFF)
8. Power ON/OFF Indicators
9. LCD Display
10. USB Output Port
11. DC 12V Output Port
12. Car Cigarette Lighter Socket
13. AC Output Port

3
2. Package Content
3. Charge Your Portable Power Supply
1. Master Power Button(ON/OFF)
2. DC Power Button(ON/OFF)
3. AC Power Button(ON/OFF)
4. Master Power ON/OFF Indicator
5. DC Power ON/OFF Indicator
6. AC Power ON/OFF Indicator
7. Battery Capacity
8. Charging Power
9. DC Output State(ON/OFF)
10. DC Output Power
11. AC Output State(ON/OFF)
12. AC Output Power
No. Item Quantity
1 Portable Power Supply 1
2 AC Wall Charger 1
3 Car Charger 1
4 Solar Charging Cable 1
5 Jump Starter Battery Clamp 1
6 User Manual 1
1
2
3
8
9
5
4
67
12
11
10
Before using or storing the portable power supply,charge it fully.
Note:NEVER charge it with solar panels and a wall charger at the same time.
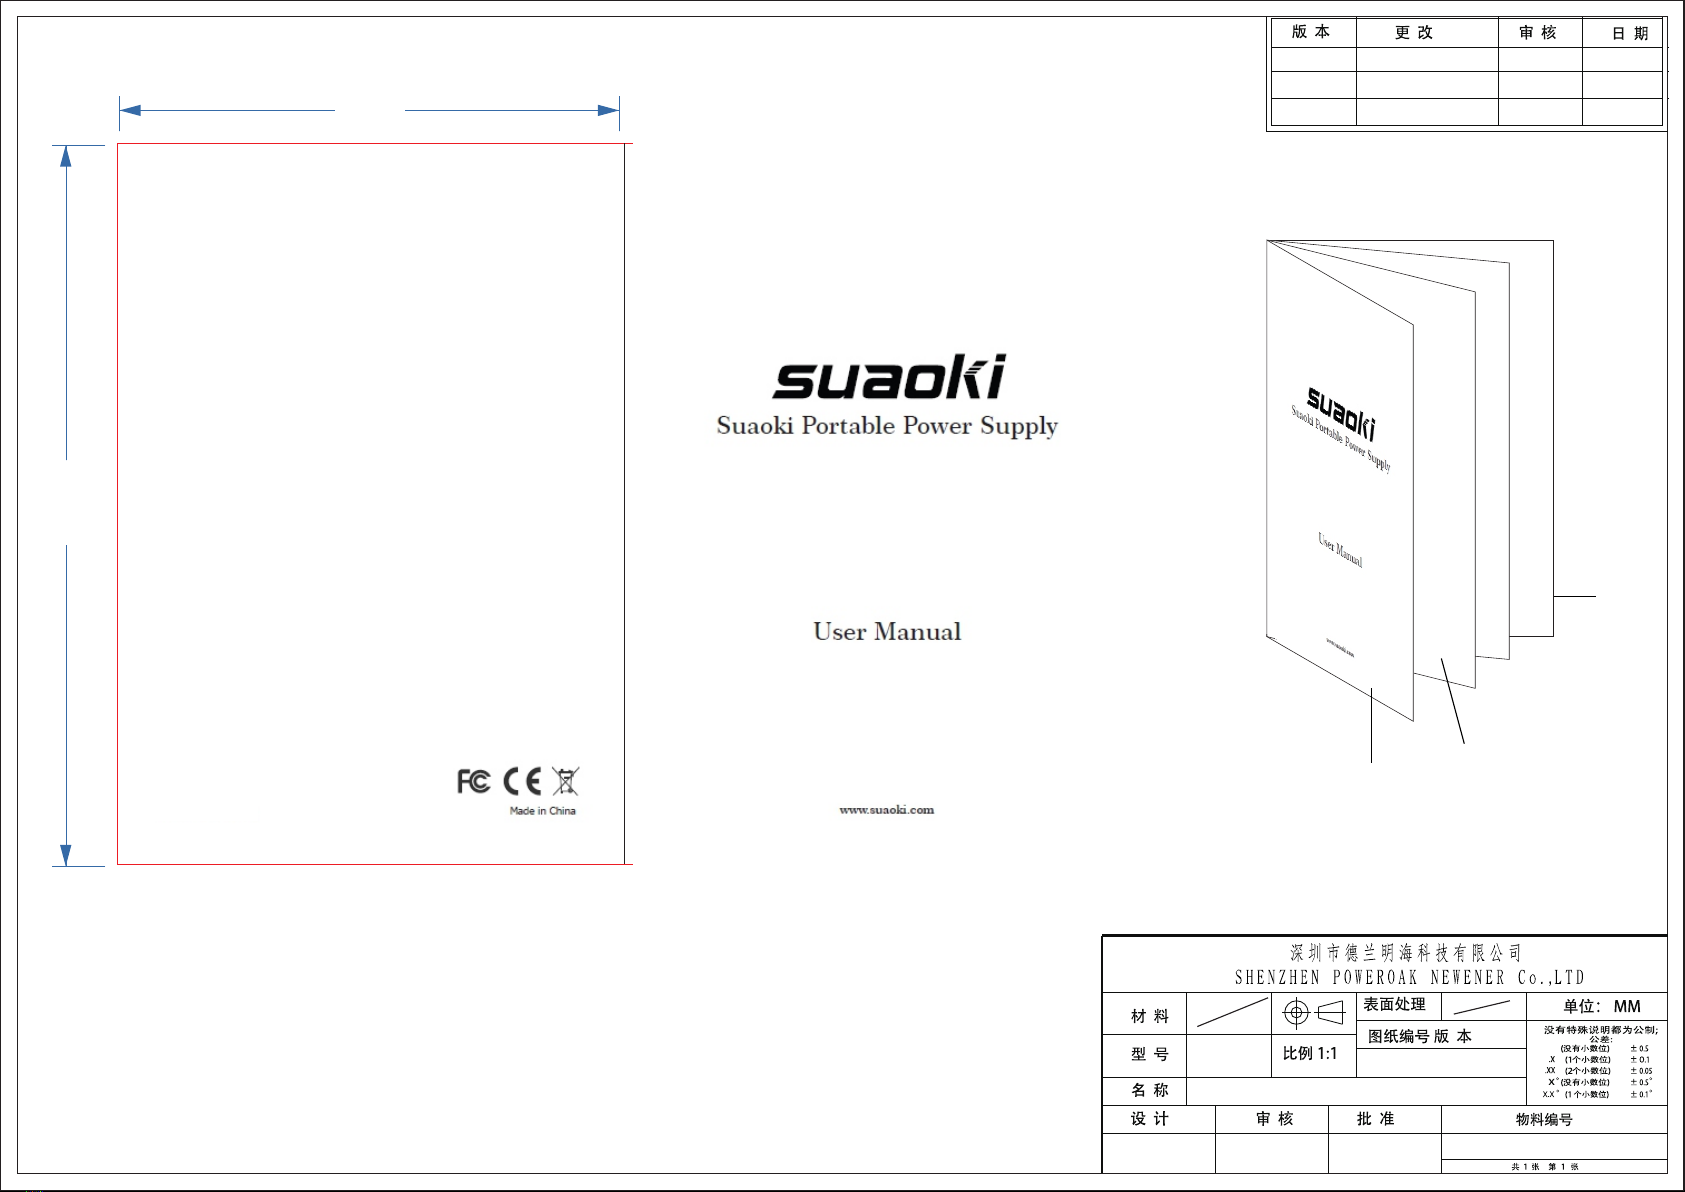
■ LCD Battery Display
The LCD Battery Display indicates the charge level.There are 5 segments of the battery,
approximating 20%~40%~60%~80%~100% capacity.During using,segments will disappear from

4
■ Charge with solar panel
4-6 Hours
Solar Panel
LAPTOP
3-5 Recharges
the display,indicating the remaining capacity.When charging it ,you will notice a battery segment
blinking with 1 second interval.This indicates the current charge status and the number under
INPUT shows the real-time charging power.Once it is fully charged,all battery segments will be lit
and remain solid.
Charge it when there is only a battery segment!
1. Power on the portable power supply by press master power button for 2 seconds.
2. Place your solar panel(We recommend Suaoki 50W/100W Semi Flexible Solar Module) where it
can get as much direct sunlight as possible.
3. Connect the solar panel by solar charging cable,then insert the Anderson plug of the cable into
the solar charging port on the left side of the portable power supply.You can know the charging
state from the LCD display.
4. You can chain multiple solar panels together to reduce solar recharge times.It is capable of
taking in 120W of solar charging power.The open-circuit voltage of the solar panel should be from
14V to 40V.
5. It will stop charging when the battery full of energy,with the built-in advance system control circuit
module.

5
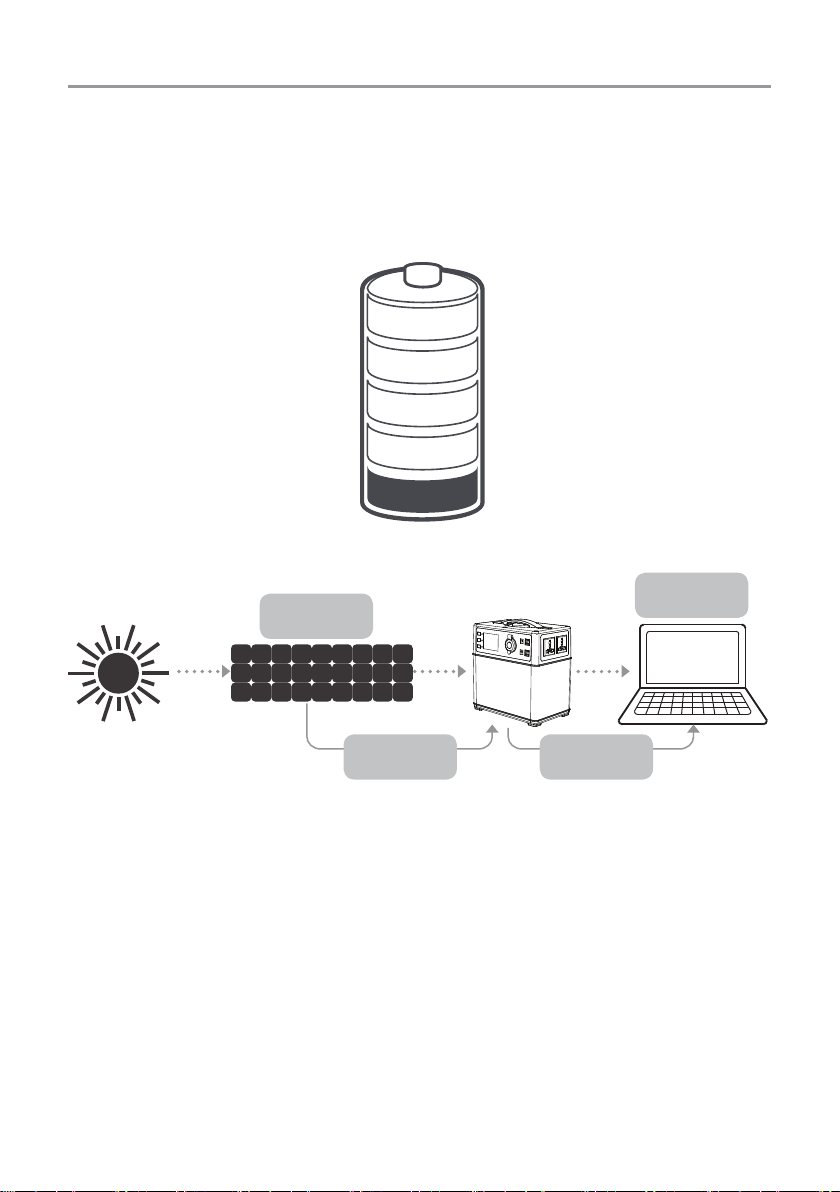
Power on the portable power supply by press master power button for 2 seconds.Plug the adapter
into wall outlet.then attach the other side to the input port of the portable power supply,you can
know the charging state from the LCD display.It will take around 8 to 10 hours to charge the
portable power supply with the adapter.It will stop being charged when it’s full of energy,with the
built-in advance system control circuit module.
The adapter comes in two pieces.Connect the two pieces by plugging the cable into the box.
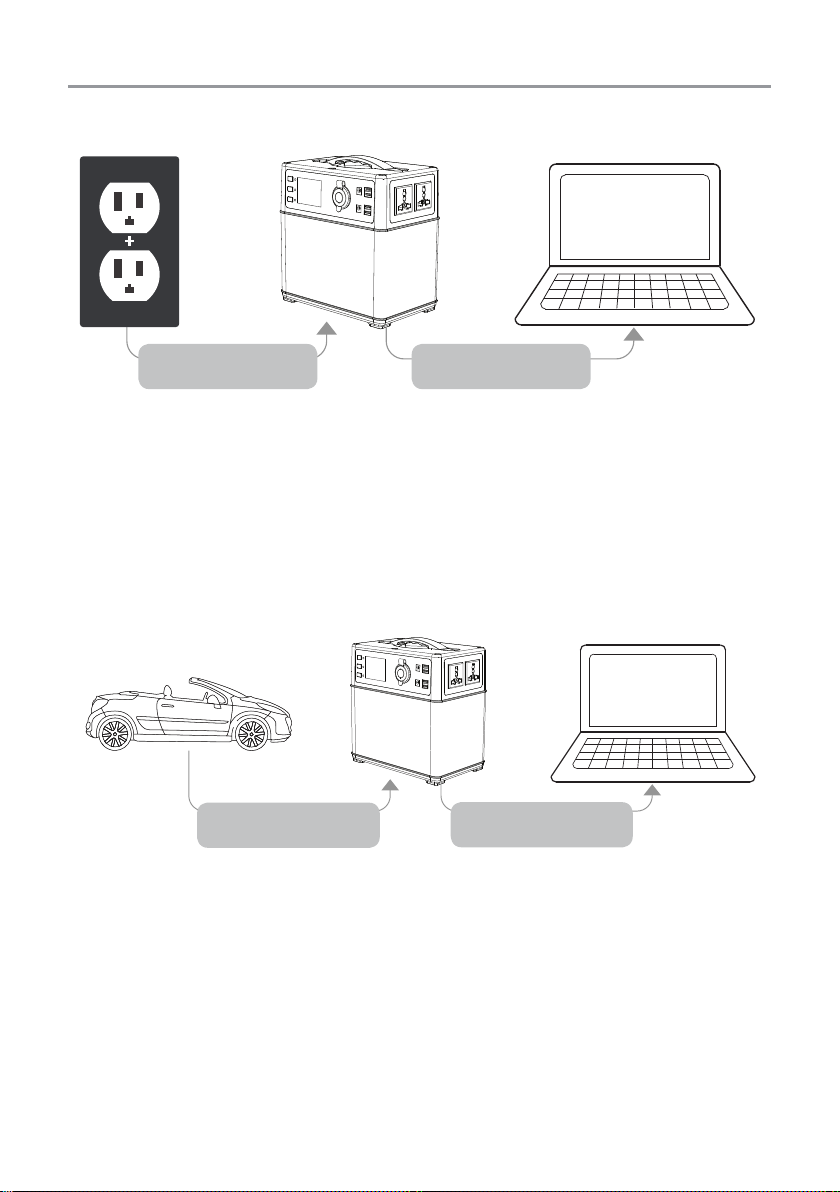
■ Charge with car charger
■ Charge with adapter
Charge from wall outlet Power your laptop or
other devices
It’s a good choice to charge it when you drive all the way.Power on the portable power supply by
press master power button for 2 seconds.Plug one end of the car charger to your portable power
supply, plug the other end to car cigarette socket of your car.You can know the charging state from
the LCD display.
Note:Car cigarette socket of 12 vehicle can’t charge the portable power
supply fully,but the 24 vehicle can.It can’t be charged when the 12 vehicle is
not starting.
Charging from car
cigarette socket
Power your laptop or
other devices

6
4. Using your portable power supply
■ What to power with the portable power supply
USB:Smart phone,MP3 Players,Digital Cameras,Tablets,E-readers,etc.
DC 12V Output Ports:Dual ports for LED lamp mainly
Cigarette Lighter Socket:Car on-board Fridges,12V appliances,etc.
AC Output Port:Electrical appliances(power rate under 300W),such as
Televisions,Laptops,Cooker,etc
■ How to use
1. Press the master power button for 2 seconds to turn on the portable power supply,then the power
indicator and LCD will be lit up.
2. Press the DC power button under the master button for 2 seconds to power DC device.Press the
AC power button under the DC power button for 2 seconds to power AC device.(When not using
certain ports,make sure to turn them off to conserve power)
3. Connect your device to the portable power supply.
4. You will know if it’s powering other devices when the numbers on the LCD changes.The numbers
indicate the amount of power your devices getting from the portable power supply.
5. Press the AC power button,DC power button,master power button for 2 seconds to shut down
the AC output,DC output and main power supply respectively.
6. When the master power button is on while the DC and AC power button are off,main power
supply will shut down automatically in 10 minutes.You need to press the master button for 2
seconds again to restart it.
7. The portable power supply will shut itself down when the battery capacity is lower than 10%.
8. Always remember to turn off the product if you don’t use it.
9. If possible,keep your portable power supply fully charged before long-term non-use.
■ Frequency Regulation(Factory Default Settings:60Hz)
Press the power switch for 2 seconds to turn on the machine, then press the DC power button and
AC power button simultaneously to enter frequency regulation mode, LCD will display the current
frequency. Click the AC power button to switch the frequency between 50Hz and 60Hz. Press the
DC power button and AC power button simultaneously to exit frequency regulation mode.
Automatically keep the setting before your next usage.
■ Best-use Strategy
When charging other devices with the portable power supply,take note of the LCD Battery Display.If
you plug in devices that drain a high power(a refrigerator),the change level of the portable can drop

7
very quickly and you may not get exactly 400Wh energy.On the ipside,if you’re charging devices
that draw power slowly(a small TV),you will get closer to 400Wh from the portable power supply.If
you’re experiencing shorter runtimes,you may need to check the device’s power requirements, refer
to TROUBLESHOOTING which will be discussed below.
■ Cold Weather Usage
Cold temperatures(below freezing) can impact the battery capacity of the portable power supply.
If you are living in sub-zero conditions,you can drain power from it.NEVER charge it in the sub-zero
conditions,which will damage the lithium-ion battery and battery capacity may not be recovered.
Low Temperature Charging Protection:In the sub-zero condition,the portable power supply would
stop being charged automatically.It starts being charged again when temperature is over 5℃.
Low Temperature Discharging Protection:In the environment which temperature is -20 ℃,it would
stop AC and DC output,then shut itself down in 15 seconds automatically;and it can output again
when the temperature is over -15℃.
■ Storage and Downtime Maintenance
Failure to maintain your portable power supply by following steps can result in battery damage
which will void the product warranty.
1. Please charge your portable power supply before storage and fully recharge it every 3 months.
Store it in a cool,dry place.
2. If the main power supply shuts down automatically because of lower battery capacity(10%),
please recharge it in 2 months.Otherwise,the battery capacity won’t be recovered.
■ Jump Start a car
Car battery
Black
red
fuse

8
1.Before starting,make sure the red and black clips are clamped tightly to the battery poles of your
car,keep the two clips with enough safety distance,to prevent the two from falling off or collision
because of the engine vibration after car starting.
2.It is strictly prohibited to connect the red and black clip directly,otherwise it may cause accidents.
3.Please keep away from the engine when starting the car to avoid any physical injury that may
caused by car engine running.
4.Please remove the product from battery within 30 seconds after engine started,otherwise it might
cause damage to the portable power supply or even cause accident.
5.Please check the battery capacity before every re-start.Make sure the power is over 60%(four
battery segments on).
6.People who are not familiar with this product(especially children) is strictly prohibited to use this
function.
Notice
1. Make sure the gas engine displacement of the vehicle is not more than 4L.
2. Make sure the power is over 60%(four battery segments on).
3. Make sure the clamps of the battery clamps is not broken.
Steps:
1. Plug the intelligent battery clamps into the jumping port of your portable power supply.If green
and red lights are on simultaneously,the connection is conrmed to be correct.
2. Connect the positive and the negative polarities of the battery clamps to the positive and the
negative polarities of battery(Red to +,black to -).If the green light is on ,then you can start you car.
If green and red lights are on simultaneously,you can try to open the head lamp of vehicle or air-
conditioner(the clamps need to be activated).
3. Turn the auto key to start the auto
4. Disconnect the clamps with battery and the jumping port of your portable power supply.
The rst step and the second step can be exchanged.Only when the indicator light of the clamps
turns to green,then you can start you car.
5. Technical Specications
Battery Capacity 400Wh
Input
AC Adapter 14V~40V(Standard: 72W/29.4V)
Car Charger 12/24V
Solar Panel 10A(Max)/14V ~40V

9
6. Frequently Asked Questions
■ What type of battery?
Lithium-ion battery is much smaller and lighter weight than normal SLA battery and also cycles
much longer time than normal SLA or AGM battery.It can last longer if you don’t drain them
completely.
■ How do you know if your portable power supply is charged?
To check the charging state of your portable power supply,refer to the LCD Battery Display.When lit
up,you will see a battery outline with ve segments,indicating the current charge level.You can turn
on the Battery Display by pressing the Master Power Button.It is OK to use your PS5B even when
it’s not fully charged.
■ How do you know if your device will work with this product?
First,you need to determine the amount of power your device requires.This may require some
research by yourself,examining the user guide for your device should sufce.
Second,you will need to check the capacity for the individual output ports.For example,the AC port
is monitored by an inverter that allows for 300W of continuous power.This means if your device is a
pulling more than 300W for an extended period of time,the portable power supply will shut off.
Output
AC Output □ 110V-60Hz/50Hz □ 220V-50Hz
Starting Outlet Voltage 12V/600A(Peak)
USB Output 5V/4×3.5A(Max)
DC Output 12V/3A
Cigarette Lighter Socket 12V/120W
Operation
Environment
Charge 0~45℃
Discharge -10~60℃
Humidness 10%~90%
■ Depth Of Discharge(DOD)
To prolong battery life,we set a DOD of 80% for this portable power supply,which means only 80%
of 400Wh can be discharged.

10
■ Here are some common devices and their watt-hour requirements:
Smart phone(2~4W) 80+ Recharges
Tablet(25~42W) 7+ Recharges
Laptop(50W) 6+ Hrs
Desktop Computer(100W) 3+ Hrs
Mini Fridge(30~60W) 5~10 Hrs
30’’ LCD TV (98~156W) 2~4 Hrs
Vacuum Cleaner(200~300W) 1~2 Hrs
Blender/Processor(200~300W) 1~2Hrs
When you are going to power your device with the portable power supply,you can do some
research about the watt consumption of your device.
7. Troubleshooting
If your device can be charge with this portable power supply,follow these steps:
1. Make sure the Master Power Button is turned on.
2. Ensure the output port has been turned on.The green LED light indicating its state should be lit
up.
3. Check the battery capacity display.If it’s at 20% or below,you need to charge the portable power
supply.
4. Verify your device is suitable to be charged with this product.All the output ports have their own
max power capacity.Check them to ensure your device is compatible.
If you are still experiencing trouble with this product after checking the TROUBLESHOOTING as
below,please contact us.
Failure
Code Failure Cause Troubleshooting
E01 System over-temperature protection
Check the ambient temperature if higher
than 45℃.Output will start again,if the
product cools down.
E02 Battery Over Voltage Protection Disconnect the charger and restart it
E03 Battery Damage Protection Contact US
E04 1st Battery String Over-Voltage Disconnect the charger and restart it

11
E05 2nd Battery String Over-Voltage Disconnect the charger and restart it
E06 3rd Battery String Over-Voltage Disconnect the charger and restart it
E07 1st Battery String Low Voltage Charge it in time and restart it after fully
charged
E08 2nd Battery String Low Voltage Charge it in time and restart it after fully
charged
E09 3rd Battery String Low Voltage Charge it in time and restart it after fully
charged
E10 Low Temperature Discharging
Protection
Check if the ambient temperature is lower
than -20℃
E11 Battery Low Voltage Protection Charge it in time and restart it after fully
charged
E12 Inverter Over Current Protection Check if the AC output overload or short-
circuit
E13 Inverter Over Load Protection Check if the AC output overload
E14 Inverter Short-circuit Protection Check if the AC output overload or short-
circuit
E16 Charging Over Voltage Protection Check if the input voltage excess the
maximum
E17 Low Temperature Charging
Protection
Check if the ambient temperature is lower
than 0℃
E19 12V Cigarette Lighter Socket Over
Current Protection
Check if the output port overload or short-
circuit
E20 12V Cigarette Lighter Socket Over
Load Protection Check if the output port overload
E21 12V DC Output Over Current
Protection
Check if the output port overload or short-
circuit
E22 12V DC Output Over Load
Protection Check if the output port overload
E23 USB1 Output Over Current
Protection
Check if the output port overload or short-
circuit

12
E24 USB2 Output Over Current
Protection
Check if the output port overload or short-
circuit
8. Warranty
9. Contact US
The Suaoki portable power supply is covered by Suaoki warranty for 12 months from the date of
warranty claim.
Website: www.suaoki.com
E-mail: [email protected]
We strive to offer exceptional customer support. If you are having a problem, we want to know
about it so we can improve the products and your experience.
We strive to respond to all issues as soon as possible.

13
Freundliche Tipps:
Vielen Dank, dass Sie sich für suaoki entschiedet haben. Bevor Sie dieses Produkt verwenden,
lesen Sie bitte das Benutzerhandbuch sorgfältig durch, so dass Sie mit diesem Produkt schnell
vertraut und es richtig zu verwenden sein können.(Fotos sind nur für Information, Produkt ist in der
Art verbindlich.)
Einführung
Dieses Produkt wurde für Versorgung mit Energie entwickelt, während Sie Ihrer liebenden Sachen
tun. Egal, ob Sie einen Berg Klettern, in Ihrem van beim Reisen um die Welt leben, oder auf dem
Campingplatz in der offenen reisen sind, werden wir Sie immer mit Strom versorgt.
Herzlichen Glückwunsch Ihnen zu Auswahl Ihrer tragbaren Stromversorgung, ein Plug - and - Play
- Generator für Notfälle, wann und wo immer Sie Strom benötigen. Mit 400 Watt - Stunden Leistung
können Sie Laptops, Mobiltelefone, Fernseher und mehr elektrische Geräte für Stunden länger
halten.
Deutsch

14
1. Verstehen Sie Ihre tragbare Stromversorgung
1. Tragegriff
2. Solar - Ladeanschluss
3. Adapter Ladeanschluss
4. Springen - Anschluss für 12V Fahrzeuge
5. Hauptnetz - Taste (EIN / AUS)
6. DC Netzschalter (EIN / AUS)
7. AC Netzschalter (EIN / AUS)
8. Strom EIN / AUS - Anzeigen
9. LCD Bildschirm
10. USB Ausgabeanschluß
11. DC 12V Ausgabeanschluß
12. Auto - Zigarettenanzünder
13. AC Ausgabeanschluß

15
2. Lieferumfang
3. Laden Sie Ihre tragbaren Stromversorgung
1. Hauptnetz - Taste (EIN / AUS)
2. DC Netzschalter (EIN / AUS)
3. AC Netzschalter (EIN / AUS)
4. Hauptnetz EIN / AUS - Anzeige
5. DC Stromversorgung EIN / AUS - Anzeige
6. AC Stromversorgung EIN / AUS - Anzeige
7. Batteriekapazität
8. Ladestrom
9. DC Ausgangszustand (EIN / AUS)
10. DC - Ausgangsleistung
11. AC Ausgangszustand (EIN / AUS)
12. AC - Ausgangsleistung
No. Item Quantity
1 Tragbare Stromversorgung 1
2 AC - Ladegerät 1
3 Auto - Ladegerät 1
4 Solar - Ladekabel 1
5 Batterieklemme für Starthilfe 1
6 Benutzerhandbuch 1
1
2
3
8
9
5
4
67
12
11
10
Vor der Verwendung oder Lagerung laden die tragbaren Stromversorgung vollständig auf.
Hinweis: NIEMALS laden Sie es mit Sonnenkollektoren und ein Ladegerät zur
gleichen Zeit.
■ LCD - Batterie - Anzeige
Die LCD - Batterie - Anzeige zeigt den Ladezustand an. Es gibt 5 Segmente der Batterie von
Table of contents
Languages:
Other Suaoki Power Supply manuals
Popular Power Supply manuals by other brands

Pulsar
Pulsar GREEN POWER CCTV PSDCB09125C quick start guide

Astera
Astera TITAN POWERBOX FP1-PWB user manual

Horizont
Horizont TRAPPER AN8 Operating instruction

Wavetronix
Wavetronix Click 210 Installation & quick start guide

APM
APM APM-SP-VDC-3U Series user manual

Elsner
Elsner KNX PS640-IP 2U installation instructions