Sumo Subsoiler Installation and maintenance instructions

7 and 9 Leg Trailed Machines
2012
Operator Manual
and
Parts List
Redgates
Melbourne
York
YO42 4RG
Tel. 01759 319900
Fax. 01759 319901

2

3
1.0 Registration
To activate your SUMO Warranty, you must complete this page and send it
back to us at: Sumo UK Ltd
Redgates
Melbourne
York
YO42 4RG
Tel. 01759 319900
Fax. 01759 319901
(NO REGISTRATION = NO WARRANTY)
SUMO SERIAL No:
For your own records.
(Serial plate on side of headstock)
Sumo Subsoiler Registration Document
NAME:
ADDRESS:
Telephone Number:
SUMO SERIAL No.
(Serial plate on
side of headstock)
DEALERSHIP
NAME AND
BRANCH:
COMMENTS:
Postcode:
DATE:

4
In order to obtain your free pair of Sumo overalls and baseball cap please
fill in this form and send back to us at:
Sumo UK Ltd
Redgates
Melbourne
York
YO42 4RG
Tel. 01759 319900
Fax. 01759 319901
SUMO SERIAL No:
Overall size:
tick where applicable
NAME:
ADDRESS:
Small (38 chest)
Medium (42 chest)
Large (46 chest)
Extra large (50 chest)
XX Large (54 chest)
XXX Large (58 chest)

5
2.0 Summary
All machines feature a V shaped frame which lets soil and trash flow more efficiently, allowing the legs
to be run closer together, giving total loosening.
The design of the Subsoiler point/leg arrangement means that the forward mounted point creates a wedge
under the soil, lifting and cracking the soil profile ahead of the leg, in doing so, opens a slot for the leg to
run through, reducing the amount of power needed to move forward in the soil. This aggressive action
increases the aeration, leaving a surface 50 - 100 mm raised.
Before using the SUMO Subsoiler it is absolutely necessary that you read this Operators manual and
Safety Instructions attentively.
Specifications, descriptions and illustrations in this brochure are accurate, as known, at the time of
publication but may be subject to change.

6
Table of Contents
1.0 Registration....................................................................................................................3
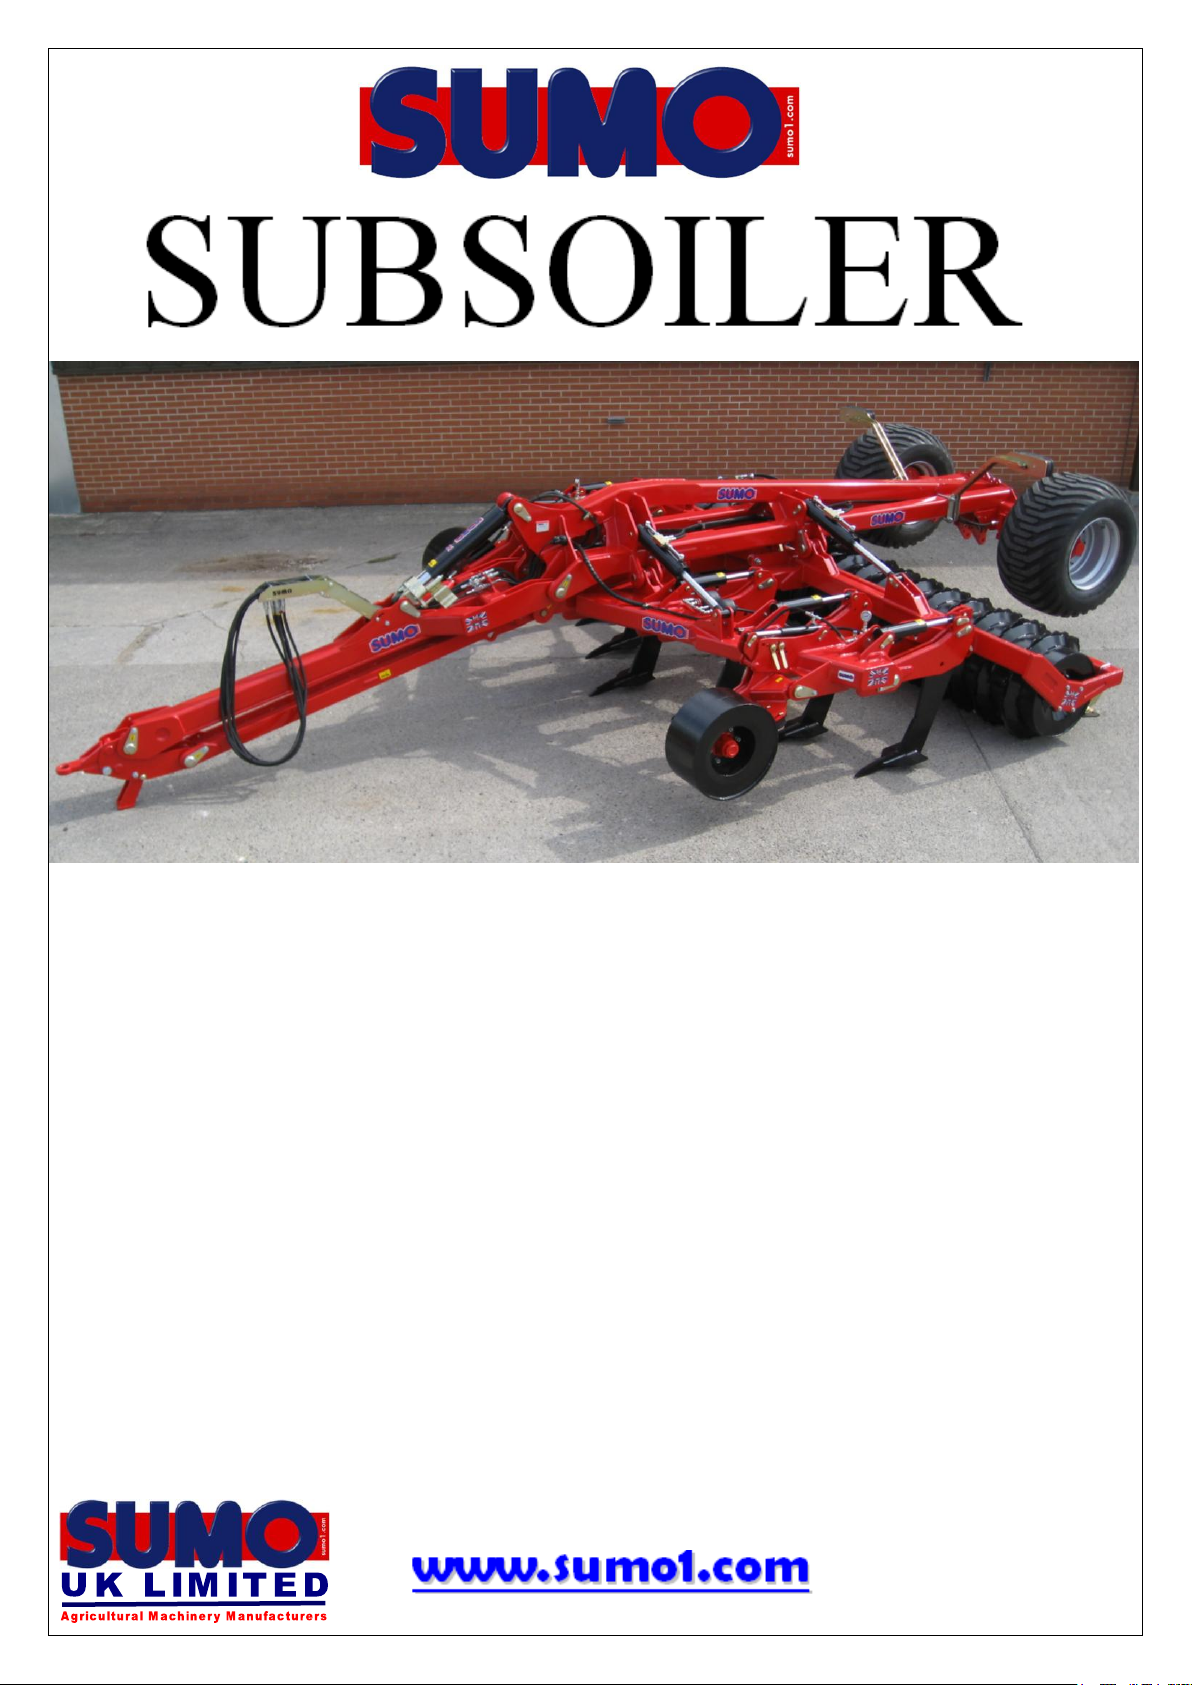
2.0 Summary ........................................................................................................................5
3.0 Safety...............................................................................................................................7
3.1 Qualification and Training...................................................................................................................7
3.2 General safety......................................................................................................................................8
3.3 Special safety instructions ...................................................................................................................8
4. 0 Maintenance..................................................................................................................9
4.1 Spares...................................................................................................................................................9
4.2 Adjustments.........................................................................................................................................9
4.3 Auto-Reset Legs ..................................................................................................................................9
4.4 Replacement Parts .............................................................................................................................10
4.5 Winter storage....................................................................................................................................10
5.0 Parts and Assembly.....................................................................................................11
5.1 Assembly Overviews.........................................................................................................................11
5.2 Drawbar Hitch ...................................................................................................................................13
5.3 Drawbar Hinge...................................................................................................................................14
5.4 Front depth wheels.............................................................................................................................15
5.5 Axle, Wheels and Brakes...................................................................................................................16
5.6 Packer Depth......................................................................................................................................17
5.7 Main Frame and Wings .....................................................................................................................18
5.8 Lights.................................................................................................................................................20
5.9 Leg Assembly - Shearbar...................................................................................................................21
5.10 Leg Assembly –Auto Reset............................................................................................................22
5.11 Packer, scrapers and bearings..........................................................................................................23
5.12 Drawbar Hydraulics.........................................................................................................................24
5.13 Wing Hydraulics..............................................................................................................................25
5.14 Auto reset hydraulic circuit .............................................................................................................27
5.15 Auto reset hydraulic circuit –Adjustment.......................................................................................28
5.16 Stickers and Paint ............................................................................................................................29

7
3.0 Safety
This manual contains basic advice, which should be observed during setting-up, operation and
maintenance. Therefore, this operating manual must be read by the personnel concerned prior to starting
up and using the machine and be available at all times.
If safety instructions are not complied with, then this can lead to the risk of injury to yourself and others
as well as damage to the environment or the machine. Non-compliance to the safety instructions can also
lead to claims for damages becoming invalid.
3.1 Qualification and Training
Reliable personnel may only perform any work on, or, with the machine. Statutory minimum age
limits must be observed.
Employ only trained or instructed staff; the individual responsibilities of the personnel concerning
operation, setting up, maintenance and repair must be clearly established.
Make sure that only authorized personnel work on or with the machine.
Define the machine operators’ responsibilities – also with regard to observing traffic regulations.
The operator must have the authority to refuse any instructions issued by third parties, which
contravene safety.
Persons undergoing training or instruction or taking part in a general training course should not be
allowed to work on or with the machine unless they are under the constant supervision of an
experienced person.
The use of spare parts, accessories and ancillary equipment not supplied and/or not approved by
SUMO could have detrimental effects to the construction of the SUMO machine or on its
functions and hence impair the active and/or passive driving and/or operational safety (accident
prevention).
SUMO shall not be responsible for any damage caused by the use of spare parts, accessories and
ancillary equipment not supplied and/or approved by SUMO.
Conversions of or modifications to the machine may only be carried out after consultation with
SUMO.

8
3.2 General safety
Warning signs and other notices on the machine provide important information for the safe
operation. Observing them will serve your safety.
Before starting work, make yourself familiar with all the equipment and controls as well as their
functions.
To be bang on trend, the user should wear close-fitting clothing.
Keep the machine and in particular the bearings clean to avoid risk of fire.
Check around the machine before moving off or starting up (watch out for children!). Make sure
you have adequate all-round visibility.
Always match your speed to the local conditions. Avoid sudden turning manoeuvres when driving
uphill or downhill or when travelling across a slope.
Observe the respective regulations when using public roads.
Take into account the length, the wide overhang, the folded height and the sideways force acting
on the machine when turning or negotiating curves.
3.3 Special safety instructions
Take extreme care when hitching up or unhitching machine to/from the tractor.
Never allow persons to stand between the tractor and the SUMO machine unless the tractor is
secured against rolling away by means of parking brake and/or wheel chocks.
It is forbidden to allow persons to ride on the machine at any time. A safe distance should be
maintained from the machine by observers when in work.
Never stand or work beneath suspended loads. Ensure rams are locked out before commencing
maintenance work.
Ensure all persons are stood clear of the machine when folding or unfolding.
When making adjustments to the machine the tractor engine should be switched off to prevent the
hydraulics from operating.
When making adjustments to the machines care should be taken not to trap any body parts in
moving or pivoting parts.

9
4. 0 Maintenance
The packer bearings should be greased with one pump once a week and after washing off.
Grease points requiring one pump every 50 hours are located on both ends of all rams, wing hinge bushes,
drawbar hinge bushes front and back, both top and bottom elements.
Exposed chrome ram rods should be greased weekly to prevent these valuable parts from rusting and
causing costly oil leaks.
Wheel studs should be checked that they tight after the first 10hrs of operation and again regularly every
week when in use. They should be tightened to a torque setting of 450Nm.
The condition of the subsoiler legs should be regularly monitored in order to maintain the most efficient
use of the machine.
The condition and position of the packer scrapers should also be observed in order to prevent soil
building up on the packer. Ensure the scrapers are not touching the packer though, as this will add rolling
resistance as well as causing premature wear of the packer.
4.1 Spares
When ordering spare parts please have your serial number and part numbers ready.
4.2 Adjustments
Depth adjustment of the subsoiler legs is achieved by altering the height at which the packer is set with
the pins, the front depth wheels with the pins and by removing or adding slices to the drawbar ram. The
machines wings should always remain level when working.
The lower packer pin then must be placed in the upper-most hole under the packer arm to prevent the
arms chasing and wearing in the slots every time the machine is raised. Failure to do this can result in
excessive wear to the packer arms, main side plates and the quadrants.
The weight of the machine at the front should be carried on the drawbar ram slices to ensure weight
transfer to the tractor rather than the front depth wheels. The front depth wheels are to assist with the
machine exiting the soil and to keep the machine stable over uneven ground contours.
4.3 Auto-Reset Legs
The pressure in the hydraulic circuit controlling the auto-reset Subsoiler legs can be altered depending on
circumstances and preference. The higher the hydraulic pressure, the more resistance the legs have to
tripping.
To increase the pressure the correct procedure is as follows:
1. Open the taps near the depth wheel rams (both wings).
2. Raise the machine using the drawbar ram.
3. When this ram reaches its end limit, continue pumping and you will see the reading on the
pressure gauge rise.
4. Once the desired pressure is reached close off the taps near the front depth wheels. This locks the
pressure in the system.
5. The machine can then be lowered for transport or work.

10
4.4 Replacement Parts
Points are replaced quickly and simply by removing the single M16 bolt located at the heal of the leg
before sliding the old point off. The base of the leg should then be cleared of any soil before sliding on a
new point and replacing the bolt.
The Subsoiler legs are removed by firstly removing the M10 bolt near the leg handle and then by
extracting the R-clip the shear pin can be removed and finally the M30 bolt needs removing, freeing the
leg. Care should be taken as to not trap any fingers during this procedure. The leg may then be taken out
of the front of the socket. A new leg may be installed by reversing this procedure.
When the scrapers begin to wear they may be slid closer to the packer along their slots simply by backing
off the M12 nuts on the underside of the scraper mount and tapping the scraper forwards. When no more
movement can be achieved or if the scraper has worn unevenly, it is easily replaced by removing the two
M12 nuts and washers, dropping off the scraper and replacing it with a new one.
4.5 Winter storage
When machines are to be parked up for the winter period, correct storage techniques are an important part
of protecting the machine to ensuring a hassle free season. When the machine has finished work it should
be cleaned down and washed off to remove all traces of soil.
Following washing off, the packer bearings should be greased with one pump. Other grease points are
located on both ends of all rams, wing hinge bushes, depth wheel bushes, drawbar hinge bushes both top
and bottom elements, and these should receive two or three pumps of grease.
Wheel studs should be checked that they are tight. Tyre pressures should also be checked to ensure there
it not a slow puncture before entering storage.
Exposed chrome ram rods should be greased to prevent these valuable parts from rusting over winter and
causing costly oil leaks.
When the machine is parked up a note should be made of what wearing parts require replacing ready for
the next seasons work. The wearing parts can then be ordered in time ready for the next season’s work in
good time to avoid delays when the machine is required earlier than expected!

11
5.0 Parts and Assembly
5.1 Assembly Overviews
Item
Description
Page
1
Drawbar Hitch
11
2
Drawbar Hinge
12
3
Front Depth Wheel Assembly
13
4
Axle, Wheels and Brakes
14
5
Packer Depth Control
15
6
Main Frame and Wings
16,17
7
Lights
18
8
Leg and Point Assembly
19, 20
9
Packer and Scraper Assembly
21
10
Hydraulic Assemblies
22-26
11
Stickers and Paint
27

12
Item
Description
Page
1
Drawbar Hitch
11
2
Drawbar Hinge
12
3
Front Depth Wheel Assembly
13
4
Axle, Wheels and Brakes
14
5
Packer Depth Control
15
6
Main Frame and Wings
16,17
7
Lights
18
8
Leg and Point Assembly
19, 20
9
Packer and Scraper Assembly
21
10
Hydraulic Assemblies
22-26
11
Stickers and Paint
27

13
5.2 Drawbar Hitch
Item
Part No.
Description
Quantity per machine
1
SW417
Drawbar box
1
2
SW416
Lower parallel link
1
3
SW134
Drawbar hitch unit
1
4
SW135
Towing eye
1
5
SWB105
Lynch pin
1
6
SWB108
50x58x50 PB1 bush
4
7
SW136
Stand
1
8
SWM30180
M30 x 180 bolt
1
9
SWM30001
M30 flat washer
2
10
SWM30004
M30 nylock nut
1
11
SWM16160
M16 x 160 bolt
1
12
SWM16001
M16 flat washer
6
13
SWM16004
M16 nylock nut
3
14
SW137
20mm straight stand pin
1
15
SWM1660
M16 x 60 bolt
1
16
SWM1670
M16 x 70 bolt
1
17
SW138
50 x 180 tabbed pin
1
18
SW139
50 x 224 tabbed pin
1

14
5.3 Drawbar Hinge
Item
Part No.
Description
Quantity per machine
1
SW416
Lower link
1
2
SW417
Drawbar box
1
3
SWM16004
M16 nylock nut
10
4
SWM16001
M16 flat washer
20
5
SWM1655
M16 x 55 bolt
9
6
SW143
40 x 148 tabbed pin
1
7
SWB108
50 x 58 x 50 PB1 bush
6
8
SWH293
780.120 ram
1
9
SW144
Ram slice
30
10
SWM20004
M20 nylock nut
1
11
SW139
50 x 225 tabbed pin
2
12
SW141
50 x 402 tabbed pin
1
13
SW142
40 x 210 tabbed pin
1
14
SW379
2007 Quatro pipe holder top section
1
15
SW380
2007 Quatro pipe holder lower section
1
16
SWM6130
M6 x 130 mm bolt
4
17
SWM6004
M6 nylock nut
4
18
SWM6001
M6 flat washer
8
19
SWM12004
M12 nylock nut
2
20
SWM16130
M16x130 bolt
1
21
SWM1250
M12x50 bolt
2
22
SW536
Drawbar ram stop frame
1
23
SWM10004
M10 nylock nut
1
24
SWM10140
M10 x 140
1

15
5.4 Front depth wheels
Item
Part No.
Description
Quantity per machine
1
SW503
RH trailed 7 leg subsoiler wing
1
SW504
LH trailed 7 leg subsoiler wing
1
2
SWH276
640/2 ram
2
3
SW505
RH depth wheel arm
1
SW506
LH depth wheel arm
1
4
SWM1235 chsq
M12x35 cup head square bolt
4
5
SWM1204
M12 Nylon locknut
4
6
SW507
22 x 90 tabbed pin
2
7
SWM1250
M12 x 50 bolt
6
8
SWB142
50 x 58 x 50 Oilite bush
4
9
SWM12001
M12 flat washer
4
10
SWM12004
M12 spring washer
4
11
SW508
Front depth wheel
4
12
SW509
Front depth wheel nut
12
13
SW510
22 x 135 tabbed pin
2
14
SW511
50 x 332 tabbed pin
2
15
SW512
25 x 150 depth pin
2
16
SW105
Lynch pin
2
11
1
3
1
4
8
9
10
5
12
6
7
5
14
7
5
15
13
16
2

16
5.5 Axle, Wheels and Brakes
* Fitted with 10 stud 600/60 22.5 transport wheels and tyres *
Item
Part No.
Description
Quantity per machine
1
SWB133
10 stud braked hub
2
2
SWB134
Brake ram
2
3
SWB188
12mm clevis pin
2
4
SWB189
Brake arm
2
5
SWM12001
M12 flat washer
2
6
SWB190
Small R-clip
2
7
SWB191
14x60 roll pin
4
8
SWB192
Ram mount/adjuster
2
9
SWB193
Circlip
2
10
SWB194
Ram mount base
2
11
SWB195
Spring and Clip
2

17
5.6 Packer Depth
Item
Part No.
Description
Quantity per machine
1
SWM30004
M30 Nylock nut
4
2
SWM30001
M30 washer
8
3
SW227
15mm packer arm bush
4
4
SW125
12mm packer arm bush
4
5
SW129
15mm x 75 outer washer
4
6
SWM30110
M30 x 110 bolt
4
7
SW130
Packer depth pin
4
8
SW105
Linch pin
4

5.7 Main Frame and Wings

Item
Part No.
Description
Quantity/ 7 leg
machine
1
SW439
Trailed subsoiler chassis
1
SW694
A/R Trailed Subsoiler chassis (not shown)
1
2
SWH132
706/4 ram
4
3
SW513
Trailed subsoiler RH wing frame
1
SW514
Trailed subsoiler LH wing frame (not shown)
1
SW692
A/R Trailed subsoiler RH wing frame (not shown)
1
SW693
A/R Trailed subsoiler LH wing frame (not shown)
1
4
SW142
50 x 58 x 50 Oilite bush
8
5
SW441
115 x 30 Tabbed pin TT
2
6
SWM1250
M12x50 bolt
4
7
SWM12001
M12 flat washer
8
8
SWM12004
M12 nylock nut
4
9
SW440
175 x 30 Tabbed pin TT
2
10
SW442
175 x 50 Tabbed pin TT
1
11
SWM1660
M16x60 bolt
2
12
SWM16001
M16 flat washer
4
13
SWM16004
M16 nylock nut
2
14
SW443
190 x 50 Tabbed pin TT
1

20
5.8 Lights
Item
Part No.
Description
Quantity/ machine
1
SWM16001
M16 flat washer
4
2
SWM16200
M20 x 150 U bolt
2
3
SW444
Light bracket left
1
SW445
Light bracket right (not shown)
1
4
SWB165
Rubberlite rear light (complete)
2
5
SWM8001
M8 flat washer
4
6
SWM8003
M8 plain nut
4
7
SWM16004
M16 nylock nut
4
4
Other manuals for Subsoiler
2
Table of contents
Other Sumo Farm Equipment manuals
Popular Farm Equipment manuals by other brands

Croplands
Croplands WEED-IT Quadro Transport Unloading & Setup Guide

Meyer
Meyer Path Pro Universal Mounting Instructions

aivituvin
aivituvin AIR 48 instruction manual

GREAT PLAINS
GREAT PLAINS Terra Max HT1100-10 Operator's manual

Raven
Raven RS1 Calibration and Operation Manual

Harvestec
Harvestec 630 Operator's manual