Sun-Tech SHIVA User manual

USER MANUAL
SHIVA
Features
Display : 1,5”
Audio format: MP3 / WMA / WAV
Video format: AMV
Picture format: JPEG / BMP
Radio FM up to 40 presets,
Record audio: MIC and FM radio
Preset EQ : Natural / Rock /Pop / Classic / Suave / Jazz
/ DBB
z
USB 2.0
z
Battery: 140 mA
z
Sleep function
z
Different languages,
z
Internal Memory :4GB.
Loading Files
1.Connect the unit to a computer and to the Micro-USB
Port using the included USB cable.
2. Once connected, the unit will show up on the
connected computer as if it were a connected USB,
hard drive, or memory card.
3. Drag and drop the desired audio, video, or photo
files into the unit’s drive location on the connected
computer.
Reset

File Compatibility:
MUSIC: MP3, WMA
VIDEO: AMV
VOICE: WAV
PHOTOS: JPEG, BMP
4.After the files are loaded onto the unit, right-click on
the drive and eject it from the computer, then
disconnect the USB cable.
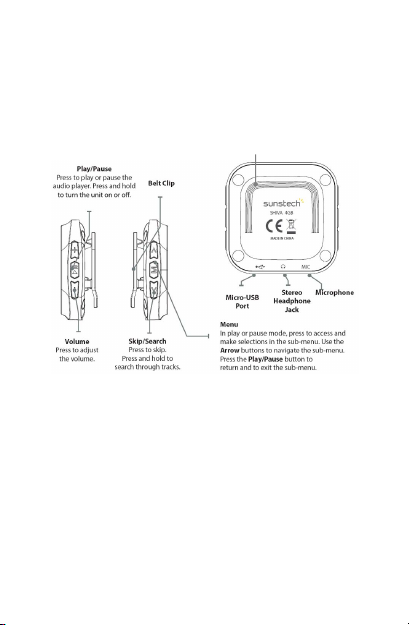
Music
1.Power the digital media player on , holding the
Play/Pause button.
2. Select the Music icon on the main menu by using the
Skip/Search buttons , and press the Menu button to
enter Music mode.
3. Press the Play/Pause button or Click to pause
and to play.
4. Press the Skip/Search buttons to skip through tracks,
or press and hold to fast forward or rewind the music.
( When you used this function is activated the audio
mute)
5. Lyric function,
When you listening the music with a Lyric file, press
and hold the menu key during two seconds and text of
the song will show in the screen.
6.Press and hold the Menu button to return to the main
menu.

File Compatibility:
MUSIC: MP3, WMA.
Movie
File-type Requirements: AMV
1.Power the digital media player on by holding the
Play/Pause button.
2. Choose the Movie icon in the main menu by using
the Skip/Search buttons , and press the Menu button to
enter Movie mode.
3.Navigate through the file browser using the
Skip/Search buttons, and press the Menu button to
select a video file.
4.Press and hold the Menu button to return to the main
menu.
Picture
1.Power the digital media player on by holding the
Play/Pause button.
2. Select the Photo icon in the main menu by using
the Skip/Search buttons , and press the Menu button to
enter Photo mode.
3. Navigate through the file browser by using the
Skip/Search buttons, and press the Play/Pause button
to select a JPEG / BMP photo file.
4.Press and hold the Menu button to return to the main
menu.

Radio
1.Power the digital media player on by holding the
Play/Pause button.
2.Choose the Radio icon on the main menu by using
the Skip/Search buttons to enter Radio mode.
3.Press the Menu button to access the other settings.
Select auto search to start memorize all available
stations, up to 40 presets.
4.Once finished, press Play/Pause button once.
CH1 will be displayed on the screen
5.Press and hold the Menu button to return to the main
menu.
Pedometer
1.Power the digital media player on by holding the
Play/Pause button.
2. Navigate to the Pedometer icon on the main menu
by using the Skip/Search buttons , and press the Menu
button to enter Pedometer mode.
3. Navigate through the file browser by using the
Skip/Search buttons,
We have three options:
Local folder : To select the music that you want listen.
Pedometer:
Press the Menu button to confirm to start a new record,
view previous records, or change personal information.

Mode : Walking / Running / Jogging.
Sex: Man / Woman
Stride: ----
Weight: ----
Position Wrist / Waist
Exit
: To exit the Pedometer function
Record
1.Power the digital media player on by holding the
Play/Pause button.
2. Choose the Record icon in the main menu by using
the Skip/Search buttons , and press the Menu button to
enter Record mode.
3.Press the Play/Pause button to begin recording.
4.Press the Play/Pause button to pause recording.
5.Press and hold the Menu button to save the file.
6.Press and hold the Menu button to return to the main
menu.
Voice
1.Power the digital media player on by holding the
Play/Pause button.
2.Select the Voice icon on the main menu by using
the Skip/Search buttons, and press the Menu button to
enter Voice mode.
3.Press the Play/Pause button to play saved recordings.
4.In play or pause mode, press the Menu button to

access and make selections in the local folder. Use the
Arrow buttons to navigate the sub-menu. Press the
Menu button to select.
5. Press the Skip/Search buttons to skip through tracks,
or press and hold to fast forward or rewind a track.
6.Press and hold the Menu button to return to the main
menu.
Setting
We have different options:
LCD set / Language /Power off/ Memory info /
Firmware version / Restore default / Exit.
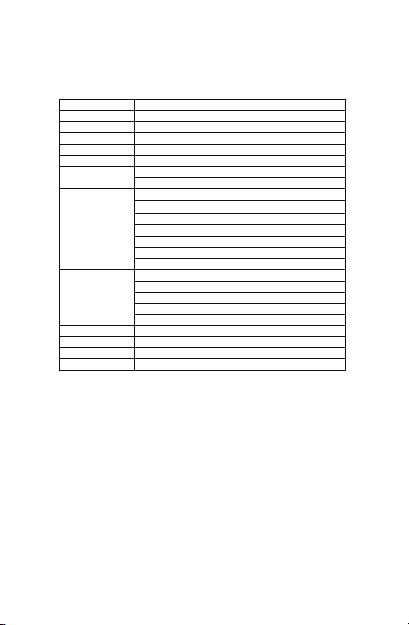
Specication
Specication
Specication
Specication
Made
Made
Made
Made in
in
in
in China
China
China
China
Size 44*44.8*18mm
Weight 22g
Screen 1.5 inch TFT display,262K color
Computer connection High-speed USB 2.0 (FS) Flash disk
Build-in memory 4GB
Supply power Built-in 180mAh rechargeable battery
REC Sample radio 8KHz
Recording format WAV(64Kbps)
MP3\WMA The biggest (L)10mW+( R)
Outputting ratio 10mW(320)
MP3 bit rate 8K bps-320Kbps
WMA bit rate 5K bps-384Kbps
Frequency corresponding 20Hz-20KHz
SNR 85dB
Lack delity <+_0.05
FM radio Frequency scope 87MHz-108MHz
Radio stations 20+20
The biggest output (L)10mW+( R)
rate of earphone 10mW(320)
SNR 45dB
Music format MP3ǃWMAǃWAV
Temperature -5 to 40 degree centigrade
Multi languagesEnglish, Spanish, French and Portuguese ......
Operating System Windows 98/XP/SE/ME/2K, MAC OS 10 ǃLinux 2.4.2

o1. DO NOT place objects on top of the
device, as objects may scratch the
device.
2. DO NOT expose the device to dirty
or
dusty environments.
3. DO NOT place the device on an
uneven
or unstable surface.
4. DO NOT insert any foreign objects
into the device.
5. DO NOT expose the device to strong
magnetic or electrical field.
6. DO NOT expose the device to direct

sunlight as it can damage the device. Keep it away from
heat sources.
7. DO NOT store your device in
temperatures higher than 40°C(104°F).
The internal operating temperature for
this device is from 20°C(68°F) to
60°C(140°F).
8. DO NOT use the device in the rain.
9. Please check with your Local
Authority or retailer for proper
disposal of electronic products.
10. The device and adaptor may
product some heat during normal
operation of charging. To prevent
discomfort or injury from heat exposure, DO NOT leave
Table of contents
Languages:
Other Sun-Tech Media Player manuals


