SunFounder PiCar-S User manual

Preface
About SunFounder
SunFounder is a technology company focused on Raspberry Pi and Arduino open source
community development. Committed to the promotion of open source culture, we strive to
bring the fun of electronics making to people all around the world and enable everyone to
be a maker. ur products include learning kits, development boards, robots, sensor modules
and development tools. In addition to high quality products, SunFounder also offers video
tutorials to help your own project. If you have interest in open source or making something
cool, welcome to join us! Visit www.sunfounder.com for more!
About the PiCar-S
The PiCar-S is a cool smart car that can work with Raspberry Pi model B+, 2 model B and 3
model B. Equipped with three sensor modules including ultrasonic obstacle avoidance, light
follower, and line follower, you can better learn the programming on how to control the car.
In this manual, we will show you how to build the PiCar-S via description, illustrations of physical
components, in both hardware and software respects. You will enjoy learning how all this work.
You may visit our website www.sunfounder.com to download the related code and view the
user manual on LEARN -> Get Tutorials and watch related videos under IDEO, or clone the
code on our page of github.com at
https://github.com/sunfounder/SunFounder_PiCar-S
You are welcome to pull requests and issue posts on our page on Github.
Free Support
If you have any TECHNICAL questions, add a topic under FORUM section on our website
and we'll reply as soon as possible.
For NON-TECH questions like order and shipment issues, please send an email to
service@sunfounder.com. You're also welcomed to share your projects on F RUM.

Contents
Components List ........................................................................................................................................1
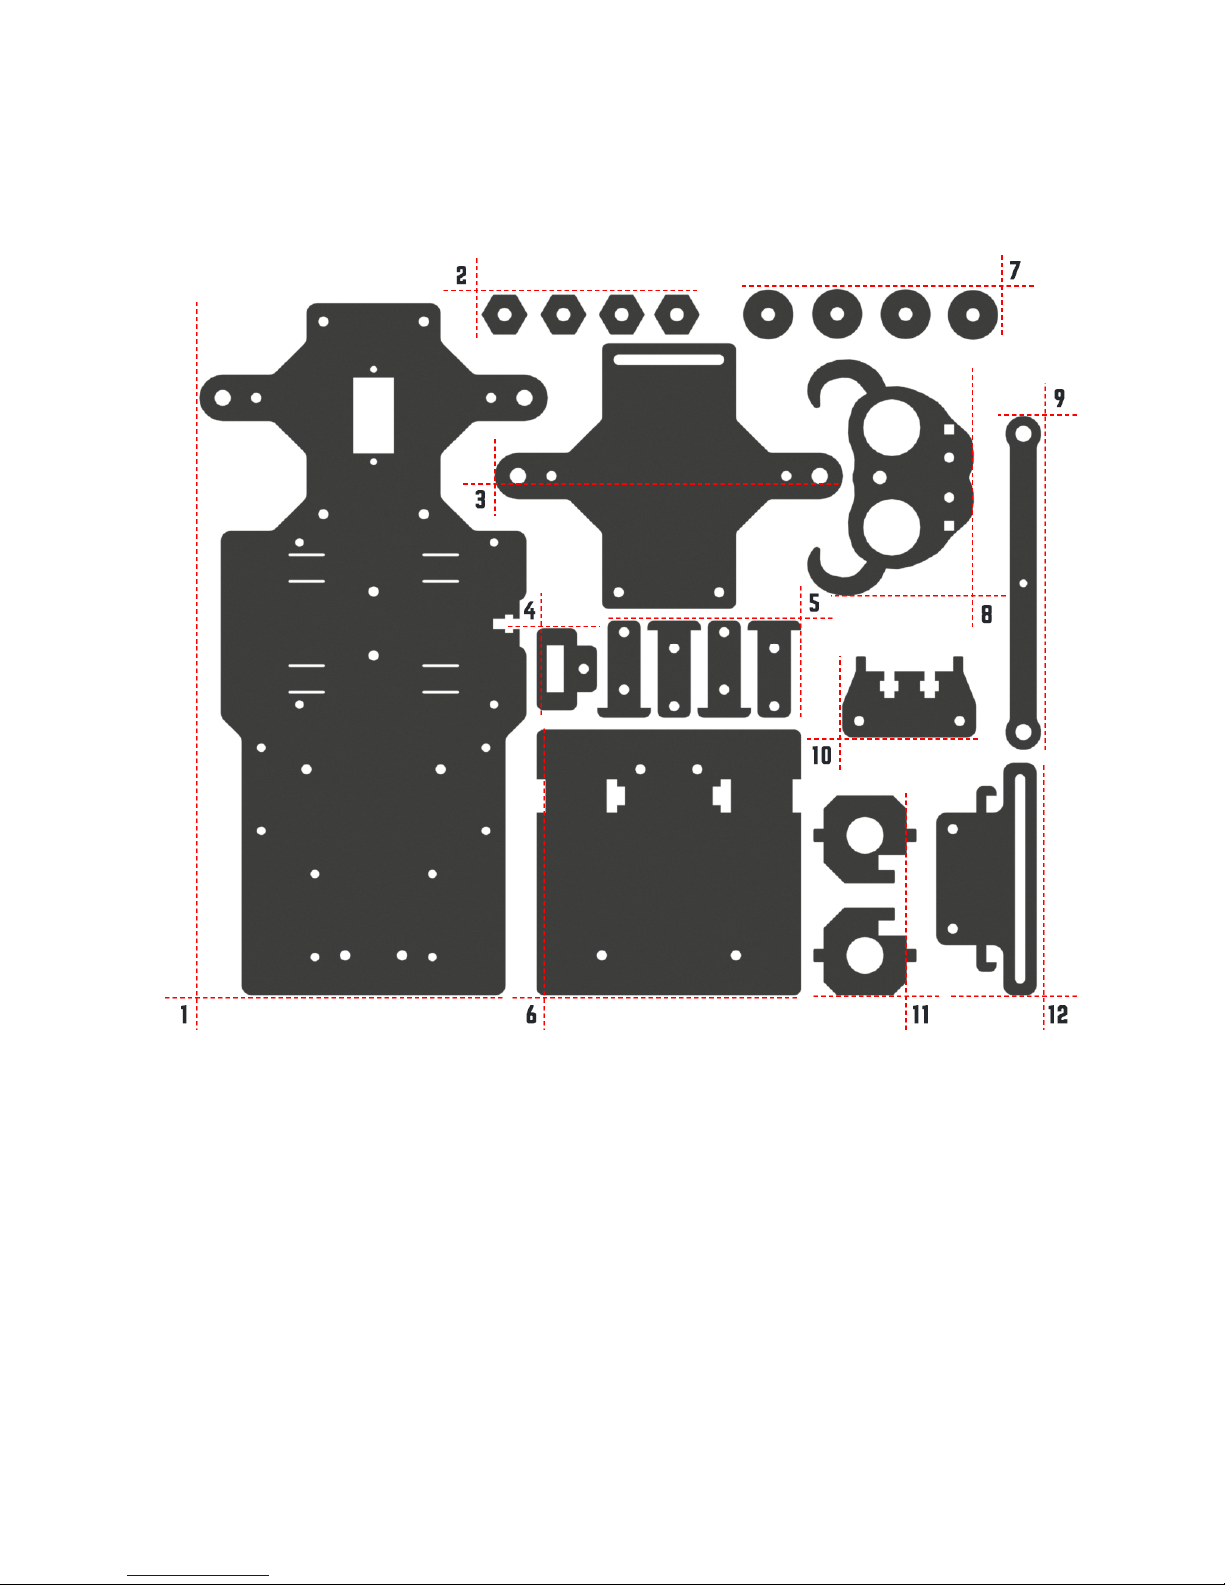
Acrylic Plates ..........................................................................................................................................1
Servo Accessories .................................................................................................................................2
Mechanical Fasteners .........................................................................................................................2
Wires .........................................................................................................................................................3
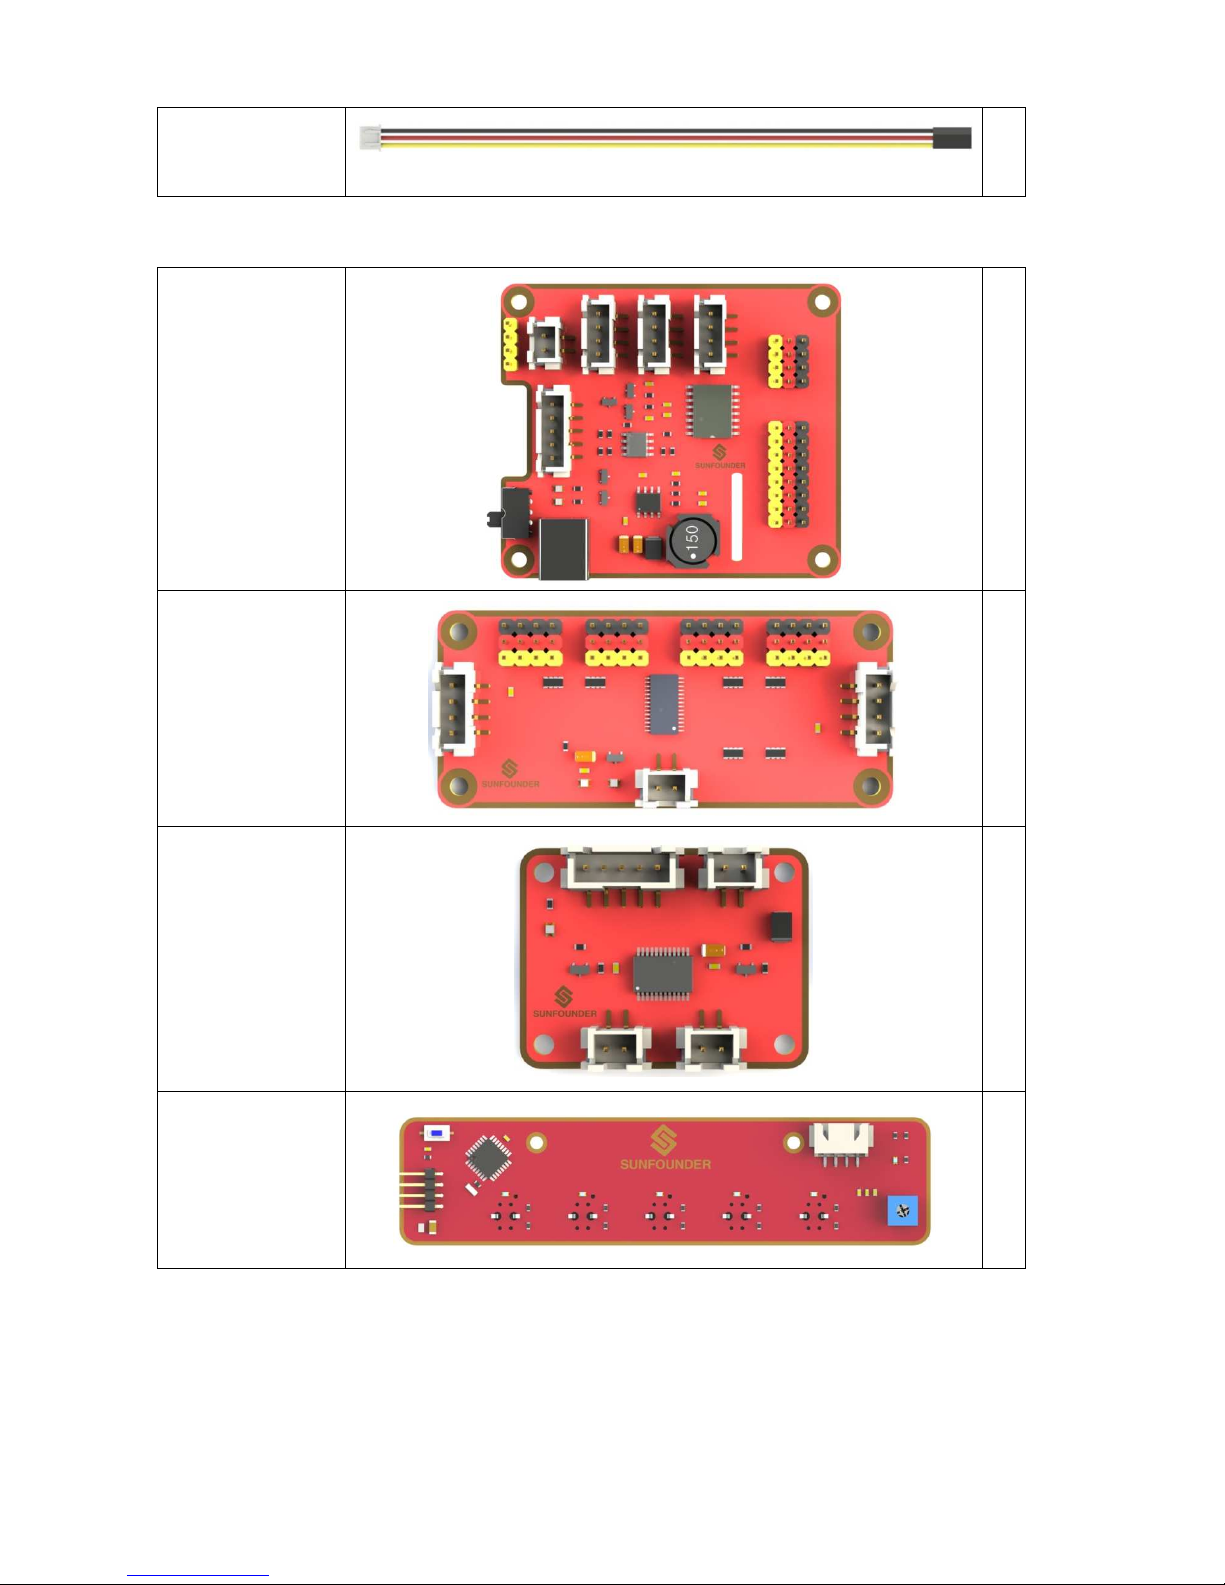
PCB ...........................................................................................................................................................4
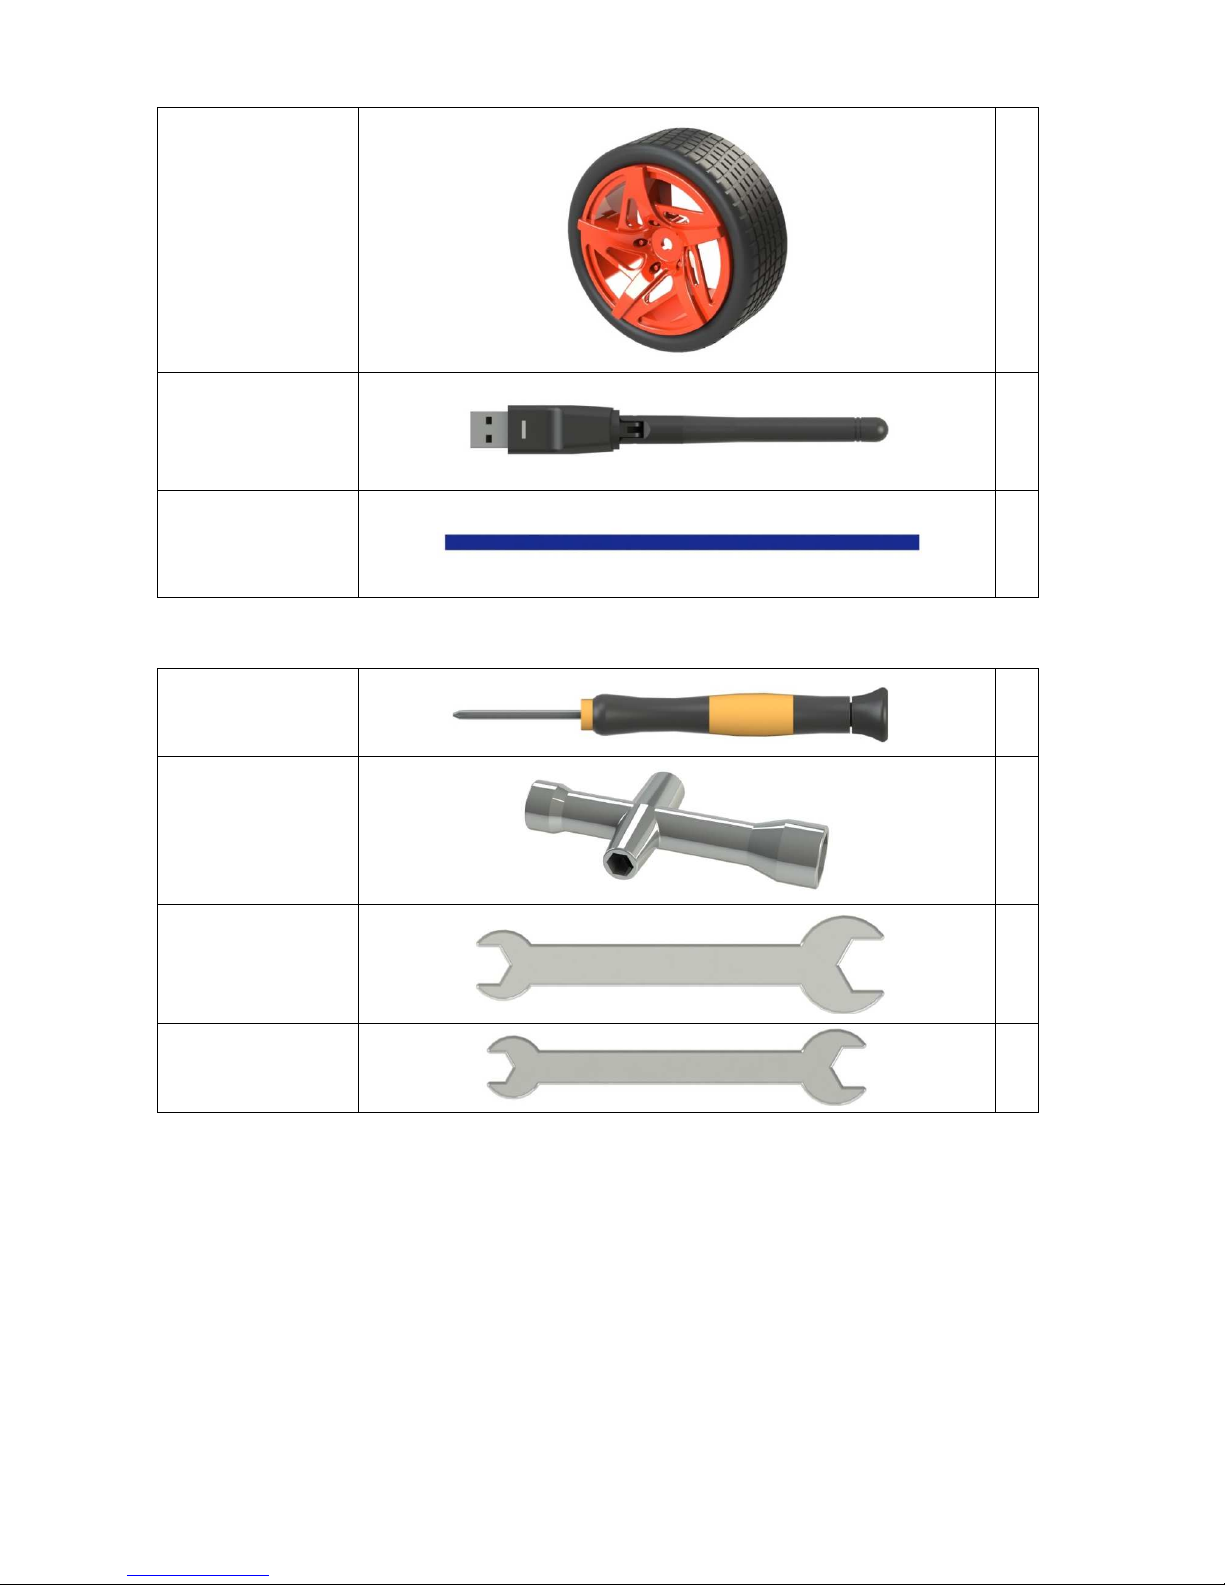
ther Components ..............................................................................................................................5
Tools ..........................................................................................................................................................6
Introduction .................................................................................................................................................7
Building the Car ..........................................................................................................................................7
Fixing Rear Wheels ................................................................................................................................7
Upper Plate ......................................................................................................................................... 10
Battery Holder ..................................................................................................................................... 11
Rear Wheels (Driving) ....................................................................................................................... 13
TF Card Guard .................................................................................................................................... 15
Front Half Chassis ............................................................................................................................... 16
Front Wheels ........................................................................................................................................ 17
Steering Part ........................................................................................................................................ 18
PCB Assembly ..................................................................................................................................... 20
Circuits Building .................................................................................................................................. 21
Software Installation .......................................................................................................................... 23
1.
Log into Raspberry Pi .............................................................................................................. 23
2.
Get Source Code .................................................................................................................... 23
3.
Go to the Code Directory ..................................................................................................... 24
4.
Install the Environment ........................................................................................................... 24
Adjust the Servo to 90 Degrees ..................................................................................................... 25
Build the Rest of the Car .................................................................................................................. 26
Configuration ...................................................................................................................................... 28
Arming the Car! ....................................................................................................................................... 32
Ultrasonic bstacle Avoidance .................................................................................................... 33
How the bstacle Avoidance Works ..................................................................................... 33
Principle ........................................................................................................................................... 33
Procedures ..................................................................................................................................... 33

Software Flow ................................................................................................................................ 35
Code Explanation ........................................................................................................................ 37
Light Following .................................................................................................................................... 38
How It Works ................................................................................................................................... 38
Principle ........................................................................................................................................... 38
Procedures ..................................................................................................................................... 39
Software Flow ................................................................................................................................ 41
Code Explanation ........................................................................................................................ 44
Line Following ..................................................................................................................................... 45
How to Follow Lines ...................................................................................................................... 45
Principle ........................................................................................................................................... 45
Procedures ..................................................................................................................................... 45
Software Flow ................................................................................................................................ 49
Code Explanation ........................................................................................................................ 53
Combination ....................................................................................................................................... 54
Appendix .................................................................................................................................................. 57
Appendix 1: Modules ....................................................................................................................... 57
Robot HATS ..................................................................................................................................... 57
PCA9865 .......................................................................................................................................... 58
TB6612 .............................................................................................................................................. 59
Line Follower Module ................................................................................................................... 59
Light Follower Module ................................................................................................................. 60
Ultrasonic bstacle Avoidance Module ............................................................................... 61
SunFounder SF0180 Servo ........................................................................................................... 61
WiFi Adapter .................................................................................................................................. 62
DC Gear Motor ............................................................................................................................. 62

1
Components List
Acrylic Plates
1. Upper Plate x 1
2. Hex Front Wheel Fixing Plate x 4
3. Front Half Chassis x 1
4. TF Card Guard x 1
5. Motor Support x 4
6. Back Half Chassis x 1
7. Bearing Shield x 4
8. Ultrasonic Connector x 1
9. Steering Linkage x 1
10. Ultrasonic Support x 1
11. Steering Connector x 2
12. Sensor Connector x 1

2
Servo Accessories
The following three parts will be used in the servo package:
1. Rocker Arm
2. Rocker Arm Screw
3. Rocker Arm Fixing Screw
Mechanical Fasteners
Name Component Qty.
M2x8 Screw
2
M2.5x6 Screw
12
M3x8 Screw
8
M3x8
Countersunk
Screw
2
M3x10 Screw
9
M3x30 Screw
4

3
M4x25 Screw
2
M2 Nut
2
M2.5 Nut
12
M3 Nut
23
M4 Self-locking
Nut
2
M2.5x8 Copper
Standoff
16
M3x25 Copper
Standoff
8
4x11x4 F694ZZ
Flange Bearing
2
Wires
100mm HX2.54
5-Pin Jumper
Wire
1
50mm HX-2.54 4-
Pin Jumper Wire
1
50mm HX-2.54 2-
Pin Jumper Wire
1
100mm HX-2.54
2-Pin Jumper
Wire
1
200mm HX2.54
5-Pin Jumper
Wire
1
200mm HX-2.54
4-Pin Jumper
Wire
1

4
200mm HX2.54
3-Pin Jumper
Wire
1
PCB
Robot HATS
1
PCA9685 PWM
Driver
1
TB6612 Motor
Driver
1
5-CH Line
Follower Module
1

5
Ultrasonic
bstacle
Avoidance
Module
1
Light Follower
Module
1
Other Components
2x18650 Battery
Holder
1
DC Gear Motor
2
SunFounder
SF0180 Servo
1
Rear Wheel
2

6
Front Wheel
2
USB Wi-Fi Adapter
1
Ribbon (30cm) 1
Tools
Cross Screwdriver
1
Cross Socket
Wrench
1
M2.5/M4 Small
Wrench
1
M2/M3 Small
Wrench
1

7
Introduction
The is a SMART SENSOR car robot based on Raspberry Pi, which comes with three sensor
modules, including the light follower, line follower and ultrasonic obstacle avoidance. With
these modules, this smart car is capable of some simple automatic actions. Thus, you can
learn some basics of programming in Python to control the car with these sensors. Let’s start
with building this smart car!
Building the Car
Extremely excited when opening the box and checking so many components? Keep your
patience and take it easy. Please note that some details in the following steps need CAREFUL
observation. You should double-check your work based on the figures in the manual after
finishing each step. Don’t worry! Kindly reminders will be given in some particular steps. Just
follow the tutorial step by step. kay, with no further ado, now let’s start!
Fixing Rear Wheels
Assemble the Motor Support Plate into the Back Half Chassis as shown below.

8
Assemble the two motors with four M3x30 screws and M3 nuts. Pay attention to place the
motors with wires inward, providing convenience for connecting the circuit.
Place wires
inwards

9
Insert four M3x25 copper standoffs through the acrylic plate into four M3 nuts as shown below:
So now this part is completed. You can put it aside for now.

10
Upper Plate
Mount the M2.5x8 copper standoffs and M2.5 nuts into the upper plate first. There are three
PCBs to be installed onto the plate and four copper standoffs are needed for each. So here
12 holes should be used, marked with cross as shown below:
Assemble the M2.5x8 copper standoffs and M2.5 nuts as shown below. Pay attention that the
side the logo carved should face up.

11
Battery Holder
Turn the Upper Plate upside down. Cut the ribbon into two halves. Thread them through the
holes on the plate. Pay attention to the direction and leave one end longer out of the plate
for each to remove the battery easily later.

12
Fasten the battery holder with two M3x8 countersunk screws and two M3 nuts: pay attention
to the direction of battery holder’s wire.

13
Rear Wheels (Driving)
Mount the assembled rear wheel driving part onto the Upper Plate with four M3x8 screws:

14
Assemble the rear wheels:
Align the rear wheels with the motor shaft, and rotate to insert them gently.

15
TF Card Guard
Mount the TF Card Guard plate onto the side near the front wheel with an M3x10 screw and
an M3 nut. First place the nut into the slot from the underneath, and then insert the screw into
the nut through the plate.

16
Front Half Chassis
Assemble the Front Half Chassis with four M3x25 copper standoffs and four M3 nuts as shown
below:

17
Front
Wheels
Insert an M4x25 screw through a Flange Bearing (pay attention to the direction – the flange
near the cap of the screw), a Steering Connector, 2 Bearing Shields, 2 Hex Front Wheel Fixing
Plates, and a front wheel, into an M4 Self-locking Nut (note the direction) as shown below:
The Self-locking Nut should be screwed tight enough. It would be better to tighten the screw
until the wheel and Steering Connector cannot move first, then loosen the screw a little, so
that the Steering Plate can just move. Thus, the wheel can turn flexibly when the connection
would not be too loose.
Assemble the other front wheel in the same way, but bear in mind the Steering Connector on
the wheel should be symmetric with the previous one:
Now two front wheels have finished assembly.
Flange
Other manuals for PiCar-S
2
Table of contents
Other SunFounder Motorized Toy Car manuals
Popular Motorized Toy Car manuals by other brands

Jamara
Jamara Ferrari 458 Speciale A Instruction

Mattel Wheels
Mattel Wheels MAXIMUM HEAT TYCO R/C HOT ROCKER 34378 owner's manual

New Bright
New Bright 614VR owner's manual

Roc Hobby
Roc Hobby 1:12 TYPE82 KUBELWAGEN instruction manual

Hotbodies
Hotbodies lightning stadium instruction manual

Eazy RC
Eazy RC 1:18 Chevrolet Colorado instruction manual